Categories
Phillosoph

SERE Pin and EDC Bypass Knife

I have been promising to write about the SERE pin for some time.
SERE Pin and EDC Bypass Knife

SERE Pin

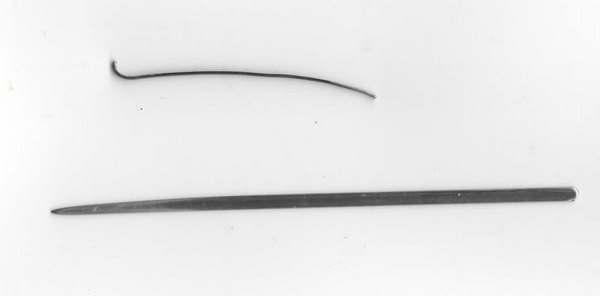
The SERE Pin is an implement for escape and evasion applications. It is very easily concealed. You can push the shaft down the seam of a garment, for example.
The SERE Pin has four applications:
• It acts like a key to lift the pawl of handcuffs.
• It can disengage the double lock mechanism of handcuffs.
• It can serve as a shank to separate the teeth of a ratchet mechanism of handcuffs.
• It can be used to shim or lift the pawl of a zip/cable tie.Handcuff Internal Mechanism

For an explanation of these terms I will direct you to my older posts on double-locking and shimming.
To disengage the double-lock or handcuffs, use the long, curved end of the tool. In the illustration, one would introduce it at around the 4:30 position on the keyhole and use it to push the double-locking mechanism (the red part in the image) upward.
Once the double lock is disengaged, the pawl can be shimmed or lifted.
To lift the pawl, insert the short hooked end of the SERE pin at around the 11 o'clock position and use it to lift the lock bar (green component) inward.
To shim, insert the long part of the tool between the teeth. You may need to tighten the bracelet a little to achieve this. If the shim becomes caught you may have to straighten it a little.
SERE pins are easily fabricated from bobby pins. Do not make the short hook too long. I recommend rounding off the corners and bevelling the tips.

EDC Bypass Knife

The second item on today’s “show and tell” is a work in progress.
After I wrote yesterday’s blog, I set about creating a bypass knife that was compatible with my EDC kit.
Basic design requirement is that it should fit within the pouch that carries part of my EDC. Whether this is where I will carry it, I have yet to decide.
EDC Pouch Contents
As a lock picker, I acquire any windscreen-wiper inserts whenever I come across them. For this project I selected a narrow one that already ended in a partial point at one end. Width is about 3 mm.
The point was tapered further with a hand-file and a Dremel tool. One side was left reasonably straight, the other tapered more so the point is offset.
Once the point was formed, the end of the insert was cut 10 cm from its end. The butt end was rounded and smoothed.
The point was smoothed and polished with several grades of glass-paper.
It is possible that the point needs to be made more acute. The only bypass knife I have is a cheap Chinese one. My tool is already better finished than that! Also, I lack any bypass-knife-vulnerable locks to try it out on.
How often will I encounter a vulnerable lock I might need to use the tool on? I don’t know. This did get me thinking about other functions it may have. (Using it as a nail-cleaner probably shouldn’t count!)
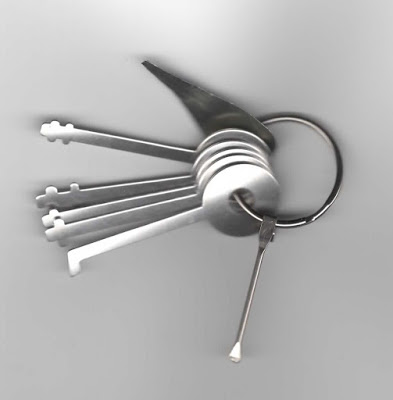
The butt end may serve as a skeleton key. The width is virtually the same as the shanks of my bunch of skeleton keys. It has already opened a small warded luggage lock I have.
The pointed end could be used on the pawl of a zip-tie.
I can also confirm that the tool makes an effective handcuff shim. Worked better than I expected, if I am honest. It might be prudent to polish and smooth the rest of the shaft for such applications.
Categories
Phillosoph

EDC Lock Picking and Bypass Kits

As regular readers will know, the lock picking contingent of my EDC is rather small:
— A pair of Bogotas.
— A small snake rake.
— A double-ended turning tool.
Bogota Lock Picks
Other items, such as the three-inch pocket prybar, may have applications in bypassing locks. When the barrel of my doorlock came out with my key, it was the long file on my Swiss Army Knife that was needed to open the door.
Today I will bring you two interesting videos on lock picking and bypass tools for EDC. Credit to Dean for directing me to the first one.
While I have done a bit of lock picking, I don’t have as much experience with bypass techniques as I might wish. When the zombies come, I will be grabbing my kukri, crowbar and brick hammer. Those will bypass a few obstacles!
Some thoughts on the suggestions:
— The plastic shim seems like a very prudent choice.
— I have never used them, but padlock shims might be worth having. I seem to recall padlock shims can be cut from soda or beer can material. The edges of these will probably be surprisingly sharp, so take care.
— I have a number of bobby pins in my general EDC pouch. These are in a bag with some paper clips and about a dozen safety pins. A few weeks back some of these safety pins were used to repair my girlfriend’s jeans.
— I have some comb-picks, but have not been able to open any locks with them. The same can be said of my set of jiggler keys, although I suspect the latter are intended for car doors since they are too large for all my locks. Most keyways I encounter have kinks in them, so the straight combs and jigglers would be difficult to insert or move within them. I think my Bogottas and snake are a more effective and versatile option.
— Similarly, my set of skeleton keys stays at home since large warded locks seem to be relatively uncommon. If long enough, a bypass knife may serve instead. The small warded locks often used on luggage can be popped by a variety of implements, including sturdy picks like the Bogotas.
Bunch of Skeleton Keys and Decoder
— My bunch of skeleton keys includes a decoder I made from a cut-out shape of soda can (top). I do not think I have tried it out, since I seldom encounter combination locks. There are ways to crack combination padlocks without a decoder tool, and I have used these at least once.
— A bypass knife seems worth having. My Serenity Plus kit includes one that came with a set of my Chinese picks. I cannot recall if I have ever opened anything with it. Most of my padlocks are not vulnerable to this technique. I plan to try making a bypass knife that will fit in my EDC.
Mini-Slim-Jim Dimensions
— The mini-slim-jim is interesting. Obviously this is too short to be used to open car doors. That is probably not a drawback given the number of vehicle vulnerable to slim-jims is probably decreasing every year. The mini-slim-jim is actually intended to bypass the latches of doors. The large notch on the tool is probably a legacy of its ancestry. Sparrows makes several sizes of slim-jim. They also make the “Hall Pass”, which is a credit-card-shaped tool in either metal or plastic. Southern Specialities offers their own design of tool for latches, the “Multipass”.
Sparrow's Hall Pass Southern Specialities Multipass Sparrow's Orion Hall Pass
I have tried making something similar out of an old plastic card. I didn’t have any success opening a door, but at the time I had yet to locate the correct dimensions. I am also now more familiar with the manual technique needed, so it might work better in future.
I have, however, managed to pop a latch using a TOK turning tool. This experiment seemed to indicate that a traveller hook may be a better way to attack a latch than a slim-jim. Being able to rotate the tool would have advantages. This is what the bent piece of music wire in the first video is intended for.
Sparrow's Traveller Hooks
I may try to fabricate a traveller hook that can fit in my EDC. Sparrows sell two sizes of traveller hook (also called traveller’s, travellers, shrum tool or travelling hooks). Auto-stores sell something similar as “O-ring pullers”. Skewers, ejector pins and music/piano wire can be used to fabricate traveller hooks. For reference, the Sparrow hooks use shanks 2.6mm (0.1 inch) thick.
Latches can sometimes be opened by threading a cord or wire behind them.
Categories
Phillosoph

Useful Pocket Kit

I may have mentioned before on this blog that I am prone to migraines. I tend to avoid using painkillers unless I have to, but recently my doctor told me my condition was such that I’d be advised to carry more painkillers with me.
I’m always in favour of precaution and preparedness, as we know!
If I have to carry some painkillers, it seems only prudent to also carry some other items of similar usefulness.
Some of my jackets are short on pockets, and I spend a lot of time not wearing a jacket.
The logical place to carry this kit was the cargo pocket of my trousers. You are less likely to be separated from your trousers, which is why in my articles on the soldier’s load I recommend the cargo pockets for survival kit, minor injuries kit and other important items.
I will stress here that what is illustrated in the photo is not supposed to be a comprehensive survival kit.
There is no means to create fire or cut, since these are already carried elsewhere.
And sometimes capabilities are duplicated, or worse. I cringe when I think how many items I have on me that can be used open beer bottles.
This is basically a collection of useful items for everyday carry.
Cargo pocket carry means you do not want a container that is hard or bulky.
I selected a cheap first aid kit. It came with a rather nice triangular bandage that was worth the asking price alone. I this bandage this in my primary travel medical kit.
 
To the now emptied pouch I added the following:
    • Some paracetamol, and some diclofenac, the latter being good for migraines.
    • Some alcohol wipes (can be used as firestarters).
    • An assortment of plasters.
    • Container of dental floss : 90 metres of useful cordage.
    • Small bag of safety pins, hair pins and paperclips. Useful for broken zippers or improvising tools. I need more of the larger, springier paperclips since these are more useful. This now includes a SERE pin.
    • Two short lengths of chalk. One light/ white, the other dark/ coloured. For leaving messages and route marking. One colour will contaminate the other if they are together. Place in separate bags or wrap the sticks in something like clingfilm.
    • Pencil, wound with about a foot of electrical tape. I should have added the tape first and used the rubber to cap the pencil point. Hindsight is wonderful! I have added a sailmaker's needle with a metre or so of invisible thread to this.
    • Foil space blanket. In its own ziplock bag for protection. This squeezed into the pouch, but could be carried outside it within the cargo pocket.
Note that each component, other than the pencil, has its own ziplock bag.
Since I have created this kit I have added a bypass knife/shim and a piece of music wire bent into a traveller hook. Tape over the points so they do not poke through the plastic bags.
 
Not shown: You could add a small compass to this kit.
I already carry a clipper compass elsewhere on my person so this was not a high priority for me.
I am also going to add a suitably sized card with Morse code on it, but have not yet had time to print one out while near a laminator.