Categories
Phillosoph

Shortening the Shovel

Back when I was much younger than I am now, I worked in many temporary jobs to support myself during higher education. Warehouses, bakeries, kitchens and hospitals, to name a few of the places that I worked.
I am above average height, so I soon became aware that many of the fixtures or tools I was expected to use were too small for me. Even in this day and age, items such as vacuum cleaners, mops and sinks are designed with the assumption that they will be used by average-sized women rather than persons of my size.
In many of the places where I worked it was not uncommon to see broom-handles extended with a length of pipe. Sadly many other tools were not so easily adapted.

A Little Off the End

Recently, someone was describing to me their early working life as a labourer on building sites.
From https://www.lilliputworld.co.uk/products/britains-navvy-standing-with-shovel-trade
“One of the first things you would do is shorten your shovel by an inch.”
Given my own early working background, it may not be surprising that I could not resist asking: “Which end?”
It turned out, it was not uncommon to shorten the shovel [spade] blade and resharpen the new edge.
Resharpening the edge made the tool more efficient and negated any neglect that a previous user might have inflicted.
It also lightened the shovel a few grams, and if you were expected to use a shovel all day, this weight saving was considered to be significant and worth having.
Of a similar ilk, cleaning the tool at the end of the day was considered important. A few millimetres of concrete drying on the shovel would add weight and make the shovel harder to use the next day.
This rather reminded me of the old adage about an ounce on the feet being like a pound on the back. A slight decrease in shovel weight may significantly decrease fatigue.

Less is More?

Logically, a shorter shovel/spade blade results in a smaller volume of material that is moved by each shovelful. Less volume means less mass, so each shovelful/spadesful took less effort to move. Thus a small decrease in blade-size might mean a significant reduction in energy needed to move each spadesful, since each spadesful would be lighter.
Of course, to move a given volume would take more actions with a smaller blade, but that may be more practical than moving it as a smaller number of much heavier loads. Are half-a-dozen light loads easier to move than three that are twice as heavy?
The following diagram may not be familiar unless you work in safety, or injury liability. It shows the recommended maximal loads that should be attempted by an average male or female.
Safe Manual Handling Limits
Maximum safe lifting is with the load close to the pelvis. The further the load is from this point, the less that can be safely lifted.
About 37% of work-related injuries are due to poor manual-handling practices, with a surprising number occurring in office and “white-collar” environments.
Based on the above, a shovel/spade-load and the tool being used to lift it should be around no more than 5 to 10 kilos in total mass.
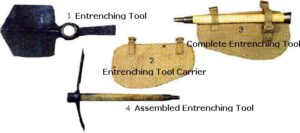
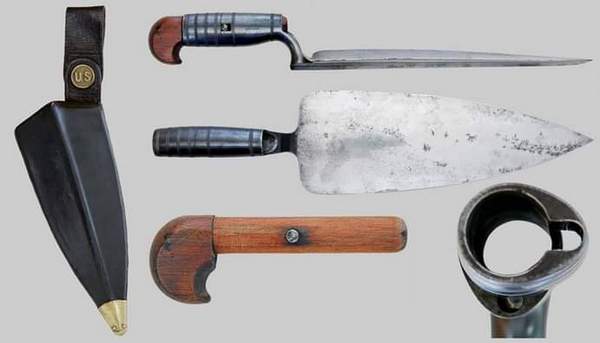
In my blog on “Easier Entrenchment”, we encountered accounts of 19th century soldiers throwing up useful earthworks using trowel-sized bayonets. A narrower blade should penetrate packed earth better. Specially designed trenching shovels tend to have long heads than may be only four inches/100 mm wide. Very different from the modern, issued entrenching tool!
Can a smaller, more efficient shape make that much difference?
1873 trowel bayonet from https://worldbayonets.com/Bayonet_Identification_Guide/United_States__19th_Century_/us_19th_century_2_page2.html
All this suggests the basis for a really useful time-and-motion or ergonomics study.
What is the most effective way to throw up an earthwork with manual tools?
If the work is easier made in smaller rather than larger bites, what is the optimum size and shape of shovel blade?
I notice that some of the titanium tools on offer on the internet are not just lighter, but use blades of 200 x 90mm dimensions on a 64 cm haft.
Titanium-headed digging tool.
What is the best configuration and length of handle for a typical male?
Categories
Phillosoph

New Survival Tool: The Brick Hammer

Some time back I was reading a number of manuals written for the British Home Guard.
Fighting in an urban environment was a common theme.
Many of the authors drew from experience in the Spanish Civil War. They had learnt that urban terrain could negate an enemy’s advantages in air power and armour.
Urban operations was expected to be routine, rather than exceptional.
It is safer to be firing from loopholes rather than from windows, but I began to wonder about the practicalities of cutting a loophole in a brick or similar wall.
The Home Guardsmen probably would have had available the 1937 entrenching tool, which included a relatively stout pick. Troops with other designs of entrenching tool may be less capable.

A bit of research turned up the tool shown below.
This is sold as a “brick hammer”. I will confess, I have yet to try cutting loopholes with it. My landlord would probably object
This is potentially quite a useful survival tool.
The adze part can be used for digging, and should be more than adequate for such tasks as creating cat-holes or Indian Wells.
The hammer part can hammer things, such as tent pegs if stealth is not a requirement.
Shank and head are both steel, so the adze could also be used as a prying tool or crowbar.
If necessary, it can serve as a passable hand weapon or missile.
It could potentially be used as an anchor or for hooking.
The brick hammer is relatively compact and light (718 grams with tape and cord), and very reasonably priced.
For trips that are unlikely to require building foxholes, this may be all the entrenching tool you need.
In its original state, this particular brick hammer was polished steel and a black rubber handle.
I have given the metal parts some paint, although I expect this to wear off with use. The handle was covered by some self-adhering grip tape I had, and I have added a thong for retention.
Categories
Phillosoph

Hori‑Hori for Survival

One of the many things that became apparent after the American Civil War was that the infantryman needed a means to quickly construct earthworks.

“Hardtack and Coffee” informs us that the quartermaster of the army had wagons of intrenching tools [sic] that were supposed to be supplied to units that needed them.

In practice, there was seldom time to send for these tools, and infantrymen resorted to digging with their tin plates or muckets.

As you can see, there were attempts to modify spike bayonets for the role.

One of the solutions offered after the war was the Rice trowel bayonet, which began to see trials in the late 1860s.

Available on-line is a document detailing the findings of the trails.

While a few officers expressed reservations, the opinion of the enlisted men and many other officers was overwhelmingly positive.

The document describes “rifle-proof” parapets being constructed in as little as nine minutes.

This would be impressive, even with larger modern tools.

The trowel bayonet was clearly superior to the improvised means the troops had been using before.

It also had sufficient size, heft and edge that it could be used to cut saplings and branches, something beyond the current spike bayonet.

Many believed the large, spear-like blade would make a better bayonet than the spike bayonet.

Breech-loading rifles were coming into service, and many were of the opinion that the bayonet might be becoming obsolete. If it wasn’t quite as good a bayonet as the weapon it replaced, this was tolerable and its greater utility made up for this.

The main objection to the trowel bayonet was that troops might be tempted to dig with it while it was mounted on the rifle. This was likely to bend the barrel, damage the muzzle or block the bore. (One reviewer does point out that the trowel was a less effective digging tool used in this way, so the practice will be rare. Someone was bound to try it, however).

Shortly after the introduction of the trowel bayonet it was replaced with a trowel knife. This probably had a better grip than the trowel bayonet, but its rounded tip gives it a less war-like appearance and possibly it was of less utility as a hand weapon. 

Bayonets continued to evolve, but along different lines.
The next step was the sword-bayonet, intended to serve as bayonet or hanger.
Some infantry had carried both bayonets and hangers. Napoleon’s guard around 1815 spring to mind as an example.
By the 1880s, most infantry had long since discarded the hanger, so effectively the sword bayonet was replacing an implement that was no longer carried. Nonetheless, many armies entered the 20th century with sword bayonets, and would be using them until the 1940s at least.
The idea of letting the infantry have their very own entrenching tools had taken root, however.
Infantry entrenching tools got bigger and more sophisticated until they reached the form we know today.
As has been discussed before on this blog, some of these tools are overkill for the non-military user.
It is a hygienic cathole, rather than atomic-proof foxhole, that we generally need.
There are little plastic trowels, of course, but these are not much use for anything else. The trowel bayonet suggests a relatively small digging tool can be a useful survival aid. Is there a modern equivalent?

Seeking to answer this took me to discover the hori‑hori.
In another blog I described how I had seen machetes used as jack of all trades by gardeners in Jamaica.
The hori‑hori is a similar device, but more compact. Not surprisingly, these are Japanese.
The ninja put a similar digging tool, the kunai, to various uses.
The hori‑hori were originally used for gathering wild foods, so technically are already survival tools. A variety of models of hori‑hori are available, but the one I have has a 7 inch blade, so more compact than the 10 by 4 inch blade of the original trowel bayonets.
One edge is serrated, the other can be used to chop or cut, or will be once I sharpen it. (The packaging says it comes “razor sharp”, which apparently means “unsharpened”.)
The blade is a broad spearpoint, with one side slightly concave, as suits its digging role.
Mine came with a nice condura sheath.
Unlike many survival knives, this is a tool the makers recommend that you can pry with.
Price is a bit more than a normal trowel, but this can be offset against the fact that many gardeners think they do not need many tools other than their hori‑hori.
On the other hand, compared to many survival knives and tools, the price is very reasonable.
Make sure that you do not buy a mini‑hori‑hori by mistake! Mine has a blade of 18 x 4.5 cm. I also recommend a stainless steel bladed example. The mirror finish on the blade may have applications for signaling.
The hori‑hori seems a pretty useful tool to have along on a trip or stored in an emergency kit. A useful backup or replacement for a survival knife.