Categories
Phillosoph

Knots to Save Your Glasses

The other day I had to escort an engineer.
He managed to set off the alarm he was servicing, and was unable to get it to stop.
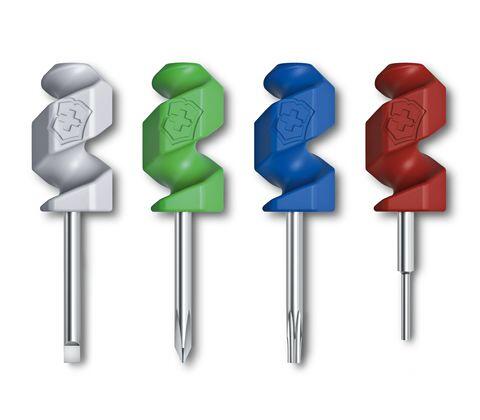
He had forgotten to bring the handle for his screwdriver bits.Girl in Sunglasses
Such farces are actually not that uncommon at this institution.
As the minutes rolled by and I sat there in the noise, it occurred to me I had some ear plugs on me. Actually the noise was not too bad, and using hearing protection to ignore an emergency alarm is probably setting a bad example!
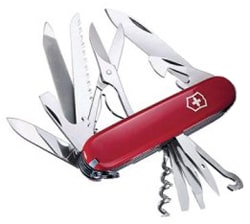
Eventually the alarm was silenced by using the end of the nail file on my Swiss Army Classic. I have better screwdrivers on my tools, but the Classic on my keyring was most readily to hand.
The engineer was also having trouble with his spectacles. The rubber loops on the retaining cord he was using kept slipping off, and he was cursing the well known website he had brought them from.
All this reminded me of a topic I was thinking about when I was writing about ear plugs.
Ear plugs are a simple thing that can make all the difference if you have them with you.
Obviously, my penknives may be included in this.

Tweezers

Tweezers are another item I thought of, possibly because at the time I had been reviewing how to deal with biting ticks.
I carry a Swiss Army Ranger and a Classic, and each has a pair of tweezers slotted into a grip panel.
One pair has been ground to a point, as shown in this video.

If, for some bizarre reason, you do not carry a Swiss Army Knife (!), the tweezers may be brought separately.
So small and so cheap there is not really any good reason not to have a pair. Your main problem may be finding a good place to carry them so you can find them when needed!

Don't Forget Your Toothbrush

Personally, I do not have a toothbrush in my EDC. If I was heading to the wilds, I might rethink this.
If your lifestyle often finds you sleeping at someone else's house, platonically or otherwise, you may find it handy to have a toothbrush with you.
There are guards you may fit over the bristles, and two-part brushes, some of which have room for a tiny tube of paste.

Glasses Save Eyes!

The next “simple thing” did not immediately occur to me since I wear spectacles, and mine have photochromic lenses.
My girlfriend mentioned a Christmas she spent in Scotland. The snow made everything so bright she wore sunglasses whenever outside.
If you do not wear photochromic glasses, a pair of sunglasses is a worthy addition to your EDC or bug-out bag.
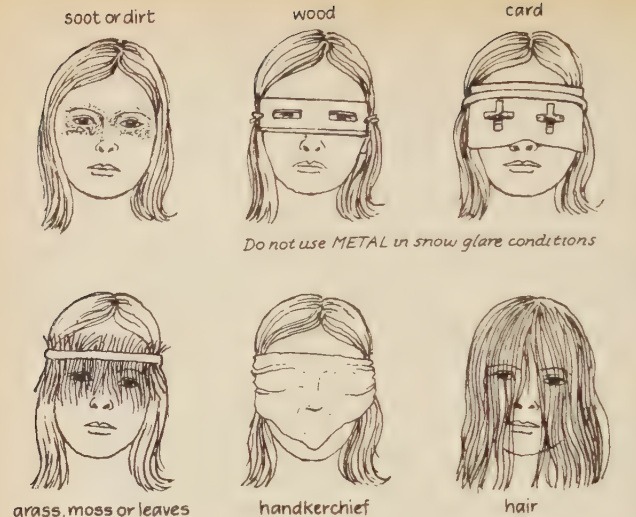
Excessive sun glare may occur in any season. See the “Too Bright” section of Greenbank's “The Survival Handbook”.
Protecting Eyes from Glare
Glasses also protect your eyes from branches when moving through the woods, and other threats. That, incidentally, is one of the reasons I do not switch to contacts.
My glasses have saved my eyes from injury several times.
Spectacles or sunglasses are important and useful. When climbing, biking or during other activities there is an increased risk that you and your lenses may part company.
Which brings us back to the engineer and his malfunctioning retention cord.

Retaining Glasses

My left hip pocket contains a lighter, bandana and a collection of cordage.
Included in the latter is a retention cord I may use with my spectacles.
I literally found this lying in the street, the irony that something to prevent loss was lost not lost on me.
I have not had cause to use this retention cord yet, but it seems well suited for purpose.
The cord is tubular and fits over the arms of my spectacles, giving a long contact area. A sliding piece of plastic allows the cord to be drawn snug against the back of the head.
An effective retaining cord is a prudent thing to carry with you if you wear glasses or have sunglasses, even if, like me, you only fit it when the chance or consequence of losing your glasses is serious.
Suppose you do not have a retaining cord, or have lost it.
If you have been visiting this blog, you will probably have some paracord or other cordage available. A draw cord from your anorak could be used.
Here are two suggestions on how to improvise a retention cord for your glasses:

Instructables Glasses Lanyard

Comments

Both of these methods use slip knots to attach the cord to the arms.
One method uses a double overhand to form the slip knot, the other uses an extra couple of turns to form the overhand knot portion.
The video uses a double fisherman's knot to tighten and loosen the cord. A single fisherman's knot would be easier to adjust when needed. Perhaps he wanted all the knotted sections to match?
A slip bend would be a good knot for this application. This could be made with double overhands if desired.
How to tie aSlip-Bend
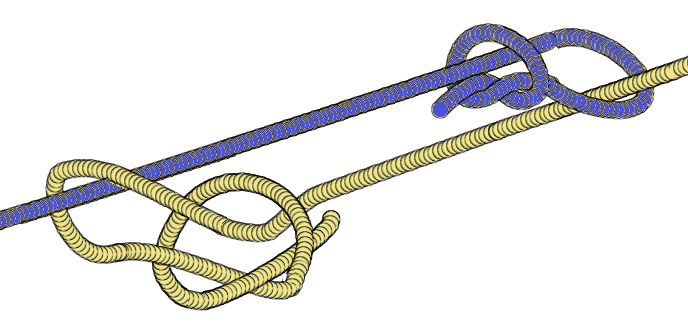
The “cobra knot” used in the Instructables' method is actually multiple overhands tied in the centre of a second piece of cord. This would have been clearer if a different coloured piece of cord was used for demonstrating this part.
The simplest way to adjust a retaining cord is probably to tie a lapped overhand loop in the doubled cord. This is probably one of the few knots that may be easily adjusted when your hands are behind your head.
The other methods may be more secure, however.
All this talk of knots brings me to my final topic.
I have rewritten Scrapboard Knots, adding more content, more knots and tweaking the format to use less paper.
All of the knots mentioned in this blog may be learnt from this booklet.
Scrapboard Knots is free, but donations and tips are welcome, and much needed at the moment.


Categories
Phillosoph

Keep Your Knives Close!

Probably high time that I told this story!
Many years ago, I went to buy a coffee at the café at work. The usual staff were not there.
Another young lady had been sent there instead. She was struggling with trying to open up in an unfamiliar environment. She had brought her boyfriend with her, but he was not much use and had decided his best approach was to stand by looking gormless.
I waited patiently.
The lady got to the stage of installing the milk boxes in the dispenser. I was familiar with these from my own experience in temp jobs. They have a blind-ended plastic tube. The end of the tube must be cut off before the box can be used.
The poor girl was unable to locate where the usual staff had placed the scissors, or whatever else they used. Futility, she gamely hacked away at the tube with a blunt butter knife.
I took pity on her.
I produced my trusty Swiss Army Knife, unfolded a blade and offered it to her.Swiss Army Ranger
I will admit, at that point I was seduced by the chocolate bar display. I only caught what occurred out of the edge of my vision. It was over before I could intervene.
What happened was this:
The young lady had taken my knife and hooked the blade behind the tube. She had then pulled it towards her. She had assumed my knife was the same as the usual semi-blunt objects she had encountered in cafés. It wasn't.
The edge went through the plastic like it was not there. The girl recoiled a foot or so. Luckily the blade missed her.
“That is a sharp knife!” she exclaimed. She seemed oblivious to the fact that she had nearly just cut off one of her breasts.
I accepted back my knife. Silently, I vowed that in future I would not to lend my blades to other people.
I have been duly wary since that incident. When my girlfriend reaches for certain tools, I cannot help but warn: “Careful! That is sharp!”
She returns this with an eloquent look. Part of it says: “I know! I am not and idiot!” but I think there is also a smidgen of pride that says: “Of course it is, it was you who sharpened it!”.
Morals of this story: Do not assume a tool is blunt. Do not assume someone else knows how to use a tool safely. Never cut towards yourself.
Categories
Phillosoph

Adding a Pin to a Swiss Army Knife

The tools on a Swiss Army Knife sometimes end up performing tasks you never imagined! A few months back I went to unlock my front door, only to have the entire barrel of the lock detach and come away with the key! The metal file/saw proved to be ideal for reaching to the back of the lock and turning the bolt.
My girlfriend’s son had asked me why I always carry my SAK. Exactly for times like the above!

The Early Years

For the first few years of my early adulthood I carried a Chinese-made version of a Swiss Army Knife. I vaguely recall there were actually two, although I do not recall why I had to replace the first. To be fair, these were quite nice knives, with a good assortment of tools. The only problem I actually recall is a time when the corkscrew straightened out as I attempted to open a bottle of wine.
Back in those days, they were all I could afford, and they served well.
Once I had some money, I invested in a genuine Victorinox Swiss Army Knife (aka SAK).

Victorinox Champion

The model I selected was called the “Champion”, not to be confused with the “SwissChamp” that had become available a few years previously. The longer named Champion was less bulky than the Champ, lacking the pliers.
Swiss Army Champion
The seven-layer Champion was about the ideal maximum size for a SAK, and had a really useful selection of tools.
Sadly, my Champion was lost in an unfortunate chain of events that do not need to be told here. Even worse, the Champion had been discontinued, so I could not buy a replacement.
There was no ebay back then, so little chance of locating a second-hand one.
All the features of a Champion

Rise of the Ranger

As a replacement of the Champion, I selected a Ranger model. The most obvious difference between the two was the Ranger lacked a magnifying glass, fish scaler and Phillips screwdriver:
Swiss Army Ranger
• The Phillips screwdriver had proved useful at times.
• I don’t recall ever using the fish scaler/hook disgorger, at least not for its intended purpose.
• I didn’t make much used of the magnifier either, although now that I am older and more decrepit, I suspect it might prove more useful. As an aside, the magnifying glass on the Champion was very cleverly thought out. Its focal length was the same as the magnifying glasses’ height. In other word, if you placed your knife on a map, the detail under the magnifying glass would be in focus. This may have been the case for other models that had the magnifying glass. I wonder if the same applies to the newer pattern of magnifier?
Since I wear glasses, an early addition I made to both the Champion and the later Ranger was to add the mini-screwdriver that fits into the corkscrew. Originally this tool was only included with the SwissChamp. They were sold as spares, however, so I acquired one. This has proved very useful over the years, often coming to the rescue of companions rather than myself. Half a lifetime ago I repaired the glasses of a grateful Swedish beauty in old Jerusalem.
Corkscrew Mini-tools
Victorinox now offer three alternate tools, each with a different coloured end.
I have carried the Ranger for many decades now. The lack of Phillips screwdriver is compensated for by the Leatherman Squirt mini-tool I also carry. If you are in the market for a medium-size (91mm) model SAK, the Ranger must be one of the best options. The Huntsman model is a good choice, but I have often found uses for the file/metal saw of the Ranger.

Swiss Army Knife Wiki

Recently I came across the Swiss Army Knife Wiki. This site is worth a look around.
Some interesting information on how to use the various tools, and some applications for them you may not have known. My Ranger had a Phillips screwdriver all along and I never knew! I discovered that the tip of the can-opener is actually intended for use with Phillips screws as well as slot.
The tip of the file/metal saw can also be used on some Phillips or Pozidriv screws.

Adding a Pin to a SAK

The original reason I have been thinking about Swiss Army Knives recently is that I came across a blog post discussing the pin carried in the handle scales.
Below is a video on possible uses for “needles” [sic pins]. The channel has many other videos on various features of Swiss Army Knives.


Even before I watched the above video, I was thinking about adding a pin to my Ranger. I own a number of very fine drill bits, so creating a channel for a pin would not be too difficult. I could probably add a pair.
I have lots of cheap pins. I decided to try and find the pins actually used, since they were probably better quality and the head looked a little wider.
A number of ebay vendors offered replacement pins for Swiss Army Knives. The one I chose got my money since they offered another idea. Included with the five pins was a small magnet. This magnet was sized to fit in the can-opener. With such a magnet, a pin could be magnetized as a compass needle.
The bits arrived this morning.

Fitting the Magnet and Pin

The 5.8mm magnet was a perfect fit for the can-opener. The vendor included the advice that the tool next to the can-opener usually needs to be opened before closing the can-opener with the magnet stored in it. If this is not so, the magnet tends to pull out of position, attracted by the neighboring steel. Although stainless steel, the blades of a Swiss Army Knife are magnetic.
Magnet in Can-Opener
Finding a drill bit small enough for the pin was not a problem. Problem was most were too short to drill a channel as long as the pin. The other problem was my Ranger has solid scales. It lacks the air-spaces found on some newer and alternate scales.
Drilling a channel deep enough and straight enough proved problematic, and inevitably the very fine drill curved and the channel exited on the inner side of scale. This actually proved to be fortuitous, allowing me to file a notch on the inner side for end of the pin to rest in.
I settled for adding just one pin for now. Most of the alternate positions for a pin are obstructed by the rivets the scales snap on to.
Ranger Knife Modified
My Ranger with pin added (blue arrow) and notches on scale (green arrows). If the balloon goes up, I am ready!

Other Modifications

Incidentally, the back scale of my Ranger has two additional non-standard features.
One is a chip, where an idiot friend used my knife as a bottle-opener without using the bottle-opener! I could fix this damage, but it is a useful reminder to be more cautious of whom I trust.
More useful are a series of three notches. The second is five millimetres from the first, the third 57 mm for the first.
The first and third notch are used to draw a circle of 57 mm radius. The first and second are used to mark the circumference in five millimetre increments. Each millimetre of the circumference closely approximates one degree. Such a compass face can be used with various improvised modes of navigation.
Another addition I have made is to add a needle and thread. Take about a metre of invisible thread and pass one end through the eye of a needle. Tie the ends together and then wrap the thread around the needle. Push it down beneath the saw blade. It should be snug enough that it will not drop out if you invert the knife with the saw open. I used the metal saw rather than the woodsaw, since this is likely to see less use.
While you are at it, wax your woodsaw.