Disclaimer: “As an Amazon Associate I may earn from qualifying purchases.” Adsense and Infolinks were no help at all.

If you have enjoyed this article or it has been helpful to you please feel free to show your appreciation. Thank you.

Read The Third Wave by Alvin Toffler!
Categories
Phillosoph

Italian Army Style Lensatic Compass

         A friend of mine brought the “Italian Army Style Lensatic Compass” to my attention. I have a bit of a thing for interesting compasses so decided to treat myself. Being on a limited budget this is probably a copy rather than the actual issue model. This will be a relatively modest review since it only arrived last night.


         The first thing that you notice, even before it is out the box, is the weight. My electronic balance tells me the compass weighs 290g or 10¼ oz. The box has the company names of “Sturm” and “Mil-tec” and the text outside is a mixture of English and German but, ironically, no Italian!


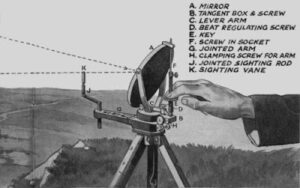
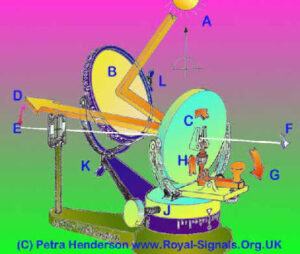
         The compass itself is an interesting mixture of familiar and novel features. Like the US lensatic compass the cover is raised to the vertical for taking bearings of terrain features. Opened fully it can be used on a map as a 15cm ruler. The other side is a 1:25000 scale, which corresponds to 4cm per kilometre. This scale is marked in thousands of metres, in 10 metre increments.

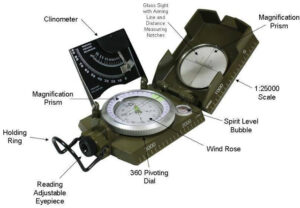
        The most obvious of the novel features is the clinometer, a black plate that folds over the compass dial. The clinometer has two scales, one marked in degrees and the other in percentage gradient. According to the manual the clinometer pointer has a lock to stop it swinging about. This appears to be that if you push it just past the fully vertical position it will stay there by friction.
         The other novel feature is the eyepiece near the lanyard ring. With many lensatic or engineer’s compasses there is a lens that you fold up and use to look at the far side of the compass dial. In this model the viewer is built into the compass body. The eyepiece can be adjusted to compensate for discrepancies of vision. This system gives a really good view of the compass dial. The view is magnified so it is very simple to distinguish the single degree increments of the dial. The bearing is in black and the backbearing is printed above in red. All very clear and easy to read. I really like this feature!
         The cover has a large clear window with various markings. One part appears to be designed to serve as a map detail magnifier. Just above the eyepiece is a fine notch that can be used to align the sighting line on the cover. This has a “pinhole camera” effect that brings the line into sharp focus. You eye easily moves from the sighting notch to the eyepiece below so bearings can easily be taken. Very well thought out and executed!
         The base also incorporates a bull’s eye spirit level, a feature I’ve not found on my other compasses.
         One surprise was that the compass bezel did not appear to rotate. Perhaps I am too used to Silva and Suunto designs, I mused. This part seemed quite solid. But why knurl the edges if it was not intended to rotate? Why bother printing it with a degree scale and etching reference marks on the glass surface? The image in the manual labels the bezel as a “pivoting dial” and this is listed in the features on the side of the box as “rotating compass ring”. Turns out (pun intended!) that the bezel does rotate but it is initially very firm. Persist with it and it will begin to work as intended. A word of caution, however. The bezel is marked in tens of degrees so “3” = 30 degrees and “30” =300. Setting the bezel helps you keep on the intended bearing. I’ll not bother describing how this is done in this post since the method will be familiar to many readers already. A future post will cover compass techniques.
         The compass came with a small but comprehensive instruction booklet. The appeared to be all in German but halfway through the text was repeated in English. This section was actually titled “Englishch” which was not promising. In fact the translation isn’t as bad as I feared! The first few paragraphs cover the obvious basics. How to take a bearing, using the compass with a map and how to move on a bearing. Then there are instructions on using the clinometer.
         The manual also includes a table. The first three columns are for converting between degrees, milliradians and grads (does anyone still use grads?). The fourth column is a % scale and the fifth column is fractions derived from height divided by distance.
         The manual then gives information on how this table can be used to determine features such as object height at a known distance, or distance from an object of known size. All this is done without the need for trigonometry tables. I will describe this in greater depth when I have had opportunity to scan the table and some related sections.
         The compass has one final trick under its skirt. If you flip it over you will find the table in the manual is reproduced on the bottom of the baseplate. The columns are even labelled in Italian! On the downside the font of this table is very small, and consists of black raised letters on a black background. It may be a good idea to copy the table in the manual and laminate it.
         The compass is a bit on the heavy side, so if you love ultra-light gear this is not the model for you! The hinge between the base and cover seems rather slim so I will have to see if this loosens up or gives other problems. Because of the way it is orientated the clinometer will be at its most accurate if one person sights while another stands beside to read the scale. I think this is a very good compass for the price. It is certainly easy to use and I love the magnified and adjustable viewer.

Categories
Phillosoph

On Prejudice.

“Prejudice” is a word I expect we will be hearing a lot over the next few months, so I would like to share an observation. 
“Prejudice” derives from “pre-judged”. A good definition may be making up your mind before you have all the facts, or in spite of the facts. Many people who claim they oppose prejudice are quite happy to hold prejudiced views about groups they do not like. We see open prejudice against groups such as law-abiding gun owners. This is considered permissible.
The “logic” is that anyone who owns a weapon is potentially a killer and murderer. If we continue with this train of logic it will also be recognized that all men are potential rapists, all women are potential whores and all parents are potential child abusers.
If I were to make the statement that “Hilary Clinton is potentially a whore and a child abuser” many people would be offended but I am only applying the same treatment that she and other gun abolitionists apply to others. I hope this gives you pause for thought.
If you wish to oppose prejudice, make sure you yourself are not really perpetuating it.

Categories
Phillosoph

Tomahawk Strengths.

Researching tomahawks has led me down some interesting paths. One such path led me to an interesting site on boarding axes:
“Ships carried a large quantity of tools to meet any eventuality. These of course included axes for fire fighting – fire being an ever present hazard on wooden ships – for general repairs, and for tree felling and wood gathering ashore.
The main uses of an axe when fire fighting, whether at sea or on land, were for breaking open doors, smashing windows or knocking holes in walls and roofs to affect a rescue, releasing smoke or creating fire breaks. The thin angle of the blade as well as the spike could also be driven into the gaps around doors and windows to lever them open. At sea during battle this would also include damage control such as clearing fallen rigging and spars by cutting and dragging them clear and to pry out embedded hot cannon balls before they set the wood alight.
Axes were therefore always part of a vessel’s equipment and it is from these that the Boarding Axe evolved to fill a niche created by the art of naval warfare at the time of the great sailing ships.  
As well as being used for damage control they were also used as a combat tool in any boarding action between vessels, and it was this action that generally concluded the fight. The boarding axe was used to cut through anti-boarder nets and lines, to cut through rigging or ropes holding gun ports open, to smash through the doors and windows of cabins to attack the opposing crew who may be defending that as a stronghold. And of course in melee an axe may not be as good as a sword or cutlass but it was still a handy personal weapon.

A boarding party would always include a complement of axe carriers to support the main body of marines and sailors armed with musket and cutlass. As the axes were generally stored in racks near each gun they were also handy for defence against enemy boarders, being quickly available to the gun crews to cut grappling lines or defend themselves.”
This nicely sums up why a tomahawk or similar tool can be so useful. Not only can it create shelter or provide fuel, it can also be used to help create escape routes, particularly in an urban environment. A Falklands veteran I know of insisted his knife should be capable of cutting through the side of a helicopter sinking in the sea, having been in such an unfortunate situation.
A kukri will make short work of a wooden door. So too will a good tomahawk or hatchet. Many other survival knives will not, even though they cost several times more.
As I detail in “Survival Weapons: Optimizing Your Arsenal” a good kukri can be acquired for very reasonable prices. The catch is you have to get them from Nepal, although postage is also quite reasonable. On the other hand, you can find reasonably priced hand axes and hatchets in any hardware or DIY store.

Categories
Phillosoph

Tomahawk Fast Draw

           As regular readers may know, I am a big advocate of the kukri. I am also, however, a big fan of Horace Kephart’s writings so am interested in tomahawks too.
           Last year I acquired a copy of “The Fighting Kukri” by Dwight C. McLemore. There is nothing wrong with this work but I personally found his techniques “over-systemized”. I can understand the reasons for his approach and recognize the influences, but it was not to my personal taste. This may be because I have my own ideas about using a kukri, as readers of Attack, Avoid, Survive or Crash Combat will know.
           One technique I did note was a defensive/ ready posture that had the forearms in a sort of pyramid configuration. If an enemy has his own kukri or a similar weapon I’d not like to leave my forearms as such a tempting static target. If he has an inferior weapon then my arms are going to be moving and letting my kukri bite!
           Yesterday I got to look at a copy of “The Fighting Tomahawk” by the same author. I found this quite informative.
           One advantage a kukri or other knife has over a tomahawk is that it can more rapidly and more smoothly be brought into action. A knife is generally worn so that its handle can be grasped first. A tomahawk is generally worn so that the first part grasped is the head or the shaft just under it. How do you move your hand to the end of the handle in a combat situation?
           You can, of course, flick the tomahawk upwards and catch the end. Or you can let it slide down out of your hand and catch then end. There is a significant chance that you may fumble this and lose your tomahawk! McLemore’s solution to drawing and readying the tomahawk will be the subject of today’s blog. It has applications for other implements such as hammers or entrenching tools.
           I call this technique “Brace and Slide” or “Slip, Brace and Slide”.
  • Grasp the tomahawk just under the head and pull upward to clear it from your belt.
  • Brace the butt of the handle against your hipbone or another convenient body part.
  • Slide your hand down the handle and grip near the end.
 
           It is possible that an enemy will have rushed your before you have the tomahawk fully drawn and readied. I have often stated, you should defend or avoid an initial attack before attempting to draw a weapon. That said, a tomahawk or hammer gripped just beneath the head can still be used to augment your unarmed techniques.
           Tomahawks and similar small axes usually come with a protective cover. Typically such covers feature belt loops or some other means to attach the cover to your belt. When carried in this way smoothly and rapidly drawing a tomahawk to defend yourself becomes very difficult. A better option is to use the cover just as a cover and rig another means for carrying the tomahawk. A tomahawk or axe with a sheathed head still works pretty well as a club!
           Many photos of WW2 German soldiers show them with entrenching tools slipped through the front of their belts rather than in the belt-mounted carrier, which was worn on the left side. The intention was to make the entrenching tool more readily available as a weapon.
           If used only as a cover many tomahawk sheathes are probably over engineered and have a lot of unnecessary weight and bulk. The photo below shows a rather elegant alternate edge protector. Such a thing could be easily constructed from materials other than leather.
 
           Cops often carry their nightsticks by a simple belt ring. Workmen carry hammers slung from a cloth loop. These methods can be adapted to carry a tomahawk. A diagonal strap can be added to prevent the tomahawk being lost when climbing or crawling and this provides greater security than simply slipping it through a belt.
Categories
Phillosoph

Boy Scout Axe

           I fully intend to write some more on the topic of tunics.
For today, however, a briefer post.
           I’ve really been enjoying the series “Westworld”. This has inspired me to resume playing “Red Dead Redeption”, which in turn has got me thinking about various topics including that of  tomahawks/ hatchets/ hand axes. There will probably be posts along these lines in the near future.
           For today I will just post this interesting example of an English boy scout axe. Length is apparently about 14". The head is backed with a point suitable for such tasks as digging latrines/ catholes.

Categories
Phillosoph

Roman Tunica and Simple Clothing.

Recently I was re-reading an article a friend of mine wrote about military clothing being too hot. One of the contributing factors to this is that the design of military uniforms is often influenced by civilian conventions. It is usually a fairly conservative interpretation too so a design will often be based on conventions at least a generation old!
If we look back in history we see that for many centuries the outdoor wear of a soldier, hunter or farmer consisted of a tunic, cloak and (usually) some form of leggings. Sometime about the 18th century it close fitting jackets became more common. The cloak persisted a little longer but was eventually replaced in military circles by the greatcoat and then the parka. By the 20th century what the military was still calling a tunic was effectively a sort of close-fitting sports coat. As the use of body armour became more common soldiers were expected to wear their tunics/ combat jackets underneath it, and not surprisingly this was hot and uncomfortable. Recently there have been attempts to address this with “underarmour shirts”. Effectively these are sweatshirts with camouflaged sleeves. Most that I have seen appear to be fairly snug fitting. A better solution would be a smock that can be worn over the armour.
Many of us are not restricted by military dress regulations. If things go really pear-shaped we are going to value functionability over fashion or convention.
Following the train of thought I was once again looking at the clothing of Roman legionaries. Roman soldiers operated all the way from the border of Scotland to what is now Israel. The basic clothing they used apparently worked in all these climates did not change much over several centuries.
Cloaks have been discussed in several previous blogs so today I will look at the Roman tunic. I’ll retain the Latin term “tunica” to distinguish it from the Saxon/ Viking/ Medieval variant.

One of the things that strikes you about the tunica is how simple it was. A tunica is just a large rectangle of cloth, or a pair of rectangles sewn together. The cloth was usually woven on a vertical loom and then cut so the selvedge edges were the bottom or top and bottom, minimising the need to hem. If you are not much of a tailor, this is the garment for you!

Typically a tunica did not have sleeves, its width being sufficient that the shoulder edge drapes over and covers the upper arm. Short sleeves were made from simple rectangles of cloth. The Romans considered long sleeves to be a bit wimpy and Julius Caesar was mocked for preferring a long sleeved tunic. Colder climates and the influence of other cultures seem to have changed this attitude over time. Long sleeved tunics were cut from a single piece of cloth, with ample volume beneath the armpits. Sometimes they were woven as a cross-shaped piece of cloth. When the sleeves were made from separate pieces they probably were cut to create the same shape.

The other thing that is notable about the tunica is that it is big. Records show tunics were made from cloth 1.55m by 1.4m. (60 x 55”). Unbloused, a tunic would hang to the wearer’s knees. One military punishment was to take a legionary’s belt and make him wear the tunic in this fashion. The belt was considered a symbol of soldiering so prohibiting its wear was a humiliation. It may have been that this was seen as demasculinizing since the tunic would have resembled to longer tunics worn by Roman women. Making an offender dress in women’s clothing is another recorded punishment.
Worn correctly the tunic was belted and gathered up above the belt so it was mid-thigh length. Why was the tunic so long? Perhaps the intention was that it could also serve as a nightshirt. However, there are records of tunics being shortened with tucks at the waist. At least one Roman writer suggests that the tunic should simply be made shorter in the first place. This page for re-enactors suggests creating a tunica from two rectangles of 36-48” by 30-48”.
The fit of the tunica is interesting. In the Mediterranean countries it probably allowed air to freely circulate around the body. Even when wearing armour there would have been some circulation to the underarm region, without the need for modern contrivances such as zippers. Combined with a cloak the folds of the tunic probably trapped air and kept the wearer warm.
The large neck opening of the tunica seems to have been less liked by some Romans. There are illustrations and records of the tunica being knotted at the back of the neck to restrict the opening. One of the reasons for the large opening was that during tasks such as manual labour the tunic was sometimes worn with one shoulder bared. The wearing of a neck scarf was very common, particularly when armour was worn. The scarf would prevent the armour chaffing the neck. The scarf may also have served a function similar to the detachable collars of later centuries. Notably tunics worn by later and more northern cultures had less of a neck opening.
The tunica was not used in isolation, of course. Unless it was very hot an under-tunic of the same basic design would have been worn. This would have provided additional insulation and reduced the need to launder the outer garment.

The tunica was long enough that it did not need to be worn with leggings. The Romans considered trousers to be barbarian and effeminate. The practicalities of military life overrode this prejudice. Bracae were breeches that reached to just below the knee. Trajan’s column shows infantry legionaries bare legged but cavalry and officers wearing bracae. Long trousers or a form of gaiter  or puttee seem to have been adopted where conditions required.

Some form of lower underwear was used. If the legionary was wearing bracae or trousers the lower part of the undertunic might have been gathered around the loins, as was common with the undershirt in medieval times. There are records of some form of underpants, “subligariorum”. Short, linen bracae-type garments are known. Loincloths were also used. The example shown in the picture below was probably “outerwear” for athletes and gladiators, a soldier wearing something less bulky and simpler.

On the theme of simple to create clothing, I came across this illustration of a Japanese loincloth. Simply a rectangle of cloth 6-14” wide with a ribbon or tape sewn to one edge. The second illustration is a curious variant with a bib front and a loop to go over the neck.

Categories
Phillosoph

Ninja Boating

Yesterday I was watching an interesting video on tools used by historic ninja. At the start, almost as a throwaway comment the speaker mentions that the box he keeps them in also happens to be a boat!
Rooted around a bit, and found a video of this ingenious device.


Categories
Phillosoph

Survival Heliographs: When the Sun Is Behind You. Part Two

Following on from my post on heliographs one of my regular readers observed:
Aiming a signalling mirror with the sun behind you could be tough but basically if you have the sun behind you and a plane in front, the problem (conceptually) is put the mirror flat between the two.”
He is correct. During my research I came across this informative illustration:

Using a signal mirror when the sun is behind

Note that the signaller is using his free hand to aim by directing the reflected spot of light on to it.
Categories
Phillosoph

Survival Heliographs: When the Sun Is Behind You

A few weeks ago a friend showed me a military heliograph he had. If I recall correctly it was part glass, and like so much milspec equipment was surprisingly heavy.
In my emergency kit I have an item that serves the same purpose. It was made from a polished stainless steel door finger plate. Unbreakable and a fraction of the weight and price of the military item.
“You know how to use the sighting hole?” I asked.
I explained that as you aimed the device by looking through the hole it would cast a spot of sunlight onto your face.
The heliograph was mirrored on both sides so you could see the reflection of this spot of light in the near side.
You then adjusted the mirror till the spot of sunlight moved back to the aiming hole.
This gives you the optimum angle for directing sunlight in the aimed direction. 
Another technique is simply to hold your hand up between you and your intended target.
Some survival heliographs have a little stick you can aim at, but your finger or hand works fine.
Angle the mirror until the sunlight shines on your hand, then drop your hand out of the way.
This technique can be used with mirrors that lack an aiming hole or items that are only reflective on one side.
This is probably the more practical method when you are trying to signal a moving target like a search plane.
Aligning an aircraft, aiming stick, light spot and looking through a sighting hole all at the same time sounds like a major plate-spinning exercise!

Another method, taken from this page:
“A rifle barrel was fixed in alignment on the station with which it was desired to communicate, accurate alignment being obtained by sighting through the bore. A small disc of white paper was then fixed just in front of the muzzle, and an ordinary hand mirror was used to reflect the sun’s rays towards the receiving station. The successful transmission of messages depended on each flash being accurately directed towards the receiver, and this was ensured by the disc of white paper at the end of the muzzle of the rifle barrel ; for if rays of light from the flat hand mirror passed through the bore the annular shadow of the rifle barrel could be seen on the disc, and all other rays were therefore bound to travel in the same direction.”
One of the disadvantages of heliographs is that you cannot use them to signal in a direction where the sun is behind you. Or can you?
I did some research.
One of the interesting things about heliographs is that they only came into widespread use as a communication device in the 19th century.
There are some earlier accounts of signalling with light flashes from reflective objects but the true potential of this technique was not exploited.
This is interesting since there is no real technological barrier that would have prevented messaging heliographs being invented centuries earlier.
The Elizabethans, Tudors or Romans could easily have invented heliograph messaging. Some events in history might have been very different if such a rapid communication system had been available!

Let us look at the setup of the British Mance heliograph.
When the sun was before the signaller the signalling mirror was set up facing it.
The operator looked into the mirror and moved it until he could see the reflection of his intended message destination.  
He then erected a sight so that it was in line with the destination and its reflection in the mirror.
Alternately the operator stood behind the mirror and looked through the hole in its centre, adjusting the sight until it was in line with the target.
The mirror was then adjusted so that it cast its light on the sight.
The centre of the Mance mirror was unglazed so it created a dark “shadow spot”. Positioning this shadow spot on the sight gave better alignment.
If the sun was not in the same direction as the message destination, the signal mirror was still set up so that it faced the sun.
The sight was replaced with a second mirror, termed the “duplex” mirror. In some designs the duplex mirror might be on its own tripod, or might be a second single mirror heliograph.
The duplex mirror was set so that there was a reflection of the intended target. Alternately, the hole in the centre could be used to aim it at the target.
The signalling mirror was then adjusted so it cast its light onto the duplex. The Mance manual suggests gumming a piece of paper onto the duplex to facilitate correctly placing the shadow spot. Any non-reflective object could be placed before the duplex with the same effect.
By using a pair of reflectors, heliograph positions could exchange information in both directions, even if the sun was behind one.
Many survival manuals will tell you about signalling with heliographs. I have never seen one address what to do it the sun is behind you.
There are various ways you can use this technique.
“Mirror” in this context means anything that is reflective. A CD, a piece of foil, a mess tin, a polished knife blade, a piece of glass, a watch face, compass face or the screen or polished back of a phone. The reflector of your flashlight should not be overlooked!
If your vehicle has broken down, use your windscreen as a duplex reflector and a rear view mirror to direct the sunlight on to it. Most vehicles have two wing mirrors.
If you have a comrade, have him hold a reflective object.
Point your hand at his reflector and use your heliograph to cast sunlight onto it. Drop your hand out the way.
Your comrade uses the light cast on his own hand by his reflector to ensure it that it is aimed in the intended direction.
If you are on your own, improvise by mounting the duplex on any natural or self-constructed suitable object.
Categories
Phillosoph

WMD: Weapon of Mosquito Destruction.

I have been known to grumble that mosquitoes are a creature I would not be too worried about if they appeared on the endangered species list. Mosquitoes and gnats are more than just a pest. They spread diseases such as dengue fever, filariasis, Japanese encephalitis, malaria, West Nile virus, and yellow fever.
Understandably I have high hopes that this invention becomes widespread.
The comment about power supply is rather daft. This technology could easily be combined with solar power. Mosquitoes are a problem in urban areas too. I recall the unpleasant sight of a whole ferry bulkhead covered in mosquitoes in Venice. Hopefully mosquito lasers will become a common item of street furniture in tropical towns and cities. They would be a welcome feature of hotel rooms and bedrooms. And if they could also be programmed to zap ugly buzzing house flies too, so much the better!