Categories
Phillosoph

AMA: Oscar to Tango.

Oscar: Possibly the easiest sign of them all! The hand looks a bit like it is adjusting a camera lens, which may help you remember the phonetic.
Papa: A first glance this looks like Golf with the palm downwards. Papa is a Pointing gesture. The thumb and second finger pinch together to further distinguish this sign. Mindhacker tells us “Papa snaps his fingers”.
Quebec: Quebec is in Canada and so are Canada geese. This sign uses a bent wrist to make a shape like a goose head.
Romeo: Romeo crosses his fingers hoping true love will prevail.
Sierra: A fully clenched fist. Compare to the signs for Alpha and Echo. The US military uses this hand signal to mean “Stop”, which is another “S” word. Mindhacker uses the concept of “coming to blows over the treasure of the Sierra Madre”. That helps getting the phonetic right.
Tango: Like Sierra but the Thumb is placed between the first and second fingers. Mindhacker has a phrase about a dance judge giving your Tango the evil eye, alluding to the fig sign being used to ward off evil.
Categories
Phillosoph

AMA: Golf to November.

Part two of the lessons on American manual alphabet (AMA) and NATO phonetic alphabet. The good news is that today’s signs are very easy and that learning them takes you past the halfway point!
Golf: Mindhacker suggests “This way to the links” to remember this, reflecting that it resembles a pointing finger. Personally I just remember it as a single finger version of Hotel, the next letter. Remember the “palm towards the viewer” rule. Your finger should point outward.
Hotel: Like Golf, but with two fingers. Mindhacker observes this looks like a key being presented to a Hotel door. Many Hotels now use cards, but you can think of the two fingers holding a card if you want. Use what helps you remember.
India: “Raise your little finger like drinking a fine tea from India”. This sign actually helps me with remembering the phonetic rather than the reverse.
Juliet: “Juliet made Romeo pinky swear their love”. Make the sign for India and use your little finger to draw a “J” in the air. The hook of the J goes outwards.

Kilo: Mindhacker tells us “a Kilo is about two pounds” reminding the user that this sign uses two fingers. I find it more useful to think of it as the sign where the thumb goes between the Knuckles of two straight fingers.
Lima: A very easy one! The “loser” sign with the thumb inwards. “Losers leave Lima beans.”
Mike: A clenched fist sign, but with the palm downwards. The tip of the thumb is placed between the third and last finger. The three fingers together make a shape resembling an “m”.
November: The same as Mike, but with the thumb tip in the middle. The two pairs of fingers look like elevens, and November is the eleventh month.
Another lesson tomorrow.
Categories
Phillosoph

AMA: Alpha to Foxtrot.

Recently I have started dipping into a book called “Mindhacker” by Ron and Marty Hale-Evans. The first section I read was a suggestion that the NATO phonetic alphabet and ASL fingerspelling be taught synchronously. As will be seen, learning the two together actually helps with memorizing some of the words or signs.
Learning these systems has obvious advantages if you find yourself in high noise or low noise situations. I cover some useful hand signals in my book Survival Weapons: Optimizing Your Arsenal. ASL fingerspelling, aka American manual alphabet (AMA) provides a useful compliment to these. Potentially one can create a sort of syllabary where one or two letters stand for longer commands. For example, the sign or command “Lima” or “Lima One” would instruct a unit to adopt a skirmish line formation.
You may already know the phonetic alphabet, or at least some of it. The basic AMA system is very easy to learn. The 26 basic letters are represented by 22 symbols. Learning four to six per day is no great feat. Probably you will pick it up at a much faster rate. The next few blogs will be about learning symbols, with some commentary from Mindhacker or from myself that I hope may help make learning them easier.
Fingerspelling is not sign language. It is a supplemental system useful for when a sign is not known or does not exist. There is a British fingerspelling system, incidentally, but this needs both hands to make many letters so the AMA system has the edge for our purposes.
The conventions when using AMA are:
  • Signs are made with the dominant hand at shoulder level.
  • Palm is directed towards the viewer.
  • Double letters are made by bouncing the hand, waving it sideways or remaking the sign.
Alpha/ Alfa: This is a clenched fist with the thumb at the side pointing upwards. There a number of signs based on the clenched fist and the position of the thumb is important. Mindhacker suggests this sign is remembered by thinking of an Alpha male rising their hand in triumph.
Bravo: Bravo is the open palm. Remember is as though you are going to applaud while crying “bravo, bravo!” Folding the thumb across the palm makes it look more like a “b”.
Charlie: Charlie is the hand forming the letter “C” so no complex aide memoir are really necessary. Since the sign is directed towards the viewer the open side of the symbol is inwards.
Delta: Delta is the upraised index finger. Mindhacker suggests you imagine pointing up at a Delta-winged plane above.
Echo: Echo is best thought of as a semi-clenched fist, as though you are holding something. The thumb is under the fingers, which I suppose does somewhat resemble an “e”. This symbol may be easier if you place the tip of the thumb on the fingernail of the little finger.

Foxtrot: The hand form usually shown for Foxtrot seems to resemble the sign for the number “9”. Mindhacker seems to suggest the symbol resembles the “OK” gesture and that the phrase “The judge in the dance contest thought your Foxtrot was magnifique!” helps. South African (and Irish) fingerspelling seems to use a modified sign where the Forefinger is bent at 90 degrees to make an “f”-like shape. Personally I think that is a much better symbol and worth wider adoption.
More signs tomorrow!
Categories
Phillosoph

Bogota the Abus!

The failure of the Mad Bob Bogotas to open my Abus padlock bothered me. Certainly they worked fine on all other locks I tried, but I had intended these picks for my emergency kits, so they were likely to be the only picks that I had available in certain situations. There was nothing actually wrong with them as picks. Used with the turning tool from my Serenity kit they popped the Abus open. It was as turning tools that they were lacking.
It is a common consensus among lock pickers that the form of turning tool is often more important than the pick used, and here was a fine example.
Constructing turning tools had proved more involved than expected. The usually suggested material is the steel strips found in windscreen wiper inserts. Unfortunately my area has very few locations where I could scrounge these. Yesterday I popped out to the shops and what should I come across lying on the pavement? A damaged wiper blade that yielded two steel strips each nearly a foot long! I would construct some turning tools to carry with my Mad Bob Bogotas and foil any locks that turned out to be as temperamental as the Abus!
It was the work of a few minutes to cut, bend and finish the material. I try one in the Abus, using my Dangerfield Bogota. The lock opens! But being a scientist, I have to refine my experiment. I try a Mad Bob and one of my new tools. Won’t open!
I compare my wiper steel turning tools with the one in the Serenity kit I had modelled them. The only difference is the thickness of the steel! The wiper steel is similar in thickness to that of the Bogotas, the kit tool much thicker. Not much I can do about that, or was there?
The thinner tools were rotating too much in the keyway and not transmitting sufficient torque. I hit upon the idea of slightly bending/bowing the long arm of the wiper turning tool. It sat better in the keyway, but prevented to tool fully inserting. I straightened it out a little and attempted to Bogota the Abus. It worked! Try again with the Mad Bob Bogota. Also worked!
Since the wiper turning tools were of similar thickness to the Mad Bob Bogotas, the next step was obvious. I bent the handles of the single-hump picks to approximate that of the turning tools. This did the trick. The paired tools now open the lock. Later, I will bend the handles of the rakes so they act as better turning tools for the single-humps.
Turning tools and Bogota lock picks with bowed blades.
Shown in the image. Wiper steel turning tools made today and Mad Bob Bogotas. Note bending of turning tools and some Bogota handles. 
Categories
Phillosoph

Bogota Lock Pick and Rake Review

I suspect that the readers of my posts on lock-picking fall into two broad camps. The first are those interested in lock sport, and that, like me, are relatively new to the field. The second are those who are not particularly interested in lock sport as a hobby but wish to add a new capability to their repertoire of survival, self-reliance and preparedness skills.
To both groups, I give the same initial advice: If you only ever buy or carry one set of lock picks, it should be the Bogotas!
Euro-twist Bogota lock picks
Euro-twist Bogotas
standard-twist Bogota lock picks
Standard-twist Bogota lock picks
As I have mentioned elsewhere, the Bogotas are the invention of a lock sportsman called “Raimondo”. You may see similar picks under other names, which is often an indication that the maker is trying to avoid copyright and IP.
There are number of options when it comes to Bogotas.
In addition to stainless steel, they can also be found in non-magnetic titanium. Interestingly, some of my steel Bogatas are strongly magnetic, others much less so. More of that later.
“Mini-Bogatas” have a shorter handle. The actual pick part is the same, don’t think these are better suited for smaller locks. Mini-Bogatas can be found in either stainless steel or titanium.
Two-hump and four-hump versions of Bogotas can also be found. I have no personal experience of these, so this article will be about the more commonly found triple and single hump set
Another option you will encounter is “standard” or “euro-twist”. This reflects that in the US cylinder locks are usually mounted with the pins uppermost, while in Europe they can be encountered with the pins down or up. A “euro-twist” Bogata has the humps pointing in the same direction as the handle curves. Even if you are in the USA, I suggest you buy “euro-twist” if you can get them. If you are using the other pick as a turning tool, this lets them curve away from each other, giving you a bit more room. There are also flat “no-twist” Bogotas.
Most paired sets of Bogota picks have handles designed to act as a turning tool for the other. And they work very well for this too! I often reach for them before other turning tools when using other picks. It is possible these handles might serve as shims. Regrettably I do not have any handcuffs to experiment with.
The single hump version can serve as a half-diamond or probably as a hook too. This form is sometimes called a “knuckle” or “p-nuckle”. I’ve not made much use of the single-hump as a hook, but have SPP picked locks using it as a half-diamond. The single hump is also good as a skeleton key for small warded locks and can be used to pick dimple locks.
I have seldom actually needed to use the single hump for SPP, since the triple hump rake is the most consistently performing pick I have used. With the right action, some locks pop in seconds. I have some rakes that open certain locks faster than the Bogotas, but if these do not work the Bogotas usually do the job. I use my Bogota rake more than any other pick I have. My other rakes are mainly for locks that are too small for the Bogota or that I know open faster with another design.
The inventor of the Bogota recommends that the rake be used with a jittery action, “like you have had too much coffee”. The Bogota rake actually lends itself to a variety of techniques. I generally start with a see-saw rocking action that becomes a scrubbing action if the lock does not yield. I guess that might qualify as a jiggling or jittery action. You can also use the Bogota with a zipping action. I have even opened some locks with the rake inverted so that the bumps rather than the peaks contact the pins.
I now have a couple of variants of Bogotas. In addition to my original Dangerfield pair, I have a more conventionally handled version from the Dangerfield Serenity set. I also have some pairs from Mad Bob. The Dangerfields have taken up residence in my lock sport kit, while the Mad Bobs I intend to place in an emergency kit.
The Dangerfield pair are not as flexible as some picks out there, which is a good thing since when you are starting out you may get some locks to open with a lateral jiggle. These Bogatas seem unlikely to bend or break with such applications, although as your finesse develops you tend to drop this technique.
The flat-handled Bogota from the Serenity kit seems more flexible than the other Dangerfields. According to UK Bump Keys, all three are 0.022" (0.558mm). Initially, I found the Serenity Bogata easier to use in the narrow twisty keyway of an SKS lock. This has been cured with practice and I now have no trouble using the stiffer Dangerfields in this lock. I actually prefer these Bogotas over the others I currently have.
The Mad Bob Bogotas are offered in both “standard” and “euro-twist” configurations and in both 0.6mm and 0.8mm thicknesss. Mine are 0.6mm euro-twist. They seem a little more flexible than the paired Dangerfield. That is not a bad thing for narrow keyways once you have learnt to be gentle with your picks. Interestingly, the steel used on the Mad Bobs does not seem to be magnetic, while that on the Dangerfields is. I’d not try taking them through a metal detector, but this might be significant if you plan to magnetize your picks to make an emergency compass.
I have seen it said that Mad Bob picks need additional sanding. The picks I have have no detectable rough spots and the finish seems adequate.
The Mad Bobs are somewhat cheaper than the Dangefields, although this is somewhat offset by the shipping and handling charge the former has. Mad Bob also failed to notify me when the picks were back in stock.
I discovered something interesting while trying out my newly arrived Mad Bobs. My stubborn little Abus padlock refused to open. Usually it opens with a Bogota, although the Octo-rake is quicker. The problem seemed to be with which turning tool I used. Using another Mad Bob Bogata pick as a turner seemed to leave insufficient room inside the small keyway for the rake to rock. When using the Dangerfield and Serenity Bogotas stored in my lock sport kit, I must have used the “L” tool in the kit.
My attempted solution was to cut the handle down to about half an inch (12-13mm). I achieved this by cutting a grove with the cut-off disc of a Dremel, then bending it until it sheared. Use something like the stone of a Dremel to re-shape the end then finish with a needle file and abrasive paper. This increases the pick’s capability as a turning tool but makes it more compact, intermediate between the unmodified pick and the often much more expensive 2" mini-Bogota. Bending the handle to a right angle decreases the overall length further and may make them easier to carry in certain locations. On the other hand, the 60 degree bend of the original may be better at reaching recessed locks, and I am not convinced that shortening the handle has that significant an effect on stowage. If your lock pick kits do not contain a Bogota bent as shown, it is worth making a turning tool with a 60 degree bend.
A Variety of Bogota Lock Picks
Despite these efforts, the Abus won’t open unless certain turning tools are used on it. Specifically, the Dangerfield Bogotas and Sohos or the Serenity L-tool. The Mad Bobs are either thinner or more flexible. They work fine on other locks I have tried, but the Abus remains a baffling exception. I later hit upon a simple solution.
Dangerfield Bogota and batarang lock picks
This image shows some “batarang” rakes (aka w-rakes) that at first glance may appear to be Bogotas. These are from one of my Chinese pick kits, which seem to have been “inspired” by an American brand called “Majestic”. Note that some of them lack the undercutting of some peaks: a feature that strengthens the Bogotas. Also note that the “wavelength” of the peaks is less. They do work, I have opened locks with them, but they are not as good as Bogotas. Incidentally, these particular examples have a number of burrs that could be sanded off, but this is likely to remove the nasty black finish that shows up the brass. I have not experience of genuine Majestic picks but expect they are better finished.
The mirror finish of other picks helps them move around inside a lock and does not show up brass marks like some other pick finishes.
Bogota-like rake made from steel rule
An honourable mention goes to this rake, which is effectively a Bogota without the innovation of the undercuts. The original Bogotas were made from the steel blades from a streetsweeper, illustrating that these are a relatively simple construction project for those with hand tools, material and patience.
Carry options for Bogotas
A pair of Bogotas constitutes a compact but very capable lock-picking capability. In other posts I have shown how a pair can be carried using the spring from a cheap pen. The safety pin lets the pair be carried where they are concealed or most convenient. An alternate method uses a few inches of gutted paracord. A safety pin may be added with a needle and thread.
If you are new to lock-picking, the Bogotas are great for building your confidence and teaching you finesse.
Given their performance, quality and versatility, a pair of Bogotas are great value for money and worth adding to you tool kit, survival kit etc. Newbie or veteran, you should give them a try!
Categories
Phillosoph

Two Soaps, One Cup.

I will admit that I can be a bit frugal at times. In an age where we waste far too much and fail to appreciate what we have, I do not regard that as a bad thing.

This is not me!
The other day I had some soap reach the end of its useful life. Both bars had begun to produce less laver and broke into shards if you tried to use them. Annoyingly, there seemed to be quite a bit of soap left. Trying to squeeze the old pieces into the new bar of soap never seems to work. Even if they are the same type of soap they tend to break off and be lost.

Decades ago newspapers used to have adverts for soap moulds that supposedly let you compress multiple old bars of soap into a new bar. Surely such a thing must be available on the internet now? Turns out that you could buy such a thing but it is now unavailable. There are youtube videos on how to make such a thing out of wood. There are also many videos showing you how to melt soap in a saucepan and place it in silicone moulds.
Some further searching and applied logic resulted in something less involved and more practical. Here is what you do:

Find a microwavable plastic cup. I use one of the little Tupperware tubs that some takeaways give you sauce in. Place your shards of old soap in the cup, having removed any labels the soap may still have.
Take a metal teaspoon and carve a trough in one side of your new bar of soap. Put the soap you have carved out in the cup with the old soap.
It does not matter if the soap in the cup is wet, but be sparing if adding extra water. Spend a couple of seconds crumbling the soap so none hangs over the edge of the cup.
Place the cup of soap in a microwave and give it 30 seconds. Keep an eye on the soap and stop the microwave as necessary. I put a little too much water in with the soap and it frothed over the side of the cup. The turntable was due for a clean anyway.
If the soap is not sufficiently softened/ melted, give it additional bursts of about 10 seconds until it is how you want it.
 Take the teaspoon and use it to pack the soft soap into the trough on the new bar of soap. I ended up taking a foil wrapper and encircling the soap with it to pack it down. The wrapper was used food packaging so additional points for recycling and repurposing!
Let the soap cool before you attempt to remove the wrapper if you used one. Very little soap should adhere to the wrapper if you have waited long enough.
I was a little concerned I had used too much water so I put the bar in the freezer for a few hours in the hope that some of the excess would crystalize out.
I tried the bigger bar of soap today. Works perfectly. The little plastic tub now lives in the bathroom, ready to collect future shards of soap. Currently my bar of soap rests on top of it to dry. When it gets smaller I will place it on a repurposed shampoo bottle cap.
Discovering soap can be melted in a microwave offers some interesting potential. Soaps can be made with essential oils, fruit zest, oatmeal or various other additives. I seem to recall I once saw coffee soap advertised. There is always a little bit of coffee and grounds left in the pot. It is mince pie season so some of those foil cups may get repurposed as moulds.
Categories
Phillosoph

Hook Ladders.

Yesterday I was reading a little more about hook ladders. The hook ladder is a masterful piece of lateral thinking: You cannot carry a ladder long enough to reach where you want to go? Carry enough to reach a ledge or balcony. Climb up to that and then use the ladder to reach higher. A typical ladder would be 4 metres/ 13 ft long.

Here are some videos of hook ladders in action, and even being used for races.
It just so happened that the same day I came across this image. If provision is made to carry or retrieve the painter’s pole such a device can be used to “climb in instalments” in the same fashion as the hook ladder is used.

The “frost knot” is simply an overhand knot. Here is a video on it, and one on making an etrier.
Below are some images of the ninja kumade, effectively a folding hook ladder. 

Categories
Phillosoph

Survival Gear: Part Two

Sleeping Through the Apocalypse

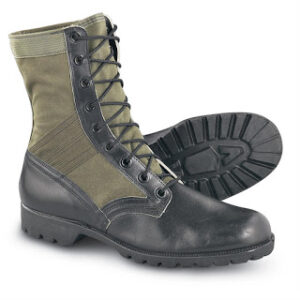
In part one of this discourse I fielded the idea that your survival kit should start with a suitable outfit of boots and clothing, including hats, bandannas and gloves.

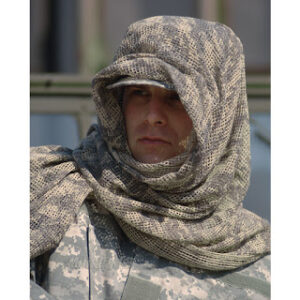
I’ll continue with a few further thoughts on “neckwear”. While useful, most modern bandannas are a little on the small side. Kephart advocated a silk neckerchief either 27" or 36" square. In “Jack Knife Cookery” James Austin Wilder stated that a scout’s neck cloth be “two cubits”. This page suggests a 30-40" square.
While researching today’s post I came across the “pashmina” shawl below. We tend to think of such garments as something for the ladies, but the potential of such a thing for any outdoorsperson should be obvious. At 190 x 70 cm it is effectively a mini-blanket.

To the ensemble we discussed yesterday, I will suggest a further addition, which is that of eyewear.
If you need glasses you may have them already with you when you reach your emergency kit. Ideally your kit should include a spare pair, but this is often not financially practical for many of us. If you are blessed with perfect vision, your kit should include a pair of sunglasses. Not only do these protect from sun and snow glare but also from thorns and branches in the woods.
If you need prescription glasses they should be selected from styles that cover as much of the eye area as possible.
Retainer bands, to stop you losing your glasses during rough travel are worth acquiring.
Protective goggles are another prudent addition to your kit, particularly if you operate somewhere where dust storms or harsh wind are common. 
While a lower priority than the other clothing items we have discussed, gaiters are a useful addition to any cross-country kit.
In part one of this discussion I stated that if your cold weather gear had you perfectly comfortable when you were standing around, you were wearing too much for hiking. Put another way, you should be slightly chilly when standing around in your marching order. So what happens when you finally make camp and are less active? Obviously, you have to wear more. This is time to break out the blanket!

Blankets are ideal for sitting around camp, standing watch or waiting in a stand. In previous blog posts we have looked at various ways to use blankets as garments. It may be prudent to pack a few large safety pins, blanket pins or cloak pins in with your blanket.

Why a blanket, you may ask? Modern people use sleeping bags! You can wrap a sleeping bag around yourself too! Indeed you can. Typically good blankets (or poncho-liners) cost less than good sleeping bags. If, like so many of us, you are on a limited budget then the purchase of a good blanket for your emergency supplies is a better investment than that of a cheap sleeping bag.

You can add a quality sleeping bag when you have the money, and use your blanket with it if you wish.

Another consideration is that sleeping bags should be stored unrolled, while a blanket is quite happy rolled up with your other emergency items.

Available now are blankets (“throws”) made of synthetic fleece. I've not actually used these in the field but often use one at home.

For field use. they may not have the wind resistance for use as outer wear. That can be solved by the addition of a more wind resistant outer layer such as a rain-poncho.

Around the same time that you buy yourself a good blanket, get yourself a rain-poncho, small tarp, basha-sheet or all-weather blanket.
Whatever you choose should be capable of serving as both a rain-garment and a shelter cloth. Add usefully long lengths of paracord to each eyelet and roll or bundle them up so they are out of the way until needed. See my knot book for some ways to do this.
Attaching such cords is better done at home in the warm rather than when out in the field when cold, wet and tired. You should be able to wear your poncho/sheet over your blanket if necessary. At night, you rig it as a roof while you curl up in your blanket.
There are many items that you can add to your emergency kit to make your sleep more comfortable, and you probably will.
The rain-poncho and blanket are the very basic must-haves that will keep you warm and dry whether awake or sleeping.
After suitable clothing, they are the first items your kit should acquire.
A foam or foil kip mat might be the next item to acquire. These are relatively inexpensive and can greatly increase your comfort at night, protecting from both the damp and chill of the ground.
In certain environments, where trees and roofs are scarce, some tent pole sections and pegs may be an early purchase.
Human nature being what it is, your possession of basic essentials such as a blanket and poncho may make you a target for theft and attack.
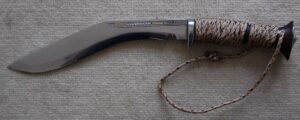
Next on the shopping list is a knife. The knife is not just a defensive weapon, it is a tool that can be used to manufacture shelter, build fires, prepare food and, if necessary, create better defensive weapons. Many bug-out bags include expensive folding knives.
Your primary knife in your emergency kit should be fixed blade and capable of the heavy work that I have described. My first choice is my 10" sirupate kukri, accompanied by a puukko and brog.
If you are on a budget, a machete is far from the worst choice you could make.
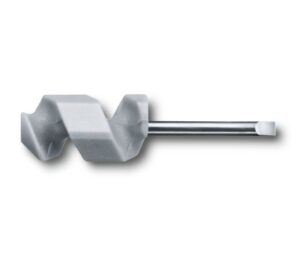
Your kit should include some means to resharpen your blade. You will also need a belt or similar so this vital tool can be worn on your person.
For an in-depth discussion on survival blades and how to use them see my book Survival Weapons.

Water is the next consideration.
Your kit should include a couple of litres of bottled water, more if you are in an arid region.
Large plastic soda bottles are very useful for water storage. Wash them out, fill with clean tap water and add two drops of bleach per litre.
You sometimes encounter nonsense about storing water. As a qualified microbiologist I can tell you water will not “go off” if it has been properly sterilized.
Water is heavy and bulky, so you can only carry a limited amount.
Your kit should also include a supply of water purification tablets. These are valuable so carry them in the cargo pocket of your trousers.
Before using other purification methods, filter water to remove gross contaminants. This is another job for a bandanna!
In an emergency situation, it is prudent to carry at least a litre of water on your person whenever practical.
This is in addition to the water supply in your pack. This doesn’t have to be an army water bottle, although their shape is well suited to this task, so get one if the price is reasonable.
“Civilian” plastic water bottles and bladders can be used instead, so long as they are convenient to carry.
Some military bottle pouches can be rather over-engineered. Modern military pouches are designed to fit on the belt and assume a load carrying system is worn.
A shoulder strap may be a more convenient arrangement. Consider a strap or paracord carrier for your bottle or a mesh or cloth bag.
In a previous blog. I described how to create a simple, effective fire kit. Add this to a cargo pocket of your emergency trousers.
You are far less likely to remove your trousers than a jacket or shirt. Thus some of your most useful items are carried in your trouser pockets rather than your pack, jacket or belt order.
You should also have a lighter as a component of your everyday carry.
There should be an emergency disposable lighter in each of your outdoor coats. Throw a few spares into your emergency bag.
Your emergency kit contains two medical kits. The more extensive one is carried in your pack, preferably where it can be quickly located.
See my article here for some suggestions on contents.
You also should have a pocket kit that lives in a trouser cargo pocket. This is just a small selection of plasters, aspirin and alcohol wipes.
Your cargo pockets should also include at least one foil blanket. These cost a pittance but can save lives. It is worth stocking up on a few spares.
If you need particular medication, you should have it located close to where your emergency kit is stored.
Ideally you would have it packed in the kit, but stocking up on prescription items is often not practical, and you may need to make sure items are relatively fresh.
It is a good idea to store a checklist with your emergency kit. This lists items that you may need that are not stored with the main kit and can be useful when you are flustered or in a hurry.
The knife or knives in your emergency kit are supplemented by something such as a Swiss Army knife (SAK).
Mine is part of my everyday carry and is accompanied a mini-leatherman Squirt. Together, these weigh 6¼ oz/ 178 gm so are several ounces lighter than many single full size multi-tools.
The SAK includes a fine screwdriver that stores in the corkscrew. This can be used to repair spectacles and sunglasses.

That concludes the second part of this discussion. Third part to follow soon.
Categories
Phillosoph

Survival Gear: Part One

What Will You Wear to the End of the World?
On this blog I have often tried to approach survival from a different angle. Recommended lists of survival gear are easy to find on the web. Many of these recommendations are products. We live in a consumer society so whatever your interest, someone will be attempting to sell you something to use. Many of these things can be very useful. Many of them can be classed as “gadgets”, which I do not intend to be derogatory. Regular readers will know that I love a good gadget or gizmo! I do, however, feel the need to urge caution. If the choice is between buying a belt buckle that can open any hex-nut, or a good blanket, the latter is a far better addition to your survival gear.

When discussing survival gear there is a common tendency to leap right to the contents of the pockets or pack. Many people on the internet will post photos of their bug-out bag without considering that these are of little use without an outfit of suitable clothing or footwear nearby. If you are going to be outdoors for any length of time then you need to first consider what you are wearing. Having the right underwear for the weather can make a massive difference. An effective clothing system is built outwards, and underwear is the foundation.
Underwear, whatever the material, should be open weave so as to be permeable. Outdoorsmen of previous centuries used light woollen underwear in all seasons, usually long in the leg and sleeve. If it was really cold they wore two sets. Some modern wicking synthetics that are good for cold weather may be too warm for some climates. I have used a CoolMax tee-shirt comfortably in hot weather.
You will often encounter the advice that several thin layers of mid-level clothing are warmer than a single thick layer and that individual layers can be removed to regulate temperature. You will also notice that outdoor shops are full of cosy looking thick garments to tempt your wallet.
Frequently stopping to undress and remove or add a layer of inner clothing may not be that practical in the field. Make sure your inner and outer garments can be easily vented instead.
If you are comfortably warm when standing still you are probably wearing too much insulation for hiking in cold weather.
Mid-level clothing for insulation should be open weave and thin. Use materials that remain relatively warm when wet and that dry easily. Select wools and synthetics, avoid cotton. You’ll note that outdoor shops are full of stylish cotton items they want to sell you! Shops often stock what sells, not what you actually need.
Down is best used in cold, dry conditions when the likelihood of wetting is low. Cotton garments should be reserved for hot dry conditions.
Outermost clothing needs to be tightly woven to protect from the sun, rain, wind and insects. It should be loose in cut to allow room for insulation or air circulation and for freedom of movement. Attention should be paid to the ability to easily ventilate the interior, even if the item is described as “breathable”.
Raincoats can also serve as windproofs. Even the breathable ones will need to be vented in certain conditions. Raingear is of limited use if it gets damaged. To reduce the chances of this happening wear it when you need it, pack it away when you don’t. Logically, you will need a windproof outer layer in addition to your raingear and should select raingear that is easily packable.
In previous decades the preferred outer layer of soldiers and outdoorsmen was of wool. Woollen outer garments are harder to find now and economy has many of us wearing cotton or polycotton, often of military origin or inspiration. Cotton and its relatives are easy to print but cold when wet and slow to dry. If you can find outershirts, tunics or jackets of wool they are worth considering if you can afford them.
Trousers take a lot of punishment out in the wilds. Expensive, ultra-lightweights may prove to be a poor investment. Cotton or polycotton trousers are probably a more prudent choice over the more expensive alternatives of wool or other materials. Thigh pockets are useful for carrying certain low weight items.
Generally, select neutral colours for clothing. Camouflage clothing can be counter-productive in certain situations. Read my articles on smocks and smocklets for ideas on camouflage garments that can be donned when needed. In other situations you will want to be seen so consider something in high visibility colours that can be worn when needed.
“Peripheral” clothing is important. The difference between comfort and misery or injury can often depend on whether your feet, head and hands are protected. Good underwear and accessories should be top of your survival list.

Your survival kit needs at least two hats. One of these needs a broad brim to protect you from the sun. A boonie hat is just about ideal for this. You will also need something to keep your head warm. A woollen or synthetic watch cap is a good choice. It can even be worn while sleeping wrapped in your blanket or sleeping bag. A headover is a good alternative or supplement to the watchcap. They are versatile and take up little room, so it may be prudent to carry more than one. They can be worn as warm hats but can also serve as balaclavas, scarves or neck gaiters.
Some form of neckwear is recommended. In hot weather this may be a cotton bandanna or keffiyeh. In colder climates a woollen, silk or synthetic scarf. The bandanna or keffiyeh has a number of uses including as a towel or headgear. If your hat lacks a full brim or the sun is particularly harsh they can be used to create a havelock. Depending on colour, they may be used either to signal or for camouflage. They are therefore an “all season” component for your kit. Triangular bandages and thin tea towels can also serve as bandannas.

Spare socks are a good addition to your kit. Ideally get several woollen pairs. You can work with cotton in certain climates and if you have enough pairs to rotate them. Change into dry socks whenever you can and carry wet ones where they can easily dry. Keep your clean spares in a waterproof bag. Sew a loop of ribbon to each of your survival or travelling socks so you can hang them up securely. Socks can be used as pouches or emergency mittens. Even if your kit only contains one outfit of clothing, pack spare socks.
Fingerless gloves maintain dexterity while protecting your hands when moving over rough country or in close combat. When using gloves for insulation remember the layering principle. Several thin pairs that can work in varied combinations are more versatile than a single thick pair that must be either on or off. I have personally operated in a -30°C windchill using just thin merkalon gloves and leather fingerless gloves. The leather gloves protected against windbite on the hand hanging by my side. The hand holding the walking pole seemed to better protected. 
Gloves seem to be very good at finding their way out of pockets, particularly if you have stuffed a scarf and a warm hat in there with them. Most cold weather coats do not have sufficient pocket space for peripherals and other stuff you want to carry in them. Buy a mesh, drawcord bag and pin it inside your coat. Use this to store peripherals that you are not currently wearing. Sew ribbon loops onto all your gloves so they can be attached to a snap link on your pack or equipment if you remove them temporarily.

Last, but not least, you need footwear that you can travel in. Boots are a pretty good choice, particularly if you are likely to travel cross-country. Boots in an emergency kit should be worn in. If they are used for other purposes they should be stored close to the rest of your bug out equipment and clothing. A common tip is that you should replace your bootlaces with paracord. An important detail is that it should be the sort of paracord that you can pull the core strands from and still use the outer sheath as bootlace. Some budget stuff does not allow this. There is little point providing yourself with cordage if you can no longer keep your boots on. Also, ensure that the paracord you use is compatible with the eyelets and hooks of your boots. Aglets that function as small fire sticks or handcuff keys are available. Other items that might be concealed in boots will be discussed another day.
That is quite a shopping list so far, and not a multi-tool yet in sight! The second part of this article is available here.
Categories
Phillosoph

Artistic Lock Picks.

The other day I voiced some ideas that I thought might make lock picks more durable. While collecting images for that blog I came across some photos of custom lock picks. Some of these have the features that I suggested, although the choice may be artistic rather than functional. Certainly they are things of beauty and worth sharing.