Arctic: In the winter, in addition to the essentials recommended above, carry a sleeping bag, parka, mittens, snowshoes, or skis, and mukluks. In summer don't forget mosquito netting and repellent, extra clothing (socks especially) and shoepacs. Wear sunglasses when sun is high on snow surface. Keep feet dry, summer and winter.
Then there are the diseases and parasites that mosquitoes carry. Mosquitoes are probably the greatest man-killers on the planet, after humans themselves.
And not to forget midges, horse flies, black flies, tsetse and a variety of other biting insects.
Biting insects can range from a nuisance to life‑threatening.
I have dozens of recommended kit lists, and several of them include an insect repellent wipe in a sachet. One wipe is not going to last long.
I have a bottle of insect repellent in my travelling bag, but I am well aware that it is a finite resource. Some insects dislike it more than others.
Many kit lists do not mention insect head nets.
A good insect head net will probably cost you less than a pint of beer. They weigh practically nothing, and take up very little space.
You have to ask yourself why you would not have at least one?
You can even keep an insect head net in your skin-level EDC, helping pad the other items in a cargo pocket.
There are numerous brands of insect net, but one bag of fine mesh is pretty much like another. You might like to try out one of the cheaper options before you part with a wad of hard‑earned cash.
The main criteria to look for is that the net be black or some other dark colour.
Lighter colours will reflect light and be harder to see clearly through.
A few people have suggested light mesh as a camouflage eye covering in snow or desert. This is why it is probably not a good idea.
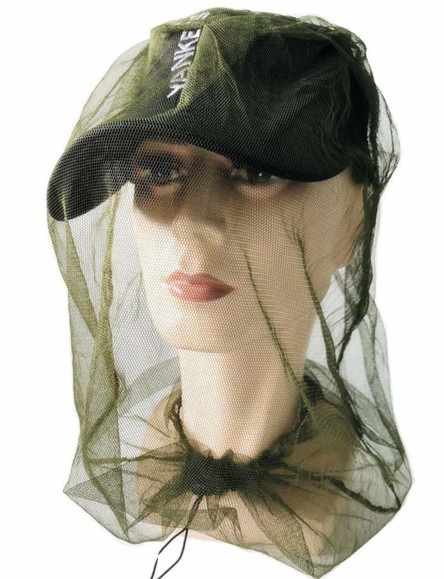
The insect net in my EDC is a British Forces Mosquito/Midge Micro Head Net (NSN 8415-99-519-8268).
This head net is 45 cm deep, and 45 cm at its widest, tapering down to 16 cm at the closed end. It will fit over most headgear, has a neck drawcord, and is “olive” in colour. The olive is dark enough to see through.
If you have added an insect head net to your kit, it is reasonable to consider what other uses it may be put to.
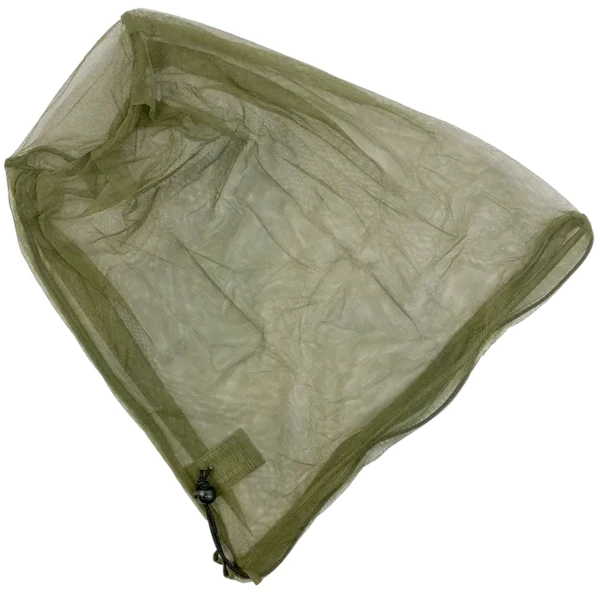
• The insect head net is a large mesh bag, probably with a drawcord. It can be used as an emergency carrying bag.
I would not recommend it for heavy or dense items, but if you come across a thicket of ripe blackberries…
You could also tie it to the outside of your pack and use it to let your wet socks dry.
• A head net could be used as an improvised fishing net. It may be sufficient to catch shrimp and the sort of small fish that can be used as bait for something bigger.
• An insect head net may be used as a pre-filter to remove debris and large material from water before you heat or chemical treat it. Use several folds of material.
I have seen it suggested that an insect head net may be used as a filter or strainer for making tea or coffee.
It should be obvious [hopefully], that these applications are not suitable for a mesh treated with agents such as permethrin.
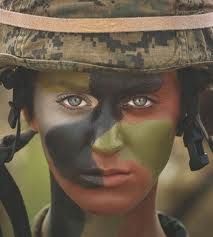
• Eyes are a difficult area to camouflage. You can do artistic things with camo‑cream but the white of the eye (sclera) and the iris colour remain.
Eyeglasses may reflect the light and draw attention.
About a week ago, I posted the second part of “Knives You Need”, discussing Swiss Army Knives.
Since the first version went up, I have added more links and more content.
The pocket clip for my Swiss Army Ranger arrived, so I have posted an additional image of the new scales with the clip installed.
I have also put a few additional modifications on the page.
For today’s chapter of Survival Library, it seems appropriate that I look at two books that look specifically at the use of Swiss Army Knives.
Whittling in the Wild
If you are interested in Swiss Army Knives, you will have encountered videos posted by Felix Immler. Most of the links from my previous blog are to videos by Herr Immler, and for good reason.
There is a lot of rubbish on Youtube, but people like Felix Immler are a welcome breath of fresh air!
Immler has written several books on the Swiss Army Knife, but I have only been able to find a copy of “Whittling in the Wild”. It may be found under variations of this title such as “Victorinox Swiss Army Knife Whittling in the Wild”.
Felix Immler has apparently done a lot of work encouraging young people to experience whittling and create objects for themselves.
Most of the projects in this book are toys, fun‑stuff or curios. This is not the book to teach shelter construction or how to make a better rabbit trap. However, within these projects are many construction techniques that might be put to other uses, so they are worth a browse.
The book is worth reading just for the sections on safely using your Swiss Army Knife and basic handling techniques.
If you have young people you want to teach to use a knife safely and creatively, this is an ideal book. Many of us longer in the tooth and barer in the pate may learn a thing or two too!
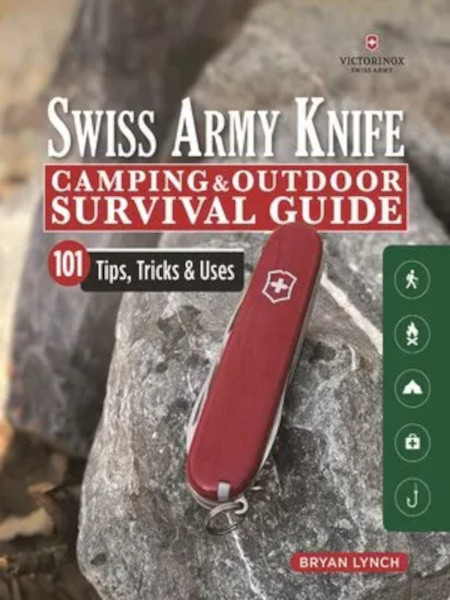
Swiss Army Knife Camping & Outdoor Survival Guide
The second book is “Swiss Army Knife Camping & Outdoor Survival Guide, 101 Tips, Tricks & Uses” by Bryan Lynch.
Part One of the book mainly looks at a variety of knife models from Victorinox, ranging from the 58mm Midnight Manager to the SwissChamps and several of the locking blade models.There is a nice chart comparing the models included in the book.
Part Two is a nice section on safely using and maintaining your knife, including sharpening tools such as the wood saw and the chisel.
Part Three is on using your Swiss Army Knife in the wilds.
One oddity of this section is the author states that the distance of an arm‑span, fingertips to fingertips, is “roughly 5 feet (152cm)”.
Generally, the arm‑span is taken to approximate an individual’s height. For me this is bang‑on: distance from the centre of my chest to finger tips is exactly half my height.
The author later mentions that he is “a little on the short side”. The quick measuring scale he illustrates will not apply to the majority of readers. As he himself states “Obviously everybody is different, so premeasure your own limbs”.
Most of this part are presented as “projects” with an estimated time. Most of the projects are survival ideas that will be familiar from other sources.
Many are nicely described, and include the occasional less‑well known idea, such as the fire‑plow. Wilder has a nice story about someone using a fire‑plow, but I have seldom seen mention of this device in other publications, although it is included in some versions of FM 21-76/3.05.70 and the SAS Survival Handbook.
There is a suggestion about carrying wire wool under the corkscrew. I wonder if contact with the corkscrew will encourage the wire wool to rust, which makes it even less useful for firelighting. It is not a particularly good tinder for non‑electric sources of ignition. Some Swiss Army Knives have an LED. Can steel wool be ignited with the batteries for these?
There are far more useful things to carry than steel wool.
When using the back of the saw or some other tool with a ferro‑rod, it is more effective to draw back the ferro‑rod while placing the “steel” on the tinder.
I liked the section on carving wooden fish hooks from branched twigs.
The author talks about “catch and release” sport fishing.
Some mention might have been made that the paracord net described (or any net made with knots) will damage fish and should only be used for emergency or sustenance fishing. Similarly, wooden gorges as hooks are very cruel, often illegal, and should only be used in genuine emergencies.
While fish trapping with a bottle is mentioned, there is no mention of trot‑lines, which are likely to be more efficient than active fishing in an emergency.
There is a useful section on how a Swiss Army Knife may be useful for firearm maintenance and cleaning.
I also liked the tip on making a squirt bottle for cleaning out wounds. Yet another use for the sometimes maligned reamer! A bottle with a drinking nipple can probably be used the same way.
“There is a lot of wasted space in a vehicle, and I urge people to use it.” Good advice, although I would stress having something like a rain poncho, duct tape, vehicle tools and a sleeping bag or poncho‑liner.
Imagine attempting to repair your vehicle in very bad weather. It will help to have a means to keep the rain or snow off what you are working on.
In the “Urban” section, the author describes getting locked in a washroom cubicle. Similar happened to me in the toilets of a very famous museum. Like the author, I used my Swiss Army Knife to dismantle the lock and free myself.
Summary
In summary, I liked both of these books. Each is worth a read. I was lucky in that I was able to read both of them together.
There is a good possibility that when you really need a tool, your EDC Swiss Army Knife may be the only tool available. These books provide a nice reminder that you are better equipped than you might fear.
I had originally planned to make “Knives You Need” a two‑part series.
I have now had second thoughts.
The second part was going to address the topic of field knives. Much of it would have repeated ground already covered in other previous articles.
Instead, I have decided to take a slightly different angle and have decided to break this topic into smaller, bite‑sized pieces.
Many of you reading this may have spent good money getting yourself a survival knife. Good tools are important, you will get no argument from me on this point.
However, unless you spend all of your time in the great outdoors, the odds are that when you really need a tool, that survival knife will be back at home or in your car rather than on your person.
What is more, the tool you actually may need may not actually be a knife.
If you are willing to spend hundreds of dollars on a survival knife, is it not sensible to invest a little in the tools you are most likely to carry with you every day?
It is no secret I am a big Swiss Army Knife (SAK) fan.
Multi-pliers and lock knives will be covered at a later date.
Critics of the Swiss Army Knife point out that the blades lack a locking mechanism and potentially may close on the fingers of the user.
In practice, I have seldom had this happen. Perhaps penknife users are more cautious due to the lack of locking mechanism?
Mechanisms fail, so a lockknife that is mistakenly used like a fixed blade may be a greater potential risk.
There are several websites that give advice on safely handling and using penknives. Many of these are written for scouts, but many older users would probably benefit from putting these ideas into practice.
I recently read of someone who did have a blade close on them. They accidentally hit the back of the blade against a nearby wall.
This might have been avoided if the user had taken the precaution of extending an arm and checking for clearance around themselves before starting at task.
This is a prudent procedure for any tool use.
If using a long tool like an axe, hold it at full extension and check all around you. Do not forget to check for obstructions above and below you too.
The Penknife Grip
When using a folding knife, use what I call “the penknife grip”.
Your four fingertips are pressed against one scale. The opposite scale is held by your thumb and themar eminence. This keeps your precious digits out of the way of the main blades. This is the way to hold your penknife when opening tools.
When you need to close a tool, hold the knife in the same way and place the palm of your other hand on the back of the open tool. Calmly and smoothly fold your hands together to close the tool.
Many actions can be performed with your knife held in the penknife grip, keeping you safe should a tool unexpectedly close.
Some tasks will require a grip with your fingers around the knife body. Ensure a solid object, such as what you are working on, obstructs the tool from closing and that any pressure is applied in the correct direction.
Never use force to compensate for a blunt tool!
Never cut towards a body part, including your own. This simple and sensible precaution is often neglected in Youtube videos!
Right Tool for the Job
The risk of injury may be reduced by using the right tool for a job.
The long knife blade and saw-blades probably have the greatest potential for causing injury.
If you need to cut something, the short blade or the scissors are usually more appropriate.
If you need to bore a hole, use the shorter blade or the reamer.
If you need to pry, use the can- or bottle-openers, or better still use a more appropriate tool that is not your penknife.
In the pouch I carry my penknife in, I also carry an eight centimetre-long flat pocket pry bar. On my keyring, the P38 may be used to pry or open paint tins.
It is handy for trimming my nails or other minor jobs that it is not worth getting the main Swiss Army Knife out for. It actually sees a lot of use since it is the first tool I usually reach for.
The Classic was donated by the lost property box. It originally had green cracked scales and was missing its tweezers.
A few years back, I treated myself to a new toothpick and tweezers, which had recently become available in green.
Recently, it occurred to me how shabby the cracked scales looked. I would need something that matched the green of the toothpick and tweezers.
I found a set of replacements at a tolerable price. What was more, the new scales were in luminous green.
Classic SD with luminous scales. Note whistle, P51 baby can-opener and Photon-light also on keyring. The safety pin is attached directly to the Classic SD. I have now removed the safety pin since it had a tendency to open while the keys were in my pocket.
The Classic is a single-layer SAK with a small blade, a pair of scissors and a nail file. The tip of the nail file of the SD model is designed to act as a screwdriver. Some users grind the end to create a wider slot screwdriver. Some reviewers complain that the file no longer ends in a pointed nail cleaner. The screwdriver tip is still good for cleaning nails.
The Classic SD is one of Victorinox's most popular best sellers.
A friend showed me the 58mm Rambler, which is a two-layer SAK with all the blades of the Classic SD plus an interesting combination tool with a cap‑lifter, magnetic #00/#0 Phillips screwdriver and wire‑stripper/bender as well. I will likely buy a Rambler if I ever need to replace my Classic SD.
(Update: I have no willpower! I brought a Rambler and transferred the luminous scales on to it. This now rides on my keyring.)
The Manager is apparently a Rambler that replaces the toothpick with a retractable pen. The Midnight Manager is a Manager that replaces the tweezers with an LED. I have heard this light is not waterproof.
There are other 58mm models, but I feel the Classic SD or the Rambler are most useful.
I do not see much point in a 58mm model without scissors.
One oddity in the 58mm models are the bladeless Jetsetters. Supposedly airliner “cabin-safe”, this ignores that the scissors are probably a more practical weapon than the blades of 58mm models. The wirestripper on the combo-tool will not work without a blade.
If you intend to have a 58mm as your primary EDC knife, the MiniChamp may appeal. The extra tool that most appeals to me is the cut and picker.
Some may find the MiniChamp may be a bit bulky or heavy for keyring carry. A friend of mine has an alox version and considers it a little heavy for his keyring. Pocket clips for 58mm models may be found, but I do not use one myself.
Incidentally, SAK with Alox scales generally do not have tweezers and toothpick slots. I would recommend only considering models that have these useful tools.
When it comes to “full-sized” (91mm) Swiss Army Knives, Victorinox currently offers 28 different models.
For general use, survival, emergencies or EDC (Everyday Carry), I would suggest one of the following models:
Spartan
As one might expect from the name, the Spartan is the most basic model of the 91mm Swiss Army Knives. Apparently it remains one of their best sellers.
It is a two‑layer knife, so you get a large and small knife blade, plus the can‑opener and the bottle‑opener. On the back is the reamer and the corkscrew.
Knife blades are quoted as 58 mm and 36 mm in length, with a hardness of RC 56. My own measurement gives a cutting edge of around 60 mm, with the distance from tip to knife body being greater. A 91mm Swiss Army Knife complies with the 3 inch/76 mm blade length restrictions some areas impose. This figure was probably chosen so that SAKs were exempt!
While on the topic of smaller knives, this video suggests a 74mm Executive for EDC, but they have been discontinued.
The applications for the knife blades are fairly obvious. Quite large pieces of wood may be split or removed by using techniques such as batoning.
The knife blades are factory sharpened to an angle of 20 degrees and this is a good choice for general use. 17.5 degrees may be used instead.
The X-notch is an alternative to the square or log-cabin notch. It may be created by saw cuts or batoning a knife blade
The bottle-opener and can-opener are collectively referred to as the “opening layer”. Both the can-opener and the bottle-opener have applications that may not be immediately obvious.
The 58mm Rambler has a tool with a magnetic Phillips screwdriver. Oddly, the screwdrivers on 91mm knives are not magnetised. My bottle opener is weakly magnetic and the can opener more magnetic, but that may be due to the magnet I keep in them.
Bottle‑Opener
The notch on the bottle‑opener/cap‑lifter works together with the cutting blade to serve as a wire-stripper. The notch may also be used as a wire‑bender or nail‑puller. It may be used as a striker for small diameter ferro-rods.
Various other parts of the bottle‑ and can‑opener or the keyring eyelet may be utilized bending wires or similar materials.
The tip of the bottle‑opener is a large (6 mm) slot screwdriver. This will fit in a socket heads adapter should you need another type of screw head. The screwdriver tip may also be used as a light prying tool.
Can‑Opener
The tip of the can‑opener is a small (3 mm) slot screwdriver. What is not often appreciated is that this part is also intended to work with Phillips and Pozidriv screws too. The tip may also be used for light prying, such as opening stubborn pistachio nuts.
I sometimes use the screwdriver tips as measuring gauges to estimate if something is 3 or 6 mm .
The hook part of the can opener may also be used to cut tape on boxes. Felix Immler has a video on how to turn this part into a more efficient hooked cutting tool. Some alternate examples of sharpened the unsharpened edge to improve string and box-cutting capability.
This can-opener may also be used as an orange peeler or a billy lifter.
One of my favourite uses for this tool is that it can be used to carry a 5.7 mm magnet. The magnet is useful for picking up or holding secure small screws, or magnetizing a pin, tweezers, safety pin or needle for navigation.
The can-opener on its own is now magnetic. Interestingly, the bottle-opener on the same layer is also weakly magnetic.
I have taken to alternating storing the magnet between the bottle-opener and can-opener to increase the effect. The main blade and scissors are now also magnetic, and the hook weakly magnetic.
Check to see if the pin in your penknife scales is actually magnetic.
Corkscrew
My main use for the corkscrew is to carry the 1.5 mm mini‑screwdriver.
The mini‑screwdriver is an essential for anyone who wears spectacles or even sunglasses. Not all SAK come with the mini‑screwdriver. I very much recommend acquiring one.
Not surprisingly, all the SAKs I recommend for EDC have corkscrews so you can carry a mini‑screwdriver.
The mini‑screwdriver may be used as a tiny prying tool to pop the back off a watch and to remove the battery. It may be used to drive out small pins, and may be used this way when replacing the spring of the SAK scissors.
If you want to use the corkscrew, the tool holding the magnet may be used to park the mini-screwdriver.
Cotton wool may be wrapped around the corkscrew to serve as a source of tinder, or it may be used to carry a supply of fishing line.
There are other alternate tools designed to fit in the corkscrew, including the Fireant, a tiny ferro‑rod. Larger diameter ferro‑rods may be cut down to fit within the corkscrew.
Alox handled variants may lack the corkscrew and other back-tools.
I have glasses, so carry the mini‑screwdriver.
Note that the Spartan, Climber, Camper and Huntsman have an equivalent that replaces the corkscrew with a #2 Phillips screwdriver. These the Tinker, Super Tinker, Hiker and Fieldmaster.
Trivia: MacGyver did not drink, and many of the penknife models he used in the series lacked a corkscrew.
Reamer
The reamer is another very versatile tool. It acts as an awl, a scraper, a punch, a seam‑ripper, wire‑stripper, wire‑bender and a threading tool.
The reamer is very useful for creating pilot holes for a drill bit or gimlet. It may be used to clean up or bevel a hole you have bored.
The reamer is also one of the most useful options for opening packages. Hold the point between thumb and finger to penetrate the packing no more than is desired.
A bit of trivia: when your reamer needs resharpening, it should be sharpened at 48 degrees.
84mm and 91mm Swiss Army knives share the same component for their reamer.
Scale Tools
Scale tools usually refers to the tweezers and toothpick. Some models have additional items such as the ballpoint pen or pin.
Some tools you will not use often, but will be very pleased you have them when you really need them. This may include the tweezers or toothpick.
Some models, such as those with Alox handles, lack the tweezers and toothpick. The tweezers in particular are worth having, and the toothpick has also proved useful to myself.
Even if you do not own a Swiss Army Knife, the tweezers are a useful thing to have in your medical or emergency kit. They are hard to beat for compactness and functionality.
Trivia: Tweezers for the 58mm and 91mm models are of similar size, but differ in the shape of the head.
A friend of mine likes his Compact Swiss Army Knife. Unlike many Swiss Army Knives with only a few layers, the Compact includes the pen and mini‑screwdriver.
The Compact is a two‑layer knife like the Spartan but replaces the small blade with the scissors, and the reamer with the multi‑purpose hook. Instead of the cap‑lifter and can‑opener, there is a single “combo‑tool” that serves as a 6 mm screwdriver, can‑opener, cap‑lifter, wire‑stripper, emergency Phillips screwdriver and wire‑bender.
Personally, I think the reamer is a “must‑have”.
The Compact apparently evolved from the 84mm Golfer. An 84mm version of the Compact would be nice, especially if they replaced the long nail file of the Golfer with a reamer.
The Companion is a three-layer SAK that replaces the can opener with a box-opener. Oddly, the box-opener was not paired with the combo-tool to keep can-opening capability. Lots of other SAK tools serve as box-openers, including the small blade, scissors, reamer and can opener.
The Climber is a three‑layer version of the Spartan, adding the hook and scissors and retaining the reamer and small blade. The same tool selection was available in an 84mm Climber Small model/Alumnus, but it is sadly no longer in production.
The 74mm Executive is comparable to the 84mm Climber, but also out of production.
For a minimal bulk, “city carry” EDC knife, the Climber is a good choice and very good value for the tools and capability it offers.
The Camper is a Climber replacing the scissors and hook with a wood saw.
If I had to make a choice, I would choose the scissors over the wood saw.
The Explorer is a Climber that adds a magnifying glass and in-line #1/#2 Phillips screwdriver. If you now find it difficult to read labels in the shops, the Explorer may be a good alternative to the Climber.
Scissors
Keeping your toenails trimmed is an important part of looking after your feet (and socks). The Swiss Army scissors are excellent for such applications. Better than many purpose‑designed items!
The SAK scissors are widely regarded as being the best available on any multi-tool. You probably own dedicated scissors that are not as good.
The scissors are also surprisingly robust, being quite capable of cutting through soda cans and tin can walls to construct various items.
The scissors are probably the Swiss Army tool I have used the most, and I suspect I am not alone in that.
I regard the scissors as a must‑have feature on a Swiss Army Knife.
Multi‑Purpose Hook
If I recall correctly, the multi‑purpose hook was once called the “parcel hook”, being intended to hook though the string of a heavy parcel or bundle of firewood and let you use your penknife as a handle.
The hook is rated for 90 kilos/200 lbs of load!
The hook is often underappreciated, since there are many other applications for this item. These include being used to untie a stubborn knot, twisting materials to make natural cordage or an eyelet in wire, lifting hot billies or their lids, pulling stuck zippers, as a pen holder, retrieving tent pegs, and tightening lacings.
Some hooks have a nail-filing surface on the back.
Check out some of the videos on‑line for more applications.
There is even a modification to turn the hook into a groove carving tool. Worth considering if your penknife is a dedicated whittling tool. Putting a cutting edge on your hook may make it less effective at some of its other applications.
Trivia: The hook and scissors will be mounted on the same layer. If your 91mm knife has one tool, it will have the other too.
Huntsman
The Huntsman is another of Victorinox’s best sellers.
Effectively, it is the Climber with a woodsaw blade to create a four‑layer model.
A Huntsman will cost approximately twice what you might pay for a Spartan. Prices vary a lot, however, so shop around!
For “bushcraft” and “woodcraft” use, the Huntsman is a really good choice, having both the scissors and a wood saw. A saw is a handy thing in the garden too!
Wood Saw
Many traps and other items you may wish to construct may require accurately cut parts.
The wood saw is also useful for scraping bark off, creating sawdust or shavings for tinder, descaling fish, and may be used as a striker for a ferro‑rod.
Take a look at this video on using the wood saw and a tip on waxing it.
Trivia: The wood saw is one of the few commonly used SAK tools that lacks a nail‑nick
Oddly, the original scales of my Ranger have “Camping” and a tent logo. Several models of SAK other than the Camper have this decoration.
The Ranger is the Huntsman with the addition of the metal saw/file. It also has a chisel blade and a 2 mm fine screwdriver on the back, so three additional tools than the Hunstman. Unlike some larger Swiss Army knives, there is a back layer tool on every layer.
I have found the metal saw useful, so will choose a Ranger over a Huntsman.
The chisel is useful when forming notches in wood, and may be used as a plane/scraper.
A Ranger will cost approximately two and a half times what you might pay for a Spartan. As I have already said, prices vary a lot, so shop around!
I once had to cut down the bolts on a rucksack frame since they were digging into my back and damaging my shirt. Not surprisingly, I like having the metal saw/file available.
The metal saw is better than the wood saw for cutting some plastics and for some wood‑cutting tasks.
It is also a good striker for a ferro-rod. Keep the saw still and pull the rod across the back.
The file may be used sharpening improvised fishing hooks.
The tip of the metal saw may be used as a Phillips screwdriver or nail-cleaner. It may also be used with a socket.
Trivia: 91mm Swiss Army knives with the metal file will also have the chisel.
Since the seven‑layer Champion was discontinued, the Ranger is as big a Swiss Army Knife as I care to consider carrying. I don't really want something over three centimetres thick!
A sewing needle, wrapped in invisible thread, has been placed under the metal saw.
The tweezers have been modified to be pointed. The tweezers with my Classic SD/Rambler are unmodified, so between the two knives I have both a pointed and a standard configuration set of tweezers.
A small hole has been melted in the toothpick so that it may serve as a blunt needle to thread cordage such as dental floss.
Using the small blade of the Ranger, I made a tick removal tool by cutting a slit in the end of the toothpick. I am most likely to use the toothpick in my keyring SAK if something is stuck in my teeth.
Both the toothpick and the pointed tweezers with the Ranger may be used against ticks.
A second hole was drilled in the new scales to hold an unthreaded additional sewing needle. The pin proved to be poorly magnetic, so I replaced it with a bead-headed pin that was more magnetic and easier to remove.
Old Ranger with new luminous scales. Note magnet carried in can-opener.
New Scales!
I liked the new scales on my Classic SD so much, I went ahead and brought a matching set for my Ranger. I kid myself this will make it less likely to lose in Autumn.
Check out the video on how to use warm water to remove the old scales without damage.
Generally, I like my kit “low-key”. The SAK is an exception, since it is not really a tactical nor defensive item. It is, however, valuable in both replacement cost and in utility as a resource. Thus I like that the new scales make it easier to see and hopefully less likely to lose.
Check out this modification, however, since it may be applicable to other knives and tools. So might this idea!
The new scales are “plus” scales, so have additional carrying places for a pin and an SAK pen. I drilled another well for a second pin. I later discovered the pins I have are not magnetic, so I replaced the first pin with a small, unthreaded needle that is magnetic.
As well as being luminous, the scales have some nice texturing for improved grip.
The larger 91mm scales were a bit harder to fit snugly compared to the 58mm for the Classic SD/Rambler. I had to use a vice.
Do not forget to pad the jaws of the vice so you do not damage your new scales!
Slots for the scale tools were very snug for both sizes of scale, making the tools difficult to remove. I used a circular needle file to create a small scallop underneath which solved the problem. Overdid it a little on the toothpick for the Ranger , but adding some “White Tack” to the slot solved that problem.
The Ranger has been fitted with a loop of beige bootlace about 14 cm long. So too has my mini‑Leatherman Squirt P4.
Both tools ride in a mobile phone belt case with cut‑out bottom corners.
The loop of cord is passed down through a corner and then the tool passes through the loop to form a lark’s head knot. Even if the top of the pouch pops open, the two tools cannot be lost.
The loop is also large enough to pass around my wrist or hook my thumb through for added security when using the tool. The safety pin may be used as a pin or clip to secure the tool to clothing or D‑rings.
This loop now has a ferro-rod toggle.
I have also to fitted a pocket clip to the Ranger, giving me another option when I need my hands free.
The pouch mentioned above is on my trouser belt. If I am wearing trousers, I have my Swiss Army Knife and mini‑Leatherman with me. I will also have my keys, so will have my Classic SD/Rambler available too.
The belt pouch also holds the aforementioned pocket pry bar and a diamond‑impregnated metal sharpening card.
The few jobs the Ranger is not suited for, the mini‑Leatherman or pry bar can usually handle.
If this collection of tools cannot handle a job, they may often be capable of making something that can.
The tools form a component of the EDC kit I have distributed across my keyring, trouser pockets and compact pouches on my trouser belt.
Summary
For EDC, I prefer a Swiss Army Knife to include scissors, a reamer and corkscrew/mini-screwdriver.
My personal choice is the Ranger and Rambler. I carry my Ranger in a belt pouch. Previous knives have worn through a few pockets over the years.
If you want something more pocket-friendly and more compact, there is the Compact, Companion and Climber. All have similar capabilities, with the Climber possibly being best value.
For an even lighter option, Sportsman, Waiter or Bantam.
The Swiss Army Knife is the tool you are most likely to have with you when you need a tool. It is worth spending a bit of money to get one you are happy with.
That said, the web currently lists the Victorinox Ranger as $75, with the lesser bladed models at correspondingly lower prices.
Given the very high quality of Victorinox knives, that is a pretty reasonable price compared to the prices of some other folding and fixed blade knives.
Roll back to the start of this century, and you would have found me practising cookery in a mountain hut in the middle of Iceland.
I had found myself part of an impromptu group hiking over the mountains.
While most of my companions tucked into their freeze‑dried rations, I busied myself cooking my dinner in my Kephart‑inspired cook kit.
I do not remember exactly what I was cooking, but it was based around some rice. Among the foodstuffs I carried was included rice, flour and “Alpen” (a brand of muesli).
Cooking a meal from base ingredients was considered to be somewhat eccentric by my fellow hikers. It was, however, admitted that my meal looked far more appetising than theirs! I was probably carrying less weight of food too.
The following day, a beautiful German girl scrutinized by every move with great interest as I improvised an Alpen bannock, cooked in my home‑made folding handled frying pan.
Carrying flour and knowing how to make use of it on the trail I can attribute directly to my acquisition of “Jack‑Knife Cookery” by James Austin Wilder.
Not to be confused with an inferior book of similar title by the “Woodsman’s Thong” (!)
The real Jack‑Knife Cookery book was first published in 1929, but has undergone several reprints. My copy dates from the twelfth printing from 1965.
Written for boy scouts, this book begins by proposing a scenario where you have only flour, raw meat and a jack-knife. How would you go about feeding yourself?
The reader is then introduced on how to cook “twister” and “kabobs”, both of which may be cooked on green sticks over a “plug‑hat hole” fire.
From here, Wilder introduces the reader to cooking dampers and other foods, cooking on or in coals, “Imu” cooking, how to cook vegetables without a pot, mixing without a bowl, how to cook in a billy, making stews and many other useful subjects.
All of this is illustrated with Wilder’s own drawings and anecdotes/“yarns”, so is clear and highly readable.
Having fed the inner (young) man and grabbed the attention of the reader, Wilder moves on to discuss camping and related topics.
This is 1920s’ style, of course, so of interest to anyone who understands that they may have to survive outdoors without Goretex, GPS and freeze‑dried rations.
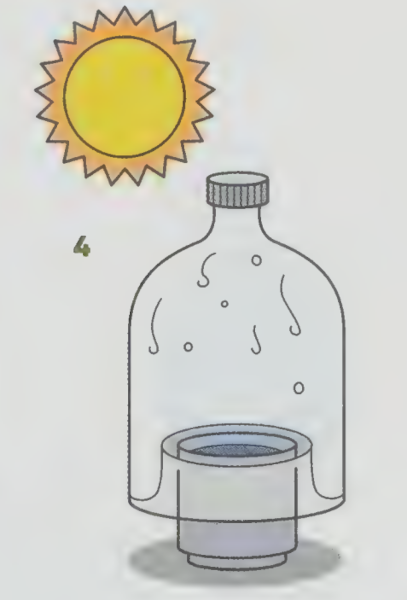
The third part of the book logically drifts into survival and emergency advice, peppering it with additional recipes and cooking techniques, including fun stuff such as boiling water in a glass bottle.
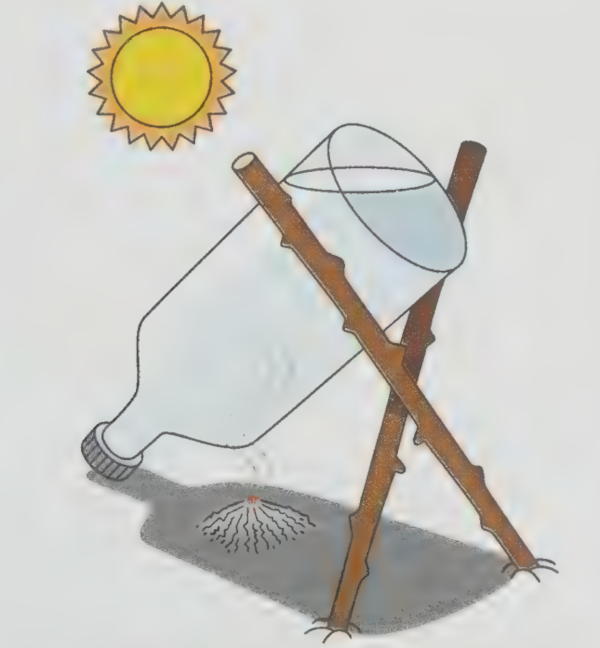
The section on friction methods for starting fires is entertaining, if not as technical as that in “Northern Bushcraft”. This section includes a story about using a fire‑plow/fire‑plough, a technique many survival manuals do not bother to include. There is also a “sawing” friction method using sections of bamboo which I do not recall often seeing in other works.
This book has been a great influence on many young outdoorsmen, myself included.
To this day, I may sometimes be found in the kitchen mixing flour and sultanas together when I feel peckish.
Jack‑Knife Cookery is a great book. I treasure my copy, which sits in pride of place on my shelves next to “Camping and Woodcraft”. I thoroughly recommend adding a copy to your survival library.
Now the bad news. I have been unable to locate an on‑line or Kindle copy of this book. The only search engine hits I get are dodgy sites with bad English that want your credit card details first, so steer well clear of those.
Printed copies may be found, although on‑line prices tend to be high. I have seen copies offered for as little as $30, so shop around before you part with hard‑earned cash.
If ever a book should be preserved on Internet Archive, it should be this one! If anyone reading can make that happen, make it so.
Trivia: I share my birthday with John Wayne. Some years, a TV channel will schedule a day of his films. Good, unpretentious entertainment! That is me sorted for the day!
I once watched something where a character declares “I try not to have high expectations. I am, therefore, seldom disappointed. Occasionally, however, I am pleasantly surprised!”
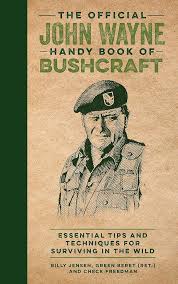
That is not a bad philosophy, and I was reminded of this when I began to read “The Official John Wayne Handy Book of Bushcraft”.
This could be really bad, have hidden pearls, or just be a bit of a giggle.
Firstly, I will answer a question I usually save until the end of these reviews. This book should NOT be used as a primary survival guide. Some fields are omitted, others lack adequate detail.
Some of the content was useful. There is a section on dealing with a riptide, which is not a topic I have seen in many manuals,
Each section is only a few pages long, so I expect much of this content was originally an article in “The Official John Wayne Collector's Edition” magazine.
Many of the sections only deal with a single topic or subject, such as a single type of knot or a particular type of campfire. That works well for certain topics and is a presentation style I may experiment with.
In other places, the treatment of the topic is rather brief, and in a few places additional illustrations would have been useful. The latter is odd, since in general the book is quite well illustrated, both with drawings supporting the text and photos from Wayne’s films.
Tools
The book starts with a section on how to make a variety of tools using primitive means. No mention is made of the risk of silicosis from stone knapping. Improvise a nose and mouth covering when making stone tools. Eye protection, if you have it, is also prudent unless you are a big Rooster Cogburn fan.
Several places in the text you are told to hit the back of an axe or knife blade with a stick or stone. Do not use a stone! The technique is called “batoning” for a good reason.
If you made yourself a stone knife as suggested at the start of the book, hitting it with another stone will waste hours of your careful work!
The section on making a whistle was disappointing. Acorn cups may be quite hard to find in certain seasons and regions.
The section on making a bow shows the first finger hooked over the top of the arrow, which must result in considerable friction.
Correctly, the book advises that hunting with a sling requires a vast quantity of practice. Incorrectly, it says the weapon is also called a “slingshot”. [Wikipedia also gets this wrong!] Sling and slingshot are quite different weapons using quite different principles.
Knots
The chapter on knots deals with one knot per section.
In some of these sections more information on the application of such knots might have been useful.
For example, the Alpine Butterfly knot is covered, but no mention of the quick and handy way this may be tied.
The section on the half hitch actually shows two half hitches in the illustration.
Food and Water
The chapter on food and water mentions water tapping from trees, which some survival manuals neglect.
The edibility test is described in detail, but no mention is made of prioritising the test for foods that are most abundant in the area.
There are sections on line and rod fishing and fish trapping, but no mention of night/trot lines. The latter section could have used some illustrations of various fish traps.
There is a section on “knife hunting” with a caution on how dangerous it will be and the high likelihood of injury.
Use the knife to cut a stick and make a spear. If in terrain where there are no sticks, you are unlikely to get close enough to use a knife, anyway.
Fire
The chapter on fire I thought was quite good. Some fire‑lighting techniques not often covered, with some useful illustrations.
Some discussion of various types of campfire. Uses for charcoal, and emphasis on properly extinguishing your fire.
Wet rocks in a fire may explode into fragments, not “shrapnel”, which is a different thing.
There is a section on using a Mylar space blanket as a reflector for your fire. This is a legitimate application, but perhaps some mention should have been made that a higher priority use for such an item is waterproofing your shelter roof or wrapping yourself.
Shelter
The chapter on shelters was much less satisfactory. It starts with a description on how to cut down a tree because it may be where you want to make a camp! Camp somewhere else, yahoo!
You are told to hang a hammock using a figure eight knot, but no real explanation nor illustration.
Building a raised bed suggests using logs for the short side. Two long logs with shorter sticks between them seems far more practical.
There is a description on how to make a five foot diameter teepee. Not sure what for. I could not lay down in such a space, let alone someone John Wayne’s height!
One of the illustrations incorporates ideas such as using natural windbreaks such as rocks, but seems to show the bed laid perpendicular to the fire.
There is a lot about this chapter I feel could be improved.
One error that really has me scratching my head is that in several sections the authors describe shelters made with “poncho liners” when they clearly mean ponchos.
You would think a retired Green Beret and a SERE course graduate would know the difference.
You would think that the editorial staff of the magazine might have picked this error up.
You would think some of the readers of the magazine might have written in about this obvious error the first time it appeared.
To confuse a liner with a more external layer is itself a really bizarre mistake for native English speakers to make!
“Make a map” could have mentioned that birch bark or similar and charcoal could be used to make a portable map.
Another objectionable section is the recommendation to shoot any snakes on sight!
You should not kill anything unless you have a legitimate reason. This saves ammunition, if nothing else.
As a later section notes, most snakes will not bother you if you leave them alone. If there is a danger of stepping on a snake, carry and use a walking staff.
At the end of the book is an advert for a survival training school where both authors work. The various points raised above do not really form a recommendation.
After finishing this book, I started browsing “The Official John Wayne Handy Book for Men”. This begins with some bushcraft information. I found this description of making a bow and arrows better written. Some of the other articles on the same topics are also superior.
It mucks up the illustration of how to identify the North Star, however.
Many decades ago, back in my student days, I was cooking something one weekend. I had decided to make a sauce to go with my meal, so I needed to brown some flour.
Running short of pans, I put into service a set of British Army mess tins I had with my collection of camping items.
As the flour browned, there was a sudden flash of silver. What looked suspiciously like molten solder appeared at the bottom of a pan!
Needless to say, I decided to do without my sauce, and the mess tins too.
It was many decades before I even considered getting another set of British Army mess tins. Authors such as Kephart had sold me on the wisdom of having a cooking vessel you could hang above a fire when needed.
I was in no hurry to get a new set, since I don’t actually rate the design that highly.
One website gloated that a design that has been in service for 70 years must be good, oblivious to the fact that they had already noted the 37-pattern replaced a design that had been in use for 150 years. Sadly, armies often keep bad stuff in service for a long time too!
About the only virtue of the British Army mess tins was they were a good shape to fit inside a pouch or rucksack side‑pocket.
During the Second World War, a version made from tin-plated mild steel was issued to conserve aluminium reserves for other purposes such as aircraft manufacture.
Around 1944, aluminium mess tins began to be issued again, and this is the material that has been used for post-war issue.
There are minor differences between the pre-1944 and post-1944 aluminium, but for convenience I will call both 37/44 pattern.
When researching this blog, I came across someone trying to sound clever saying they preferred the stainless steel version when they could find them. There was no stainless steel British Army 37/44-pattern mess tin issued.
Many British Army influenced nations copied the design.
The Indian version was oval and had the handles on the longest side. This may have been more practical with respect to handling and cleaning.
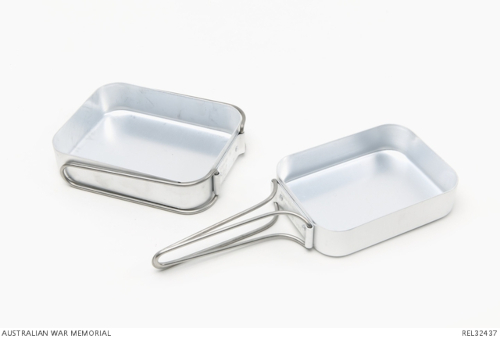
Another notable variation was the Australian version, which had sideways-folding handles and was shallower.
Copies, often of less quality materials, were also manufactured. For many years I assumed that this was the explanation for my melting example. Now I learn more about the topic, I wonder if I had purchased some wartime tinned examples. I seem to recall they may have had “fullers” in the sides.
I recall reading that the way to identify a “knock-off” was to try to push in one side. If it popped out again, it was legit. If the dent stayed, it was not.
Tales from the Supply Depot is a good source for the variations between different models. He offers the advice:
“These tins are very easily available, having been made continuously for over seventy years, and can be bought for a few pounds- the metal is far thicker and better quality than the cheap copies sold in camping shops so even if you are not a collector it is more sensible to invest in a second hand military set rather than a new civilian set as these are almost indestructible!”
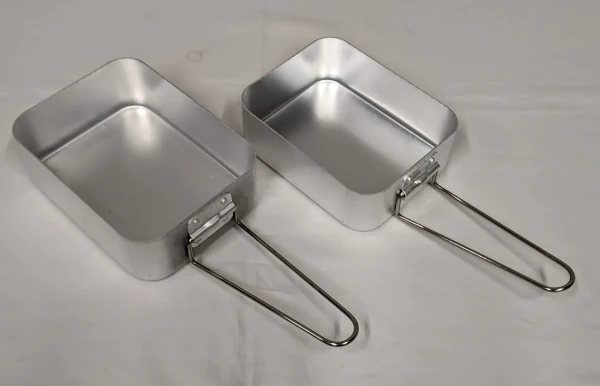
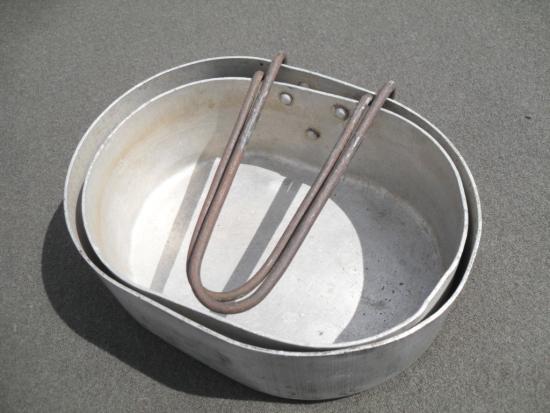
The 37/44 pattern consists of two rectangular pans with folding handles and rounded corners. One pan is slightly smaller than the other and will fit inside the larger. The smaller pan may be carried either bottom up or bottom down.
The pans actually look larger and bulkier than I recalled. The smaller one will comfortably hold a litre of water. The larger pan also takes a litre. You can squeeze nearly 200 mls more in, but the water level will be impractically close to the rim.
The capacity of my set is actually less than the capacity quoted by some vendors.
The two tins nest, although that is not so welcome if you do not have time to clean the outside of the smaller one.
Sometimes the larger tin was carried in the large pack and the smaller tin in a belt pouch or in a smaller backpack.
Some soldiers just made do with a single tin.
Supposably, the metal of the thin handles is a poor conductor of heat, so may be held without the need for gloves or bandana. I would be very cautious trying that.
The handles have no locking mechanism. If moved in certain directions, the handles of the mess tin will suddenly fold, usually dumping the tin’s contents.
Use
In the field, the mess tins were mainly used as simple water boilers.
They were either used to make tea, or to heat up the canned items from the 24 hour “ratpack”. For the latter duty, the cans were placed in the mess tin, water poured into the remaining space and brought to a boil for a few minutes. Using the hot water to make a drink was not recommended since it was contaminated with whatever was on the outside of the cans.
While I was shopping for a set of mess tins, I was bemused to see some vendors claiming they were “easy to clean”.
Many an old soldier would dispute that!
The corners were hard to get clean and the issued hexamine stoves often left the bottoms sooty and covered with hard to shift partially burnt fuel residue.
While “nesting cook kit” sounds like a good feature, the outsides of the inner vessels need to be very clean otherwise they contaminate the insides of the outer pots. You can wrap the inner vessels up, but this may make them too bulky to nest.
Using the mess tin just for water did cut down on some of the cleaning.
This was not the case when a unit was fed from a field kitchen. The mess tins were often the only receptacle available.
Some interesting culinary combinations were experienced as dessert was piled on top of the remains to the main course. Irish stew with custard, anyone?
The mess tins are probably a little large for the uses they were actually put to. That may be why the Australian model was of a lower capacity. The side-folding handles of the Aussie version are a clue to another flaw of the original.
The 37/44 mess tins cannot be hung over an open fire, like the “European”-style pails. The European mess tins are effectively small buckets, while the British mess tins are awkward to carry tea or water any distance.
The British Army mess tins are mainly designed to be used on stoves.
There are ways to use them over an open fire.
Flat‑topped rocks may be employed, although likely to be wobbly.
Bricks or logs with the top hewn flat are another possibility.
Three or four 6 inch nails can also be used.
If you let your fire burn down to coals, pots may be placed directly on the coals.
Digging an L‑shaped hole in the side of a bank and building the fire at the bottom is another option.
Lids for Mess Tins
Combined with the Esbit cooker, the mess tin was not noted as particularly efficient.
The black build up on the bottom of mess tins was common, which may suggest incomplete combustion from using too much fuel.
Often the smaller tin was used as the boiling vessel and the larger tin placed over it to act as a lid.
It was not long before some companies started offering purpose built lids that could be used with the issue mess tins. These could also be used as frying pans, some examples even having non-stick coatings. One company even went as far as offering the mess tins with non-stick interiors too.
Back around the 1980s, many soldiers and survivalists regarded the mess tin lids as an essential bit of kit.
It is rather surprising that such lids are now hard to find.
I have seen a non-stick set of mess tins, but it is not clear if these have the same size and proportions as the issue items.
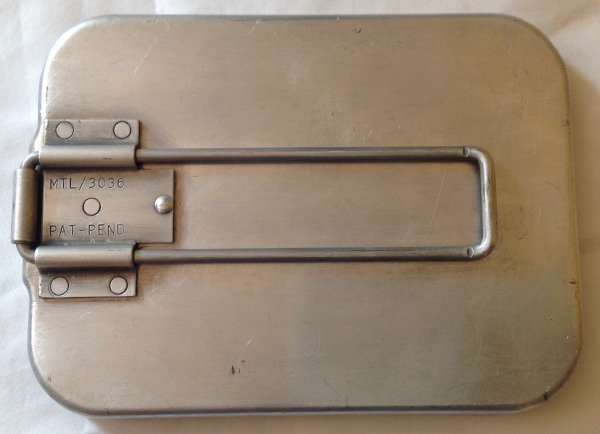
Lids are much harder to find. I have only found one place offering them. The price was actually quite reasonable, so I purchased an example to test out for this review.
The interior has a black coating, which may be non-stick. I have yet to cook with this item and find out if this is the case.
I got distracted by trying to fit the lid on the mess tins. It would not fit. The lid actually seemed to be a different shape to the large tin.
Careful measuring confirmed that the lid is exactly the same length as the large tin!
The rim of the lid was actually irregular. Perhaps it took a few dings going through the post, but the length of the bottom is still too small.
My current mess tins lack any numbers or identifying symbols, so may not be actual army issue, despite what the seller claimed. On the other hand, they appear brand-new rather than used. Their dimensions seem correct, however, so I suspect the fault is with the lid.
Careful use of a ball-peen hammer reshaped the lid rim so it is slightly bigger than the large tin. This also removed some of the black coating near the edges.
I can fit the lid over the large tin, but when the smaller tin is packed inside the lid will not stay in place unless packed inside a snug 85-pattern water bottle pouch. The handle of the lid is also very tight, and scores the outer surface of the lid when it is pulled out.
Definitely room for a better executed version!
Conclusion
Many regard the British mess tins as a classic. I am not one of them.
Personally, I think the British Army 37/44 pattern mess tin lacks versatility as a field cooking vessel and is somewhat oversized for the uses it is put to.
They are a good illustration of how the needs of a soldier may be very different to a camper or prepper who lacks a comprehensive support infrastructure.
There are some similar smaller cooking vessels that are commercially available, some with lids that fit!
I notice certain vendors are offering “Crusader Mess Tins”. This is an oval shape so hopefully easier to clean. It consists of a single pot with a lid/flying pan. I don’t know if these have become an official issue. The name is an obvious attempt to associate it with the Crusader canteen cups.
Mess Tin Survival Kit
In the first of my Survival Library posts, I recommended Lofty Wiseman’s “SAS Survival Handbook”.
As well as describing the tobacco tin-based survival tin, Wiseman also suggests a “survival pouch”, one of the main components of which is a mess tin into which most of the other components are packed.
I don’t like all my eggs in one basket, nor do I want to carry emergency items by a means I am likely to be separated from. Jackets get taken off, bags get put down. That is why a certain proportion of my gear is in my trouser pockets and pouches on my trouser belt. This is more comfortable than a lumpy tin crammed in a pocket.
One of the criticisms of the survival tin is that the useful stuff it does have, it does not have enough of.
You could do worse than empty the contents of the survival tin into a mess tin, then add greater quantities of the useful stuff. You will need more than a handful of fishing hooks and matches. Why not join the 21st century and carry a lighter rather than matches? A space blanket, whistle, signal mirror, candles and a fresnel lens are all good additions. A mess tin in a pouch can pack a lot of genuinely useful emergency gear.
A mess tin can heat-treat a genuinely useful quantity of water.
The downside of this idea is that a mess tin-based kit is of no use if you stow it in your pack. You have to keep it on your person, and since it is somewhat bulky, this may not suit many of you.
In Part 2 I mentioned grabbing fresh food from the kitchen and adding it to your bag.
Realistically, it is not likely that everything you will want will be ready packed in your bag.
There may be important documents or personal items you will want to take with you.
There may be things you will want to do before you leave, if time permits. Turning the gas and water supply off will reduce the damage to the house that might occur while you are away, for example.
Sit down, and make a checklist of things you will want to do before bugging out. List things you will want to add to your bag, and their location. Then leave your list for a day or so. Other things to add to the checklist are bound to occur to you.
Then reorganize your checklist by location. In the kitchen, you will need to do this, and this, and take this, for example.
Once you are happy with your list, sleep on it, then add anything else that occurred. Print it out in large font.
You may be stressed and hurried if you have to use it. Make it clear and easy to read.
Radio
Many BOB lists suggest having a radio receiver so that you may listen to weather reports and other emergency broadcasts.
For obvious reasons, such a radio should not be too heavy or bulky.
Examples that use a hand crank power source and/or solar charging are available. Many of these also act as flashlights and phone chargers.
If the device has solar charging, you may want to come up with a way to carry it where it gets its required dose of sunlight, but is protected from damage.
Make sure that any design you buy can receive the emergency broadcasts for the region and country that you will be operating it in. Mark the dial with these frequencies.
Flashlight
You may have brought a 1000 candlepower “special forces” tactical flashlight that can survive a nuclear blast and immersion in the Marianas trench.
It won’t be much use if the battery is flat.
At least one of your light sources with your bug out bag should be hand cranked.
Fire
Have a fire kit in your pack. This will supplement the fire kit you carry on your person, some of which will be part of your EDC.
Hexamine blocks have a very long shelf life, so having a pack in your bag as firelighters or as an alternative fuel is a good idea.
The alcohol gel for your stove may also be used for fire-lighting.
Tools
Your survival knife(s), penknife etc should be carried on your person. The small pouch in the photo above contains a sharpening stone and a fire kit.
A hiking pole or staff is worth having. Uneven ground, steep terrain, fording streams, aggressive animals, twisted ankles, shelter support and other uses. Well worth the weight
The pack carries tools that are less often needed. Unless you are in the jungle, your machete will likely ride in or on your pack until needed.
If you live in the colder, wooded latitudes, an axe may be more useful than a machete. A three-quarter or Hudson Bay model is often suggested as a good compromise between utility and portability.
Digging tools are carried in the pack and only transferred to one's person when use is expected.
A crowbar is useful in urban areas, and makes a passable digging stick.
As advised in Part 2 of this series, carrying some lengths of cordage of various types and sizes is prudent.
Wash Kit
Since we are talking about a 72 hour scenario, our wash kit should be very basic.
Toothbrush, small tube of toothpaste, half a bar of soap, one razor, perhaps a small plastic mirror and a microfibre flannel.
That is all you really need in a 72 hour emergency scenario.
All this will fit in a small drawcord mesh bag.
Fit the wash bag in a small sandwich box and you may use the box as a wash bowl.
A tenugui or microfibre towel rides elsewhere in the pack so that it can dry.
We are trying to keep our load light, so consider a children’s toothbrush, a cut down adult brush or one of the travel toothbrushes. Some of the latter come with a really tiny tube of toothpaste!
No shaving foam, you can use the soap. It is debatable if you actually need the razor in a 72 hour emergency scenario. You probably won’t be attending any job interviews!
You can survive 72 hours without shampoo (or use the soap!)
A stick of deodorant, however, may be appreciated if you share your shelter!
A supply of feminine hygiene items may need to be included in your BOB. These have alternate uses such as fire lighting or as wound dressings.
First Aid
Suggestions for first aid kits for bug out bags often go over the top.
I have seen recommendations that a bug out bag include a full stainless steel surgical kit, a couple of reference books on medicine and surgery (680 pages between them!), diethyl ether, saline solution, a thermometer and so on.
Your first aid kit is mainly there for cuts, grazes, sprained ankles and such.
My own travel kit, which I have used for trips of more than three weeks (504 hours!) is shown here. The lice comb may not be necessary for a 72 hour kit. I hope to never need it!
Some disposable gloves in a Zio‑lock bag and a CPR face shield might be useful additions.
Robert dePugh stated that the basis of a good first aid kit was water purification tablets, aspirin, soap and a toothbrush.
In addition to pain relief, aspirin can treat fevers, inflammation and cold and flu symptoms.
Soap is in your wash kit. It is a far better antiseptic than hand‐sanitizer or most other things you are likely to have available.
The toothbrush is probably also with your wash kit.
Some water purification tablets should be carried on your person, others with one of your water containers.
To that list I would recommend adding some plasters, alcohol wipes and a roller bandage.
A twisted or sprained ankle is no fun when you have a backpack, hence the roller bandage.
In addition to conventional plasters, have a few feet of elasticated plaster tape that is useful for the minor cuts to the fingers that accompany careless knife use. This tape may be twisted into improvised butterfly closures.
A little tin of Vaseline is also useful for chaps and chaffing.
Both the Vaseline and alcohol wipes may assist in fire lighting.
A snake bite kit should be carried where venomous snakes are a likely hazard. Have a bee-sting kit if anyone in your party is allergic.
If you expect combat, you should have shell dressings, a CAT tourniquet and an CI-IFAK kit, but these items are more useful carried on your person, not in your pack.
I am of the opinion that any activity that involves knives and hand tools should have some plasters readily available.
Likewise, any activity where guns or bows are involved should have some shell dressings and similar nearby.
If you take any personal medications, place them on your checklist and add them to your bag or clothing pockets when you bug out.
Your “internal medical kit” should be “fully stocked”. Ensure all relevant vaccinations are up to date.
Paperwork
Have a roll or two of toilet paper.
Put each in a Zip‑lock bag to keep them dry and carry a tube of hand‑sanitizer with one.
Your hand‑sanitizer should be 60 to 95% alcohol, both for its antiseptic properties and to ensure it is flammable. Sanitizer and toilet paper are both possible aids to fire lighting.
In addition to the items in the bug out bag, have a Zip‑lock bag with a number of paper napkins or sheets of toilet paper on your person. I have this in the right cargo pocket of my trousers.
Books
Whether to take any books in your BOB is up to you. Most books claimed to be “ideal for your bug-out bag” are nothing of the kind.
A book on identifying edible plants in your area might be considered.
Repairs and Spares
Repairs and Spares were described in the article on rucksack packing.
You do not need the bulky “housewives” offered by some merchants.
You just need a couple of needles, already threaded with a metre or so of invisible thread. A couple of safety pins. A couple of rucksack buckles. A few metres of electrical and duct tape. A couple of 20 cm or longer zip/cable ties. Perhaps a couple of buttons, a neutral-coloured cloth patch, square of Blu Tack and a tube of super glue. All these, except the cable ties, fit in a little Zip‑lock bag.
No need for folding scissors. I have a penknife with scissors on my belt and another on my keyring.
For heavier repairs I use dental floss. I have a reel of this in my EDC and also some in my wash kit. Ensure one of your needles has an eye large enough to take dental floss and thicker materials you might improvise.
Today’s review is for “The Pocket Outdoor Survival Guide” by J. Wayne Fears.
I had not planned for this to be the next review. I got looking at a copy and burned right through it.
One of the merits of this book is that it is highly digestible. I read through it in a single (admittedly extended) lunch break.
This book is written specifically for outdoorsmen who might become lost in the woods. The premise is that such individuals are most likely to be found within 72 hours of the search being initiated.
Preparation
The first few chapters, logically enough, deal with preparations before your trip to ensure that a search is conducted should you not return by an expected time.
Give an itinerary to a responsible individual [or better still, several!].
A similar account of your intentions might be placed in a plastic bag and left under the windscreen wiper of the vehicle you used to reach the woods. Give it a label such as “For Attention after 24th April…”
A list of useful advice to include is given, including giving the make and sole pattern of the footwear you are wearing, which will be useful to trackers.
Although not suggested in the book, this idea might be extended by including a photograph of your actual boot soles. (Putting a worn sock in for the tracker dogs may be going too far, however!)
There is a brief summary of how a search and rescue may be conducted. I found the version of this in “Desert Survival” better.
Later in the book, how to deal with a member of your group going missing is covered, which is a subject many books do not cover.
Survival Kit
The section on survival kit does show some originality and fresh thought. He advises that one prepares for three unexpected extra days to any trip.
Fears’ personal, “two pound” kit is given as:
◦ (Coghlan’s) Tube tent
◦ Strike-anywhere kitchen matches in waterproof match safe
◦ Flashlight
◦ Fire starters [hexamine fuel blocks?]
◦ Signal mirror [Star Flash]
◦ Police whistle [actually a Fox 40 is suggested in the text]
◦ MPI Emergency Space bag
◦ Parachute cord – 50'
◦ Aluminium foil – 36" x 36"
◦ Insect repellent [sachet]
◦ Water purification tablets
◦ Pocket Survival Guide [Fears’ book]
◦ First Aid Kit
◦ Gallon Ziplock bag.
These items are in addition to a belt knife, map and compass, GPS, water canteen, personal medication and cell phone/two-way radio.
How this kit is carried is not made clear, other than it is packed inside the gallon zip-lock bag, which may also be used as a water carrier. [I suggest you reinforce the seams with duct tape]
The bulk of the kit would suggest that it is in some form of daypack. Some emergency items are best carried on one’s person should the daypack and survivor part company. A lot of my basic kit is in my trouser pockets or on my trouser belt.
The somewhat misnamed “tube tent” is an item not often included in survival kit lists. It seems to be a reasonably priced and useful item.
There are variants that have silver Mylar lining, and/or doors at the end. The silver-lined versions should probably be turned silver-side out in desert conditions.
Since the plastic is impermeable, condensation in these tube tents may be an issue if there is not a flow of air. However, one would want to partially block the ends to reduce draughts on the sleeper(s).
Leaves or similar could be piled underneath for more padding and insulation when sleeping.
Drip-wicks added to the suspension cord are recommended.
Fears echoes my own view that an emergency is no time to rely on gadgets or primitive skills to provide you with fire.
Fears suggests replacing the matches often since they “have a short shelf life”. This is not a concern that I have seen in other books.
My kitchen drawer has matches that must be more than fifteen years old and that still light. Perhaps out in the damp woods it is different, but a match safe that is genuinely waterproof should have some influence.
While the Star Flash mirror is recommended in the book, other items will serve just as well without the high price tag.
Water purification tablets and insect repellent are sound additions, although oddly he only packs a single sachet of insect repellent alongside a whole bottle of purification tablets.
A small bottle of insect repellent would last several nights, and be very welcome should your stay be extended. Some insect repellents may be used for fire-lighting, remember.
The space bag is like a Mylar space blanket, but a closed bag. These used to be fairly common, but nowadays it is hard to find anything except the foil blanket.
A space blanket or two is a good substitution, and a blanket is somewhat easier to vent.
Heavier foil lined bags with a green or orange outer are on sale. These resemble an All-Weather blanket I have carried one of the latter in my daysack for decades. The blanket configuration is probably more versatile. It can be made into a cloak against the rain, for example.
Fears’ suggestions for a personal pocket first aid kit are much more practical than those in some other publications. I would suggest adding some aspirin and alcohol wipes. Aspirin may be used to reduce inflammation, reduce a fever and reduce the symptoms of colds or flu. Used alcohol wipes may be used for tinder.
In accordance with the book’s basic premise, there is no attempt to teach the reader navigation.
Wandering around can greatly hinder the efforts of a search party.
Fears notes that topics such as navigation and first aid are better learnt on a course or by deeper study than can be provided by a book such as this.
STOP
STOP, as in “Sit, Think, Observe and Plan” is advocated for readers who become lost or encounter a similar emergency.
While other books have different translations of this acronym, it remains sound advice.
As I was once told, “Don’t just do something, sit there!”
This section works well with the later section on dealing with fear and panic.
There is also some lip-service paid to “will to live” and “positive attitude”, but no real practical advice on this topic.
Signalling
The section on signalling has some good advice, such as avoid noisy areas such as waterfalls if you intend to use your whistle. If static, I would see what objects around the camp may be used as improvised drums.
Instructions on how to use the signal mirror reproduce those on the back of the Star Flash (which neglects to mention that you should move your forward hand as you move the mirror to aim it in a new direction!)
There is also an illustration of someone lying on their back and using a mirror, with no explanation of why this is being done. See here and here for information on the use of heliographs.
Fears notes that a CD/DVD may be used as a reflector and already has a sighting hole. I am sceptical as to whether a sighting hole is really needed in a heliograph.
Most of us have some CDs or DVDs that have stopped working or that we do not want (remember AOL?). These can be cut to a pocket-size and shape by placing them in a freezer or warm water for ten minutes before cutting. Cover the back with some duct tape, since they may be fragile.
Glue a pair of CDs label to label for a more robust item that is mirrored on both sides.
The book also claims the “X” is the universal ground to air signal for help. Most other sources give the meaning of this symbol as “unable to proceed”, “unable to move” or “require medical assistance”.
“V” is more commonly used for “require assistance”, and easier to construct on the ground than “SOS”.
Too Brief in Places
While the book is easily digestible, some of the sections could have been greatly improved by one or two more lines.
For example, there is a section on removing ticks, but no mention of saving them in a plastic bag for later identification and testing to assist in prevention of any long term consequences of bites.
A photo caption describes using “your knife to get into the dry wood found in the center of a damp log”, but there is no explanation that what is being shown is a stick being used to baton the blade into the log.
The section “When There Is No Repellent” could have used some mention of materials such as pine oil that may be used as improvised insect repellents.
Similarly, the sections on fire, sleeping and shelter could have used some additional passages.
While a rock overhang can provide shelter, heating from fires underneath have been known to cause rockfalls.
The section on snow shelters could have used some mention of some of the improvised digging devices a survivor might use: vehicle hubcaps, plank of wood split from a log, digging stick, snowshoes, frying pan, billies etc.
Water
The chapter on water I had the most issue with.
Carrying plenty of water purification tablets is sound advice, although it is odd the same kit that packs a whole bottle of tablets has only a sachet of insect repellent to last the whole unplanned stay!
We have the flawed advice about boiling water for ten minutes, complete with the old chestnut complaining that boiled water has a flat taste. That is not going to be one of my major concerns if stuck in the woods for a couple of days!
Halazone and iodine are no longer recommended for water purification in the field since they do not affect certain organisms.
It is also claimed that water filtration devices make water safe to drink. They don’t! Viruses are too small for these devices to filter out, so chemical or thermal treatment of the water is still needed.
It would also have been appropriate to describe the Indian/Seepage well in this section.
Food — Not a Necessity
The book does not attempt to teach trapping, fishing or identifying edible plants, since Fears points out a few days without food is not likely to be fatal.
The plant edibility test is reproduced, but lacks the stipulation that this should only be used on plants that are abundant in this area.
It is worth bearing in mind that “most people found within 72 hours” requires the outdoorsman to be overdue or authorities to receive some other notification before a search is launched. If your plan was to be in the woods a week or more, you could be roughing it for some time before anyone starts looking for you. Some of the stories in the book used for illustration have the survivor being in the woods for much longer than 72 hours before being found.
Tending a trot-line and building some traps may be a good way to occupy yourself while you are waiting. Animals often shy away from human activity and recent disruptions to their environment, so it may be some time before your traps get anything. Better to make them before you get hungry!
And if you are stuck in the woods, it is worth learning which trees have edible inner bark or can be harvested for sap.
The Pocket Outdoor Survival Guide is a quick read, and has some useful content.
Its chief strength is that it makes a survivor aware of their obligations in a rescue operation. These may be summarized as “Stay Put”, “Make Yourself Comfortable” and “Make Yourself Visible”.
It is, however, overly brief in certain sections, and in some places out of date.
The taiga or boreal forest is the Earth’s largest land biome.
Many of my readers probably live in this area, so some recommendations for survival in these regions is warranted.
With this in mind, the next book reviewed for the Survival Library is “Northern Bushcraft” by Mors L. Kochanski.
Note that this book may also be encountered simply entitled “Bushcraft”.
Some copies include a section of colour photographs at the end of the volume.
I was actually surprised to reach the end of the book and discover Kochanski was a Canadian. The early chapters seemed to have a Scandinavian vibe.
In my previous review I commented that many survival manuals are “much of a muchness”. Many seem to be clones of FM 21-76 with a few embellishments by the author.
Northern Bushcraft is another book that takes a different approach. It does not cover as many topics as a typical survival manual, but those it does cover, it covers in greater depth than is usual.
Logically enough, the book begins with firecraft.
Most survival manuals mention the friction fire drill. Some even suggest that you cannot be a “proper” survivalist unless you can light a fire with this device.
Kochanski goes into much greater detail regarding this device. He discusses how different components require different properties and which woods are most suitable for their construction. There are numerous other useful tips and advice on this subject.
If you have struggled with friction firelighting, or just want to get better, this chapter is well worth a read.
Various other fire-related topics are covered. Particular emphasis is given to ensuring a fire is really extinguished and will not ignite long after you have left the area.
“Stone Rimmed Fire Places. A common, though unnecessary practice, is to ring open fires with stones. This practice is based on the claim that the stones confine a fire and make it safer, yet many forest fires are in fact traced to such fireplaces. There are, however, justifiable uses of stones in a fire: to store warmth in a closed shelter: to support pots when no other means arc available: and to produce steam for a steam bath or a steam cooking pit. Rocks used without good reason arc needlessly defaced and, unless they are scattered after use. leave a permanent marker of the campfire. A stone fireplace also requires more effort to cool, and the stones that are not moved aside can harbour hot spots that may start a forest fire.”
An interesting tip on cutting fish along the backbone rather than the belly for grilling.
The following chapters are on Axecraft, Knifecraft and Sawcraft, and each treats its subject in considerable depth.
Bearing in mind he also packed a full-sized axe or a hatchet, Kochanski recommends a small fixed blade knife. “One of the best methods in preventing the loss of a knife while carrying it is to use a deep sheath and wear it around the neck to be constantly aware of the knife’s presence. When the knife is not in use the sheath is tucked in the shirt.” Kochanski was to become a fan of Moras.
The chapter on “Bindcraft” mainly deals with constructing cordage from natural materials.
The Sheltercraft chapter returns to some of the ideas introduced in the first chapter.
Sleeping outside at minus 40 (Centigrade or Fahrenheit, minus 40 is where the two meet!) requires an understanding of both fire and shelter construction!
As a change of pace, the next chapters discuss the various uses that many of the common trees and shrubs in the northern forests may be put to.
The final two chapters discuss the moose and the varying (aka snowshoe) hare. The trap designed to prevent the hare biting through snare lines is not one I have seen in most other books. It has the merits of being both simple and ingenious.
The colour section is nice enough, although I have some reservations about the text where it mentions medical uses by indigenous populations. These things are often romanticised. If tinder fungus really is a remedy for cancer, I think we might have heard more about it!
In my previous review, I noted that “Desert Survival” contained many ideas that were useful even if you were not prone to venture into dry sandy places.
“Northern Bushcraft” is similar, in that it includes many skills and topics of information that have more general applications.
“Northern Bushcraft” is a recommended addition to your survival library.
Several copies of the older edition of the book are available on Internet Archive.