Categories
Phillosoph

New Machete Grip

Surprisingly, machetes have featured infrequently in this blog. Possibly this is because much of what could have been said is already covered in “Survival Weapons” and “Crash Combat”.
One of the virtues of machetes is that they are mass-produced in their thousands, allowing you to acquire a reasonable quality tool for a very modest outlay. Sometimes the sheath costs more than the knife!
Some auction sites that no longer sell “knives and bayonets” still sell machetes.
A typical machete may be a fraction of the price of a smaller survival knife, yet prove more capable and more useful.
In addition to new items, you may find some bargains second-hand or army surplus.
Certainly, there are machetes being sold for hundreds of dollars, but it is unlikely that ten times the outlay will get you a ten-times better tool.
The price of machetes is such that you may find yourself owning several, and distributing them among various kits and caches. You may have one in your garden shed, another with your bug-out bag, and one with your vehicle, plane and/or boat.
If you are a bit of a kit tinkerer, this gives you an excuse to try out a variety of models without wasting large amounts of money.

Adding a Barong Handle

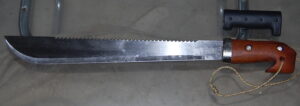
I have spent the last couple of days fitting one of my machetes with a new grip. The new grip is modelled on that of a couple of barongs that I have.
Machetes sometimes attempt to escape their user! You might cut at a springy branch placed under tension by other growth. Such an event can knock a machete right out of the user’s hand and send it flying into the brush.
It is rather surprising that more machetes do not feature retention features such as knuckle bows and wrist loops. Many models don’t even have a hole in the grip for fitting the latter!
The barong-style handle is functional as well as cosmetic. The bird’s head shape facilitates both retention and manipulation.
My grip is made from teak, which once served as a chunk of laboratory bench top.
The grip was shaped with a variety of hand-tools, with the occasional use of a Dremel-tool and an electric drill.
Once the sanding was complete, it was treated with several applications of linseed oil.
The metal collar was made from a strip of soda can.
Just above the machete you can see one of the original handle halves.
The only modification made to the blade was one corner of the tang was reduced and rounded.
Flip-side view: Some dust still in need of cleaning off.
I changed the cord for a longer piece with an extra knot, to allow use as both a wrist loop and a thumb loop.
The grip part could be slimmer, but I err on the side of caution when carving.

Sharpening a Machete

Currently, I am sharpening this machete up, and it now has a reasonable edge on it.
Most newly purchased machetes need some sharpening.
You will be tempted to try sharpening it with a Dremel or bench grinder, but it is possible to overdo this.
Machetes are made of softer metal than most smaller knives, and do not need a fine edge. The “micro-serrations” of the edge actually help the machete bite on vegetation.
This means all you really need is a medium-sized “bastard” file. A round file is useful for major work on tools with a concave edge, such as kukris and billhooks.
In the field, you can maintain the machete edge with your usual sharpening tools. My EDC includes a diamond-impregnated card, and my kukri has a chakmak and small stone with it.
If planning a trip where you expect your machete to see lots of use, it is worth packing a file in your camp gear.
Hold the file at an angle of around 22.5 degrees (for example) to the blade flat and push away from the spine.
The noise the file makes on the steel will give you clues as to which parts of the edge need more work. Sharpening sometimes involves touch, sound, and/or sight.
Half a right angle is 45 degrees and 22.5 is half this again. Fold the corner of a piece of paper twice and use this to check your angle.
I have been sharpening with the machete across my knees, edge away from me.
You could probably make a rig with a couple of supports at 22.5 degrees. The width, flatness and relatively straight edge of a machete favour this arrangement.
With the machete resting on the ramps, edge up, a file held horizontally will be at the correct angle.
Now I have an edge at the correct angle it is easy to file either side while holding the blade vertically. 
Categories
Phillosoph

Musketeer Cloak for Survival

Another night where the only good stuff on TV I have seen before. I remembered that the BBC series “The Musketeers” had been added to box sets. I think I had missed the early episodes when they were first shown, so I downloaded episode one and started watching.
As it turned out, I remembered quite a bit of the first episode, so must have started watching part way through the first one. Good fun, however.
According to some sources, a cloak with arm-vents is called a “mandelion”. This is often also defined as being waist-length. The cloaks in the series appear to be around knee length.
The costumes of the musketeers in this series is interesting. It features a pauldron on the right shoulder and is mainly leather. Think “Mad Max” meets Dumas! No idea as to the historical accuracy, but looks good. I wonder how uncomfortable it was in the sunnier scenes.
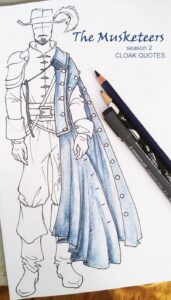
What did grab my attention this watch through was the design of the cloaks worn by the musketeers. According to some web-sources there were at least two different cloaks used. A lighter weight, light blue cloak was used in “parade” scenes, a heavier, darker blue in other scenes. In some scenes the cloaks appear to be hooded. In the episode set in the “Court of Miracles” Portos wears a brown cloak sharing some design features with the musketeer cloak. Cloaks with similar features appear worn by other characters in later episodes.
The distinctive feature of the cloak is that it has two long arm vents so the cloak resembles a long tabard. These are usually shown open, but the long line of buttons suggest they can be closed so the cloak can be worn in a more conventional fashion. Presumably these slits can be partially unbuttoned too. Unlike the tabard, the cloak has a full length opening down the front. This too has a long line of buttons, and the fold-over of cloth suggests when closed it may share some of the features of a double-breasted greatcoat. While it is hard to make out, the rear part of the cloak may have a waist-height buttoned vent for use when riding. As one might expect, the collar of the cloak is substantial and can be turned up to protect the neck. In warmer conditions the cloak is shown worn on the left shoulder, with a cord passing under the right armpit.
Some patterns. I suggest the rear side of the side pieces be sewn to the back part. The wearing of a rapier seemed to necessitate a second side vent. A cloak could be constructed by joining a semi-circular back piece to a rectangular front section. In such an instance it may be prudent to continue the top of the front section back to create a vented yoke, rather like a trench coat.
The merits and possibilities of a cloak for survival have been discussed on previous posts. One advantage is that it is sufficiently roomy that any of your other cold weather items can fit beneath it. For a modern version two-way zips might be utilized. For the arm vents I would suggest poppers be used, allowing a closed vent to be more easily opened. Seventeenth century clothing often featured closely spaded buttons, so a modern cloak may need less poppers than the buttons used on the costume items.
Categories
Phillosoph

Breakfalls: The Lateral Roll

Close combat has been described as the art of knocking someone down and kicking them while they are down. In this light, it is perhaps surprising that breakfalls are a rather neglected skill in many martial arts and self-defence courses.
The book Arwrology recounts and incident where a serviceman uses a breakfall to avoid injury when he is thrown to the ground during a bombing raid. Breakfall techniques can be incorporated into the warm-up for a training session in any martial style. In an ideal society, children would be taught breakfalls in kindergarten, learning a useful skill to save them from possible injuries in later life.
It will come as no surprise that Crash Combat and Attack, Avoid, Survive both contain sections on breakfalls. Breakfalls can be classed as “rolls”, “slaps” and “non-traditional”. A roll is self-explanatory. Slaps use the impact of the forearms and palms on the ground to brake the fall. In my books, the non-traditional techniques are represented by the cartwheel and the parachute landing fall. Once, on an isolated mountain path I missed my footing. Executing a parachute landing fall saved me from injury in a remote location, even though I was wearing a heavy pack.
In my books I also describe the forward roll, and slap techniques to the front, side and rear. Today I will look at two additional techniques.

The Rear Roll

The first is the rear roll. This resembles the rear slapping technique, but without using the forearms to brake you. The starting posture for learning resembles that used to learn the rear slapping roll. Instead of using your arms you continue to roll backwards, across your back and shoulders. It may be necessary to roll several times. Ideally you finish on your feet, ready to stand up from the squat position.

The Lateral Roll

The second technique is the “lateral roll” (yokonagare). The starting position for learning this resembles that used for the sideways slap breakfall. These photo sequences from books by Stephen Hayes illustrate the principle better than my text does:
The extended leg provides balance, and should be extended straight so that the bottom of the thigh absorbs the impact with the ground. The supporting leg is allowed to fold as much as practical to reduce drop distance. In the first sequence the roll seems to be to the rear quarter rather than to the side. The same starting position and core technique can be used to make a roll to the rear.
The lateral roll has a number of other applications. As well as being a breakfall, the technique can be used to drop below and away from an attack. It can also be used to drop and roll behind cover if spotted or fired upon. Possibly the move could be incorporated into certain sacrifice throws.
This is a move that can be initiated from any stance where the weight can be easily transferred to the rear leg. My Capoeira background notes that the actual roll action is preceded by a posture similar to negativa. It also resembles the semi-squat position often seen with some Chinese martial arts. For negativa and other breakfalls, see my books.

Categories
Phillosoph

Wind and White Crane: Hidden Hand Attacks

I have used lockdown as a chance to complete a number of projects. I have also done a lot of reading on a wide variety of topics.
This reading included finishing some books I had stalled on, and looking at some others I had just never got around to giving my full attention to.
In the latter category were a number of books on Ninjitsu, including some by Stephen Hayes. Books on this topic often have a lot of chaff in with the wheat, although to be fair, that is true of many martial arts books written in the 80s, if not in general!

The Wind Posture

One of the sections that interested me was that on stances, the stance associated with the element “wind” in particular.
As I have discussed in my own books, I feel “stance” and most of its English alternatives is an unsatisfactory term.
A stance is a transitional rather than stationary configuration. Hayes likens them to snapshots or frames from a film rather than being stationary.
Most of us, even many high-grade martial artists, have a relatively shallow immersion in the art.
Stances are an important training aid but it is easy to become diverted by the details rather than passing through to master the underlying concepts. Interestingly the Japanese term “kamae” translates as “pose” or “posture”, but also as “base”. Stances are often the foundation for learning.
From Stephen Hayes Ninja Vol.1:
“The wind level of consciousness is characterized by the receiving posture, or hira no kamae. The receiving posture couples a freely moving base and the power to harmonize the body with the intentions of an attacker. The feet are placed hip-width apart and carry the body weight evenly. The knees are flexed slightly more than in the natural posture, creating a feeling of balance in the hips similar to that experienced just before sitting down on a chair. The back is straight, in a natural manner, and the shoulders are relaxed. The arms extend outstretched to the sides with the hands open, and the eyes gaze forward in soft focus, taking in the whole picture without limiting the concentration to one single point.
The body should have an extremely light, almost floating feel to it. Epitomizing some concepts that are the opposite of those embodied in the shizen earth pose, the wind-level hira no kamae prepares the fighter for adapting to and going with the attacking moves of the enemy. This adaptive sensitivity is centered in the chest behind the breastbone. The evenly distributed balance facilitates quick and easy movement in any direction in response to the attacker’s intentions. The outstretched arms have the potential of becoming tools to carry out punches, strikes, deflections, blocks, throws and locks, as well as acting as distractions and calming techniques.
In self-protection situations, the hira posture is used to handle attackers in a way that subdues them without injury, if possible. The pose itself is nonthreatening, and it appears to be an attempt to fend off an attack or to reassure an adversary that there is no hostile intention, as upraised open hands traditionally symbolize surrender or benediction. From the hira no kamae, footwork proceeds with circular or straight- line movements, as appropriate for the specific circumstances. The arms are used to entangle the adversary with spiraling actions or intercept the adversary with direct advances.”
Another book on Taijutsu (by Charles Daniels, taught by the same sensei as Hayes, Masaaki Hatsumi) shows a posture it calls “hoe no kamae”. While this uses an L stance and raised forearms, I suspect the application is similar.
Those of you wise enough to have invested in a copy of Crash Combat or Attack, Avoid, Survive (thank you!) will know I place considerable emphasis on evasion rather than parrying or blocking.
The basis of this is the ginga movement from Capoeira.
Could the wind kamae be an alternative or complimentary evasion technique to ginga?
Sadly, I do not currently have much room to dance around, so I cannot experiment much with movement and evasive moves in hira no kamae.
Some observations:
On its own, hira no kamae and hoe no kamae look like the fighter is just standing there saying “Go on dude, hit me!”.
This is one of the symptoms of regarding a stance as static, amplified by still photography.
In practice, this posture will be used to allow fast body turns.
The outstretched arms contribute to maintaining balance.
Study the body twist used in the photos below. Hira no kamae is not used, but it could have been passed through if the defender had thrown up his arms for stability.
Both of my martial arts titles explain how to use quick evasive turns similar to that shown. You will find these in the bayonet and knife sections, as well as elsewhere in the text.

White Crane

Hira no kamae may have reminded some of you of the white crane-inspired movements used in some styles of kung fu and karate.
Not surprisingly, white crane styles often put a considerable emphasis on evasion.
The extended lead arm can be used to parry attacks that cannot be fully avoided.
Brought up under the attacker’s armpit, and we have the tai chi technique of “diagonal flying”.
This is effectively the same principle as using a straight-arm karate parry against a foe’s torso and breaking their balance.
Hayes’ books often show defensive strikes made against the attacking limb, including from hira no kamae. This is also a tactic favoured by many white crane styles.
The wind posture is likely to place a defender side-on to an attacker.
As described above, the lead hand may be used for an assortment of parries and strikes.
The latter include finger jabs to the face and clawing actions.
The rear hand has the advantage that is has a considerable distance in which to generate power, and that it is effectively hidden from the attacker’s view.
This is the equivalent of the “tail” position used with swords and other weapons.
The foe has no idea from what direction a rear hand attack may come, and the rotation of the waist can create power and velocity.
One option is to adopt a side-on horse stance as the forward arm parries.
The rear hand then executes a classic reverse punch, the hips twisting through ninety degrees to transition into forward stance.
Hook punches are another useful technique for an enemy you are side-on to.

Kup and Pow

In Complete Wing Chun (Vol.2), the author discusses Pak Hok Pai, a white crane style with several techniques suited to attacking an opponent to the side.
In best Batman tradition, two of these are called “pow” and “kup”.
Pow chui has been described as a straight uppercut employed with a semicircular body motion. I like to think of it as a “long uppercut”, although technically it is more of a long shovel-hook.
Targets for pow chui include the testicles, kidneys or throat.
Kup/cup chui is a downwards, overhead strike that can be targeted at the soft muscles of a kicking leg, or the forearm, biceps or triceps of an attacking or guarding arm.
The temple, nose or top of the head can also be targeted with kup.
Like the corkscrew hook described in Attack, Avoid, Survive, a kup can be used to reach over and around a guard. The difference is that the kup typically comes from the rear hand while the corkscrew starts as a lead jab.
Choy Lay Fut is also notable for use of large arc swinging strikes.
A more horizontal motion, intermediate between pow and kup, can be used to throw a lateral, circular strike (a “roundhouse punch”, perhaps?), that is more open and straighter-armed than a hook.
While this has elements of being a “haymaker”, many of the standard objections against a haymaker do not apply if correct tactics and a hidden hand posture is used.
The back and kidneys or below the guard are the favoured target areas.
An upward angled or horizontal strike can be applied to the area of the sixth to tenth ribs: above the floating ribs and below the level of the lower tip of the sternum. This is likely to affect the lungs.
All these punches are powered by waist/hip rotation and are most effective with a relaxed, easily accelerated arm.
Kup and pow are both performed using the second knuckle of the fingers as the striking surface. These are the knuckles that would make contact if you were knocking on a door. Some styles call this a “leopard fist”.
Attack, Avoid, Survive showed a related technique, the half-fist, used to attack soft, narrow targets such as between the ribs. The thumb is often pressed against the side of the fingers, rather than being clamped across them as with a conventional fist.
Rear hand attacks can also utilize palm-strikes, chops and hammer-fist strikes.
Recently, my girlfriend described how her mother had often fought men who had turned up with the intent of raping her sister.
Many a bully and would-be rapist who dismissed the mother as a “mere-woman” got a percussive readjustment.
Her mother's technique of choice was a powerful overhand or underarm punch.
My girlfriend learnt the same techniques and has used them to defend herself on numerous occasions.

Tai Chi

In “How To Use Tai Chi as a Fighting Art” Erle Montaigue describes the “Stork Spreads Wings Punch”, another potential rear hand attack.
The “Stork Spreads Wings” posture is often translated as “white crane…”:
“This punch is one of the most powerful punches from any martial art. It is totally centrifugal and quite fast considering its distance…This is one of only three punches in T’ai Chi that uses the first two knuckles, in T’ai Chi we use the knuckles that most suit the position of the palm upon impact otherwise we use extra muscles to hold the palm into position and there-by lessen its impact…If you block with the right fist across to the left against a left face attack with the left palm underneath it, … the left palm then takes over the block while the right fist is thrown out at the target with the turning of the waist…Your left palm looks after the left fist while your right fist circles back up in a centrifugal punch to his left temple”