Categories
Phillosoph

Sleeping Bags for Hostelling

A few weeks back I got talking about my experiences of youth hostelling when younger.
I didn’t get into hostelling until I was in my early twenties so was often the “old man” of a dorm. That said, I often struck up enjoyable liaisons with some of my fellow travellers. Some of these only lasted a couple of days until our paths parted, others were friendships that remained active for many years.
I was asked to write a little on the blog about my experiences and conclusions. .
One of the first topics I was asked about was sleeping bags for hostelling.
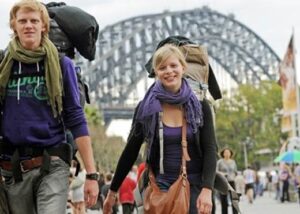
Do you really need a sleeping bag for hostelling, I was asked? My answer would be yes. 
While many hostels provide some bedding there are many that do not. It depends where you are in the world and whether it is an official IYH hostel or not. .
I will note that some of my most memorable experiences have been at “unofficals”, although by no means should you avoid the official places. There have been some fun times in those too. .
Another reason for having your own bedding is that there will be times when you want to travel overnight by train or bus, saving yourself the price of a room for the night.
This is not going to be a generic article on selecting sleeping bags. I will save that for another day if there is interest.

Too Much of a Good Thing?

The most common mistake when buying your first bag is magnum-itis!.
A common mistake when buying a bag is to buy one that is too warm. .
Look around any hostel and you'll see several roommates with legs draped out of too hot five-season expedition bags. I did exactly the same when I brought my first bag (labelled as -15°C). I still have that bag but now reserve it for outdoor use or buildings that I know will be insufficiently heated. .
In truth, I have seldom used it. 
Use your hard saved money for a more practical purchase.
I soon invested in a one/two-season sleeping bag that folds up to the size of a rugby ball without the need for compression straps. My bag of choice was a Snugpak Merlin Softie 3, which I am happy to say are still in production. There are several variants available now. There are lengthened versions for the very tall. A tactical version has a reinforced lower for users that might need to sleep in their boots. (Put sandbags over them first!). 
Looks like the modern versions do have compression straps, probably because users expect them. My original stuff-sack neither had nor needed them.
The latest versions may have higher specs than my bag. According to its label my original bag is a “summer” bag for -5 to +10°C, comfort 0°C.

My Merlin Softie has been all around the world with me and is still good to go. I have used it for both hostelling and camping.
I prefer bags with two-way zips for hostelling and similar travels. They provide better ventilation and are easier to get into in a dark dorm room. 
Some designs can also be zipped together, if your bag has a right hand zip and your loved one's a left.
The compact size allows me to carry a very small pack, with plenty of room for everything else. 
The larger sleeping bags often take up most of your rucksac volume or become large unwieldy lumps lashed to the outside. 
Should conditions be colder than expected, I can always add more insulation in the form of clothing or blankets. Taking insulation out of a heavier bag would not be possible. 
Conceivably I could use my lower performance bag inside another bag.
I suppose if I had my time again I'd buy a one or two season bag and a two or three season and have a really versatile system for all conditions.
I have a lightweight down bag that might work well with the Merlin but I cannot recall any instances where I was cold in the Merlin bag. 
Bear in mind that many of your travels will be to warm places in summer and you will see that such a bag is more than adequate. 
You’ll spend a third of your time on holiday sleeping, so a good bag is a good investment.
Many hostels will provide blankets but expect the guest to provide a sleeping bag liner. A sleeping bag liner is basically a sheet sewn into a bag-shape to keep the bedclothes clean. Some hostels may also have sheets or bags for hire.

For a long time I carried a simple, easily washable cotton sheet bag, both for hostel bedding and to protect my own sleeping bags.
One morning in a German hostel it disappeared from my bed! The maid had mistaken it for one of the hostel’s sheets and sent it on to the laundry. This was my last morning before moving on to Holland, so there was no way my bag would be returned to me in time.
The hostel owner was most embarrassed by this and gave me a set of sheets as a replacement. Once I'd returned home I set about sewing these sheets into a replacement liner, with two modifications:
  • One was to sew the sheets into a mummy shape to match the shape of my sleeping bag.
  • The other was to sew round the opening several pieces of brightly coloured material. This was partially to make my bag instantly recognizable to prevent the same happening again, and also so that I could locate the opening of the bag by touch, saving me from using a light and disturbing my roommates.
Although quite reasonably priced, liners can be very easily made, and there's no reason why they have to be white.
Make them from something you can recognise in an instant and line the neck with something that feels different and identifies it further. Some of you may consider a piece of lace.
I’m still using my homemade liner. Nowadays you can find pile liners to make your bag warmer. There are also silk liners and pertex ones, which have tempted me but I have yet to try.
If you are a restless sleeper who often gets tangled up in their bed clothes, you can make or modify your liner so it has separate legs.
Categories
Phillosoph

Simple Effective Personal Camouflage.

For a long time I have advocated the use of camouflaged smocks. Surprisingly it is hard to get the idea that camouflage should be worn over the armour into some heads!
In a previous blog post I discussed the idea of camouflaged aprons or tabards. While I like the simplicity of this approach I feel it still has a way to go. Some of the illustrated examples are overly long and have too rectangular and regular a shape. Most obviously they do little to camouflage the distinctive arm and shoulder region.
Recently I was having a conversation and recalled this:

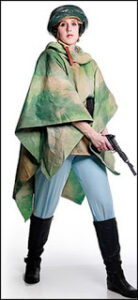
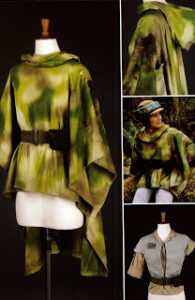
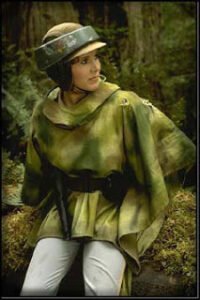
Several of the rebel characters on Endor wear these ponchos. Since it is not raining they seem to be primarily for camouflage. Leia’s, at least, seems to be rigged so that it is relatively short at the front, providing freedom of movement.
In his book mentioned in the previous post Langdon-Davies notes that the sniper suit (and personal camouflage in general) is:
“to destroy your human shape, as well as your human features. It is therefore cut as unlike a Savile Row tailor’s suit as possible”
and that “For many purposes the sniper’s suit may be thought too clumsy and readers are advised to experiment by making hoods of a larger size reaching to the waist. These can easily be taken off when the moment comes to run, and they do not in any case impede the movements of the legs”
A poncho is very good at concealing the shape of the human body. In previous posts I have discussed ponchos and shelter cloths as rainwear and I have discussed ponchos, blankets and cloaks as cold weather wear. Suppose we merge the idea of the camouflage apron and poncho to create a garment intended for camouflage rather than warmth or rain protection. Here, a similar idea is called a bush rag.
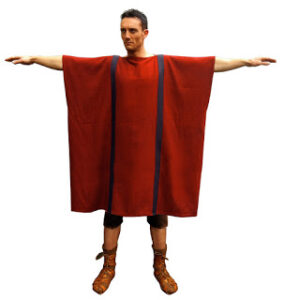
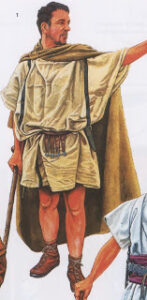
What I suggest is something roughly hexagonal in shape, folded across two opposite points. Its width would be about an arm span as measured between the elbows. This would be half an wearers height by Vitruvian proportions. At the front and back it would be about mid-thigh length to provide freedom of movement. Using the Roman tunica as an illustration, the camo-poncho would not be as long and would taper towards the lower edges. The sides would not be seamed. One of my reasons for mentioning the tunica is that like this garment the poncho would most likely be clinched, the equipment belt or webbing securing the flaps. Tapes or cords can be added for when a belt is not worn. The sides below the belt would not be joined for better freedom of movement when crawling or climbing.

Being a very simple garment it is more practical to make the camo-poncho double-sided. One side could have a verdant pattern and the other a more brown and tan pattern suited to semi-arid, autumnal and many urban environments. Another version would have a desert pattern on one side and a semi-arid pattern on the other. Another variant would have pure white on one side and a pattern for broken snow on the other.
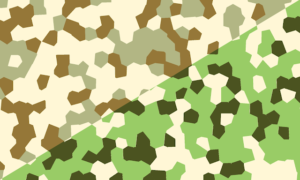
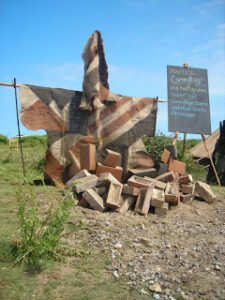
The camo-poncho (smocklet, ponchoet?) would use a contrasting macro-pattern that breaks up its shape. There is little point trying this concept with some of the multi-coloured patterns currently in vogue that blob-out into a single monocolour. In the pattern below individual polygons should be about three or four inches across. Mesh in useful patterns such as CCE can be found.

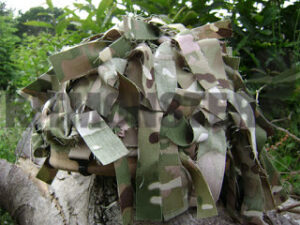
The double-sided camo-poncho could be created by simply sewing two differently patterned sheets together. A hexagonoid shape can easily be made from rectangles and rectangles cut diagonally. The hem would be made several inches from the edge and the cloth outside allowed to fray. It might even be cut into tassels like a buckskin shirt. The frayed edges and tassels further break up the recognizable shape and assist in the garment drying when wet.
Since the camo-poncho is unlikely to see a parade ground we can add some patches of cloth, hessian and netting to make it three-dimensional, as was discussed for headgear. The poncho could work in conjunction with other ideas such as the soldier’s mantle.
Just to be clear. The camo-poncho is not intended to replace the rain poncho or poncho-liner. The soldier would also carry these items and use them when needed. They are vital components of his lightweight sleeping system. The camo-poncho is not intended to act as a shelter or provide warmth. One of its advantages is that air easily circulates under it, which will be welcome in hot climates. The camo-poncho is designed to provide the wearer with concealment. Warm clothing, including a poncho-liner, can be worn under it if the climate warrants. The camo-poncho can be worn over a waterproof jacket or rain poncho, providing camouflage and snag-protection and also muffling the noise of these materials.
Hunters, wildlife photographers and the like should feel free to try this concept out. It requires minimal sewing skills and is likely to be far superior to more expensive, tailored options.
Categories
Phillosoph

Langdon-Davies Home Guard Camouflage Suit.

As I have already pointed out, I am getting old and my faculties are declining. Every now and then I look back for an article I have written to refer to and discover I have never posted it.

During the discussion of camouflage I referred to “The Home Guard Fieldcraft Manual” by Maj John Langdon-Davies. Despite its age this is a book I would recommend to anyone remotely interested in camouflage or not getting shot.

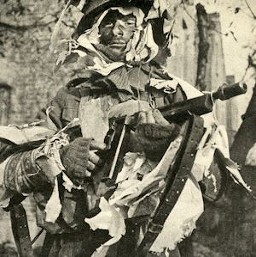
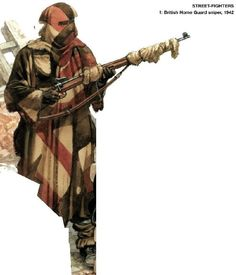
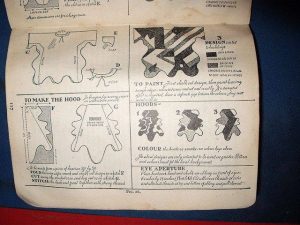
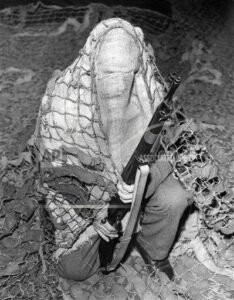
One of the most memorable parts of the book is Langdon-Davies’ instructions on how to create a “sniper suit” from open weave hessian. Don’t get too hung up on the “sniper” label. Langdon-Davies consider camouflage to be a skill that all soldiers should be adept at and comments that “twenty rifle rounds at 25 yards will be far more effective that fifty at 250 yards”. If further proof were needed, note that one of the photos below shows a camouflaged sub-machine gunner.
 
The basic garment is a loose fitting smock. Its construction is not unlike some of the Roman tunics I discussed in a previous blog. The seams are some distance in from the edge of the sleeves and sides and these parts are deliberately irregular. These would be permitted to fray to further break up the shape. The garment was to be worn over the woollen battledress and webbing equipment. A flapped opening was provided for accessing the pouches and pockets within.
 
The hood illustrated is a separate piece. For vision alternate threads are picked out to create a “slot”. Langdon-Davies cautions against distinctive paired eyeholes. He provides some examples from nature of animals disguising their distinctive eyes with band-like markings.
The book also suggests an alternate design that resembles a short poncho with an integral hood. He describes this as a waist-length hood with arm openings. Obviously a poncho with a separate hood is possible too.

One of the advantages of using hessian is that it has a light, natural colour to begin with. This forms a good base on which to paint contrasting colours, giving good disruption of the human shape. One interesting suggestion Langdon-Davies makes is that the front and back of the garment might have different patterns. The camouflage needs of a kneeling man viewed from the front may be different from those of a prone man viewed from above. Camouflage should be thought of as 3D rather than being two-dimensional patterns. Additional patches of frayed hessian or cloth can be added to the garment, as can pieces of netting that allow the utilization of natural materials.
Categories
Phillosoph

Compact Living Space

A friend of mine recently contacted me to discuss his accommodation plans. Local zoning laws allow him to build a structure of ten square metres so we soon got onto the subject of optimizing compact living spaces. This topic has applications in many other fields, including survival so I thought I would blog some of our thoughts.
Firstly, make the best use of light. Pretentious interior designers on house makeover shows disparage marigold-painted walls. There are good reasons why marigold is so commonly chosen. It is light and it is warm, so a very good colour for living space walls. My own walls are a cream colour that works well with white trim and furnishings. If you have to live in a small space chose light and warm colours, not just for your walls but the other items that surround you.
Personally I never use curtains. If you do make sure the rail is wider than the window. This allows you to fully expose the window when the curtains are drawn, maximising the light entering your compact space.  
Intelligent use of mirrors can increase the light and illusion of space. Shop around since large mirrors can be expensive. Mirror tiles, on the other hand can be quite reasonable.
Compact living requires efficient use of space. Most caravans have seating areas that convert to beds at night. The table between the seats forms the centre part of the bed and the cushions become the mattress. This has some advantages. Unlike a conventional mattress the cushions can be easily taken outside to sun or air. Beat them with a carpet beater to get the dust out.

In all the caravans I have slept in the tables have been one-legged affairs that engaged a rail on the wall. A more conventional table with folding legs may be a better choice for our compact living space. This allows the table to be taken outside if the weather is nice. Ideally the legs would be an inverted “T” shape so you can easily take your seat. The table is your dining area and desk. At night it is part of your bed. When not needed it folds up and can be placed out of the way.
The lower part of the seats are also storage boxes. Logically this would be a good place to store your bedding. Install some vent panels so the bedding can air and dry during the day.
For bedding use rectangular sleeping bags or duvets. Sleep on one and under another. Have a light blanket, duvet or bag for summer nights and as additional insulation when it is really cold. Air your bedding outside regularly.
I discussed alternate sleeping systems such as hammocks and cots with my friend and these may be the subjects of future blogs. The caravan-style convertible sleeping/ seating area seems the most practical choice for this application.

Above is a rather nice example of a compact living area from an IKEA site. It could be improved by replacing the conventional bed with the system described above. I like the laundry bag that fits at the end of the bed. Ideally this bag would also let you carry the laundry to the machine or laundrette.

Storage space is an important consideration of a compact living area. Unlike a typical caravan you may be living in this area for months or years at a time. The IKEA photo shows most of one wall used for storage areas. These should be as tall as possible. If they do not reach the ceiling it should be practical to use their tops for additional storage.
Conventional wardrobes have doors that swing out into your limited living space.  The above arrangement uses a rail mounted in a storage unit to hang jackets and trousers. Obviously the unit needed must be about half a metre deep. If you do not like your clothing out in the open like this or fear some items might get faded by the sun fit this section with a light-coloured curtain.
Even if your storage units are free-standing it is prudent to attach them to the walls to “earthquake-proof” them. Open fronted shelving units create a feeling of space and make it easier to find things. Transparent boxes are useful here too. If your compact living area is mobile your storage areas will need doors. Sliding doors are worth considering.  Shelves should be detachable so height and arrangement can be changed easily to suit the contents.
Other areas can also be used for additional storage area. The areas under the seating have already been mentioned.  Shelves can be mounted above the seating/ sleeping area but must be high enough that you do not hit your head on them when you stand. Very tall visitors will need watching! If you want a bedside table make it a short shelving unit. If you have room for a free-standing chair have one that folds up when not needed. A stout storage box with a cushion on is a stool. Without the cushion it can help reach those high shelves.