Categories
Phillosoph

Survival Kits: Bringing It All Together

Today I am going to try and bring together some of my ideas regarding survival kit and selection of contents. When possible, I try to approach topics from a different perspective to that echoed on most websites.
Regular readers may know that I have my reservations about the “little tin of gizmos”. Thinking that you are covered because you have a couple of band-aids and a couple of loose fishing hooks and swivels is a recipe for disaster.
Survival kit may exist on several levels. On your person you will have your skin-level EDC. Most of mine is in the pockets of my trousers, although some items are on my trouser belt or key-ring. If you are carrying a bag, it is prudent to have some additional items in your bag. You consume the items in your bag in preference to your skin-level items. Military personnel often have an intermediate level in their webbing load-bearing equipment. Ideally this should only hold ammo, weapons, some water and immediate first aid items but the tendency to add additional gear is common. A larger pack or vehicle may provide higher levels of survival gear. One should always plan for the contingency that one may get separated from bags or vehicles. This is why your skin-level gear is important.
My current planning list looks like this:
Seven Tools of EDC
Hat, Towel, Rope
Medical, Writing, Fire, Knife
Foundation Survival Kit
Blanket, Fire, Knife
Poncho, Water, Toilet Paper, Canteen Cup
Travelling Kit
Navigation, Signalling, Illumination
Washing, Repairs, Food,
Documentation, Money, Clothing, Armament
The item names are memory aids and should be taken generically rather than specifically. “Knife” represents other tools, “blanket” represents sleeping bags and related items and so on.
The Seven Tools of EDC
The Seven Tools of EDC were inspired by the roguku or Six Tools of Travelling. I remember these as three flexible things (hat, towel and rope), three multi-part things (medical kit, fire kit and writing kit) and a knife.
Hat” represents other protective clothing, such as gloves, goggles and sun-glasses. At “skin-level” this will be whatever headgear and other items suits the current or expected weather. If I am taking a bag I will probably have two hats. One will be to protect from the sun and keep the rain off my glasses, probably a boonie hat. The other will be a warm hat such as a watch cap or headover. If it is really cold spare gloves and headover are a prudent precaution.
Towel” in this context is a multi-purpose piece of cloth. At skin-level this is a bandanna in my pocket but recently I have also been wearing a shemagh. If I lose or did not bring my hat these can serve as head coverings. Any bag I carry usually has a spare bandanna and/or shemagh in it. In colder conditions the shemagh is replaced or supplemented by a woollen or acrylic scarf.
Rope” for the ninja may have meant a grappling hook and rope. For me this reminds me to carry some cordage. At skin-level this is a couple of armspans of paracord, a hank of string, a container of dental floss and a retaining cord for my glasses. Packs contain longer lengths of paracord. If heading for the deep wilderness I would have a toggle rope or the modern equivalent.
Medical Kit. On my person I have a small number of plasters, alcohol wipes and pain-killers, plus some personal medication. I have a more extensive medical kit I carry in daysacs, plus a bigger kit in my travelling bags. Medical also includes such items as insect repellent and sun cream. These are usually bag items but certain conditions may require a small supply to be carried on your person. Whenever possible items are consumed from the larger kits before the skin-level kit.
Writing represents communication and recording. In my pockets I carry a pen, pencil and two pieces of chalk (one light, one dark colour). Usually have a phone on my belt. Daysac may contain a notepad in a plastic bag. When on holiday I keep a journal.
Fire Kit. For everyday use this is simply a disposable lighter riding in the bottom of a pocket. I carry a plastic bag with a couple of tissues in, which could be used as tinder. If straying further afield I would add a container of tinder, fresnel lens and spare lighter to my pockets. Daysac has a couple of spare lighters and some candles.
Knife” represents tools and related hardware. My Swiss Army Knife goes nearly everywhere with me. I also have a Leatherman Squirt and pocket prybar on my person. A diamond impregnated metal card is carried for sharpening.
Foundation Survival Kit
The items on the Foundation Survival List are mainly bulkier “bag” items, with a couple of significant exceptions.
Blanket” represents sleeping items in general. It includes poncho-liners, sleeping bags, cloaks and long coats. These can keep you warm, even when not sleeping. This category is called “blanket” to remind us about the survival blanket, which is compact enough you can easily fit one or more in a trouser cargo pocket. They are reasonably priced so you can buy a dozen and stick spares in coat pockets and any bags you might carry. As well as keeping you warm, they can keep the rain off, spread out as a signalling panel, possibly even used as a heliograph. One is in the little medical pouch that carries most of my skin-level EDC. For decades now my daysac has carried the survival blanket’s larger cousin, an All-Weather Blanket.
Fire Kit. A fire kit was included in the original Foundation Kit list. It is repeated since the ability to create a fire is an important component of survival. Have a means of making fire on your person, and additional means in your bag. Consume the bag supplies before that on your person.
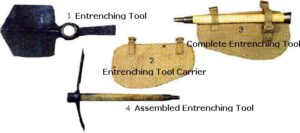
Knife. Another duplication, but repeated for much the same reason. In this context it can be read as “a bigger knife”. Useful as a pocket knife or muli-tool are, they can only get you so far. This category also reminds us to remember other, larger tools such as a crowbar or entrenching tool. Have a fixed-blade knife on your trouser belt. If you lose your pack, webbing or even your jacket or shirt you will still have a useful survival tool.
Poncho includes other forms of rain-proof clothing and shelter items such as tarps, tents, shelter halves, basha-sheets, groundsheets and so on. Any bag of sufficient size should include a means of rain protection.
Water represents a means to carry water, and the means to ensure that it is drinkable, such as water purification tablets. In rural areas a supply of water and purification tablets should be both on your person and in your pack. Consume the water in your pack before that on your person.
Toilet Paper. A roll of toilet paper in a waterproof bag is a prudent addition to any bag. A small bag with a couple of paper tissues rides in a cargo pocket of my trousers. A bag with additional tissues will be added if I am heading off the beaten track. As well as intended use, such tissues can be used for nosebleeds, nose-blowing and as tinder.
Canteen Cup. A metal canteen cup or similar small cooking vessel is a useful addition to the above items. Boiling water to sterilize it will conserve water-purification tablets. It can also be used to sterilize instruments or blades intended for medical uses. Even if you wear a water bottle on your person, the canteen cup is probably best carried as a pack it. The interior can be packed with some of the smaller items listed above.
There is a survival adage that says you cannot live three minutes without oxygen, three hours without shelter can kill you, you can last three days without water and three weeks without food. The Foundation Kit contains the essentials towards keeping you alive beyond three days.
Travelling Kit
What I have chosen to call the “Travelling Kit” are mainly “very useful” rather than essential. Food is obviously essential, but you can last several days or more without it.
Repairs. If away from home, a small repair kit is worth putting together. My compact little sewing kit has seen many uses over the years. This is supplemented by a couple of rucksac buckles, dental floss, a roll of electrical tape and a tube of superglue. A small screwdriver that fits in my Swiss Army Knife corkscrew has been used to repair several pairs of glasses. I have seen it suggested that a piece of glue stick of the type intended for hot glue guns may also be useful. You can even add a little repair capability to your skin-level kit. A small bag of safety pins can deal with tears and zipper problems. Around the pencil I have wrapped a length of electrical tape then bound two threaded needles to its sides.
Food includes food procurement and cooking means. Put together a small fishing kit, with some wire traces that can be used as snares in extremis. Assemble as much of the kit as is practical before hand. Sitting in the wind and rain as the light fades is no time to be tying on swivels! Add the fishing kit to your trouser pocket items if heading into the wilds. The food you carry should include some items that can be consumed without heating or rehydrating. Some boiled sweets/ hard candy is a useful addition to any daysac, giving a quick energy boost when it is needed.
Illumination. There are numerous small flashlights that are suitable for skin-level EDC. The little Photon lights can be added to a keyring, dogtag chain or whistle lanyard. A larger flashlight is a suitable addition to a daysac or larger pack. My daysac has a handcrank model in it.
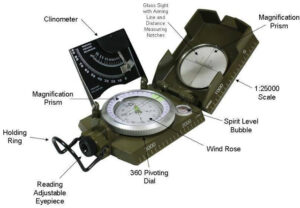
Navigation. Personally, I have found a small compass a useful addition to my EDC. Even in town it is sometimes useful to know which direction is which. A number of guidebooks have information such as “…the hostel is to the northwest of the piazza”. If travelling away from civilization better maps and compass are recommended. GPS is nice, but you should plan for when it stops working. Without a compass there are other ways to determine direction, which is why these items are under “very useful” rather than essential. Worth repeating is that in most cases where rescue can reasonably be expected your chances of survival are better if you stay put rather than walking out.
Signalling. Signalling assumes there is somewhere out there to signal to. Flares are not much use if no one is likely to be in line of sight. Tell someone where you are going and when you will be overdue. Signalling overlaps with Illumination and Fire, and mobile phones have already been mentioned. Your skin-level kit should include a whistle. Mine is on my key-ring. A small heliograph is easily fabricated. The back of my phone is mirror-polished, so I would use this instead.
Washing. If you do any travelling you should put together a lightweight wash kit. How to put one together is detailed on another page. I prefer mesh bags over the more elaborate, heavier and more expensive wash bags.
Documentation. Travelling may require visa, permits, passports and other documentation. Make sure you have it all before any trip, and store in a waterproof bag. Make photocopies of important documents, such as your passport, and carry then separately to the originals. I prefer to carry some of these things on my person rather than in a bag.
Money. In some environments, one of your most useful tools. Includes credit, debit and ATM cards. Have information on what to do if you lose the latter. Don’t put all your eggs in one basket!
Clothing. How much spare clothing, its type and quantity will depend on trip duration and conditions. 
Armament. Carry if you can. The world is full of nasty people who will rob you or hurt you just because they can.
Categories
Phillosoph

Bush Shirts.

You may have an emergency kit or bug-out bag ready packed, but what clothing do you have stored with it? Your emergency kit should include an outfit of clothes suitable for travelling. This must include underwear, outerwear, footwear, headgear and insulation suited to any season. There are many possible choices, some better than others. What are our best options, particularly if on a budget?
For most of the nineteeth century the US Army wore a dark blue woollen uniform. This was considered suitable for all climates, regions and seasons within the US. In practice the material and colour were uncomfortable and impractical for the hotter months and latitudes. Durability was also an issue. Troops often returned from campaign with uniforms in a very poor state. The blue woollen uniform was also poorly suited for the various menial tasks a soldier might be called on to perform.
Troops on campaign were, however, allowed considerable latitude when it came to clothing. During the Geronimo campaign some infantry in Mexico and Arizona are known to have marched wearing only their army underwear of undershirts and cotton drawers. (Uniforms, Arms, and Equipment: Headgear, Clothing, and Footwear by Douglas C. McChristian) Historical accounts mention soldiers on campaign wearing their “overalls” as an alternative or replacement for uniforms. The overalls in question were a two-piece alternative to the stable frocks mounted troops were issued. Mounted troops were required to conduct stable duties twice a day. Horse hair and dust would have rapidly fouled the blue wool uniforms so troops on stable duty wore either frocks or overalls of white cotton duck garments over their blue uniforms. These overalls and smocks saw use as campaign wear or unofficial uniforms. The white colour was less than ideal, but a few weeks of campaign often turned them another shade.
Officially, the US Army remained resistant to issuing a summer uniform. When regulations were relaxed to permit the wearing of a white summer uniform, the soldier was expected to pay for the garments out of his own pocket at whatever prices sutlers asked. It was not until the 1880s that a summer uniform was issued. Quartermaster General Holabird ordered surplus shelter tents to be made into coats and trousers. Experiments with dying the canvas brown also proved successful. The uniform was clearly intended to serve as a summer uniform and campaign wear. The jacket was of blouse or sack-coat style, rather than a stable frock coverall. I have seen it suggested that the canvas uniform was designated a fatigue item so troops would not have to pay for them from their clothing allowance.
Jump forward about half a century and things come full circle. World War Two saw fatigue-duty clothing being used as hot weather combat wear. By the Korean War this had become common practice and “fatigues” became synonymous with hot-weather combat dress.
When selecting outdoor gear it may seem logical to copy what the army uses. After all, the army spends millions developing and testing gear, and surely wants our troops to have the best possible. Sadly, no! If this hypothesis was true, why do different armies produce different solutions to the same problem? Why is gear changed and replaced with such frequency?
If you study the history of, say, US combat/ field jackets, you observe a repeating cycle. Something practical is designed. After a few years in service it is noted the practical item is not that smart looking. A new, smarter replacement is adopted. Troops complain the smarter item is not that practical, so a replacement is designed, and so on. This cycle dates back well into the blue woollen uniform era. The army wants practical field and work wear that still looks soldierly. (This trend can be seen in a number of books on the history of US Army uniforms. Several of the “U.S. Army Uniforms of…” series by Shelby L Stanton are a good starting point) The US Army currently seems to be in a “non-practical” phase. Trousers are cut too narrow to fit over knee-pads or to allow good air circulation. Shirts intended to be worn under body armour have no camouflage on the torso, with tight-fitting sleeves that do nothing for shape disruption and air circulation. Camouflage that does little to hide the wearer.
As preppers, survivalists or outdoors-people, looking neat and soldierly is low on our list of priorities. We want versatile, practical gear that hopefully will not break the bank.
As I have mentioned in the previous post, for many conditions, jackets are too warm, particularly if lined. This holds true for many designs of combat jacket. As might be expected from the introductory passages, an unlined fatigue jacket is a possible option, if you can find such a thing at a reasonable price. More readily available are medium or heavyweight shirts, which we will designate “bush shirts”. A pair of cargo trousers and a bush shirt over suitable underwear is the start of a very practical clothing system. Notable is that the upper garment of US Army fatigues was originally designated a jacket, but troops were usually required to tuck it into their trousers. Eventually it was re-designated a “utility shirt” and redesigned with shirt-type cuffs.
If you now jump to googling “camouflage shirt” you will discover most of your hits are tee-shirts, which are not what we are looking for. Those that are not tee-shirts tend to be pricey!
Forget about camouflage patterns for a while. Smocks and other camouflage measures will be dealt with in other posts. For the moment we will be satisfied if our bush shirt(s) is a low-signature “neutral or natural” colour. Google “khaki shirt” and you should discover a wide variety of choices and colour shades. The true green coloured are best reserved for summer or jungle use. Similarly, very light khaki shades may be best kept for bright environments such as desert. This still leaves us a wide choice ranging from light tans to olive-brown. Mid to light greys and possibly pale olive are also acceptable shades.
Whatever shirt you opt for, buy it larger than you would usually wear. In cold weather that space allows you to wear more insulation under the shirt. In hot weather that space allows air to more freely circulate. Your shirt should also be long-sleeved, for when insects bite and thorns come scratching. Here is a good place to repeat a piece of advice from the Victorian explorer Francis Galton: “When you have occasion to tuck up your shirt­sleeves, recollect that the way of doing so is, not to begin by turning the cuffs inside out, but outside in-the sleeves must be rolled up inwards, towards the arm, and not the reverse way. In the one case, the sleeves will remain tucked up for hours without being touched; in the other, they become loose every five minutes.” Try it! He is right!
Most of the potential bush shirts you will encounter will be cotton or poly-cotton.  Microfibre shirts are becoming more widely available and often with a similar price tag to cotton. These are breathable synthetics, so should be quicker drying.
Other features are up to the buyer. A pair of practical breast pockets are useful, although your trouser pockets should be where your primary EDC gear is carried. The shirt is also your nightshirt, so overfilled pockets may be uncomfortable. A “traditional” shirt collar can be turned up to further protect the back of the neck, although since your outfit should include a neckerchief, shemagh or scarf this is probably moot.
Your bush shirt(s) can be customized, should you feel so inclined. Reinforcements can be added to the elbows and possibly the shoulder area too. Elbow patches should not hinder the sleeve’s ability to be rolled up or stay up. Breast pockets may be covered by pack straps, so sleeve pockets are a useful addition. These should be long enough to hold a pen or pencil. Poppers may be preferable to buttons. Vent zips or holes under the armpits can be added for increased ventilation. Additional pockets can be added to the lower part of the shirt, although these will not be accessible if the shirt is worn inside the waistband. If the shirt is worn outside the waistband the sides may be vented to allow access to a belt-worn knife or pistol. If desired, a bush shirt can be converted to a pullover style by sewing up the lower half of the front opening. This can reduce drafts around the midriff and keeps biting insects out.
In many conditions your bush shirt will be your outermost garment. When it gets colder it is an additional mid-layer beneath a jacket or coat. It may also be your nightshirt.
While I was planning this article, I came across the following passage in the Boy Scout Handbook (1911) “It is well to carry a spare shirt hanging down the back with the sleeves tied around the neck. Change when the shirt you are wearing becomes too wet with perspiration.”
Tying a jumper around your waist was standard practice when I was a schoolboy. The jumper tied and draped over your shoulders is a familiar 1980s icon. Carrying and using a second shirt this way is something quite different, and potentially very useful. If not worn in this way the spare bush shirt should be kept somewhere easily accessible, such as the outer pocket of a pack. The merits of being able to change out of sweaty gear were addressed in the last post. If the weather turns colder you can wear both shirts. The spare shirt can also serve as an emergency face or head covering or as a scarf. A wet shirt can be hung down the back, or the back of the pack, to dry. This is one of the reasons we choose neutral or natural tones for clothing, even undergarments. Drying laundry can act like a signal flag!
Categories
Phillosoph

The Layer System

I plan to make some posts on clothing.
Before I do so, it is appropriate that I address the commonly encountered concept of “the Layering System”.
Many websites and books pay lip service to the Layering System. The problem is that this is usually oversimplified into a “lie to children” that omits important facets.
The typical version goes something like: “Your clothing needs to be in three layers. The under layer (buy some wicking underwear), the mid-layer (we sell really nice fleeces!) and the outer layer (have you seen our Gore-tex range?)
Not technically false, but also lacking a lot of information you should also know.
The most important concept to grasp is that it is not the clothing that keeps you warm, but the air that the clothing traps.
Several layers of thin garments may keep you much warmer than a single thicker (and possibly heavier) layer. The best insulation is still, dry air. Most materials that we call insulators serve to catch and hold such air.

Underwear

I have addressed the topic of underwear in a number of other posts, so I will be brief here (pun intended!). Underwear is not just for wicking sweat off your skin surface. It is also there to prevent your body soiling the outer layers of clothing. Clean clothing traps air more effectively than that clogged up with oils, salt and other crud. Undergarments should be selected with of washing and quick drying properties in mind. Thin items will dry quicker than thicker. If it is very cold wear multiple thin layers of underwear. Carry a spare set of underwear. Depending on climate this may be simply a tee-shirt/ vest and a pair of underpants. Kephart tells us to change into our cleaner set for sleeping. If your underwear becomes sodden from exhaustion, change into the drier set. Use the dirty set to give your body a rub-down before donning the cleaner. Whenever practical, give the set your are not wearing a rinse or a wash. It may be prudent to change first if the set you are wearing is the dirtier.

Mid-layer

This should actually be “mid-layers!”. A thick fleece jacket or jumper can only be on or off. This may mean a choice of too-cold or too-hot. Many of the mid-layer garments sold in outdoor shops tend toward being overly insulated. If your mid-layer is actually several layers of thin garments you have a more versatile system. This is likely to be warmer and lighter. Individual layers will be easier to wash and quicker to dry. Chances are you have a number of old shirts or thin jumpers that can be combined as very effective mid-layers. Minor damage or marks are not a problem in this role. Shirts may be more comfortable as mid-layers with the collars removed.
Your body may be sweating as well as producing heat. You want to get rid of this water vapour before it can condense, or even freeze. Even if there is metre-thick snow on the ground, vent your clothing occasionally to remove humid air.

Outer Layer

The mid-layer(s) trap a layer of air that your body warms up. The outer layer prevents the wind blowing this warm air away, or the rain soaking into the mid-layers and displacing the air. Fleece jackets are often seen worn as the outermost garment. While this works with some models or under certain conditions, you will also find in other situations the wind will cut right through them.
You actually need a choice of outer layers. A rainproof is great if it is actually raining. In other conditions, even the breathable models may become clammy inside. Regularly venting your mid-layers is an important habit to acquire, even if you have top of the range breathables.
The more you wear rainproofs, the greater the likelihood they will be holed by thorns or other hazards. A few decades back “pac-a-macs” were fairly common. Rainproof garments that folded up into a small pocket or pouch when not required. These now seem hard to find and modern rainproofs tend to be more substantial, bulkier and more expensive. I have to think this may be a step backwards. On the other hand, some of the rain-ponchos on offer seem to be very light, compact and reasonable in price. They can also be used as groundsheets, shelters and so.
If you are not wearing your rainproof, you still need an outer layer that will retain the air your mid-layers are holding. Most cloths of a sufficiently tight weave can serve as a windproof. Most of your likely options are going to be cotton.
Cotton is not ideal as an outdoor material. If wool gets wet it retains most of its heat. Wet cotton is cold, and drains the body of heat trying to dry. While this is relatively well known, outdoor shops are full of cotton items they will try to sell you. Most military surplus items you may consider will be cotton. Cotton is easier to print in camouflage patterns, although the wide use of cotton in certain armies predates their adoption of camouflage. Most civilian, non-specialist items you might use instead of the above are also likely to be cotton.
You probably cannot avoid having some cotton items as your windproof layer. Sensible precautions are keeping a fire kit and rain-poncho on you. A change of clothing, carried in a waterproof bag, is also prudent.
For the lower body, cargo trousers and gaiters are a reasonable choice. The former can be modified as suggested elsewhere.
Combat jackets may seem a logical choice for the upper body. Their main problem is that in many conditions they tend to be too warm. You may be better basing your clothing system around a couple of bush-shirts, much as Kephart did. Field jackets and parkas can be added if the mercury drops.
A good bush-shirt may be cotton, but may also be found in fast-drying microfibres. Bush-shirts are a topic I will discuss in more depth in a future post. Relevant to today’s subject is that any shirt (or jacket) you plan to use as an outermost layer should be selected with room to wear several layers of insulation underneath. It should be at least a size larger than your usually wear. You should be able to comfortably wear it over a fleece jacket or NATO sweater, or their equivalent in thinner layers. In hot weather that space lets more air circulate.
As an aside, wearing a shirt over any insulation is a useful dodge to remember should you become separated from your jacket. A similar idea was to wear a combat jacket or bush-shirt over a waterproof jacket. This protected the waterproof from damage and reduced the noise that such a garment might make. It also might contribute to visual camouflage too. Although the outermost layer of clothing might get soaked, the waterproof kept the inner layers and wearer dry.
A few final points about the Layer System. The idea is that you can regulate or comfort and temperature by removing or donning garments as needed. Some means to carry unworn items will be needed. Stopping to change may not be practical. The rest of the platoon may not want to stand around while you redress, especially if your garment is under a mass of LBE and body armour! A common error in cold climates is to over-dress/ over-layer. If you are mobile, your level of clothing should ideally feel slightly chilly when standing around. Static roles such as sentry duty or manning foxholes will need more insulation. In any climate, do not neglect ventilation.
Categories
Phillosoph

New Survival Tool: The Brick Hammer

Some time back I was reading a number of manuals written for the British Home Guard.
Fighting in an urban environment was a common theme.
Many of the authors drew from experience in the Spanish Civil War. They had learnt that urban terrain could negate an enemy’s advantages in air power and armour.
Urban operations was expected to be routine, rather than exceptional.
It is safer to be firing from loopholes rather than from windows, but I began to wonder about the practicalities of cutting a loophole in a brick or similar wall.
The Home Guardsmen probably would have had available the 1937 entrenching tool, which included a relatively stout pick. Troops with other designs of entrenching tool may be less capable.

A bit of research turned up the tool shown below.
This is sold as a “brick hammer”. I will confess, I have yet to try cutting loopholes with it. My landlord would probably object
This is potentially quite a useful survival tool.
The adze part can be used for digging, and should be more than adequate for such tasks as creating cat-holes or Indian Wells.
The hammer part can hammer things, such as tent pegs if stealth is not a requirement.
Shank and head are both steel, so the adze could also be used as a prying tool or crowbar.
If necessary, it can serve as a passable hand weapon or missile.
It could potentially be used as an anchor or for hooking.
The brick hammer is relatively compact and light (718 grams with tape and cord), and very reasonably priced.
For trips that are unlikely to require building foxholes, this may be all the entrenching tool you need.
In its original state, this particular brick hammer was polished steel and a black rubber handle.
I have given the metal parts some paint, although I expect this to wear off with use. The handle was covered by some self-adhering grip tape I had, and I have added a thong for retention.
Categories
Phillosoph

Battle of Jangsari: Camouflage

Recently I watched the movie “Battle of Jangsari”, set in the Korean War. I enjoyed it, and many of my readers may do so too. So as not to spoil your enjoyment, I will try to avoid any possible spoilers that I can in the following passages.
The photo below shows the North Korean troops that are sent as reinforcements. Notable on their first appearance is the bundles of grass/ straw/ rushes that each infantryman has sprouting from his back.
At first glance I thought this might be an earlier example of the device described as in a previous post as the Vietnamese Camo Ring. Subsequent scenes show the foliage attached directly to their shirt/ blouses. The intention is the same, however. If an enemy aircraft had appeared these infantrymen would disappear.
“Osprey Men-at-Arms 174: The Korean War 1950-53” includes the following passage (p.37) on the North Korean summer field uniform:
“The uniform had reinforcing patches on the elbows, trouser seat and knees, and frequently single or double rows of horizontal ‘zigzag’ stitching around the cap and across the shoulders, chest and upper sleeves, which were used to hold leaf camouflage. ”
For some of the movie the South Korean (ROK) soldiers wear captured North Korean uniforms. They do not use camouflage materials, but the means by which they can be attached are clearly seen in some shots. In these examples the “stitching” appears to be relatively substantial cord.
A side view of foliage attached to a machine-gunner’s back. Some North Korean troops also have foliage attached to their upper arms, although the means of doing this is not clear in the film. Presumably loops might also be sew to the sleeves. Many of the North Korean soldiers are also wearing short capes of what appears to be camouflage net. In the movie this was not clear and appeared as an irregular shape of mossy green-grey on the upper chest. In the stills this is much more clearly seen to be net.
The Russian-style shoulder-boards worn with the North Korean uniforms appear fairly impractical. Men-at-Arms 174 notes that these shoulder-boards tended to fade less than the rest of the uniform, making them stand out as regular shapes and thus detrimental to camouflage.
Also note that none of the actors have camouflaged their helmets, leaving a distinctive, recognizable shape. As I have pointed out in recent posts, shape disruption and texture contribute far more to camouflage than colour. Notable in this movie is that the North Korean uniforms work far better in the terrain shown than the green American fatigues worn by some characters. The Osprey publication states that the North Korean summer field uniforms was “olive khaki shade faded rapidly to a light yellowish hue”. Actual appearance varies in the photos since the soldiers of both sides get realistically dirty.
Minor spoiler follows: In one scene the first sergeant stamps on a mine several times and chides the student soldiers, telling them it is an anti-tank mine and ten of them could run across it without setting it off. This is not strictly true. The mine shown is an American M15 that is claimed to need a force 159 to 340 kg (350 to 750 lb) on pressure plate to set it off. “Taming the Landmine” (p.51) by Peter Stiff describes how repeated passages over an anti-tank mine would “settle” the trigger mechanism of some models until they became sensitive enough to be set off by a pedestrian, donkey cart or bicycle tire.