Categories
Phillosoph

It's Not Easy Being Green.

In my last blog I quoted Tom Wintringham’s advice that the first lesson to learn was how to take cover. This piece of advice can be applied to survival as well as military personnel and has many aspects. It includes how to find shelter from the weather. It includes how to take cover from gunfire. It covers the difference between cover and concealment and it includes how to move between cover. Some of these aspects have already be addressed in this blog and future articles will cover others. Today I am going to share some reflections on concealment and camouflage.
In 1848 the British Army in India began to use khaki-coloured garments. “Khaki” is an Urdu word meaning “dusty” and the colour was a light beige, tan or dull pale yellow. The pioneer behind this was an officer called Hodson and it is notable that his early correspondence refers to the uniforms as mud or dirt-coloured, with the intent to make his troops  invisible in a land of dust. Some garments were made by dying white items with tea. Garments that won’t show tea stains are only prudent for a British soldier, of course! Many garments were made from a cotton cloth called “khaki drill” and this name is used for the colour, the fabric and the uniform items issued in it. The British army at the time was a major influence on military fashions and many other nations adopted khaki, particularly for tropical wear.
In 1902 the British Army adopted a new service dress. Woollen cloth is generally not suitable for printing with camouflage patterns, so a single colour was required. (bear in mind the term camouflage did not come into use until during the First World War). The colour chosen for the 1902 dress was a hue intermediate between brown and green. Some paint manufactures call this hue “khaki drab” but it is commonly referred to as just “khaki”. Incidentally, the term “khaki” has become virtually useless for describing a colour. Imperial Japanese Army woollen uniforms are described as “khaki” but are closer to an ochre than khaki drab. Just to confuse things further the IJA used khaki drill for summer and tropical wear.
The colour of the new 1902 British Army service dress was also used for the later battledress. It has been described as matching the colours of heath and forests of the United Kingdom fairly well”. Most other nations adopted uniforms of a similar hue.
It seems to be deeply rooted into our psyche that nature and countryside is “green”. In actuality, a few days of military operations tend to render an area less verdant than before. Artillery, vehicles and boots soon create more mud than lawn. Green is also seasonal in temperate climates. Even in summer green is rare in some rural terrain such as rapeseed fields or ripened wheat. Hodsons original idea of mud or dirt-coloured uniforms is more logical.
The selection of khaki drab was also based on the assumption that most fighting would be in rural areas. The Spanish Civil War indicated that urban areas would be important battlegrounds. Urban terrain negated many of an attackers’ advantages in aviation, artillery and armour.
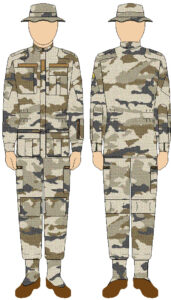
Below is a suggestion of what battledress might have looked like if it had been designed for both rural and urban use.
That urban operations are not exceptional has still not fully penetrated the institutional military mindset. For several decades British troops in Northern Ireland wore dark green DPM. When the US Army tried to develop a Universal Camouflage Pattern at the start of the 21st century it chose the colours sand, grey and green. In practice UCP appeared to be several pale greys that blobbed out into a light man-shape that stood out against most terrain. Equipment such as webbing and pouches that will be used in a variety of environments also tends to be made with green predominating.
If we are choosing clothing for concealment it is most logical that we choose hues that will work well in both urban and rural terrain. Generally this means neutrals such as the duller, lighter shades of browns, beige, greys, yellows and pale blues. Lighter shades counter body-shading and in certain conditions will reflect light from surrounding terrain.
Should you choose monocolour or camouflage patterns? In some environments camouflage can attract unwelcome attention which can be counterproductive. Prudence suggest that you have at least one ensemble of mixed monocolours. In a rural situation natural materials can be added to this outfit to disrupt the shape and better fit in with your surroundings. If you are in an area where there is lots of green there are green things growing you can use. The WW2 Japanese were noted for their effective camouflage but did not widely issue any camouflage pattern items that I know of. Instead they used nets and natural materials over their green or khaki gear
When buying items in camouflage patterns some prudence needs to be exercised. The primary task of camouflage clothing is shape disruption. The size and shade contrast between elements is far more important than the hues used. Many modern camouflage patterns neglect this fundamental, and often come up with all sorts of technical sounding snake-oil to defend this. The British MTP is a good example of a poor modern pattern. At more than a few metres the small colour elements merge and you see an obvious khaki drab man-shape, unlikely to blend with the background unless you get an exact match of hue and shade. Many older camouflage patterns tend to be too green and too dark for many environments, the latter made worse by body-shading. A good pattern needs contrast between elements and needs some of those elements quite light to counter shading and create the illusion of negative space.
You may be better buying some cloth or a garment of a suitable light neutral shade and adding your own pattern. See previous blog posts for ideas.
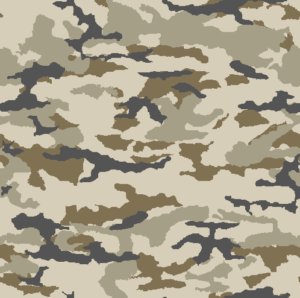
Below is a camouflage pattern and palette that I have been toying with. It is intended for both urban and rural use. In a verdant environment green can be added in the form of natural materials.
Any camouflage pattern on a cloth is only the foundation for your camouflage. You must add 3D elements too. Some of this is local and natural materials. If you are in a forest you might add bracken to your headgear, pack and shoulders. If you move into a wheatfield you dump the bracken and replace them with bunches of wheatstalks. 3D is also provided by textiles. Your cape or smock should include various scraps of fabric sewn to it that disrupt the shape and smoothness of the garment. These ideas have been covered in previous blogs.
The above advice comes with a caveat. Three environments occur to me where there may be alternate choices to the yellows, greys and browns suggested above.
The first is in snow, where predominantly white camouflage may be needed.
The second is in urban environments where red brick is the main building material. Many urban environments use a variety of materials so browns and greys serve well in most situations and do not look out of place near the occasional red surface.
The third is in rainforests, be they temperate or tropical. Brown-based items can work here if they are combined with local materials. This is, however, an environment where green-based camouflage patterns or pale green monocolours may be a more practical choice.
Categories
Phillosoph

Easier Entrenchment?

In Tom Wintringham’s “New Ways of War”, he states that the first lesson to learn is how to take cover. That is pretty good advice in general!
Recently I was thinking about entrenchments. When a soldier halts and expects the enemy, he is supposed to create a shallow trench he can lie in. This rendition of a Soviet soldier nicely illustrates the process:

Military men often have a tendency to try to refight previous conflicts. Things get done a certain way because that is the way they have always been done. This may fail to take account of changes in tactics or technology.
In some 1940s field manuals one can detect concerns that about the vulnerability of entrenchment systems to contemporary artillery. It is suggested that attention should be paid to camouflage to prevent them being targeted.
Within a few decades we are likely to see weapons that can recognize and specifically target foxholes and weapon nests. They may even be able to distinguish those that are occupied. 
In the modern era of aerial and satellite reconnaissance, hiding the location of entrenchments is problematic. There is little point in camouflaging the final position when the construction process has been observed and logged. Extensive entrenchments may only be practical if constructed in covered areas such as urban locations or woodland.
In more practically orientated forces, hasty entrenchment may be more usual.

Hasty Entrenchments

There is an implication that the trench should point in the direction of the enemy.
In actuality, the trench may be orientated so the soldier can fire obliquely, with the majority of the dirt placed between him and the enemy’s approach.
The hasty trench is about half a metre deep, as wide as the soldier needs and has one end constructed as a firing position with elbow rests etc.
The earth mound should be about 1.5 metres/5 feet thick to deal with bullets such as the 7.62 x 51 mm and 7.62 x 54 mmR.
This illustration from an American field-manual better illustrates the latter point. The prone position is the most stable firing position so should be used whenever possible. Many of us are not symmetrical in our most comfortable prone position so the angle of your shallow trench should reflect this if possible.
In theory, a soldier should continue to dig his hasty firing position, deepening the hole to make a kneeling and then a standing position.
The position is constructed so the soldier can still rest his elbows, so theoretically a foxhole is a better firing position than standing or kneeling when in the open.

Deliberate Firing Position

Field manuals show what a “deliberate” fighting position should look like.
Typically, it is a rectangular hole perpendicular to the line of enemy advance. Turning a shallow hasty position into such a construction seems to involve a lot of earth moving!

Improving the Hasty Position

Perhaps there is a better way?
Once you have dug your hasty prone-firing position and camouflaged it, leave it alone! Instead, ramp the rear end downwards and construct a slit trench, 60-75cm wide and 1.5 metres deep. Given time and materials give this overhead cover. Creating a seat means less earth to remove and this can also serve as a fire-step.
The illustration below shows something along these lines. Two prone-firing positions have been extended back and down and the deep area provided with overhead cover. This works well on a slope.
A variation is to dig a pit about 2 metres deep at the foot of the prone position. This acts for drainage. The slit trench is then dug radiating out from this well.
This method allows for vagaries of the terrain and creates a less regular shape when viewed from the air. The slit trench can be extended to create a communication trench if needed.
Below is a WW2 example. A relatively shallow fighting area for the infantry gun. Deeper, narrow armour protection/slit trenches to each side.
This approach provides a protected firing position and a deep protective shelter against bombardment and armour.
It would be interesting to do some time and motion studies to see how this method compares to the traditional “make everything deeper” approach.
It should be remembered that digging deeper is proportionally more labour-intensive than a shallow digging. Considerably extra energy is expended moving the earth up out of the hole. This is even more problematic if the soldier is working alone or lacks a container such as a sandbag or bucket.

Loopholes

The above raises another question.
When loopholes are made in buildings, they are usually positioned so that a standing solider can use them. Given a prone position is superior, would it not be more logical to cut them lower in the wall?
Building windows are naturally targeted by enemies, so loopholes at the same level are more likely to catch stray rounds. Placing the loopholes lower would reduce this. Also, loopholes at skirting board level are much easier to cover with a sandbag or two when not in use. Something to ponder!
The image above is from a Home Guard manual. Note the two corner men are prone and this allows more efficient strengthening of the walls. The MG team fire out the window, although they are positioned behind an interior wall and use a loophole.
Ideally, wire defences prevent an enemy getting within grenade range of the house. This is seldom practical.
Low loopholes should have a small trench below them outside. Grenades that hit the wall and fall down will explode in the trench beneath the level of the loophole.

Hasty Positions and MRE Boxes

“I hate digging fighting positions, I really do. hate it with a passion. Particularly those full length armpit-deep types. Why? For the same reasons as you. It takes damn too much work, too much time, and too much out of you. And by the time you get around to completing yells, 'Let's go! Fill'er up, pick'er up and move out! Am I right or wrong?
Don't misunderstand me, I know the purpose of a fighting position, they're to protect against small arms fire, indirect fire (art, mortar & fragments), tanks, etc. They're designed to give a defender a better chance of survival during an air or ground attack when the bad guys want to take over your estate property.
As a Ranger. I only believe in hasty, prone, dug-in fighting positions versus those armpit deep ones. Why? Well. just because they're easier. faster, and take less strength to build. But because a soldier can rest and shoot better in a prone position than a standup arm-pit deep position. How in the hell can you sleep standing up? You obviously either have to crawl out of it to sleep, or dig another position just for your sleeping gear, right?
Every time our unit was told to dig in, I didn't question or ask, "What type?" I instructed my men to start with the hasty prone position until they're told differently. If the Commander or 1 SG didn't come by to check up on us, we were good to go! If we were told to go all the way- (AIRBORNE), we just continued digging.
But you know what, it's too damn bad that the MRE cardboard box doesn't come in another color. Wouldn't it be nice if half the box was woodland camouflage and the other half desert camouflage? You just turn the box over to match the surrounding terrain. side you don’t is the part that's facing down or in towards you.
Would it work? Why not? You'd only have to fill up boxes with dirt or rocks and start sucking. You could build a bunker Or even a defense wall, they'd be as good as any sandbag, and be like playing with toy building blocks except bigger. [see “gabion”] But they wouldn't be water proof unless a chemical was added to make them water resistant.
The MRE box would also be a lot easier to dispose of in the field. Troops would fight over boxes because they know it would save them time in digging a position. Think about it, as you fill the boxes with dirt, you're also digging a hole. You wouldn't have to dig down far like a regular armpit fighting position. What do you think?”
Ranger Digest IV, p.66

19th Century Hasty Positions

The 1870s trials of Rice’s trowel bayonet mention earthworks thrown up in under twenty minutes. At the end of the report is an attached circular instructing troops how this may be done, and some illustrations.
“The soldier should dig a hole six or eight inches deep, and about twelve inches in width across the top, scraping the earth out to his front; he should then thrust the bayonet into the ground from four to six inches toward himself, from the edge of the hole, pressing it downward, and working the bayonet from right to left, so that the edge of the weapon will cut through the tough sod or other surface.
1873 trowel bayonet from https://worldbayonets.com/Bayonet_Identification_Guide/United_States__19th_Century_/us_19th_century_2_page2.html
The blade of the bayonet having been thus worked into the earth some six or eight inches, it will be pressed forward (using both hands at the handle), thus breaking off large pieces of turf, or other compact earth.
The soldier will work in this way, moving backward, until he has broken the ground from three to five feet from the edge
Of the hole; he will then turn or face to his right, take the point of the bayonet in his left hand and scrape all the loose earth to his left, the bayonet pointing from him, making there with a parapet to the front. If the ground is such that after having thus worked backward some three or four feet the men are still in line, the odd or even numbers should be directed to turn to their right, and scrape the earth toward and upon the parapet; this, however, will depend upon the kind of soil in which the line may be working.
A few trials will teach the men the best methods of working and of aiding each other in different soils.
While the men in ranks are busy throwing up the work, the sergeants, or file-closers, should be placing any available obstructions on the work to strengthen it, as logs, Stumps or fences, or may cut sods for-loop-holes, or collect branches to plant on the parapet for a screen ; and, if the trench be thrown up on grass, may cut turf to cover the parapet, so that it may not be distinguished at a distance.
If such materials be abundant enough to render it advantageous, the rear rank, or a portion of it, or if in one rank, certain sets of fours or numbers, may be directed to aid in this portion of the work.
In this way the intrenching would be carried on along the whole front, with the assistance of all the soldiers…
…The trowel bayonet requires the digger to work on his knees. This is but a slight drawback when the work is of short duration, and it is even an advantage when it is being carried out under the enemy’s fire as a man offers in this way a smaller mark for bullets and shrapnel.
Although but little used to earth-works, infantry soldiers who do not work long enough to get tired will attain a great rapidity of execution for it will be to their interest get quickly under cover.
Skirmishers Making Shelter-pits.
Men skirmishing should be able to make cover for themselves. In most instances the men will only have to improve natural cover, but it may be necessary to dig small pits, and each be for one set of fours or for one man only. In a few minutes he can in this way render himself almost entirely safe from the enemy’s fire, and at the same time aim correctly, using as rest either both his elbows or his left one only.
After a little practice, each man will soon ascertain the exact form of pit that suits him.
The depth need not be uniform, should be about ten inches where the man’s body will be, and about six inches in the other parts.
If time admits, a small mound of earth may be built up on each side of the spot on which the barrel rests, order to give cover to the head, or the parapet may be made thicker and the trench deeper. Natural cover should always be taken advantage of when possible. Sometimes it will suffice of itself; sometimes it only wants a little improvement.
It is a known fact that a well-protected skirmish line can easily drive back a line of battle.”

Categories
Phillosoph

Tactical Trowel

As regular readers will know, I am interested in various survival tools and feel that digging ability sometimes does not get the attention that it deserves.
Yesterday, while researching another topic I came across this interesting item.
I like the rubber handguard/ belt hanger, although a more tactical mid-brown colour would be welcome. I am a little baffled by the reversible feature. I’d be quite happy with the hook in just one position and the head and shaft as a single piece. The other main modification I would suggest is that the shaft end in a pommel or similar widening.
I would probably not issue a 13 inch entrenching tool to an infantryman but this could be a good item for combat engineers, survivalists and campers.
The handguard/ belt hanger idea may be worth looking at. An add-on piece that could be attached to larger tools might have potential.