I must have been little more than a toddler when my father told me “you don’t pull a trigger, you squeeze it.” He had been trained this in the army and so deeply ingrained was this that he felt obliged to pass it on even though I was knee high and using a toy.
Many years later I was visiting Los Angeles and my hosts took me to shooting range. My hostess was very proud of the fact that she had been on a firearms training course run by well know trainer and gun writer. In a passing I mentioned something about “squeezing the trigger” and got a blank look. She had been on this intensive and expensive course, run by an “expert” who writes for gun magazines, and yet the concept of not jerking a trigger was new to her.
The other day I came across this article posted up on scribd. It is well worth a read and has some interesting ideas. It could have used an illustration of the recommended one handed grip, but you can probably work this out once you have mastered the two handed techniques. The idea of balancing things on you pistol while dry firing to check stability is kind of neat. I will also note that if you suspect your gun may not be suited to dry firing you can always chamber an empty casing or acquire some dummy/drill rounds.
Another article I recently read suggested ways to improve your instinctive aiming. I don’t have a weblink for this one since it was rather old. The idea was quite simple.
With an unloaded gun you close your eyes, aim at the target and then open your eyes. Correct your aim and then repeat the process again. The idea is to improve and educate your “muscle memory” to improve coordination of where you point and where you want to aim. The author suggests progressively making your target smaller as you improve. The latter echoes something I observed when I learn knife throwing. Throw at a man sized target and soon you are hitting a man sized target most of the time. Put a chest sized mark on the same target and soon most of your blades will stick in that area. Put a simple X on the target and most of you blades will hit within a few inches of here. It is all a question of focus. Often I would end up hitting knives I had already stuck.
If your gun has a laser spot system this can be a useful training aid in using the above techniques. Toy guns such as airsoft pistols can also be useful training aids.
Given that it is Monday morning I will am going to avoid making this post too text intensive and just pass on some interesting images today. These are not really that useful for self-defence but they may interest or amuse, which is not a bad thing for a Monday morning.
What you are seeing is an attachment for an MG-42 that allows it to be aimed and fired from a trench or foxhole without the user exposing their heads. Similar devices date back to the First World War. Trench warfare was a predominant facet of this conflict and understandably a number of devices to facilitate firing from trenches were developed. Many of these devices adapted the standard service rifle, which often necessitated some mechanism to work the bolt action the chamber a new round. There were also periscope equipped Lewis Guns.
During World War Two the Germans developed an alternate approach. The story goes that an institute that developed turrets for aircraft had a problem. The guns and their mountings had to fire a variety of directions including straight upwards, but bullets raining down from thousands of feet was a problem. A curved barrel fitting was created that would deflect the rounds into a mound of earth. The German army was concerned about the high number of head injuries that occurred while troops tried to fight from trenches. They also had a problem with Russian soldiers who would succeed in getting so close to Panzers that they could not be engaged with standard tank weapons. Someone saw the potential of a curved barrel fitting to solve both problems. The “Krummlauf” attachment was fitted to the StG44, a 30 degree model with a prismatic sight being used by infantry and a 90 degree model with a mirror being used by panzer crews. 45 and 60 degree models are also known to have been made and the sighting system might vary depending on the vehicle it was used from.
After the war both the Americans and the Russians experimented with the Krummlauf for a number of weapons including the M3 and the PPSh-41. The fitting for the M3 is interesting in that part of the barrel is a gutter, open on its inner side. In recent years we have seen a new “gun that can shoot around corners” for SWAT teams. This is the Cornershot, using a video camera system. In the James Lovegrove novel, “Age of Zeus” these are called “Perseus Guns”.
I will leave you with another image, a rather ingenious way to blind fire utilizing the MP40’s folding stock.
Today’s blog will be a short one, but it will cover a couple of useful and interrelated ideas, all to do with water.
If you find a source of water, the chances are that it will not be too clean.
All sorts of mud, dirt and grit may be floating in it and the organic components will affect the efficiency of chemical purification methods you may employ.
Filter Tripod
One solution is to use a cloth bag to filter the water through.
I have even seen it suggested to use a spare pair of trousers. Tuck one leg into the other to form a double layer and then tie a knot in end of the leg(s).
Hang this up and pour water through so that it drips into a container.
In a long term camp, the filter can be packed with sand and straw etc.
Note that the water produced will be clearer, but cannot be considered to be safe until it has been boiled or chemically treated.
Wick Method of Filtration
A variation of the above is the wick method. Fill a container with your crude, suspect water and place an empty container lower down. Connect the two with a strip of cloth such as a bandanna and allow capillary action to do its thing. This may work with other materials such as paper or string. Experiment.
This method is a lot more economical on materials. When your wick becomes too dirty wash it or discard it.
Note that while the water produced will appear clearer it cannot be considered to be safe until it has been boiled or chemically treated.
Indian Well
A third method I was taught to call an Indian Well. It is also called a seepage well.
We have all seen the movies when the protagonists get to a water hole and it is all muddy. “Oh no!” they cry.
What they should do is start digging a hole near the shore of the waterhole or river.
If the ground is too hard for your hands find an object you can use as a digging stick. A tent peg, tire iron, even a stick!
The hole should be about half a metre across and deep.
Since you have dug down into damp ground the hole will begin to fill with water.
Poke a few holes in the side of the hole and it will fill even quicker.
The water will probably look muddy and still something you do not want to drink.
Using your hands, a bark scoop, tin can or anything else you have handy, bail out the water and cast it onto the ground nearby.
Eventually the water coming through should become clearer. Leave it a while and more material will settle out.
The water will still need to be filtered further and boiled or treated.
This is not the fastest method of getting cleaner water but does have the advantage that you can use it when not near an obvious water source. Just dig down into damp ground.
The water first revealed by digging a hole just above the high-tide mark should be fit for drinking. Further digging only produces water which is too salty..
Obviously, digging at a low point will be more productive than a hilltop.Dig between dunes or the lowest point on the outside bend of a dry water course.
The Boy Scout Handbook (1911) tells us that an Indian Well should be several feet from the water source, twelve inches across and six inches below the water level.
Empty by bailing at least three times before considering using the water.
Solar Distillation with Bottles
Our fourth method is useful for sunnier locations such as the desert, but may work elsewhere.
Take two bottles, glass or plastic. Clear is good but if both are opaque use the darker coloured one for the “crude” water.
Partially fill one bottle with untreated water and tape the necks of the two bottles together.
Since we are in the desert we will assume you have a vehicle nearby (working or not) and it has some tape in the tool kit. (don’t go to places like the desert without a tool kit and other essentials in your vehicle!).
If you have a suitable tube, use this to connect the two bottles rather than taping them neck to neck.
Find a slope or pile of sand, Select the side that will get the most exposure to the sun (the south in the northern hemisphere).
If the bottles were taped directly together, lay the two bottles on their sides and bury the empty one in the side of the slope, leaving the one with water exposed to the sun.
Let nature take its course.
The water in the outside bottle will be heated and evaporate. Being in a closed system it will pass into the interior of the buried bottle and the drop in temperature will cause it to condense.
After a while, the buried bottle will contain drinkable water which can be collected if you take the apparatus to pieces carefully.
If you had a suitable tube, you could have run this into the collection bottle when you constructed the device.
If you paid attention in school, you will recognise this method as distillation without the need for Bunsens and heatproof glassware.
The source water you used could have been urine and the produced water would still be safe to drink.
Today, as I still lay asleep, my dreaming mind decided to consider what today’s blog would be about. It considered several topics, which in the manner of dreams mingled and interwove. These resolved into two articles, both part-written as I travelled into work. All that was needed was to write them down and decide which was more suitable for a Friday blog. Regular readers will know that I often elect to make Friday’s blog a little different. Usually it is something humorous, and failing that something a little off-topic that may still entertain or provoke thought. I had decided to post the more off-topic of the two possible articles. Then I looked at my emails and a link a friend had sent me and I knew that I had Friday’s blog topic.
In Spider Robinson’s book “Callahan’s Crazy Crosstime Bar” an alien character is asked what he finds most remarkable about living on Earth. His answer, to the surprise of everyone else, is “bathrooms”. He then gives a long list of reasons for his statement. One point I recall is that he asks why people waste so much time running hot and cold taps to get the desired temperature when a cheap electronic addition could do this? I have discussed on this blog that we frequently use hot water in the bathroom when we do not need it.
Years ago the friend who sent me today’s link and myself got into a long discussion on illogical aspects of bathrooms. I seem to recall that one topic was the shape of toilet bowls. Why is the back of them gently sloped? If the rear part was more vertical, or even receding towards the bottom this part would be less prone to fouling. The horse-shoe shaped toilet seats used in some public institutions are more hygienic than the more common horse-collar shaped seats, being less prone to drips of urine from a seated user.
Friday blogs has semi-humorously mentioned the topic of self-defence in the bathroom. It is a place with just one way in or out in which you may be naked or partially dressed. Is it that outlandish to have some means of defence in that room against an intruder? I watched a movie the other week where the female protagonist survives and encounter with two psychopathic serial killers. Unlike most movies of this ilk, the heroine realizes one or both of these men may come after her and makes preparations. We see her moving around her home. There is a knife taped under the counter top, a stout stick in the umbrella stand and in her shower is a screwdriver in the cup with her toothbrush.
Possibly the most interesting point in the “Poop like a Samurai” article is how the master also considered this posture to be better for evacuation. I have yet to try it but it did remind me of the works of Alexander Kira. Kira was an advocate of the modified squat position. There are various companies and individuals that will sell you gizmos to make your toilet more like squatting over a hole, but these are not really necessary. Just rest your toes on the floor and lean forward so your elbows are on your knees.(middle right, below) It really does make things easier.
A friend of mine posted this image up on his facebook page.
Apparently, if someone grabs your wrists you should break your own tailbone and the assailant will laugh so hard he will hit his head against the convenient nearby wall.
There are a lot of simpler and far more effective things you can do against a wrist grab like this.
Most of these are detailed in my book, so I will not repeat them here.
A technique that the above illustration does remind me of is one of my favourite sacrifice throws.
A sacrifice throw is a technique that takes you down to the ground as well as your adversary.
As such, it is not the best choice if you are facing a mob of people who may be tempted to kick you if you are so cooperative to lay down near their feet.
For an one to one encounter this can, however, be a useful trick to add to your toolbox.
This is a very simple technique and is somewhat easier to initiate than the better known Stomach Throw (Tomoe nage).
There is doubtless a Japanese term for this throw but it is easier to just think of it as the Step-Across Sacrifice Throw.
Firstly, you must have some kind of connection to your foe. Grab his shirt or he has grabbed you lapels. Hook your hands around the back of his neck.
If he has your wrists as in the illustration above hook your hands outward so you do not lose contact.
If your foe should release your wrists as you execute your technique you will end up on the floor with him standing over you, which is embarrassing to say the least!
Step your right foot over to the outside of his right foot (or left foot to beyond his left). The result is one of your legs crossed over the front of both of his.
Drop to the floor. You can sit down on your rear heel, drop down on one knee or just fall down, whatever suits you and the situation.
The important thing is you remain in contact and the foe has to suddenly handle your entire dead weight.
Executed correctly this will pull him forward, but he cannot step forward to compensate because your front leg or body is obstructing his legs.
The foe is pitched forward, head first.
The photo below shows a variant of this using a drop to the knee and disrupting the foe's balance to throw him to the side.
The mechanisms and techniques behind this are covered in my book.
If his arms are free, he may be able to arrest his fall.
If he has the training and quick wits he may manage a forward breakfall or roll.
Be prepared for this by regaining your feet as soon as the throw has been made so you can maintain the initiative and counter attack.
In training, be careful with this technique since it will throw a partner headfirst and they may be injured if their breakfall technique is not good.
I don’t know if this throw is legal in competitions. Best consult the judges beforehand.
As I have mentioned recently, I am currently reading the Pellucidar novels of Edgar Rice Burroughs.
Often the protagonists prevail against their caveman enemies by their “Outer Crust” knowledge of boxing or jiu-jitsu.
Consequently, this has got me interested in again reading some of the older jiu-jitsu manuals that I have available.
One of the oldest I have come across is from 1904.
The two Japanese fighters demonstrating the techniques do not look like they are much taller than five foot. What would they make of modern Japanese, I wonder?
The book has some interesting techniques, most of which will be familiar to modern students of martial arts.
A couple of techniques can be criticised as being overly elaborate, although that can be said of many manuals.
Just because a book shows a thing as possible does not mean it is the best solution. It may be there for illustrative purposes of basic principles, for example.
This particular book can be praised for often avoiding complicated throwing techniques when simple strikes can produce the desired result. I
do not recall any kicks being used in this book, the strikes used being the knife-hand, the elbow and a two-finger jab directed against the solar plexus.
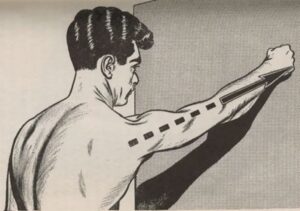
A section of the book that struck me in particular was on the various uses of “the shoulder pinch”.
We get told that pressing into this point with the thumb or fingertips is a good way to make someone release a hold, move them aside when they are obstructing you, and various other applications to induce compliance.
The one photograph that purports to show the shoulder pinch does not show its location with sufficient clarity. The recipient’s head prevents me seeing where the thumb is being applied.
The text tells us:
The thumb is pressed into the front side of the top of the shoulder, while the grip is kept by grasping with the fingers at the back of the shoulder. A very little practice upon his own shoulder will show a jiu-jitsian where the spot is that is hyper-sensitive to the pinch with the thumb. Bear in mind that the ball of the thumb should dig in at the point where the head of the upper arm joins the scapula.”
I would have assumed that the “shoulder pinch” was against the brachial plexus, but the last sentence suggests a more peripheral location.
The brachial plexus is quite an effective location to apply a thumb or fingertip to.
The nerves from the plexus continue into the arm and can also be pressed upon closer to the shoulder joint if you use deep pressure.
It is possible the author considered both locations to be “the shoulder pinch”.
The brachial plexus is pretty easy to locate. Just search around where the neck forms a corner where it joins the trapezius muscle. The anatomical diagrams should hopefully make this clear.
The brachial plexus is also a good target for strikes such as the knife-hand, hammer-fist and forearm.
You have probably heard of the “brachial stun” technique that has become well-known in recent years.
Often the technique shown in videos is a strike to the side of the neck.
A strike to the actual brachial plexus will have similar effects and this point is often easier to hit during combat than the side of the neck.
Like any strike to a major nerve centre, this can be potentially very damaging so do not attempt this except in a real self defence situation.
The other dayI mentioned how difficult it was to write about hitting with the hand without implying a closed fist punch. Punching and hand-striking are effectively synonymous in common English. This morning I was reflecting on the term “boxing”. Generally when we talk about boxing we mean the western combat sport, but terms such as “boxer” or “boxing” are used for Chinese martial arts, for example. Why do we call fighting with our fists “Boxing”? Wiktionary says:
That a similar word exists in a number of European languages suggests it may have a very ancient root. It is also possible that the word has an onomatopoeic origin. Many more words in English have an onomatopoeic origin than you might suspect. Ever thought about why a device that makes a “tock” is a “clock”?
Decades ago, when I was first on the internet I wrote a piece of conjecture called “Ninja Should Be Grey”. I may have referred to it before on this blog. That article and the website it was on have long since vanished. A friend of mine and regular reader of this blog has often expressed the wish that he could have read that article. Since the article could be considered as covering urban self-defence and survival I am going to recreate that article and include couple of updated ideas.
Ninja Should Be Grey.
Many historians of ninjitsu have claimed that what we now call a “ninja outfit” is actually derived from the costumes of Japanese stage hands. By convention the hooded and dark-clad stage hands were treated as being “invisible” by the audience. When ninja and other invisible characters began to appear in plays they were given costumes similar to the stage hands to convey that other characters in the play could not see them.
Real ninja would often wear disguises that allowed them to move about the country without arousing suspicion. Often they would be disguised as wandering priests, monks, entertainers or pedlars. If they did need to wear low-visibility clothing it probably would not be pure black. One reason for this was with the dyes available at that time creating a deep black was difficult. Another reason was that even on a dark night a pure black object would tend to stand out. Night gear was more commonly a dark shade of blue, green, red or grey. Interestingly Special Forces in Vietnam would dye their uniforms black knowing that after a few washes it would fade to a more useful charcoal-grey colour. Back in my youth I dyed a green M65 jacket black and it turned a very useful dark drab-green.
Grey itself is a quite interesting colour. The pedantic will claim that it is not a colour at all! Grey is a neutral shade and as such combines well with a variety of colours and backgrounds. We all know that the World War Two German Army wore grey uniforms. Originally “Feldgrau” seems to have had a greenish tinge or been a green-grey. As the war progressed greyer cloths became more common and some historians class some items as actually being “mouse grey”. Many animals are grey and as many of us can attest, this can often make them hard to see. The England football team once wore a grey away-strip and claimed that their poor performance was that the strip made it difficult for players to see each other. That this should also make them harder for the opposing team to see was not mentioned!
Let us think about a “modern ninja”. By “ninja” we mean someone who for any number of reasons wants to avoid attention. Dressing in black pyjamas and a hood with a sword across his back is not going to do this. Nor, for that matter, is dressing him in grey pyjamas!
Suppose instead we give our “ninja” some street clothes consisting of a grey jacket and faded blue jeans. Faded denim is effectively a light grey with a hint of blue. Our ninja looks rather dull and unremarkable. There are probably a thousand other men walking the streets in similar outfits. And this is the point entirely. Not only is he grey in colouration, but also in aspect.
Against the greys and browns of a typical city the dull greys and blues of the ninja make him fade into the background, be it night or day. People that see him tend to overlook him. Many security cameras are low resolution and often only see in black and white. Our grey ninja is also sometimes overlooked by such cameras. There is little distinctive detail about him to recall.
Let us refine this outfit a little more. A hat of some kind helps conceal the colour and the style of his hair. If the cap has a peak it is at the front, helping conceal his features from cameras and keeping the sun out of his eyes. A knitted hat may be warmer and less likely to be lost under certain conditions. Such a hat may actually be a ski-mask. If the ninja is wearing a hoodie he can wear the hood up to help conceal his hair and features. Be aware, however, that hoods can reduce your situational awareness and can be grabbed during a fight. Wearing your hoodie with hood up can also draw attention to you in some situations, so is counter-productive. A scarf or neck gaiter is a useful addition to the outfit since it can be used to conceal the features when necessary. Such an item should be of a shade/ colour that does not contrast with your skin tone so that at a distance it will not be obvious you are masked. Footwear must be something functional such as sneakers. Like the rest of the clothing items these must be unremarkable rather than distinctive. Logos, graphics and brand names on clothing are best avoided. If this cannot be achieved they should be as unremarkable and as generic as possible for the area. A “Yankees” cap will be noticed more in LA than in NY. Clothing needs to fit well while allowing freedom of movement. Excessively tight or baggy clothing will draw attention and is not desirable, despite what the fashion industry tells you. You do not want jeans hung so low and loose that they slip around your ankles as soon as you have to move fast.
There are a few more tricks our modern ninja might employ. Streetwear is often worn in layers, such as a bomber jacket over a hoodie. Swapping these over can produce a quick change of appearance. If you are wearing a baseball cap and have a watch cap or bandanna in your pocket changing headgear can also change your appearance. Reversible garments are a staple of old spy movies but this is a practical option for some hats and jackets.
Context is important in “being grey”. If you are in Hawaii an obnoxiously loud shirt may be your best camouflage. Anyone seeing you will just regard you as “just another jerk-off tourist” and immediately overlook you and forget you. If you are in an office building the streetwear described above will make you stick out like a sore thumb. In such an environment “grey” would mean an unremarkable suit and a boring tie. Something that is neither poorly fitting nor snappy.
When I started my exercise program a few years back, I was amazed at how quickly I began to see results.
If I had known how easily I could have improved my muscle tone for relatively little effort, I would have started years ago.
If I had known in my teens what I know now my life would have been very, very different and considerably better I suspect.
A friend of mine is in his teens, and very like I was back then, so I have encouraged him to try my exercise routine and see what results he gets.
He started a couple of days back, lifting heavy books and on his own initiative, hitting a punchbag.
Today’s blog post is dedicated to Gabriel and wishes him success and perseverance in his endeavours.
In the movie “Little Big Man”, there is a scene where a young Indian boy attempts to manhandle the young protagonist. The youth defends himself and punches his assailant, bloodying his nose. This amazes all the young Indians and the narration tells us that fist fighting was unknown to Indians.
My recent reading of the Pellucidar novels reminded me of this scene.
In these books, several of the protagonists are familiar with “outer crust” fighting styles such as boxing and jiu-jitsu, and they use them to good effect against the violet but less sophisticated attacks of cavemen.
I don’t know how much truth there was in the movie’s statement that Indians did not know boxing, nor if there are any cultures that this is true of.
When I was writing my book, it became apparent to me how deeply ingrained into our culture the idea of punching with a closed fist is.
I had to consciously stop myself using the term “punch” for hand strikes and any alternate term I did use did not look right.
If you hit someone, you were punching, and punching seemed to imply a closed fist.
A correctly applied punch can be devastating. On the other hand, (pun intended) striking with the fist requires conditioning, practice and good technique.
Hands are sensitive and their bones are small.
Mike Tyson is by no means the only experienced boxer to break a hand punching someone without a glove.
One of the books I recommend to my readers is Jack Dempsey’s “Championship Fighting”, which can be found at various locations on the internet.
In one section the famous boxer talks about “The Power Line”. In his own words:
THE POWER LINE RUNS FROM EITHER SHOULDER-STRAIGHT DOWN THE LENGTH OF THE ARM TO THE FIST KNUCKLE OF THE LITTLE FINGER, when the fist is doubled. Remember: The power line ends in the fist knuckle of the little finger on either hand. Gaze upon your "pinky" with new respect. You might call that pinky knuckle the exit of your power line- the muzzle of your cannon…. …..Unfortunately, however, the hand-bone behind the little knuckle is the most fragile of the five backbones. It can be broken the most easily. You must not attempt to land first with the little knuckle. Instead you must try to land first with the knuckle next to your pinky (the ring finger). We'll call that the 2nd knuckle. Aiming with the 2nd knuckle usually brings about a three-knuckle landing. Those three-knuckles are: middle, second (ring) and pinky. If you aim with the second knuckle, those three knuckles usually will land together because the average fist slopes slightly from the middle knuckle to the pinky. Such a three-knuckle landing not only prevents the hand-bone behind any one knuckle from bearing all the punch-shock, but it also permits punching almost exactly along the power line. Rarely will one of those knuckles make a solo landing. But if you aim with the little knuckle, you risk a dangerous solo landing on forehead or blocking elbow.”
An oddity is that Dempsey considers the little finger as the “first finger” when many of us would consider the first finger to be the index finger.
What Dempsey is telling us is that if you hit with the lower knuckles, the force of impact will pass in a direct line to the larger bones of the arm.
Interestingly, we see the same knowledge in other martial arts too. Many Chinese styles such as wing chun and tai chi hit with the lower knuckles of a vertical closed fist.
Those of you that are more familiar with karate or tae kwon do may now be objecting that you have been trained to strike with the first two knuckles!
Turn your fist from vertical to horizontal and you will see the alignment of the hand bones changes.
The little finger knuckle is no longer on a line with the larger bones, the index and middle finger knuckles are.
Experiment with this and you will find this changes for different hand positions and punching techniques.
Hooks, Shovel Hooks and Uppercuts tend to line up the last two knuckles.
The quick advice I usually offer for punching with the closed fist is to save it for the soft parts.
Use closed fist punching for targets below the lower ribs. The solar plexus, the kidney region and the genitals.
For most other targets, you must untrain yourself from punching with the closed fist and learn to use palm heel and knife-hand strikes.
Knife-hand (aka “Karate Chop!”) has defensive applications too. Parrying attacks with the edge of the hand or the edge of the forearm can numb or injure an opponent’s attacking limb and a swinging strike with the edge of the hand is sometimes quicker to execute than a punch.
For a more in depth discussion of this topic and related issues please purchase my book
Reading through my file collection the other day I came across an old (1930’s?) article on how the North American Indians made their bows. I have some knowledge of English and Asian bows but this was a field I was less familiar with. One of the reasons that this article so interested me was that I am currently reading Edgar Rice Burroughs’s Pellucidar series. Many of the characters in these books use bows and there are frequent references to them constructing new weapons after escaping from capture. The Indians tended to favour flatbow designs and I have heard it suggested that such a bow is easier to construct under field conditions than the D-section English Longbow.
I will not bother to reproduce the entire article since there are some excellent websites on the topic available on the internet. Some interesting points from the original article were:
The best time to cut wood to make bows was February since the sap had not yet risen into the wood. This was defined in the article as “when the geese return”.
The wood of choice was Osage Orange. Where this was not available a number of other woods were used including ash, hickory and yew.
Like the English Longbow, the bowstave needed a considerable period of seasoning before any carving could be done. Bowstaves were hung high up in the tepee above the fire to gently season in the heat. Arrowshafts and other items were seasoned in the same way. The bark side of the stave was used for the "back" of the bow: the part that faces away from you.
Bow length varied with tribe, intended use and probably the individual. Bows of six foot or longer were known, as were bows of only a few feet. A suggested measure for a bow was the distance from the left hip to the right hand when the hand was held out horizontally to the side. This is about four feet. Some readers will recognize this as illustrated in Lofty Wiseman’s “The SAS Survival Guide” and doubtless this book and the article drew from a similar source. The bow illustrated in that publication is a flatbow.
Arrows were often marked with three lightning bolt carvings. Practical purpose of these may have been to reduce the tendency of the arrow to warp. It was also suggested in the article that the grooves might have encouraged blood loss.
Arrowheads were bound into the end of the arrowshaft. Some war arrowheads were constructed so that impact with the target would cut the bindings, leaving the head in the target even if the shaft was pulled out.
Hard sinew (from the neck of a buffalo) was sometimes used as an arrowhead. The stated advantage of this was that such heads had a tendency to deflect from the ribs of an animal and slip between them while flint or iron heads would stick, shatter or bend.
ERB does not give us any description of the type of bows his characters use, although David Innes in “Land of Terror” does tell us:
“A species of the genus Taxus is more or less widely distributed throughout Pellucidar; and I had discovered that its wood made the best bows. For arrows I used a straight, hollow reed that becomes very hard when dry. The tips which I inserted in the end of the reeds were of wood, fire-hardened.
A modern archer of the civilized outer world would doubtless laugh at the crude bow I made then at the edge of the Valley of the Jukans. If he uses a yew bow, the wood for it was allowed to season for three years before it was made into a bow, and then the bow was probably not used for two more years; but I could not wait five years before eating; and so I hacked the limb I had selected from the tree with my stone knife and took the bark from it and tapered it crudely from the center toward each end. I prefer a six foot, eighty pound bow for a three-foot arrow, because of the great size and formidability of some of the beasts one meets here; but of course my bow did not attain this strength immediately. Every time we had a fire, I would dry it out a little more, so that it gradually attained its full efficiency. The strings for my bows I can make from several long-fibered plants; but even the best of them do not last long, and I am constantly having to renew them.”
“Fruit and nuts grew in abundance on the trees and shrubs of the little canyon; but fighting men require meat; and one must have weapons to have meat. These two had not even a stone knife between them, but the first men had no weapons originally. They had to make them.
Innes and Hodon went into the little stream and hunted around until they found a large mussel. They pried it open with a sharp stone, and each took a half shell. With these they cut two pieces of bamboo-like arborescent grass to form the hafts of two spears. Searching again they collected a number of stones: soft stones, hard stones, flat stones, stones with sharp edges; and with some of these they chipped and scraped at others until they had fashioned two spear heads and a couple of crude knives. While Hodon was finding the toughest fibers with which to bind the spear heads to the hafts, Innes made a bow and some arrows, for this was one of his favorite weapons.”
Since Pellucidar was constantly under an unmoving noon-day sun it presumably had no seasons and the trees would have always been filled with sap. Perhaps that was why the bow was so rare on Pellucidar!


 seen it suggested to use a spare pair of trousers. Tuck one leg into the other to form a double layer and then tie a knot in end of the leg(s).
  A variation of the above is the wick method. Fill a container with your crude, suspect water and place an empty container lower down. Connect the two with a strip of cloth such as a bandanna and allow capillary action to do its thing. This may work with other materials such as paper or string. Experiment.


 Bow length varied with tribe, intended use and probably the individual. Bows of six foot or longer were known, as were bows of only a few feet. A suggested measure for a bow was the distance from the left hip to the right hand when the hand was held out horizontally to the side. This is about four feet. Some readers will recognize this as