Food and Cooking
A bug-out is not going to be three square meals a day with a choice of ice cream flavours!
For a bug-out bag, most of the food should be capable of being consumed without cooking. A significant part should be food you can consume on the move.
Long shelf-life without the need for refrigeration or freezing is a priority.
MREs are an expensive and somewhat bulky way to stay fed for 72 hours. You will also be lugging around weight and junk you do not need such as multiple spoons, instant coffee and chewing gum.
Soldiers often strip down their MREs before a patrol. Vast amounts of fuel and money could be saved if many of these items were not included in the first place!
Stripping down the MREs for a bug-out bag beforehand is not really practical since you will violate the packaging and affect the shelf-life.
Possibly the best feature of MREs is the provision of flame-less heating pouches.
There are lots of other foods that meet the above criteria, many of them available down the supermarket. I suggest you read DePugh’s comments on food selection.
Some possible things to provision your BOB include:
Dried or semi-dried food such as sultanas, apricots and banana flakes.
Matzos and/or hardtack.
Rolled Oats/Porridge: One of the few grains that can be eaten without cooking.
Cured or smoked sausage.
Tinned meats such as Spam, corned beef etc.
Trail mix (has a relatively short shelf life, but use it if you have it).
Home-made Jerky (a good stock of the store bought stuff may be expensive, so make your own!)
Cereal bars.You can make your own.
Lifeboat Biscuits.
Pinole (easily made from polenta).
Malt barley.
Note that many of these are “go-foods” which may be consumed on the move.
If you are not in immediate danger, add fresh foods you may have in the house. Priorities are fruit, cheese, bread, jams, butter, and cooked meats.
Carbs, fats and sugars: The end of the world is no time to keep to the diet!
Carry a bag of hard candy/boiled sweets. One of these can give you a quick boost when you are flagging.
Don’t waste space and money on vitamin supplements. You should only be taking these if instructed by your doctor. Vitamin deficiency is not going to be a major threat in 72 hours!
While carrying a bug-out bag and its contents will consume energy, many reading this will be used to eating larger meals and more frequently than they need to. You can go a lot further on less than you might think.
In addition to the above, you may wish to put together a “brew kit”. In certain conditions hot liquids are much more than just a morale boost.
Have tea bags and coffee bags. If civilisation is ending you don’t want the last thing you drink to be yucky instant pseudo-coffee!
Add some variety such as hot chocolate mix, stock cubes, packet-soups and even some blocks of instant noodles.
If water supplies are a concern, sugars and starches take less water to digest than fats. Eating tends to stimulate thirst. Eating less food if water is restricted is usually prudent, and appetite is often reduced in vary hot weather, so the quantity of food may be reduced in favour of more water.
Many of us are carrying extra weight around our middles, so a couple of days on light rations will not harm us. A couple of days without adequate water will!
Boiling Water
Even if you do not carry a brew kit, some means to heat water to render it safe to drink will be needed.
This is another area where bad advice is common. I have seen recommendations to boil for twenty minutes and allow to stand for another twenty! The WHO standard specifies a rolling boil for ten minutes. This is not a strictly scientific criteria and is deliberate overkill. (This criteria may have been updated since I was educated!) Ten minutes is not really practical if your fuel supply is limited.
Generally, your actual requirement is to pasteurize your water (kill pathogens) rather than sterilize it. This may be done by heating water to 65°C for six minutes. More practically, since the pasteurization process is exponential, bringing water to a rolling boil (100°C) for a few seconds has the same effect. That is how humans have been pasteurizing water (and making tea) for thousands of years.
I am a qualified microbiologist (be it an old one!), but don’t take my word for it, do some research of your own. Many sites on solar cooking have information on water pasteurization and SODIS, and may have links to scientific papers on the topic.

A European mess kit is a better choice for cooking and boiling than a canteen cup. It will treat a more useful quantity of water and may be hung above a fire. It may also be used as a bucket to fetch water, collect berries and similar.
The interior of your mess kit may be packed with your brew kit and other items.
I would not recommend carrying your stove and fuel inside your cooking vessel, even if bagged up.
A mess kit or canteen cup is a pack item, not belt-kit.
Stove
A stove will be needed for when a fire cannot be used.
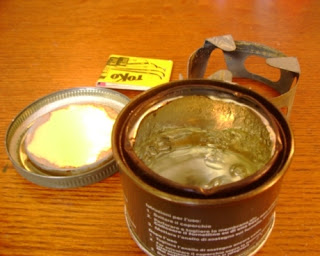
Alcohol gel stoves are probably the best option for your bug-out-bag.
Some of these resemble small paint cans with a pot stand. Other models of stove, such as the Crusader cup stoves, mini-Trangia and Trangia Triangle will work with either alcohol gel or solid fuel blocks. The Trangia stoves and the Esbit folding stoves can be modified to use gel by adding a metal dish for the fuel. Some solid alcohol blocks work with the standard Esbit stove.
Solid fuel blocks or gel may also be used to help light more traditional fires.
Other designs of stove, pot support or burning dish are easily constructed.
You may use your stove while the pot handle hangs from a stick or other support. This is useful when your cooking space is not totally level, or your pot is likely to get knocked.
Air Ministry Pamphlet “Desert Survival” 225:
Paragraph 11. “The following items, in addition to water, should be carried if possible: heliograph, signal pistol and cartridges or flares, a small reliable compass, maps (indicating roads and sources of water if possible), tinted flying goggles or sun glasses, head covering, knife, matches, salt tablets, a minimum of concentrated emergency rations, first aid kit, anti-burn cream, torch, warm clothing (for use at night), and a pair of strong boots. A useful maxim to bear in mind is “always fly in the boots in which you intend walking home”.
Water
You will need some means to carry water, the quantity depending on climate and availability. In arid and semi-arid conditions water is one of your priorities. In the jungle or Pacific Northwest there may be more water around than you care for.
Water consumption should not exceed water loss. When water supplies are a concern, minimize water loss. “Ration Sweat”. Cover your head and exposed skin. Stick to the shade. Hike or work at night.
When water is scarce, priority is for drinking rather than washing or cooking. Washing should be restricted to washing wounds and cleaning the hands before eating or medical procedures.
Each litre of water you carry will weigh one kilo/ 2.2 lbs, not including the container.
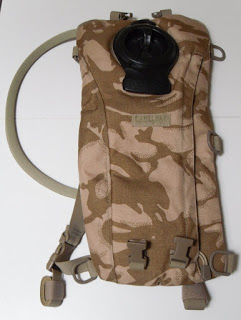
A water bladder with a drinking tube is recommended, since it allows you to drink on the move without needing to remove or unpack your pack. 
A hydration pack is a water bladder with carrying straps, so it can be worn as a small pack when you are not wearing your rucksack. The hydration pack should either fit in or onto the outside of your rucksack when you are wearing the latter.
You only really need one bladder with a drinking tube in your bug-out-bag. The rest of your water may be carried in containers such as large soda bottles, which saves a few pennies. Refill your water bladder from the soda bottles as needed.
There are various pros and cons regarding keeping the water bottles in your bug-out-bag already filled.
Firstly, any water kept for an extended period should have a few drops of unscented bleach added to it. This sterilizes the water and harmlessly decays down into water and hint of salt over time. I would not keep water in water bladders when they are not in use.
Plastic components leaching into the stored water has been raised as an objection. According to scientific studies this is a very minor worry. If a nearby volcano or the local nuclear plant is about to blow, this may be fairly low on your list of worries!
There may not be time to fill-up your water bottles before you go. The mains water supply may have been cut off, or toxic waste dumped into the water supply by your friendly local industry may be the reason you are evacuating.
Filling the bottles in your bug-out-gear in a supply of water you stored for the purpose has been suggested. Presumably some people intend to use non-plastic bottles. Finding non-plastic storage bottles larger than a litre may be difficult. That may be a lot of bottles you will need to find room for!
Obviously, if storing water long term, use water that is as clean and clear as possible. Preboil it if possible. Reoxygenate it as described on the SODIS protocol before topping up and adding bleach or purification tablets.
Leaving the filled and sealed bottles standing in strong sunlight for a day or so will not hurt.
While most of your water should be in your pack, you should have a reserve on your person to carry when you are away from your main pack.
Hydration packs or canteens with slings are good, but there will be temptation to put them down. Slings or carrying straps may get caught on undergrowth and branches.
A canteen in a belt pouch may make sloshing noises that will give your presence away or alert game. A water bladder in a belt pouch may be a better option.
Smaller bottles, such as the US pilot’s flask (One US pint) can be carried in a large pocket.
With your water supply you might decide to carry a dew-sponge, length of plastic tube, and a bandanna/cloth to be used for initial filtration.
Your bug-out-bag should have a good supply of water-purification tablets for instances when you cannot heat treat your water. Get the sort intended for travellers, where a single tablet treats one litre of water. Some varieties treat 5 or 200 litres per tablet!
Water purification pumps are possibly not necessary for an individual travelling light in a 72 hour scenario, but useful for a squad or group or for a longer trip. Such water will still need chemical or heat treatment. Filtration will remove many harmful organisms but cannot remove all viruses.
For a short duration/72 hour kit, a few coffee filters may be carried to filter debris out of found water. You will still need to boil this water or chemically sterilize it.
Used and dirty coffee filters may then be used as tinder, toilet paper or for leaving notes.

Recommendations for trapping and fishing gear for a bug-out bag can also get quite extensive.
In many bug-out scenarios there may not be time or suitable conditions for trapping and fishing. Trapping and fishing involves staying in an area for some time, when in a bug-out travelling may be a priority.
My EDC includes a six-span length of braided fishing line and 22 hooks on nylon. If I was expecting to venture into the wilds, I might add some additional gear to my EDC. I will talk about that another day. Today I am discussing what to carry in your bug-out-bag.
Brass wire suitable for making snares may be used for repairs or for other purposes, so a ten metre coil has a place in your bug-out bag.
A generous amount of braided fishing line also has many other applications. You might as well pack whatever was left on the reel once you had constructed your EDC fishing lines.
Some advise to also have a spool of light monofilament or flurocarbon line for when fish are shy of a braided or heavy line. All my hooks are on nylon and in a survival/bug-out situation I am most likely to be night fishing, so I expect line visibility will not be a major problem.
It is not a bad idea to fill the nooks and crannies of your bag with various types of cordage: ball of cotton string, bundle of bankline, hank of paracord.
Fishing hooks and lures cost little and take up little room, so have a good supply. They will be no great burden even if you do not have a chance to use them. All should already be tied to nylon leaders or fitted with snap-swivels.
A bundle of wire leaders will be useful if you find yourself lucky enough to be fishing for bigger, sharp-toothed fish. Long leaders may also be used as snares.
I am a little dubious about carrying fishing rods and other items intended for active angling. There are easier methods for catching fish. If travelling the most likely technique will be setting a night line while sleeping.
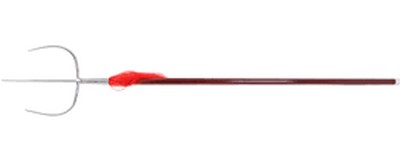
A fishing gig and a net are useful if you are certain that you will be fishing.
Most gigs I have seen have a screw fitting. You will need to modify this so you have a socket that may be mounted on a stick such as your hiking staff.
In Brazil, my girlfriend would use a net she called a “pulsa”. Her description sounds like a circular lift net, but it would be thrown out over the water like a frisbee and then hauled back, effectively trawling. Similar nets fold up to a size compatible with a large pack.
As far as active hunting goes, you may not have time if the emergency requires you to move fast or travel far.
All the chaos and human activity may make game shy, or they may have bugged out themselves before humans woke-up to the danger.
A hand catapult takes up little room in a bag, although you may have little opportunity to hunt with it. It could be useful in driving off aggressive dogs.
A .22 hunting rifle may not see much use either.
In a 72 hour bug-out scenario, other human beings are likely to be more of a problem than hunger. This should be figured into what firearms you decide to take with you.


 Bow length varied with tribe, intended use and probably the individual. Bows of six foot or longer were known, as were bows of only a few feet. A suggested measure for a bow was the distance from the left hip to the right hand when the hand was held out horizontally to the side. This is about four feet. Some readers will recognize this as