Disclaimer: “As an Amazon Associate I may earn from qualifying purchases.” Adsense and Infolinks were no help at all.

If you have enjoyed this article or it has been helpful to you please feel free to show your appreciation. Thank you.

Read The Third Wave by Alvin Toffler!
Categories
Phillosoph

Tactical Trowel

As regular readers will know, I am interested in various survival tools and feel that digging ability sometimes does not get the attention that it deserves.
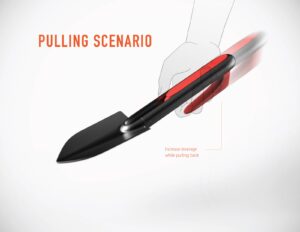
Yesterday, while researching another topic I came across this interesting item.
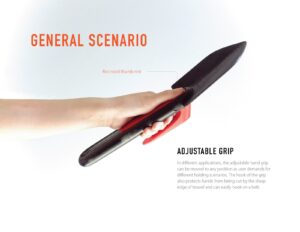
I like the rubber handguard/ belt hanger, although a more tactical mid-brown colour would be welcome. I am a little baffled by the reversible feature. I’d be quite happy with the hook in just one position and the head and shaft as a single piece. The other main modification I would suggest is that the shaft end in a pommel or similar widening.
I would probably not issue a 13 inch entrenching tool to an infantryman but this could be a good item for combat engineers, survivalists and campers.
The handguard/ belt hanger idea may be worth looking at. An add-on piece that could be attached to larger tools might have potential.
Categories
Phillosoph

Home Guard Camouflage by Slater

Recently I have been reading some more Home Guard manuals. Camouflage and fieldcraft were something that the Home Guard took very seriously. They were some of their major defences against the superior firepower of fascist invaders. In previous posts I have referenced “The Home Guard Fieldcraft Manual” by Maj John Langdon-Davies. This is recommended reading to anyone interested in camouflage, not just in the context of WW2 Home Guard. Another notable publication was “Home Guard for Victory” by Hugh Slater. His section on camouflage is only a few pages, but well worth a read. Since this book is not available as a reprint and I have been unable to locate an electronic copy I will take the liberty of reproducing the relevant pages below. If you think your pickup is a little too conspicuous the section on camouflaging cars will be very useful. Many military vehicles could learn from this section.
(Incidentally, I’m very impressed at how well the free “a9t9” OCR software handled the small type in an aged 1941 book!)
CHAPTER XIII CAMOUFLAGE
CAMOUFLAGE WAS ORIGINATED some time in 1915 by a small group of young French artillerymen who in civilian life had been cubist painters and associates of Picasso. As painters they had been experimenting for some years with those problems of form which seemed to them to arise from the work of Cezanne. As light field artillerymen they very soon found themselves to be the bull's-eye for the enemy guns, and they applied their civilian knowledge to the problem of concealing their battery from the enemy's artillery observers.
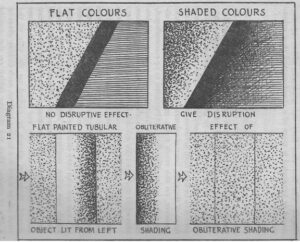
Camouflage covers both concealment and disguise. Any object is seen and recognised first by its form, next by its tone, and then by its colour. The first problem, therefore, is to find a way of breaking up or changing the form of the object you are going to camouflage. Form is indicated to the observer by the shading of the object and the shadows which are cast. To alter the form it is necessary to disrupt and change the normal shading by which the form is shown, and either to eliminate or to alter the shape of the shadow cast by the object. In order to alter the shape of the thing you are camouflaging, disruptive patterns must be painted across its form, using sharply contrasted tones in a line against one another, shading away into one another between. See Diagram 21.
In the distance colour tends to fade, while tones may become more pronounced. Therefore the best way of disguising the shape of an object from an observer at a distance is to use sharply contrasting tones cutting across its shape. All colours fade in the distance, but yellow is the first to lose its saturation, then red and finally blue.
Blue has a greater saturation some distance away than it has near to. For this reason, when camouflaging (for example, a block-house sited on the side of a hill with a wide view, and therefore visible from a considerable distance) the colours used will be yellowish-greys and warm browns with an absolute minimum of blue. Where it is a question of camouflaging an object that we may expect will be seen by the enemy at short range, yellowish colours will not be used, but cold bluish colours will be the most appropriate. In neither case should red be regarded, as a general rule, as a particularly successful camouflaging colour. Pitch black is always very useful.
Obviously the second, though not less important, problem of camouflage, after the question of the disruption of the form of the object has been considered, is to make it merge into, and become part of, its background. Appropriate colours will be used according to where the object is, in a town or in the country. It will be remembered that country colours change quite considerably at least four times a year. In the spring there are yellowish colours, in summer green, in autumn brown, and in winter grey.
In towns, more red may effectively be used. Patterns in towns will tend to be more zig-zag and less curved. Generally speaking white is a bad colour to use in camouflage, but it is not possible to lay down any absolute rules, White could be an excellent way of camouflaging a pill-box in front of a white-painted house in a town.
Light tones are also useful for neutralising any constant dark shadows, such as the shadows at the bottom of fairly deep trenches. In this case, rabbit-netting with fairly light scrim can be most valuable. As a general rule the under sides of objects should be fairly light. In the case of a cubic pill-box the sides should always be painted lighter than the top, and the north side should be the lightest of the four sides, because it is on the one that may be expected always to be in shadow at any hour of the day.
Paint is not, of course, the only way of camouflaging. Very often all sorts of nets and structural methods can be most useful. Symmetry is generally the most obvious giveaway of any position. There is, therefore, every reason why pill-boxes should be deliberately built all sorts of odd shapes. The fact that they are generally either square, round or octagonal is more of a disadvantage than otherwise.
CAMOUFLAGING CARS
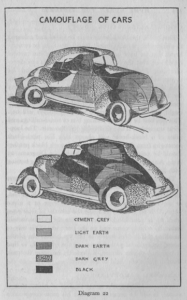
If we apply these principles to the camouflaging of motors, it will be seen that contrasting tones should be painted diagonally across the car. They should be shaded off into one another to spoil the car's form. See Diagram 22.
The roof of the car should, in general, be darker than the sides. The paint used must not shine. Because cars may be expected to be used both in towns and in the country, and at all times of the year, neutral colours should be used. There are, however, on the roads today many khaki cars which, although it is clear that they are intended to be camouflaged, are perfectly obvious, either from the air or the ground, because the tones used are not sufficiently contrasting to have altered or disrupted the tell-tale form to the slightest extent.
The most conspicuous part of any motor car is the shining windscreen. This can be camouflaged by fixing painted expanded metal right across the outside of the glass. This does not interfere to any great extent with the ability of the driver to see out. The wheels and the tyres of a car are also very characteristic and conspicuous shapes which are often neglected, and may give a car away.
From the air, the greatest danger is the shadow cast by the car on the road, which outlines it exactly to the enemy airmen however well the car has been painted. Cars should, therefore, always be parked on the side of the road where there is a broken surface, such as long grass or a pile of stones. Thus the shadow falling on the ground will have jagged edges, and the silhouette will be broken up.
CAMOUFLAGING BLOCK-HOUSES
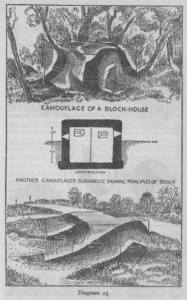
First of all, the block-house must be toned and coloured to merge with its background. It will, however, be remembered that we have got to assume, under modern tactical conditions, that the enemy may approach from any direction. From different angles, the background for a particular block-house may be completely different.
This means that camouflaging such positions is very far from a simple matter. The first thing to do is to spoil the block-house's symmetrical shape (although it ought not to be symmetrical, it nearly always will be).
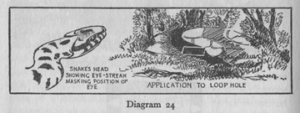
This can best be done by leaning bits of wood-railings and sticks up against it and destroying its silhouette. The loopholes of a block-house will always look like pitch-black rectangles from the outside. Therefore rough black patches should be painted across the loopholes. See Diagrams 23 & 24. Another way of disguising loopholes is to hang netting with light scrim across them.
 
To the aerial observer, one of the most obvious ways of spotting block-houses, or an artillery position, is to look for worn tracks and footpaths that seem suddenly to end, or for two or three of them that converge at a given point. It is all too easy to make the mistake of wearing a  track up to your block-house, because the occupants will naturally tend to come and go the same way, One way of handling this is deliberately to hoe up behind the blockhouse, an artificial path, continuing the real path, so that it becomes, to the airman, a perfectly innocent footpath  from one side of a field to the other.
PERSONAL CAMOUFLAGE
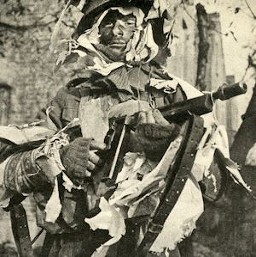
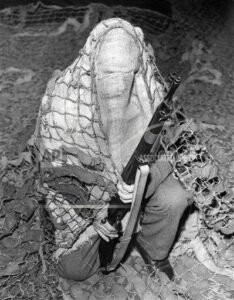
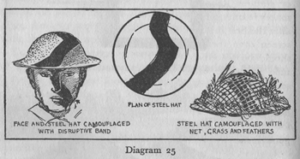
When considering the camouflaging of a scout or a sniper, it will be remembered that his most conspicuous parts are his steel helmet (which is symmetrical and shining) and his face, which, however sunburnt, is always very light in tone. His hands are also conspicuous. The helmet must be painted a matt colour, and disruptive black stripes may be drawn across it. Another way of camouflaging the helmet is to buy at a ladies' hairdresser an old-fashioned hairnet or snood, into which feathers and bits of rag may be fixed for scrim. For raiding parties at night faces and hands should be made black. This can be done either with burnt cork or, better still, with grease paint. During the day, patrols likely to run into danger may find it useful to draw a black stripe across their faces with grease paint. A more simple means of covering the light tone of the face, particularly for anti-aircraft riflemen, is the use of an ordinary khaki handkerchief folded into a triangle and tied across the face just underneath the eyes, covering the whole of the lower part of the nose and the mouth, chin and ears. See Diagram 25.
CAMOUFLAGING BRIDGES AND RAILWAY STATIONS
Because it is almost impossible to conceal the tracks leading into a station, or the river over which a bridge runs, it is difficult to prevent the enemy pilot from finding the bridge or station he is looking for. A determined enemy, prepared to make sacrifices, can, by diving low, secure the necessary direct hits-always presuming that he can see the object he is aiming at. To camouflage bridges or stations, therefore, a method must be found which makes it impossible for the enemy to see his target. Probably the best solution of this problem is to put up a smoke screen over the bridge to be protected. The generators should be placed in a circle at a radius of about half a mile from the bridge or station, and ignited along a segment on the windward side of the vital point. In this way an opaque screen one square mile wide can be placed between the bomber and his target. It would be impossible for him to score direct hits except by the most extraordinary good luck.
Categories
Phillosoph

Capes for Camouflage

Version 1.2
The 1944 book “Infantry Training-part VIII” reminds us:
“…camouflage should never be treated as a "specialist" subject, but as part and parcel of every tactical move, for it deals with what the enemy sees of that movement.”  Paragraph 14, page 8.
When it comes to personal camouflage the modern soldier is faced with several obstacles.
    • Many armies have adopted “designer label” patterns that do not live up to their inflated hype. Many modern patterns lack the element size and element contrast necessary to break up the distinctive human shape. At realistic viewing ranges the colours merge to create a brown-green man-shape. In addition to this problem there is often a failure to provide the serviceman with apparel in appropriate designs for the area where they will operate. The British army operated for decades in urban Northern Ireland wearing predominantly green and dark brown camouflage. Similarly, troops operating in desert environments have had to spend many years wearing distinctive black or green equipment and body armour. The latter problem could easily have been solved by use of a simple hessian smock or apron.
    • Modern combat gear tends to be overly tailored, in some cases being form hugging. This exacerbates the problem of the soldier being a distinctive man-shape. Close fitting clothing also may restrict freedom of movement, inhibits air circulation and limits the insulation that can be worn beneath it. “Camouflage uniform” is a military oxymoron. The soldier in the field should look as far from the crisp, parade ground ideal as possible.
    • Often the soldier is prohibited from camouflaging his weapon, or is reluctant to do so since materials must be removed for parades and inspections. This provides a distinctive shape for the enemy to notice despite any other camouflage measures the soldier may have taken. Knee pads are usually worn outside the trousers, providing another distinctive shape. Combat trousers should be sized so that knee pads can be worn underneath them, providing both better camouflage and air circulation. If you are worried about the knees of your trousers getting holed simply patch them with a double or triple thickness of material.
    • Any camouflage patterned cloth is only the foundation of personal camouflage. Three dimensional elements need to be incorporated. Some of these will be local foliage and some will be textile additions. A helmet cover printed with a camouflage pattern may still leave the helmet as a distinctive hemisphere. The cover does nothing to obscure the straight line of the brim or the regular shape of the helmet. Many helmet covers have very little provision for adding natural foliage. Other combat clothing and equipment seldom has provision for mounting foliage. Even in deserts where there is little vegetation the distinctive shapes of helmets, shoulders, pouches and packs needs to be disrupted.
Outdoorsmen, preppers and survivalists are not subject to the military regulations that often hinder a soldier but we often find ourselves influenced by what the military is doing, and sometimes this is not a good thing!
Recently I have been thinking about “un-uniformity”. I have also been considering how camouflage items will interact with other equipment present. Wearing a smock or poncho over your body armour solves the problem of distinctive shape and inappropriate colouration. There have been smocks that were intended to be worn over webbing gear too but it was found that soldiers generally prefer to have their ammunition outside. These pouches have a regular shape and they often create shadows in the chest area that are darker than the surroundings. The upper edges tend to catch the light, forming distinct straight edges. This is another area where 3-D camouflage measures should be applied.
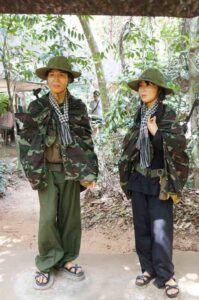
The solution that I am going to propose is a little unconventional, but logical. Effectively, this is an improvement of the Viet cong cape seen in an earlier post.
Firstly, acquire a piece of material about two metres long and one and a half metres wide. Material is often sold in pieces of about 1.5m/ 60" width. This cloth should be of your preferred camouflage pattern. If you cannot acquire this then a couple of metres of hessian/ burlap is fine. You can paint a pattern onto this later.
Fold the cloth widthwise, then cut a curve between two opposite corners. You do not have to be particularly neat with this. When it comes to camouflage irregularity is good. You now have a half-oval shape, two metres long and one and a half across. Save the two remaining pieces, we will use them soon.
Take your piece of cloth and drape it over your head like a shawl. If you are likely to wear a helmet or boonie hat when using the cape, put this on first. The long straight edge is at the front, the curved bit hangs behind you. Once you have finished pretending to be Emperor Palpatine, mark where you think the cape fastening should be. See the video below on how this is done. You want the front edges of the cape to cross over a little.
There are a number of options as to how you may fasten the cape. Our ancestors used a variety of hooks, pins or knots. For the modern user a fastex buckle and short length of webbing strap will probably be most attractive. This allows for a degree of adjustment and the option of quick, one-handed release. Sew the ends of the straps to the inside of the cape. You may like to add a couple of lengths of cord inside. These can be hitched to your webbing and used instead of or in addition to the front strap. They can also be run down the front of your chest and tied behind your back.
Next, you have to sew a few centimetres inside the edges of the cape. We want the edges of the cape to fray. We will even be cutting the edges into tassels. But we do not want this to spread too far. Frayed and tasselled edges help break up the shape. They may even help the cape dry when wet.
The brim of the hood will need some work to make it less distinctive. Take one of your remnant pieces and use some of it to make a fringe that can be sewn into the brim. This should hang at about eyebrow height and will help put your eyeglasses in shadow to minimize reflections. The bottom level of the fringe may vary with headgear worn. Add buttons or poppers so you can shorten it if this is the case.
The next phase is to add the textile 3-D elements. The trick here is no to overdo things. We are not creating a heavy, full-blown ghillie suit. Natural materials will also be added to the cape and “overgarnishing” will attract attention instead of the intended purpose. It is possible to add textile elements in ways so that they also provide attachment points for foliage.
Sources for textile elements include:
    • Camouflage cloth. The remnant pieces you saved. Off-cuts. Cheap camouflage tee-shirts. Children's clothing. Old or damaged camouflage clothing. Non-official or captured clothing etc. A lot of camouflage is too dark once you place it around a convex human shape. Light coloured patterns such as pieces of desert cloth can help make your cape and its contents appear less solid. Green is less common in nature than is generally assumed. Capes intended for autumnal and semi-arid environments should go easy on darker greens.
    • Monochrome cloth in neutral and appropriate colours. Greens, browns, beiges, greys.
    • Hessian/ burlap. Sources include non-synthetic sandbags and gunny sacks.
    • Jute, hemp and raffia fibres.
    • Scrim
    • Pieces of camouflage net and/or artificial foliage from a net.
There is no need to seam any of these items. Fraying adds to the disruptive effect. Short pieces of material tend to stand up, longer pieces droop. Use more shorter pieces in area likely to be uppermost, such as the top of the hood, shoulders and the back. Remember you may be prone when using the cape, so include some “uprights” on the back.
Keep patches of netting and similar materials small. In heavy undergrowth these may get caught. In very heavy undergrowth the cape is easily removed and can be packed away until there is less cover.
The camouflage cape is not intended to keep you warm, or keep off the wind and rain. It is for camouflage. What you wear under it should handle these other duties.
When worn the cape covers the chest rig and any other equipment worn here. If a weapon is carried at “Rhodesian ready” or a similar position it will also camouflage the weapon until it is brought into action. The cape also covers and camouflages any rucksac or backpack being worn. This is one of the reasons the back part is cut longer than the front. When prone the cape will also cover most of the wearer’s body.
When the wearer is stationary the upper part of the cape can be pulled up over the wearer’s head like a shawl. obscuring the distinctive head and shoulders shape. When moving the “hood” can be thrown back, but its folds still help disrupt the shape of the shoulders. Unlike a conventional hood the folds of the cape can be arranged so that they will not catch on low-handing branches.
When not worn a cape can be rigged to create a hide or windbreak.
The cape can easily be replaced, making it practical to carry several capes with alternate patterns for different terrain or time of day. It is possible to create a cape with a different pattern on each side but I suspect it is not practical to incorporate textile 3-D elements on both sides, making one side secondary rather than alternate. The exception to this may be a snow cape with one side pure white and the other in a broken snow pattern. The doubled layer of cloth might prove welcome in such conditions, too.
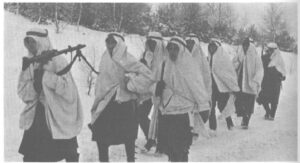
Soldiers using capes in the snow. The agal-like headband keeps the cowl in place where moving. The headbands may also be a means of identification, necessary when both sides wear white. In warmer climates such headbands can also mount foliage.
The camouflage cape will work well with any other camouflaged items you may be wearing. It will probably work fairly well with non-camouflaged items, if they are of a reasonable hue and shade. It is not the whole story, of course. You will still need suitable headgear and facepaint/ mask/ headnet/ veil/ scarf/ neck gaiter. Your chest rig will be exposed once the cape is opened. Your chest rig should be of a light shade, overall, to counter body shading. Desert patterns such as British two-colour DPM, US “chocolate chip” and “coffee stain” and Tropentarn are good camouflage patterns for chest rigs. Add some tufts of textile to further break up the pouch shapes, remembering the top edges will catch the light. The front of the camouflage cape is dimensioned to not interfere with the movement of the legs so camouflaged trousers and/or gaiters are prudent.
Categories
Phillosoph

Improvised Lock Picking.

No-SPP Hook Picking.
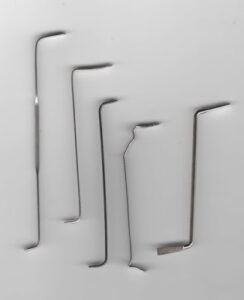
The chances are that if you ever have to pick a lock “for real” you will be away from your lock pick kit. What tools you have you will have to improvise. It is possible to create a rake or half-diamond by bending in a key-way but it is more likely you will have to use some form of hook.
This does not necessarily mean you have to use single pin picking (SPP). There are a couple of things you can try before you resort to this.
The first is “go deep!” I have discovered many of my locks will open if I move a hook about at the very back of the key-way. Apply light torque as usual, then reach deep and hook upwards. This may act on the final pin, another part of the lock mechanism or some combination thereof. It may be a statistical abnormality that my particular collection of locks can be opened this way. It is something worth trying. This also suggests that some of the bypass techniques that a razor pick or mini-knife are suggested for may also work with a stout hook.
The second technique is rocking. I have mentioned this in previous posts but it is worth repeating. Rocking is my favourite techniques for using a rake but you can also try it with “non-rakes”. To rock with a hook invert it so it curves away from the pins. Apply light torque and see-saw the inverted hook up and down in the key way.
The third “no SPP” hook technique is called “zipping”. You will also see it called “ripping” or “dragging”, although these terms imply a level of force or violence that is not needed. Like so much lock picking, a lighter touch often yields better results. Zipping is a raking technique. Apply torque and insert your hook. Withdraw the hook, running the tip across the ends of the pins like a stick on a railing. It is worth trying this several times, varying the pressure, torque and the speed you withdraw the hook.
Sometimes these techniques will set some pins but not others. If you suspect this happening keep the torque applied so the pins do not reset and experiment with different combinations of the three.
Jiggling Small Locks.
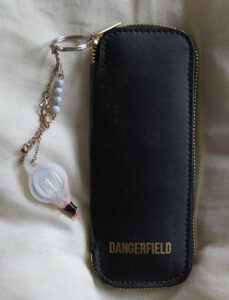
Readers may recall how I acquired a very small lock to test my finger rakes on. The main problem was finding a turning tool small enough to fit in the lock in addition to the rake. Luckily I had a piece of hair pin I could modify. Yesterday an alternate approach occurred to me. I inserted just a rake in the key-way and used it to apply turning force as well as moving the pins. Effectively I was using the rake as a jiggler key. This is an option to bear in mind when dealing with very small locks. You need a fairly rigid rake to do this, such as a Dangerfield Bogota. Most picks will be too flexible and you risk breaking them.

Carry Hair Pins.
Add some hair pins to your lock picking, tool and emergency kits. They have numerous uses.
Final Tip.
I have said this before but it is worth repeating. Lock picking tends to be the antitheses of brute force. If something is not working the solution is usually less force, not more.
Categories
Phillosoph

Equipment Pouches

One of my reasons for writing this post is that I came across a statement that a certain army was currently issuing several dozen different designs of equipment pouch.
I see pouches for survival tins offered, which misses the point of a survival tin!
One even sees belt pouches for KFS!
This got me thinking about what configurations would be most useful. Some of us do not have an unlimited budget or supply system, after all!
It would be very nice to have pouches designed based on the golden ratio, such as in the proportions 1: 1.618: 2.618. Such gives a litre pouch of about 6 x 10 x 16 cm and a two litre of 7.8 x 12.6 x 20.3 cm.
Attractive though these are, we must also consider more practical considerations such as the dimensions of the already existing items that such pouches will be required to carry.

Medium Utility Pouch Size One

To begin with, let us consider a medium-sized utility pouch with internal dimensions of approximately a litre volume.
This could serve as a water-bottle carrier for typical military designs such as the British 1-litre ’58 pattern and the US 1-quart M-1961.
There should also be room for associated items such as canteen-cups and stoves, so size may be something around 9 x 14 x 22cm.
Personally, I think a two-litre bladder with a drinking tube is more practical, but designing the medium utility pouch to take a water-bottle also gives us a convenient size for many other items.
If you don’t carry a water-bottle, the pouch can still carry a cup and stove, zip ties, pliers, cordage, flashlight and a useful collection of other items.
Personally, I think a cup and stove are pack items rather than something that should be weighing down your belt. A size-one pouch containing these could be mounted on the outside of a pack for easy access.
It can be used to carry several magazines, bagged stripper-clips or several grenades.
The pouch itself would be fairly basic. If a draw-cord neck is desired, a suitable liner is added. Likewise, inserts can configure the interior to specialist roles.
There will be provision to mount smaller pouches on the outside should external pockets be desired

Small Utility/Frag Pouch

There would also be a small utility pouch, perhaps of about 10 x 12 cm.
This item is obviously inspired by the M1967 compass/field dressing pouch, and like this item it can exploit mounting positions high on the body.
It will also be convenient for mounting on the sides of a chest rig where larger pouches might be awkward.
The proposed item will not use the popper fastening that the M1967 does, since these are fiddly if a pouch is partially filled or contains soft contents.
For some contents it may be convenient to be able to mount the pouch with the opening downwards or to the side.
As well as compasses and first field dressings (FFD) such a pouch can hold various other items and would serve as a pouch for frag-grenades. This latter requirement may require a change in proportions.
There may be a case for sizing this pouch to carry mobile phone-shaped items.
Small utility pouches would be designed so they can be mounted on larger pouches. When used for FFD the soldier's blood group should be clearly marked on the outside and a TCCC casualty card or equivalent carried inside

Medium Utility Pouch Size Two

The medium utility pouch will be complemented by a larger version of approximately twice the capacity.
We will call this the “medium size 2” and the previously described variant the “medium size 1”.
The size 2 utility pouch would serve a number of functions and be designed so that it can be worn on the belt or be carried by shoulder strap.
One of its roles is to carry a 2-litre hydration bladder fitted with a drinking tube. This allows the wearer to easily access a source of drinking water independent of any backpack.
Another role for this pouch is to hold an Combat Injury-Immediate First Aid Kit (CI-IFAK). This pouch would contain an insert roll holding a vacuum-packed major trauma kit and a pair of combat tourniquets.
Two such pouches at the back of a soldier’s belt resembles a more compact version of the British army kidney pouches, but their contents are more useful and combat relevant
The size 2 utility pouch was inspired by the Canadian utility pouch that was found to be useful for carrying a (C9) 200rd SAW drum. Alternately, a 100rd belt of 7.62x51mm/6.5mm Creedmore or five 30-round rifle magazines could be carried instead.
If the one-litre/quart water-bottle is the item we design the size 1 pouch around, then the SAW reload is what the size 2 is designed around.
For the ammunition carrying role, the contents of the utility pouch should be rapidly and easily accessible. This again suggests that the utility pouches be a relatively simple design.
For other roles one or more small stuff sacks could be carried in the pouch. It may be prudent to proportion the pouch so it can carry 2-litre plastic ice cream containers. Other possible contents include the US 2-quart canteen
Utility pouches with shoulder straps allow a machine gunner’s ammunition load to be shared throughout a unit. Each soldier carries a bag and deposits it with the machine gun team when they take position.
Such bags can also increase an individual’s ammunition if that carried by the chest rig is felt insufficient

Munitions Pouch

The fourth design of pouch would be the “munitions pouch”.
As regular readers will know, I am fond of the chest rig. I am also a fan of not overloading said rig.
The basic component of the chest rig should be a pouch that can accommodate a pair of magazines.
Depending on body form, a rig will have three or four of these. It makes sense to design the pouch to accommodate  a pair of AKM 30-round magazines, allowing it to also carry 20-25 round 7.62x51mm/.260 Rem/6.5mm Creedmore magazines. Such a pouch can easily take a pair of 30-round 5.56mm magazines or a 60-round 5.56mm coffin-mag.
Box magazines for shotguns may also need to be considered.
The pouch may be a little too big for the 5.56mm magazines but this may be addressed in several ways.
The pouch may be adjustable or some item used as a spacer beneath the magazines (extra socks are always useful!).
If the magazines are fitted with pull loops it probably does not matter if they sit deep in the pouch. Pull loops are detailed in my book “Survival Weapons: Optimizing Your Arsenal”.
Should such pouches be built, some smart company might produce larger capacity 5.56mm magazines the same length as those of the AKM.
A number of pouches capable of taking a variety of magazines are already offered by a number of manufactures
Other features of the munition pouch need to be considered.
Some ammunition pouches have a pocket for a pistol magazine on their front. Such could also be used for other equipment such as wire cutters, flashlights etc.
Many ammunition pouches do not have flaps, so it may be prudent to design the flap as removable.
If fitted, should a flap need to be lifted up, as is traditional or is it more efficient to have it open forward?
What is the most useful fastening for an ammunition pouch? Fastex buckle or tab and staple?  
A possible design might be a separate flap piece held by a strap and quick release buckle at both front and back. This might also facilitate the pouch being adjustable to magazines or loads of varying height
A single, filled munition pouch and a magazine on the rifle gives a shooter 90 – 120 ready rounds, which should be ample if correct fire discipline is observed.
The remaining munition pouches might carry other contents.
Such a pouch can take items such as rifle grenades or smoke grenades.
It may also be used for items such as some designs of radios.
At least one manufacture makes a “trauma insert” for ammunition pouches which contains an abbreviated CI-IFAK. The Size 1 utility pouch could be used for an intermediate-sized CI-IFAK
Extra small utility/frag pouches to hold additional grenades can be added if the wearer desires

Dump Pouch

Dump pouches” have come into vogue in recent years. Many are designed to fold or roll up so they take up little room when not in use. Some are cleverly sized so that they can carry a soldier’s helmet when it is not worn.

Cargo Pocket Liner Pouch

A soft, padded pouch that could fit in the cargo pocket of a soldier’s trousers would be useful for survival items and first aid kits. This should have loops that fit over the pocket buttons to keep it in place

Larger Utility Pouches

Larger pouches may be needed for specialized roles. These could be carried as shoulder bags or mounted on larger packs or webbing.
For example, some Canadian military units issued their personnel an extra buttpack to carry their NBC gear in.
The Canadian 82 pattern butt pack was 30 x 25 x 12 cm, which is approximately 9.8 litres by my calculation
The US army M1961 butt pack was 22 x 21.5 x 14 cm, so about 6.89 litres.
The most useful parameters for a buttpack/shoulder bag need to be determined.
Provision to attach small and medium utility pouches to the exterior needs to be included.

Claymore Bag

The M7 claymore mine bag (“bandoleer”) is another item that soldiers have found to be useful for functions other than its intended role.
Such bags could carry ten 30-round 5.56mm magazines or 27 40mm grenades.
A claymore bag has two pockets with a shared flap and is about 30 cm square. Given their intended contents I would estimate that it is at least 5 cm deep, giving a capacity of about 4.7 litres.
The claymore bag is similar in size to the haversacks used in the American civil war. These were used to carry rations and “table furniture”: a tin plate, cutlery and related items.
The haversack had an easily washed cloth liner designed to protect the bag from the food and vice-versa.
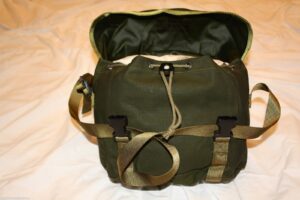
Civilian bags such as this one combine features of both, the larger pocket being useful for laptops

Fasteners and Patterns

I have touched on the topic of fasteners already. Fastex buckles or tab and staple systems are preferable to poppers, buttons, toggles or velcro.
Fastening systems should be operable with one hand and compatible with gloves.
Ideally, we do not want to issue duplicate items in different colour schemes.
It is also worth remembering that disrupting the box shape of a pouch is different to camouflaging a whole person.
The best “off the shelf” pattern for pouches is probably British two-colour desert DPM, although in some examples the darker shade is too orange. A grey-sand and coyote-brown version might be even better.
The high contrast between the sand and brown of desert DPM disrupts both perceived shape and depth. The light sections help counter the body shading that usually can be seen with pouches.
Two-colour desert DPM will be effective in a wide range of environments. In jungle, the pattern helps break up the shape of more verdant patterned garments worn beneath it. In snow, white tape can be added.
Categories
Phillosoph

Frogs for Tools

Entrenchments were a prominent feature of the American Civil War.
Earthworks were already an established component of sieges, but this conflict frequently saw troops digging in at more temporary positions.
Hard Tack and Coffee (p.361)” tells us that each corps of 23,000 men had six wagons loaded with entrenching tools that were provided to units that needed them.
In later wars, infantry were issued entrenching tools as part of their personal equipment. SLA Marshal criticised this practice:
The only amendment that might strengthen them would be to add that rations and ammunition should be specified only in the amounts which reason and experience tell us the Soldier is likely to expend in one day. Beyond that, everything should be committed to first line transport. This includes entrenching tools since twenty heavy and sharp-edged spades will give better protection any day to an entire company than 200 of the play shovels carried by Soldier
(The Soldier’s Load and The Mobility of A Nation, p.57)
There will be situations where a unit cannot be easily reached by the company train.
The best approach most likely lies between the two approaches.
A unit will have some tools organic to it but also have access to more substantial items from the company or battalion.
For the prudent civilian, the approach is similar. One should have portable items with some larger items cached at base, home or with a vehicle.
Level of issue is another issue.
Some argue that if the enemy is close, half the unit should dig while the other half stands guard, so only half the men should carry entrenching tools.
If on a mobile patrol, only a couple of tools may be needed.
In an urban sweep, digging tools are of limited use but there may be a need for crowbars and axes.
This last point illustrates something that should be borne in mind in the following passages.
For simplicity, I may use spade-type entrenching tools for illustration but the proposed ideas are equally applicable to other types of hardware such as axes, mattocks, picks, tomahawks, prybars and so on.

When I was writing about the soldier’s load it became apparent that entrenching tool covers and carriers were rather superfluous.

When on the march the entrenching tool is best carried with the rucksack.

Rucksacks have numerous pockets, loops and straps that can be used to secure such an item so a carrier that can be affixed to them is redundant.

There are times when the rucksack is not carried but the entrenching tool may be needed, and may be needed in a hurry!

The various belt mounted carriers in common use take up a lot of room and do not permit the tool to be brought quickly into action. This is why we have numerous images such as the one below.

Assault troops ignore their belt carriers and tuck their e-tools through their belts. The belly position is not ideal if the soldier has to crawl or is forced to go prone by enemy fire. A better position is around the right hipbone, as was often done with tomahawks. See my previous blog on fast-drawing of items such as tomahawks.

One function that a carrier or cover does serve is to protect the soldier from the sharp-edges of his tool.
There are simpler, lighter and more efficient ways of doing this.
The image shows a simple guard used with a tomahawk.
For a spade, a U-shape can be made from plastic or aluminium tube or siding. Cord or elastic and hooks or simple knots are used to keep this in place.
Such constructions do not prevent the soldier from drawing his tool in an emergency. A muzzled pick, tomahawk or spade are still effective weapons.
If a tool does not carry well tucked through the belt, a simple “frog” can be constructed.
The simplest is to tie a cord into a circle and pass it behind the belt, letting one end to pass through the other to form a simple loop.
Loops like this are used to carry hammers on tool belts. If the carry is considered too loose the circle is reduced.
Other tricks can be used.
It is possible to tie a clove hitch without access to the ends of a cord. This can be done with the hanging part of the loop and the shaft of the tool passed through the centre of the knot. Such a knot can be prevented from collapsing when empty by the simple use of a paperclip or loop of fishing line.
A better frog can be created from nylon strap.
Ideally, a second strap would be sewn to the outside of the loop, the outer having either a fastex or double-D buckle. The outer strap can be tightened when a more secure grip on the shaft is wanted, the buckle easily released when it is not.
To the frog, I would add one or two eyelets to which a short length of cord can be attached. For articles such as tomahawks, the cord can be passed over the top of the tool and tucked down inside the loop, which is then tightened. This helps secure the tool but is easily released by the action of pulling upwards on the head.
Potentially, items such as machete sheaths and even pistol holsters could be designed to be compatible with the frog.
Watching episodes of the TV series “Vikings” I note that some axes are apparently worn on belts using two loops or rings. One ring or loop is horizontal, the other vertical. The latter keeps the head from swinging around.
The vertical ring appears to be a smaller diameter than the width of the axe edge. Presumably, the butt of the axe is passed through both rings to stow it.
Categories
Phillosoph

Seven Tools of EDC

Today, as I was coming into work, I was thinking about “magic number seven”.
In short, this is an observation that the average number of related “data chunks” a person can recall is seven, plus or minus two.
This is usually specified as for short term memory, but may be relevant to longer term memorization of lists too.
A friend of mine is working on a language-related project. It seemed to me that if you must have lists of categories or affixes, then breaking them up into groupings of seven or less might be a good approach.
As it is wont to do, my mind drifted and I began to think about the ninja “six tools of travelling”.
I know six is not seven, but bear with me a moment.
I remember this list by recalling that three things on it are “flexible”: hat, rope, “towel”; and that three are not: medicine, writing kit and fire tube.
As I point out in my earlier article, this list does not include a knife, since telling a ninja or any other sensible person of that era to carry one was probably redundant. If we add knife/tools to the list it becomes seven.
OK, I thought, does what I have on me right now meet the criteria of the six/seven tools of travelling/everyday carry (EDC)?
  • Firstly, I have a hat. It’s cold out and my head has little remaining natural insulation. If it was sunny out and I was planning to spend any time outside I would probably have a hat of a different design.
  • Rope, or cordage at least. I have a spare shoelace tucked into the bottom of a pocket. I also have the dental floss in my pocket kit which can be used for a variety of purposes.
  • “Towel”. The item the ninja regarded as a towel (tenugui) was a relatively thin, multipurpose item. I have a bandanna in my pocket which can serve similar purposes, including as an emergency hat.
  • Medicine. My pocket kit contains plasters, painkillers and disinfectant wipes.
  • Writing kit. I have a pencil. I can also write things down on my phone.
  • Fire. No ninja tube of smouldering charcloth, but I do carry a source of fire. A lighter rides in the same pocket as the bandana and shoelace. A short piece of duct tape wrapped around it may be used for repairs or for tinder. A bag of tissues in another pocket may also be used for firelighting.
  • Knife. I carry a Swiss Army knife and a mini-Leatherman squirt and have a Swiss Army Classic SD mini-knife on my key ring.
These seven tools do not just represent concrete objects.
They also represent broader, more generic categories.
For example, the hat also represents shelter, so includes a coat suited to the weather, scarf and gloves should they be needed, and the survival blanket I carry in my pocket pouch.
A silver survival blanket is a far better thing to have available than a little tin full of gizmos and gadgets!
The hat also is a reminder to accessorise! Hats, scarves, gloves, bandannas and similar can make the difference between comfort and catastrophe.
EDC Pouch Contents
The writing kit also represents communication, so includes my phone and the USB drive I carry.
In addition to the pencil and chalk in my pocket kit, I have a couple of pens (one is part of my Swiss Army Knife) and a Sharpie. The chalk or the Sharpie may be used to mark walls, tree trunks etc.
Communication can include signalling, which includes my phone and the whistle and photon light on my keychain. Illumination can be taken as a subset of signalling. I have a larger flashlight in my thigh pocket, and the phone has a flashlight mode.
The knife also represents tools in the narrower sense, so includes my mini-prybar, diamond sharpening card and the P38-style can opener on the keychain.
The knife also represents the requirement for self-defence, where such is permitted.
The fire icon I have used above also represents knowledge. EDC items are of little use unless one knows how to best use them. Using cordage requires knowing some basic knots, for example.
As can be seen, the “Seven Tools of EDC” are a good starting point for planning an EDC or larger kit.
There are other categories, of course.
Money is always useful and documentation may be needed.
I carry tape, pins, paperclips and other items that might be used for repairs. These might be considered a subset of the knife/tools category. I have added a needle and a metre of invisible thread. This is bound to the side of my pencil along with a wrapping of electrical tape. The needle may be magnetized using the magnet with my Swiss Army Knife.
None of the seven categories really covers navigation, but I do carry a Suunto clipper compass which has proved to be surprisingly useful in town.
On the next level up, food and water, or the means to procure and prepare them should be addressed. At the EDC level this is addressed by the money and credit card. My pocket pouch has a long piece of braided fishing line and a score of small hooks, which may be used for other purposes.
If you live in a very hot, dry environment carrying a supply of water on your person is prudent.
Categories
Phillosoph

Useful Pocket Kit

I may have mentioned before on this blog that I am prone to migraines. I tend to avoid using painkillers unless I have to, but recently my doctor told me my condition was such that I’d be advised to carry more painkillers with me.
I’m always in favour of precaution and preparedness, as we know!
If I have to carry some painkillers, it seems only prudent to also carry some other items of similar usefulness.
Some of my jackets are short on pockets, and I spend a lot of time not wearing a jacket.
The logical place to carry this kit was the cargo pocket of my trousers. You are less likely to be separated from your trousers, which is why in my articles on the soldier’s load I recommend the cargo pockets for survival kit, minor injuries kit and other important items.
I will stress here that what is illustrated in the photo is not supposed to be a comprehensive survival kit.
There is no means to create fire or cut, since these are already carried elsewhere.
And sometimes capabilities are duplicated, or worse. I cringe when I think how many items I have on me that can be used open beer bottles.
This is basically a collection of useful items for everyday carry.
Cargo pocket carry means you do not want a container that is hard or bulky.
I selected a cheap first aid kit. It came with a rather nice triangular bandage that was worth the asking price alone. I this bandage this in my primary travel medical kit.
 
To the now emptied pouch I added the following:
    • Some paracetamol, and some diclofenac, the latter being good for migraines.
    • Some alcohol wipes (can be used as firestarters).
    • An assortment of plasters.
    • Container of dental floss : 90 metres of useful cordage.
    • Small bag of safety pins, hair pins and paperclips. Useful for broken zippers or improvising tools. I need more of the larger, springier paperclips since these are more useful. This now includes a SERE pin.
    • Two short lengths of chalk. One light/ white, the other dark/ coloured. For leaving messages and route marking. One colour will contaminate the other if they are together. Place in separate bags or wrap the sticks in something like clingfilm.
    • Pencil, wound with about a foot of electrical tape. I should have added the tape first and used the rubber to cap the pencil point. Hindsight is wonderful! I have added a sailmaker's needle with a metre or so of invisible thread to this.
    • Foil space blanket. In its own ziplock bag for protection. This squeezed into the pouch, but could be carried outside it within the cargo pocket.
Note that each component, other than the pencil, has its own ziplock bag.
Since I have created this kit I have added a bypass knife/shim and a piece of music wire bent into a traveller hook. Tape over the points so they do not poke through the plastic bags.
Recently, I stabbed myself deep into the thigh while reaching for a rubbish bag. One of the safety pins in the pocket kit had opened. Injuring myself with my survival kit, not my finest moment!
Pack your pouch so that the pins and delicate items such as the pills and chalk are in the centre, cushioned by the plasters on one side and the foil blanket on the other.
 
Not shown: You could add a small compass to this kit.
I already carry a clipper compass elsewhere on my person so this was not a high priority for me.
I am also going to add a suitably sized card with Morse code on it, but have not yet had time to print one out while near a laminator.


Categories
Phillosoph

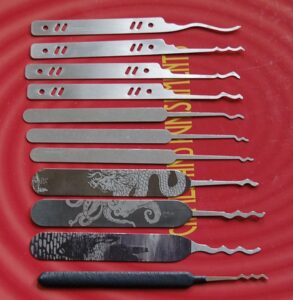
Fantasy Lock Pick Set

Version 1.1
Recently I described the lock sport kit I have built based around the Dangerfield Serenity kit. The Serenity kit gives a pretty good selection to build a kit around.
A hypothetical challenge has been posed to me. If I was putting together a new kit, perhaps to be associated with this blog and my other writings, what would be my wish-list contents?

The case would have reasonable room for a user to add additional items. Four pockets would be prudent. It would be nice if there was room for my skeleton keys and similar related items. 
 

The contents of the kit effectively divide into three groups: SPP, raking and turning tools. 
 

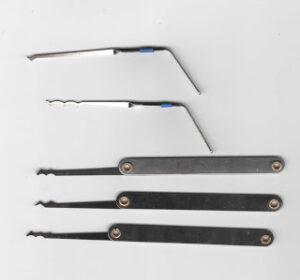
SPP is the field I have least experience with, but to my mind any kit should include some provision for practising and developing these skills. A kit should have a standard or partial hook and a half-diamond, at least. Notably the Serenity kit did not have a standard hook. Perhaps it was felt that the two reach tools (one angled, one curved) could do the same job. A more conventional hook seems desirable, even if it is just so the user can establish they prefer other tools. The high hook in the Serenity set I have not had much success with. I have even managed to get it stuck in locks. Gonzo hooks seem popular with many SPPers, so this may be a better substitution. I ended up rounding the tip of my high hook into a Gonzo-like hook and it handles somewhat better.
 Standard hook/ euro-hook, Gonzo hook, half-diamond and a couple of reach/ offset tools for good measure seems reasonable for the SPP component, but I am open to suggestions from those with more experience in this field than myself. 

Turning tools: I think a kit should contain several of these, and have provision for the user to add additional examples. Many pickers prefer prybars but I like L and Z shaped tools. The Southern Specialities six-piece set that is included with the twelve-piece Toool set and 2500 Series turning set seems to me like a good basis to start with. I would bend the ends of each tool so the narrower (2.4mm) examples also have a 12mm long nose and the wider (3.18mm) examples also have a 6mm short nose. This gives twelve width/ thickness/ length combinations in a relatively compact package. Perhaps there would be a related prybar set you could take as an option or addition.

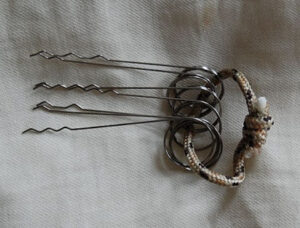
Rakes: At least one Bogota! A triple-hump, although I’d not complain if there was a spare also. Perhaps give one triple a standard twist and the other a euro-twist for variety. I have yet to try a double-hump so I would not object if one was included in this kit. My recent experiences suggest more humps are more useful so perhaps a four or five hump Bogota. instead. Some of my easiest SPPs have been with a half-diamond so I would be happy to have a single-hump Bogota included too. This would be my reserve/ alternate half-diamond. There may be a case for making the other half-diamond pick a different size to the Bogota. The selection of rakes would also include something like the Sparrow Octo rake and the Warlock too. The final type of rake would be something that can handle keyways that the Bogotas, Octo’ and Warlock are too big for. This might be something like a snake rake or worm rake, but the wire finger rakes have impressed me recently. Perhaps a five-peak continuous wave and a three-hump Sabana-style? This would be either wire or flat stock, whichever works best. That is eight rakes, including the duplicate triple-hump Bogota. Five SPP tools and six turning tools makes 19 pieces. Perhaps add an adjustable wishbone turning tool to make it an even 20? 

Handles are something that would distinguish this kit. The Dangerfield Bogotas and Sohos in my Serenity kit are designed to double as standard-width turning tools. An additional benefit of this feature is that the tools nest together and take up very little room within a pouch. Four rakes take up less than a centimetre of width. I would like it if the various Bogota rakes in my hypothetical kit were designed the same. These could serve as general use turning tools, reserving the dedicated turning tools for more specialized applications.

The real world Octo rake and Warlock have very wide handles with decorative transfers. For my kit there would be something plainer and less bulky. Perhaps this might be a rod or flat bar with an Octo rake head at one end and a Warlock at the other. The “narrow” rake might also be a double-ended tool: a three-hump Sabana one end, five-peak wave at the other. Flat bar would allow rocking as well as scrubbing actions, the latter difficult with springy wire.
What kind of handles should the SPP tools have? Bogota-type handles for these would make for a very compact kit indeed. On the other hand, SPP tools may be used for longer durations than rakes. Perhaps there is merit in giving these more conventional grips, perhaps designed along the lines I suggest in a previous article. The thermoplastic handle on the Sparrow Worm rake seems like a good model. Most of my picks lack handle materials and I have never found that a problem. A case can be made that you get better feedback without. 
The idea of creating a double-ended Octo/ Warlock and narrow rake reduces the number of pieces to 18, but twelve of these are double-ended and/or multi-functional!
Update: I have become fond of the double ended picks in the Honest Dong Shi wave rake kit. I would have no objection to the SPP picks being double-ended as well. Perhaps a hook/ gozo, a reach/ offset and a half-diamond paired with a larger variant, similar to the princess or Goso p-nuckle.
Categories
Phillosoph

Mission Impossible Lock Picks

It is Friday so time for a more light-hearted post.
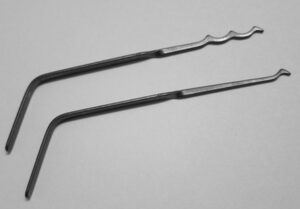
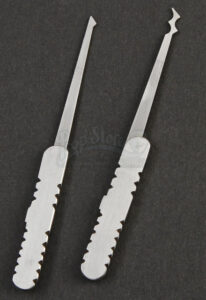
A few weeks back I came across a webpage with the following image. These are props from the film “Mission Impossible 3” and were used in a scene in the Vatican. I cannot say I remember noticing them when I saw the movie.
The original webpage has vanished from the net, so I do not have any of the additional images. The picks were designed so that the handle of each forms a sheath for the other pick so they can be carried as one compact unit. The construction material of the whole picks seems to be plastic, possibly of the same sort used to make credit cards. I have no idea as to whether they will work in real life.

Bizarrely, the writer of the original page referred to the picks as “files”.
Note that this set has no tension/ turning tool. I don’t recall what Tom Cruise did in the movie, but not using a tension tool is the number one movie mistake when it comes to lock picking.
As can be seen, the kit has a half diamond and a two-hump batarang. What amuses me about this is that it looks like it was made by someone who had heard about paired Bogotas but could not be bothered to web-search on what they actually looked like. (Knowing that I would write this article today, I tried picking a lock with my three batarang-style rakes last night. The lock only opened for one. The finger rakes, on the other hand, opened the same lock in a fraction of the time!)