Version 1.2
The 1944 book “Infantry Training-part VIII” reminds us:
“…camouflage should never be treated as a "specialist" subject, but as part and parcel of every tactical move, for it deals with what the enemy sees of that movement.” Paragraph 14, page 8.
When it comes to personal camouflage the modern soldier is faced with several obstacles.
-
-
Many armies have adopted “designer label” patterns that do not live up to their inflated hype. Many modern patterns lack the element size and element contrast necessary to break up the distinctive human shape. At realistic viewing ranges the colours merge to create a brown-green man-shape. In addition to this problem there is often a failure to provide the serviceman with apparel in appropriate designs for the area where they will operate. The British army operated for decades in urban Northern Ireland wearing predominantly green and dark brown camouflage. Similarly, troops operating in desert environments have had to spend many years wearing distinctive black or green equipment and body armour. The latter problem could easily have been solved by use of a simple hessian smock or apron.
-
-
-
Modern combat gear tends to be overly tailored, in some cases being form hugging. This exacerbates the problem of the soldier being a distinctive man-shape. Close fitting clothing also may restrict freedom of movement, inhibits air circulation and limits the insulation that can be worn beneath it. “Camouflage uniform” is a military oxymoron. The soldier in the field should look as far from the crisp, parade ground ideal as possible.
-
-
-
Often the soldier is prohibited from camouflaging his weapon, or is reluctant to do so since materials must be removed for parades and inspections. This provides a distinctive shape for the enemy to notice despite any other camouflage measures the soldier may have taken. Knee pads are usually worn outside the trousers, providing another distinctive shape. Combat trousers should be sized so that knee pads can be worn underneath them, providing both better camouflage and air circulation. If you are worried about the knees of your trousers getting holed simply patch them with a double or triple thickness of material.
-
-
-
Any camouflage patterned cloth is only the foundation of personal camouflage. Three dimensional elements need to be incorporated. Some of these will be local foliage and some will be textile additions. A helmet cover printed with a camouflage pattern may still leave the helmet as a distinctive hemisphere. The cover does nothing to obscure the straight line of the brim or the regular shape of the helmet. Many helmet covers have very little provision for adding natural foliage. Other combat clothing and equipment seldom has provision for mounting foliage. Even in deserts where there is little vegetation the distinctive shapes of helmets, shoulders, pouches and packs needs to be disrupted.
-
Outdoorsmen, preppers and survivalists are not subject to the military regulations that often hinder a soldier but we often find ourselves influenced by what the military is doing, and sometimes this is not a good thing!
Recently I have been thinking about “un-uniformity”. I have also been considering how camouflage items will interact with other equipment present. Wearing a smock or poncho over your body armour solves the problem of distinctive shape and inappropriate colouration. There have been smocks that were intended to be worn over webbing gear too but it was found that soldiers generally prefer to have their ammunition outside. These pouches have a regular shape and they often create shadows in the chest area that are darker than the surroundings. The upper edges tend to catch the light, forming distinct straight edges. This is another area where 3-D camouflage measures should be applied.
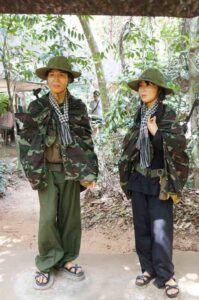
The solution that I am going to propose is a little unconventional, but logical. Effectively, this is an improvement of the Viet cong cape seen in an earlier post.

Firstly, acquire a piece of material about two metres long and one and a half metres wide. Material is often sold in pieces of about 1.5m/ 60" width. This cloth should be of your preferred camouflage pattern. If you cannot acquire this then a couple of metres of hessian/ burlap is fine. You can paint a pattern onto this later.
Fold the cloth widthwise, then cut a curve between two opposite corners. You do not have to be particularly neat with this. When it comes to camouflage irregularity is good. You now have a half-oval shape, two metres long and one and a half across. Save the two remaining pieces, we will use them soon.
Take your piece of cloth and drape it over your head like a shawl. If you are likely to wear a helmet or boonie hat when using the cape, put this on first. The long straight edge is at the front, the curved bit hangs behind you. Once you have finished pretending to be Emperor Palpatine, mark where you think the cape fastening should be. See the video below on how this is done. You want the front edges of the cape to cross over a little.
There are a number of options as to how you may fasten the cape. Our ancestors used a variety of hooks, pins or knots. For the modern user a fastex buckle and short length of webbing strap will probably be most attractive. This allows for a degree of adjustment and the option of quick, one-handed release. Sew the ends of the straps to the inside of the cape. You may like to add a couple of lengths of cord inside. These can be hitched to your webbing and used instead of or in addition to the front strap. They can also be run down the front of your chest and tied behind your back.
Next, you have to sew a few centimetres inside the edges of the cape. We want the edges of the cape to fray. We will even be cutting the edges into tassels. But we do not want this to spread too far. Frayed and tasselled edges help break up the shape. They may even help the cape dry when wet.
The brim of the hood will need some work to make it less distinctive. Take one of your remnant pieces and use some of it to make a fringe that can be sewn into the brim. This should hang at about eyebrow height and will help put your eyeglasses in shadow to minimize reflections. The bottom level of the fringe may vary with headgear worn. Add buttons or poppers so you can shorten it if this is the case.
The next phase is to add the textile 3-D elements. The trick here is no to overdo things. We are not creating a heavy, full-blown ghillie suit. Natural materials will also be added to the cape and “overgarnishing” will attract attention instead of the intended purpose. It is possible to add textile elements in ways so that they also provide attachment points for foliage.
Sources for textile elements include:
-
-
Camouflage cloth. The remnant pieces you saved. Off-cuts. Cheap camouflage tee-shirts. Children's clothing. Old or damaged camouflage clothing. Non-official or captured clothing etc. A lot of camouflage is too dark once you place it around a convex human shape. Light coloured patterns such as pieces of desert cloth can help make your cape and its contents appear less solid. Green is less common in nature than is generally assumed. Capes intended for autumnal and semi-arid environments should go easy on darker greens.
-
-
-
Monochrome cloth in neutral and appropriate colours. Greens, browns, beiges, greys.
-
-
-
Hessian/ burlap. Sources include non-synthetic sandbags and gunny sacks.
-
-
-
Jute, hemp and raffia fibres.
-
-
-
Scrim
-
-
-
Pieces of camouflage net and/or artificial foliage from a net.
-
There is no need to seam any of these items. Fraying adds to the disruptive effect. Short pieces of material tend to stand up, longer pieces droop. Use more shorter pieces in area likely to be uppermost, such as the top of the hood, shoulders and the back. Remember you may be prone when using the cape, so include some “uprights” on the back.
Keep patches of netting and similar materials small. In heavy undergrowth these may get caught. In very heavy undergrowth the cape is easily removed and can be packed away until there is less cover.
The camouflage cape is not intended to keep you warm, or keep off the wind and rain. It is for camouflage. What you wear under it should handle these other duties.
When worn the cape covers the chest rig and any other equipment worn here. If a weapon is carried at “Rhodesian ready” or a similar position it will also camouflage the weapon until it is brought into action. The cape also covers and camouflages any rucksac or backpack being worn. This is one of the reasons the back part is cut longer than the front. When prone the cape will also cover most of the wearer’s body.
When the wearer is stationary the upper part of the cape can be pulled up over the wearer’s head like a shawl. obscuring the distinctive head and shoulders shape. When moving the “hood” can be thrown back, but its folds still help disrupt the shape of the shoulders. Unlike a conventional hood the folds of the cape can be arranged so that they will not catch on low-handing branches.
When not worn a cape can be rigged to create a hide or windbreak.
The cape can easily be replaced, making it practical to carry several capes with alternate patterns for different terrain or time of day. It is possible to create a cape with a different pattern on each side but I suspect it is not practical to incorporate textile 3-D elements on both sides, making one side secondary rather than alternate. The exception to this may be a snow cape with one side pure white and the other in a broken snow pattern. The doubled layer of cloth might prove welcome in such conditions, too.

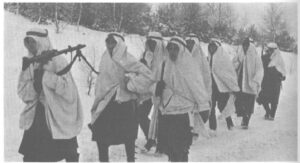
Soldiers using capes in the snow. The agal-like headband keeps the cowl in place where moving. The headbands may also be a means of identification, necessary when both sides wear white. In warmer climates such headbands can also mount foliage.
The camouflage cape will work well with any other camouflaged items you may be wearing. It will probably work fairly well with non-camouflaged items, if they are of a reasonable hue and shade. It is not the whole story, of course. You will still need suitable headgear and facepaint/ mask/ headnet/ veil/ scarf/ neck gaiter. Your chest rig will be exposed once the cape is opened. Your chest rig should be of a light shade, overall, to counter body shading. Desert patterns such as British two-colour DPM, US “chocolate chip” and “coffee stain” and Tropentarn are good camouflage patterns for chest rigs. Add some tufts of textile to further break up the pouch shapes, remembering the top edges will catch the light. The front of the camouflage cape is dimensioned to not interfere with the movement of the legs so camouflaged trousers and/or gaiters are prudent.