Categories
Phillosoph

Walk-A-Heaps

When it comes to the Indian Wars, it is the cavalry that gets the glory and screen-time. In reality, the infantry or “walk-a-heaps” (as Sioux are reported to have called them) played a significant role. Prolonged travel tires horses. Over a period of weeks seasoned infantry can outdistance cavalry or other horse-mounted raiders.
It seems some of the lessons learnt during the War between States were retained. I came across this interesting passage in the Osprey book “Men-at-Arms 063: The American Indian Wars 1860-1890”
An 18th Infantry captain, Anson Mills, at Fort Bridger in 1866 had his post saddler make leather looped belts for his men, personally obtaining a patent on the idea. In late 1876 the Ordnance Department, which had consistently preferred boxes to belts, finally gave in to popular pressure and had 30,000 canvas and leather 'prairie' cartridge belts made at 1sWatervliet Arsenal. By then virtually no cartridge boxes had been used out West for a number of years.
This light-weight belt had another advantage, besides bringing in a fair sum of royalties to Captain Mills. It reduced the fighting man's load. The Indian-fighting infantryman became one of the lightest loaded soldiers in the world. Lieutenant W B. Weir in 1877 listed an infantryman's full field equipment load as:
60 rounds ammunition and belt 5.40 lbs
overcoat 5.25 lbs
blanket (grey wool) 5.13 lbs
rubber blanket (ground cloth) 3.00 lbs
Springfield rifle and sling (bayonet ommitted from this list) 8.40 lbs
extra clothes 2.00 lbs
full canteen (one quart) 3.84 lbs
five rations: 3/4 lbs meat and 1 1b hardtack per day 8.75 lbs
Total 41.77 lbs (18.79 kg)
Officers, who generally carried a pistol and often some sort of rifle, carried about the same weight. Sometimes the men went even lighter, as shown in General Field Orders No. 2. Department of Dakota, 10 August 1876, in an anti-Sioux campaign: 'No tents whatever will be carried, no companv property, no cooking utensils except tin cups, no. bedding (except one blanket per man) … 100 rounds of ammunition (per man) …Everv infantry officer and man will carry with him two days' cooked rations.'
Osprey “Men-at-Arms 438: US Infantry in the Indian Wars 1865-91” notes: “Most infantrymen on campaign preferred to leave their packs behind at barracks, and carried personal items rolled in blankets slung around their bodies. When the 5th Infantry were ordered on campaign in July 1876. each soldier took only a blanket, a shelter-half, an extra pair of shoes and one change of underwear, plus weapons and ammunition. Sibley tents, iron stoves and other unit gear were carried in company wagons; more lightly equipped columns used pack mules.”
No information on how many wagons a company had is given, but “Hardtack and Coffee” informs us that each ACW Union Infantry company would have two wagons and five for the Regimental HQ.
Men at Arms 438 provides the information that companies were small units compared to modern versions:

Each of the post-July 1866 regiments of infantry was to be composed of one colonel, one lieutenant-colonel, one major, one adjutant and one regimental quartermaster (both of the latter being extra first or second lieutenants), one sergeant-major, one quartermaster sergeant, one commissary sergeant, one hospital steward, two principal musicians, and ten companies. Each infantry company consisted of one captain, one first lieutenant, one second lieutenant, one first sergeant, one quartermaster sergeant, four sergeants, eight corporals, two artificers, two musicians, one wagoner and 50 privates. The number of privates in a company could be increased to 100 when needed.

Note that only one wagoner is listed. Later on in this section it is stated the average size of a company would be 35 men. The company was the key operational unit. If a company was relatively small, the platoon level was omitted. A platoon had two sections, each of two or more squads. Typically a squad would be a corporal and seven privates. Interestingly, military reformer Emory Upton proposed soldiers manoeuvre and skirmish in units of four, so squads might be further divided.

Categories
Phillosoph

Kephart's Autumn Outfit

I was certain I had posted Kephart’s list for cold weather trips. Apparently not, so here it is. For many decades I unsuccessfully tried to find out what “German socks” were. Thanks to the catalogue here the mystery is finally solved!
This version of the Autumn outfit is taken from the 1921 version of Camping and Woodcraft, Vol.2 p.143-6:

Kephart: The man who goes out alone for a week or so in the fall of the year, or at an altitude where the nights always are cold, should be fit to carry on his back from 40 to 50 pounds at the outset—of course the pack lightens as he consumes rations. I am not including weight of gun, cleaning implements, and ammunition. He should wear woolen underwear of medium weight, thick and soft woolen socks, army overshirt, kersey or moleskin trousers, leather belt with pockets (not loops) for clips [sic. more likely chargers or stripper-clips than clips] or loose cartridges, hunting shoes of medium height for ordinary use, felt hat, and, at times, buckskin gloves.

In his pack there would be a spare suit of underwear and hose, a cruiser or “stag” shirt of best Mackinaw, moccasins or leather-topped rubbers, and German socks.
In pockets and on the belt he would carry the same articles mentioned in my summer* hiking list.

A mere shelter cloth is too breezy for this season (there will be no opportunity to build a thatched camp, as the hunter will be on the move from day to day). He needs a half-pyramid tent, say of the Royce pattern (Vol.I., pp.85-91) but somewhat smaller, and weighing not over 4 pounds.

Bedding is the problem; a man carrying his all upon his back, in cold weather, must study compactness as well as lightness of outfit. Here the points are in favor of sleeping-bag vs. blankets, because, for a given insulation against cold and draughts, it may be so made as to save bulk as well as weight. For a pedestrian it need not be so roomy as the standard ones, especially at the foot end. Better design one to suit yourself, and have an outfitter make it up to order, if you have no skill with the needle. An inner bag of woolen blanketing, an outer one of knotted wool batting, and a separate cover of cravenetted khaki or Tanalite—the weight need not be over 8 pounds complete. Your campfire will do the rest.
A browse bag is dispensed with, for you will carry an axe and can cut small logs to hold in place a deep layer of such soft stuff as the location affords.
The short axe may be of Hudson Bay or Damascus pattern. There should be a small mill file to keep it in order, besides the whetstone.
The ration list is based on. the assumption that the hunter’s rifle will supply him, after the first day or two, with at least a pound of fresh meat a day. If it does not, go elsewhere.

There are plenty of good ways to cook without boiling, stewing, or roasting in an oven (see Vol.I.), which are processes that require vessels too bulky for a foot traveler to bother with.

Either the Whelen pack sack or a large Duluth one will carry the whole outfit. Both have the advantage that they can be drawn up to smaller dimensions as the pack decreases in size, or for carrying the day’s supplies when most of the outfit is cached at or near camp.
The following outfit is complete, save for gun, ammunition and cleaning implements.
For a longer trip than one week, a reserve of provisions can be cached at some central point in the hunting district.
AUTUMN OUTFIT

Pack sack, with tump strap…2lb 12oz
Tent…4lb
Sleeping-bag…8lb
Pillow bag*…3oz
Rubber cape*…1lb 5oz
Mackinaw stag shirt…1lb 8oz
Spare underwear, 1 suit…1lb 8oz
Spare socks, 2 pairs…5oz
Moccasins…1lb
German socks…12oz
Axe and muzzle…1lb 12oz
Cooking kit, dish towel, tin cup*…2lb 2oz
Cheese cloth…2oz
Mill file, 6 in…2oz
Whetstone*…2oz
Pliers*…4oz
Wallet, fitted*…6oz
Twine*…2oz
Toilet articles*…6oz
Talcum powder*…2oz
Toilet paper*…1oz
First aid kit*…5oz
Spare matches, in tin…6oz
Alpina folding lantern…8oz
Candles, ½ doz…8oz
Emergency ration [probably the “camper’s emergency ration” mentioned on p.167]…8oz
Tobacco, in wpf. bag…8
Spare pipe…3

Total pack without provisions …28lb 120z

One Week’s Rations (not including fresh meat)
Flour…4lb
Baking powder…4oz
Meal, cereal…1lb oz8
Milk powder…8oz
Butter…8oz
Bacon…2lb
Egg powder…8oz
Raisins…8oz
Dried apricots, prunes…1lb
Sugar…1lb
Chocolate…12oz
Coffee…8oz
Tea…2oz
Salt…4oz
Total [weight of food]…13lb 6oz
Provision bags, etc…10oz
Total…14lb

Pack complete…42lb 12oz

The articles starred (*) are same as in summer hiking list already given.
Moccasins are to be large enough to fit over the German socks. This foot-gear is used in still hunting in dry weather, and on cold nights. The camper sleeps, when it is frosty, in fresh underwear and socks, army shirt (dried before the fire after the day’s use), trousers, stag shirt, neckerchief rigged as hood, German socks, and moccasins. When he has to get up to replenish the fire, or in case of any alarm, he springs from his bed attired cap-a-pie.
Categories
Phillosoph

Camouflage: Does Size Matter?

This particular train of thought probably started as I was watching Westworld. In one scene we see a parked truck, as shown below:

Geometric urban camouflage patterns are nothing new, of course. What is notable about this example is the use of obliques, and the size of the elements used. The pattern appeared even more effective on the show than it does in the still. My eye kept losing parts of the shape and I had to remind myself that I was looking at a truck.
I have reached the conclusion that shape-disruption is one of the most important properties of a camouflage, and that this is where so many modern camouflage schemes fail. To hide a man we must first stop him appearing man-shaped.
The other day I happened across a booklet I have called “Camouflage Simply Explained” by Lt.-Col. Cyril H. Smith. Leafing through it I came across a statement that hiding an objects shape required bold patterns. The section on personal camouflage draws from Langdon-Davies, but the pattern illustrated by Smith is different from the one Langdon-Davies suggests for field and forest. As you can see, it uses large, bold elements.

This pattern is similar to those given by Langdon-Davies for rocky and urban terrain. Bold patterns, using proportional large elements.
Smith also addresses the camouflage of RAF aircraft, which also shows bold, large elements. These patterns were used well into the jet age. Similar patterns are used by some Russian ground vehicles. 

RAF patterns were painted adhering to a template, so all aircraft of the same type should have an identical pattern (although in the early part of the Second World War the pattern was mirrored for even-numbered aircraft).
I don’t know how these schemes were arrived at, but observe:
  • Band width loosely approximates the height of the fuselage.
  • Bands may branch.
  • Bands are oblique
  • Bands typically divide a wing or fuselage into between four and eight parts. This may be more on long-bodied aircraft.
Looking for similar camouflage schemes turned up some interesting images:

The last three are interesting, since they may be the first ever camouflage jackets known by the term. Created by the artist Louis Guingot, the pattern was called “Léopard”. Only five examples were made. Shows good contrast between the elements and uses natural-looking hues of green and brown. Could teach many latter efforts a thing or two!

Some charming attempts at Langdon-Davies’ sniper suits. He would not approve of the separate eyeholes and pink flesh visible, however!
Curious, I performed a little experiment using a pattern I generated. Like most modern camouflages, the pattern is too green, but will serve to investigate the effects of element size. The same pattern was resized so that it was 250, 350, 500, 600, 750 and 1000 pixels square. Results suggest that even larger elements may be more effective.

Categories
Phillosoph

Field Jacket Features

Yesterday I wrote about the consideration of grey uniforms for the Victorian British Army. During my researches I turned up a rather nice example of a grey uniform that was used in the Sudan. This has a number of interesting features, other than its colour. 

The buttons appear to be brass, showing that the recommendation of using low visibility bronze with the grey uniforms had not been acted upon. The grouping of the buttons confirms the claim that this tunic was worn by a Coldstream Guard.
Other than the colour the most noticeable feature is what appear to be two pleats in the front. If you look carefully you will see these pleats conceal vertical pocket openings that begin just below the second button group. Vertical breast pockets are a common feature of Norfolk jackets.
Vertical “Napoleon” pockets are a useful feature if you wear equipment straps. The suitability the Norfolk design for military service was one of the topics discussed in the account of the House of Commons proceedings reproduced in yesterday’s blog.
Another feature of Norfolk jackets is the shoulder area is designed for maximum freedom of movement when aiming and positioning a rifle or shotgun. This may account for the atypical cut of the tunic shoulders in the photo.
The position of the lower pockets is also unusual. Perhaps placing them further to the sides was more comfortable if the soldier was crawling or firing prone. This position might also make the pockets more accessible if ammunition pouches are worn.
Norfolk jackets provided inspiration for another variety of 19th century military tunic.
Some varieties of Spanish and Philippine hot climate tunics incorporated Norfolk features. Some very nice examples are shown on this website.
The provision of four lower cargo pockets is a nice feature.
I also like the side vents that allow access to a pistol, knife or sword worn on a belt beneath the tunic. Attaching a pistol and survival knife to the trouser belt is a sound strategy. If you have to dump your webbing, for example during a river crossing, you still have a useful tool and weapon.
Here it is worth stressing that your primary survival gear should be in your trouser pockets. Jacket and shirt pockets are mainly for clothing accessories and useful items.

Why am I interested in a pair of 19th century tunics?
It should be clear they both have a number of features that would still be desirable in a modern field jacket.
The term “field jacket”, “combat jacket” etc can be ambivalent. In some instances it refers to the primary outermost layer of an outfit, which may be a tunic or shirt-like garment. In other instances it refers to a garment intended to be worn over your primary clothing.
Most outdoor coats need more pocket space. This is particularly true in cold weather.
Put away a scarf, hat and gloves and your pockets are probably full or overflowing. That may explain why you so often see dropped gloves in the street.
Many soldiers complain they cannot use the lower pockets because of their ammunition pouches, but not all servicemen are infantry.
Lower pockets should be deep, large and wide for easy accessibility. Having four, like the Filipino jacket, and pocket at the flanks, like both designs, is worth considering.
Horizontal pockets over the kidneys, and a storage pocket in the tail for soft items are features other combat jackets have used.
Sleeve pockets are more accessible if the soldier is prone or wearing body armour.
Many field jackets are too warm. It is preferable to have an unlined, or partially lined, and add additional clothes beneath if it is cold. Multiple, thin garments can be dried more easily than a lesser number of thicker, lined garments.
Size is another feature to consider when selecting a field jacket. You want to get it at least a size bigger than your bush shirt.
This gives room for air to circulate in hot weather and space to wear warm clothing beneath in the cold.
For the same reasons, the shirt you wear beneath your field coat/overgarment needs room for several layers of underwear if needed.
Categories
Phillosoph

Victorian Shades of Grey

Today I came across an interesting thread on a forum.
This establishes that khaki (beige)/drab uniforms had been adopted for their resemblance to mud or dirt rather than vegetation.

Further down were two intriguing extracts:

The article from The Times reports some experiments performed to study the effect of uniform colour on visibility. The term “camouflage” would not be coined until the First World War.
The recommendation is for the adoption of a tunic, trousers, greatcoat and helmet cover in the grey then currently worn by the 3rd Devonshire Volunteers (3rd Devonshire Artillery Volunteer Corps?).
A tunic of scarlet, blue or green would be worn with the dress uniform and one of grey used for undress and active service.
More practical might have been to issue the home service helmet in grey and have a more decorated cover for parade wear.
I have been unable to determine how light a shade of grey this was, nor if it was a “warmer” or “cooler” grey.
The suggestion that existing white equipment be stained with an umber solution may imply that it was a warmer shade.
The shade of brown the equipment would have dyed is also unknown. Presumably this was of a similar shade to the grey.
I like the thought that evidently went into this report. Since grey will go with nearly anything, a smarter uniform can be created by just changing tunic colour.
Grey Home Service Helmet https://www.militarysunhelmets.com/2013/the-british-home-service-helmet
Some volunteer regiments already wore grey home service helmets.
The second extract (shown first on the original page) is an account of a discussion in the House of Commons that predates The Times article and may have inspired the experiments reported.
Soldiers of the Rifle Brigade are described in the report as wearing black when their uniform is actually dark green with black equipment. Although the dark green rifle uniform is often attributed to being a form of camouflage, it was unlikely to be so in practice in terrain other than dark forests.
Of particular note in this extract is the discussion of poorly designed uniforms that restrict the soldier.
Jump forward to just before World War Two and you will hear similar discussions.
Then again in the 1970s and 80s.
And if we now look at modern combat wear, we still see overly tailored uniforms that restrict movement, air-circulation and provide poor camouflage.

There were, apparently, some efforts to adopt grey uniforms and in at least one campaign both khaki and grey were used by the British Army. Note that some illustrations show combinations of grey and khaki. Also note references to stained “off-white” equipment.
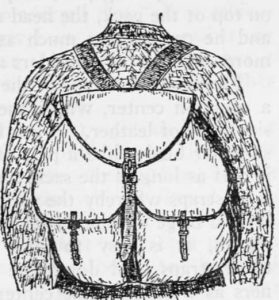
Shown above is a Coldstream Guards uniform from the Sudan campaign.
The suggestions about dying white equipment seem to have been only partly observed, however, and presumably buckles and buttons were still polished.
It is worth noting that later designs of military uniform covered buttons with a fly front, like a paletot coat.
Indian-based units (the greater part of the British Army) seem to have already adopted khaki.
Khaki uniforms seem to have been cotton drill, while grey were woolen serge.
Which would have been adopted would have been of considerable economic interest to the cotton and wool producers of the Empire.
Wool production was mainly within the British Isles, while cotton production was in the overseas areas of the Empire.
History suggests the cotton growers had the more influence.
So, with a few twists of fate, the familiar image of the Victorian soldier in khaki with white equipment might have been in grey, with umber equipment and bronze buckles. 
Perhaps the army might have adopted grey serge for temperate climes and cotton khaki for hotter postings. Or use grey trousers and greatcoat with a khaki service tunic.
Some other armies of the time issued “summer” and “winter” tunics, often of different shades and cloth types.
The Times of March 29th, 1883:
THE COLOUR OF ARMY UNIFORM
The report of the Colour Committee appointed by the Field-Marshal Commanding-in-Chief to consider and report what colour, suitable for military uniform, is least conspicuous, was published yesterday as a Parliamentary paper. The Instructions given to the Committee were as follows:
"Having regard to the increased range of rifled arms and the consequent exposure to troops to fire at great distances, that exposure of troops to fire at great distances, that exposure continuing and being enhanced as they approach the enemy, it is desirable that Her Majesty's forces on active service should wear uniform of the colour ascertained to be the least conspicuous.
"It is observed that the use of a neutral colour – Khakee – is general in India, and at the same time that at least four colours are generally worn by Her Majesty's troops elsewhere, each of these (except, perhaps, in the case of the green worn by the Rifles) having been adopted without reference to their greater or less visibility.
"It appears, under these circumstances, desirable that, in the first instance, before the question is discussed with reference to other considerations, a scientific enquiry should take place as to the comparative visibility of different colours suitable for military uniform in the field.
"His Royal Highness has recommended to the Secretary of State that two or more persons of undoubted scientific authority on the question of this character should be invited to co-operate with a small number of officers with a view to carry out any practical experiments which may be necessary for the complete discussion and utilization of known facts on this subject.
"A committee composed as follows: President. – Lieutenant-General Sir. G.J. Wolseley, G.C.B.,G.C.M.G.; members – Major-General R.B. Hawley, O.B.; Major-General J.H.F. Elkington, O.B.; Director of Clothing – has been appointed to consider this question.
"Professors Abel and Stokes will co-operate with the Committee, and as the utility of the enquiry will depend upon the nature of the questions submitted to these gentlemen, it is recommended that this should be arranged with one or both of them beforehand.
"The Committee will cause experiments to be made as to the visibility of various colours, and the relative merits of – scarlet, green, blue, khakee, and gray (warm or cold shade); and report what colour suitable for military uniform is under all the ordinary conditions of war, the least conspicuous.
"Supposing the colour found to be the least conspicuous is not scarlet, green, or blue, does it possess such advantages over those colours that the Committee would recommend its general adoption.
"It is recommended that the practical experiments necessary to test the various colours had better be carried out at Aldershot.
"C.H. ELLICE, A.G"
The following is the report of the Committee:
"On the termination of the experiments by the scientific members of the Committee and on the rendering of their report, the Committee desire to lay before the Secretary of State the conclusion to which they have come, after careful consideration of that report.
"In accordance with the instructions of his Royal Highness the Field-Marshal Commanding-in-Chief, at the first meeting of the Committee Professors Abel & Stokes were consulted on the best means of carrying out the scientific inquiry as to the comparative visibility of different colours suitable for military uniform in the field. A detailed account of these experiments will be found in their report, which is submitted herewith.
"It may be briefly stated that a series of experiments were carried out under varying conditions of weather, atmosphere, surroundings, and background – the object being to make them as exhaustive as possible. Various members of the Committee were present during these experiments, which were under the immediate superintendence of Professors Abel and Stokes.
"The result was to eliminate all the colours at present used in the dress of the Army, and the glaring conspicuousness of white and scarlet was at once evident.
"On the other hand, the neutral colours, more particularly the Indian 'Khakee' and certain volunteer grays, were indistinct even at short distances, and, in comparison with the Army colours, all but invisible at long ranges.
"The question was in the end narrowed down to a shade of gray, which, besides its character of invisibility, stands exposure to rain and sun without fading.
"The Committee recommend that this gray (now worn by the 3rd Devon Volunteers) should be adopted as the service dress of the Army.
"As it would, however, be unadvisable to break entirely with the traditions attached to the red uniform of the British Army, the Committee recommend that red or scarlet (and blue or green for corps wearing those colours) should be retained for full dress; but that on all other occasions the gray should take the place of the present undress. By this arrangement the Committee think the advantages, as recruiting, to be gained from an attractive uniform will be retained, while at the same time men and officers will become familiar with a colour which, there can be no question, is the best for active service. The Committee consider that the greatcoats and trousers should be of this gray colour, and that a gray helmet cover should also be issued.
"Intimately connected with the question of the colour of the uniform is that of pipeclayed belts and white haversacks. White, under all but very exceptional circumstances, is the most conspicuous colour of all, and it would avail little to substitute gray for scarlet if the white accoutrements are retained. By the use of an umber colouring (of a similar nature to pipeclay) the belts may be made nearly invisible at a distance, and its employment permits their colour being changed at will.
"This colouring, as prepared by Professor Abel, has been practically tried and found to answer remarkably well. The Committee therefore recommend its general adoption throughout the Army, the umber belts to be worn at all times on active service.
"The haversack, instead of being of white material, should be of the same colour as the belts.
"No practical test was made as to the conspicuousness of the shining metal portions of the soldier's uniform and accoutrements, but it is evident that in sunlight these would attract the eye, and so weaken the advantage gained by the use of gray uniform and brown belts. The Committee therefore recommend that all ornaments, buttons, &c., of the gray uniform should be bronze, and not polished; and that on active service a brown lacquer should be applied to the bayonets, metal scabbards, and all other bright portions of the accoutrements.
"G.J. WOLSELEY, A.G., President
"R.B. HAWLEY, D.A.G.
"JOHN ELKINGTON, D.A.G.
"GEORGE D. RAMSAY, Director of Clothing.
"F.A. Abel.
"G.G.STOKES.
"H.C. REYNOLDS, Major, D.A.Q.M.G., Secretary
"July 25, 1882."
OBSERVATIONS.HC Deb 13 March 1882 vol 267 cc781-5:
§ COLONEL BARNE rose to call attention to the dress of the Army, and said, that, had the Forms of the House permitted, he should have been glad to have moved the following Resolution:— ‘That the present conspicuous colour and tight-fitting Dress of the Army interferes with the efficiency of the soldier and causes the unnecessary loss of many valuable lives.’ He had brought forward the subject last year, when the right hon. Gentleman the Secretary of State for War admitted that a change ought to be made in this respect, and suggested that he should bring the matter on when the Estimates for Soldiers' Clothing were discussed. He regretted that he had not done so; but when the time came two-thirds of the House were absent, and he deferred bringing the subject forward, in the hope that it would receive a more satisfactory discussion than it could have obtained last year. Nothing had yet been done in the matter, and he should like to know whether the right hon. Gentleman really intended carrying out what he had said? He did not complain of want of alteration in the uniform of the Army, because those changes had been frequent, and he knew that some of the small alterations which had been made had been of a vexatious character, and had been the cause of great expense to officers. Last year the right hon. Gentleman ordered the stars to be removed from the collars of the officers to their shoulder straps, and this slight change, which did no good whatever, cost each officer in the Guards about £20. The other day he was talking to an old Militia officer, who told him that since the year 1852 his headdress had been changed no fewer than eight times. His (Colonel Barne's) complaint was that the alterations were made in an entirely wrong direction. First, with regard to the colours worn, it had been found by the Emperor Napoleon that the most conspicuous were white, black, gamboge, and then scarlet; thus, the dress of our Army was composed of the most conspicuous colours that could be found. The Rifles, for instance, who ought to be the least visible, were clothed in black, which was the second most conspicuous colour. Modern warfare consisted largely of battles between two lines of skirmishers, each armed with weapons of precision, so that the loss of life was necessarily conspicuous amongst the more conspicuous body. This was proved by the experience of our men in the conflict with the Boers in South Africa, and more recently by the testimony of the Austrians in Herzegovina. Our losses in the Transvaal War were, generally speaking, due to the superior marksmanship of the Boers, and their ability to pick out our men, whereas the English soldiers complained that they could see nothing of the enemy except their heads. It was found that the grey dress of the Rifles was far less conspicuous. That colour was also advocated by Military and Volunteer officers who had tested the point. He also advocated a change of colour on the ground of economy, for the scarlet dye took the oil out of the wool and impaired its durability. He objected to the tight-fitting tunic, because it did not allow the lungs to expand in a natural way when a man began to ascend a hill, or to do any kind of hard work. The regulation trouser was also objectionable, because it gave an immense drag at the knee, especially if it got wet through. He should like to see the British troops dressed in a Norfolk jacket, breeches loose at the knee, and gaiters, with a light helmet, which would not impede the men in their work. He could not move the Resolution of which he had given Notice; but he had ventured to bring the subject under the notice of the right hon. Gentleman, in the hope that he would consider it, and make a move, if possible, in the direction indicated.
§ LORD ELCHO said, he entirely agreed with the hon. and gallant Member who had just sat down (Colonel Barne), that an unnecessary expenditure had been thrown upon officers by the alteration in the collar and shoulder straps, also that soldiers should wear a dress thoroughly adapted to the work they had to do, and did not think he could add anything to what he had said. As to the question of expense entailed by the changes in the uniform, such as altering the mark of rank from the collar to a shoulder strap, he believed the cost to an officer involved by the renewal of uniform in accordance with the changes was about £20, which he was bound to say was a very unnecessary expenditure. As regarded the question of convenience and comfort in the matter of uniform, he was an advocate of easy clothing, as the movements of a soldier should not be constrained by his uniform. The clothing of the hard-working navvies was loose, and they wore a strap under the knee to prevent the dragging of the trousers. He believed it was a fact that if two men, equal in all other respects, were set to walk, one dressed in knickerbockers or a kilt, and the other in the present uniform of a soldier, in course of the day the former would very considerably outwalk the other; and, besides, trousers were not so fitted for work as other descriptions of clothing. The Secretary of State for War was the person really responsible for the efficiency of the uniform; and he wondered how his right hon. Friend the present Secretary of State for War, who was a most kind and indulgent man, and about as sensible a one as he (Lord Elcho) was acquainted with, when he went down every day to his office could bear to see the sentries with trousers so tight at the knees and baggy below, that it seemed impossible for them to go up and down hill without splitting them. The trousers were, in fact, the very reverse of what they ought to be. It was the custom to ridicule the "peg-tops" worn by the French troops; but they were much more sensible than the trousers of the English soldier. Then, in the Cavalry, the clothes were so tight that the men could hardly mount, and only did so at imminent risk of splitting their trousers. He hoped his right hon. Friend would give his attention to these matters, which were by no means trivial, but essential to the welfare and efficiency of the Army, and would see especially that good and efficient leggings were supplied. He would now turn to the question of colour. As regards the colour, the War Office Volunteer Committee had reported in favour of the Volunteers being clothed in red. He had on his right his hon. and gallant Friend the Member for Berkshire (Sir Robert Loyd Lindsay), who was a Member of that Committee. He was a great advocate of scarlet, and, having won his Victoria Cross in red, naturally thought there was no colour like scarlet for the British soldier. But he (Lord Elcho) did not share in that partiality, and he therefore obtained permission for the regiment he commanded to retain their old grey uniform; and he hoped that, instead of the whole Force being put into red, they would be turned into grey. When the Army went to India, the soldiers were dressed in a uniform khaki or dust colour, and in the Ashantee campaign the dress of the London Scottish was adopted. At the time of the Edinburgh Volunteer Review, he met Sir Frederick Roberts, after he had been round looking at the troops as they were drawn up, and that officer said— ‘I only wish an order would come out that within five years every Volunteer should be clothed in grey instead of red. I am so struck with grey as being a very much better colour than red.’ He (Lord Elcho) had great hopes that, instead of all the Volunteers becoming red, there was some chance from some thing he had heard—and perhaps his right hon. Friend would tell the House if he was right—that the working dress of the Army would be made grey. He was told that experiments were being made at the present with a view of testing what really was the effect of colour at distances in Woolwich marshes and elsewhere. With the small Army we were able to put into the held these were matters of the greatest importance, for it simply meant whether in action a greater or less proportion of our men were to be hit or not. Recently, wishing to try some experiments with a range finder, and sighting a Martini-Henry rifle, he had a target erected at 2,000 yards distance. Had that target been grey, he would not have seen it at the distance; but he covered it with red Turkey twill, and saw it flaming at the other end like a danger signal on a railway. To give them an idea of the accuracy of the weapon, every shot from that distance would have gone into a space not larger than the Palace Yard, or into a regiment in column. Whether they could see men or not at that distance, would depend on the colour of their dress; and with the view of effecting a saving of life, as well as on the score of convenience and comfort, the question of uniform was one which should be thoroughly gone into.
§ MR. CHILDERS said, he was sure no Member of the House would complain of the character of the remarks which the hon. and gallant Gentleman (Colonel Barne) and his noble Friend (Lord Elcho) had made. He must, however, take exception to one of the remarks of the hon. and gallant Member about small alterations of uniform, and especially about the change made above a year ago in the marks on the collar and shoulder strap denoting rank. For these he (Mr. Childers) was not responsible; but he had clearly informed the House last year that henceforward the Secretary of State would be responsible for changes in uniform, and to this declaration he adhered. As to the particular object of the hon. and gallant Gentleman, he quite agreed in his general position that, putting colour aside, the fighting uniform of a soldier should be as appropriate for fighting as the shooting dress of a sportsman or gamekeeper was for the pursuit of game. In one respect the authorities were hardly responsible for undue tightness of dress, which they did not encourage, and which was the result often of commanding officers wanting their men to look smarter, and tightening their tunics. On the question of colour, he proposed to offer some explanation, when they were in Committee, as part of his general statement. He would only say now, that there was more to consider than the mere question of greater or less visibility, important as that was as a factor in the case.
Categories
Phillosoph

Knots for Traps

Today I will look at some knots relevant to yesterday’s blog.

This is the “snare knot”, which I have to admit was new to me. It did look familiar, however! The animated knots website describes the similar poacher’s knot, aka strangle snare or a double overhand noose, as a double overhand on a bight. It also provides the useful information that this is a good knot for high modulus ropes that might fail with knots such as the bowline.

From the double overhand on a bight comes the triple overhand, scaffold knot or triple overhand noose, another strong, useful loop.

While on the subject of loops, twisting a wire loop into a double loop for better locking:

The previous blog featured toggles tied into the middle of ropes. Two methods of doing this, one for a clove hitch, the other for the related constrictor knot.

Categories
Phillosoph

A Single Trap System

Today I will start with a warning. Knowing how to trap for food is an important component of your knowledge. It should, however, only be used when needed. I do not condone poaching, nor leaving traps set for any other reason than genuine survival needs. Practice building them if you want, but break them up once you are done. If you use this for poaching or unnecessary cruelty you deserve everything that may happen to you.
In my first book I used the principle of teaching by which I concentrated on underlying common principles. For example, rather than trying to teach dozens of different Judo throws I taught the principles of balance and obstruction around which most are based. A similar idea is used in my knot book. You are taught a knot, then introduced to similar knots that have different applications. From the clove hitch it is easy to learn the constrictor, transon, slippery hitch and buntline hitch, among others.
Recently I came across a similar approach to learning trap construction. Rather than try to memorize every design in the survival manuals, learn a single mechanism that could be put to many different purposes. Look for the similarities and common features as well as the differences.
This is the basic mechanism, which is pretty easy to understand. Don’t make the trigger parts from green wood or that which is gummy. You do not want these parts to stick together. The following examples will also give you a good grounding in understanding other types of traps.

Power to the trap can be either by tension or by counterweight. Counterweights are often shown as tree trunks or rocks, but can be a limb used as a lever under its own weight. The constant load may uproot stakes or cause parts of a mechanism to fail, so inspect traps when you check them, even if they have not caught anything. As can be seen with the fish trap, there are applications for this mechanism other than snares. A mechanism that can hold up a weight can also be used to drop it! A crash site or battlefield will have lots of metal and plastic that can be used for trap construction. This option is not shown in most survival manuals. The piece of parachute harness shown should also suggest to you that the hook in most of these diagrams could easily be a ring or loop instead. Use a stone or similar to smooth and taper a peg used for a loop or ring. A toggle on the end of a line can be used to pull a ring from a peg.
The form of the next trigger looks different but the principle is exactly the same. Rather than a hook (or ring) you have a toggle and two pegs/pins. In this particular example the counterweight also acts as a deadfall. The toggle is held by two pegs. These pegs could be spent cartridge cases hammered into the bark. If using nails bend them upwards slightly so the toggle does not catch on the heads. Always test trap mechanisms.

The next illustrations show the same principle again, but a slightly different form. Effectively a notch or hook and a crosspiece. Note that a single trigger can serve several nooses.

These variants are the same as the last, but support the horizontal with two supports rather than one. The first illustration is not a spring snare, but could easily be improved to be one. The stick shown will not slow the rabbit down much, but might hinder it entering its burrow. This may be a considerable distance away, so making a better trap or using a larger/ additional drag would be more humane and better for the survivor too. Do not underestimate how much weight a trapped animal will drag. Secure traps to heavy weights or well-rooted objects in preference to simple stakes.

A horizontal such as this could support multiple snares. Note how one example has the supports orientated so the trap works in either direction. In another illustration the contact areas have been reduced to make the trap more sensitive.
Here is another variation of the basic mechanism. Some might argue it is a different mechanism, but I like to think of it as a toggle tied off-centre. Note how it can be worked with a platform or tripwire, and that it can be used to raise nets or drop weights as well as snares.

The same mechanism, using a horizontal bar. Note use of dual tripwires:

A variation of the above systems. The cord is hitched around the support pole and disturbing the trap releases it. Test to ensure it works smoothly.

This variation holds the toggle between two other parts. This has a passing resemblance to the “Figure-Four” type mechanisms. A small saw, such as that on a Swiss army knife, may be very useful in making these fitted mechanisms.

A variation of the mechanism using two pegs in a tree-trunk. Here a nail is used in place of the toggle bar.

This is a commercially made trap, I believe, but illustrates how scrap metal and other “non-woodland” resources can be used. The trigger is simply a hole that fits over a pin.  Weight in the platform levers it off the pin.

Use existing resources where possible. Here a supple tree is simply hooked to its neighbor.

Some more variations of the systems shown. Note, trap is positioned so that the only way to the bait is through the noose.

Categories
Phillosoph

New Medical Pouch.

I decided to give myself a little treat. For decades my travel medical kit has ridden in a silver-grey zip pouch that once held materials for contact lens care. This has worked well enough, partially because it was always stored in the same place. If I needed it and could not get it myself, the directions “front upper pocket of my bag, grey pouch” were clear enough for most. I realized that it would help if the pouch itself were more clearly recognizable as a medical item.
A quick look online secured an item as a tolerable price. As it turned out, this was a fortuitous decision. The top of the TCP bottle had broken with age and would have spilt all over the inside next time my travel rucksac was disturbed.

The new pouch is 14-15 cm square and about 5 cm deep. It holds everything the old pouch did, although it is a little bit more of a squeeze. In truth, my travel kit has acquired a few extra items over the years. I probably should have migrated some of these to other kits.
The new pouch has two internal zipped mesh pockets. The main zip is two-way and already provided with pull-tabs to make it easier to operate if wearing gloves.

I have detailed how to construct your own kit in other blogs. Items of note, going clockwise from top left:
  • Lice comb: Never needed it, hope never to need it.
  • Roller bandage: useful support for sprained or twisted ankles.
  • Bag of alcohol wipes. I probably have more of these than needed. Some extras came with another kit.
  • Olbas oil, TCP, Oil of Cloves.
  • Vaseline. Sleeve of scalpel blades I happen to have.
  • Plasters. Note bottom of the bag they are in has been reinforced so it makes a better water carrier. This was a gift from a friend of mine and has ended up in the medical kit.
  • Dental floss: this is probably a duplicate of an item also carried in my repair kit. I have one in my EDC pouch too. Could be uses to construct an emergency bikini for my Brazilian girlfriend.
  • Roll of tape. I only have this because I got it free with another pouch I purchased.
  • Green plastic sleeve contains fine pointed forceps.
  • Bag of safety pins on large bandage. This bandage was another freebie. I would be happy with the plasters and roller bandage.
  • Two pairs of haemostats, one curved, one straight. I had access to these so acquired some. Hopefully will never need to clamp an artery, but they have proved useful for less sanguine tasks.
  • In the centre, a bag containing aspirin and other general medications.
The “hardware” goes into one of the side pockets. Small bottles, Vaseline tin and dental floss into the other. Items most likely to be wanted, the aspirins and plasters, go in the centre.
Categories
Phillosoph

Survival Headbands

Recently I have been thinking about headgear.

If you are in the military your primary headgear should be your helmet.

The Roman Vegetius reports that Roman soldiers always wore hats so they were accustomed to carrying a weight here. These hats were leather and known as “Pannonian” or “Tetrachic” caps.

Your helmet should be competently camouflaged, which involves more than just putting the latest cloth cover on it.

I will give some additional ideas for helmets in a later blog. In the meantime, think “puggaree”.

My headgear of choice is usually either a watch cap or a boonie hat.
With the watch cap we can include headovers, ski-masks and other items that can be worn in the same way.
A good watch cap is not too thick. In cold weather you do not want to overheat, and one of the merits of a watch cap is you can screw it up and carry it virtually anywhere.
If it is really cold, you can use it in combination with other headgear or another watch cap. A watch cap doubles as a night cap so can keep you a little warmer sleeping at night.
One size fits nearly all, and the cap stays on in all but the very strongest winds.
Your outdoor kit should include at least one watch cap or equivalent. Most of my coats and jackets have a cap or similar tucked into a pocket for when the weather turns for the worse.
Sadly, the watch cap cannot be used for everything, and this is where the boonie hat steps in. It has a brim, which as well as keeping the sun off, keeps the rain off my glasses.
In a previous blog I described how to camouflage a boonie, although it should be understood that these techniques can also be applied to helmets and other headgear too.
Unlike the watch cap, the boonie and many other types of headgear need to be sized to fit the wearer. Chances are most readers do not know their hat size. Even if you do, there is still the chance a size may come up large or small.
Most forms of headgear have very little provision for size adjustment.
As an individual, this can be irritating. For someone like a quartermaster, who must equip hundreds of personnel, it means multiple alternatives of the same item must be stocked.

While I was thinking about this, another train of thought intersected with it.

In the classic movie “Seven Samurai” it is notable that the farmers who are defending their village have scarves bound around their foreheads. We see this in other movies, with some samurai wearing headscarves beneath their helmets. It is a common practice in kendo too.

This has practical applications. Fighting is a physical activity and a scarf keeps the sweat from running into your eyes. Also keeps your hair out of your eyes.

Logical enough, so it is perhaps surprising how rarely we seem to see fighting men using headcloths. There is Rambo, of course, and a few individuals in pictures from Vietnam.
If you are a regular reader, you will have a bandanna in your EDC, and such is handy should you find yourself sweating more than you expected. If you know you are likely to be sweating, you should have made some preparations.
In hot weather, a neck gaiter may be repurposed as a sweat band.
In the vast, echoing expanse of my mind, two ideas collide!

Take an elasticated headband, as made famous by Bjorn Borg, and sew it into your boonie hat, patrol cap or whatever else you favour:

  • Your hat is now more size-tolerant. Don’t worry about ordering a new hat that may be too big. Order it a size bigger and fit a sweatband.
  • Your hat now stays on better. It hugs your head like a watch cap.
  • You will be bothered less by perspiration running down into your eyes.
Only problem with this idea is most elasticated sweatbands are in very un-tactical colours. You may be able to find grey, but these are still a bit light. It may be possible to dye grey and white with tea or diluted acrylic paint.
What is really needed is for some smart company to manufacture sweatbands in a useful colour such as “light coyote tan”. I’m sure someone will demand them in “tactical” black! Very dark grey may have applications for police headgear. A friend of my suggests sage or olive might suit some police uniforms.
Such headbands would have dual use. Firstly, they can be sewn into headgear as described above.
Secondly they can be worn as a stand-alone item, either on their own or under helmets.
And here is a third use. Take a sweatband and use it for the foundation of a hat. Sewn a bag of light, neutral-coloured cloth to it. It doesn’t have to be that neat or regular, quite the opposite. Then sew a net or similar to the bag and camouflage it as described in the articles above.
You can wear this as a hat on its own, or over something such as a watch cap if it is cold. If you made it big enough you can use it to camouflage a boonie or even a helmet.
In the latter application it works rather like the Israeli “mitznefet/clown-hat”, but with the added improvement of some textilage and the provision to add natural foliage.
Categories
Phillosoph

Canteen (cup) Coffee

I have been using the past few months productively. I may not be able to go out much, so why not use the time to finally get around to all those little jobs that stack up? I have washed my down jacket, replaced the zips in two jackets and the cuffs in another.
It is also a good time for various experiments! I love my coffee, and I do mean coffee, not the horrible instant chemicals that masquerade under the name. It seems a great shame that our young men and women risk their lives serving their country and the last thing they may drink is such crap.
While researching how to made a decent cup of coffee in the field, I came across this interesting website. How you go about making coffee (or tea, for that matter) can have a considerable influence on the taste. Relatively recently my coffee machine broke down and I went back to using a cafetiere (aka “French Press”). The first few cups I made were unimpressive. It makes all the difference if you wet the grounds with a small volume of boiling water and let them “bloom” for 30 seconds. This is probably a good technique to try with coffee bags.
Coffee bags seem to finally be becoming more widely available. Your brew kit probably already includes tea bags, so there is not reason not to carry coffee bags instead of sachets of foul smelling instant muck. But what if you cannot get coffee bags?
This page has a very useful description of five ways to “Make coffee without a maker”. This includes ways to improvise filters and coffee bags. Adding a piece of cloth to your brew kit is worth considering.
Many of these methods work best if you have one vessel for boiling water and another for drinking or brewing in. Let us assume you have listened to all my advice on saving weight and just have a canteen cup.

Making Greek/Turkish coffee is a little involved, so the method of choice for canteen cup brewing is “cowboy coffee”.
How I did it was thus: Fill your (metal!) canteen cup to about a centimetre above the second mark. I am using a Crusader 2 and each mark is equivalent to about a mug-full. Try this at home in the kitchen. Put your canteen cup on to boil. I will assume you are only using your canteen cup. If you boil up the water in a more efficient vessel the volume you add to the cup will need to be less.
Wait for your water to boil. If you think a watched kettle takes ages, a watched canteen cup takes longer! Wait for a “rolling boil”. This is the point where the surface of the water gets stirred up by bubbles. Remove your cup from the heat and dump in about two and three-quarter tablespoons of coffee. Some say wait 30 secs before adding the coffee. Good coffee needs water at about 90-95 centigrade rather than full boil. Give each spoon of coffee a good stir so the spoon/ spork comes out clean each time. Cover your canteen cup and let it sit for about four minutes. It needs time to brew and it will be too hot to drink yet, anyway.
And it is ready! Ideally you can decant the coffee into another cup for drinking, but in our canteen cup scenario that may not be possible. Most of the grounds will have settled out. They will not be a problem unless you try and drain the cup to the bottom. In some westerns they mention settling the grounds by adding crushed eggshell to the coffee. Good luck finding one of those out in the field! “Jack Knife Cookery” also suggests you can use “spotlessly clean gravel” to settle the grounds. More practically, a dash of cold water will settle the ground and cool the coffee to drinking temperature. I don’t usually bother, but you may feel different if you have to drink direct from the hot canteen cup. Remember, a little bit of foil over the cup edge can save burnt lips.
“Jack Knife Cookery” gives a slightly different method for making coffee. Take a fistful of coffee for each individual and add cold water. Allow to sit for a while. Then bring your coffee just to the boil. Remove from heat and place the pot at a distance from the fire so that it is just simmering.
A couple of tricks inspired by Greek/ Turkish coffee are worth mentioning. This coffee is often made with coffee ground to very fine powder. This seems to help the grounds settle at the bottom. If you like your coffee sweet, add the sugar to the water before you make the coffee, like the Turks and Greeks do. Stirring and coffee grounds do not mix, or rather, it does!
The Scout Handbook of 1911 gives an alternate method for campfire coffee:
“For every cup of water allow a tablespoonful of ground coffee, then add one extra. Have water come to boiling point first, add coffee, hold it just below boiling point for five minutes, and settle with one fourth of a cup of cold water. Serve. Some prefer to put the coffee in a small muslin bag loosely tied.”