Many decades ago, back in my student days, I was cooking something one weekend. I had decided to make a sauce to go with my meal, so I needed to brown some flour.
Running short of pans, I put into service a set of British Army mess tins I had with my collection of camping items.
As the flour browned, there was a sudden flash of silver. What looked suspiciously like molten solder appeared at the bottom of a pan!
Needless to say, I decided to do without my sauce, and the mess tins too.
It was many decades before I even considered getting another set of British Army mess tins. Authors such as Kephart had sold me on the wisdom of having a cooking vessel you could hang above a fire when needed.
I was in no hurry to get a new set, since I don’t actually rate the design that highly.
One website gloated that a design that has been in service for 70 years must be good, oblivious to the fact that they had already noted the 37-pattern replaced a design that had been in use for 150 years. Sadly, armies often keep bad stuff in service for a long time too!
About the only virtue of the British Army mess tins was they were a good shape to fit inside a pouch or rucksack side‑pocket.
Given the tendency of many soldiers to overload their belts, that is a questionable virtue at best.
However, I felt that my series of articles on mess kits was not really balanced unless these the British Army mess tins were included.
The British Army mess tins were introduced as part of the 1937 pattern equipment. Prior to this, the British soldier had used a D-section pail-type mess kit much like that which continued to be used by most other armies.
Interestingly, the mess tins were originally intended as a pack-carried item rather than belt kit.
Early issues of the 37 pattern were aluminium.
During the Second World War, a version made from tin-plated mild steel was issued to conserve aluminium reserves for other purposes such as aircraft manufacture.
Around 1944, aluminium mess tins began to be issued again, and this is the material that has been used for post-war issue.
There are minor differences between the pre-1944 and post-1944 aluminium, but for convenience I will call both 37/44 pattern.
When researching this blog, I came across someone trying to sound clever saying they preferred the stainless steel version when they could find them. There was no stainless steel British Army 37/44-pattern mess tin issued.
Many British Army influenced nations copied the design.
The Indian version was oval and had the handles on the longest side. This may have been more practical with respect to handling and cleaning.
Another notable variation was the Australian version, which had sideways-folding handles and was shallower.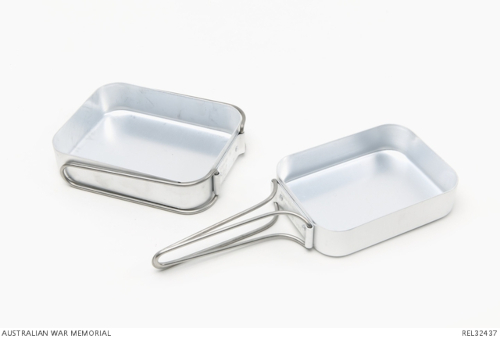
Copies, often of less quality materials, were also manufactured. For many years I assumed that this was the explanation for my melting example. Now I learn more about the topic, I wonder if I had purchased some wartime tinned examples. I seem to recall they may have had “fullers” in the sides.
I recall reading that the way to identify a “knock-off” was to try to push in one side. If it popped out again, it was legit. If the dent stayed, it was not.
Tales from the Supply Depot is a good source for the variations between different models. He offers the advice:
“These tins are very easily available, having been made continuously for over seventy years, and can be bought for a few pounds- the metal is far thicker and better quality than the cheap copies sold in camping shops so even if you are not a collector it is more sensible to invest in a second hand military set rather than a new civilian set as these are almost indestructible!”
Description
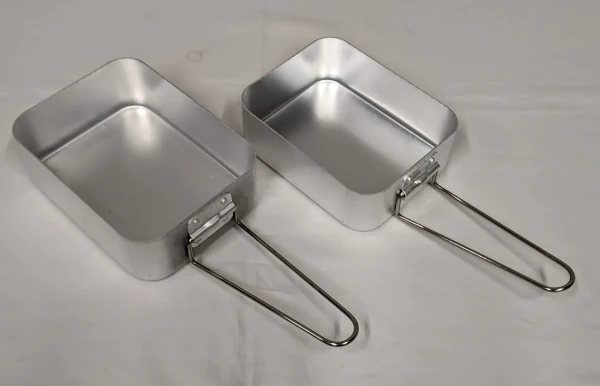
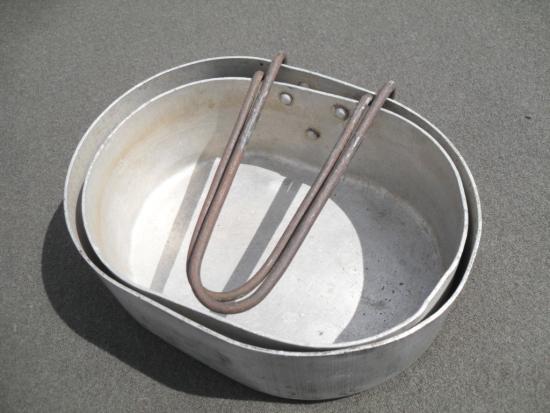
The 37/44 pattern consists of two rectangular pans with folding handles and rounded corners. One pan is slightly smaller than the other and will fit inside the larger. The smaller pan may be carried either bottom up or bottom down.
The pans actually look larger and bulkier than I recalled. The smaller one will comfortably hold a litre of water. The larger pan also takes a litre. You can squeeze nearly 200 mls more in, but the water level will be impractically close to the rim.
The capacity of my set is actually less than the capacity quoted by some vendors.
The two tins nest, although that is not so welcome if you do not have time to clean the outside of the smaller one.
Sometimes the larger tin was carried in the large pack and the smaller tin in a belt pouch or in a smaller backpack.
Some soldiers just made do with a single tin.
Supposably, the metal of the thin handles is a poor conductor of heat, so may be held without the need for gloves or bandana. I would be very cautious trying that.
The handles have no locking mechanism. If moved in certain directions, the handles of the mess tin will suddenly fold, usually dumping the tin’s contents.
Use
In the field, the mess tins were mainly used as simple water boilers.
They were either used to make tea, or to heat up the canned items from the 24 hour “ratpack”. For the latter duty, the cans were placed in the mess tin, water poured into the remaining space and brought to a boil for a few minutes. Using the hot water to make a drink was not recommended since it was contaminated with whatever was on the outside of the cans.
While I was shopping for a set of mess tins, I was bemused to see some vendors claiming they were “easy to clean”.
Many an old soldier would dispute that!
The corners were hard to get clean and the issued hexamine stoves often left the bottoms sooty and covered with hard to shift partially burnt fuel residue.
While “nesting cook kit” sounds like a good feature, the outsides of the inner vessels need to be very clean otherwise they contaminate the insides of the outer pots. You can wrap the inner vessels up, but this may make them too bulky to nest.
Using the mess tin just for water did cut down on some of the cleaning.
This was not the case when a unit was fed from a field kitchen. The mess tins were often the only receptacle available.
Some interesting culinary combinations were experienced as dessert was piled on top of the remains to the main course. Irish stew with custard, anyone?
The mess tins are probably a little large for the uses they were actually put to. That may be why the Australian model was of a lower capacity. The side-folding handles of the Aussie version are a clue to another flaw of the original.
The 37/44 mess tins cannot be hung over an open fire, like the “European”-style pails. The European mess tins are effectively small buckets, while the British mess tins are awkward to carry tea or water any distance.
The British Army mess tins are mainly designed to be used on stoves.
There are ways to use them over an open fire.
Flat‑topped rocks may be employed, although likely to be wobbly.
Bricks or logs with the top hewn flat are another possibility.
Three or four 6 inch nails can also be used.
If you let your fire burn down to coals, pots may be placed directly on the coals.
Digging an L‑shaped hole in the side of a bank and building the fire at the bottom is another option.
Lids for Mess Tins
Combined with the Esbit cooker, the mess tin was not noted as particularly efficient.
The black build up on the bottom of mess tins was common, which may suggest incomplete combustion from using too much fuel.
Often the smaller tin was used as the boiling vessel and the larger tin placed over it to act as a lid.
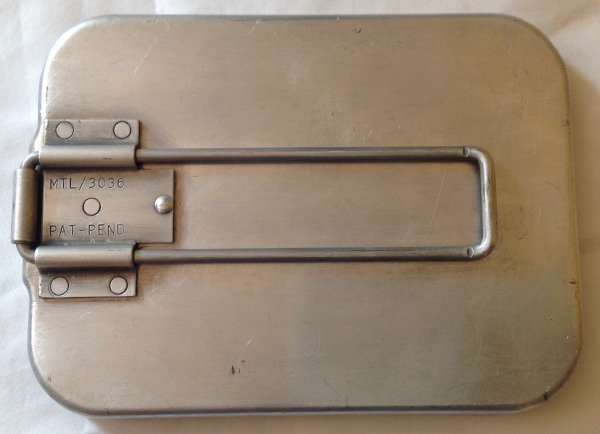
It was not long before some companies started offering purpose built lids that could be used with the issue mess tins. These could also be used as frying pans, some examples even having non-stick coatings. One company even went as far as offering the mess tins with non-stick interiors too.
Back around the 1980s, many soldiers and survivalists regarded the mess tin lids as an essential bit of kit.
It is rather surprising that such lids are now hard to find.
I have seen a non-stick set of mess tins, but it is not clear if these have the same size and proportions as the issue items.
Lids are much harder to find. I have only found one place offering them. The price was actually quite reasonable, so I purchased an example to test out for this review. 
The interior has a black coating, which may be non-stick. I have yet to cook with this item and find out if this is the case.
I got distracted by trying to fit the lid on the mess tins. It would not fit. The lid actually seemed to be a different shape to the large tin.
Careful measuring confirmed that the lid is exactly the same length as the large tin!
The rim of the lid was actually irregular. Perhaps it took a few dings going through the post, but the length of the bottom is still too small.
My current mess tins lack any numbers or identifying symbols, so may not be actual army issue, despite what the seller claimed. On the other hand, they appear brand-new rather than used. Their dimensions seem correct, however, so I suspect the fault is with the lid.
Careful use of a ball-peen hammer reshaped the lid rim so it is slightly bigger than the large tin. This also removed some of the black coating near the edges.
I can fit the lid over the large tin, but when the smaller tin is packed inside the lid will not stay in place unless packed inside a snug 85-pattern water bottle pouch. The handle of the lid is also very tight, and scores the outer surface of the lid when it is pulled out.
Definitely room for a better executed version!
Conclusion
Many regard the British mess tins as a classic. I am not one of them.
Personally, I think the British Army 37/44 pattern mess tin lacks versatility as a field cooking vessel and is somewhat oversized for the uses it is put to.
They are a good illustration of how the needs of a soldier may be very different to a camper or prepper who lacks a comprehensive support infrastructure.
There are some similar smaller cooking vessels that are commercially available, some with lids that fit!
I notice certain vendors are offering “Crusader Mess Tins”. This is an oval shape so hopefully easier to clean. It consists of a single pot with a lid/flying pan. I don’t know if these have become an official issue. The name is an obvious attempt to associate it with the Crusader canteen cups.
Mess Tin Survival Kit
In the first of my Survival Library posts, I recommended Lofty Wiseman’s “SAS Survival Handbook”.
As well as describing the tobacco tin-based survival tin, Wiseman also suggests a “survival pouch”, one of the main components of which is a mess tin into which most of the other components are packed.
Many readers will know that I have a number of criticisms of the traditional survival tin.
I don’t like all my eggs in one basket, nor do I want to carry emergency items by a means I am likely to be separated from. Jackets get taken off, bags get put down. That is why a certain proportion of my gear is in my trouser pockets and pouches on my trouser belt. This is more comfortable than a lumpy tin crammed in a pocket.
One of the criticisms of the survival tin is that the useful stuff it does have, it does not have enough of.
You could do worse than empty the contents of the survival tin into a mess tin, then add greater quantities of the useful stuff. You will need more than a handful of fishing hooks and matches. Why not join the 21st century and carry a lighter rather than matches? A space blanket, whistle, signal mirror, candles and a fresnel lens are all good additions. A mess tin in a pouch can pack a lot of genuinely useful emergency gear.
A mess tin can heat-treat a genuinely useful quantity of water.
The downside of this idea is that a mess tin-based kit is of no use if you stow it in your pack. You have to keep it on your person, and since it is somewhat bulky, this may not suit many of you.


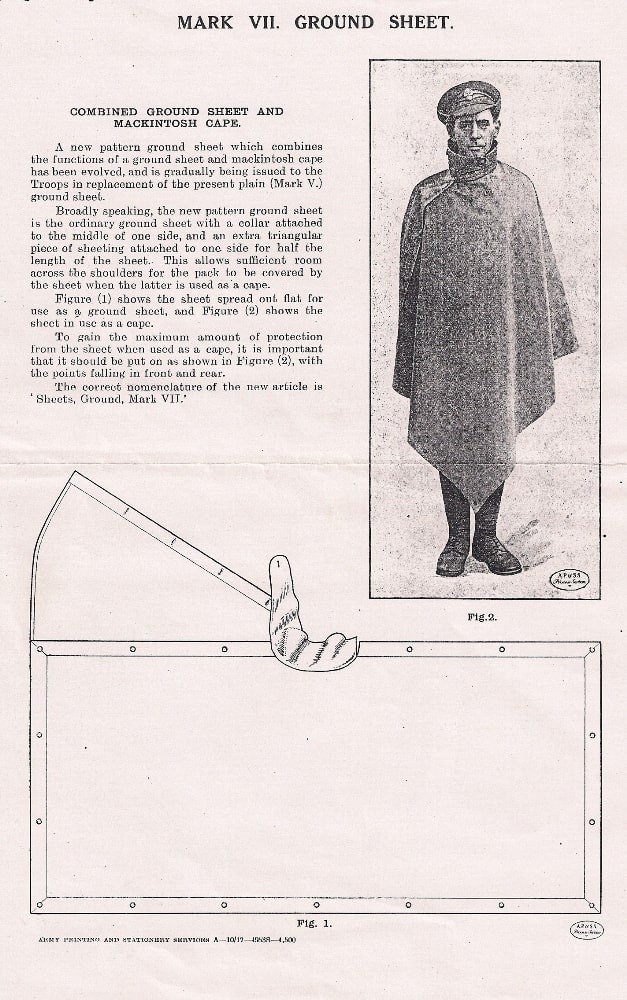
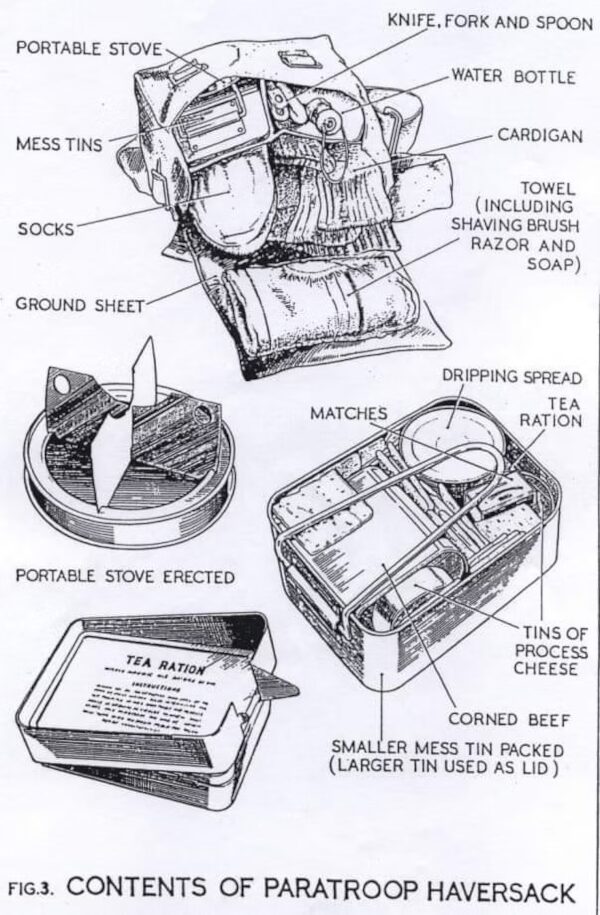
 of the 37 pattern small pack were actual clothing. The interior was divided into two compartments, the forward one bisected by an additional divider. One forward pocket held the soldier’s pair of mess-tins, the other a water-bottle. Carried in the main compartment was a groundsheet, towel, soap, pair of spare spare socks, cutlery and possibly an emergency ration and cardigan. Below is a photo of a typical British infantryman’s small pack contents, taken from “British Army Handbook 1939-45” by George Forty.