Disclaimer: “As an Amazon Associate I may earn from qualifying purchases.” Adsense and Infolinks were no help at all.

If you have enjoyed this article or it has been helpful to you please feel free to show your appreciation. Thank you.

Read The Third Wave by Alvin Toffler!
Categories
Phillosoph

Knots for Traps

Today I will look at some knots relevant to yesterday’s blog.

This is the “snare knot”, which I have to admit was new to me. It did look familiar, however! The animated knots website describes the similar poacher’s knot, aka strangle snare or a double overhand noose, as a double overhand on a bight. It also provides the useful information that this is a good knot for high modulus ropes that might fail with knots such as the bowline.

From the double overhand on a bight comes the triple overhand, scaffold knot or triple overhand noose, another strong, useful loop.

While on the subject of loops, twisting a wire loop into a double loop for better locking:

The previous blog featured toggles tied into the middle of ropes. Two methods of doing this, one for a clove hitch, the other for the related constrictor knot.

Categories
Phillosoph

A Single Trap System

Today I will start with a warning. Knowing how to trap for food is an important component of your knowledge. It should, however, only be used when needed. I do not condone poaching, nor leaving traps set for any other reason than genuine survival needs. Practice building them if you want, but break them up once you are done. If you use this for poaching or unnecessary cruelty you deserve everything that may happen to you.
In my first book I used the principle of teaching by which I concentrated on underlying common principles. For example, rather than trying to teach dozens of different Judo throws I taught the principles of balance and obstruction around which most are based. A similar idea is used in my knot book. You are taught a knot, then introduced to similar knots that have different applications. From the clove hitch it is easy to learn the constrictor, transon, slippery hitch and buntline hitch, among others.
Recently I came across a similar approach to learning trap construction. Rather than try to memorize every design in the survival manuals, learn a single mechanism that could be put to many different purposes. Look for the similarities and common features as well as the differences.
This is the basic mechanism, which is pretty easy to understand. Don’t make the trigger parts from green wood or that which is gummy. You do not want these parts to stick together. The following examples will also give you a good grounding in understanding other types of traps.

Power to the trap can be either by tension or by counterweight. Counterweights are often shown as tree trunks or rocks, but can be a limb used as a lever under its own weight. The constant load may uproot stakes or cause parts of a mechanism to fail, so inspect traps when you check them, even if they have not caught anything. As can be seen with the fish trap, there are applications for this mechanism other than snares. A mechanism that can hold up a weight can also be used to drop it! A crash site or battlefield will have lots of metal and plastic that can be used for trap construction. This option is not shown in most survival manuals. The piece of parachute harness shown should also suggest to you that the hook in most of these diagrams could easily be a ring or loop instead. Use a stone or similar to smooth and taper a peg used for a loop or ring. A toggle on the end of a line can be used to pull a ring from a peg.
The form of the next trigger looks different but the principle is exactly the same. Rather than a hook (or ring) you have a toggle and two pegs/pins. In this particular example the counterweight also acts as a deadfall. The toggle is held by two pegs. These pegs could be spent cartridge cases hammered into the bark. If using nails bend them upwards slightly so the toggle does not catch on the heads. Always test trap mechanisms.

The next illustrations show the same principle again, but a slightly different form. Effectively a notch or hook and a crosspiece. Note that a single trigger can serve several nooses.

These variants are the same as the last, but support the horizontal with two supports rather than one. The first illustration is not a spring snare, but could easily be improved to be one. The stick shown will not slow the rabbit down much, but might hinder it entering its burrow. This may be a considerable distance away, so making a better trap or using a larger/ additional drag would be more humane and better for the survivor too. Do not underestimate how much weight a trapped animal will drag. Secure traps to heavy weights or well-rooted objects in preference to simple stakes.

A horizontal such as this could support multiple snares. Note how one example has the supports orientated so the trap works in either direction. In another illustration the contact areas have been reduced to make the trap more sensitive.
Here is another variation of the basic mechanism. Some might argue it is a different mechanism, but I like to think of it as a toggle tied off-centre. Note how it can be worked with a platform or tripwire, and that it can be used to raise nets or drop weights as well as snares.

The same mechanism, using a horizontal bar. Note use of dual tripwires:

A variation of the above systems. The cord is hitched around the support pole and disturbing the trap releases it. Test to ensure it works smoothly.

This variation holds the toggle between two other parts. This has a passing resemblance to the “Figure-Four” type mechanisms. A small saw, such as that on a Swiss army knife, may be very useful in making these fitted mechanisms.

A variation of the mechanism using two pegs in a tree-trunk. Here a nail is used in place of the toggle bar.

This is a commercially made trap, I believe, but illustrates how scrap metal and other “non-woodland” resources can be used. The trigger is simply a hole that fits over a pin.  Weight in the platform levers it off the pin.

Use existing resources where possible. Here a supple tree is simply hooked to its neighbor.

Some more variations of the systems shown. Note, trap is positioned so that the only way to the bait is through the noose.

Categories
Phillosoph

New Medical Pouch

I decided to give myself a little treat. For decades my travel medical kit has ridden in a silver-grey zip pouch that once held materials for contact lens care. This has worked well enough, partially because it was always stored in the same place. If I needed it and could not get it myself, the directions “front upper pocket of my bag, grey pouch” were clear enough for most. I realized that it would help if the pouch itself were more clearly recognizable as a medical item.
A quick look online secured an item as a tolerable price. As it turned out, this was a fortuitous decision. The top of the TCP bottle had broken with age and would have spilt all over the inside next time my travel rucksac was disturbed.
I now keep the TCP bottle empty until I intend to travel.

The new pouch is 14-15 cm square and about 5 cm deep. It holds everything the old pouch did, although it is a little bit more of a squeeze. In truth, my travel kit has acquired a few extra items over the years. I probably should have migrated some of these to other kits.
The new pouch has two internal zipped mesh pockets. The main zip is two-way and already provided with pull-tabs to make it easier to operate if wearing gloves.

I have detailed how to construct your own kit in other blogs. Items of note, going clockwise from top left:
  • Lice comb: Never needed it, hope never to need it.
  • Roller bandage: useful support for sprained or twisted ankles.
  • Bag of alcohol wipes. I probably have more of these than needed. Some extras came with another kit.
  • Olbas oil, TCP, Oil of Cloves.
  • Vaseline. Sleeve of scalpel blades I happen to have.
  • Plasters. Note bottom of the bag they are in has been reinforced so it makes a better water carrier. This was a gift from a friend of mine and has ended up in the medical kit.
  • Dental floss: this is probably a duplicate of an item also carried in my repair kit. I have one in my EDC pouch too. Could be used to construct an emergency bikini for my Brazilian girlfriend.
  • Roll of tape. I only have this because I got it free with another pouch I purchased.
  • Green plastic sleeve contains fine pointed forceps.
  • Bag of safety pins on large bandage. This bandage was another freebie. I would be happy with the plasters and roller bandage.
  • Two pairs of haemostats, one curved, one straight. I had access to these so acquired some. Hopefully will never need to clamp an artery, but they have proved useful for less sanguine tasks.
  • In the centre, a bag containing aspirin and other general medications.
The “hardware” goes into one of the side pockets. Small bottles, Vaseline tin and dental floss into the other. Items most likely to be wanted, the aspirins and plasters, go in the centre.
Recent Additions: To one zipper pull I have added an ORT spoon. To the other a velcro case with a CPR resusciade.
A Zip-lock bag containing a pair of nitryl gloves might be added.
Categories
Phillosoph

Survival Headbands

Recently I have been thinking about headgear.

If you are in the military your primary headgear should be your helmet.

The Roman Vegetius reports that Roman soldiers always wore hats so they were accustomed to carrying a weight here. These hats were leather and known as “Pannonian” or “Tetrachic” caps.

Your helmet should be competently camouflaged, which involves more than just putting the latest cloth cover on it.

I will give some additional ideas for helmets in a later blog. In the meantime, think “puggaree”.

My headgear of choice is usually either a watch cap or a boonie hat.
With the watch cap we can include headovers, ski-masks and other items that can be worn in the same way.
A good watch cap is not too thick. In cold weather you do not want to overheat, and one of the merits of a watch cap is you can screw it up and carry it virtually anywhere.
If it is really cold, you can use it in combination with other headgear or another watch cap. A watch cap doubles as a night cap so can keep you a little warmer sleeping at night.
One size fits nearly all, and the cap stays on in all but the very strongest winds.
Your outdoor kit should include at least one watch cap or equivalent. Most of my coats and jackets have a cap or similar tucked into a pocket for when the weather turns for the worse.
Sadly, the watch cap cannot be used for everything, and this is where the boonie hat steps in. It has a brim, which as well as keeping the sun off, keeps the rain off my glasses.
In a previous blog I described how to camouflage a boonie, although it should be understood that these techniques can also be applied to helmets and other headgear too.
Unlike the watch cap, the boonie and many other types of headgear need to be sized to fit the wearer. Chances are most readers do not know their hat size. Even if you do, there is still the chance a size may come up large or small.
Most forms of headgear have very little provision for size adjustment.
As an individual, this can be irritating. For someone like a quartermaster, who must equip hundreds of personnel, it means multiple alternatives of the same item must be stocked.

While I was thinking about this, another train of thought intersected with it.

In the classic movie “Seven Samurai” it is notable that the farmers who are defending their village have scarves bound around their foreheads. We see this in other movies, with some samurai wearing headscarves beneath their helmets. It is a common practice in kendo too.

This has practical applications. Fighting is a physical activity and a scarf keeps the sweat from running into your eyes. Also keeps your hair out of your eyes.

Logical enough, so it is perhaps surprising how rarely we seem to see fighting men using headcloths. There is Rambo, of course, and a few individuals in pictures from Vietnam.
If you are a regular reader, you will have a bandanna in your EDC, and such is handy should you find yourself sweating more than you expected. If you know you are likely to be sweating, you should have made some preparations.
In hot weather, a neck gaiter may be repurposed as a sweat band.
In the vast, echoing expanse of my mind, two ideas collide!

Take an elasticated headband, as made famous by Bjorn Borg, and sew it into your boonie hat, patrol cap or whatever else you favour:

  • Your hat is now more size-tolerant. Don’t worry about ordering a new hat that may be too big. Order it a size bigger and fit a sweatband.
  • Your hat now stays on better. It hugs your head like a watch cap.
  • You will be bothered less by perspiration running down into your eyes.
Only problem with this idea is most elasticated sweatbands are in very un-tactical colours. You may be able to find grey, but these are still a bit light. It may be possible to dye grey and white with tea or diluted acrylic paint.
What is really needed is for some smart company to manufacture sweatbands in a useful colour such as “light coyote tan”. I’m sure someone will demand them in “tactical” black! Very dark grey may have applications for police headgear. A friend of my suggests sage or olive might suit some police uniforms.
Such headbands would have dual use. Firstly, they can be sewn into headgear as described above.
Secondly they can be worn as a stand-alone item, either on their own or under helmets.
And here is a third use. Take a sweatband and use it for the foundation of a hat. Sewn a bag of light, neutral-coloured cloth to it. It doesn’t have to be that neat or regular, quite the opposite. Then sew a net or similar to the bag and camouflage it as described in the articles above.
You can wear this as a hat on its own, or over something such as a watch cap if it is cold. If you made it big enough you can use it to camouflage a boonie or even a helmet.
In the latter application it works rather like the Israeli “mitznefet/clown-hat”, but with the added improvement of some textilage and the provision to add natural foliage.
Categories
Phillosoph

Canteen (cup) Coffee

I have been using the past few months productively. I may not be able to go out much, so why not use the time to finally get around to all those little jobs that stack up? I have washed my down jacket, replaced the zips in two jackets and the cuffs in another.
It is also a good time for various experiments! I love my coffee, and I do mean coffee, not the horrible instant chemicals that masquerade under the name. It seems a great shame that our young men and women risk their lives serving their country and the last thing they may drink is such crap.
While researching how to made a decent cup of coffee in the field, I came across this interesting website. How you go about making coffee (or tea, for that matter) can have a considerable influence on the taste. Relatively recently my coffee machine broke down and I went back to using a cafetiere (aka “French Press”). The first few cups I made were unimpressive. It makes all the difference if you wet the grounds with a small volume of boiling water and let them “bloom” for 30 seconds. This is probably a good technique to try with coffee bags.
Coffee bags seem to finally be becoming more widely available. Your brew kit probably already includes tea bags, so there is not reason not to carry coffee bags instead of sachets of foul smelling instant muck. But what if you cannot get coffee bags?
This page has a very useful description of five ways to “Make coffee without a maker”. This includes ways to improvise filters and coffee bags. Adding a piece of cloth to your brew kit is worth considering.
Many of these methods work best if you have one vessel for boiling water and another for drinking or brewing in. Let us assume you have listened to all my advice on saving weight and just have a canteen cup.

Making Greek/Turkish coffee is a little involved, so the method of choice for canteen cup brewing is “cowboy coffee”.
How I did it was thus: Fill your (metal!) canteen cup to about a centimetre above the second mark. I am using a Crusader 2 and each mark is equivalent to about a mug-full. Try this at home in the kitchen. Put your canteen cup on to boil. I will assume you are only using your canteen cup. If you boil up the water in a more efficient vessel the volume you add to the cup will need to be less.
Wait for your water to boil. If you think a watched kettle takes ages, a watched canteen cup takes longer! Wait for a “rolling boil”. This is the point where the surface of the water gets stirred up by bubbles. Remove your cup from the heat and dump in about two and three-quarter tablespoons of coffee. Some say wait 30 secs before adding the coffee. Good coffee needs water at about 90-95 centigrade rather than full boil. Give each spoon of coffee a good stir so the spoon/ spork comes out clean each time. Cover your canteen cup and let it sit for about four minutes. It needs time to brew and it will be too hot to drink yet, anyway.
And it is ready! Ideally you can decant the coffee into another cup for drinking, but in our canteen cup scenario that may not be possible. Most of the grounds will have settled out. They will not be a problem unless you try and drain the cup to the bottom. In some westerns they mention settling the grounds by adding crushed eggshell to the coffee. Good luck finding one of those out in the field! “Jack Knife Cookery” also suggests you can use “spotlessly clean gravel” to settle the grounds. More practically, a dash of cold water will settle the ground and cool the coffee to drinking temperature. I don’t usually bother, but you may feel different if you have to drink direct from the hot canteen cup. Remember, a little bit of foil over the cup edge can save burnt lips.
“Jack Knife Cookery” gives a slightly different method for making coffee. Take a fistful of coffee for each individual and add cold water. Allow to sit for a while. Then bring your coffee just to the boil. Remove from heat and place the pot at a distance from the fire so that it is just simmering.
The method Nessmuk gives is:
Of the berry, browned and ground, take six heaping tablespoonfuls, and add three [US] pints of cold water; place the kettle over the fire and bring to a sharp boil; set it a little aside where it will bubble and simmer until wanted, and just before pouring, drip in a half gill [about two fluid ounces/70 ml] of cold water to settle it. That is all there is to it. The quantity of berry is about twice as much as usually given in recipes; but if you want coffee, you had better add two spoonfuls than cut off one.
Tea: To make it as it should be made, bring the water to a high boil, and let it continue to boil for a full minute. Set it off the fire and it will cease boiling; put in a handful of tea, and it will instantly boil up again; then set it near the fire, where it will simmer for a few minutes, when it will be ready for use. Buy the best green tea you can find, and use it freely on a hard tramp. Black, or Oolong tea, is excellent in camp. It should be put in the pot with cold water and brought to the boiling point.
A couple of tricks inspired by Greek/ Turkish coffee are worth mentioning. This coffee is often made with coffee ground to very fine powder. This seems to help the grounds settle at the bottom. If you like your coffee sweet, add the sugar to the water before you make the coffee, like the Turks and Greeks do. Stirring and coffee grounds do not mix, or rather, it does!
The Scout Handbook of 1911 gives an alternate method for campfire coffee:
“For every cup of water allow a tablespoonful of ground coffee, then add one extra. Have water come to boiling point first, add coffee, hold it just below boiling point for five minutes, and settle with one fourth of a cup of cold water. Serve. Some prefer to put the coffee in a small muslin bag loosely tied.”
Categories
Phillosoph

Around The World In 30 Litres

Decades ago I wrote a piece called something like “Travelling the World with a 30 Litre Pack”. This was so long ago it was on a floppy disc and it only ever got read as a print-out. That article is long since lost, but the experiences that contributed to it has also fueled many of the articles on this blog. I was asked if I could attempt to reproduce the article, since much of it is still relevant to travelers today.

Firstly, I will point out this was not intended for wilderness expeditions or camping trips, but for holidays in areas where youth hostels or similar accommodation was available. On the trips where I expected to also do some camping, I carried a larger pack and more gear. Thinking back, I never personally made any of my trips with just a 30 litre pack. My daysac was smaller, and I already owned several larger packs. Money was often tight so I never got around to buying myself a nice 30. That said, one of the people who read the original article was inspired to spent nearly a month traveling around India with just a small pack.
One advantage of a larger pack is that you can carry a packed daysac inside it, which saves a lot of unpacking and packing when you want to dump the gear you don’t need for a few hours of sightseeing.

One of the products of my travels was “Uncle Phil’s List”, so I will use its categories for the following description.

The first category was “shelter”, which divides into shelter, sleeping and clothing.
Accommodation was in hostels or budget accommodation. The former were preferred for their social aspect, and I have many fine memories from such stays. The only thing I needed to carry for shelter was a credit card and a YHA membership card.
My daysac carried (and still has) an all-weather blanket, which over the years has been put to many uses.

Many youth hostels do insist you have a sleeping bag liner. Mine got accidentally placed in the laundry on my last day at a hostel. My current one was sewn from the sheets the apologetic warden offered me as replacement. The top of the bag has some very distinctive cloth added to the top, to avoid this happening again. If I have to unpack in the dark the texture helps me orientate the bag. There are silk liners, which look really nice, but again, I have never been able to justify the expense.

I also carried a Merlin Softie one-season sleeping bag. This packs to the size of a rugby ball without using compression straps. Very useful when the bedding provided was not up to standard, or when I had to sleep on a bus, train or ferry on an overnight journey. Overnight trips were a useful trick when traveling on a tight budget. Saved on a night’s accommodation and got you to a new place to see.

Careful selection of clothing can save you lots of weight. I encountered travelers who were carrying 20+ kg of clothes!
The trick is to select items that were easy to hand-wash, and just as importantly, quick to dry. I was fortunate that about the time I began traveling there were lots of reasonably priced silk shirts on sale. My basic travel wardrobe was two long-sleeved silk shirts and two short-sleeved. Theoretically, if it was cold I could have wore a short-sleeve under a long, but don’t ever recall this need arising. Denmark was a little chilly, so I brought a thin woolen jumper to supplement my usual gear. I did not know about ranger rolling back then. I could probably have packed things even smaller.
Underwear was three pairs of black swimming shorts, the sort with pockets and inner liners. If the day was hot I could easily remove my trousers and be already in shorts. Due to the odd climate inside airliners, for the flight out I found cotton underpants more comfortable. These would probably not be worn again until the flight back. I might wear a cotton tee-shirt for the flights instead of the silks. More commonly, I wore a casual cotton shirt that served as a light jacket for the rest of the trip.
The markets no longer seem to have reasonably priced silk shirts so as mine have worn out I have replaced them with the newer microfibre synthetics.
Just before a trip I would treat myself to some new socks, usually white cotton sports socks. Three pairs of these would go in the bag and a fourth pair worn on the trip out. When I began to get pains in my legs when flying I added a pair of compression socks to my load-out.
I carried two pairs of trousers, basically a “wear and a spare”. Cargoes’ would be fine, although one of my pairs was “smarter”. On some trips I hooked up with friends I had made on other trips. This often involved a family dinner so being able to smarten-up was useful. At the airport I often needed my passport and boarding pass readily to hand, and the large thigh pockets of the cargo trousers was very useful for this.
Since I was carrying a pack, and sometimes had to deal with rough terrain, including cobbled streets within towns, ankle support was a priority. Most of my trips were to hotter climes, so footwear of choice was canvas hiking boots. Honourable mention goes to my Hi-Tech Sierras. I only wore these during holidays, but they did so many miles the soles were treadless by the time I had to retire them. I was most disappointed to discover the line had been discontinued. The Hi-Tech Trilogies I brought as replacement nearly crippled me. My tendons bled and my toes too, if I recall correctly. Brand new white cotton socks soaked in blood. I have a different set of canvas boots now. Unlike the Sierras these have gore-tex. You don’t need gore-tex for what I am using them for, but finding canvas boots without it no longer seemed to be possible. In addition to the boots I also carried a pair of espadrilles or kung-fu slippers. If you have been wearing boots all day it is nice to slip into these when you head into town looking for dinner and a beer.
An important item was a rainproof jacket, ideally a lightweight one that packed into its own pocket or small pouch. The latter quality was far more important than it being breathable or some wonder fabric. I discovered that breathable waterproofs have a finite life, and you get to know that time is up the hard way, during a rainstorm!
I carried a lightweight jacket of some synthetic material for some protection against the wind. One of these had a cotton liner which I replaced with one made from a silk shirt. I don’t recall using these jackets much. Often I would use my cotton shirt, fleece or rainproof. I carried a fleece for colder days and evenings. This had a more windproof outer than most fleeces, so was more practical for outerwear.
Clothing included a boonie hat for sun protection, and several bandannas, one in a trouser pocket, the others in the pack. I carried a pair of gloves, although seldom needed them in hot climates.
The secret to carrying so little clothing is being willing to clean it during your trip. You will notice that most of the items I carried are quick-drying materials such as synthetics or silk. The cotton socks are an obvious exception, but these dried pretty well in the climates I traveled in. In such conditions putting on slightly damp socks was not a health problem.

The only laundry gear I carried was a small nail brush. The same soap I washed and shaved myself with served as detergent. Washing socks generally involved putting them over my hands and “washing my hands”. The brush worked well on collars. Often I would step into a shower wearing a silk shirt and clutching a bundle of other items to wash. Hang a silk shirt on a hanger and it dries without needing ironing. In fact, the same is true of cotton tee-shirts!
Moving on to other categories: I carry a lighter as part of my EDC, which covered the requirement for fire. My daysac carried a water-bottle, although this might be moved to the outer pocket of a larger pack if I was carrying one. On more recent trips this has been one of my Platypus bottles, often the larger one with a drinking tube. On some trips I simply brought a large bottle of soda in a local store, then used the bottle for water once the soda was drunk. For most of my trips you could trust the local tap-water, but I did acquire a cup device that chlorinated water passed through it. You might wise to include a bottle of purification tablets instead.
I was seldom anywhere where I could not purchase food. The times I was, a few hours hungry would not kill me. Thus I carried nothing to cook with on hosteling trips. The bag soon acquired some local foods such as fruit, salami, bread and cheese. I can still recall sitting outside the Parthenon, making a sandwich with my penknife and surrounded by feral cats sunning themselves. I learnt to carry a bag of boiled sweets (aka “hard candy”). These provided an energy boost when climbing hills: most sights to see seem to be up hills or high up! And I will admit that offering a sweet to a fellow traveler was a great ice-breaker and gained me some very memorable companions over the years.
My travel medical kit I have described elsewhere. Medication appears in my current load-out, but I did not need such things in my younger days! My daysac included a bottle of sunscreen and one of insect repellent. These days you will have to ensure that the volumes of these are less than 100mls if you intend to travel by air. Another item for your daysac is a roll of toilet paper in a plastic bag. Over the years I refined and optimized my wash kit. This is described here.
My tiny sewing kit has seen a lot of use over the years, so is something it would be very foolish not to carry. My “spares and repairs” includes a couple of spare rucksac buckles, electrical tape, string and a tube of superglue.
Documents included my passport and any visa needed. Plane tickets: no e-tickets on smart phones back then! In Europe I carried the E111 medical treatment form, but these may no longer be valid. A zipped pouch such as a pencil case proved very useful to hold documents and other miscellaneous items. Traveler cheques, although I doubt modern travelers carry these. A photocopy of my passport, and record of the traveler cheque numbers went in the pencil case. I did have my cheques stolen on one trip, and got all my money back, since I had the numbers to cancel them. Wisely, I carried my credit card in a different place so that was not stolen. A couple of guide books, usually borrowed from the local library at home. Have more than one, since entries can be misleading or inaccurate. A phrasebook. A novel or similar to read while waiting for trains or just sitting in the sun. A notepad in a plastic bag, and something to write with.
I carried my penknife on my person, and often it has proved useful. My daysac included a flashlight of some form, in an outside pocket so it was readily accessible. A telescopic hiking pole was a blessing on steep terrain or when tired.
One of the first things I would do when reaching a new town was locate the tourist office and acquire any street maps they had. My EDC includes a Suunto Clipper compass and this has often proved useful when navigating a strange town. 
An item conspicuously absent from my original article was a mobile phone. They were only just coming in, they needed frequent recharging, and you were unlikely to find facilities to charge them, back then. My trips were an escape, so I made a point of leaving all my electronic devices at home, which probably would have been a Walkman back then! Not really being a photographer, I also never bothered carrying a camera.
Few backpacks are totally waterproof, so the contents should be in one or more plastic bags. These needn’t be anything expensive, just intact. If you are traveling with just one pack I suggest you divide the contents with at least two bags. One bag holds your bedding, wash-kit and most of your clothing. The other bag has the items you may need during a day’s sightseeing: medical kit, guide books, raincoat etc.
Categories
Phillosoph

Optimizing Canteen Cups

Yesterday I happened across this webpage.
This is a concept that I have encountered before: that the optimum proportions for a cylinder are to have it at a height equal to its diameter.
The non-calculus explanation for this goes something like “a sphere has the lowest ratio of surface area to volume and a cylinder of equal diameter and height is closest that a cylinder can get to a sphere”.
Optimum use of materials means less weight to carry. 
You would think there would be a special name for such a cylinder so proportioned, but if there is I have yet to encounter it. Update: Equilateral Cylinder.
This concept can be applied to the design of hiking and survival gear.
Yesterday I wrote a little about canteen cups and muckets. In a previous post I mentioned a idea that a good size for an eating vessel was around half a litre.
If you have to travel light, your main, probably only, cooking vessel will be a canteen cup, and this will also serve as your bowl and your mug.
Most of us have to make do with whatever we can get, which is usually a military design.
Perhaps our most important, most likely cooking vessel deserves greater consideration?
Let us imagine we are designing a better canteen cup. The above concepts may play a part.
The typical military canteen cup has a kidney-shaped cross-section. They are designed with the assumption that they will be carried with a water-bottle, and that that bottle may be worn on the belt.
Assumptions are always dangerous beasties, and should occasionally be tested to discover if they have gone rogue!
(Military water bottles of kidney or oval section date to at least the 18th century and therefore predate their being worn in belt pouches!)
Obviously, carrying a supply of water on your person is prudent. Depending on situation and other factors this may be anywhere between 500 mls to 2 litres. Larger volumes should be considered a pack item.
Your typical military water-bottle is not the best way to carry water on your belt. If you land on it when falling or taking cover, it can hurt or bruise you.
If it is only partially filled, noises of water sloshing may betray you.
Many designs have a cup that fits over the top of the bottle, meaning you have to remove this and keep it safe every time you want to drink from the bottle. That snap-link I told you to attach to your webbing can prove useful here, but this can still be a hassle when you are half-way up a windy hillside and trying not to drop your rifle or lose sight of your mates.
For the above reasons a lot of soldiers and outdoorsmen now prefer bladders with drinking tubes such as Camelback and Platypus.
Does the cup need to fit outside a water-bottle? That interior space can be put to use for lots of other useful items. A hank of cord, fuel tablets and/or tube of alcohol fuel paste, small medical kit, sewing kit, spare lighter, tea and coffee bags, instant soup, OXO cubes and so on.
Does the cup need to be on your belt?
Generations of British soldiers will probably disagree with me here, but usually a hot cuppa is not life and death.
Your survival gear should be at skin level and your belt/webbing reserved for immediate use items: ammo, a good knife, a couple of litres of water, CI-IFAK trauma kit.
Your canteen cup should be a pack item, preferably in a readily accessible side-pocket.
What is the ideal shape for a canteen cup?
A spherical vessel is not really practical for a number of reasons. A hemispherical bowl of around 500 mls capacity will be about 12 cm/5" across and 6 cm/2.5" deep. Such a bowl can be used for both eating and drinking from but may not be the best shape for a cooking vessel. Woks generally need to be wider.
A cube of around 500 mls capacity has 8 cm sides. The corners of a cube may be difficult to get clean with a vessel of this width.
Another space-efficient option is a half-cube, 10 cm square and 5 cm deep. This has potential. This might resemble a smaller, square-section version of the familiar British Army mess-tin. Plenty of tea has been drunk from these, but it is not the best shape for a mug.
This brings us back to a cylinder of equal diameter to height, or thereabouts. For a capacity of about 500 ml, height and diameter will need to be around 9 cm/3.5".
This seems wide enough to eat out of and keep clean, deep enough for cooking and drinking. On the other hand, this shape may be too wide for easy carriage in a back-pack side-pocket.
This suggests that our canteen cup should be flattened in cross-section, and if we take this route we might as well give it a kidney-shaped cross-section. Realistically, most end-users will probably not buy a canteen cup unless it is this shape!
There is probably an optimum ratio of height to end-size for a kidney-section vessel, but the calculus is beyond me.
The above figures are based on another assumption: that we want a volume of around 500 mls.
Looking at four of the metal canteen cups I own, there is a notable difference in sizes.
The British Crusader Mk1 is noticeably bigger than the US (actually Dutch) cup and the upper cup from the Bundeswehr M59 canteen. This may partially be so the Crusader can fit over the bottom of the Osprey waterbottle. The Osprey has a plastic mug that fits over the top (!).
Theoretically you can carry both this mug and the metal Crusader around the same bottle. In practice you are better leaving the plastic mug for kit inspections. Also notable is that the Crusader Mk2 has a larger capacity than the Mk1.
A quick exercise with a measuring jug and some water yielded the following approximate volumes:
  • German M59 upper cup: 450 ml
  • Dutch canteen cup: 500 ml
  • Crusader Mk1: 650 ml
  • Crusader Mk2: 800 ml
The Dutch cup appears closest to our theoretical ideal. This is about 13 x 8 cm across and 9.5 cm deep. I don’t know if that is optimal, but the basic shape has not changed since 1910!
The Dutch cup is a sound choice for your emergency kit, but the British cups are ahead on features such as non-stick coatings, measuring marks and accessories. 

Even more interesting was weighing the cups. The Dutch cup was 9.4 oz/266 gm, the Crusader Mk 1 was 9.7 oz/275 gm yet the larger volume Mk 2 only 6.9 oz/195 gm.
What this boils down to (pun intended) is that most of the commonly available choices are fairly sound, but there is room for improvement.
While issues such as lids and bail handles need addressing, optimizing proportions could save additional weight.
A smaller version of the Crusader Mk2 would be an attractive product.
Categories
Phillosoph

What's a Mucket?

Today I was woken from my slumbers by a hailstorm rattling against my window.
When I was a young boy, I was very interested in spiders and read many books about them. Even with this knowledge, it still impresses me that a flimsy looking cobweb caught so many hailstones, so they appeared frozen in mid air.
My day started with me being reminded of old knowledge, so I was pleased to discover something new while I drank my coffee:
I came across the word “mucket”.
Most sources will assure you that a mucket is a variety of bivalve, resembling a mussel. But it was also used for a much different beast.

Mucket is presumably a portmanteau of “mug” and “bucket”. Alternate names are “coffee boiler” or “boiler cup”.

The sites offering them for sale are mainly geared to supplying American Civil War reenactors.

Some of the examples offered us the original construction methods and materials such as soldered tin, which is less than ideal for actual use.

Others look the part but use modern construction and materials such as stainless steel.

I have been planning to write a post on canteen cups, but I am holding off until I can get around trying to make lids for mine.
At around 24 fl.oz (c.710ml) the mucket fills a similar niche to the modern canteen cup, but I have to say it is ahead on some of its features.
The mucket has a bail handle so that you can hang it over a fire.
And not only does it have a lid, but one that is attached by a hinge, at least in some examples I have seen!
The lids have a ring, allowing you to raise them with a stick or similar implement rather than burning your fingers.
Admittedly, it is not kidney shape in section, but since a canteen cup (or mucket) should be in a pack rather than extra weight on your belt, this is a minor issue.
Camouflage not being an issue, the Civil War soldier hung his mucket outside his ration bag.
Hopefully some manufactures will have a good look at the mucket and design more capable canteen cups.
Categories
Phillosoph

Umbrella Fighting in PDF

My series of articles on self-defence with an umbrella, cane or similar objects have now been combined into a single document.
brolly2
Categories
Phillosoph

Sun-Compass

Yesterday’s topic logically brings me onto today’s, and another ancient but useful navigation device.
If you have even just glanced through a survival manual, you will most likely have seen the shadow-stick method.
I have previously described this in the context of navigating by the moon. Like the sun, the moon and stars also rise in the east and set in the west.
The more usual context for the shadow-stick is using the sun.
The method is simple.
Place a stick or similar in the ground so that it casts a shadow. Mark the end of the shadow.
Wait for at least twenty minutes.
The tip of the shadow will have moved. Mark this new position. The first marker will be west of the second.
Draw a line between the two markers, then run a line perpendicular to this and back towards the base of your stick (gnomon).
This second line will be true north-south. The greater the distance/longer the time between marker placement, the more accurate will be your determination of north-south.
Logically, we will get a more accurate estimate if we take several hours and place a number of markers.
If we do this we will observe that the shadow is longest in the morning and evening, and shortest when the sun is directly overhead.
The arc plotted on the ground will be flattened rather than constant, unlike some illustrations of this method!
When the shadow is at its shortest, it is on the north-south line, and the time will be local midday. The shadow will be shortest at local apparent noon (LAN), which is midway between sun-up and sun-down, so may differ from 1200 hrs.
As well as determining distance, you have also made yourself a crude sundial. This can be useful in determining true local time.
Some countries on the same longitude use different times. China spans several time zones but uses one official time for the whole country!
The principle is simple enough, but it can get confusing which end of the north-south line is north. In the northern hemisphere the sun (or moon) rises in the east and travels west, passing through the south. In the southern hemisphere it goes through the north.
  • In the northern hemisphere the shadow always points in a northerly direction. At midday the shadow will point due north.
  • In the southern hemisphere the shadow always points in a southerly direction. At midday the shadow will point due south.
Memorize that and solar navigation becomes much less confusing.
In the movies, air-crash survivors usually undertake an epic journey back to safety.
In the real world, your prudent strategy is to stay near the crash site if practical.
Setting up a shadow stick is a practical way to spend the time, and establishing the bearings of visible landmarks may be useful later on.
Suppose, for whatever reason, you need to travel. This decision should never be made lightly.
Thanks to your shadow-stick, you know what bearing you are heading out on, and that of some of the local features.
But we cannot take our compass/sundial with us!
With a few modifications, we can make a portable variant.
If you have ever read about the early days of the SAS or of the Long Range Desert Group (LRDG), you will most probably have encountered to references to sun-compasses on their vehicles.
In those days, trying to use a magnetic compass while riding in a large lump of steel was problematic. The solution was the sun-compass.

Descriptions of how the sun-compass was used used to be hard to find. Thankfully, this is changing.

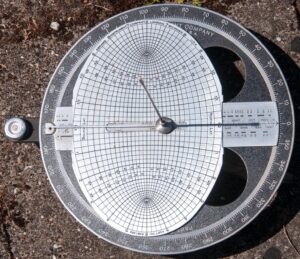
The sun-compass is an ancient device, and was used by the Vikings, among others. A version was also used by some Apollo missions on the moon.

As you can see, some sun-compasses are very complicated or sophisticated, so not really something you can improvise.
I am going to describe a less accurate variant that can be easily constructed.
In the previous blog, I described how a circle of 57 mm radius had a circumference of c.360 mm. (The person who taught me this trick had 5 mm and 57 mm marked on the zipper of her jacket. I notched my penknife handle).
Create such a circle on a piece of paper, back of a notebook, etc.
An alternate name for a sun-compass is “shadow board”, which reminds us it can be made with a piece of plank or other flat material.
A folded piece of paper will help us mark off the 45, 90 and even 22.5 degree points.
Each 1.5 cm of the circumference is 15 degrees.
The radius of a circle can be measured twelve times along its edge using a drawing compass, or an improvisation of one.
By folding the marked points together the circle can be divided further into 24 parts, or the drawing compass can be used further.
A nail or pin can be used as the gnomon, but a sliver of wood is more likely. In fact, you do not have to mount the gnomon, just place a shadow-casting object in the centre of the circle whenever you take a reading.

All we have to do now is mark off the circle. This will be a 24 hour clockface so mark off every 15 degrees with an hour.

Remember that the shadow will point due north at midday in the northern hemisphere, so mark 1200 hrs as North/0 degrees (In the south, 1200 will be South/180).

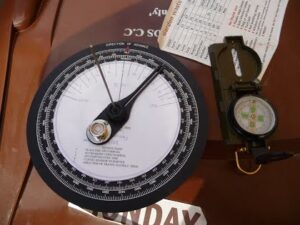
Fill in the rest of the face. You might get something that looks like this:

Using this simple sun-compass is simple.
Hold it level and rotate it until the gnomon shadow is over the current time. If the clocks are adjusted for daylight saving/BST or similar you will have to account for this.
Remember, “spring forward, fall back”, so the shadow will be on the north-south line at 1300hs, not 1200, so you will have to subtract an hour from local time to get the time to read on the dial.
Once you have your sun-compass orientated, use the dial to find the bearing you want. Your portable sun-compass should agree with your base-camp shadow stick.
Pick out a landmark, put away your sun-compass and walk towards the landmark. 
An alternate method is to do the same as you did with a shadow-stick. Erect a little gnomon on a board or sheet of paper and plot the tip of the shadow over the course of a day.
Draw a line from the base of the gnomon across the curve where it is at its closest.
To use this version you do not need to know the time.
Rotate the sun-compass until the tip of the shadow meets the curve. The line you drew will point north (or south if you made your sun-compass in the southern hemisphere).
You must use the same height gnomon for each reading, so mount this permanently.
The Ottomani version is suspended from three or four points by cord to ensure that it is level.
You may have realized that if you know the bearing of something, your sun-compass can be used as a crude sundial.
Related to the methods described above is using a watch directly to navigate by the sun.
Remember to adjust time for BST/DST. Substitute 1 mark for 12 mark in the above instructions.
If your watch is digital, or you are using your phone clock, use your imagination.
If you become confused as to which end of the north-south (N-S) line is north, check the local shadows.
Hold a blade of grass over the watch-face and see if it casts a shadow. The one direction a shadow cannot point in the north is south.
Useful to recall is the north gets up around 3 o'clock, goes to bed around 9”.
In other words, the north end of the N-S line will be in the small numbers in the morning, the higher numbers in the afternoon. (In the southern hemisphere replace the word north with south and the motto still works.)
Remember, sometimes shadows are still visible even when you cannot see the sun directly. 
The basic watch method is easy to remember: midpoint between “12(/1)” and the hour hand.
The specifics for each hemisphere can be difficult to remember.
It may help to think that “N” for north-hemisphere looks like a “H” for “hour-hand” and that this should be pointed at the sun. A cast shadow will point in the opposite direction to the hour hand.
For the southern-hemisphere, the 2 in “12” looks a little like an “S” so the 12 should be pointed at the sun. A cast shadow should point towards “6”.
Hopefully that will help you use this method.