If some field manuals are to be believed, determining the lead for a moving target involves:
• Correctly determining the range to the target.
• Remembering the time a bullet will take to reach that distance.
• Estimating the speed of movement of the target. For added complexity estimate this in miles per hour and convert.
• Calculate how far the target will move in the time the bullet gets to reach it, and aim that distance ahead.
• Don't forget to halve the value if the target is moving obliquely.
You will probably have under a second to do this as the target dashes between cover.
Andrew G. Elliot, “Shooting to Kill”:
“The impossibility of judging this consciously will be realized when it is explained that a target moving at this range and speed scarcely allows time to place the rifle to the shoulder without making complicated mathematical calculations.
“In war, as distinct from print, there is hardly time to aim at all, and that is why the whole technique must become so natural that it is carried out without thought.
“…The secret of hitting a moving target is simple. Follow the target with your aim for a few seconds to judge its speed, then just before firing, quite instinctively and without any conscious allowance, you will find that you swing a little in front of the enemy.
Always keep your eye on the target, and for a moving one, on the front of it, so that- if you are shooting a running Nazi, focus the front buttons of his tunic.
“…In shooting moving targets, one need not worry about the sights. The Nazis will rarely give you any time for that!
“To prove that instinctive allowance is easier than conscious effort, it has been found that many men can shoot better in the semi-darkness than in daylight. I myself have often shot running rabbits with a rifle when the light was such that I could only just see the animal’s outline.”
Elliot was a big advocate of soldiers spending time practising raising, swinging through and dry-firing their rifles. This was time much better spent than squarebashing.
Note that swinging through is not the same as the tracking of a target that some manuals describe. Swing through overtakes the target.
The swing-through method of leading a target cannot always be used. From certain postures or firing positions it is difficult to use. In such an instance one must use the ambush method. Aim at a point in space and fire when the moving target is the correct lead distance from your aim point.
For simplicity, the following will assume targets are dismounted personnel. Shooting at drones, aircraft and vehicles will not be covered today.
Note that if you need to quantify a target's velocity, it is more useful to judge it in metres per second than units such as miles per hour or km/h. This is something that you can observe and make use of in the field.
Depths of Lead
Possibly the easiest technique to learn is found in field manuals for the M14. The M14 was zeroed to 250 metres so the nearer aim point is also lower to allow for trajectory and provide hold-under.

The method is based around a measure I call a “depth of lead”. This is approximately the depth of a human torso, from sternum to spine. It is also roughly a foot or 30 cm if you are viewing your target side on. If the target is moving at an angle to you, the depth will appear smaller and the amount of lead you apply will be automatically reduced.
Bear in mind that lead is often overestimated. At less than 50 metres most moving targets will not need leading. Those that will will only need aim shifted towards the leading edge.
For targets that are more distant, or moving fast:
• If the target is moving slowly (less than 2 metres per second), and within 200 m, aim at the leading edge or the button-line/belt-buckle.
• If speed is slow but range greater than 200 m, add one depth of lead.
• If moving fast, but within 200 m, add one depth of lead.
• If moving fast AND beyond 200 m, add two depths of lead.
The amount of lead this gives may differ somewhat from a calculated value. Given all the other factors in play during combat, it is generally “close enough for government work”.
A variation of this method is to add a depth of lead for each 100 metres over the first 100. One depth of lead at 200, two at 300, three at 400 and so on.
This is for a running target. Half the lead if target is walking.
Two complementary systems will be mentioned:
USMC Points of Aim
This first is that given in USMC MCRP 3.01A Rifle Marksmanship.
This is an excellent work for fundamentals and how to utilize iron sights.
The “point of aim” system appears to resemble the “point of depth” method, but has differences.

“One point of Aim” in the marine manual is actually aiming directly at the target's leading edge. (The above illustration could be clearer on this.)
“Two points of Aim” is placing the top corner of the trailing edge of the front post on the target's leading edge. Two points of aim is used for a fast-walking (2 m/s) target at 300 metres or a running (3+ m/s) target at 200 m.
These leads are reduced for targets not moving perpendicularly.
The actual offset this will produce will depend on the apparent width of the front post.
US Army Single Lead Rule

The technique given for leading a target in US Army FM 3-22.9 (August 2008) at first glance seems the same as MCRP 3.01A.
The army “Single Lead Rule” actually uses the trailing edge corner of the post to sight with.
Unlike the marine method, the corner of the post is targeted on the centre rather than the leading edge. This technique automatically increases the amount of lead as distance increases. Lead is approximately 5 MOA (about 15 cm/half a foot at 100 metres). If you miss, increase lead.
7 mph is about 3 m/sec.
The manual notes: “At 100 meters, the rule begins to break down for targets moving at slight and large angles.”
Despite this, it seems a useful technique to get in the ballpark.
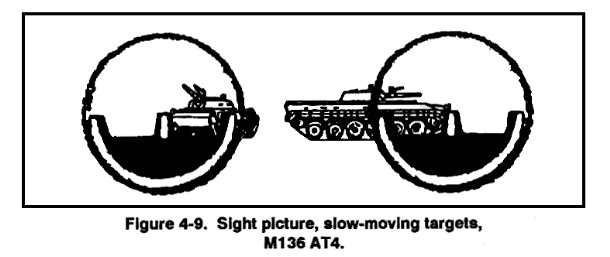

This aiming technique is very similar to that used for the AT4/M136 anti-tank weapon.
For a slow target the post is placed on the leading edge of the vehicle.
For faster targets one of the “horns” is placed on the centre of the target.
Aiming at faster targets such as jeeps and technicals does not yet seem to have made it into the copies of the manuals I have. Placing the horn on the leading edge seems like a logical place to start.
Amusingly, the copy of FM3-22.9 I have insists that iron sights on the M16/M4 are now only for backup. The entire section on leading a target only refers to the use of iron sights!
Below is an example of using the ACOG sight with a depth of lead-type method. Using frontal silhouettes is misleading.
