This page will record various tips, tricks and ideas that do not really warrant their own article.
You may want to bookmark this page, as new content will be added whenever it occurs to me.
The first part of this page will concentrate on combat related material. I have now add a section on survival and bushcraft further down the page.
These are in no particular order or precedence.
Version 1.0.3.5
Combat
• When fighting, assume there is a knife present. Just because you cannot see a knife, does not mean it is not there. Cunning knifemen ensure their knife is felt before it is seen.
Many unarmed defensive and offensive techniques become unworkable if the foe can bring a blade into play.
Handguns may also be difficult to spot, particularly in poor light.
• A parry should use the minimum of force needed to take an attack out of line of any targets. The attack should be deflected the minimum distance necessary.
A parry that uses unnecessary force or moves an attack more than is needed may slow the defender’s ability to counter‑attack. If you overparry you will be more vulnerable to feints and/or a sequence of attacks.
• Strike/kick the nearest target with your closest hand/foot.
• Close combat has been defined as knocking the other guy down and not letting him get up again.
Achieving this often involves several phases.
Some self-defence courses only teach reactions to attacks so students are uncertain about how to take the initiative and secure the advantage, or how to engage in defence of someone else.
Some striking styles seem to have no takedown techniques or have neglected these in favour of sport and competition sparring. Or the takedown and throwing techniques are a “secret technique” and not available to most of the students who may need them. An aggressor is presumably battered until one party is exhausted or knocked out.
You will need kicks, hand-strikes, locks and throws.
Many wrestling and grappling styles expect to prevail without acknowledging that a “blow before throw” is often necessary, and combat may not be one-to-one. Often they train with partners who do not know how to realistically attack.
A common assumption is that a foe will use a similar style, or will fight on equal terms and that the foe will not use a knife.
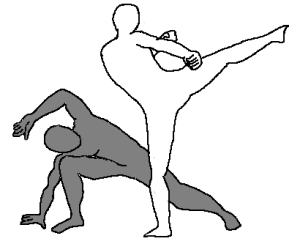
• Any time that a person is standing on two feet, there will be an angle at which the feet will be on the same line. If the body is tilted out of this vertical plane, that person will probably lose balance. Typically they will step back or forward to correct this. If you position your foot, leg or body so this step cannot be made, they may be made to fall. This is the principle behind many combat throws and takedown techniques.
• Breakfalls have useful applications other than just self-defence and martial arts. In everyday life they can save you from serious injury.
If your preferred training style does not include breakfalls, take the trouble to learn and practice them independently.
Ideally, everyone would be taught breakfalls as infants.
• You cannot make your hand or foot heavier, so if you want more power you must move it faster. Relaxed bodies move faster than tensed ones. Only tense a body part when really necessary.
This is the key not only to unarmed and armed combat, but also to many sports and other activities.
• There are ways to deal with someone catching your leg when you kick, but it is better to avoid this situation.
Do not kick at targets where there is a chance your leg might be grabbed. Kick targets away from the hands or wait for opportunities where the hands are otherwise occupied. Against a standing foe, kicks are best directed against the legs and hip. This will slow the enemy down and may cause them to fall,
The actions learnt from kicks may also be used to rapidly move your feet to manoeuvre or trip a foe.
• Bayonet attacks against high targets may be followed by a kick to a low target from either the front or rear leg. Defending against the high attack with the bayonet may expose targets beneath rib-cage level. Kick or knee the legs, hips, tailbone or testicles. A front thrust kick to just below the heart may be possible.
• The front stance of karate, and its equivalents in other styles, is not just for punching and parrying. It may also be used to move into grapples, takedowns or throws. Position the lead leg so it prevents the foe compensating as you unbalance them.
• When using a forward head butt, the upper part of the head rather than the forehead should be used to strike. This area is centred around the hairline, for those of you that are not yet balding.
If striking to the side with the head, impact using the area at hairline level above the temples.
When possible, the force from a headbutt comes not from neck movement, but from the motion of the entire body. “Back-heel” applies to headbutts just as much as it applies to linear punches.
• A butt with the back of the head may be used against someone who grabs you from behind. Striking area is the back of the skull, the face from the eyes down the preferred targets. In practice, hitting with a particular region of the skull and against a particular target is difficult in such conditions.
The back of the skull may be used when in front of an enemy. If in a clinch and your head is lower than your attacker’s hit upwards with your head, straightening your legs for more power.
Headbutts may be used on targets other than the face. When grabbing an enemy’s legs from behind, butt the small of the back or tailbone to encourage them to fall.
Butting into the stomach or chest is also possible, although the chances of a counter against the neck or face are higher.
If both hands are busy controlling an arm, the head may be butted just above or into the side of the elbow.
• A friend of mine used to advocate treading on someone’s foot before delivering a headbutt.
A variation is to place your weight on the foe’s foot and drive your knee into the front of his knee. The knee is unable to bend and may take damage or the foe may fall. Combine this with other techniques to unbalance the foe.
• a time to plant and a time to uproot, a time to weep and a time to laugh, a time to play with your precious bloody phone and a time to look where you are going and at what is around you. Amen!
• Never walk with your hands in your pockets. If your hands get cold, carry gloves. If you trip or are pushed, you will not be able to save yourself. Attacking someone with their hands in their pockets is a simple matter of hugging them and throwing them down hard.
• Never stop on public stairs. It is bad manners and inconsiderate if nothing else. Some people have bad legs or feet and need to be within reach of the handrail even if they do not need to constantly hold it.
• The palm heel, knife hand and hammer fist must become your primary weapons. The chances of injuring your hands when using these strikes is greatly reduced. Save closed fist punches for softer target areas of the body. Think of this as “hard against soft and soft against hard” if you wish, although being on the receiving end of a well thrown palm strike is unlikely to feel that soft.
• The eye jab/finger spear is one of the fastest of distraction and opening techniques. Some people are reluctant to use this technique and in many cases it may be considered excessive force.
Placing your open hand over the foe’s eyes (such as “Eagle’s Alien”) is an alternative. Variations of this may be used from the side or behind in situations where a finger spear could not. Speed is the key to this technique so you must learn to apply it with your hand and arm relaxed.
• Illustrations or photographs in martial arts books often exaggerate the distances between fighters for clarity. Occasionally you will encounter an illustrated technique that will not work at realistic ranges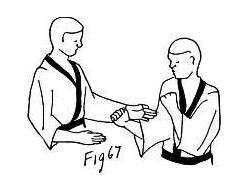
• Techniques are sometimes taught as “long range”, “medium range” and “short range”. In reality, engagement may change from long range to short range in a fraction of a second. Relying mainly on long range techniques probably will not work outside an action movie.
• There will be times when it is necessary to attack rather than wait for an aggressor to make the first move. Some self-defence students and martial artists are at a loss how to proceed since they have mainly been taught defensive reactions. Psychologically they may have formed the impression that attacking may make them vulnerable, since most of their drills have been “attacker does this so you defeat him using…” Being able to attack effectively and realistically will also make their classmate’s training better.
Defensive techniques such as peng-hinge and long har ch’uan may also be used to knock aside an enemy’s guard to clear the way for the attacks.
• Once you commit to an attack, keep attacking as long as you can. Move in and keep on the pressure until it is safe to escape, you need to defend or evade, or the threat is neutralized.
• It has become a common trope in movies and on TV. A woman attempts to help someone else who is being attacked. She jumps into the back of the attacker, her feet leaving the ground.
Never attempt this in real life. It is ineffective and you may be thrown and land hard.
If the target presents itself, stomp the calf of his rearward leg. Read my books and learn the reverse punch against his kidneys, or the palm heel against his coccyx.
If he falls, jump or stomp on his legs before you run away.
• Even if an attacker is much larger than you, use what weight you have. If he tries to lift you, go limp to become deadweight and kick your legs around to hurt anything you can contact. If the rapist falls, use your body weight by jumping or stomping on him. Leave him unable to get up and run after you.
• The primary target areas on the centreline approximate the supposed positions of the chakras.
1. The genitals (front), coccyx (back). The CV1 point lies between the two on the perineum.
2. Sacral region/Tan tien (front): a little below the navel. Join of spine and pelvis top (back)
3. Solar plexus (front). First lumbar vertebrae (back): Where spine joins bottom of rib cage.
4. Heart/middle of sternum (front). Spine over heart (back)
5. Throat region (front) Spine at base of skull (back)
6. Forehead/Glabella (front). Back of skull.
7. Top of head/Bregma.
Note that attacking some of these targets forcefully may cripple, maim or kill your foe. Use only when there is a genuine threat to life.
• Strikes to the kidneys may be highly effective, so learn their position.
From the rear, strike the soft areas between the top of the pelvis and bottom of the rib cage, lateral to the spine. From the side, strike the same area at the level where the waist is narrowest (presuming the foe does not have a “spare tire”).
These strikes actually target the nerve complexes in the region of the kidney. If using a sharp weapon you must know the physical location of the kidneys. The actual kidneys sit above the waist, partially covered by the lower ribs. Stab upwards under the bottom ribs from the rear or rearward side.
• Is the threat you are being taught to defend against likely and realistic, or is it just there to show a clever counter. Are there simpler options?
A constant of older and lower quality self-defence manuals is techniques against someone who stands in front of you attempting to strangle you. I call this the “Frankenstein monster” attack. Recognise that this is highly unlikely. If you are strangled from the front, it is likely you are also being pushed up against a wall, or on your back with the attacker on top of you. Will the taught defence still work? What will?
An overhead knife or axe attack is more likely, but may not start with the attacker helpfully raising the weapon above their head while still several yards away. You may not have time for the recommended arm catch and throw technique.

• “A punch starts with the toes” (or the back-heel)
• To separate two individuals in a clinch: Place your hands together as though in prayer and insert them between the men’s faces.
Simultaneously covering each man’s eyes with a palm may cause them to flinch back.
If this fails, the edge of each hand may be placed to apply pressure against the throats or upward, under each nose. Be wary of bringing a hand into a position where it might be bitten when using the latter option.
If the above methods do not work, return your hands to the prayer position. Drop your weight down and bring your hands and arms down across theirs.
• Arms crossed over your chest has been suggested as a good “ready” stance, particularly when being “interviewed for a fight”. On the positive side, it places the arms in a good position to respond to attacks. On the downside, this body posture may project the impression of insecurity and nervousness, encouraging the potential aggressor.
The same criticism also applies to positions with one hand on your chin or near your mouth.
• Raising the forearm with an action like brushing back the hair over your ear is a useful defensive technique against circular punches at the end. Sometimes described as “attempting to smell your own armpit”.
Combine with ducking and appropriate body movement away from the attack. The other forearm may be brought up to shield the other side of the head.
If you move towards an attacker this basic arm motion may also be used to deliver an upward elbow strike to the chin or face.
The motion may also be used to break a wrist grab, although the “under and outside” method is preferred. Even if the grip is not broken, moving the hand up to your ear may pull the foe off-balance towards you. Use your other hand appropriately!
• The opportunity for using some elbow strikes can be brief as it takes very little time for a foe to move from “out of range” to clinching and grappling range.
Use an open palm as a rangefinder as an enemy closes distance. When the palm makes contact with his upper chest immediately bend the elbow and move forward to deliver an upward elbow strike to the chin.
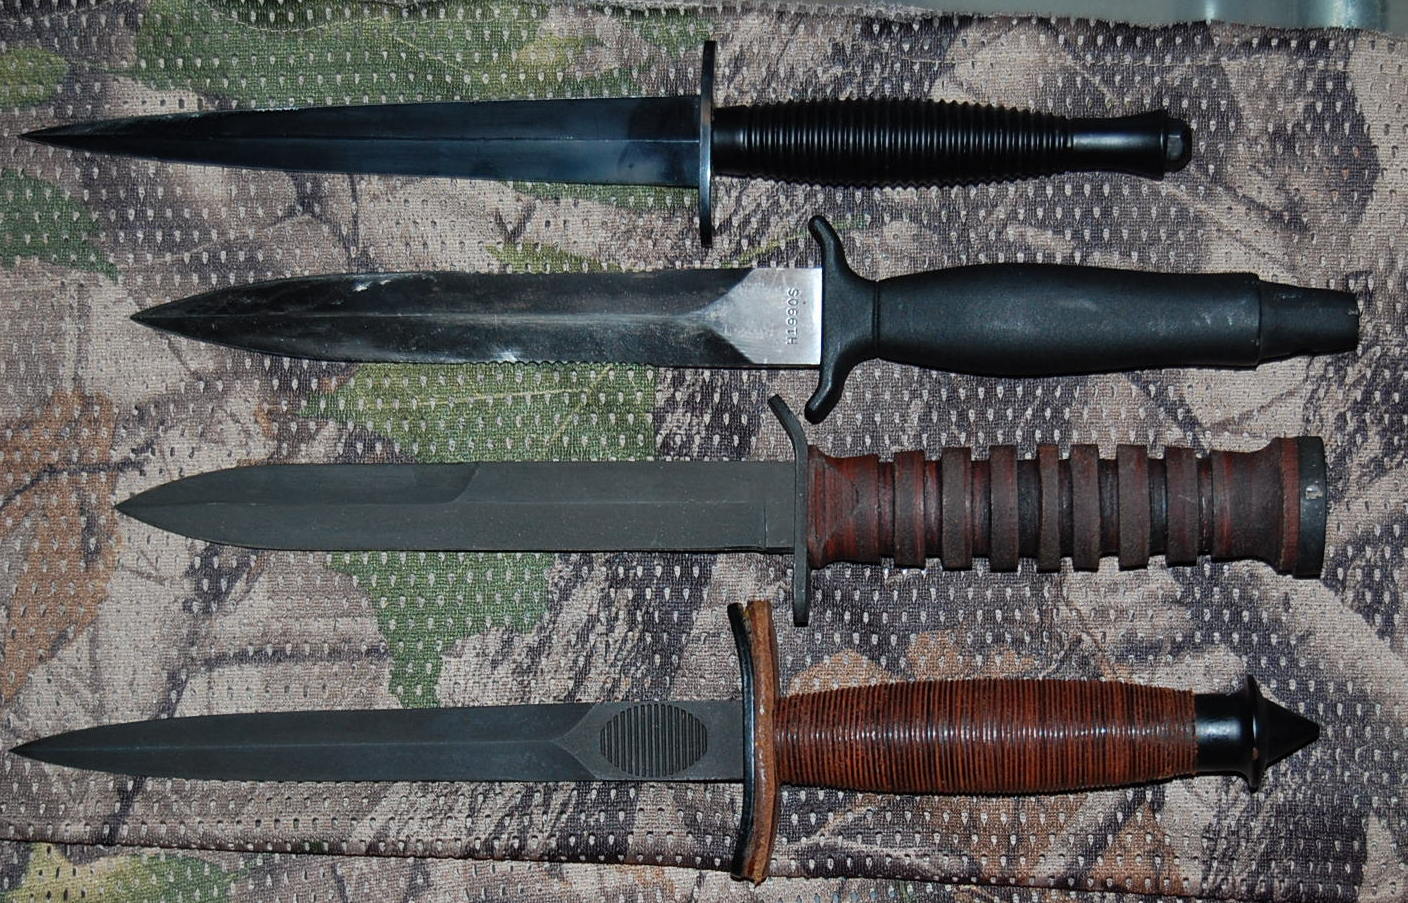
• Cloth can be surprisingly effective at resisting knife cuts. Small knives (i.e. those that are not kukris or machetes) should always attack with the point first against clothed areas. This should be practised against bare flesh targets too, since a penetrating attack is likely to do more effective damage than a slash.
• To cut a throat, stab into the side of the throat first then cut outward. Pulling back the head moves the major blood vessels back so would need a deep cut or slash to reach them. Better to stab in and cut outward.
If you cannot access the throat area, stab up under the ear, down from the suprasternal notch, down behind the clavicle or upwards just under the sternum or into a kidney.
• Knives for anti-personnel use should be selected on the basis of their point and suitability for thrusting attacks. For more general field and survival uses, the ability to chop, slice, carve and cut is a higher priority.
• If you can slip to a foe’s outside gate, try a headslap.
Swing your relaxed outermost arm upwards, parallel to the foe’s back. As you reach shoulder height convert the motion to an inward horizontal slap impacting the back or side of the head. The more relaxed you keep your body, the more velocity and power this attack will have.
• Many fracas involve pushing and shoving. Most fighting styles fail to fully utilize pushing as an attack. Tai chi uses “push” (arn/an) like a double palm heel strike. It can often be utilized when in very close proximity to a foe. It may also be used using a hand and a forearm, or both forearms.
Step forward with one foot, utilizing body motion and back heel to generate power.
Push is often used against the foe’s ribs, with force delivered at a slight upward angle. This exploits the elasticity of the foe’s ribs to help bounce them away.
• Tai chi often has the hands held in a configuration as though holding an invisible ball. This has a number of applications. One is used to seize the foe’s head. Power and movement from the hips and waist may then be used to twist the neck or unbalance and throw the foe. This is a useful technique if you are taller than your foe.
If your hands are in “hold the ball” and you bring the palms together this action may be used to clamp an arm between them. Slide the hands apart laterally to transition into an arm lock.
Hold the ball may also be used to bring the palms together to use the tai chi technique of press/squeeze. This may be used to strike and push in confined positions when push would not be practical.
A similar technique has both palms towards the foe, one on top of the other.
• When you manoeuvre to the outside gate, hook your palms over the foe’s shoulders and pull downwards and back by making your elbows heavy. This is an adaptation of the opening move of the tai chi form. Your target is actually the GB 21 point.
Position your legs so the foe cannot step back to regain balance, or kick at his legs to further unbalance him. Alternately, knee him in the spine.
• Many techniques suggested for dealing with a knife attack or other threats involve catching the attacker’s arm in a wrist grab. Grabbing accurately and firmly may be difficult to achieve in practice.
Hooking your palm over a limb is easier to apply and gives you some measure of temporary control. The forearm may be used in the same manner. Counterpressure from the other hand or forearm may be used to increase control.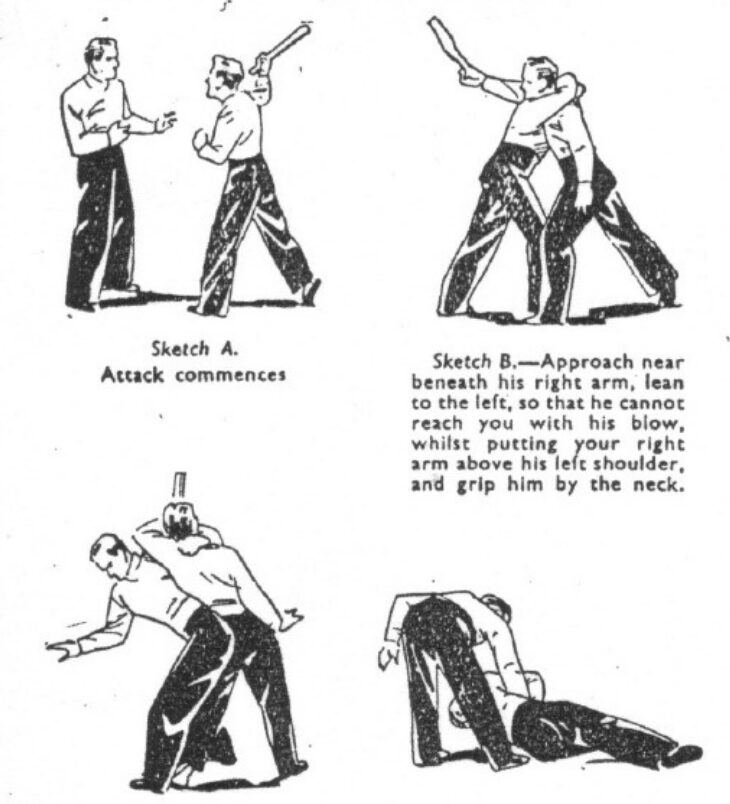
• If a foe raises their right arm high to use a club, a possible move is to duck in and headbutt to the underarm region. At the same time, attack to hit their solar plexus or sub‑sternal region with a hook punch, palm strike or hammerfist.
You will be in a position where it is difficult to strike you with the club, and most blows will have little power.
Immediately after the attempted torso strike, slip your head behind him and hug him around the chest or over his left shoulder and against his neck.
From this position, use a hip/cross buttock throw.
Variations: Hit under the arm with the shoulder rather than your head. Duck under the arm before moving closer to the body. Use your inner arm to push his chin upward or hook around his left arm to to clamp it to his side.
• When studying a technique proposed for use against a knife or club, always be aware of what the foe’s other hand may do.
There is little point controlling their weapon arm if it puts you in a position where the other hand can strike your kidney.
It may be possible for the foe to easily transfer the weapon to their free arm.
• Many techniques you may encounter are too complicated. Remember KISS! Will as simpler set of actions be as or more effective?
• Real fights often end up with both parties on the ground. Being practised in groundwork techniques is prudent, although some are derived from combat sports and may not work if knives are present.
In most situations, it is foolish to willingly go to ground. Even if you think a confrontation is one-to-one, your foe may have friends nearby. They will happily kick you when you are down if you have given them the opportunity.
• Tai chi techniques such as peng/p’eng utilize the forearm and back of the hand. In addition to being used for parrying, this is a useful close-range technique that may be used to strike, push a foe away or off balance.
The forearm may also be used as a striking weapon, either against the body, the throat or an attacking limb.
A strike with the back of the hand may be converted into one with the knife-edge of the hand or hammer-fist when possible.
• When grappling, do not interlace your fingers. This may result in injury if a hold is forced open. Hook your hands together by the fingers, or use one of the palm across palm techniques used in various wrestling styles. Or grab one of your wrists or forearm with the other hand.
• When doing press-ups or performing “the Plank”, use closed fists. This is better for your wrists and helps condition your hands for punching.
Concentrate the weight on the first two knuckles if the fists are horizontal, the lower two if vertical.
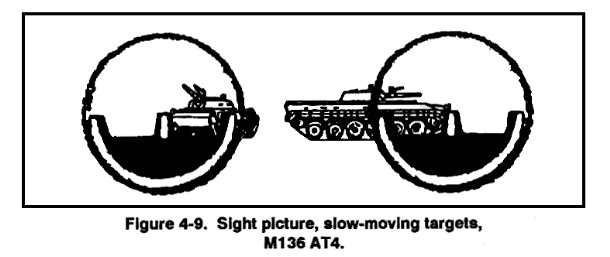
• Point-blank is the distance at which a target of a certain size may be hit without significant holdover or hold-under. Point-blank range to hit a tank is much greater than that for a squirrel!
Point-blank does not mean “close-range” or “short-range”. Most people getting something wrong does not make it right.
Many weapon-ammunition-target systems have point-blank ranges in the hundreds of metres.
• Concealment prevents you being seen, Cover stops bullets.
An unarmoured vehicle such as a police cruiser offers concealment but very little cover.
Only the engine block is likely to provide any useful cover against gunfire.
Shooting from behind a car door looks cool, but…
• If the enemy is shooting, your priority must be finding cover rather than shooting back. If nothing is within sprint range, go prone and exploit any microterrain. Even a street kerb may provide some cover.
Always shoot from cover if possible. If in a door, use the door jamb.
Seek any cover if you have to reload or deal with a weapon malfunction.

• There are times to use the sights and a perfect stance, and times to snap-shoot. You need both skills and the wisdom to know when to use which. “Shooting to Live” (Fairbairn & Sykes), the hand gun chapters of “Kill or Get Killed” (Rex Applegate) and “Shooting to Kill” (G.A Elliot) should be essential reading.
• There is little point in having a fast-draw if you cannot accurately snap-shoot. If you have time to line up sights and take a stance, you have time to draw normally and avoid the risk of a fumble.
• Movies and TV shows often show a character about to enter a room with their gun held muzzle up. This makes for a nice tight dramatic shot.
In real life, keep your muzzle down. If a foe is immediately inside the room they may grapple you to prevent you bringing your firearm to bear. If your muzzle is down you may still fire at their legs, which can be distracting.
• The “Lethal T” is a target usually described as a line drawn between the temples and down the centre of the torso.
The vertical of the T actually represents the spine, so is actually down the centre of the back rather than the front or the central axis of the torso. The crossbar may be visualized as a circlet around the brow.
Shooting “centre of mass” (as most people interpret this) is likely to miss the Lethal T unless directly before or behind the foe.
To the visualization of the Lethal T one should also imagine the “vital ball”. This is a 15 to 20 cm sphere within the torso at armpit height.
Shots fired at armpit level of a foe are most likely to hit a vital area. From certain angles such shots will pass through the arm openings of body armour.
Targeting the Lethal T and vital ball is for relatively short ranges where there is sufficient time to aim available.
• In combat, range is often uncertain and targets are fleeting. Engagements are often within less than 200 to 300 metres distance.
Shooting high in combat is due to a number of common factors, including shooter and target being at different elevations.
In such conditions, aim at where the foe’s belt buckle would be. This automatically leads a target if they are moving across your field of view or at an angle. If only the head is visible, shoot below chin-level.
At longer ranges, point-of-aim should be shoulder-height or towards the top of the head.
• Zero iron sights on the bottom of a target. Scopes and reflex sights should be zeroed on the centre of target.
• If you have any choice in the matter, zero your combat rifle to 200 metres. This will be more accurate at the ranges you are most likely to engage targets.
• Zero a combat pistol to hit two inches high at 25 yards. At 100 yards the round will have dropped less than twelve inches from point of aim.
• Handguns can be used accurately at longer ranges than many users realize. Put in the practice, and they may be used as emergency medium-range hunting or defensive weapons. While a .357 or 10mm shoots flatter than a .45, the difference is only a few inches and generally not significant at useful ranges.
• When zeroing an unfamiliar weapon or one new to you, start at a few metres to ensure it actually puts rounds on the paper.
• Take the stairs whenever you can. Be thankful you still have the health to do so.
• For most of us, the finger jab only has sufficient power as a distraction technique. Learn to throw it with a relaxed arm and body to make it as fast as possible.
This action is worth learning since it has other applications such as making a parry or setting up a throw or takedown. A finger spear “shot” between a foe’s arm and torso might be used to apply an armlock, for example.
• In the morning, before you shower, perform “the Plank” on your fists. Immediately after, stand and stretch your hands high above your head. Still stretching, twist your waist to face right and left.
Take several deep breaths to clear your airways.
• Variation of the DURA throw (see “Crash Combat”): After ducking under the arm and placing your other hand in contact with the foe’s leg, do not attempt to lift the foe.
Instead, move forward, tilting the foe to move his weight and balance to his left.
Your hand against his calf or shin will prevent him stepping to compensate and he will fall to the side.
• A straight limb can only be bent. A partially bent limb may be straightened or bent further, as needed.
• Very close? Your shoulder, chest, back, hips, thighs and knees may all be used to bump, strike or knock the foe off balance.
• A soft-point or hollow-point load should meet three criteria:
1. The round should be capable of reliably feeding through the mechanism of the weapon using it.
For a revolver or derringer, this may simply be a requirement for the round to fit in the chamber and stay there until fired. Recoil should not case the casing to ride back and foul the gun’s mechanism, for example.
For a round that must feed from a magazine and through a self-loading or other mechanism, the requirements may be more stringent. The bullet must not be deformed or misshapen by loading or firing.
2. The round must have a high chance of reliably expanding at the velocities it is being used at by the gun/ammunition system.
If the round is unlikely to expand, you may be better off shooting solid rounds such as FMJ or semi-wadcutter.
3. Both expansion and penetration is required.
If a round does expand, it should still have sufficient penetration to reach vital organs.
If your hollow-point or soft-point loads give inadequate penetration, you should consider other loads, and be open to the idea that you may need to use non-expanding ammunition.
• Think of a pistol as a two‑handed weapon that can be used single‑handed. Whenever possible, use both hands, and if practical, a rest.
• A snooker ball hitting a cushion will bounce off at an angle close to that at which it impacted. Bullets and shot fired against hard surfaces behave differently!
Bullets or shot hitting a hard surface will be deformed, and follow a trajectory close to the surface. This will be between 2 and 20 centimetres for a distance of about 25 metres.
This behaviour may be used to send rounds along walls or under vehicles.
Do not move too close to walls.
• Master reloading by touch alone. It will be dark. You will need to watch what the bad guy is doing!
Survival and Bushcraft
• Placing a net or camouflage cloth cover on your headgear does not make it camouflaged. You need to add things to it.
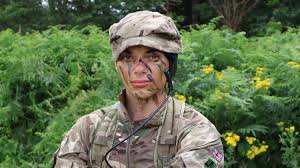
• Wearing an outfit of the latest fashionable camouflage pattern does not make you camouflaged.
A few token streaks of camo paint on your face does not make you camouflaged.
• “Uniform” is the antithesis of “camouflaged”.
•Chest rigs and other load-bearing gear intended for field use should have textilage attached to break up its shape. Provision to add natural materials such as foliage should also be included.
• For a general purpose survival/hunting .22LR rifle, zero to 35 yards/33 metres. This will give you a point-blank shot against the smallest of game at most practical hunting ranges. Targets far enough away to require hold-over will probably not be visible under usual field conditions.
• You would not parachute without a reserve chute. Always have backups, be it the files on your computer, a means of self-defence or a resource for survival.
• Having survival items tightly packed or integrated into objects like bracelets makes it more difficult to access them when you really need them. Always assume you will be tired, cold and wet.
• Using paracord as boot laces is often suggested. Most miss out the vital detail that if you do use such laces as a source of cordage, you must gut the cord into outer and inner and use one of these to keep your boots on.
• Stock up on survival/space blankets, disposable lighters and waterproof ziplock bags. Buy in bulk, you will find many uses for them. A 100m reel of paracord is also a good investment.
• In any outdoor coat, have a survival blanket and disposable lighter, at the minimum. A hank of cotton string can serve as cordage or tinder.
A spare pair of gloves and spare hat in a pocket are also prudent.
• A hiking/trekking pole or walking staff have too many useful applications to list here.
Spears may also be used for many of these tasks. Equipping yourself with one should be a high priority in rural terrain.
A pole or staff will be more comfortable to use if it is long enough that your elbow may be bent at 90 degrees when using it.
A walking staff should be under six feet to allow it to easily navigate doorways. Five foot/1.5 metres is good. Some say as high as your eyebrow, your chin, breastbone etc.
To a pole or staff add a couple of metres of cordage and wrap it LOOSLY around the shaft. This cordage will be readily accessible when needed and may be used as a carrying sling to carry the pole when it cannot carry you.
Near the top end of the shaft, add a small screw-hook, with the open end down. Useful for retrieving items from ponds or pulling down branches.
• Many a good movie and novel has been made about survivors trekking to safety.
In most situations, you are better staying with the vehicle or wreckage if possible. Locate resources and construct signals.
Your chances are better if more than one person knows your travel plan and ETA.
• If you judge a knife by how well it cuts rope, you will end up with a knife that is a great rope cutter! A survival knife needs to be able to work wood and prepare game and fish.
• Only two types of people are injured by their own tools. Those who are unfamiliar with them, and those who are too familiar with them.
Treat all tools with caution and respect.
• Despite what you may see on youtube, never cut towards a body-part!
• A hunting sling is easily constructed or improvised. Realistically, it will take weeks and probably months of practice before you are accurate enough to be able to hunt small game with a sling.
It is probably more practical to hone your skill at throwing stones by hand.
• One of the first survival hunting weapons to construct is a throwing baton. Carve or abrase one end to a point, the other to a wedge. It may then also be used as a digging stick or also serves as a club to dispatch fish or for batonning a knife.
• After a throwing baton and a spear, the construction of bolas and Apache/rabbit-stars should be considered.
Apache stars should be big enough to prevent a hit rabbit entering its burrow. Construct from two sticks of about half a metre/18 inches/one cubit length. If possible, use the woodsaw of a penknife to cut a square- or X-notch in the centre of each before binding them together. Pine resin/pitch or similar may be added as an adhesive in addition to the lashing.

• Bolas are of little use in wooded terrain.
• Do not reach your hand anywhere you cannot see. There may be thorns or things that bite and sting. Use your throwing baton, digging stick or staff instead.
• The darts offered for commercially produced blowguns are not suitable for hunting, even those designated as “broadheads”.
A survivor is unlikely to have suitable poisons available so must use more effective projectiles. Darts from sewing needles and paperclips are not going to work!
Darts need to be long to achieve sufficient penetration. Hunting darts used by some indigenous peoples may be nine inches and resemble half-sized arrows.
Darts more effective than the shop-bought junk have been constructed from 3 mm to 5 mm diameter bamboo “satay” skewers or dowels, 10 to 18" long. Coat hanger wire has also been used effectively. Darts made from three inch nails have been used effectively on very small game. Something similar may be made from local natural materials or wreckage.
The tail is just a paper cone (or birch bark) or a blob of cotton wool (sheep's wool, bird or thistle down etc). This design is pretty easy to make in the field.
Blowguns may also be used to project pellets against small game.
If improvising a blowgun, an internal bore diameter of about half an inch is desirable, and a length of more than a metre.
If you do not have a pipe, a semi-circular section channel may be cut in two pieces of material and the halves bound together. Use a taunt string to ensure both channels are cut straight.
• Snow on the ground? Footing unstable? Use a stick! So many injuries each winter could be avoided if everyone owned a decent pair of boots, knew how to walk on ice, and used a stick or hiking pole when it was needed.
• My girlfriend was about to embark on a long journey by plane, train and bus.
She called for me to produce my stock of ziplock bags. Into one bag went several handfuls of “wet‑wipes”.
Washrooms are likely to be few and far between, and often occupied. With a modest supply of wet‑wipes she can freshen‑up when she wants.
• When batoning, use the section of the edge nearest the hilt, unless this part is serrated or scalloped. Also not a good technique to use on double-edged knives.
When batoning, hit the back of the blade with a wooden object, not one of metal or stone. Use a hatchet handle rather than the back of the head.
•Black is not a good camouflage colour. Calling it “SWAT-black”, “chaos-black”, “ninja-black”, “tactical-black” or such does not make it so.
• A bath is relaxing, but not the best way to get clean. You effectively end up soaking in your own dirt!
At the end of a bath, finish by having a shower if possible. A shower is a more efficient time to wash your hair.
• When using a seatbelt‑cutter/hook‑knife, cut away from you at an oblique angle. This creates some tension, helping the edge cut. If possible, pull on the strap(s) with the other hand to create tension.
A seatbelt‑cutter/hook‑knife or similar may be used to cut open clothing with less chance of injuring a casualty. They should be included with any larger medical kit, and attached to the outside of the bag with cord.
• A cheap butane lighter lights more fires, more easily, than the equivalent weight in matches.
Get the type with a striking wheel. Once the gas has run out it will still produce sparks.
Invest in a number of these before you spend your money on more exotic fire-lighting gadgets.

• Your primary survival/emergency items should be carried on your person. You are more likely to remove a jacket or coat than your trousers. Your trouser belt and trouser pockets should carry a useful assortment of items.
• Tobacco tins or mint tins are not the best means to carry your emergency items. Often they are such masterpieces of packing that items pop out when opened and are lost in the grass.
There is a danger of thinking their contents are all that is needed.
They carry too few of some useful items, and cannot carry some very useful gear.
Tins are bulky and unpleasant if you sit or fall on them. They are not well suited to being carried in trouser pockets. Carrying them in a belt pouch or jacket pocket is contrary to their intended function.
The only merit of a tin is that it can hold and heat a very small amount of water, possibly to attempt to sterilize a needle or scalpel blade. There are other ways to do this, and it is unlikely the tin will hold enough water to boil the item for an adequate time.
• When in doubt, step out! Feeling flustered, or uncertain? Don't be proud or stubborn! Let someone else take over and take a break.
If on your own, sit and think about the problem calmly and logically. Or don’t think about it, practice tying some knots or brew-up, and the answer may come to you.
• Carry a metre of clear plastic tubing with your primary water bottle or bladder. The bladder may have a drinking tube, but you do not want to take this to bits if you can avoid it.
A length of tube may be used to reach sources of water that are difficult to reach.
If using a solar still or transpiration trap, a tube may be used to drink collected water without disrupting the apparatus.
Carry additional tubing if planning to travel in desert or arid areas.
• A solar still may be most effective in non-desert conditions. In desert soil it may produce only half a litre or so of water per day. This may not justify the effort and water lost digging it.
You will probably need multiple solar stills.
Yield may be increased by urinating in the hole or adding salt water, vehicle radiator water, greywater, blood (not your own!) or most other water not safe to drink.
• In a vehicle, carry a length of tubing suitable for syphoning fuel. Better still, equip your vehicle with the sort of plastic hand pump that is primed with a squeeze bulb. Save yourself a mouthful of fuel.
• When a chimpanzee cannot drink directly from a source of water, such as in the fork of a tree, it makes a ball of leaves or grass. It dunks the ball in the water, then squeezes out the water into its mouth. Learn from the chimp.
• Some tribes of chimps signal each other by banging on the trunks or the buttresses of trees. This sound will carry further than your voice or whistle.
Bang on aircraft fuselages, vehicle bodies, boat hulls, bridge railings, refuse, debris etc.
• During the siege of a fortress during World War One, French defenders had to resort to licking condensation off the walls.
A small piece of clean sponge added to your water bottle carrier takes up little room and is of negligible weight. It may be used to mop up condensation or morning dew. Keep this separate from the sponge you use to wash your mess kit, unless you like the taste of detergent!

• Walking in the woods, or just down the park? Take along a field guide, preferably the sort that lists if a plant or tree is edible or has medicinal or other uses. It is easier to learn to identify specific plants if you have a memory to put them in context.
• Illustrations of natural shelters often show the “rafters” as a lattice of horizontal and vertical sticks.
Experiment with laying the “rafters” obliquely. Most will only need to be lashed at the top, and the bottom end may be driven into the dirt.
• When constructing a natural shelter, do not underestimate the weight the main supports and ridgepole must take. Several inches of wet insulation or a foot or so of snowfall is not light!
A ridgepole should be of sound (not rotten) wood and about four inches/ten centimetres diameter. Ridgepole and primary supports should be able to take your bodyweight, at least.
• Conveniently Y-shaped forked branches are not as common as many wilderness manuals make out. A join between a branch and side branch will often serve instead.
• Attach tent pegs to your shelter using a lark’s head knot. Easy to make, even when fingers are cold and numb. With a lark’s head knot the pegs remain attached when you pull them up. Useful if you need to vacate an area quickly.
• Keep a stout, medium-sized slot screwdriver with your tent pegs. This may be used to poke holes for pegs when you do not want to attract attention by hammering. Also used as a crossbar handle to pull-up stubborn pegs. Can itself be used as a tent peg. Paint or tape over the handle if a more natural colour is needed.
• Put on a fleece under your coat. Put a hat, scarf and gloves in the lower pockets. You may have trouble closing it up!
Buy outdoor coats and casual jackets at least a size bigger than you need. Room for insulation when it is cold. In warmer weather, room for air to circulate.
• Zig zag when ascending steep slopes.
Naismith’s rule is that you average 5 km/h (1.4 m/s) plus an additional minute for each 10 metres ascended.
If you ascend a 45° slope making a zig zag of 45° across the direction of travel, you have to walk 40% further, but it is the equivalent of walking that distance on a slope of only 30°.
This is equivalent to ascending a slope only 57% as high!
It is also a lot easier on the ankles!
• If you set a ridgeline for a poncho, basha or tarp, rainwater will run down it to drip from the lowest part. This will usually be inside your shelter.
Just inside the sheet edge, tie to the ridgeline a “drip-wick”, a length of cord with one end hanging down. Do this at each end of the sheet.
You may use simple string for this, or pieces of grass or leaves. You may use a simple overhand, clove hitch or lark's head knot
Water running down the ridgeline will be diverted and run down the hanging cord or plant stalk.
This trick is sometimes seen performed with a piece of stick pushed through the ridgecord. This leaves a section of exposed line between the stick and the sheet edge that may still allow water into the shelter.
• Consume from the outside, inwards.
Use the water, food and resources in your pack before that in your webbing. Use items in your webbing before those in your coat pockets. You coat contents before the items in your trousers. Likewise, use supplies in your vehicle before your pack. Your base camp supplies or stuff in the local area before your vehicle stores.
If you use any “inner” items, such as ammunition, fully replenish from “outer” stocks as soon as possible.
• If you must use matches, find a watertight, large mouthed container for them. Do not forget to include the striker strip(s). Cotton wool stops them rattling and may be used as tinder.
• Strike a wooden match by pushing it along the striker strip rather than pulling. Less chance of the matchstick breaking. Fingertip may be placed just behind matchhead for support. Best method for wooden matches, may not work with paper/books of matches.
If windy, face into wind. Hand holding matchbox forms wind-shield for striker and matchstick in palm. Help flame catch by tilting matchhead down into palm so flame catches stick.
• Strike a match, light a candle! To save wasting matches/lighter fuel, use the candle to get your tinder burning. Hold a small candle handy between two fingers when striking a match. A pack of birthday cake candles may be distributed between your various fire kits, EDC etc.
• I once saw the advice “to learn camouflage, read a good photography book and break all the rules for taking a good photo!”
Camouflage is often taught as being a product of shape, shine, shadow, silhouette, movement, noise and smell.
If you maximise rather than minimise these properties, you have the essence of effective emergency signalling!
• In very cold conditions, store water bottles cap down. Ice will form in the uppermost (bottom) part. Water near the cap will remain liquid.
• Melting snow for water can be problematic.
The snow at the bottom of the container will melt but the water will be absorbed by the snow above. The resultant airspace cause the pot to burn.
Snow is mainly air. Squeeze as much air as possible out of the snow and gradually add very small amounts to the warming pan, ensuring liquid water is never fully soaked up.
Better still, make “snow kebabs”! Squeeze balls of snow on to the length of a rod or stick. Position angled sticks before a heat source so the melted snow drips into a collection vessel.
• A pot of water allowed to freeze overnight warms the shelter by its heat loss. Ice takes less fuel to melt than snow, so reheat the pot when you need water. Much easier than trying to remove ice frozen within a water bottle.
• You can light a fire with batteries and steel wool. If you happen to have these items, by all means make use of them. Foil or wire may also be used.
This does NOT mean you should be carrying batteries and steel wool just for fire lighting!
Rusted steel wool will not burn so well. If you (bizarrely) carry steel wool and a battery in a survival tin, you need to consider galvanic corrosion.
A couple of disposable lighters, cotton wool and a candle are lighter and more effective.
• That condoms may be used to carry water is commonly reported. Very few sources actually mention the filled condoms are much easier to handle and transport if placed inside a sock first!
You will need some means to pour water into the condom. Very little water enters if you submerge it.
The condom may alternately be used to keep matches or tinder dry.
• A Zip-lock bag may be used to carry water instead of a condom. Reinforce the bottom with duct tape. The side seams may also be taped.
Until needed to carry water the bag serves to keep some of your emergency items dry. My EDC pocket pouch easily fits in mine.
• A “V” shape is the ground-to-air code for “Require Assistance”.
This may be an easier shape to create on the ground than “SOS”. Straight lines are rare in nature so this may be more distinct.
Note that many survival books that show ground-to-air signals do not include this one.
Each arm should be at least a metre wide and at least six metres long.
• Replace the metal rings of a wire saw with loops of cord. Add fishing swivels between the wire and loops if it does not already have these.
Some things you want to be easily seen so you do not lose them. Loops can be made from trainer/shoe/boot laces. These may be found in colours such as red, orange, bright blue, neon green and yellow.
Wire saws work best if the wire is kept relatively straight when sawing, rather than looped around something.
A branch may be bent to convert a wire saw into a bow-saw.
• Dark objects absorb heat better than light ones. If attempting to ignite scrap paper with a magnifying glass, create a dark spot with your EDC Sharpie. Charcoal or dirt may be used instead.
Cotton wool/tampon or other materials you are attempting to light by sparks etc, may also be darkened first.
• Ed’s Wisdom:
1. A tool left in camp is no tool at all. Trying to save a few ounces is a mug’s game.
2. Jerky is serious trail food, especially at the turnaround point. The more highly flavored the better. Having a bag to pass around makes you popular.
3. Every hike is longer than you think.
No. 3 is the really important one, in particular above 9500 feet. No, goddammit, I am NOT getting old!
• Around the opening of your sleeping bag liner sew material that is distinctive to both sight and touch.
This lets you locate the opening of your liner by touch.
It also prevents the maid at a hostel mistaking your liner for hostel bedding.
• Many are familiar with the bow‑drill method of creating fire. Fewer realise that by adding a piece of metal or stone the basic mechanism becomes a useful hand‑drill.

• Swiss Army Knives (and some other tools) include a small split ring. This ring may be used to hold the SAK tweezers closed.
This serves as a small vice suitable to hold, for example, a fishing hook while material is added to create a fly or lure.
Lay the tweezers and ring crossways across the back of your penknife and clamp them down under the head of the multipurpose hook.
• Add a safety pin to the split ring or lanyard of your penknife or multi‑pliers.
A safety pin serves as either a pin or a clip to attach your tool to a D-ring or clothing. This secures the tool when you need your hands free.
The safety pin may also be used for other purposes such as draining a blister, when necessary.
• Hung from a cord, a Swiss Army Knife or similar object may be used as a plumb‑line.
• If you own a hot-glue gun, consider adding a stick or part stick of the adhesive to your repair kit.
The piece of adhesive on the tip of a safety pin may be gently heated over a lighter flame until clear, and then used as a seal or to stick items together.
• Never sharpen a tool that does not belong to you without the permission and knowledge of the owner.
A sharp tool expected to be dull is an accident waiting to happen.
• Any polished or semi‑polished item may be used as a signalling mirror. Some larger objects may be more effective than the expensive purpose‑designed item you purchased!
Remember that glass or similar may also be used as a heliograph.
• Paracord stretches! This makes it good for its intended purpose, not so appropriate for uses such as shelter construction.
Make use less elastic cordage such as bankline when appropriate.
For temporary constructions, use natural materials that will bio‑degrade.
• “Stone Rimmed Fire Places. A common, though unnecessary practice, is to ring open fires with stones. This practice is based on the claim that the stones confine a fire and make it safer, yet many forest fires are in fact traced to such fireplaces. There are, however, justifiable uses of stones in a fire: to store warmth in a closed shelter: to support pots when no other means arc available: and to produce steam for a steam bath or a steam cooking pit. Rocks used without good reason arc needlessly defaced and, unless they are scattered after use. leave a permanent marker of the campfire. A stone fireplace also requires more effort to cool, and the stones that are not moved aside can harbour hot spots that may start a forest fire.”.
“Northern Bushcraft” by Mors Kochanski
• “The Tepee Fire: This method is probably the most common one used all over the world. Simple to light, providing there are plenty of dry materials available. However, no matter how simple or practical it may be, this method will not work on snow or very wet ground. All fires, no matter which type, should always be built on some form of a platform. [My emphasis] Because this method has no controlled fire surrounds it quickly consumes the fuels. More forest fires are started by this method than any other. Often the lazy campers just kick the fire out and move out leaving the fire to smoulder and relight.”.
“No Need to Die” by Eddie McGee
• To use a ferro‑rod: Place the “steel” down on the tinder or just between the tinder and yourself. If it is windy use the steel to hold the tinder down.
Keep the steel stationary and pull the ferro‑rod back towards yourself.
• Before attempting to light a fire, gather all materials that you expect to need first. Gather tinder, kindling and a good supply of fuel. Build a platform under your tinder and stack fuel as a windbreak/reflector
Only when this is all gathered should you attempt ignition.
Gather more than you expect to need. That which is not used for this fire may be used later.
• Shift through the remains of a fire to ensure everything is extinguished and cold.
While you do this, save any pieces of charcoal you find.
◦ A couple of tablespoon‑sized lumps of charcoal should be eaten if you have diarrhoea.
◦ Charcoal may be used like chalk to mark a trial or leave a message. It can be used to draw a map on a sheet of flexible bark.
◦ Charcoal may be used as tinder/kinder to help start your next fire.
◦ If attempting to light a fire with a magnifying glass, charcoal may be used to “blacken” tinder to increase its heat absorption.
◦ Charcoal may be used in the construction of a water filter.
◦ Ground charcoal and a little water may be used as improvised toothpaste. Don't expect a pearly white smile.
◦ Charcoal may be used to camouflage exposed areas of skin.
◦ Charcoal smeared under the eyes reduces the effects of sun-glare from sand, snow or water.
• Metal at sub‑zero temperatures will freeze on to bare flesh.
If you have a metal whistle, tape around the mouthpiece with insulating tape. On some designs of whistle, heat‑shrink tubing may be used.
Make sure the whistle you carry in your cold weather coats and gear is non‑metallic
• Loose matches will rattle in a partially filled container. Pad the space with materials such as dry grass. Ensure whatever you use is completely dry!
It is easier and more practical to carry a lighter instead of matches.
• Learnt on the Russian Front in the Second World War: Cold Weather clothing should be either warm, or white, never both.
A warm garment will be worn whenever it is cold, so will not stay white for long.
Once dirty, a white item has little camouflage value.
Warm items tend to be thick and slow to dry, so having to wash them frequently to keep them white can be problematic in the field.
• When using stairs, make less noise by allowing the banister to take some of your weight.
Note that buttons or poppers on your cuffs may hit a banister and make noise that will reveal you.
Cuffs can also get caught on the ends of banisters, causing you to stumble or make unnecessary noise.
If trying to move quietly, roll your jacket cuffs up. The exposed forearms may act as an additional tactile surface. Open cuffs may be covered by knitted tubes or devices similar to ninja bracers/tekkou.
• In cold weather, take a blanket or similar, and fold it twice lengthwise to create four layers.
Wrap around your torso just under the armpits. Secure with a belt or cordage. Wear beneath your coat or jacket.
• Acid removes rust. Cover the rust with vinegar, rub it with a slice of lemon etc. Also good for water-scale in your bathroom.
This does not need to be cider vinegar. Unless you are following a recipe, anything that tells you you need cider vinegar is usually BS.
For a gentler action, submerge the item is something such as pineapple juice. For a knife, use a container with a good depth to volume ratio. A tall glass, vase, measuring cylinder.
Leave for a few days, checking occasionally.
• Soak pieces of cotton wool in Vaseline to make tinder.
Push into lengths of plastic straw.
Heat each end of the straw and crimp together to create an airtight and water-tight seal.
• Swiss Army knife tweezers are compact and useful, even if you do not own a Swiss Army knife (yet).
Place in a short length of plastic straw or tube. Add brightly coloured tape if wanted.
Carry tweezers in your wallet, pocket pouch, medical kit etc.
• Four Ws: Water, Wood, Wind, Widowmakers.
When choosing a campsite, consider the four Ws.
A source of water is good. Camping too close to the water may cause problems with insects. You should have shelter against rainfall.
A nearby source of wood for fuel will be useful.
Your site should be out of strong winds. A gentle breeze may remove smoke from your fire and keep some insects away.
Widowmakers are potential dangers: Dead branches that may drop on you. Rock overhangs that may crack in the heat of your fire and fall. Dry river courses that may be flooded by rainfall elsewhere.
• Five (Seven) Cs: Cover, Combustion, Container, Cordage, Cutting (Consumables and Compass)
When considering equipment needs, utilize the five Cs:
Cover: Suitable clothing, bedding and means of shelter. Rain poncho, poncho‑liner, space blanket(s), survival/large plastic bag(s), hats, gloves etc.
Combustion: Have the means to make fire easily. Lighters and tinder. Perhaps a ferro-rod as backup.
Container: Have the means to carry water with you. Have the means to boil water.
Cordage: Have a variety, from fishing line and cotton string to paracord and bank line.
Cutting: Carry useful tools. Invest in a Swiss Army knife and a Mora and carry the penknife with you at all times. Different environments need different larger tools.
With the above, also consider Consumables and Compass. Water, food, ammunition, medication, soap, batteries, water treatment tablets. How much will you need and where can you resupply?
• Your emergency items in your vehicle should include:
Blanket, poncho‑liner and/or winter sleeping bag: An immobilised vehicle is a metal box. It will get cold inside.
Bottles of drinking water and “European” mess tin: Mess tin can be used to melt snow, treat water or as a bucket to fetch water for an overheated radiator. A stove will be needed.
Lightsticks, Warning Triangle: Means to make an immobilised vehicle visible on a dark road.
Flashlight/headlamp: Means to inspect vehicle in dark. Ideally a wind-up model since the batteries will be flat when you most need it.
Candles: long duration candles, nightlights. Provide a source of heat in an immobile vehicle. Open a window a little for ventilation.
Spade and other tools: Can be used to dig out a stuck vehicle. Your vehicle probably has room for a robust, full-sized garden spade rather than a more expensive, smaller folding camping tool. Placing floor mats under tires can help free a stuck vehicle.
• A survival bag or large plastic bag retains heat and keeps out wind better than a foil space blanket. It is easier to manage when stationary.
Few gizmos or gadgets are as useful as a roll of trash bags in your pack or vehicle
Such bags are generally bulkier than space blankets, many requiring a large pocket or needing to be carried in your daysac. A space blanket will easily fit in most pockets, your EDC pocket pouch etc.
It is not an “either/or” choice. Use the bag if available, with the space blankets if necessary.
If you cannot reach the backpack or coat the survival bag was in, you still have the space blankets.
• STOP
In an emergency:
Sit: (stop, stay) Once clear of immediate danger, find a safe location. Take a deep breath and accept you are in a survival situation. Nothing can be done about how you got there. Generally it is better to say close to your vehicle, the crash site etc than wander off in a long cross‑country trek.
Think: (Take stock) Don’t Panic. Think through what you can do. Take Inventory. Go through your pockets and bag to remind yourself what you have available that may be useful. Don’t just do something, sit there!
Observe: Look around. What resources in the area or from the wreckage may be used? Which of your fellow survivors have useful skills. Which will need extra help. Assess the situation and location.
Plan: Make a plan. Prioritise your needs (Medical, Shelter and Fire, Signalling, Sustenance). If you need to change location, where will you go and how will you notify searchers?
• A pair of zip-lock bags may be joined together to make a larger bag by turning one bag inside out so the collar sections engage.
• A rucksack is an extra layer of insulation. Empty the rucksack and place the foot of your sleeping bag/survival bag inside. Pull the draw-cord snug if it has one.
• Many of the survival applications advocated for zip/cable ties are better if string or plant stems are used instead.
Some claimed applications, such as using zip ties as tinder for fire‑lighting, are just wrong.
Two or three 20 cm or longer zip ties may prove useful as part of your repair kit.
There are various ways the lock of a zip tie can be opened. The pin or tweezers of your Swiss Army knife, the needles in your sewing kit and the safety pins in your medical kit or the tip of a fine screwdriver, may all be used for this.
After being trimmed, the tail end of a zip tie may be melted into a blob with a flame to prevent a zip tie being undone.
If you cannot unlock a zip tie, cut it close to the lock where it enters the lock. The shortened tie may still be of use.
• There are several ways to escape from zip ties.
If using them to restrain a bad guy, do not leave the prisoner unattended.
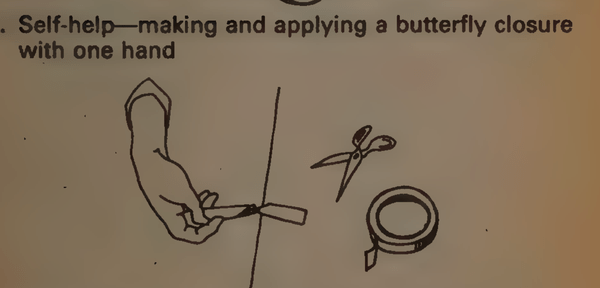
• Butterfly closures may be improvised from narrow lengths of adhesive tape.
Twist the centre one complete turn to form the section that crosses the wound.
My medical pouches have some elasticated tape that is good for minor finger cuts. Twisting this into butterfly closures for larger wounds is more practical than trying to cut plasters into the butterfly shapes.
• No Combustion without Ventilation.
Do not light so much as a single candle unless you can ensure there is an adequate supply of oxygen.
Carbon monoxide kills quick!
• Conserve your fuel and use the Boil 3, Add 1 method to pasteurise your water.
The 3:1 ratio is used if the unheated water is very cold and/or when at high altitude (4000 m+). In most other situations a 2:1 ratio may be used.
After mixing water, return some to your measuring vessel to pasteurise it.
• JC: Something that I have used with good success is the inner strands of paracord and superglue.
My students would break their glasses or similar and not have the money to replace it. Sometimes I could wrap the strands around it and superglue it.
Basically makes a type of fiberglass.