Disclaimer: “As an Amazon Associate I may earn from qualifying purchases.” Adsense and Infolinks were no help at all.

If you have enjoyed this article or it has been helpful to you please feel free to show your appreciation. Thank you.

Read The Third Wave by Alvin Toffler!
Categories
Phillosoph

Quickly Polished Off

Today’s blog is actually a follow up to two previous posts.
In The Great Locker Opening I mentioned that I intended to order another credit card kit and add the tools to the Serenity Plus kit. The new items arrived last night. In my review of the credit card kit I mentioned how nicely finished the items were. The new set was quite different. Not so shiny and with some very distinct burrs on some tools. On the other hand, the five-piece kit actually had six pieces, a duplicate snake being included. My cheap micrometer indicates the cruder picks are 0.2 to 0.5 mm thick while the better finished set are 0.1 to 0.2 mm.
If you read my previous article and the credit card set you received was not a nice as my first set, this is easily and quickly solved.
The burrs were quickly removed with a few swipes of a needle file. 600 grit abrasive paper is usually recommended for polishing picks but I didn’t have any. Given how rough the picks were I used 400 instead and then moved down to 800. This does not require a great deal of effort. About 30 seconds on each side of the pick should be adequate.
Most picks I have do not need polishing. I did recently apply some 800 paper to my Sparrow Worm, Warlock and Octo-rake. I think the two larger picks are designed with American locks in mind so could afford to lose a little bit of thickness. Likewise, the Worm is mainly used in narrow locks. The Worm had also got a bit discoloured so some light polishing cleaned it up.
The Great Locker Opening has an amusing footnote. The other day I noticed one of the lockers I had cleared had a new lock on it. Distinctive, since it was the same model of lock as that I had previously removed. Seems our squatter had got a two for one deal. A quick enquiry revealed the rightful tenant had not started using the locker yet. This may have been one of the quickest picks I have ever done. Not only did I know exactly the right turning tool and pick to use, but I even had the lock’s twin sister to practice on the night before.  
Categories
Phillosoph

The Great Locker Opening!

Version 1.1

As regular readers will know, I have acquired a number of lock picking items over the last few months. What most will not know is this was with a particular goal in mind. 
Where I work people are assigned lockers. This is on the understanding that come September, they empty the lockers and remove any locks. Of course, as is the spirit of the age many of them take the stance that the rules intended for everybody do not apply to them personally. It is quite amazing some of the things people will leave in lockers and often never return for!
Usually we cut the locks off or break them, but this sometimes damages the lockers. Given my newly learned skills this year I intended to pick as many locks as possible. This would also increase my collection of padlocks to practice on.
For the last few months I have acquired lock picks, comb picks, master keys and several other items that might help with “the Great Locker Opening”.
Ironically, for the first time, most of the people have observed the rules and vacated their lockers. Only five remain locked. One has a keypad padlock. Three are very small padlocks and one is rather large.
I will deal with the “failures” first.  There is a technique for opening the keypad padlock. I was not able to get it to work in the limited time that I had so cut this one off. I was unable to open one of the small padlocks. The actual problem was the wide but very small key way. All of my turning tools proved to be too wide or too thing to engage. Those that would left no room to use a pick in. This was a very small padlock that was easily broken. It is a paradox that many of the hardest locks to pick are easiest to brute force.
The first success had an odd key way. Very narrow up at the pins but wide at the plug edge. Firstly I tried my usual “quick” openers. The bogota, the Octo-rake, the Warlock and the Worm. No luck! I tried one of my snakes and she popped open! I had brought my snakes for situations where the bogotas could not be used, so this vindicated that decision.
The second success also had a keyway much wider at the edge than the pins. It also resisted the bogota et al. I had a sudden inspiration that I should use a low jag. I selected the no.10 pick from my “Honest Wave” kit. The lock opened with a few seconds of rocking and jiggling. (Since then I have opened this padlock just by attempting to turn the plug with one of my longer Chinese turning tools. It also opens using my knife pick or by turning with a relatively thick pick such as my single hump bogota.)
This left the largest lock. At least there were no problems getting a turning tool in! I tried a variety of the usual picks but it resisted my seductions. For some reason I decided to try my half-snowman.
Many people dismiss ball picks as a gimmick. They will point out they do not do anything that more conventional picks cannot do. I don’t dispute this. My half-snowman was a novelty purchase, a bit of whimsy if you will. I actually could not find anyone selling a half-snowman so mine is actually a full-snowman with one side ground down.
I employed a technique known as “having a bit of a poke around”. You can imagine my surprise and delight when the lock popped open after a few seconds! (Since then I have opened this lock with other picks such as the Serenity bogota and the Sparrow Worm.)
I am quite happy with three out of four for my first “public” lock picking. The failure was more due to lack of a suitable tool than technique.
Several things were learnt her, some of which I will cover in later posts. The primary one is that I need a turning tool(s) that can deal with wide but small keyways. I have some ideas along these lines and will keep you informed.
Like any tool kit, a collection of lock picks tends to have a small number of tools that gets used for the majority of jobs. Interestingly, all three locks were opened by my “other” lock picks. I did not bring my credit card pick set with me for this, but might have tried the jag and the snake if I had. I have ordered a duplicate set and intend to add the tools to my Serenity Plus kit when they arrive.
It is quite surprising how often you drop turning tools! It can also be difficult to tell one from another when they are mixed together. Distinctively marking turning tools with paint, coloured tape or heat shrink may address both problems.
Categories
Phillosoph

Soviet Camouflage Items

Only a short blog today. I left my flash-drive at home so cannot work on the articles that I had planned.
I did come across this interesting page on Soviet WW2 camouflage techniques.
Notable was Camouflage Net for Rifleman… is about 5 by 2 1/2 feet and weighs about 1/3 pound.” WW2 British Army/ Home Guard manuals show similar items staked out in front of entrenchments. A modern equivalent should be made brown so that it is more useful in urban, autumn, winter and arid environments. Such a net would serve many other purposes. Such nets could be placed over windows to prevent the entry of grenades or drones.
 
The other item that particularly caught my attention was Camouflage FringeThe fringe consists of a band about 3 yards long, from which grass colored matting is hung. On the ends are hooks for attaching the fringe on the object. The rifleman can fix the fringe on the helmet or shoulders. Five of these fringes are used to camouflage a machine gun, and six for an antitank gun.”
In previous posts I have discussed how a camouflage pattern garment is only the foundation for good camouflage. You also need to add 3D elements such as local foliage and bits of textiles to break up your distinctive shape. Problem is in some organizations modifying your gear like this is frowned upon. Similarly, attempting to camouflage your weapon is unpopular since everything has to be removed so the weapon looks nice on parade.
A partial solution to this may be a length of cord with some rags tied to it. Again this should use browns and yellows for versatility. Ideally there should be some way to add local foliage. Perhaps the cord should be two twisted strands so stalks or bundles of leaves can be placed between them. The only problem that I can see is that cords draped around the shoulders may get caught by vegetation. The camouflage cape is therefore a better solution.
Categories
Phillosoph

Camouflage Hood and Article

Langdon-Davies is a name that has often appeared in this blog, and rightly so. His book on fieldcraft is recommended reading. This book was a best seller during the Second World War.
In a previous blog I showed his suggestion on creating a camouflage smock from hessian.
Recently I was reading a Home Guard manual published at a slightly later date and it was with some amusement I read a passage that said that due to a shortage of hessian, it was no longer available for making “sniper suits”.

The book instead suggested that equal concealment could be achieved by attaching materials and foliage to the helmet, webbing and the arms and legs of the battledress.

It also recommended a facemask made from a sandbag. Below is the relevant page. I’m aware that it is crooked. I chose to leave it this way to impress that camouflage measures should be irregular.

As per Langdon-Davies, paired eyeholes are avoided as being distinctive. The surface of the sandbag may be painted in contrasting, disruptive shapes. The skin beneath should be camouflaged with creams or other materials.
A British Infantry training manual from 1944 makes these wise observations:
(a) Fieldcraft is universal.-This is a war of infiltration into the enemy’s position-that is, war in which small parties, such as sections or even individuals, work their way through, relying on their own skill and on the power of their own weapons. Infiltration cannot be carried out unless you are an EXPERT in movement in the field, concealment, and surprise. One bad movement by one individual may ruin everything.
(b) Fieldcraft is offensive and does not mean using ground to cower in a hole out of the enemy’s fire. Ground must be used as a hunter uses it-to get closer to the prey whom he is going to kill. You must use your knowledge and cunning to outwit the enemy.
(c) Observation is paramount in offence; concealment is paramount in defence.-This is a war of concealed posts, of camouflage. You cannot kill the enemy unless you can find him. You cannot even start to attack him, if you do not know where he is. 
(d) Cover from view is not cover from fire (especially if you have been seen getting there).-Train yourself to get away from enemy fire unseen. Do not dart behind a bush and stay there; that is suicide.
These comments are still relevant today, although I believe these basic principles are often neglected. Infiltration is often now regarded as a specialist skill rather than a basic requirement for the infantry role.
As a bonus, I have scanned an article on Personal Camouflage from an 1980s magazine. This is a nice, succinct summary of how to use foliage and other 3D materials to improve your camouflage.
Essentially the same advice was given in British WW2 manuals. Significantly, we seldom see such measures being taken by modern fighting men.
Categories
Phillosoph

It's Not Easy Being Green.

In my last blog I quoted Tom Wintringham’s advice that the first lesson to learn was how to take cover. This piece of advice can be applied to survival as well as military personnel and has many aspects. It includes how to find shelter from the weather. It includes how to take cover from gunfire. It covers the difference between cover and concealment and it includes how to move between cover. Some of these aspects have already be addressed in this blog and future articles will cover others. Today I am going to share some reflections on concealment and camouflage.
In 1848 the British Army in India began to use khaki-coloured garments. “Khaki” is an Urdu word meaning “dusty” and the colour was a light beige, tan or dull pale yellow. The pioneer behind this was an officer called Hodson and it is notable that his early correspondence refers to the uniforms as mud or dirt-coloured, with the intent to make his troops  invisible in a land of dust. Some garments were made by dying white items with tea. Garments that won’t show tea stains are only prudent for a British soldier, of course! Many garments were made from a cotton cloth called “khaki drill” and this name is used for the colour, the fabric and the uniform items issued in it. The British army at the time was a major influence on military fashions and many other nations adopted khaki, particularly for tropical wear.
In 1902 the British Army adopted a new service dress. Woollen cloth is generally not suitable for printing with camouflage patterns, so a single colour was required. (bear in mind the term camouflage did not come into use until during the First World War). The colour chosen for the 1902 dress was a hue intermediate between brown and green. Some paint manufactures call this hue “khaki drab” but it is commonly referred to as just “khaki”. Incidentally, the term “khaki” has become virtually useless for describing a colour. Imperial Japanese Army woollen uniforms are described as “khaki” but are closer to an ochre than khaki drab. Just to confuse things further the IJA used khaki drill for summer and tropical wear.
The colour of the new 1902 British Army service dress was also used for the later battledress. It has been described as matching the colours of heath and forests of the United Kingdom fairly well”. Most other nations adopted uniforms of a similar hue.
It seems to be deeply rooted into our psyche that nature and countryside is “green”. In actuality, a few days of military operations tend to render an area less verdant than before. Artillery, vehicles and boots soon create more mud than lawn. Green is also seasonal in temperate climates. Even in summer green is rare in some rural terrain such as rapeseed fields or ripened wheat. Hodsons original idea of mud or dirt-coloured uniforms is more logical.
The selection of khaki drab was also based on the assumption that most fighting would be in rural areas. The Spanish Civil War indicated that urban areas would be important battlegrounds. Urban terrain negated many of an attackers’ advantages in aviation, artillery and armour.
Below is a suggestion of what battledress might have looked like if it had been designed for both rural and urban use.
That urban operations are not exceptional has still not fully penetrated the institutional military mindset. For several decades British troops in Northern Ireland wore dark green DPM. When the US Army tried to develop a Universal Camouflage Pattern at the start of the 21st century it chose the colours sand, grey and green. In practice UCP appeared to be several pale greys that blobbed out into a light man-shape that stood out against most terrain. Equipment such as webbing and pouches that will be used in a variety of environments also tends to be made with green predominating.
If we are choosing clothing for concealment it is most logical that we choose hues that will work well in both urban and rural terrain. Generally this means neutrals such as the duller, lighter shades of browns, beige, greys, yellows and pale blues. Lighter shades counter body-shading and in certain conditions will reflect light from surrounding terrain.
Should you choose monocolour or camouflage patterns? In some environments camouflage can attract unwelcome attention which can be counterproductive. Prudence suggest that you have at least one ensemble of mixed monocolours. In a rural situation natural materials can be added to this outfit to disrupt the shape and better fit in with your surroundings. If you are in an area where there is lots of green there are green things growing you can use. The WW2 Japanese were noted for their effective camouflage but did not widely issue any camouflage pattern items that I know of. Instead they used nets and natural materials over their green or khaki gear
When buying items in camouflage patterns some prudence needs to be exercised. The primary task of camouflage clothing is shape disruption. The size and shade contrast between elements is far more important than the hues used. Many modern camouflage patterns neglect this fundamental, and often come up with all sorts of technical sounding snake-oil to defend this. The British MTP is a good example of a poor modern pattern. At more than a few metres the small colour elements merge and you see an obvious khaki drab man-shape, unlikely to blend with the background unless you get an exact match of hue and shade. Many older camouflage patterns tend to be too green and too dark for many environments, the latter made worse by body-shading. A good pattern needs contrast between elements and needs some of those elements quite light to counter shading and create the illusion of negative space.
You may be better buying some cloth or a garment of a suitable light neutral shade and adding your own pattern. See previous blog posts for ideas.
Below is a camouflage pattern and palette that I have been toying with. It is intended for both urban and rural use. In a verdant environment green can be added in the form of natural materials.
Any camouflage pattern on a cloth is only the foundation for your camouflage. You must add 3D elements too. Some of this is local and natural materials. If you are in a forest you might add bracken to your headgear, pack and shoulders. If you move into a wheatfield you dump the bracken and replace them with bunches of wheatstalks. 3D is also provided by textiles. Your cape or smock should include various scraps of fabric sewn to it that disrupt the shape and smoothness of the garment. These ideas have been covered in previous blogs.
The above advice comes with a caveat. Three environments occur to me where there may be alternate choices to the yellows, greys and browns suggested above.
The first is in snow, where predominantly white camouflage may be needed.
The second is in urban environments where red brick is the main building material. Many urban environments use a variety of materials so browns and greys serve well in most situations and do not look out of place near the occasional red surface.
The third is in rainforests, be they temperate or tropical. Brown-based items can work here if they are combined with local materials. This is, however, an environment where green-based camouflage patterns or pale green monocolours may be a more practical choice.
Categories
Phillosoph

Easier Entrenchment?

In Tom Wintringham’s “New Ways of War”, he states that the first lesson to learn is how to take cover. That is pretty good advice in general!
Recently I was thinking about entrenchments. When a soldier halts and expects the enemy, he is supposed to create a shallow trench he can lie in. This rendition of a Soviet soldier nicely illustrates the process:

Military men often have a tendency to try to refight previous conflicts. Things get done a certain way because that is the way they have always been done. This may fail to take account of changes in tactics or technology.
In some 1940s field manuals one can detect concerns that about the vulnerability of entrenchment systems to contemporary artillery. It is suggested that attention should be paid to camouflage to prevent them being targeted.
Within a few decades we are likely to see weapons that can recognize and specifically target foxholes and weapon nests. They may even be able to distinguish those that are occupied. 
In the modern era of aerial and satellite reconnaissance, hiding the location of entrenchments is problematic. There is little point in camouflaging the final position when the construction process has been observed and logged. Extensive entrenchments may only be practical if constructed in covered areas such as urban locations or woodland.
In more practically orientated forces, hasty entrenchment may be more usual.

Hasty Entrenchments

There is an implication that the trench should point in the direction of the enemy.
In actuality, the trench may be orientated so the soldier can fire obliquely, with the majority of the dirt placed between him and the enemy’s approach.
The hasty trench is about half a metre deep, as wide as the soldier needs and has one end constructed as a firing position with elbow rests etc.
The earth mound should be about 1.5 metres/5 feet thick to deal with bullets such as the 7.62 x 51 mm and 7.62 x 54 mmR.
This illustration from an American field-manual better illustrates the latter point. The prone position is the most stable firing position so should be used whenever possible. Many of us are not symmetrical in our most comfortable prone position so the angle of your shallow trench should reflect this if possible.
In theory, a soldier should continue to dig his hasty firing position, deepening the hole to make a kneeling and then a standing position.
The position is constructed so the soldier can still rest his elbows, so theoretically a foxhole is a better firing position than standing or kneeling when in the open.

Deliberate Firing Position

Field manuals show what a “deliberate” fighting position should look like.
Typically, it is a rectangular hole perpendicular to the line of enemy advance. Turning a shallow hasty position into such a construction seems to involve a lot of earth moving!

Improving the Hasty Position

Perhaps there is a better way?
Once you have dug your hasty prone-firing position and camouflaged it, leave it alone! Instead, ramp the rear end downwards and construct a slit trench, 60-75cm wide and 1.5 metres deep. Given time and materials give this overhead cover. Creating a seat means less earth to remove and this can also serve as a fire-step.
The illustration below shows something along these lines. Two prone-firing positions have been extended back and down and the deep area provided with overhead cover. This works well on a slope.
A variation is to dig a pit about 2 metres deep at the foot of the prone position. This acts for drainage. The slit trench is then dug radiating out from this well.
This method allows for vagaries of the terrain and creates a less regular shape when viewed from the air. The slit trench can be extended to create a communication trench if needed.
Below is a WW2 example. A relatively shallow fighting area for the infantry gun. Deeper, narrow armour protection/slit trenches to each side.
This approach provides a protected firing position and a deep protective shelter against bombardment and armour.
It would be interesting to do some time and motion studies to see how this method compares to the traditional “make everything deeper” approach.
It should be remembered that digging deeper is proportionally more labour-intensive than a shallow digging. Considerably extra energy is expended moving the earth up out of the hole. This is even more problematic if the soldier is working alone or lacks a container such as a sandbag or bucket.

Loopholes

The above raises another question.
When loopholes are made in buildings, they are usually positioned so that a standing solider can use them. Given a prone position is superior, would it not be more logical to cut them lower in the wall?
Building windows are naturally targeted by enemies, so loopholes at the same level are more likely to catch stray rounds. Placing the loopholes lower would reduce this. Also, loopholes at skirting board level are much easier to cover with a sandbag or two when not in use. Something to ponder!
The image above is from a Home Guard manual. Note the two corner men are prone and this allows more efficient strengthening of the walls. The MG team fire out the window, although they are positioned behind an interior wall and use a loophole.
Ideally, wire defences prevent an enemy getting within grenade range of the house. This is seldom practical.
Low loopholes should have a small trench below them outside. Grenades that hit the wall and fall down will explode in the trench beneath the level of the loophole.

Hasty Positions and MRE Boxes

“I hate digging fighting positions, I really do. hate it with a passion. Particularly those full length armpit-deep types. Why? For the same reasons as you. It takes damn too much work, too much time, and too much out of you. And by the time you get around to completing yells, 'Let's go! Fill'er up, pick'er up and move out! Am I right or wrong?
Don't misunderstand me, I know the purpose of a fighting position, they're to protect against small arms fire, indirect fire (art, mortar & fragments), tanks, etc. They're designed to give a defender a better chance of survival during an air or ground attack when the bad guys want to take over your estate property.
As a Ranger. I only believe in hasty, prone, dug-in fighting positions versus those armpit deep ones. Why? Well. just because they're easier. faster, and take less strength to build. But because a soldier can rest and shoot better in a prone position than a standup arm-pit deep position. How in the hell can you sleep standing up? You obviously either have to crawl out of it to sleep, or dig another position just for your sleeping gear, right?
Every time our unit was told to dig in, I didn't question or ask, "What type?" I instructed my men to start with the hasty prone position until they're told differently. If the Commander or 1 SG didn't come by to check up on us, we were good to go! If we were told to go all the way- (AIRBORNE), we just continued digging.
But you know what, it's too damn bad that the MRE cardboard box doesn't come in another color. Wouldn't it be nice if half the box was woodland camouflage and the other half desert camouflage? You just turn the box over to match the surrounding terrain. side you don’t is the part that's facing down or in towards you.
Would it work? Why not? You'd only have to fill up boxes with dirt or rocks and start sucking. You could build a bunker Or even a defense wall, they'd be as good as any sandbag, and be like playing with toy building blocks except bigger. [see “gabion”] But they wouldn't be water proof unless a chemical was added to make them water resistant.
The MRE box would also be a lot easier to dispose of in the field. Troops would fight over boxes because they know it would save them time in digging a position. Think about it, as you fill the boxes with dirt, you're also digging a hole. You wouldn't have to dig down far like a regular armpit fighting position. What do you think?”
Ranger Digest IV, p.66

19th Century Hasty Positions

The 1870s trials of Rice’s trowel bayonet mention earthworks thrown up in under twenty minutes. At the end of the report is an attached circular instructing troops how this may be done, and some illustrations.
“The soldier should dig a hole six or eight inches deep, and about twelve inches in width across the top, scraping the earth out to his front; he should then thrust the bayonet into the ground from four to six inches toward himself, from the edge of the hole, pressing it downward, and working the bayonet from right to left, so that the edge of the weapon will cut through the tough sod or other surface.
1873 trowel bayonet from https://worldbayonets.com/Bayonet_Identification_Guide/United_States__19th_Century_/us_19th_century_2_page2.html
The blade of the bayonet having been thus worked into the earth some six or eight inches, it will be pressed forward (using both hands at the handle), thus breaking off large pieces of turf, or other compact earth.
The soldier will work in this way, moving backward, until he has broken the ground from three to five feet from the edge
Of the hole; he will then turn or face to his right, take the point of the bayonet in his left hand and scrape all the loose earth to his left, the bayonet pointing from him, making there with a parapet to the front. If the ground is such that after having thus worked backward some three or four feet the men are still in line, the odd or even numbers should be directed to turn to their right, and scrape the earth toward and upon the parapet; this, however, will depend upon the kind of soil in which the line may be working.
A few trials will teach the men the best methods of working and of aiding each other in different soils.
While the men in ranks are busy throwing up the work, the sergeants, or file-closers, should be placing any available obstructions on the work to strengthen it, as logs, Stumps or fences, or may cut sods for-loop-holes, or collect branches to plant on the parapet for a screen ; and, if the trench be thrown up on grass, may cut turf to cover the parapet, so that it may not be distinguished at a distance.
If such materials be abundant enough to render it advantageous, the rear rank, or a portion of it, or if in one rank, certain sets of fours or numbers, may be directed to aid in this portion of the work.
In this way the intrenching would be carried on along the whole front, with the assistance of all the soldiers…
…The trowel bayonet requires the digger to work on his knees. This is but a slight drawback when the work is of short duration, and it is even an advantage when it is being carried out under the enemy’s fire as a man offers in this way a smaller mark for bullets and shrapnel.
Although but little used to earth-works, infantry soldiers who do not work long enough to get tired will attain a great rapidity of execution for it will be to their interest get quickly under cover.
Skirmishers Making Shelter-pits.
Men skirmishing should be able to make cover for themselves. In most instances the men will only have to improve natural cover, but it may be necessary to dig small pits, and each be for one set of fours or for one man only. In a few minutes he can in this way render himself almost entirely safe from the enemy’s fire, and at the same time aim correctly, using as rest either both his elbows or his left one only.
After a little practice, each man will soon ascertain the exact form of pit that suits him.
The depth need not be uniform, should be about ten inches where the man’s body will be, and about six inches in the other parts.
If time admits, a small mound of earth may be built up on each side of the spot on which the barrel rests, order to give cover to the head, or the parapet may be made thicker and the trench deeper. Natural cover should always be taken advantage of when possible. Sometimes it will suffice of itself; sometimes it only wants a little improvement.
It is a known fact that a well-protected skirmish line can easily drive back a line of battle.”

Categories
Phillosoph

Tactical Trowel

As regular readers will know, I am interested in various survival tools and feel that digging ability sometimes does not get the attention that it deserves.
Yesterday, while researching another topic I came across this interesting item.
I like the rubber handguard/ belt hanger, although a more tactical mid-brown colour would be welcome. I am a little baffled by the reversible feature. I’d be quite happy with the hook in just one position and the head and shaft as a single piece. The other main modification I would suggest is that the shaft end in a pommel or similar widening.
I would probably not issue a 13 inch entrenching tool to an infantryman but this could be a good item for combat engineers, survivalists and campers.
The handguard/ belt hanger idea may be worth looking at. An add-on piece that could be attached to larger tools might have potential.
Categories
Phillosoph

Home Guard Camouflage by Slater

Recently I have been reading some more Home Guard manuals. Camouflage and fieldcraft were something that the Home Guard took very seriously. They were some of their major defences against the superior firepower of fascist invaders. In previous posts I have referenced “The Home Guard Fieldcraft Manual” by Maj John Langdon-Davies. This is recommended reading to anyone interested in camouflage, not just in the context of WW2 Home Guard. Another notable publication was “Home Guard for Victory” by Hugh Slater. His section on camouflage is only a few pages, but well worth a read. Since this book is not available as a reprint and I have been unable to locate an electronic copy I will take the liberty of reproducing the relevant pages below. If you think your pickup is a little too conspicuous the section on camouflaging cars will be very useful. Many military vehicles could learn from this section.
(Incidentally, I’m very impressed at how well the free “a9t9” OCR software handled the small type in an aged 1941 book!)
CHAPTER XIII CAMOUFLAGE
CAMOUFLAGE WAS ORIGINATED some time in 1915 by a small group of young French artillerymen who in civilian life had been cubist painters and associates of Picasso. As painters they had been experimenting for some years with those problems of form which seemed to them to arise from the work of Cezanne. As light field artillerymen they very soon found themselves to be the bull's-eye for the enemy guns, and they applied their civilian knowledge to the problem of concealing their battery from the enemy's artillery observers.
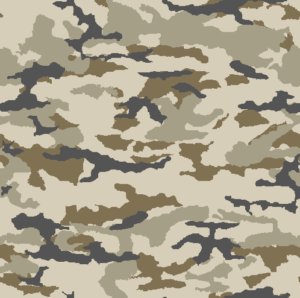
Camouflage covers both concealment and disguise. Any object is seen and recognised first by its form, next by its tone, and then by its colour. The first problem, therefore, is to find a way of breaking up or changing the form of the object you are going to camouflage. Form is indicated to the observer by the shading of the object and the shadows which are cast. To alter the form it is necessary to disrupt and change the normal shading by which the form is shown, and either to eliminate or to alter the shape of the shadow cast by the object. In order to alter the shape of the thing you are camouflaging, disruptive patterns must be painted across its form, using sharply contrasted tones in a line against one another, shading away into one another between. See Diagram 21.
In the distance colour tends to fade, while tones may become more pronounced. Therefore the best way of disguising the shape of an object from an observer at a distance is to use sharply contrasting tones cutting across its shape. All colours fade in the distance, but yellow is the first to lose its saturation, then red and finally blue.
Blue has a greater saturation some distance away than it has near to. For this reason, when camouflaging (for example, a block-house sited on the side of a hill with a wide view, and therefore visible from a considerable distance) the colours used will be yellowish-greys and warm browns with an absolute minimum of blue. Where it is a question of camouflaging an object that we may expect will be seen by the enemy at short range, yellowish colours will not be used, but cold bluish colours will be the most appropriate. In neither case should red be regarded, as a general rule, as a particularly successful camouflaging colour. Pitch black is always very useful.
Obviously the second, though not less important, problem of camouflage, after the question of the disruption of the form of the object has been considered, is to make it merge into, and become part of, its background. Appropriate colours will be used according to where the object is, in a town or in the country. It will be remembered that country colours change quite considerably at least four times a year. In the spring there are yellowish colours, in summer green, in autumn brown, and in winter grey.
In towns, more red may effectively be used. Patterns in towns will tend to be more zig-zag and less curved. Generally speaking white is a bad colour to use in camouflage, but it is not possible to lay down any absolute rules, White could be an excellent way of camouflaging a pill-box in front of a white-painted house in a town.
Light tones are also useful for neutralising any constant dark shadows, such as the shadows at the bottom of fairly deep trenches. In this case, rabbit-netting with fairly light scrim can be most valuable. As a general rule the under sides of objects should be fairly light. In the case of a cubic pill-box the sides should always be painted lighter than the top, and the north side should be the lightest of the four sides, because it is on the one that may be expected always to be in shadow at any hour of the day.
Paint is not, of course, the only way of camouflaging. Very often all sorts of nets and structural methods can be most useful. Symmetry is generally the most obvious giveaway of any position. There is, therefore, every reason why pill-boxes should be deliberately built all sorts of odd shapes. The fact that they are generally either square, round or octagonal is more of a disadvantage than otherwise.
CAMOUFLAGING CARS
If we apply these principles to the camouflaging of motors, it will be seen that contrasting tones should be painted diagonally across the car. They should be shaded off into one another to spoil the car's form. See Diagram 22.
The roof of the car should, in general, be darker than the sides. The paint used must not shine. Because cars may be expected to be used both in towns and in the country, and at all times of the year, neutral colours should be used. There are, however, on the roads today many khaki cars which, although it is clear that they are intended to be camouflaged, are perfectly obvious, either from the air or the ground, because the tones used are not sufficiently contrasting to have altered or disrupted the tell-tale form to the slightest extent.
The most conspicuous part of any motor car is the shining windscreen. This can be camouflaged by fixing painted expanded metal right across the outside of the glass. This does not interfere to any great extent with the ability of the driver to see out. The wheels and the tyres of a car are also very characteristic and conspicuous shapes which are often neglected, and may give a car away.
From the air, the greatest danger is the shadow cast by the car on the road, which outlines it exactly to the enemy airmen however well the car has been painted. Cars should, therefore, always be parked on the side of the road where there is a broken surface, such as long grass or a pile of stones. Thus the shadow falling on the ground will have jagged edges, and the silhouette will be broken up.
CAMOUFLAGING BLOCK-HOUSES
First of all, the block-house must be toned and coloured to merge with its background. It will, however, be remembered that we have got to assume, under modern tactical conditions, that the enemy may approach from any direction. From different angles, the background for a particular block-house may be completely different.
This means that camouflaging such positions is very far from a simple matter. The first thing to do is to spoil the block-house's symmetrical shape (although it ought not to be symmetrical, it nearly always will be).
This can best be done by leaning bits of wood-railings and sticks up against it and destroying its silhouette. The loopholes of a block-house will always look like pitch-black rectangles from the outside. Therefore rough black patches should be painted across the loopholes. See Diagrams 23 & 24. Another way of disguising loopholes is to hang netting with light scrim across them.
 
To the aerial observer, one of the most obvious ways of spotting block-houses, or an artillery position, is to look for worn tracks and footpaths that seem suddenly to end, or for two or three of them that converge at a given point. It is all too easy to make the mistake of wearing a  track up to your block-house, because the occupants will naturally tend to come and go the same way, One way of handling this is deliberately to hoe up behind the blockhouse, an artificial path, continuing the real path, so that it becomes, to the airman, a perfectly innocent footpath  from one side of a field to the other.
PERSONAL CAMOUFLAGE
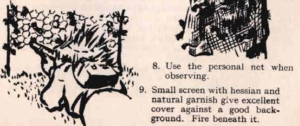
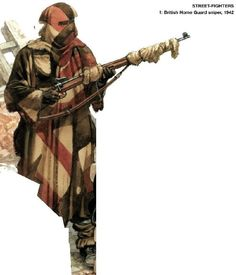
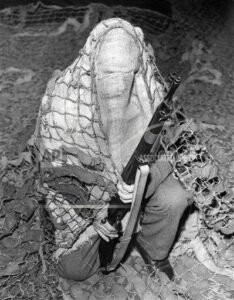
When considering the camouflaging of a scout or a sniper, it will be remembered that his most conspicuous parts are his steel helmet (which is symmetrical and shining) and his face, which, however sunburnt, is always very light in tone. His hands are also conspicuous. The helmet must be painted a matt colour, and disruptive black stripes may be drawn across it. Another way of camouflaging the helmet is to buy at a ladies' hairdresser an old-fashioned hairnet or snood, into which feathers and bits of rag may be fixed for scrim. For raiding parties at night faces and hands should be made black. This can be done either with burnt cork or, better still, with grease paint. During the day, patrols likely to run into danger may find it useful to draw a black stripe across their faces with grease paint. A more simple means of covering the light tone of the face, particularly for anti-aircraft riflemen, is the use of an ordinary khaki handkerchief folded into a triangle and tied across the face just underneath the eyes, covering the whole of the lower part of the nose and the mouth, chin and ears. See Diagram 25.
CAMOUFLAGING BRIDGES AND RAILWAY STATIONS
Because it is almost impossible to conceal the tracks leading into a station, or the river over which a bridge runs, it is difficult to prevent the enemy pilot from finding the bridge or station he is looking for. A determined enemy, prepared to make sacrifices, can, by diving low, secure the necessary direct hits-always presuming that he can see the object he is aiming at. To camouflage bridges or stations, therefore, a method must be found which makes it impossible for the enemy to see his target. Probably the best solution of this problem is to put up a smoke screen over the bridge to be protected. The generators should be placed in a circle at a radius of about half a mile from the bridge or station, and ignited along a segment on the windward side of the vital point. In this way an opaque screen one square mile wide can be placed between the bomber and his target. It would be impossible for him to score direct hits except by the most extraordinary good luck.
Categories
Phillosoph

Capes for Camouflage

Version 1.2
The 1944 book “Infantry Training-part VIII” reminds us:
“…camouflage should never be treated as a "specialist" subject, but as part and parcel of every tactical move, for it deals with what the enemy sees of that movement.”  Paragraph 14, page 8.
When it comes to personal camouflage the modern soldier is faced with several obstacles.
    • Many armies have adopted “designer label” patterns that do not live up to their inflated hype. Many modern patterns lack the element size and element contrast necessary to break up the distinctive human shape. At realistic viewing ranges the colours merge to create a brown-green man-shape. In addition to this problem there is often a failure to provide the serviceman with apparel in appropriate designs for the area where they will operate. The British army operated for decades in urban Northern Ireland wearing predominantly green and dark brown camouflage. Similarly, troops operating in desert environments have had to spend many years wearing distinctive black or green equipment and body armour. The latter problem could easily have been solved by use of a simple hessian smock or apron.
    • Modern combat gear tends to be overly tailored, in some cases being form hugging. This exacerbates the problem of the soldier being a distinctive man-shape. Close fitting clothing also may restrict freedom of movement, inhibits air circulation and limits the insulation that can be worn beneath it. “Camouflage uniform” is a military oxymoron. The soldier in the field should look as far from the crisp, parade ground ideal as possible.
    • Often the soldier is prohibited from camouflaging his weapon, or is reluctant to do so since materials must be removed for parades and inspections. This provides a distinctive shape for the enemy to notice despite any other camouflage measures the soldier may have taken. Knee pads are usually worn outside the trousers, providing another distinctive shape. Combat trousers should be sized so that knee pads can be worn underneath them, providing both better camouflage and air circulation. If you are worried about the knees of your trousers getting holed simply patch them with a double or triple thickness of material.
    • Any camouflage patterned cloth is only the foundation of personal camouflage. Three dimensional elements need to be incorporated. Some of these will be local foliage and some will be textile additions. A helmet cover printed with a camouflage pattern may still leave the helmet as a distinctive hemisphere. The cover does nothing to obscure the straight line of the brim or the regular shape of the helmet. Many helmet covers have very little provision for adding natural foliage. Other combat clothing and equipment seldom has provision for mounting foliage. Even in deserts where there is little vegetation the distinctive shapes of helmets, shoulders, pouches and packs needs to be disrupted.
Outdoorsmen, preppers and survivalists are not subject to the military regulations that often hinder a soldier but we often find ourselves influenced by what the military is doing, and sometimes this is not a good thing!
Recently I have been thinking about “un-uniformity”. I have also been considering how camouflage items will interact with other equipment present. Wearing a smock or poncho over your body armour solves the problem of distinctive shape and inappropriate colouration. There have been smocks that were intended to be worn over webbing gear too but it was found that soldiers generally prefer to have their ammunition outside. These pouches have a regular shape and they often create shadows in the chest area that are darker than the surroundings. The upper edges tend to catch the light, forming distinct straight edges. This is another area where 3-D camouflage measures should be applied.
The solution that I am going to propose is a little unconventional, but logical. Effectively, this is an improvement of the Viet cong cape seen in an earlier post.
Firstly, acquire a piece of material about two metres long and one and a half metres wide. Material is often sold in pieces of about 1.5m/ 60" width. This cloth should be of your preferred camouflage pattern. If you cannot acquire this then a couple of metres of hessian/ burlap is fine. You can paint a pattern onto this later.
Fold the cloth widthwise, then cut a curve between two opposite corners. You do not have to be particularly neat with this. When it comes to camouflage irregularity is good. You now have a half-oval shape, two metres long and one and a half across. Save the two remaining pieces, we will use them soon.
Take your piece of cloth and drape it over your head like a shawl. If you are likely to wear a helmet or boonie hat when using the cape, put this on first. The long straight edge is at the front, the curved bit hangs behind you. Once you have finished pretending to be Emperor Palpatine, mark where you think the cape fastening should be. See the video below on how this is done. You want the front edges of the cape to cross over a little.
There are a number of options as to how you may fasten the cape. Our ancestors used a variety of hooks, pins or knots. For the modern user a fastex buckle and short length of webbing strap will probably be most attractive. This allows for a degree of adjustment and the option of quick, one-handed release. Sew the ends of the straps to the inside of the cape. You may like to add a couple of lengths of cord inside. These can be hitched to your webbing and used instead of or in addition to the front strap. They can also be run down the front of your chest and tied behind your back.
Next, you have to sew a few centimetres inside the edges of the cape. We want the edges of the cape to fray. We will even be cutting the edges into tassels. But we do not want this to spread too far. Frayed and tasselled edges help break up the shape. They may even help the cape dry when wet.
The brim of the hood will need some work to make it less distinctive. Take one of your remnant pieces and use some of it to make a fringe that can be sewn into the brim. This should hang at about eyebrow height and will help put your eyeglasses in shadow to minimize reflections. The bottom level of the fringe may vary with headgear worn. Add buttons or poppers so you can shorten it if this is the case.
The next phase is to add the textile 3-D elements. The trick here is no to overdo things. We are not creating a heavy, full-blown ghillie suit. Natural materials will also be added to the cape and “overgarnishing” will attract attention instead of the intended purpose. It is possible to add textile elements in ways so that they also provide attachment points for foliage.
Sources for textile elements include:
    • Camouflage cloth. The remnant pieces you saved. Off-cuts. Cheap camouflage tee-shirts. Children's clothing. Old or damaged camouflage clothing. Non-official or captured clothing etc. A lot of camouflage is too dark once you place it around a convex human shape. Light coloured patterns such as pieces of desert cloth can help make your cape and its contents appear less solid. Green is less common in nature than is generally assumed. Capes intended for autumnal and semi-arid environments should go easy on darker greens.
    • Monochrome cloth in neutral and appropriate colours. Greens, browns, beiges, greys.
    • Hessian/ burlap. Sources include non-synthetic sandbags and gunny sacks.
    • Jute, hemp and raffia fibres.
    • Scrim
    • Pieces of camouflage net and/or artificial foliage from a net.
There is no need to seam any of these items. Fraying adds to the disruptive effect. Short pieces of material tend to stand up, longer pieces droop. Use more shorter pieces in area likely to be uppermost, such as the top of the hood, shoulders and the back. Remember you may be prone when using the cape, so include some “uprights” on the back.
Keep patches of netting and similar materials small. In heavy undergrowth these may get caught. In very heavy undergrowth the cape is easily removed and can be packed away until there is less cover.
The camouflage cape is not intended to keep you warm, or keep off the wind and rain. It is for camouflage. What you wear under it should handle these other duties.
When worn the cape covers the chest rig and any other equipment worn here. If a weapon is carried at “Rhodesian ready” or a similar position it will also camouflage the weapon until it is brought into action. The cape also covers and camouflages any rucksac or backpack being worn. This is one of the reasons the back part is cut longer than the front. When prone the cape will also cover most of the wearer’s body.
When the wearer is stationary the upper part of the cape can be pulled up over the wearer’s head like a shawl. obscuring the distinctive head and shoulders shape. When moving the “hood” can be thrown back, but its folds still help disrupt the shape of the shoulders. Unlike a conventional hood the folds of the cape can be arranged so that they will not catch on low-handing branches.
When not worn a cape can be rigged to create a hide or windbreak.
The cape can easily be replaced, making it practical to carry several capes with alternate patterns for different terrain or time of day. It is possible to create a cape with a different pattern on each side but I suspect it is not practical to incorporate textile 3-D elements on both sides, making one side secondary rather than alternate. The exception to this may be a snow cape with one side pure white and the other in a broken snow pattern. The doubled layer of cloth might prove welcome in such conditions, too.
Soldiers using capes in the snow. The agal-like headband keeps the cowl in place where moving. The headbands may also be a means of identification, necessary when both sides wear white. In warmer climates such headbands can also mount foliage.
The camouflage cape will work well with any other camouflaged items you may be wearing. It will probably work fairly well with non-camouflaged items, if they are of a reasonable hue and shade. It is not the whole story, of course. You will still need suitable headgear and facepaint/ mask/ headnet/ veil/ scarf/ neck gaiter. Your chest rig will be exposed once the cape is opened. Your chest rig should be of a light shade, overall, to counter body shading. Desert patterns such as British two-colour DPM, US “chocolate chip” and “coffee stain” and Tropentarn are good camouflage patterns for chest rigs. Add some tufts of textile to further break up the pouch shapes, remembering the top edges will catch the light. The front of the camouflage cape is dimensioned to not interfere with the movement of the legs so camouflaged trousers and/or gaiters are prudent.
Categories
Phillosoph

Improvised Lock Picking.

No-SPP Hook Picking.
The chances are that if you ever have to pick a lock “for real” you will be away from your lock pick kit. What tools you have you will have to improvise. It is possible to create a rake or half-diamond by bending in a key-way but it is more likely you will have to use some form of hook.
This does not necessarily mean you have to use single pin picking (SPP). There are a couple of things you can try before you resort to this.
The first is “go deep!” I have discovered many of my locks will open if I move a hook about at the very back of the key-way. Apply light torque as usual, then reach deep and hook upwards. This may act on the final pin, another part of the lock mechanism or some combination thereof. It may be a statistical abnormality that my particular collection of locks can be opened this way. It is something worth trying. This also suggests that some of the bypass techniques that a razor pick or mini-knife are suggested for may also work with a stout hook.
The second technique is rocking. I have mentioned this in previous posts but it is worth repeating. Rocking is my favourite techniques for using a rake but you can also try it with “non-rakes”. To rock with a hook invert it so it curves away from the pins. Apply light torque and see-saw the inverted hook up and down in the key way.
The third “no SPP” hook technique is called “zipping”. You will also see it called “ripping” or “dragging”, although these terms imply a level of force or violence that is not needed. Like so much lock picking, a lighter touch often yields better results. Zipping is a raking technique. Apply torque and insert your hook. Withdraw the hook, running the tip across the ends of the pins like a stick on a railing. It is worth trying this several times, varying the pressure, torque and the speed you withdraw the hook.
Sometimes these techniques will set some pins but not others. If you suspect this happening keep the torque applied so the pins do not reset and experiment with different combinations of the three.
Jiggling Small Locks.
Readers may recall how I acquired a very small lock to test my finger rakes on. The main problem was finding a turning tool small enough to fit in the lock in addition to the rake. Luckily I had a piece of hair pin I could modify. Yesterday an alternate approach occurred to me. I inserted just a rake in the key-way and used it to apply turning force as well as moving the pins. Effectively I was using the rake as a jiggler key. This is an option to bear in mind when dealing with very small locks. You need a fairly rigid rake to do this, such as a Dangerfield Bogota. Most picks will be too flexible and you risk breaking them.

Carry Hair Pins.
Add some hair pins to your lock picking, tool and emergency kits. They have numerous uses.
Final Tip.
I have said this before but it is worth repeating. Lock picking tends to be the antitheses of brute force. If something is not working the solution is usually less force, not more.