Disclaimer: “As an Amazon Associate I may earn from qualifying purchases.” Adsense and Infolinks were no help at all.

If you have enjoyed this article or it has been helpful to you please feel free to show your appreciation. Thank you.

Read The Third Wave by Alvin Toffler!
Categories
Phillosoph

Webbing Gear and Ventilation

Recently I have been reading some new stuff on “cold-dry” or “snow” survival.
Dipping back into one of my older books, I noticed this caption on an image:
“Most soldiers trained in Arctic warfare prefer to keep their webbing attached to their backpack, rather than over their clothes, which restricts movement. ”
“Survival” (1988), Len Cacutt (p.124)
If it is acceptable to not wear webbing during Arctic operations, this suggests that it may be practical to do without many of the contents of the webbing during operations in warmer climes.
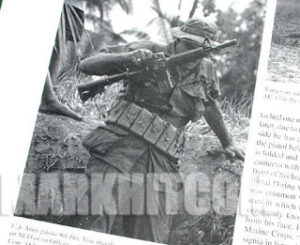
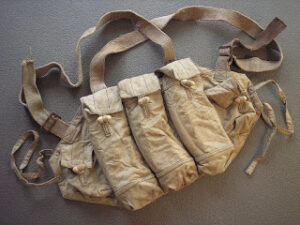
Given the date and origin of the book, the webbing referred to would be the British 58-pattern. Below is an illustration from the SLR-era. The following comments are still applicable to later systems and those of many other nations.
As can be seen from the illustration, webbing carried a lot of gear that was not immediately mission relevant.
Earlier in “Survival” there is a recommendation to “eliminate all non-essential items” (p.60). It then shows webbing loaded with wash-kit, stove, mess-tins, boot-polish, cutlery etc.
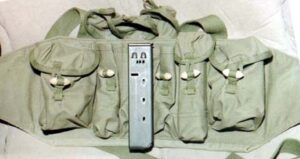
Part of the problem is the kidney pouches. Their large size is a temptation to load them up.
The pouches cannot be easily removed from the system when the weight they carry is not needed.
The position of the kidney pouches also hindered the use of efficient rucksacks that transfer the weight to the pelvis.
The consequence of all this is the webbing is heavy and bulky. It cannot be worn comfortably unless the belt is clinched tight, and it requires some system of yoke or suspenders.
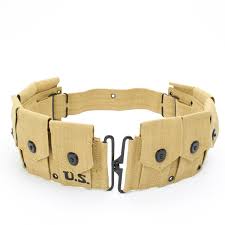
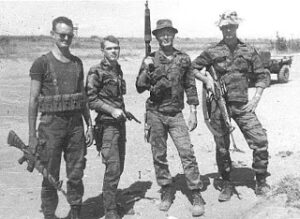
In the SLA Marshall loadout recently described, a notable feature was carrying the ammunition only in bandoliers. No equipment belt is mentioned. Presumably there is one, since the soldier had to carry a water canteen and possibly a pouch for his pair of grenades. However, this belt would be relatively light without 80 rounds (about 5 lbs) of ammunition weighing it down.
Note in the photo below the GI wears a belt without any clip-pouches and does not use suspenders.
WW2 GI wearing bandoliers
Reading about pulks produced a similar observation from a Dutch source:
“As a result, Marines are now carrying a heavy backpack while moving on skis in snowy areas. An additional disadvantage of a complete package on the man is that the function of the worn clothing is not fully utilized (breathing capacity).”
In sub-zero operations it is important to avoid overheating.
Condensing perspiration can soak into clothing, reducing its insulating capability and chilling the body. This moisture can even freeze within the clothing.
There are a number of solutions to this problem. One is to not wear too much insulation. Another is to pay attention to the permeability and venting of clothes. Sweat must be prevented or allowed to escape the clothing before it becomes cold enough to condense.
It should be obvious that venting, air-circulation and removing excess insulation will all be hindered by the torso being constricted by a system of tight straps.
Air-circulation and heat-loss remain important considerations in warmer or hot-climates too.
Not only is what we carry important, but how we carry it!
Webbing/Load Carrying Equipment should be reserved for immediate-use mission gear. Items that do not qualify should be removed to a backpack. A small pack, or the detachable side-pockets of a large pack, can carry items for a 24 hour or CBRN (Chemical, Biological, Radiological, and Nuclear) operations
Decreasing the mass and bulk of webbing gear to improve air-circulation will greatly improve soldier comfort and performance. As a regular reader so eloquently puts it, it “reduces sweating without the benefits!”
A simple chest/belly rig, as described here, should be used for the primary ammunition supply. This will have three two-magazine pouches and a couple of smaller pouches for up to six (standard size) grenades, for example, two smoke and four fragmentation grenades. The only other features of the rig would be a snap-link, map/dump pocket, small weapon-cleaning kit, flashlight carrier and a mounting for a pec-knife. comms and first field dressing.
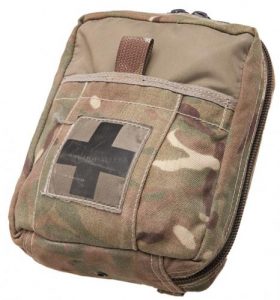
An equipment/waist belt would be lightly loaded with an CI-IFAK pouch and up to two litres of water.
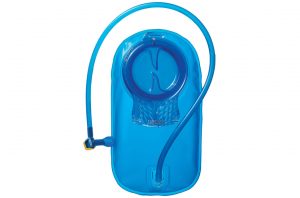
In sub-zero conditions, water might be better carried in a bladder worn under the clothing to keep it liquid.
Possible additions to the equipment belt would be a handgun, handgun-magazines, long knife and possibly additional grenades and rifle-magazines. Extra munitions may be better carried by other means such as a claymore bag.
This configuration leaves the back clear for the more comfortable carrying of backpacks.
Categories
Phillosoph

Soft-Core Pack: Military Version

The battle order suggested in the previous blog raises an interesting question: How does the soldier carry his poncho?
Items such as bayonets and ammunition have obvious places on the webbing.
Not only must a poncho be carried when not worn, but it must be protected from unnecessary damage.
The official solution was most probably to carry the poncho in the butt-pack. As I have discussed in previous posts, there are objections to using a butt-pack or similar. Its capacity is a temptation to carry extra gear. Its position makes it hard to easily access, and it is inconvenient if sitting in a vehicle for any time.

Military Soft-Core Bag

In a previous post I described my “soft-core bag”. This idea can easily be adapted to military applications.
The military version of the soft-core bag actually may be lighter than my version. Items such as the fire-kit, first aid kit and sweets can be omitted, since these roles will already be met by items hopefully carried on the soldier’s webbing or person.
For the same reason, the water-bottle in the soft-core pack can be omitted unless operating in particularly arid conditions.

Contents

What should the military soft-core bag contain?
• A poncho. This should ride at the top of the bag for easy access. If the poncho has its own stuff sack, add two three metre lengths of cord. Paracord stretches, so something non-elastic is preferable. Loops of cord for pegging should already be attached to the poncho side and corner eyelets.
• Accessory clothing items such as warm hats, work protective gloves, spare socks, bandanas, shemagh.
Many outdoor coats lack sufficient pocket space to carry such items, and you may need your pockets for more tactical items.
The soft-core bag is a practical solution. Wrap in plastic bags to waterproof them. The majority of these items would stay in the large pack. The soldier dresses in what he needs when he caches his large pack.
• A spare shirt, jumper, jacket or liner, “ranger-rolled”. Useful if the temperature drops or you reduce your actively level. Wrap in plastic bags to waterproof them.
• Toilet roll in waterproof bag. As well as the intended use, good for fire starting. Use a bag that can be sealed against water. A 100 ml bottle of alchohol hand-sanitizer may be added to this bag.
• A small notebook in a waterproof bag may be useful.
• Items such as cordage and space blankets are optional for the military soft-core pack. You may decide these are better carried in your trouser or shirt/jacket pockets.
• A “non-soft” item of equipment that might be carried in your soft-pack are your goggles.
These can get in the way if you are not wearing them. When not in use they need to be covered for camouflage purposes.
Stowing them in your soft-core bag is a very practical solution. Place them in the middle of clothing to provide padding and protection.

Carrying Bag

Like the other version, the military soft-core bag fits in a simple draw-cord bag. This is stowed in the top of your rucksack so the poncho or other contents can easily be accessed if needed.
When you stow your rucksack, you pull out the soft-core pack and wear it as part of your battle-order. When seated in a vehicle, the soft-core pack should act as additional padding for your back.
Nearly all of the contents of my civilian version of the soft-core bag may be fitted in one of the detachable side pouches of a bergen.
There is room for a water bladder and a few “mission” items.
Ideally, there should be provison to stow the mini-medical kit directly under the lid,
Tent poles that can fit down the sides of the pack, and a small bag of pegs would be useful. Currently I am not aware of any off-the-shelf shelter poles that break into sections of less than 32 cm.
The other side pocket may be used for NBC gear. When NBC (CBRN) is not a likely threat, the single side-pouch may be carried as a patrol pack.

Camouflage

Ideally, your draw-cord bag should be of an effective camouflage pattern.
A grey-beige-brown scheme may be more versatile than the green-dominant examples shown in the photos.
Sewing some textilage to the outer side is a good idea too.
If you cannot get a camouflaged example, a suitably neutral-coloured bag can be camouflaged with a few passes of spray paint.
Making a camouflage draw-cord bag will be within most reader’s capabilities. Note that the bags shown have carrying cords created by taking the cord down to eyelets at the bottom corners. If your bag lacks these, they can easily be added.
Dark or unsuitably coloured cords are easily replaced with something such as “desert-camo” paracord.
Categories
Phillosoph

Bandoliers for Budget Burdens

This interesting photo is from the Osprey publication, “Armies of the Vietnam War 1962-1975”.

Caption for the photo reads:US soldiers with Bandoliers

Soldiers of the 196th Light Inf.Bde., Americal Div., examine a VC cache near Chu Lai in December 1970. The abbreviated rifleman's equipment is typical of short-range operations at this period. Bandoliers are used to carry both magazines and grenades, and spare M-60 belt is looped around the riflemen's waists. The two XM203 grenadiers at the right wear the special grenadier's ammo vest; the man at far right also carries his rifle magazines in a spare canteen carrier, and ration toilet paper packs in his helmet band. Third from right has a Kabar knife sheathed in his trouser cargo pocket, and fourth from right has a civilian hunting knife on his belt.

A lot going on in that photo. The bandoliers used to replace, rather than supplement, the issue “ammo case” [pouch] are of particular note.
A previous blogpost discussed stripper clips or chargers. In this photo the bandoliers are being used to carry grenades and 20-round magazines.
More recent examples of bandolier can also accommodate 30-round magazines. In the photo below, a light-coloured thread is visible. Removing the thread makes each pouch deep enough to carry a 30-round magazine rather than a pair of stripper clips.
As issued, each pocket of a bandolier holds two ten-round 5.56mm strippers. Number of pockets varies between four and seven.
Bandolier with pull threadM16 Bandiolier
If you shoot 7.62 x 51mm (or 6.5mm Creedmore), you needn’t feel left out. Below is an Australian bandolier intended for use with the SLR/FAL.

Aussie Bandolier for SLR

Categories
Phillosoph

The Brooksbank Carrying System

I have talked about using Claymore mine bags to carry ammunition on a number of instances. I was therefore intrigued by this idea from 1943, called the “Brooksbank” method. All credit to Karkee Web for the images and information:

(a) The gas cape folded flat, about 10 in by 12 in, is put on first in the normal manner.

(b) The small pack is slung over the right shoulder and the two valise straps fastened (firmly but not tightly) over the stomach with the bayonet and frog on the right hand side, slung on the valise strap.

(c) The respirator is put on in the reverse alert position, i.e., the haversack goes on the back resting on the gas cape with the sling (shortened as far as possible) on the chest, with a piece of tape on each lower " D " on the haversack coming round to the front and with the left tape underneath the brace, through the sling, fastening on the right with a slip knot. (The right tape therefore will be only approximately 4 in to 6 in in length).

Commentary

Some clarification is in order. The “gas cape” or “anti-gas cape” was a protective garment against chemical warfare agents such as mustard gas. It actually resembled a long, sleeved coat rather than a cape. The model in use in 1943 was provided with long tapes so that the rolled garment could be carried across the back of the shoulders. No webbing was needed to carry the cape in this fashion. In the figure on the reader’s right in figure 1 the tapes of the cape can be made up coming up from under the soldier’s armpits and disappearing behind his neck. The cape could be quickly unrolled down the back and put on without unfastening the tapes. An excellent source of information on these items can be found on this video.
What is possibly not made clear is that the small pack would spend most of its time across the small of the back, and would only be pulled around the side when ammunition or other items were wanted. A photo of how just the pack would be worn is shown on this page.
The Brooksbank method was supposed to save weight. While it does away with the ammo pouches, belt and water-bottle carrier, the soldier still carries his standard haversack contents, plus finding some room inside for carrying individual and squad ammunition. Although called a haversack, not many of the recommended contents of the 37 pattern small pack were actual clothing. The interior was divided into two compartments, the forward one bisected by an additional divider. One forward pocket held the soldier’s pair of mess-tins, the other a water-bottle. Carried in the main compartment was a groundsheet, towel, soap, pair of spare spare socks, cutlery and possibly an emergency ration and cardigan. Below is a photo of a typical British infantryman’s small pack contents, taken from “British Army Handbook 1939-45” by George Forty.
Many of these items should probably have been left with the truck rather than being carried into combat. I recently read a 1940s manual on street-fighting and soldiers were told not to bring their haversacks into action. Urban environments had plenty of shelter so groundsheets and gas capes were not needed. Haversack items that might prove useful could probably be carried by other means.
The groundsheet carried at this time is of interest, since this would probably be of some variety of MkVII, and was designed to also act as the soldier’s rain protection. The gas cape was supposed to be reserved for the event of chemical warfare, but in practice might be used as a raincoat.
Many years ago, I travelled down Italy, my belongings packed in a sports bag. At one town I had to walk longer and further than usual to located accommodation. Even though I could swap over the shoulder I carried the bag on the uneven weight caused me to sprain one ankle, resulting in a rather painful couple of days. Since then I have always used rucksacs. I don’t know if that would have been a problem with the Brooksbank method, but do feel more though should have been given to what was carried, as well as how.
Categories
Phillosoph

Combat Carry: The Hippy Configuration

A friend of mine commented that Canadian troops were wedded to the idea of carrying at least six to seven magazines.
Recently, I was reminded that many water-bottle pouches can hold five or six 30-round magazines.
I also came across a comment pointing out that you do not want your magazine pouches where most troops actually carry them, at the front on the waist.
Lousy to crawl with them at the front, worse to fall on. Not so comfortable if you have to sit down, and many armies now have more drivers than infantry.
The latter is not necessarily a bad thing! A small force, well-supported, can achieve more than a large, poorly supported one. This is how many guerilla, terrorist and clandestine forces operate. There are relatively few “trigger-pullers” and a much larger number of support and intelligence-gatherers. Put the right person, in the right place, at the right time with the right tools.
Load-bearing equipment (LBE) tends to be designed with the infantry in mind, but most of its users will be signallers, engineers, gunners and drivers.
Thinking further, most troops reload with their weak-side hand. (It might be different for some bullpups, but seems true for the M16, AKM and their relatives).
It makes sense to have most of the ammo where the weak hand can easily reach it? Why not have a water-bottle/utility pouch of magazines on the weak side of the belt, at the side?
If you read my blog on chest-rigs. you may recall the four-magazine pouches for the AK issued by some armies.
Someone will object that all the magazines could get tipped out at once, so alternately, a pair of ALICE-type magazine “cases” that hold three magazines each. These would tend to sit at eight and ten “o’clock” on the belt (for right-handers), which may be more comfortable.
Most rifle-magazine pouches available nowadays hold two magazines, and a pair of two-magazine pouches will be less bulky. These four magazines constitute the primary reloads. Additional magazines can be carried in chest or sleeve pockets or other locations.
Some experimentation will be prudent. Pouches for three mags usually sit with the spines of the magazines towards the body. Side-on may be better.
Pouches might be more accessible orientated obliquely or laid horizontally. And we need to remember the soldier may need to reload while prone.
The above arrangement puts 4 to 6 lbs on one side of your belt or harness, but there is a logical way to balance this.
The soldier will use his grenades in his strong hand, so on the strong-side of the belt we put a pouch or pouches holding several grenades.
When throwing prone, you lay on your weak-side, so it is logical to have your primary source of grenades on the strong-side. Perhaps some frags at two o’clock, pouches for one or two cylindrical grenades such as smoke bombs at four.
Actual grenade load-out will depend on combat role and mission.
Alternately, a smoke grenade pouch can carry a 500ml water-bottle.
So far we have one pouch or pouches on one side of the belt, another set on the other.
Our soldier is well-armed, yet front and back areas of the belt region are relatively clear, allowing our soldier to comfortably sit in a vehicle or crawl if someone is shooting at him or he doesn’t want to be seen.
No bulky butt-pack or kidney-pouches at the back that hinder him (or her) carrying a rucksack, or wave at the enemy as they crawl.
The front of the belt can be used for relatively small, low-bulk items, such as a compass pouch and some shell-dressings. With a number of small pouches the front of the belt could end up looking like an old Garand ammo belt! (above)
For non-infantry, the front of the belt will probably end up carrying small specialist tools and items.
For some personnel the grenades and magazines at the side may be replaced by larger utility pouches.
The back of the belt is clear so far. This clearly contributes to comfort when seated in a vehicle or carrying a long pack.
Here I am going to revive my “camelbum” concept and suggest a second belt, mounting two pouches.
One pouch (clearly marked, and marked with blood group) contains an CI-IFAK (Combat Injury-Immediate First Aid Kit) for the soldier.
The other is a pouch containing a two-litre water-bladder dimensioned to fit inside. Having their own belt allows these to be worn rather like a bumbag. They can be added when in high readiness and shunted round the front or to a more convenient position when the soldier is seated or carrying a pack.
An entrenching tool or other tools can be shoved through the belt when needed, carried on the backpack when not.
As I have discussed elsewhere, carrying cases for such tools are superfluous, and have no place on the primary LBE.
A small, fixed-blade utility knife of about 25 cm loa. should be mounted over the weak-side pectorial muscle where it can be reached with either hand. See my books Survival Weapons and Crash Combat for more on this.
If a bayonet is carried, the logical place for it is on the weak-side of the belt, possibly mounted on the side of a magazine pouch in the manner of the British 58 webbing.
A larger survival knife such as a machete or kukri should probably be attached to the trouser belt, so it remains on-person should the LBE need to be discarded in an emergency.
The same is true of a handgun, which will likely be carried on the opposite side of the trouser belt. Field jackets and other garments should be modified/ redesigned so that tools and weapons carried in this manner are accessible.
This arrangement places the survival knife in the space between the magazine pouch(es) and the trouser belt, and the handgun behind/between the grenade pouches.
I have described this equipment configuration as mounted on a conventional LBE belt, but the basic concept should work with other carry systems.
Rather than on the waist, those weak-side magazine pouches might be mounted in the area under the arm, and this gives some possible alternate configurations. For example, three dual-magazine pouches mounted horizontally or obliquely.

Neck Dump Pouches

One currently fashionable item I have not mentioned above is the “dump-pouch” for empty magazines. What to do you do with those empty magazines?
If fitted with a cord pull-loop (as described in Survival Weapons), you can clip them onto a snap-link on your LBE or rucksack strap, although this may admittedly be a challenge while most of your attention is understandably on more pressing concerns.
Back in the day you might drop your magazines down the front of your smock or jacket, but this is difficult with modern combat-wear and armour.
The current solution is to fumble for a belt-mounted “dump pouch”, but the LBE belt is fairly crowded already and there may be more useful things that could use that space.
There is an easier, simpler, more efficient and cheaper option.
Take a sandbag and cut off the bottom foot or so. Save the rest for making textilage.
Hem the new top edge of the bag. You may choose to add a drawcord here at this step, although the cord is not needed for the dump-sack role. Elasticising the mouth will hinder the primary role.
Put a ring or loop at each top corner of the cord so you can tie or snap-link a strap or two to it. Straps should be easily adjustable for length, so should have some form of buckle. You may like to add a length of cord to each lower corner of the bag. These can be tied behind the back to stop the bag flapping around.
A sandbag is good because they are often readily available and the light tan colour is good for most environments. You can, however, make these bags out of any suitably coloured piece of cloth, including discarded or damaged combat wear and old tee-shirts. If you have access to a sewing machine, even a little cheap one, you can knock these bags out in minutes.
You will have to disguise the basic rectangular shape of the bag, so regardless of what you made it from, add some scraps of cloth and sandbag as textilage. Don’t forget the straps.
Some bold blobs of any suitably coloured and contrasting paint you have handy can be added too.
Adjust your strap so the bag hangs from your neck, at about chest level. Use the lower cords to keep it in place if you wish.
When you change magazines you can drop the empty into the open mouth of your neck bag.
The bag also helps camouflage your chest area. Since this area is subject to body-shading it helps that the basic colour of the bag is light. The neck bag will fit over a “reasonably-size” chest-rig while still allowing access to magazines.
The neck bag is a handy place to quickly stow anything else you come across during an operation. Bunch of materials or possessions that might provide intelligence? Drop them down your neck bag and examine them later.
When not in use a bag easily rolls up and can be kept rolled by tying one of the corner cords into a slippery hitch. A quick tug and the bag can be unrolled.
Such simple bags will provide useful for lots of other purposes. They are useful for foraging or supplying extra ammunition to crew-served weapons.
Add a pair of snap-on straps, or use one “Veshmeshok”-style and use as a simple rucksack.
Categories
Phillosoph

LBE, M-1956

My friend Ralph Zumbro had often referenced “the Pentomic division”, so recently I read “The Pentomic Era” by A. C. Bacevich. This provides an interesting insight into the politics and mindset that was behind this phase of Army history.

What the book does not provide is much detail on the actual organization of the Pentomic divisions. Thus, a few nights ago I could be found wading through an on-line copy of “Infantry”, 1957-1958.

One thing I came across was an article (p.34, April-June 1958) on the new “universal, individual load-carrying system.”.
Although the designation is not used, this is the M-1956 system that served in Vietnam and was replaced by what was essentially a nylon version.
What caught my eye was the author divided the soldier’s load into three groupings: Battle load, existence load and protection and comfort load.
“Combat load” was the battle and existence loads,
“Full field load” was all three.
Before entering “close combat” the soldier could jettison the existence load “except bayonet or fighting knife, first-aid pouch and other essential items”.
What were these loads?
The battle load was defined as the individual’s weapon and ammunition and weighed 25 lb. This was still the era of the M1 Garand, although the M14 was just coming into service.
The existence load included emergency rations, medical items, canteen and canteen cup, toilet articles, one pair of socks, poncho and bayonet or fighting knife, and weighed 20 lbs.
The comfort load included a sleeping bag, extra clothing and “personal gear” and weighed 10 lbs.
The existence load was carried in the combat pack. Presumably the protection and comfort items could be stored in the sleeping bag carrier.
An illustration in the article declares that clothing and other personal items can be carried inside the sleeping bag roll.
Oddly, it shows a shaving kit as existence load, which you would think was a toiletry and comfort or personal.
Thus either load could be removed by just releasing a few clips. Full field load was therefore 55 lbs. Compare this to the 1877 load in a previous article.

The idea of dividing and packaging the gear as several categories is interesting, although some of the details can be challenged.

Why is the bayonet/ knife and first-aid pouch not part of the battle load? These would probably be carried on the webbing anyway, so would not be jettisoned with the combat pack/existence load.

One of the canteens on the webbing and part of the battle load makes sense, but the canteen cup is less vital and should be a pack item. 

Essentially this approach has the soldier carrying two packs, the contents of each having different functions and different priorities.
You can create a similar system by having a large pack and one or more smaller packs that clips onto or fits in the larger.
It is a set of ideas to play around with.
Categories
Phillosoph

Soldier's Load: How Much Ammo to Carry

Continuing our look at the soldier’s/survivor’s load, I will return to the subject of ammunition.
Regular readers will know that I am not ashamed to draw inspiration from unusual sources. They will also know I am partial to the occasional video game.
I was playing a western-themed game and came to a point where I was offered a chance to buy some ammunition. I looked at how much ammo I had collected for the weapons I used the most and decided I did not need to buy any.
What was interesting was that I had something like 80+ rounds for the repeater carbine, my primary weapon. Granted that in the game there is a mechanism to make you a deadeye shot and slain enemies generally drop useful ammunition, but if it was in real life 80-100 rounds for a Winchester would seem an ample amount.

Historical Examples

The typical soldier in the American Civil War carried a cartridge box with 40 rounds ready for immediate use.
Yesterday I was reading about World War One trench raiding. Troops did not wear “equipment” (webbing) for these raids but the men carrying a rifle and bayonet carried 50 rounds. Other men carried ten grenades instead. “Marching load” for British soldiers was 90 to 110 rounds.
An account of a World War Two British platoon had each rifleman with 50 rounds and two to four magazines for the Bren gun. How much ammunition was carried in practice may have been more.
German soldiers of the same period are noted for being frugal with their rifle ammunition and letting the machine-guns handle the bulk of the offensive and defensive fire. I’ve encountered 90 rounds as the ammunition allocation for a Mauser rifle. The issue belt pouches only hold 60 rounds as twelve 5-round chargers so the remainder may have been in the pack if 90 rounds were carried.
The Japanese soldier carried 120 rounds. Twelve 5-round chargers were distributed between two frontal belt pouches and a further 60 rounds was in a “reserve” pouch at the back.
The American soldier in World War Two was issued with an ammunition belt with ten pouches, each for an 8-round Garand clip. In his famous study of the soldier’s load, SLA Marshall claims that soldiers generally carry more ammunition than is needed and suggests six clips (48/96 rounds) be carried instead.
If we look a little later in history, the American soldier in Vietnam was instructed to carry 330 rounds for his M16. Other sources say 14 magazines. Bear in mind, a loaded 30-round magazine weighs around a pound each. 880 rounds was allocated for each M60 so the riflemen probably helped carry some of this too.
The British soldier with a 7.62mm SLR was expected to carry five 20-round magazines and a 50 round bandolier or belt for the MG. With the switch to 5.56mm weapons and a rifle capable of automatic fire came a suggested load of 330 rounds: six 30-round magazines and 150 rounds in a bandolier.
In a previous post, I have discussed appropriate and inappropriate use for fully automatic fire with rifles.
If you have a semi-automatic or manual action weapon this is obviously not a concern.
How ammunition is carried may have an influence on the quantity a shooter carries.
Give a soldier two belt pouches that each hold three magazines and he will probably carry at least seven magazines. Three in each pouch and one ready in his rifle.
Give him a single pouch that holds four magazines and he will probably carry five. Give him a claymore mine bag instead and he may fill one pocket with magazines and use the other for other useful items.

A few posts back we looked at the Viet Cong chest rigs. If a wearer decides to carry six AK magazines, he has around 180 rounds.
An AKM 30-round magazine weighs about 1.8 lbs, so six loaded magazines weighs 10.8 lbs.
The equivalent load for an SKS would be eighteen 10-round chargers. Each of these weighs 0.4 lb loaded, so 180 rounds would weigh only 7.2 lbs.

Chargers

Several of the examples given earlier carried their ammunition in chargers (aka stripper clips, but calling them “strips” reduces confusion). The Garand took ammunition in true clips.
Contrary to what TV shows, video games and some supposedly expert gun writers will tell you, a clip is not a magazine.
A clip is a device that fits inside a magazine.
A charger/stripper-clip/strip remains outside a magazine and unloads its rounds into the magazine
Carrying ammunition in chargers rather than magazines constitutes a considerable saving in weight.
Unfortunately. there are not that many modern semi-automatic rifles that can be loaded directly with chargers. The SKS and M14 are probably the only ones you are ever likely to encounter.
Canadian FALs could have their magazines topped up with chargers while the magazine was in place. When Canada switched to the AR-15, this capability was not continued, probably because of the carrying handle.
Many modern AR-15-type weapons no longer have the carrying handle and a replacement receiver top that can take chargers may be possible.
The SKS has an integral 10-round magazine but this can be replaced with a 20 or 30 round capacity part. Since the chargers hold 10-rounds, it is possible to top-up such a magazine when it is only partially empty.
The capability to use chargers is just one of the advantages an SKS has over a semi-automatic AK-type weapon.
While most semi-automatic rifles cannot be loaded directly with chargers, chargers can be used to quickly reload magazines when they are not fitted to a weapon.
For some designs of magazine, a device to facilitate this may be needed. Carry a couple. It is practical to have just a couple of magazines and carry additional ammo as lighter chargers.

A Realistic Load

So how much ammunition is a realistic load?
We are talking personal load here. If you are mechanized, carry additional ammunition in your vehicle.
If you operate in a given area, establish a number of caches with additional ammunition and other useful items.
As a rough guide, if you are a hunter or outdoorsman, aim for 80-100 rounds and two or three magazines, including the one in your rifle. You can probably find pocket room for two magazines without needing a belt pouch.
There are chest-rigs and pouches that have just three single-magazine compartments. Such a rig could probably fit comfortably under a light jacket.
A pouch for a single magazine on your rifle-stock is not a bad idea, given that ammo is of only limited use if you are separated from your rifle.
If you are in the habit of loading 27 rounds into a 30-round magazine then three magazines still gives you 81 rounds.
Nine-round chargers would be very useful in the above case. Nine-round chargers would be useful for general use. They would allow more opportunity for magazines to be topped-up before they are fully emptied.
81 ready rounds will probably be ample for a semi-automatic weapon. Additional ammo can be carried as chargers.

Six and Six

If you are military, you will probably want to carry more ammunition.
Many soldiers weight themselves down so much that they become waddling targets.
Here it is important to distinguish between what is carried and what is worn.
For the ammunition carried on your webbing, set a sensible upper limit. Do not try to carry everything you have on your webbing.
If you must carry more ammunition than the suggested limit below, carry it in a pack, a claymore bag, pulk, handcart or vehicle. Then, at least, you can occasionally put it down if you need a rest or need to move fast.
How much to carry in your webbing? A sensible limit is what I call “six and six”.
For simplicity, I will only consider riflemen. Rifle-grenades, mortars, grenade launchers and machine-guns I will save for another day.
No more than six rifle-magazines/180 rounds and the equivalent of six (standard-sized) hand grenades (c.3 kg), for example: four frags and two smoke-bombs.
This is the ammunition permanently carried on the body and immediately accessable. With the magazine loaded in the rifle included, you have 210 rounds.
If a handgun(s) is carried, the reloads for these are in addition to the six rifle-magazines. A common recommendation is to carry two reloads for a handgun. If your handgun is your primary weapon, more might be prudent.
The six rifle mags and the grenades can be carried in a chest rig, belly rig, equipment belt or across a combination of these.
Add to this load four shell/first-field dressings. Some of these may be carried around the back over the kidneys.
Categories
Phillosoph

Vietnam Chest Rigs

Version 2.4

Continuing my researches on how to carry equipment.
Last night I read a lengthy paper about the adoption of British PLCE. One of the points that struck me was the mixed reviews of the chest rigs trailed. It is probably safe to say that for most readers mentioning chest rigs will bring to mind the Vietnam war.
During this period Soviets and most countries under their influence used belt pouches for AK magazines. The examples below hold four 30 round magazines, although versions holding just three are also known. The side pouch on one of these examples is for an oil bottle. (The East German example with the splinter pattern shows a nice example of “staple and tag” closure, btw.) The North Vietnamese Army (NVA) did make some use of these pouches but a chest rig seems to be a more common option. Understandably such rigs are often termed as “Vietnam”, “Chicom” or “Viet Cong” chest rig.
Commonwealth forces did use some systems that could be termed chest-rigs. One of the photos below shows additional ammo pouches that could be worn above the belt pouches. Certain variants of the battle jerkin used only a pair of pouches on the chest.
It is more likely that the inspiration for the Vietnam chest rig was from closer to home. There are numerous photos of Chinese soldiers in the 1920s and 30s wearing a sort of “apron” for SMG magazines.
Several types of chest rig were in use by the Viet Cong (VC) and NVA.
The “simplest” was that intended for use with the SKS. This had ten identical pockets. Each pocket could hold two 10 round chargers for the SKS, giving a capacity of up to 200 rounds. In practice, one pocket often held a weapon combination tool and an oiler. The pockets could also accommodate a 20 round M16 magazine so this rig was also used by some GIs or Vietnamese with American weapons. It is probable that some of these pouches were used for other items. They appear to be of a size that can accommodate some designs of grenade.
A similar rig held chargers for a Mosin Nagant rifle.
A variety of SMGs were in use in this conflict so there were also chest rigs designed to accommodate SMG magazines. An example is shown below:
The third type of chest rig was intended for use with the AK-47/AKM/Type 56 and related weapons. Typically it had three central pouches each capable of holding a pair of 30 round magazines. One or two smaller pouches were to either side. These could be used for grenades but might have held other items such as loose ammunition, field dressings, cleaning kits etc. It is worth remembering that these items were often produced at a local level or homemade so show considerable variation in both colour and details. Some items had straps that crossed at the back while others are described as having a loop that passed over the head like an apron.

One of the things to note about these items is that “chest rig” is something of a misnomer. Often you see the pouches worn quite low on the torso. A sort of “combat cumberbund” or “belly rig”! Perhaps this transferred some of the weight to the pelvis? Rigs such as these can be worn either high or low, depending on physique, preference, type of rucksac worn etc. NVA/ VC seem to have kept their actual waist belts relatively uncluttered, often with just a grenade pouch and a canteen. Items not needed in the assault seem to have been carried in the rucksac rather than crammed into belt-mounted butt-packs or kidney pouch equivalents.
The Chicom chest rig has inspired a number of other designs. The Rhodesians often encountered enemies using this equipment and developed their own version with four or five pockets for 20 round FAL magazines.
The South Africans also adopted the chest rig. The 83 pattern shown below has a smoke-grenade pouch on the wearers right and two smaller pouches on the left, possible for a frag-grenade and shell-dressing.
There are small fittings that can carry a pen-flare/pen/pencil, knife or small flashlight.
A rather clever feature is that there is a map/document pocket behind the magazine pouches. On the other hand, the sides seem to have some excess material.

South African Chest Rig Contents

Not surprisingly, the Russians also copied the Vietnam chest rigs. The first-pattern Lifchik is very similar to the Vietnam Type 56, but designed for the AK-74 magazines. It also adds provision for carrying a pair of RSP-30 flares. The second-pattern moves the small pouches so they are vertically aligned. The second-pattern also has the option of attaching a belt holding ten 40mm (VOG-25) grenades. 
1st Pattern Lifchik Chest Rig
Second Pattern Linfhik Chest Rig
Some commercial imitations have possibly tried to incorporate too many “bells and whistles”. Some have ignored that a chest rig can also be a “belly rig”. Another problem is the chest rig is often seen as additional rather than alternate carrying capacity.
The Chicom chest rig is very much a compact assault order carrying ammo and grenades and little else. When you start adding pouches for waterbottles, mess tins and rain-proofs it become something else. The main improvements I would make over the original designs is provision to carry a couple of field dressings. I’d also add provision to carry a small fixed blade knife on either the left pouch or left suspender, a snaplink/ carbineer for empty magazines and a small pouch for a flashlight.
The chest region is often shadowed so a chest rig should have a light base colour to compensate for this .
As mentioned above, VN examples often resembled a sort of combat- cummerbund or “belly rig”. A moment’s thought will confirm that you do not want the openings of your ammo pouches up at nipple level or higher, if you are carrying them vertically. You don’t have much choice with the long AK magazines, admittedly.
The chest area is a major site of heat loss, so a lower slung chest rig may help avoid overheating.
Many (western) chest rigs simply try to carry too much, hence problems with crawling, which is your primary means of not being seen or shot!.
Don’t use frontal pouches that hold more than a pair of magazines each.
There are a great variety of options out there commercially. Some can be mounted horizontally or slanted on the chest. The under-arm or hip positions proposed in a later blog is another option.
Basically, the chest/belly rig should only carry a reasonable amount of ammo.
No more than six magazines/180 rounds and up to six (standard sized) grenades, for example, four frags and two smoke. There is probably not enough room on many designs to carry all of these grenades on the chest/belly rig. One smoke and one or two frags seems more likely, with additional grenades carried elsewhere.
You can mount your “pec’ knife;” on a rig (see Survival Weapons or Crash Combat), a shell-dressing or four, a flashlight and a snap link for spent mags.
Some of the shell-dressings may be carried at the back over the kidneys. They are more likely to be accessed by someone treating the wearer, rather than the wearer so the rear position is not a major problem.
If you have a compact weapon-cleaning kit, such as in a discarded flare container, the belly-rig is a logical place to carry that too.
You will not need the latter in a hurry so it can be stowed on the rig somewhere out of the way.
Provision to add other items temporarily can be included.