Disclaimer: “As an Amazon Associate I may earn from qualifying purchases.” Adsense and Infolinks were no help at all.

If you have enjoyed this article or it has been helpful to you please feel free to show your appreciation. Thank you.

Read The Third Wave by Alvin Toffler!
Categories
Barata

Practical EDC Kit

When it comes to EDC/survival/emergency kits, I think it is safe to say that many people just are not getting it.
EDC kits should be available
An excellent example was an LBE/webbing pouch designed specifically to carry a survival tin.
What is wrong with that?
One of the likely events that will put you on emergency status is becoming separated from your rucksack, webbing or jacket.
Yes, my rucksacks, coats and jackets contain emergency items.
These are intended as a supplement to my EDC/emergency kit, and are not the primary kit itself.
There is not a perfect answer.
Jackets may be taken off, packs put down, hats get lost.
The clothing item that I am least likely to be separated from is my trousers. Thus, my primary EDC items are in my trouser pockets, or in pouches on the trouser belt.
Luckily, I am not subject to any stupid work dress codes, so trousers means those with thigh cargo pockets.

What, No Survival Tin?

No, I don’t carry a survival tin.
I want my EDC items easily accessible so I can use them if needed. Try wrestling with a yard of tape in the wind with an injured bleeding finger.
The supposed advantage that you can boil a tiny amount of water in the tin to sterilize something is marginal at best.
I do not want a hard item banging against my thigh as I walk, and digging into me if I sit down or fall.
Lid as a mirror? Most survival tin lids that I have seen will require a lot of polishing. You can easily buy a better item, saving you a lot of time for a very small amount of money.
The best thing you can do with a survival tin is empty the contents out and use them to stock a better EDC kit as will be described.
Many of the tin items need to be in karger quantities anyway.
Use the tin to pack something fragile in your backpack.

Practical EDC Kit

Much of this has been covered in previous blogs. There have been some updates, reorganisations and additions since I first wrote those page.
A friend requested I bring the updated information together in one place.

Trouser Belt

The trouser belt that I use is a rigger’s belt. This could be used with the carabineer I carry my keys on.
Main reason for having a rigger’s belt is that unlike my previous belt, it does not have a buckle that damages my tee-shirts.
The kit is spread across several locations, rather than all the “eggs in one basket”.

Left Thigh Cargo Pocket

Within a large zip lock bag, a little zippered pouch, mainly containing medical items.
EDC Pouch Contents
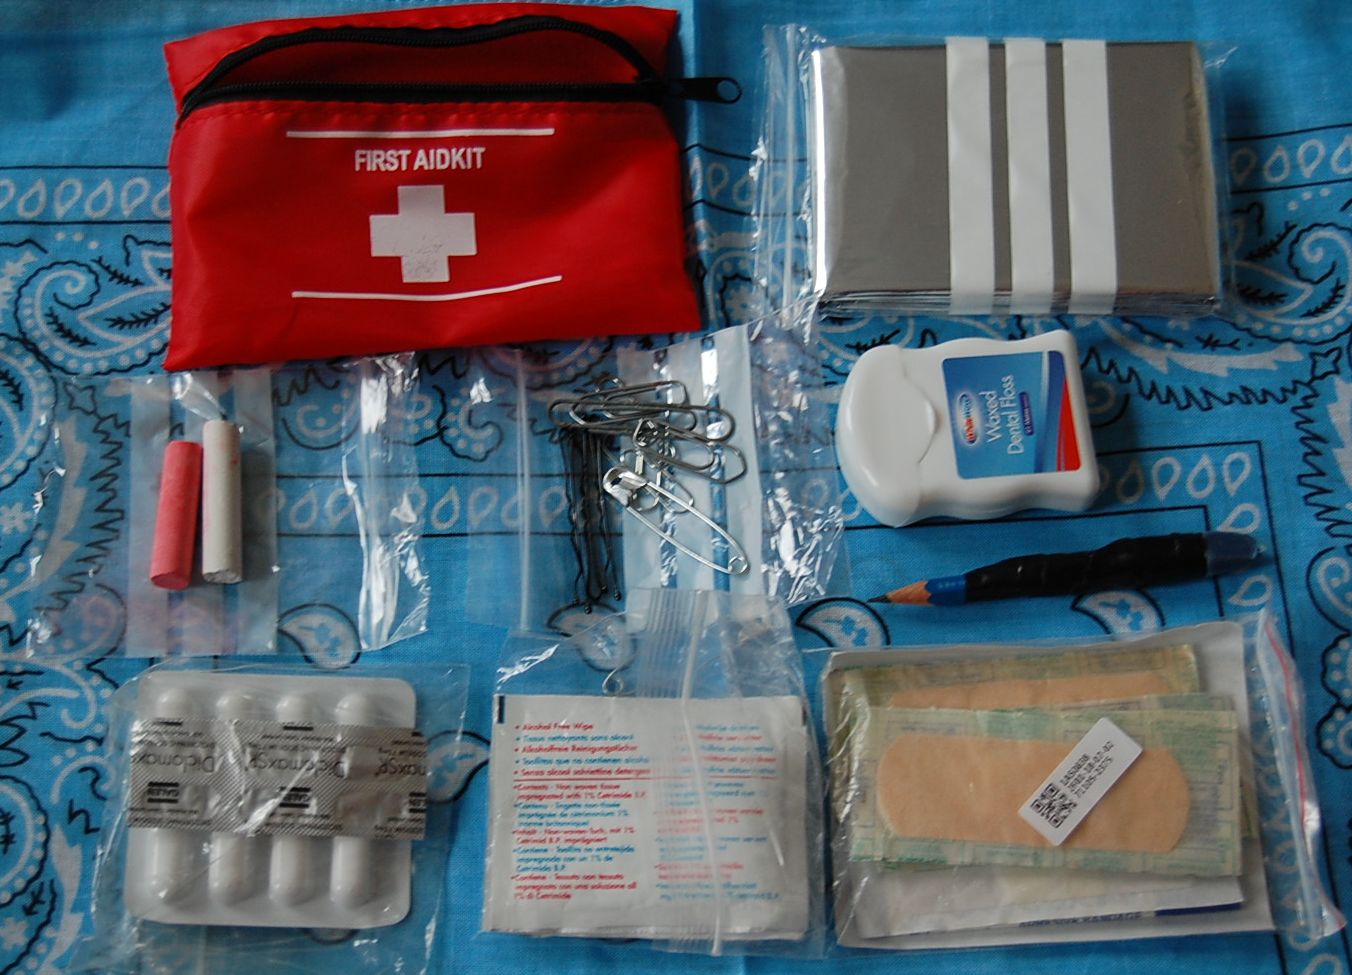
This pouch also contains many smaller items such as
• Safety pins
• Paper clips
• Two colours of chalk
• A pencil
• Two birthday cake candles
• One sailmaker’s sewing needle wrapped with invisible thread
• Dental floss
• Ultra minimal fishing kit of six spans of braided line and 22 fishing hooks.
• Space blanket. Few traditional survival tins have these, but potentially one of most useful items you can carry in your pocket. Mine fits inside the zippered pouch. If yours does not, put it in a plastic bag or its original packaging.
A good idea is to buy space blankets in bulk and add one to each of your rucksacks and outdoor coats. Keep some in your vehicle and so on.
I have added my little button compass to this pouch, purely because it may be of some use here, while it is of none sitting in my gear box.
The large zip lock bag is reinforced with duct tape so could be used to carry water or for other purposes.

Right Thigh Cargo Pocket

• A zip lock bag of tissues/toilet paper.
• Some additional cordage of various types, since the left side pocket was getting bulky.
• A Sharpie, or some other pen that can write on most things.
• A ballpoint pen. I have a Zebra pen, but any type that will not get broken in your pocket.
• A “thumb” flashlight.
• A pen-shaped window breaker, which includes a handcuff key.
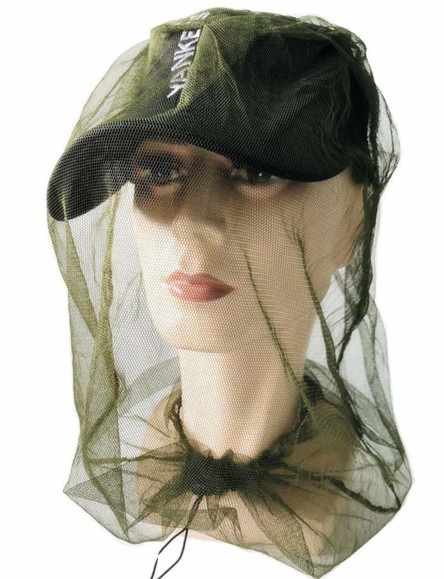
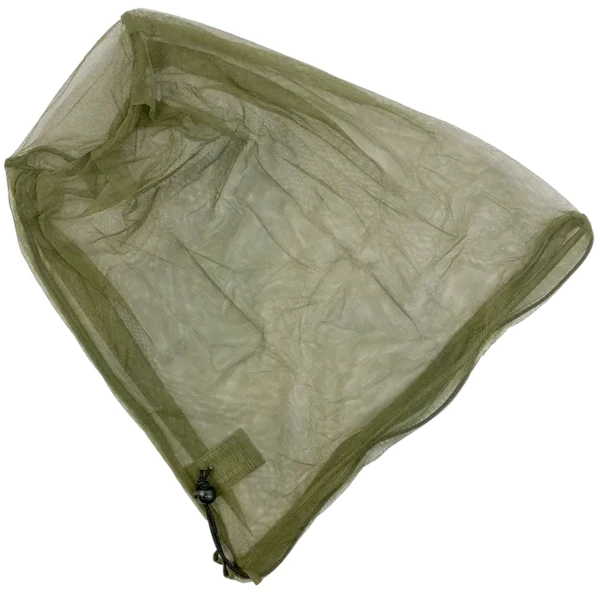
• An insect head net. I use the British Forces Mosquito/Midge Micro Head Net (NSN 8415-99-519-8268), since it is compact, and costs less than a pint of beer. May be used as a carrying bag or a net for shrimp and small fish (bait). This could be an EDC item or part of the up-levelling if heading to the wilds.
• Supply of personal medication.
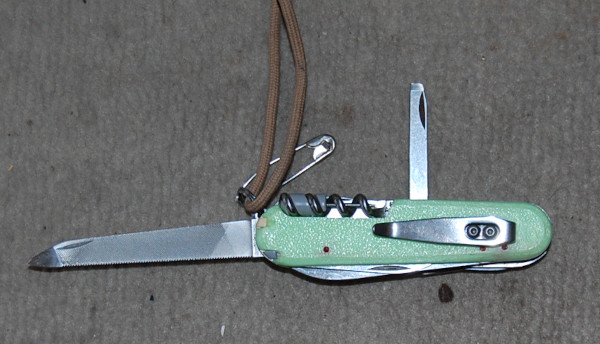
Left Side Pocket

• One bandanna
• One disposable-type lighter in waterproof case, with some duct tape wrapped around lighter body.
• Two two-metre bootlaces or lengths of paracord.
• Hank of cotton string: conserves paracord and may be used as tinder.

Right Side Pocket

Keyring Tool Kit for EDC

Coins, but seldom enough to buy anything.
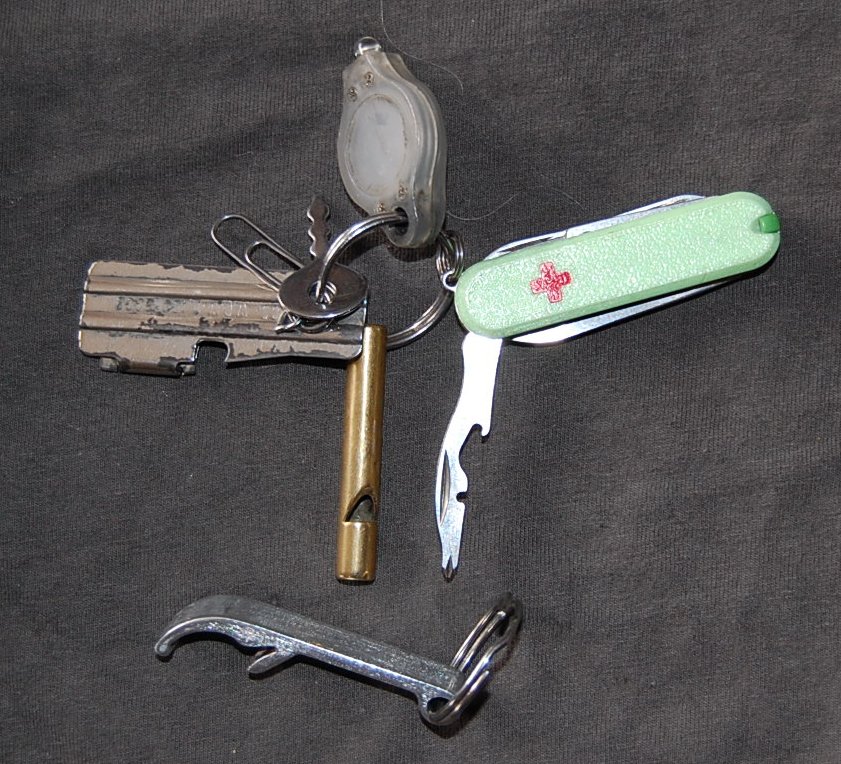
Carabiner key ring on belt hanger above pocket. My keys are always with my trousers, never in a jacket or bag. The logic of this should be clear by now.
Key ring includes the “split ring tool kit” detailed in the recent article: SAK Rambler, photon light copy, whistle, paperclip, P51 can-opener.

Small Pouch on Trouser Belt

Suunto CLipper Compass

• Debit card
Ear plugs in small plastic box they came in
• Small magnifier loupe
Mirror in case with laminated Morse reminder card and Fresnel lens inside.
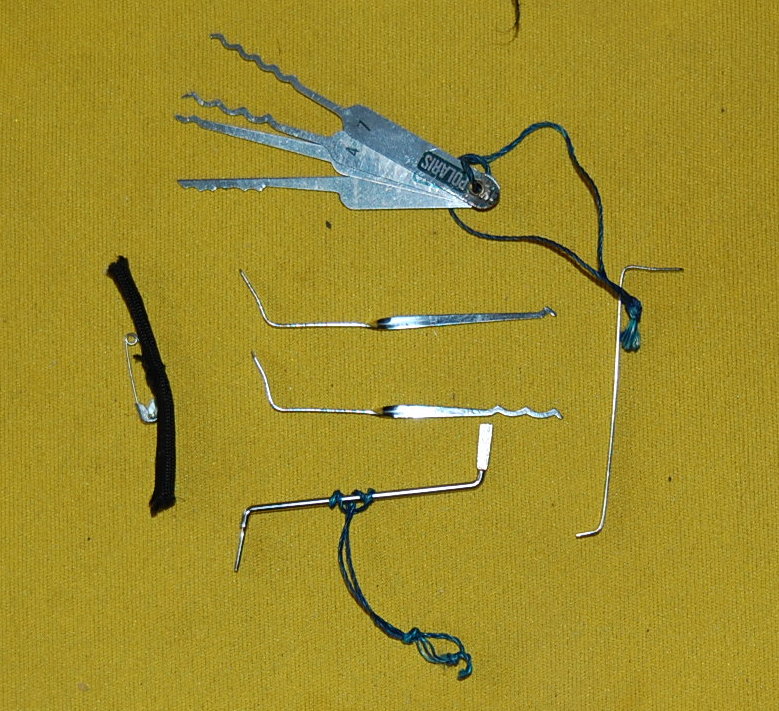
• Small set of EDC lock picks.
Tubular spectacles retaining cord. Moved to this pouch from the left pocket so that it does not get mixed-up with the other cordage.
Because I am a bit of a magpie, a few found hairpins and paperclips have ended up in this pouch.
I used to carry a USB drive here, but use the cloud more these days.
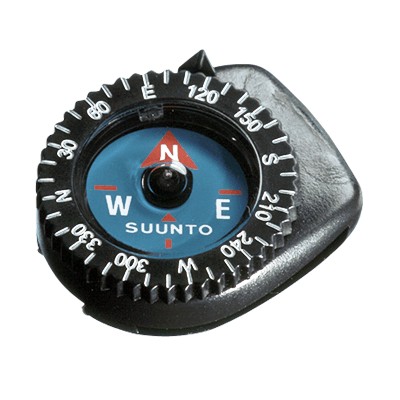
My usual “bug-out coat”, and the soft-core pack in any rucksac I might be carrying, both contain larger baseplate compasses.
It is surprising how often the Clipper compass has proved useful in towns, however.
Budget Baseplate compass
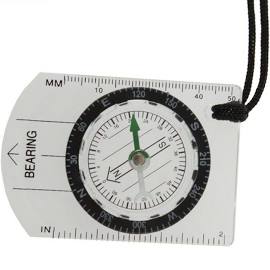
If you do not have a Clipper, the smaller budget versions of baseplate compasses are more useful than tiny button compasses. A compass is much more useful with a movable bezel.

Repurposed Mobile Phone Case on Trouser Belt

Customized Swiss Army Ranger with pocket clip

• Mini-Leatherman P4 Squirt
• Diamond impregnated metal sharpening card
• “Widgy” three‑inch prybar.
[I am a tool whore! Guilty]
The Ranger contains a number of useful additional items, including a ferro-rod toggle, sewing needle and line, pen, pin, tweezers, toothpick/tick remover and a magnet.
You could add a wire-saw here. I find it more comfortable to carry mine in a pocket of my bug-out parka.

Mobile Phone

Worn on trouser belt in another pouch.
My phone is pretty useless, but does have a flashlight mode.
If you have a smartphone, it may have useful things such as a compass and GPS. Chances are the reason you are in trouble is you didn’t look up from your phone!
The above is my personal kit and provided for guidance. There is no point having lock picks nor sharpening items unless you know how to use them. [although I have written enough articles explaining how]. Likewise, cordage requires a knowledge of knots.
If you are still in the bloom of youth, you probably do not need a magnifier to read package labels [yet!]
All of this EDC is pretty easily transferred across when I change trousers. Only one pouch needs threading onto the belt rather than clipping on.
Back pocket is a little wallet of cards and useful numbers and a comb. Nothing really of survival use.
The above kit fits any trousers with thigh pockets. No need for extra pockets nor anything fancy.

Up‑Levelling

If I expected to be heading to the wilds, I might add some additional elements to the EDC. These items will mainly go in the right thigh pocket.
A zip lock bag containing a larger quantity of tissues/toilet paper would be likely. This is an additional supply of emergency bumph. The soft-core pack that will be in my rucksack includes a full roll of toilet paper and a bottle of hand sanitizer with it.
If not already there, I would add the insect head net. Biting insects range from nuisance to life threatening. Given the low price and minimal bulk, you would be foolish not to have an insect head net in your EDC if you can.
I would probably expand my fishing capability with several trot lines, each of six spans of braided fishing line with swivels already tied in place. A container of hooks on leaders, some with lures such as mackerel feathers.
One or more ten-metre spools of picture hanging wire for making traps. You could make these up beforehand, but there is a chance you might encounter a cop or ranger who wants to be a dick and classes ready-made snares as intent.
To the above, I can also add the belt holding my kukri, Mora and a pouch holding a fire kit and sharpening stone.
I was intending to attach this belt to my trouser belt using press-stud keepers. The weight probably carries better worn down on the hips, however.
A handgun could be added to this belt where such was permissible.
Categories
Phillosoph

The Case for Insect Head Nets

We tend to associate mosquitoes with the tropics.
During summer in Alaska, however, caribou can lose a pint of blood a day to mosquitoes. This may prove fatal to the younger or weaker caribou.
Little wonder AFM 64.5 (1952) recommends:
Arctic: In the winter, in addition to the essentials recommended above, carry a sleeping bag, parka, mittens, snowshoes, or skis, and mukluks. In summer don't forget mosquito netting and repellent, extra clothing (socks especially) and shoepacs. Wear sunglasses when sun is high on snow surface. Keep feet dry, summer and winter.
Then there are the diseases and parasites that mosquitoes carry. Mosquitoes are probably the greatest man-killers on the planet, after humans themselves.
And not to forget midges, horse flies, black flies, tsetse and a variety of other biting insects.
Biting insects can range from a nuisance to life‑threatening.
I have dozens of recommended kit lists, and several of them include an insect repellent wipe in a sachet. One wipe is not going to last long.
I have a bottle of insect repellent in my travelling bag, but I am well aware that it is a finite resource. Some insects dislike it more than others.
Many kit lists do not mention insect head nets.
Insect head net worn over hat
A good insect head net will probably cost you less than a pint of beer. They weigh practically nothing, and take up very little space.
You have to ask yourself why you would not have at least one?
You can even keep an insect head net in your skin-level EDC, helping pad the other items in a cargo pocket.
There are numerous brands of insect net, but one bag of fine mesh is pretty much like another. You might like to try out one of the cheaper options before you part with a wad of hard‑earned cash.
The main criteria to look for is that the net be black or some other dark colour.
Lighter colours will reflect light and be harder to see clearly through.
A few people have suggested light mesh as a camouflage eye covering in snow or desert. This is why it is probably not a good idea.
The insect net in my EDC is a British Forces Mosquito/Midge Micro Head Net (NSN 8415-99-519-8268).
This head net is 45 cm deep, and 45 cm at its widest, tapering down to 16 cm at the closed end. It will fit over most headgear, has a neck drawcord, and is “olive” in colour. The olive is dark enough to see through.
British forces insect head net
If you have added an insect head net to your kit, it is reasonable to consider what other uses it may be put to.
• The insect head net is a large mesh bag, probably with a drawcord. It can be used as an emergency carrying bag.
I would not recommend it for heavy or dense items, but if you come across a thicket of ripe blackberries…
You could also tie it to the outside of your pack and use it to let your wet socks dry.
• A head net could be used as an improvised fishing net. It may be sufficient to catch shrimp and the sort of small fish that can be used as bait for something bigger.
• An insect head net may be used as a pre-filter to remove debris and large material from water before you heat or chemical treat it. Use several folds of material.
I have seen it suggested that an insect head net may be used as a filter or strainer for making tea or coffee.
It should be obvious [hopefully], that these applications are not suitable for a mesh treated with agents such as permethrin.
• Eyes are a difficult area to camouflage. You can do artistic things with camo‑cream but the white of the eye (sclera) and the iris colour remain.
Camo cream is of no use for eyes
Eyeglasses may reflect the light and draw attention.
A dark‑coloured insect head net can help with this. The insect head net should be combined with other measures such as a camouflaged head covering and facial covering.
Categories
Phillosoph

Lock Picks for Everyday Carry (EDC)

When you start a new hobby, it is highly likely that you will buy a number of items that ultimately are seldom used.
This is certainly true of lock picking. One of the first purchases most beginners make is a cheap set of picks, often Chinese made.
I was no exception to this, although I had already decided I wanted a set of Bogota rakes too.
Such cheap kits are actually a useful step on your learning curve. These kits have a wide variety of designs. and give you a chance to experiment and discover what kind of picks and turning tools you like.
As I have gained better and more suitable collections of tools, that Chinese kit has seldom been used.
Like others, in my early days I also acquired a number of items that I have seldom, if ever, found an actual use for.
Lock Picking Legend recently posted a video on comb picks.
I won’t bother to explain how comb picks work, since the following two videos clearly explain this, as do many other videos and pages.

I have a set of comb picks. Comb picks top my list of lock picking gear I have never needed.
Even the perspex practice locks are immune to comb picking.
As Lock Picking Legend notes, unless you frequently encounter very old, low quality locks, your comb picks are going to sit unused. Comb pick sets often come with a high price tag, so save your money and put it towards some Bogotas, or one of my books.
If comb picks are one of the things I would not buy if I had my time again, what would I get?
I have talked about my Serenity Plus collection and the Polaris Rakes elsewhere.
Today, I am going to share a look at what I think of as my “EDC kit”. These are the items I am most likely to have with me if I encounter a lock that requires opening.
As part of my usual duties I sometimes encounter items that have been locked that should not be, or more commonly, locks for which the key has been misplaced.
I do this, however, with caution. Some colleagues are likely to shift the blame for the lock not opening to myself.
EDC lock pick collection
Central to my EDC collection are a pair of Bogota Rakes, shown beside their home-made carrying sleeve (far left). This latter item may be pinned to clothing if I want to keep the picks handy.
The set consists of a single hump Bogota and a triple hump, both with handles designed to also function as turning tools. I recommend you get the “euro-twist” versions so the handles point away from each other when you use both to open a lock.
The handles of these Bogotas have been “bowed” so they can be used as turning tools in a wider variety of keyway widths.
Sometime in their history, the handles got bent at ninety degrees and shortened from about 27mm to 15mm. I have been able to bend them back to close to the original angle of 60 degrees. In hindsight, I should have left them alone, since a longer 60 degree turning tool might be handy for recessed locks and tulip knobs.
Most locks I have been called upon to open in real life have succumbed to raking using the Bogotas.
Often the key (pun intended) to picking a lock is how you apply the turning tool. My kit therefore includes a couple of turning tools in addition to the Bogota handles.
This article suggests creating a tapered thickness turning tool of 0.7 to 1.5mm thickness. I do not currently have the materials for this, being mainly limited to wiper blade inserts of about 0.4mm thickness.
That said, the turning tool I have used most is the one on the far right of the photo, which was made from wiper-blade insert. It has proved to be both useful and versatile.
The longer (13 to 14mm) nose is bent at ninety degrees to the shank and slightly bowed. The corners have been rounded off. It is approximately 2.7mm wide. With the ends bent, it is a little over 60mm long.
Ends of home-made turing tool
Since I tend to favour raking, I tend to primarily use bottom of the keyway (BOK) applied turning tools.
The shorter (6 to 6.4mm) end is also rounded off. The width has also been reduced to just under 2mm, the shank starting to be reduced just before the bend.
This shorter hook may be used as a TOK turning tool or a BOK for small padlocks.
I should probably add a SERE pin to this kit, since it may also be used as a turning tool for very small locks. I have a SERE pin elsewhere in my EDC, but another in this kit would be handy
The other turning tool at the bottom of the main photo is taken from a cheap Chinese set, and is a round 1.5mm section rod with flattened 2.9 to 3mm ends, 0.7mm thick. This is a handy tool for wider keyways.
The Bogota rake is usually the first tool I reach for when attempting to pick a lock. In most cases so far, this has been all that is needed.
Many of the locks I have encountered that have resisted the Bogota have opened with a snake pick. Not surprisingly, I like to have a snake pick in my kits, and my EDC kit is no exception.
This particular snake pick was taken from a “James Bond Credit Card” set. These kits also include a city rake. When they work, city rakes work very fast, so I decided to include the city rake too.
As I have noted elsewhere, the credit card kits vary a lot in quality. The first I brought was very nice, while the second had much thicker picks, with a poorer finish. Some grinding, filing and sanding made them more useful.
Drilling a hole in them, however, proved surprisingly problematic. Turned out these “poor quality” picks were made from very tough steel! It took at least an hour using a low-rpm carbide bit and oil.
Having read Christine Holler’s lock pick recommendations in this article, I wanted to add a cycloid and sinusoid rake to my kit. Luckily, UKBumpkeys has started selling individual Polaris rakes. I decided on the No.4, four-hump cycloid, and the No.7, five-hump sinusoid.
I shortened the handles so the tools were all about 75mm long.
I then went about adding a hole. I had little doubt the Polaris are made from high quality material. Given the trouble I had had drilling the snake and city rake, I tried a different approach.
Since these picks had thinner handles, I was able to hole them using a punch and hammer. These holes were then enlarged using the conical grinding stone of a Dremel Tool. This took a fraction of the time that drilling the others had taken!
My local hardware store had no idea what a tubular rivet was. Fortunately, I remembered some brass tubing I had. I cut a short length and a few minutes work with a ball-peen hammer rivetted the four picks together.
Lock picking requires a light touch, so it is not unusual to drop tools when working in the field. To counter this I have added cord loops to a couple of tools.
The two turning tools are supposed to be joined, but the wiper blade tool usually works itself loose. I have left them apart since it makes a clearer photo.
Categories
Phillosoph

My Left Pocket: Epilogue

An amusing little endnote to my previous post.
Last night I walked into my local takeaway. My iPod is hanging around my neck.
“That is exactly what I need!” enthuses one of the staff. “I am always losing my phone.”
“It’s a shoelace.” I explain.
“Where did you get it?”
“Er, my pocket.”
I have to explain that one day my headphones had broke.
The only replacements I had had too short a lead for me to use them and place the iPod in a pocket.
So I had fished a shoelace out of my pocket, tied it into a sort of net around the device and hung it around my neck with another shoelace.
The only later improvement was replacing the second lace with a badge lanyard I had in a drawer.
I end up reaching into my left pocket and demonstrating that I really was the sort of person who walks around with old shoelaces in his pocket.
I explained the technique was very simple, and was actually just a modified bottle hitch or parcel tying method. (even though it looks like my iPod is into Japanese bondage). 
Figure Eight Can Sling Method
I informed the lady there were doubtless lots of websites that could show her the knots, and also lots of interesting decorative knots too (for her phone that is, although that statement is also doubtless true of Japanese bondage too).
She suggested she could use ribbons, and that is a nice idea.