Some of the previous blog have been inspired by topics that were in “Mind Performance Hacks” by Ron Hale-Evans.
Recently I have started reading the sequel, “Mindhacker” by Ron Hale-Evans and Marty Hale-Evans. I had previously dipped into this book for the posts on learning American manual alphabet (AMA).
Both books cover the topic of memory.
My memory has been getting demonstrably worse since 2019, so I looked at the section in the newer book with interest.
There are lots of systems of memorisation, some of them quite complex seeming.
One of the easier systems uses number shapes.
Humans are visually orientated animals. An image of something is easier to remember than a simple noun. If that image happens to be naughty, gory, silly, scary or similar, it is often more likely to be recalled.
Below is a number system suggested by the Mindhacker book and their website.
A couple of those images do not really work for me.
An elephant does not look much like a six. If anything, I would associate an elephant with five.
Instead, I use an insect. Insects have six legs. There is a great variety of insects so I can select the type most appropriate to what I am trying to remember.
A tennis racquet for nine? I prefer to use a cat, or even a cat-o-nine tails.
The first version of a number memory aid I encountered only had four images. These were Flagpole, Red Bloomers, Tricycle, Pig.
You can use any four-legged animal, but cartoon pigs are funny and distinctive looking, so work well.
Red bloomers are sometimes substituted with a pair of trousers if this works better for what I want to remember. A pair of boobs works better for some images.
I came across an interesting system of unit signs used by a Canadian Divisions in the First World War.
A circle was used for one, a half-circle for two, a triangle for three and a square for four. An arch or archway may be used in place of the half-circle. These shapes may be used to create memory images if they make a better image than the other suggestions. If visiting someone is your second chore, you might visualise the individual standing beneath a stone archway, for example.
An alternative for five is to remember a hand, since it has five fingers. Perhaps think of the Thing from the Addams Family.
A tripod can be an alternative for three.
A spider or a snowman is an alternative for eight. I might even use a snowman lock pick, which is an object familiar to me personally.
These are just suggestions. Adapt the elements to what works for you.
I generally have an n-1 memory. Seven things to remember and will remember six. Five things and I can remember four, no problem.
This was the case with the list of items in the SOE Loadout blog. Always could not remember one item.
As an experiment, I tried making a number shape list.
1 I could have flown or hoist something up the flagpole. For his example, the candle was an obvious reminder for a flashlight. My EDC also includes a candle, so this is an additional reminder to number 6.
2 Trousers with bulging pockets reminded me that money was an item. Pockets bulging with money, like mine never have. Or you can think of banknotes stuffed down cleavage.
3 The heart with a knife in it was an obvious object to remind me of knives and tools.
4 For the compass, I placed it in a square to represent the four corners of the Earth. If you want, imagine the angels standing in the corners of the Earth as the Bible describes. In the centre sits a compass, and this is the trigger for maps and other navigation aids.
5 Five is a hook. On that hook hangs a skein of thread, or it is attached to the hook like a fishing line. Five reminds me of cordage and fishing gear, and by association, other hunting items. This is a very effective memory hook.
6 Six is a ladybird in a matchbox. Matchbox means matches, which means fire kit. I do not carry matches, they are reminder for the lighter, tinder and more useful means of ignition or cooking.
7 Seven may be an axe, Grimm Reaper's scythe, or similarly shaped tool. In this example, it is an axe chopping a bandaged leg. Medical items.
8 Eight is an hourglass with a wrist watch around its centre. Perhaps a slender spider crawls across the hourglass.
9 Here is a handsome black cat with a stylish broad‑brimmed hat and a rakish neckerchief. Over one shoulder is a stick with a bundle in a hanky at the end. A rather effective image, it reminds me of hats, bandannas and walking sticks, all useful things to have on a trip. By association, hats and bandannas remind me of shelter and clothing accessories such a good gloves, goggles etc. “A cat in a hat with a staff and a scarf.”
10 Ten is formed by a tire (or donut) beside an upright pencil or pen. This represents pens, pencils, sharpies, chalk, notebook, documents and other items of communication. “Ten is a pen.”
The above is just an example, of course. The order of the above items does not matter, so I have arranged them to best suit the number shapes they are with. Memorising an ordered list is also possible.
Using this system, I have managed to keep this list in memory for several days now.
All I have to do is say the numbers and the associated item pops into mind.
It is no great secret that my memory has been getting worse since at least 2019.
The other day, I came across an interesting term. A day or so later, I came across an opportunity to use this new word.
Could I remember the word, no.
Worse, I could not remember where I had encountered the word.
It must be in one of the books I read within the last few days.
Eventually, I remembered the word, but still no idea from where.
I have read several books on diverse subjects over the last week. I also may dip into several other books during a day.
Since I have just started reading another of the Mindhack books, I will suggest a “hack” of my own I have now adopted.
On your computer, have a .txt file called “Books Read” (for example).
This file should be easily accessible, such as on your desktop or in the documents folder. It should open quickly, using a program such as Notepad or Xed.
List each book you read and/or complete, in the order you read them.
You can mark books you have started but not got around to finishing.
Also, put down when you dip into a book to find a piece of information or quotation. Perhaps note what it was you found.
Current list looks like:
Information Anxiety
Information Anxiety 2
On Writing Well, Zinsser
Greek and Roman Artillery, Osprey
Steampunk Guide to the Apocalypse
*The I Hate to Housekeep Book" Flagpole memory aid*
Mindhacker–
I do not use a full title and author, just enough to identify the book.
Titles between asterixes are books consulted for references. In this example, I had reread the chapter on memory tricks.
Double dashes are books started but not finished. Depending on your reading habits, there may be several of these.
I suppose I could distinguish between electronic and dead tree books.
A separate column for fiction and non‑fiction is another possibility.
When this list gets longer, I may duplicate the data in a spreadsheet for easier sorting and searching.
I wish I had started this habit years ago. I have folders full of novels where I cannot recall which ones I have read and which I have not.
If you find yourself in a similar situation of being unable to recall where you read something, or even if you have read something, you at least have a shortlist of where something may have been.
Now I just have to remember to keep the list up to date.
“The Third Wave” by Alvin Toffler explained humanity was on the cusp of an Information Age.
Toffler warned that the transition was likely to incur growing pains. Progress has been hindered by the persistence of many Second Wave institutions.
“Information pollution”, rather than lack of information, often hinders us. Opinion too often masquerades as fact. Editorials pretend to be news. Truth is buried under more entertaining alternatives.
My first impression of the book was a reaction against its length. Page count on my reader is 372 pages! Shouldn't a book on information be more concise?
It was not as bad as it initially appeared. About 30 pages at the end are the bibliography, index, acknowledgements and so on. There are blank pages at the end of the chapters.
The start of the book explains that it can be read non-linearly.
Immediately after follows an annotated contents list with several extracts from each chapter. This takes up more than 20+ pages, contributing to the high page count. Deceptively, each content's entry looks like the start of a chapter. The author evidently likes this feature, since it was kept in the rewrite.
Personally, I found it a waste of pages and the time that I had to spend scrolling through this to find the actual start of the text.
The book is about two things. One is about perception and presentation of information. Selecting and filtering the information that you are exposed to. The other is about managing “information anxiety”.
Personally, I do not consider myself as being particularly prone to information anxiety.
As a pessistoic, I tend not to devote much brain time to things that do not affect me, or over which I have little control or influence.
Most “normal” people, however, will sit down with their daily newspaper or before the nightly news without comprehending they are little more than spectators.
According to the Information Anxiety, one should read certain magazines or newspaper sections to keep informed about art, theatre and similar. Not being informed about a topic that arises would cause anxiety.
Personally, I am more inclined to follow the author’s good advice about embracing ignorance. Vulnerability has a strength of its own.
If I do not know about a topic, I will ask the speaker about it. This contributes to the conversation, and many personality types would rather be speaking than listening, so is socially prudent.
If the subject explained interested me, I will read-up on it later. I will consult several sources, since most things are better understood if looked at from various different angles.
In general, I found Information Anxiety useful. As the book itself notes, information needs to be understood in context. Therefore my recommendation of this book comes with some observations and reservations.
There is a good section on the importance of conversation. However, in many modern institutions obsessed with their woke posturing, conversation and opinions must be carefully guarded. Forget about joking with someone.
Carl Rogers notes that although humans have a natural potential for learning, they approach the process with great ambivalence because “any significant learning involves a certain amount of pain, either pain connected with the learning itself or distress connected with giving up certain previous learnings.” (p.155)
Contradictions
The book has a number of contradictions.
Early on is the quotation from Iris Murdoch that to be a good writer, you have to kill your babies. Yet the book has several sections that seem overly long, or do not seem to make any real contribution.
Some books need an unsentimental editor.
In many places, I found myself wishing the author had followed some of his own advice.
The book has frequent sidebars or “marginalia”. Some are interesting, some entertaining. Many are overly long and do not seem to contribute much. Many of these are guilty of the very literary posturing that an early chapter cautions against.
The marginalia are so frequent that after a while I found myself ignoring them. As a later chapter notes, less is sometimes more.
Contrary to what is claimed in the book, quite a few writers do not put any particular importance on being accurate!
The author advocates the need to know geography to put international news in context. Yet the book itself is very clearly written by an American for Americans, rather than a global readership.
Many of the cultural references will be lost or outdated to many readers.
Several sporting examples are used, but at least one has the simpler explanation that most sports commentators have a very poor standard of English.
The statement “the news industry which worships objectivity with the zeal of Shiite Muslims” had me laughing at how ludicrous this view was. [that simile will probably trigger a few woken‑SS!]
Similarly, accuracy of information is not a particularly notable feature of mass‑media presentations.
The above statement very much contrasts with the later, very useful “Violent Wallpaper” chapter on the mass‑media, which has some interesting insights on how the mass‑media presentation of information is intended to produce fear rather than understanding.
This chapter, however, is followed by an interview by a news anchorman who is treated like a wise guru rather than a figurehead.
The section on “Fat-Free Daily Reading Diet” was also useful, although the modern reader is more likely to be using on‑line sources rather than printed matter.
There is an annoying error that the word “eureka” was originated by Archimedes, rather than popularised by the story about him. Similarly, I also rather doubt that “Socrates was the first teacher to use questions as a way to bring in-depth answers from his students”
The comment about [American] hospitals being primarily concerned with improving the quality of life in the community is amazingly naive. In contrast to this, it is later noted that many hospital routines are for the convenience of the hospital administration rather than of the patients or nursing staff.
Several of the marginalia quote Toffler’s “Future Shock”.
Some reference to “Third Wave” would have put many of the institutions discussed in a historical and broader context. Reading the Tofflers’ “War and Anti-War” would have inspired punchier presentation.
The epilogue of the book has a number of predictions.
Information Anxiety 2
“Information Anxiety 2” (2001) is a rewrite rather than a sequel. Many of the original sections are included, and there is some new content. Some original sections do not appear. The ludicrous comment about journalist objectivity and American hospitals remain, however.
This version is “only” 337 pages. This edition has less “tail”, just an index.
There seems to be more name-dropping and quotation of other books in this edition. There also seems to be a greater emphasis on the author's own achievements.
Generally I have found this book weaker than the original. There is more emphasis on business and less on the individual.
Once you wade past the lengthy contents section, there is a rather smug chapter on predictions about the information age that have not come true (in 2001). No mention is made of the predictions in the epilogue of Information Anxiety (1989), which consistently missed every time.
The five ways that information may be organized by has been given the acronym “LATCH”: Location, Alphabet, Time, Category and Hierarchy. Hierarchy was formally “continuum”.
All the quotations from Future Shock have been removed.
Page format and layout seems a little easier to read.
“Civilization had too many rules for me, so I did my best to rewrite them”.– Bill Cosby (p.193) [Awkward!]
A few sections are in triple column print, which might have worked in the original paper book, but is tedious to read on-screen.
In contrast to the original book, there is a section about the merits and continued popularity of printed newspapers. Also some examples of design work the author’s company had done for printed newspapers…
Significantly, the “Violent Wallpaper” chapter on newspapers and mass-media is no longer found in this edition.
There are several sections on various management and employee interactions. If you want to learn about this, you are better reading “First Break All the Rules” by Marcus Buckingham and Curt Coffman.
New text includes discussion of company mission statements, customer service and engagement, workplace politics, search engines and websites.
The “pyramid cookbook” (p.107) idea was interesting. Hopefully one day something along these lines may be created.
Much of the technology related comments in either book are no longer accurate.
While I have my reservations about the presentation of these books and some of the content, they do contain a lot of useful information and ideas, and are worth reading.
When hunting, camouflage will help put food on the table.
If hunted, knowing how not to be seen or found will save your skin.
Many preppers take their cues from military practice. Sometimes this may not be the best option.
As I have discussed elsewhere, many armies do not seem to practise camouflage as seriously as it was taken a few decades ago.
Stretching a net or camo cover over your helmet and wearing the latest camouflage pattern in vogue does not make you adequately camouflaged.
USMC MCRP 3‑01A Rifle Marksmanship, Chapter 10: “Target indicators are anything that reveals an individual’s position to the enemy.
“These indicators are grouped into three general areas: movement, sound, and improper camouflage…There are three indicators caused by improper camouflage: shine, outline, and contrast with the background.
“Most targets on the battlefield are detected due to improper camouflage.”
Camouflage is commonly taught as “the five S” or sometimes, “seven S”. What these S actually stand for varies. “Movement” and “Aircraft!” are sometimes included, flying in the face of alliteration.
Silhouette
You probably understand this as a caution not to silhouette yourself on a skyline. And that may be the limit of your thoughts on the topic.
For example, you can silhouette an enemy by adopting a low observation position, which may skylight them even if they are not walking along a ridge line. “Skyline” is sometimes an alternate category.
Silhouette involves more than just skylines, however.
If you are dressed darkly, but before a light background, or dressed lightly, and before a dark background, you have also become a silhouette.
Walking past a window may silhouette you to a viewer outside or inside.
A ship underway on the ocean is silhouetted by its wake.
Muzzle flash in the dark will silhouette you.
If you are utilising an object for concealment, position yourself so that you do not create a separate silhouette. Looking around concealment will make you less obvious than looking over it.
Background
Paying attention to your background is one of the fundamentals of good camouflage.
Remember that backgrounds appear lighter with increasing distance. Most backgrounds are lighter than is assumed.
If you are attempting to avoid observation, you must constantly be mindful of your background, relative to an observer. If the observer is airborne, your “background” may be beneath you.
The availability of small drones/UAVs means that the capability to observe an object from the air as well as ground level has become commonplace, even for individuals.
As an aside, during the Second World War, “Project Yehudi” investigated camouflaging aircraft by mounting lamps on them, so they did not appear as dark objects in light skies. With new technologies such as variable LEDs controlled by photocells, it would not surprise me if this idea was not soon dusted off and applied to military drones.
Many a would‑be ninja, gangsta or Rambo will dress in black. They will appear as a dark spot against most backgrounds.
If you do not know where an enemy is, “shooting the shadows” and putting a round in any particularly dark spots may yield results. This is a variant of the “shooting cover” tactic used by Rhodesian soldiers.
In TV and movies, sun glinting off an optic constantly gives snipers away. Choosing a position where they are not firing into the sun does not seem to occur to fictional snipers!
Tights/pantyhose material may be used to reduce reflections from scopes, binoculars and goggles.
Goggles should be kept covered until needed. This will also reduce the chance of the lenses becoming scratched.
Buckles and other metal gear should have a non‑reflective finish.
A polished knife blade or handgun may catch the light at night. Smearing it with mud or dirt may help, or keep it holstered until needed.
Some clothing, such as waterproofs, have a shiny surface, which looks unnatural.
The clear areas of map cases or watch faces may catch the light.
Large pieces of foliage used for camouflage may also have a shine.
Areas of different colours may reflect the same if viewed at certain wavelengths.
The natural oils of the human skin give it a sheen which may be distinctive, even under moonlight. Skin should always be covered by some means.
If you have ever dropped a well‑polished object in long grass, you will understand that being reflective can contribute to camouflage.
Suppose you are wearing a beige outfit and laying in a grass meadow on a sunny summer day. Will you appear as a brown spot in a green field? No. The sunlight reflecting off the grass will gain a green hue, and that light being reflected off your light-coloured clothing will make your outfit appear green too.
In certain conditions, the reflectance of light colours may contribute to camouflage.
Shade
Shade is actually two topics. Some sources do have shade and shadow as separate considerations
Many amateur camouflage designers agonise over the colours they select.
In real life, the appearance of a colour will depend on many factors, including light level, colour of light the cloth is reflecting, what colours it is in proximity to, fading from washing, wear, whether the garment is clean or muddy and so on.
Shade or tone of a colour is actually a more important consideration than precise hue. An object of a different hue may be overlooked if it is of a similar shade or intensity to its surroundings. Light shades may reflect the colours surrounding them.
Matching shades with your surroundings overlaps with the observations already made about matching backgrounds. Indeed, it will be seen that many of the categories discussed here intersect and overlap.
Why many modern camouflage patterns fail is because the colours selected do not differ sufficiently in shade. Beyond a certain distance, these patterns “blob‑out” and the wearer appears as an obviously human figure who seems to be wearing a single colour outfit.
Shadow
If you should be mindful of your background, you should also be attentive of shadows.
There is a Western where a character explains to another why they are walking down the dark side of the street.
If you are in the shadow, you can see what is within the shadow and also into the lit areas. If you walk in the light, you may be unable to see clearly into the shadow.
This is good advice, and works for both day and night. On a very sunny day, keeping to the shadows keeps you cooler too!
The most basic way to not be seen is to hide behind something.
When this is not possible, taking to the shadow of a terrain feature is a good strategy. This may be combined with utilising a suitable background too.
Suppose you have to cross a forest road or clearing and fear observation? If possible, cross within the shadow of a tall tree. Crouch over with your hands close to the ground and you may be mistaken for an animal if you are observed.
While shadows can hide you, they may also reveal you too.
Shadows are actually one of the main challenges when attempting camouflage.
When the sun is low in the sky in the early morning or towards sunset, it will create very long shadows. A relatively small projection may have a shadow metres long pointing to its location. Aerial reconnaissance photos were often taken at these times to exploit this. A similar effect may occur in bright moonlight too.
Depending on time of day, time of year, and latitude, an object may cast a shadow three to six times its height.
The Afrika Korps and Italians fighting in the desert used a style of entrenchment that lacked a pronounced parapet and parados. This made the positions less obvious. The hole itself would still show as a dark area when viewed from the air unless covered by camouflage netting or a shelter cloth.
The flatter something is, the less shadow it creates. A camouflage net over a foxhole makes it appear less like a dark hole in the ground.
A rectangular object like a building or vehicle will create a distinctive shadow. Covering the object with a well‑sloped camouflage net will reduce the object’s shadow and create a shadow/shape closer to that of a natural terrain feature.
A standing man will throw a longer shadow than a prone one. The prone man will still create a shadow, and parts of the body will create distinctive shadows that will make them recognisable as human body parts.
By using some means such as a cloak or blanket, the prone man can “flatten‑out” his apparent shape and conceal some of the more distinctive shaped areas.
Shadows and shades play an important part in our perception of objects. How we distinguish between a white marble statue and a white paper silhouette is by the shades and shadows of the former.
Have a look at videos of the “Hollow Face Illusion” for an example how the brain uses such cues and how it may be sometimes fooled.
Given the above, it is surprising that this effect is not more often exploited for camouflage systems.
A human body is effectively a collection of cylindrical shapes. If the camouflage pattern on clothing was structured more like a shaded relief map, it might do a more effective job at disguising the actual shape of the wearer. Shading would make flat or concave areas of cloth appear as either depressions or projections.
Butterflies hold their wings vertical when at rest. Moths hold their wings horizontal. Most moths are active at night. Butterflies are active in the day and holding their wings vertically minimises the shadow they create, reducing the attention of predators.
Multiple Camouflage Failures
Shape
One of the primary rules of personal camouflage is don’t look humanoid.
The human brain has specialised areas for recognising human body shapes and particularly human faces. This is part of the explanation for phenomena such as pareidolia.
Headgear, pouches and weapons also have distinctive shapes that an enemy will notice.
Shape and silhouette are related. The less human a silhouette appears, the greater the chance that it will be mistaken as something else.
Covering your face and adopting postures that are not obviously human will contribute to better camouflage.
“Camouflage uniform” is an oxymoron. Good camouflage avoids regularity in colour and outline. To quote Langdon‑Davies: “as unlike a Savile Row tailor’s suit as possible.”
One of the ways to disrupt outline is to use a disruptively patterned material.
Many man‑made camouflage patterns lack sufficient contrast to disrupt the outline, simply resulting in a human shape wearing a patterned outfit.
Many camouflage recent patterns use small elements, which increases the tendency for the pattern to blob‑out, creating a human shape apparently wearing a single colour outfit.
In nature, many animals that utilise disruptive colouration enhance the contrast between the elements. Rather than being uniform, light areas become lighter towards the edge, dark areas darker toward their edge. The patterns of some snake skins are a good illustration of this.
Textilage breaks up some of the distinctive shapes of a rucksack.
The other approach to disrupting shape, which may be used in addition to disruptive cloth patterns, is to break up the outline with irregularities and protuberances.
This three‑dimensional approach has the advantage that it works when light‑levels are too low to distinguish the patterns on a cloth. It also helps disrupt the apparent surface texture of a uniform item.
The best known way to do this is the addition of natural materials such as leaves, twigs or tufts of grass.
Some clothing items include nets or loops for the attachment of such materials. Pockets, button‑holes, waist‑bands, webbing, collars, shoulder‑straps and similar may also be used.
Natural materials will tend to wilt or discolour, so need to be replaced often.
Adding foliage to helmets or other headgear may still be encountered, but often the shoulders, upper arms, backpacks and other visible areas are neglected.
You will spend a lot of your time walking or prone. Your backpack will often be the thing that observes see first. Add some foliage and textilage.
Create an irregular-shaped hat/helmet cover as described here and here. Use a metre square piece of scrim or net to create a coif, shawl or mantle for the shoulders and add textilage and foliage.
British soldiers with foliage added to helmets but body and weapons neglected. Note how the British MTP pattern blobs-out to a single colour.
British Soldier of an earlier decade, doing better!
Natural materials may be supplemented by “textilage”. Strips of cloth, scrim, hessian, string etc. that are knotted to the garment to create irregular shapes.
Shorter pieces tend to stand up, and are useful for upper surfaces, while longer lengths droop and hang down, which is good for other areas.
Disruption without concealment is not camouflaged.
A basha‑sheet pitched in the middle of a field will be easily identified, no matter how good the camouflage pattern painted on it. A basha pitched in a wood, under cover, coloured to match leaf litter, will work much better.
As already mentioned, “Shape” also applies to posture.
A standing individual is difficult to conceal. A prone figure is less obvious, particularly if they utilise any terrain features within the area. Flatten yourself against walls or similar objects to reduce creating a distinctive shadow or silhouette.
The example above of crossing an open area moving like an animal is another example of shape and posture used for camouflage.
Scenery
I will admit I have never seen “scenery” as one of the 5 or 7 S.
Hiding behind or below cover or concealment is one of the fundamentals of not being detected. Yet the 5/7 S make no direct reference to it.
A hunted squirrel will move around a tree trunk so the trunk is always between squirrel and the hunter or dog. Keep the direction of a potential observer in mind.
Surface
“Surface” or texture is often a clue to something being out of place.
A flat, painted area will not resemble grass, even if the exact colour of surrounding vegetation could be matched.
No matter what pattern it is printed in, most camouflage clothing has a smooth uniform texture. The addition of foliage and textilage help reduce this.
Camouflage requires disruption of depth perception as well as disruption of shape.
Speed
It is very difficult to conceal a moving object or individual.
I suspect this may have been used as an argument for the obvious current neglect of teaching sound camouflage practices to modern soldiers.
However, currently in the Ukraine, one of the main defences against enemy drones is ceasing movement so as not to attract attention.
FM 3‑21.75: “If moving where it is easy to blend with the background, such as in a forest, and you are caught in the light of an aerial flare, freeze in place until the flare burns out…If you are caught in the light of an aerial flare while moving in an open area, immediately crouch low or lie down. If you are crossing an obstacle, such as a barbed‑wire fence or a wall, and are caught in the light of an aerial flare, crouch low and stay down until the flare burns out.”
In nature, freezing is a very common behaviour for creatures that depend on their camouflage for protection.
When they do move, animals that rely on camouflage tend to move slowly and smoothly without becoming unbalanced. Some animals such as certain lizards and insects, utilise a swaying movement, mimicking the movement of leaves stirred by a breeze.
If you move, move slow and steady. This also reduces sweating and the chance of overheating.
Move for 20 minutes, rest for five. When still, watch, listen, smell.
Many armies teach a variety of crawling techniques that allow a soldier to exploit any concealment and cover. Langdon‑Davies taught some intermediate techniques such as the monkey walk that allowed faster movement when higher cover or concealment was available.
Sound
Speed and sound are related, in that fast or hasty movement is often noisy. Slow and careful movement is often quieter.
Loose coins, keys, certain types of clothing, chewing gum, a partially filled container of matches or pills, a half‑full water bottle, dog tags, sling fittings etc may all cause noises that will give you away. Phone on silent, or switch it off if you can.
Certain types of terrain or animals may create noise that will betray your presence.
Jump up and down, and see if there is any other noise than that of your feet hitting the ground.
Sometimes noise may be masked by other noises such as passing traffic or artillery.
Smell
Most hunters know to position themselves so the wind is blowing from the intended prey towards themselves.
Smell is less of a consideration to many soldiers, but can be a factor in camouflage.
Having eaten certain foods, body odour, sweat, wearing perfumed aftershave or other skin and hair products, may give away your presence.
Smoke
Smoke is related to Smell.
Smoking or chewing tobacco, or just having the smell of it on your person may also betray you.
A glowing cigarette tip not only gives away your position, but makes a good aiming point. So does the screen of your phone!
Smoke on the battlefield, be it deliberate or accidental, may be used for concealment.
Similar natural occurrences such as mist and fog may also aid concealment. Fog also tends to dampen the transmission of sounds.
Spacing
“Regular”, “neat”, “symmetrical”, and “uniform” are the opposites of good camouflage. This applies to clothing, formations and just about everything.
Summary and Suggestions
When it comes to camouflage, it becomes obvious there is no single answer.
Note that many of the strategies described above are actually behavioural. For example, minding your background, using the shadows, keeping behind or beneath concealment, dropping down when not moving, and slow and smooth movement, among others.
These things are easier if you are not dressed in day‑glo orange, of course!
Wearing neutral or natural colours will help, particularly if you avoid very dark shades which will stand out against many backgrounds.
Adding contrasting patches and pockets offers the potential of a variation of “boroboro”!
Tassels like a buckskin shirt may help disrupt shape.
Camo‑gear is an option, but have no illusions as to how effective it will be. A human‑shaped garment can only do so much, no matter what pattern it has.
Many of the modern patterns do not perform that well.
Dressing in nothing but camo “army gear” may attract more attention than you intended.
Some time ago, I came across some photos of soldiers fighting in the streets wearing snowshirts. If there had not been snow, would it have occurred to them to wear similar items in greys and browns, I wondered?
A “shapeless” smock along the lines the Langdon‑Davies suggests could be tried. This has the advantage that it may be removed when looking more regular and conventional is required.
Snow
On the topic of snow: white only works as camouflage if it is clean.
A garment that is both white and warm will be worn when there is now need for camouflage and soon become dirty. Being insulated it will be difficult to clean and slow to dry.
Snow camouflage and warm clothing should be separate items..
Cover Your Skin
Camouflaging yourself is pointless unless you include usually exposed areas such as hands, neck and face. Most of us don’t have hair in camouflaged colours either.
In an emergency, mud may be used to dull down your hands, neck and face. Camo‑cream, soot, dirt, cocoa or burnt cork have their drawbacks if you need to remove your camouflage quickly and appear like a regular person.
A suitably coloured or patterned hat and gloves may be used for the hands and hair. Textilage may be added and provision to add foliage included.
During the Second World War, troops were taught not to look up at enemy aircraft. To the aircraft, a single uncamouflaged face stood out like a flashing light. A whole company of curious faces looking up, an invitation to strafe or to call in the artillery. The “anti‑aircraft” section were advised to use bandannas or veils.
In a more modern context, facial‑detection and face‑tracking software is already being used to help pick out humans from terrain. The ability to also recognise weapons is inevitable.
For the face, a balaclava or neck gaiter, preferably with a suitable camouflage, shade, pattern and colours, may be used, but may be uncomfortable in certain climates.
A bandanna, keffiyeh or scrim can be wrapped around the lower face, although most keffiyeh are not in camouflage colours.
The SOE Syllabus suggests a mesh of black or dark green: “The veil should be of double thickness over the whole face except for a belt of single thickness running round the front from ear to ear. It is not sufficient to leave eyeholes of single thickness as it will be found that vision is very much restricted at the sides. The veil must be made to tie on securely or it will be easily displaced when crawling or passing through thick cover.”
Apparently this tied at the front, where the knotted belt presumably helped break up the shape. If you do not have to look through such a veil, light and mid‑browns may be a better option than black or dark green.
Another interesting design is show here. The face cover has irregular leaf-like flaps that hang down and allow the escape of breath.
In low-light conditions you would not want your eyes covered.
The shade of a hat brim will help conceal the eye region. A mosquito head‑net is useful, even if the mozzies, gnats and black fly are thankfully not about.
If using goggles and/or an overvisor, a fringe of fibres or cloth strips added to the bottom may help conceal the lower face.
Cloaking Technology
When stationary, one wants to eliminate any distinctive shadows. The flatter you can look, the better. Some form of cloak or sheet may be utilised.
Unless operating in a permanently verdant environment, a brown-dominant pattern will probably prove most versatile.
This item must be big enough to cover you when prone, including your feet. When lying on a slope, your feet may appear higher than your head to an observer. A net or sheet should not be so big or bulky that it is an encumbrance when moving, or being carried.
Some camouflage nets on sale on the internet are available in 1.5 x 2 m sections. I have seen 8 x 4 feet suggested as a good size too.
A sheet of hessian, such as sewn‑together sandbags or sacks, may be used instead of a net and may be more effective in some situations.
When the snow lays on the ground, a white sheet or net may be required.
In the movies, the police helicopter will often spot the rooftop sniper. Hiding under an old tarp would have prevented this.
The shape of the net or sheet may be broken up by pattern and textilage, and there should be provision for adding natural materials. Do not overdo such additions, or the item will become heavy and look unnatural.
The edges should be irregular.
If not too large, such a cloak or net may be worn when moving, and helps camouflage your pack and other gear. In other posts, I have described the Inverness and another mode of wearing a blanket or similar as a hooded cloak.
Optionally, one may add a head opening so that the cloak may be worn poncho-style. Cinch it to reduce the length.
In dense terrain, when thorns and twigs will constantly catch on a net, it may be packed away in a suitable protective bag.
A cloak configuration allows you to access ammunition held in a chest rig. Since the chest region is often shaded, a chest rig should be of a light shade and colour and its shape disrupted with textilage. Beige or a light brown-dominant pattern is probably the most versatile choice for a chest rig.
By adding tapes or cords to the net or sheet, it can be secured around the limbs and worn when crawling.
The net may be erected to cover your sleeping position, or rigged as a screen before a firing position.
Mantle
Wearing a full-sized net may not be ideal when on the move. A short cloak or mantle can be constructed from a piece of material such as a metre-square piece of scrim with textilage added.
The main function is to break-up the shape of neck and shoulders. It may be modified with ties or loops so that is covers part or all of the arms.
There are also ghillie bases that are just a set of sleeves that cover the arms and shoulders. Some of these have hoods. Cut the hood off to make a helmet or hat cover.
Camouflaging Weapons
In some armies, camouflaging your weapon is frowned upon! You need it looking nice and tidy for parades!
Take a length of cord and tie some suitably coloured or patterned strips of cloth along its length. When in the field, spiral this cord along your rifle foreend. If you use a twisted cord, pieces of natural material can be inserted too. This “bunting” may be easily removed when necessary.
Extra Head Camouflage
When stationary, hide beneath your cloak/net/sheet. Your head and weapon may benefit from additional measures.
Head cover is good, but weapon needs some more work!
The SOE Syllabus recommends a sheet of moss, as is commonly found on stones or round tree roots. This is widely available, and needs virtually no further preparation. It may be combined with other means of head camouflage.
A piece of scrim may be draped over the weapon and/or head. If you need to see through it, this will probably need to be a dark colour such as dark green. That may stand out in certain environments. Pieces of foliage may be added to the scrim to make it less uniform. On the other hand, this area will be well-lit, and a darker colour will help compensate for this.
Scrim is often worn as a neck cloth rather than a keffiyeh. Alternately, carry your binoculars in a larger pouch and wrap them in a scrim for protection and padding. You will generally need the two together.
A hood for static duties is another option. One version is shown in the illustration, with additional explanation here. An alternative design is given on this page.
A hood attached to a garment has a number of disadvantages. It can get caught or reduce situational awareness. A better option is a helmet or hat cover that hangs down at the sides and rear.
Around page 306, the section on clothing choice is followed by:
“Personal equipment.
Nothing must be carried which is unnecessary. Personal equipment must be cut down to a minimum, and unnecessary objects mean extra bulk, weight, noise and possible loss of security. The following are always useful, and should be carried independent of personal taste or the necessities of the particular operation decided by the recce.
i) A knife, capable of being used either as a utility or offensive weapon. As an offensive weapon the ordinary clasp knife can be improved by sharpening the back of the blade for a short distance below the point.
ii) A match-box, full, because a half-empty box rattles. If there are only a few matches in the box the lower part of the box should be filled out with grass or other material.
iii) Some money – paper when possible – because coins in the pocket are noisy.
iv) A length of at least four yards of stout string. This may be used for any purpose from tieing [sic] up a man to preparing a booby trap or stretching across a path to give warning of a man’s approach.
v) A watch, worn on the wrist, where it will not get crushed when crawling.
vi) A compass, worn on a string round the neck, but carried down the back, where it will not cause discomfort when crawling.
vii) Some first-aid equipment on the lines of the British First Field Dressing.
The length of the operation and the type of ground will decide what type of quantity of food (or water) should be carried.”
One seldom encounters a load‑out list of such brevity, nor of such modest means.
With the exception of the compass, and possibly the knife, most of these recommendations might be considered common household items. No gadgets or gizmos!
The above list nicely compliments that given in my article “Seven Tools of EDC”, even consisting of seven recommendations.
As the first paragraph explains, these items are carried in addition to mission specific items such as small arms, binoculars or explosives.
A later section on night operations recommends adding:
• A small pocket torch with spare battery. The torch may be encased in a section of bicycle tube to avoid noise, or it can be bound with rags.
• Stick encased in old bicycle tube for carefully feeling the ground ahead. The stick may also have a lead-loaded head as a weapon of silent offence.
• Watch and compass to have luminous dials. The watch is best worn on the wrist, with face against the skin instead of outwards. Compass worn as recommended above.
• Cough lozenges to prevent coughing.
Observations
i) A Swiss Army Knife is my usual EDC choice. SOE operatives might have a more serious and urgent need for their blades, so a more substantial folder was likely.
Other publications make it clear a dagger was likely to be carried for more deliberate operations.
Given the option, I would add at least one fixed blade knife to an outfit.
ii) In a modern context, carry a butane lighter, as recommended elsewhere in this blog.
Grass, thistle down or similar used to prevent matches rattling should be completely dry.
iii) Money is a useful tool. Look into ways in which coins (or keys) can be carried to minimize noise. If nothing else, stack them and wrap in duct tape.
iv) Four yards of stout string is the minimum. Elsewhere, the book notes several strings may be tied together to create guide‑ or contact‑lines.
A greater variety of cordage may be carried with very little additional encumbrance. For example, a pair of two metre lengths of paracord or bootlace, a six-span length of braided fishing line, a two-span length of comms‑cord, roll of dental floss and some cotton string easily may be distributed across your trouser pockets.
The cotton string may be used as tinder and for applications where biodegradable cordage is more appropriate.
v) The next section of the book stresses the necessity of timing and coordination, hence the emphasis on the watch.
Included in that topic is allowing adequate and realistic travel times and allowing time for unexpected occurrences.
A watch that may easily be synchronized with others may be most useful.
vi) While very small compasses have their uses (I am seldom without my Suunto Clipper), a larger compass that is easier to read should be carried if you are out of town. These may often be found for less cost than some button compasses.
Adding a whistle to a compass neck cord is a good idea.
vii) You should have some medical items for minor boo-boos. Aspirin, plasters and alcohol wipes meet most needs.
The SOE expected to be shot at, so a couple of field dressings was prudent.
If there are guns, bows or large tools about, have the means to deal with any injuries, such as a few “Israeli Dressings”.
Many years ago, I read an observation that a shorter blade offered more control. I thought about the possibilities of a short, fixed blade on a full-sized handle.
There are, of course, a number of knife designs that use this strategy. Many wood-carving knives have blades much shorter than their grips. The familiar “Stanley”‑type knife might be included here, although the replaceable blades do sacrifice some potential strength.
And there are, of course, many tasks where a long blade is more suitable. If I want to quickly build a shelter, or turn wood into kindling, bigger is generally better.
Regular readers are well aware I am a big Mora knife fan. I own a couple of Mora 860 Companions, a 511 and a Pro Robust.
Recently, I came across the Mora Eldris. A similar, short bladed knife had featured in an episode of the Netflix production of “Ronja, The Robber’s Daughter”.
Time for an early birthday present!
This is not going to be a full review of the Eldris.
There are a number of those on-line already and I have not had this knife very long. I will record some of my initial impressions and related thoughts.
I chose the green model. The colour is actually a yellowish-green and possibly a little vivid to be considered a camouflage shade. Rather resembles grass in the summer sun.
Some gear you want low-profile, other items you want highly visible so you are unlikely to lose them. I think my Eldris is more the latter.
Mora call this their “pocket knife” and I have even seen it ironically referred to as “the Mora pocket folder”.
It doesn’t fold, but it is small enough for many pockets, and does weigh a lot less than many pen knives and multi-tools. Certain legislations will prohibit carrying a fixed blade knife without good reason, no matter how short the blade.
The Blade
As one might expect from Mora, The knife is very well designed and very good quality.
Some reviews have listed the blade as 63 mm, while the box description claims 59 mm. Several different measuring instruments I used make it closer to 54 mm.
The blade is actually shorter than the main blade on many penknives.
The blade is short but broad. The blade is 2 mm thick, but one gets an impression of a very sturdy item.
Blade material is stainless steel, which is my personal preference for knives that may be used for messy jobs a long way from home.
At time of writing, I am not aware of any carbon steel variants of the Eldris, an option that Mora have offered for some other models.
In addition to the Eldris, an Eldris Light Duty is available. The main difference, other than the colour choice and price tag, is that the Eldris has its backspine ground to act as a ferro‑rod striker.
The forward part has a wider bevel and thinner edge than that nearer the grip. This is a feature also seen on the Mora Kansbol knife. The blade has a Scandi-grind.
Out of the box, the knife felt very sharp. Many reviews talk about it seeming razor sharp straight out of the box. I used it to cut some cordage I was using, and the ends appeared very feathered.
I ran it down some crocksticks I had set up at 20 degrees. The knife did not feel so sharp to the fingertips, but cut a lot better.
I suspect a wire edge may have been the culprit, which is to be expected on a blade straight from the factory.
I suggest that new owners at least strop the Eldris before serious use.
The Grip
The grip is oval in both cross-section and shape. For some reason it reminds me of a Russian Doll!
Brand new, the grip surface has a slight tackiness. There are textured sections for increased grip retention.
I have relatively slender, skinny hands. The pommel of the grip sits within my palm. I suppose if you have really big hands this may or may not not be a good fit, so try before you buy.
It is possible to insert the knife into the sheath butt first if you really need a longer grip.
For most of us, however, the grip is quite frankly, excellent,
I am pleased to see the design includes a generously designed lanyard hole.
If Mora offered the companion blade on this grip, I would be very happy!
One of the reasons for the grip shape is that the sheath is intended to be ambidextrous. You may insert the blade with the edge either to the left or the right. Like other plastic Mora sheaths, the knife clicks securely into place and won’t be coming out until you want it.
The only thing the knife lacks is a belt hanger. This is a separate component, if you want one.
The belt hanger does not have a retention strap, but in genuine Scandinavian fashion, may be hung from a button instead of a belt (or a belt with a button?)
Accessory Kit
I brought my Eldris with the “Fire Starter, Secondary Lock and Paracord” kit. This came as a separate box stuck on to the bottom of the knife box.
I will call this the “accessory kit”.
The accessory kit, as Herny Ford famously said, is “any colour you want as long as it is black”.
This makes the discussion of the camouflage characteristics of the handle and sheath colour somewhat moot, since black is not a camouflage colour.
The accessory kit is mainly designed to make the Eldris a neck knife.
I have a couple of neck knives. One was once in production by CRKT and may be seen at the top of a photo in this article. Another was made and sent to me by a generous friend. A link I posted in another recent article shows 58mm Swiss Army Knives such as the Classic SD used as neck knives.
In my recent review, I noted that Mors L. Kochanski became well known for carrying a Mora knife on a neck cord.
The Eldris differs from most neck knives, in that it is a full-sized knife, be it one with a short blade.
It is probably a shade lighter than the knives Kochanski carried, but possibly not by that much, since a Companion or 511 are hardly heavyweights!
Secondary Lock
The “secondary lock” is a sort of frog/collar that fits around the sheath and mounts a strap across the butt to keep the knife in place.
The back of the sheath has two dimples which engage with bumps inside the collar section to lock it in place.
The instructions show that it should be pulled up the sheath until it clicks.
Presumably, the belt hanger fitting utilizes the same features.
As I already noted, the knife fits very securely into the sheath already. The secondary lock adds extra security since the knife is intended to be hung handle downwards when in neck knife mode.
When you first go to use it, the retention strap seems to be a little too short. You need to give it a bit of a pull for it to stretch and reach the popper. Whether this will change with use, I do not yet know.
Fire-Starter
The accessory kit also contains a “fire starter”. This is a fairly substantial ferro‑rod mounted on a short loop of cord.
The back of the blade of the Eldris (but not the Eldris Light Duty) is intended to be used as a striker for the fire starter. The user is cautioned not to use parts of the blade other than the back.
There is a little leather tab that according to the instructions is supposed to be folded over and braced against the end of the rod when the fire starter is being used. This is a feature I do not think I have ever seen with ferro‑rod systems.
I prefer to keep the knife blade still and pull the ferro‑rod backwards, and in this mode the tab seems to have no function.
The instructions show two ways to carry your fire starter with your knife.
The first appears to be passing the rod through its loop and securing it to the neck cord with a lark’s head knot. The rod on mine is too long to pass through the loop (or the loop is too short). Either way, I cannot do this with my example.
I later realized that the cord could be so knotted by passing the plastic fob through the loop. This needs to be pulled tight with the fob section as long as possible to prevent the fire starter sliding around. I positioned it so that it is unlikely to create noise by hitting the sheath, but am not confident it will stay there.
That leaves the second mode. The loop is dropped down over the bottom of the inverted sheath and finds a location just above the secondary lock, around the fat section of the sheath. To do this, the loop also needs to pass over the neck cord.
You therefore, cannot remove or stow your fire‑starter without removing the knife from its neck carry.
Like most similar devices, the ferro‑rod comes with a thick protective coating. Your first few strikes will be unimpressive until the coating is worn away.
Potentially, the second mode could cause rattling. Keeping the leather tab between the sheath and the rod seems to reduce this, and the rod mainly hits the compliant material of the secondary lock.
If you are hunting, it may be prudent to remove the fire starter from the knife. Having a neck knife swinging around may not be ideal anyway. Some animals have very acute hearing and what are relatively small noises to us may alert them.
The Cord
Last, but by no means least, the cord.
Mora call it paracord, but when is paracord paracord?
I ask this because I recently saw a “credit-card” survival tool that was wrapped with what was claimed to be “paracord”. Since it was about 2 mm in diameter, possibly less,
I am confident to bet this “paracord” is not 550 lb-rated, and very unlikely to be Mil-Spec 550. The cord was, however, perfectly good for the uses that it was intended for.
Worth remembering that real paracord can be too stretchy for many survival applications. That may be why your basha roof always sags!
550 lb paracord is 4 mm in diameter. Admittedly, paracord is made in other sizes. I have a 100 metre roll of 3 mm 425 lb-rated paracord that is more than adequate for the purposes I use it for.
Technically, I suppose it may be claimed to be paracord if it has been used to make parachutes. There is cord of under 2 mm diameter and only 95 lbs that is claimed to be paracord. Several friends will doubtless remind me that cats and beavers have been parachuted!
Mora chose to call the cord in this kit “paracord”. It seems more compressible than other paracord I have to hand. It is 4mm diameter, but does not feel like there are multiple internal cords within. The ends are heat sealed, and evidently there is a white core material. I don’t intend to cut into it to find out if it is “real” paracord or not.
It is, however, perfectly good cordage for the use it was provided for.
Fit the cord to the sheath exactly as shown in the instruction sheet. Feed one end of the cord into one drainage hole. When it emerges, feed that end back down into the sheath until it sprouts out of the other drainage hole. Pull on the cords until they are roughly equal in length.
Tie the two sections of cord in an overhand knot. The overhand knot near the sheath is supposed to reduce the tendency of the sheath to twist.
I tried a figure-eight knot, but it used up too much of the cord’s length. If you have a thick neck, large head (or big hat!), you may find the length of cord provided insufficient.
The knot suggested to join the ends of the cord is not one I have ever seen before. The instruction sheet calls it a “slipknot”, and no argument can be made that it is not a slipping knot. It is not the knot usually encountered as a slip knot, nor any of the other knots that sometimes use this name. It is not even the jam knot, a slip knot that pretends not to be one!
This knot, which I will call a safety knot, is simple. Tie a loose overhand knot in one end of the cord. Take the other end, fold it into a bight and place the bight in the eye of the overhand. Pull the overhand tight.
The utility of this knot for a neck knife or similar object is obvious. If the cord catches on something or the knife gets caught in machinery or similar, the knot will undo even when the force is not enough to snap the cord or break the sheath.
During wear, the end bight worked free, resulting in a single cord held firm by the overhand knot. This is an interesting alternative, which seems less likely to come undone when not desired.
You may need more security if climbing or working near water. The safety knot may be quickly modified into a fisherman’s knot.
When I assembled this, the first thing I thought was that the neck cord cries out for a whistle.
Unfortunately, all the whistles I have to hand were orange! The sheath colour really wanted something that complimented it more.
One thing I did find was that attempting to open the popper of the secondary lock pulled the safety knot undone, or loosened it. You will need to hold the sheath in one hand when opening the lock. You will also need to use both hands to draw the knife.
Conclusions
The Eldris poses several questions.
The first is, perhaps, is the accessory kit worth the money? It is a little pricey for what it is, even if a little cheaper if bought with the knife.
Paracord is pretty easy to acquire, and may be found in colours and patterns that better suit the sheath and grip colour than black.
The fire starter is of good quality, and more robust than some examples. Similar items may be acquired from other sources for a little less, however.
The main feature of this fire starter is that the loop is exactly the right size to fit around the sheath. I find the fob at the end of the cords a little ungainly and obstructive when the fire starter is carried in this mode.
Is this the best position to carry a fire‑starter? Would a butane lighter attached to the sheath with a rubber band (cut from a bicycle inner tube) be more practical? Said band could hold both a lighter and a ferro‑rod.
If you intend to carry the Eldris as an inverted neck knife, the secondary lock has an obvious appeal.
Something similar, however, could easily be constructed from some appropriately coloured webbing strap and a button. popper or Velcro.
The secondary lock may be “belt and braces” since I expect the lock in the sheath will prove to be very effective.
An interesting idea would be to use the lanyard hole to connect the knife to the sheath. Then in the unlikely event the two do part company, your knife will be lost. This precaution may be useful for other modes of carrying the Eldris.
It is a wonderful knife, but what are you going to actually use it for?
For some jobs, a longer blade is better. If gutting a fish or skinning a rabbit, I would be inclined to reach for a Mora Companion rather than an Eldris. The Companion is probably a more versatile knife, which is why one sits in my bug-out kit beside a kukri.
The Eldris has been touted as “the perfect knife for any outdoor activities” but that is clearly clickbait nonsense. Perfect if you also have a machete, saw, axe and Swiss Army Knife handy too, perhaps.
Perhaps it is unfair to compare the Eldris to other sheath knives.
The Eldris has been described as a pocket knife, or as having the virtues of a fixed blade with the convenience of a pocket knife.
It does offer an interesting alternative to many folding knives. It is stronger, simpler, and better suited to messy jobs. Lighter than many folders too.
The Eldris is a supplement to a good penknife, rather than a replacement.
I can see myself carrying an Eldris if heading into the wilds, but it would not be replacing the Companion or any of my other primary tools.
Mora’s main competitor for the Eldris is Mora themselves.
While the Eldris is very reasonably priced compared to many other outdoor knives from other companies, it is about three times the price of many other Mora models.
The Eldris has an obvious superiority in materials and design, but the cheapest Moras are still first class quality and outstanding value for money. Companions or 511 may be more versatile choices than the Eldris.
Within camp or when working, the Eldris might be handy for numerous minor cutting jobs, being handier than fishing out a folding knife.
It is a good choice for the sort of jobs an average belt knife may be a little big and clumsy for.
Personally, I have never really been one for neck knife carry. I may get more used to the idea with time. The cord may be wrapped around the sheath and the whole thing carried in a pocket until the neck knife mode was wanted, of course.
If you are not sure whether to invest in an Eldris, it may be prudent to buy a Eldris Light Duty first and try it for fit.
For me, it was an easy leap for me to get from penknives to fire‑lighting.
In a serious situation, gram for gram, you should be carrying at least one butane lighter. Simple, reasonably priced and good for hundreds of fires. Can still be used to light fires once the fuel is exhausted.
I was investigating which penknife tools are best for striking sparks with.
The back of the saw blades is the answer.
I also discovered that a better technique than that you usually see is to keep the saw blade or “steel” stationary on the tinder and pull the ferro‑rod backwards towards yourself.
Uses the whole length of the ferro‑rod and does not flick your tinder all over the place.
I looked in wonder at some of the exotic tinder materials available on sale, and their lofty price tags!
I will stick with cottonwool and Vaseline, which works wonderfully with a ferro‑rod, as well as naked flames.
Gunpowder as Tinder
I began to think about other tinder materials, specifically, gunpowder.
Some may argue that modern firearm propellants are not strictly gunpowder, but for convenience this is the term I will use, although much of the following may also be applicable to black powder and other low‑explosives.
In general, ammunition is precious, and should be reserved for its primary application.
One exception to this is when the immediate need for a quick fire far outweighs the remote possibility of you managing to shoot a hare or large bird sometime in the future.
Cold and wet may kill you in hours, while you can last several days without a meat dinner.
It is quite possible that you have not seen any likely targets. Some hikers manage to blunder through the wilderness never seeing a four‑footted beast or large bird.
The second exception is on a location such as a war‑zone where there may be quite a lot of ammunition available.
The enemy’s ammunition may not be usable in your weapons. One of the practical applications enemy ammunition may be put to is fire‑lighting, assuming a fire is tactically permissible, of course.
If you have pliers or a similar tool, the bullet may be pulled from the case. Most small‑arms cartridges are relatively thin, so may be cut in two with a stout blade, bayonet edge or hatchet.
Firearm propellant is a low‑explosive, so will not explode unless it is confined. It will, however, burn fast.
For this reason, propellant is best used to “season” other forms of slower burning tinder and kindling.
An interesting idea is to lay a powder-train leading to the centre of tinder and kindling.
Propellant not used should be stored in a water‑tight container for later use. You may mix it in with your container of “found” tinder and/or carry a separate supply.
That is all fairly straightforward and makes good use of enemy ammunition as a resource.
Many of these techniques could also be used with blank ammunition, or by utilising other sources of powder such as fireworks.
Firing with Primers
Some of you will doubtless be wondering: Can you light your fire using the cartridge primer?
The primary answer to this is not to try it unless you really, really have to!
Dry powder is easily ignited by a lighter, matches, magnifying glass or sparks. I may have once seen references to combining powder with friction methods such as the fire‑drill or fire thong too!
Lighters, matches, magnifiers and ferro‑rods are relatively safe and reliable mechanisms. You should always use the safer option whenever you have a choice.
A couple of well known survival publications do give a method for lighting a fire with a cartridge.
“Little powder mixed with tinder may prove effective. To try for flame, cut cartridge or bullet leaving a very few grains of powder in shell. Insert a little dry cotton (coat lining) with torn and fuzzy edge. Pack loosely.
“Fire into air. Cloth may float down‑ burning. Grab and light tinder with it.”
I have not tried the above, but it sounds like the burning material will have a fairly wide area to come down in, and will need to be found before it goes out, or starts an unintended fire!
“Break open the round and pour the gunpowder on to your tinder before using your flint, or remove only half the powder and stuff a piece of cloth into the cartridge case.
“Chamber the round and fire as usual, into the ground.
“The cloth will be ejected smouldering. Place it on tinder with the remaining propellant and you will soon have a fire going.”
Shooting into the ground at least seems a little more practical.
Then there is “Survival” by Len Calcutt:
“The powder contents of the cartridge can be used to help fire your tinder. You can also wedge a cloth in the cartridge once the ball or projectiles have been removed and chamber the round into your weapon. Aim at the tinder and fire. The cloth will be shot out smouldering.”
And, I suspect, your carefully gathered tinder and fire materials will be scattered over a large area by the muzzle blast!
The same article insists that aluminium foil and shavings may be used as tinder. Good luck with that!
If you have a moment, go to your kitchen, take a strip of aluminium cooking foil and try to light it on the stove.
I would be very cautious about attempting to use these methods unless you really have to.
I have to wonder just how old this technique of firing a cloth from a firearm is? Is it an old idea that has been passed on without consideration on how weapons have changed?
If you have a large bore muzzle‑loading weapon, it seems feasible. It is just the normal round, without the lead ball. If the weapon is earlier than a percussion lock, it is simpler to place the lock right next to the tinder.
Firing a bit of cloth from a bottlenecked case down a 5.56mm calibre barrel sounds like a good way to block your barrel.
I would not, personally be inclined to try this with anything smaller than a 20‑bore shotgun.
Cutting the cartridge open and lighting the powder by some other means seems simpler and safer!
No Other Choice?
But what if the only means to light a fire you have is a cartridge?
Full disclosure: I have not personally done this, and have no intention of trying.
If the situation did arrive, here is how I would consider going about it.
Use at your own risk, and preferably don’t use at all and use safer methods instead.
Handgun Method
If you have a handgun:
Pull or cut off the bullet. Empty as much powder as possible on your tinder. Insert the rear half of the cartridge directly into the chamber.
Place the muzzle near the tinder and fire. Only the primer and a few remaining grains of powder will ignite, but this should create enough of a flame to light the powder in the tinder.
Probably will not work with long‑guns and may not work with longer barrelled pistols.
Without a Gun
If you do not have a suitable gun:
Make a sturdy tripod of sticks over your tinder, with your other fire materials nearby.
Cut the cartridge and empty out all the propellant. Add some to the tinder and save any you do not use.
Split the bottom section of one of the tripod legs and place the rear of the cartridge case between, mouth towards the tinder. Ideally you would bore a hole, but you are unlikely to have the means to bore a large enough hole with you.
Take a stick about a foot or more long. Carve one end into a blunt point smaller than the primer.
Hold the stick as far from the point as practical.
If you have gloves, wear them. If you do not have gloves, wrap your nearer hand with a bandana, keffiyeh etc.
Wear any eye‑protection (sunglasses, goggles etc) and face covering that you may have.
Ideally, look downward to the ground when hitting the primer, rather than at the cartridge.
A helmet or brimmed hat will provide added protection as you look down.
Place the stick point on the primer and hit the other end. This may ignite the emptied cartridge and light the tinder.
The same methods should work for rimfire cartridges, but you will need an implement that crushes the brass rim of the cartridge rather than hitting a central primer.
You can try carving the point of the stick as a wedge. You may need to add a stone or similar to the tip.
The above techniques are theoretical, untested and should not be attempted unless in a genuine dire situation.
I know someone on Youtube will be trying this.
Some of this information has been out there for decades. SAS and other special forces will have been taught some of the above methods. We cannot know if they ever have had cause to use them.
About a week ago, I posted the second part of “Knives You Need”, discussing Swiss Army Knives.
Since the first version went up, I have added more links and more content.
The pocket clip for my Swiss Army Ranger arrived, so I have posted an additional image of the new scales with the clip installed.
I have also put a few additional modifications on the page.
For today’s chapter of Survival Library, it seems appropriate that I look at two books that look specifically at the use of Swiss Army Knives.
Whittling in the Wild
If you are interested in Swiss Army Knives, you will have encountered videos posted by Felix Immler. Most of the links from my previous blog are to videos by Herr Immler, and for good reason.
There is a lot of rubbish on Youtube, but people like Felix Immler are a welcome breath of fresh air!
Immler has written several books on the Swiss Army Knife, but I have only been able to find a copy of “Whittling in the Wild”. It may be found under variations of this title such as “Victorinox Swiss Army Knife Whittling in the Wild”.
Felix Immler has apparently done a lot of work encouraging young people to experience whittling and create objects for themselves.
Most of the projects in this book are toys, fun‑stuff or curios. This is not the book to teach shelter construction or how to make a better rabbit trap. However, within these projects are many construction techniques that might be put to other uses, so they are worth a browse.
The book is worth reading just for the sections on safely using your Swiss Army Knife and basic handling techniques.
If you have young people you want to teach to use a knife safely and creatively, this is an ideal book. Many of us longer in the tooth and barer in the pate may learn a thing or two too!
Swiss Army Knife Camping & Outdoor Survival Guide
The second book is “Swiss Army Knife Camping & Outdoor Survival Guide, 101 Tips, Tricks & Uses” by Bryan Lynch.
Part One of the book mainly looks at a variety of knife models from Victorinox, ranging from the 58mm Midnight Manager to the SwissChamps and several of the locking blade models.There is a nice chart comparing the models included in the book.
Part Two is a nice section on safely using and maintaining your knife, including sharpening tools such as the wood saw and the chisel.
Part Three is on using your Swiss Army Knife in the wilds.
One oddity of this section is the author states that the distance of an arm‑span, fingertips to fingertips, is “roughly 5 feet (152cm)”.
Generally, the arm‑span is taken to approximate an individual’s height. For me this is bang‑on: distance from the centre of my chest to finger tips is exactly half my height.
The author later mentions that he is “a little on the short side”. The quick measuring scale he illustrates will not apply to the majority of readers. As he himself states “Obviously everybody is different, so premeasure your own limbs”.
Most of this part are presented as “projects” with an estimated time. Most of the projects are survival ideas that will be familiar from other sources.
Many are nicely described, and include the occasional less‑well known idea, such as the fire‑plow. Wilder has a nice story about someone using a fire‑plow, but I have seldom seen mention of this device in other publications, although it is included in some versions of FM 21-76/3.05.70 and the SAS Survival Handbook.
There is a suggestion about carrying wire wool under the corkscrew. I wonder if contact with the corkscrew will encourage the wire wool to rust, which makes it even less useful for firelighting. It is not a particularly good tinder for non‑electric sources of ignition. Some Swiss Army Knives have an LED. Can steel wool be ignited with the batteries for these?
There are far more useful things to carry than steel wool.
When using the back of the saw or some other tool with a ferro‑rod, it is more effective to draw back the ferro‑rod while placing the “steel” on the tinder.
I liked the section on carving wooden fish hooks from branched twigs.
The author talks about “catch and release” sport fishing.
Some mention might have been made that the paracord net described (or any net made with knots) will damage fish and should only be used for emergency or sustenance fishing. Similarly, wooden gorges as hooks are very cruel, often illegal, and should only be used in genuine emergencies.
While fish trapping with a bottle is mentioned, there is no mention of trot‑lines, which are likely to be more efficient than active fishing in an emergency.
There is a useful section on how a Swiss Army Knife may be useful for firearm maintenance and cleaning.
I also liked the tip on making a squirt bottle for cleaning out wounds. Yet another use for the sometimes maligned reamer! A bottle with a drinking nipple can probably be used the same way.
“There is a lot of wasted space in a vehicle, and I urge people to use it.” Good advice, although I would stress having something like a rain poncho, duct tape, vehicle tools and a sleeping bag or poncho‑liner.
Imagine attempting to repair your vehicle in very bad weather. It will help to have a means to keep the rain or snow off what you are working on.
In the “Urban” section, the author describes getting locked in a washroom cubicle. Similar happened to me in the toilets of a very famous museum. Like the author, I used my Swiss Army Knife to dismantle the lock and free myself.
Summary
In summary, I liked both of these books. Each is worth a read. I was lucky in that I was able to read both of them together.
There is a good possibility that when you really need a tool, your EDC Swiss Army Knife may be the only tool available. These books provide a nice reminder that you are better equipped than you might fear.
I had originally planned to make “Knives You Need” a two‑part series.
I have now had second thoughts.
The second part was going to address the topic of field knives. Much of it would have repeated ground already covered in other previous articles.
Instead, I have decided to take a slightly different angle and have decided to break this topic into smaller, bite‑sized pieces.
Many of you reading this may have spent good money getting yourself a survival knife. Good tools are important, you will get no argument from me on this point.
However, unless you spend all of your time in the great outdoors, the odds are that when you really need a tool, that survival knife will be back at home or in your car rather than on your person.
What is more, the tool you actually may need may not actually be a knife.
If you are willing to spend hundreds of dollars on a survival knife, is it not sensible to invest a little in the tools you are most likely to carry with you every day?
It is no secret I am a big Swiss Army Knife (SAK) fan.
Multi-pliers and lock knives will be covered at a later date.
Critics of the Swiss Army Knife point out that the blades lack a locking mechanism and potentially may close on the fingers of the user.
In practice, I have seldom had this happen. Perhaps penknife users are more cautious due to the lack of locking mechanism?
Mechanisms fail, so a lockknife that is mistakenly used like a fixed blade may be a greater potential risk.
There are several websites that give advice on safely handling and using penknives. Many of these are written for scouts, but many older users would probably benefit from putting these ideas into practice.
I recently read of someone who did have a blade close on them. They accidentally hit the back of the blade against a nearby wall.
This might have been avoided if the user had taken the precaution of extending an arm and checking for clearance around themselves before starting at task.
This is a prudent procedure for any tool use.
If using a long tool like an axe, hold it at full extension and check all around you. Do not forget to check for obstructions above and below you too.
The Penknife Grip
When using a folding knife, use what I call “the penknife grip”.
Your four fingertips are pressed against one scale. The opposite scale is held by your thumb and themar eminence. This keeps your precious digits out of the way of the main blades. This is the way to hold your penknife when opening tools.
When you need to close a tool, hold the knife in the same way and place the palm of your other hand on the back of the open tool. Calmly and smoothly fold your hands together to close the tool.
Many actions can be performed with your knife held in the penknife grip, keeping you safe should a tool unexpectedly close.
Some tasks will require a grip with your fingers around the knife body. Ensure a solid object, such as what you are working on, obstructs the tool from closing and that any pressure is applied in the correct direction.
Never use force to compensate for a blunt tool!
Never cut towards a body part, including your own. This simple and sensible precaution is often neglected in Youtube videos!
Right Tool for the Job
The risk of injury may be reduced by using the right tool for a job.
The long knife blade and saw-blades probably have the greatest potential for causing injury.
If you need to cut something, the short blade or the scissors are usually more appropriate.
If you need to bore a hole, use the shorter blade or the reamer.
If you need to pry, use the can- or bottle-openers, or better still use a more appropriate tool that is not your penknife.
In the pouch I carry my penknife in, I also carry an eight centimetre-long flat pocket pry bar. On my keyring, the P38 may be used to pry or open paint tins.
It is handy for trimming my nails or other minor jobs that it is not worth getting the main Swiss Army Knife out for. It actually sees a lot of use since it is the first tool I usually reach for.
The Classic was donated by the lost property box. It originally had green cracked scales and was missing its tweezers.
A few years back, I treated myself to a new toothpick and tweezers, which had recently become available in green.
Recently, it occurred to me how shabby the cracked scales looked. I would need something that matched the green of the toothpick and tweezers.
I found a set of replacements at a tolerable price. What was more, the new scales were in luminous green.
Classic SD with luminous scales. Note whistle, P51 baby can-opener and Photon-light also on keyring. The safety pin is attached directly to the Classic SD. I have now removed the safety pin since it had a tendency to open while the keys were in my pocket.
The Classic is a single-layer SAK with a small blade, a pair of scissors and a nail file. The tip of the nail file of the SD model is designed to act as a screwdriver. Some users grind the end to create a wider slot screwdriver. Some reviewers complain that the file no longer ends in a pointed nail cleaner. The screwdriver tip is still good for cleaning nails.
The Classic SD is one of Victorinox's most popular best sellers.
A friend showed me the 58mm Rambler, which is a two-layer SAK with all the blades of the Classic SD plus an interesting combination tool with a cap‑lifter, magnetic #00/#0 Phillips screwdriver and wire‑stripper/bender as well. I will likely buy a Rambler if I ever need to replace my Classic SD.
(Update: I have no willpower! I brought a Rambler and transferred the luminous scales on to it. This now rides on my keyring.)
The Manager is apparently a Rambler that replaces the toothpick with a retractable pen. The Midnight Manager is a Manager that replaces the tweezers with an LED. I have heard this light is not waterproof.
There are other 58mm models, but I feel the Classic SD or the Rambler are most useful.
I do not see much point in a 58mm model without scissors.
One oddity in the 58mm models are the bladeless Jetsetters. Supposedly airliner “cabin-safe”, this ignores that the scissors are probably a more practical weapon than the blades of 58mm models. The wirestripper on the combo-tool will not work without a blade.
If you intend to have a 58mm as your primary EDC knife, the MiniChamp may appeal. The extra tool that most appeals to me is the cut and picker.
Some may find the MiniChamp may be a bit bulky or heavy for keyring carry. A friend of mine has an alox version and considers it a little heavy for his keyring. Pocket clips for 58mm models may be found, but I do not use one myself.
Incidentally, SAK with Alox scales generally do not have tweezers and toothpick slots. I would recommend only considering models that have these useful tools.
When it comes to “full-sized” (91mm) Swiss Army Knives, Victorinox currently offers 28 different models.
For general use, survival, emergencies or EDC (Everyday Carry), I would suggest one of the following models:
Spartan
As one might expect from the name, the Spartan is the most basic model of the 91mm Swiss Army Knives. Apparently it remains one of their best sellers.
It is a two‑layer knife, so you get a large and small knife blade, plus the can‑opener and the bottle‑opener. On the back is the reamer and the corkscrew.
Knife blades are quoted as 58 mm and 36 mm in length, with a hardness of RC 56. My own measurement gives a cutting edge of around 60 mm, with the distance from tip to knife body being greater. A 91mm Swiss Army Knife complies with the 3 inch/76 mm blade length restrictions some areas impose. This figure was probably chosen so that SAKs were exempt!
While on the topic of smaller knives, this video suggests a 74mm Executive for EDC, but they have been discontinued.
The applications for the knife blades are fairly obvious. Quite large pieces of wood may be split or removed by using techniques such as batoning.
The knife blades are sharpened at an angle of 20 degrees.
The X-notch is an alternative to the square or log-cabin notch. It may be created by saw cuts or batoning a knife blade
The bottle-opener and can-opener are collectively referred to as the “opening layer”. Both the can-opener and the bottle-opener have applications that may not be immediately obvious.
The 58mm Rambler has a tool with a magnetic Phillips screwdriver. Oddly, the screwdrivers on 91mm knives are not magnetised. My bottle opener is weakly magnetic and the can opener more magnetic, but that may be due to the magnet I keep in them.
Bottle‑Opener
The notch on the bottle‑opener/cap‑lifter works together with the cutting blade to serve as a wire-stripper. The notch may also be used as a wire‑bender or nail‑puller. It may be used as a striker for small diameter ferro-rods.
Various other parts of the bottle‑ and can‑opener or the keyring eyelet may be utilized bending wires or similar materials.
The tip of the bottle‑opener is a large (6 mm) slot screwdriver. This will fit in a socket heads adapter should you need another type of screw head. The screwdriver tip may also be used as a light prying tool.
Can‑Opener
The tip of the can‑opener is a small (3 mm) slot screwdriver. What is not often appreciated is that this part is also intended to work with Phillips and Pozidriv screws too. The tip may also be used for light prying, such as opening stubborn pistachio nuts.
I sometimes use the screwdriver tips as measuring gauges to estimate if something is 3 or 6 mm .
The hook part of the can opener may also be used to cut tape on boxes. Felix Immler has a video on how to turn this part into a more efficient hooked cutting tool. Some alternate examples of sharpened the unsharpened edge to improve string and box-cutting capability.
This can-opener may also be used as an orange peeler or a billy lifter.
One of my favourite uses for this tool is that it can be used to carry a 5.7 mm magnet. The magnet is useful for picking up or holding secure small screws, or magnetizing a pin, tweezers, safety pin or needle for navigation.
The can-opener on its own is now magnetic. Interestingly, the bottle-opener on the same layer is also weakly magnetic.
I have taken to alternating storing the magnet between the bottle-opener and can-opener to increase the effect. The main blade and scissors are now also magnetic, and the hook weakly magnetic.
Check to see if the pin in your penknife scales is actually magnetic.
Corkscrew
My main use for the corkscrew is to carry the 1.5 mm mini‑screwdriver.
The mini‑screwdriver is an essential for anyone who wears spectacles or even sunglasses. Not all SAK come with the mini‑screwdriver. I very much recommend acquiring one.
Not surprisingly, all the SAKs I recommend for EDC have corkscrews so you can carry a mini‑screwdriver.
The mini‑screwdriver may be used as a tiny prying tool to pop the back off a watch and to remove the battery. It may be used to drive out small pins, and may be used this way when replacing the spring of the SAK scissors..
Cotton wool may be wrapped around the corkscrew to serve as a source of tinder, or it may be used to carry a supply of fishing line.
There are other alternate tools designed to fit in the corkscrew, including the Fireant, a tiny ferro‑rod. Larger diameter ferro‑rods may be cut down to fit within the corkscrew.
Alox handled variants may lack the corkscrew and other back-tools.
I have glasses, so carry the mini‑screwdriver.
Note that the Spartan, Climber, Camper and Huntsman have an equivalent that replaces the corkscrew with a #2 Phillips screwdriver. These the Tinker, Super Tinker, Hiker and Fieldmaster.
Trivia: MacGyver did not drink, and many of the penknife models he used in the series lacked a corkscrew.
Reamer
The reamer is another very versatile tool. It acts as an awl, a scraper, a punch, a seam‑ripper, wire‑stripper, wire‑bender and a threading tool.
The reamer is very useful for creating pilot holes for a drill bit or gimlet. It may be used to clean up or bevel a hole you have bored.
A bit of trivia: when your reamer needs resharpening, it should be sharpened at 48 degrees.
84mm and 91mm Swiss Army knives share the same component for their reamer.
Scale Tools
Scale tools usually refers to the tweezers and toothpick. Some models have additional items such as the ballpoint pen or pin.
Some tools you will not use often, but will be very pleased you have them when you really need them. This may include the tweezers or toothpick.
Some models, such as those with Alox handles, lack the tweezers and toothpick. The tweezers in particular are worth having, and the toothpick has also proved useful to myself.
Even if you do not own a Swiss Army Knife, the tweezers are a useful thing to have in your medical or emergency kit. They are hard to beat for compactness and functionality.
Trivia: Tweezers for the 58mm and 91mm models are of similar size, but differ in the shape of the head.
A friend of mine likes his Compact Swiss Army Knife. Unlike many Swiss Army Knives with only a few layers, the Compact includes the pen and mini‑screwdriver.
The Compact is a two‑layer knife like the Spartan but replaces the small blade with the scissors, and the reamer with the multi‑purpose hook. Instead of the cap‑lifter and can‑opener, there is a single “combo‑tool” that serves as a 6 mm screwdriver, can‑opener, cap‑lifter, wire‑stripper, emergency Phillips screwdriver and wire‑bender.
Personally, I think the reamer is a “must‑have”.
The Compact apparently evolved from the 84mm Golfer. An 84mm version of the Compact would be nice, especially if they replaced the long nail file of the Golfer with a reamer.
The Companion is a three-layer SAK that replaces the can opener with a box-opener. Oddly, the box-opener was not paired with the combo-tool to keep can-opening capability. Lots of other SAK tools serve as box-openers, including the small blade, scissors, reamer and can opener.
The Climber is a three‑layer version of the Spartan, adding the hook and scissors and retaining the reamer and small blade. The same tool selection was available in an 84mm Climber Small model/Alumnus, but it is sadly no longer in production.
The 74mm Executive is comparable to the 84mm Climber, but also out of production.
For a minimal bulk, “city carry” EDC knife, the Climber is a good choice and very good value for the tools and capability it offers.
The Camper is a Climber replacing the scissors and hook with a wood saw.
If I had to make a choice, I would choose the scissors over the wood saw.
The Explorer is a Climber that adds a magnifying glass and in-line #1/#2 Phillips screwdriver. If you now find it difficult to read labels in the shops, the Explorer may be a good alternative to the Climber.
Scissors
Keeping your toenails trimmed is an important part of looking after your feet (and socks). The Swiss Army scissors are excellent for such applications. Better than many purpose‑designed items!
The SAK scissors are widely regarded as being the best available on any multi-tool. You probably own dedicated scissors that are not as good.
The scissors are also surprisingly robust, being quite capable of cutting through soda cans and tin can walls to construct various items.
The scissors are probably the Swiss Army tool I have used the most, and I suspect I am not alone in that.
I regard the scissors as a must‑have feature on a Swiss Army Knife.
Multi‑Purpose Hook
If I recall correctly, the multi‑purpose hook was once called the “parcel hook”, being intended to hook though the string of a heavy parcel or bundle of firewood and let you use your penknife as a handle.
The hook is rated for 90 kilos/200 lbs of load!
The hook is often underappreciated, since there are many other applications for this item. These include being used to untie a stubborn knot, twisting materials to make natural cordage or an eyelet in wire, lifting hot billies or their lids, pulling stuck zippers, as a pen holder, retrieving tent pegs, and tightening lacings.
Some hooks have a nail-filing surface on the back.
Check out some of the videos on‑line for more applications.
There is even a modification to turn the hook into a groove carving tool. Worth considering if your penknife is a dedicated whittling tool. Putting a cutting edge on your hook may make it less effective at some of its other applications.
Trivia: The hook and scissors will be mounted on the same layer. If your 91mm knife has one tool, it will have the other too.
Huntsman
The Huntsman is another of Victorinox’s best sellers.
Effectively, it is the Climber with a woodsaw blade to create a four‑layer model.
A Huntsman will cost approximately twice what you might pay for a Spartan. Prices vary a lot, however, so shop around!
For “bushcraft” and “woodcraft” use, the Huntsman is a really good choice, having both the scissors and a wood saw. A saw is a handy thing in the garden too!
Wood Saw
Many traps and other items you may wish to construct may require accurately cut parts.
The wood saw is also useful for scraping bark off, creating sawdust or shavings for tinder, descaling fish, and may be used as a striker for a ferro‑rod.
Take a look at this video on using the wood saw and a tip on waxing it.
Trivia: The wood saw is one of the few commonly used SAK tools that lacks a nail‑nick
Oddly, the original scales of my Ranger have “Camping” and a tent logo. Several models of SAK other than the Camper have this decoration.
The Ranger is the Huntsman with the addition of the metal saw/file. It also has a chisel blade and a 2.5 mm fine screwdriver on the back, so three additional tools than the Hunstman. Unlike some larger Swiss Army knives, there is a back layer tool on every layer.
I have found the metal saw useful, so will choose a Ranger over a Huntsman.
The chisel is useful when forming notches in wood, and may be used as a plane/scraper.
A Ranger will cost approximately two and a half times what you might pay for a Spartan. As I have already said, prices vary a lot, so shop around!
I once had to cut down the bolts on a rucksack frame since they were digging into my back and damaging my shirt. Not surprisingly, I like having the metal saw/file available.
The metal saw is better than the wood saw for cutting some plastics and for some wood‑cutting tasks.
It is also a good striker for a ferro-rod. Keep the saw still and pull the rod across the back.
The file may be used sharpening improvised fishing hooks.
The tip of the metal saw may be used as a Phillips screwdriver or nail-cleaner. It may also be used with a socket.
Trivia: 91mm Swiss Army knives with the metal file will also have the chisel.
Since the seven‑layer Champion was discontinued, the Ranger is as big a Swiss Army Knife as I care to consider carrying. I don't really want something over three centimetres thick!
A sewing needle, wrapped in invisible thread, has been placed under the metal saw.
The tweezers have been modified to be pointed. The tweezers with my Classic SD/Rambler are unmodified, so between the two knives I have both a pointed and a standard configuration set of tweezers.
A small hole has been melted in the toothpick so that it may serve as a blunt needle to thread cordage such as dental floss.
Using the small blade of the Ranger, I made a tick removal tool by cutting a slit in the end of the toothpick. I am most likely to use the toothpick in my keyring SAK if something is stuck in my teeth.
Both the toothpick and the pointed tweezers with the Ranger may be used against ticks.
A second hole was drilled in the new scales to hold an unthreaded additional sewing needle. The pin proved to be poorly magnetic, so I replaced it with a bead-headed pin that was more magnetic and easier to remove.
Old Ranger with new luminous scales. Note magnet carried in can-opener.
New Scales!
I liked the new scales on my Classic SD so much, I went ahead and brought a matching set for my Ranger. I kid myself this will make it less likely to lose in Autumn.
Check out the video on how to use warm water to remove the old scales without damage.
Generally, I like my kit “low-key”. The SAK is an exception, since it is not really a tactical nor defensive item. It is, however, valuable in both replacement cost and in utility as a resource. Thus I like that the new scales make it easier to see and hopefully less likely to lose.
Check out this modification, however, since it may be applicable to other knives and tools. So might this idea!
The new scales are “plus” scales, so have additional carrying places for a pin and an SAK pen. I drilled another well for a second pin. I later discovered the pins I have are not magnetic, so I replaced the first pin with a small, unthreaded needle that is magnetic.
As well as being luminous, the scales have some nice texturing for improved grip.
The larger 91mm scales were a bit harder to fit snugly compared to the 58mm for the Classic SD/Rambler. I had to use a vice.
Do not forget to pad the jaws of the vice so you do not damage your new scales!
Slots for the scale tools were very snug for both sizes of scale, making the tools difficult to remove. I used a circular needle file to create a small scallop underneath which solved the problem. Overdid it a little on the toothpick for the Ranger , but adding some “White Tack” to the slot solved that problem.
The Ranger has been fitted with a loop of beige bootlace about 14 cm long. So too has my mini‑Leatherman Squirt P4.
Both tools ride in a mobile phone belt case with cut‑out bottom corners.
The loop of cord is passed down through a corner and then the tool passes through the loop to form a lark’s head knot. Even if the top of the pouch pops open, the two tools cannot be lost.
The loop is also large enough to pass around my wrist or hook my thumb through for added security when using the tool. The safety pin may be used as a pin or clip to secure the tool to clothing or D‑rings.
I have also to fitted a pocket clip to the Ranger, giving me another option when I need my hands free.
The pouch mentioned above is on my trouser belt. If I am wearing trousers, I have my Swiss Army Knife and mini‑Leatherman with me. I will also have my keys, so will have my Classic SD/Rambler available too.
The belt pouch also holds the aforementioned pocket pry bar and a diamond‑impregnated metal sharpening card.
The few jobs the Ranger is not suited for, the mini‑Leatherman or pry bar can usually handle.
If this collection of tools cannot handle a job, they may often be capable of making something that can.
The tools form a component of the EDC kit I have distributed across my keyring, trouser pockets and compact pouches on my trouser belt.
Summary
For EDC, I prefer a Swiss Army Knife to include scissors, a reamer and corkscrew/mini-screwdriver.
My personal choice is the Ranger and Rambler. I carry my Ranger in a belt pouch. Previous knives have worn through a few pockets over the years.
If you want something more pocket-friendly and more compact, there is the Compact, Companion and Climber. All have similar capabilities, with the Climber possibly being best value.
For an even lighter option, Sportsman, Waiter or Bantam.
The Swiss Army Knife is the tool you are most likely to have with you when you need a tool. It is worth spending a bit of money to get one you are happy with.
That said, the web currently lists the Victorinox Ranger as $75, with the lesser bladed models at correspondingly lower prices.
Given the very high quality of Victorinox knives, that is a pretty reasonable price compared to the prices of some other folding and fixed blade knives.


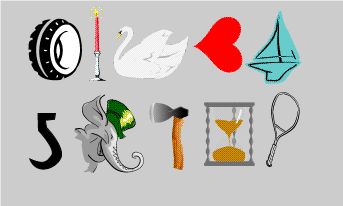


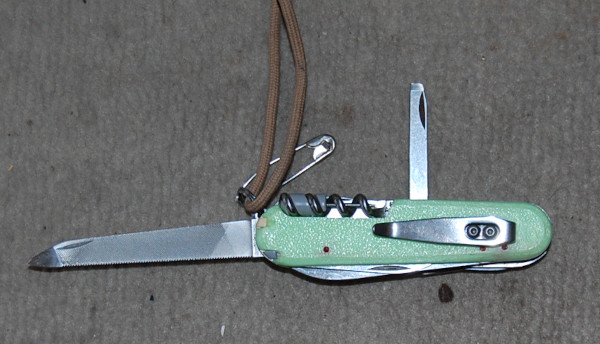


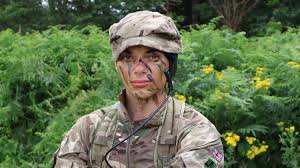
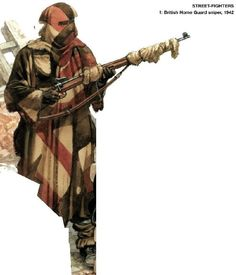
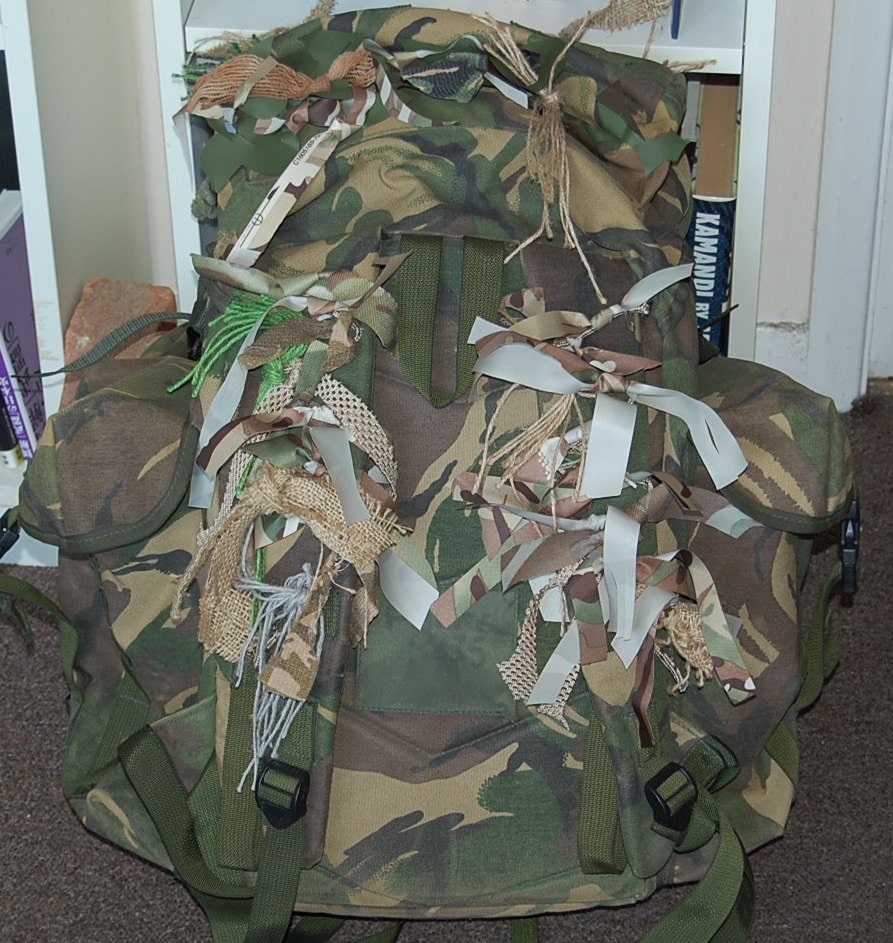
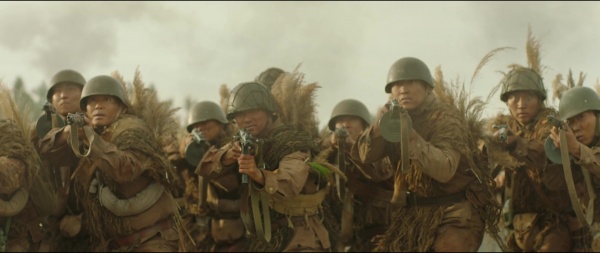

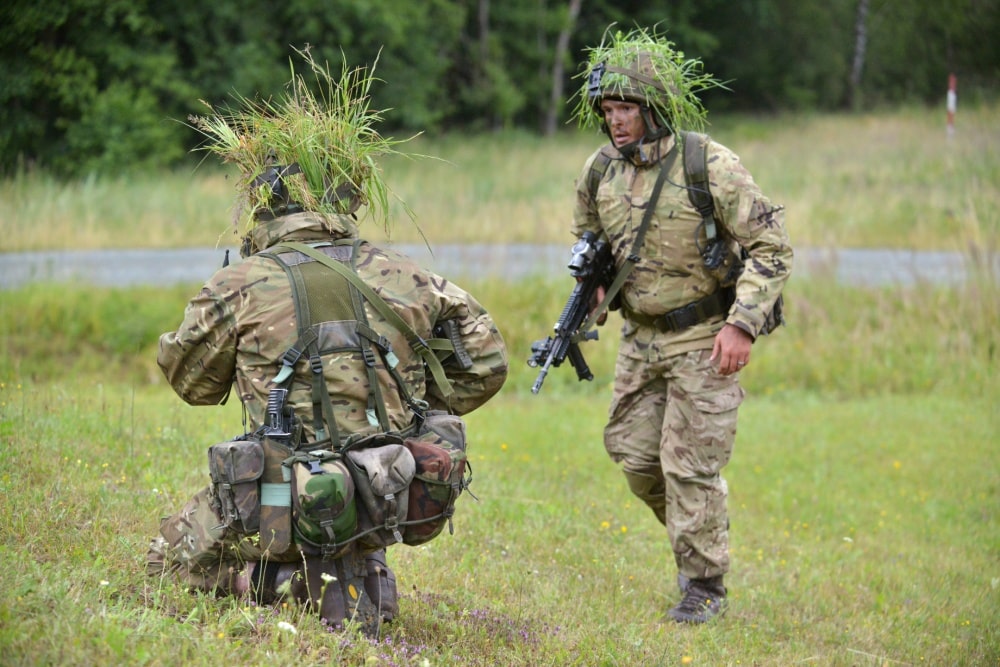


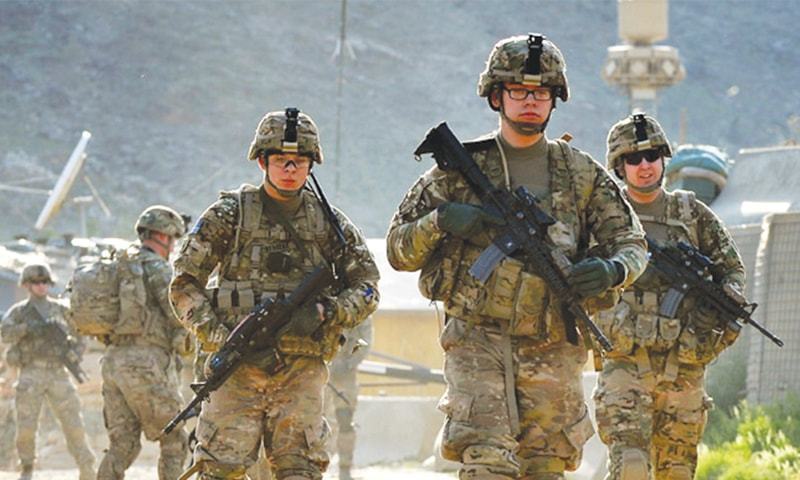
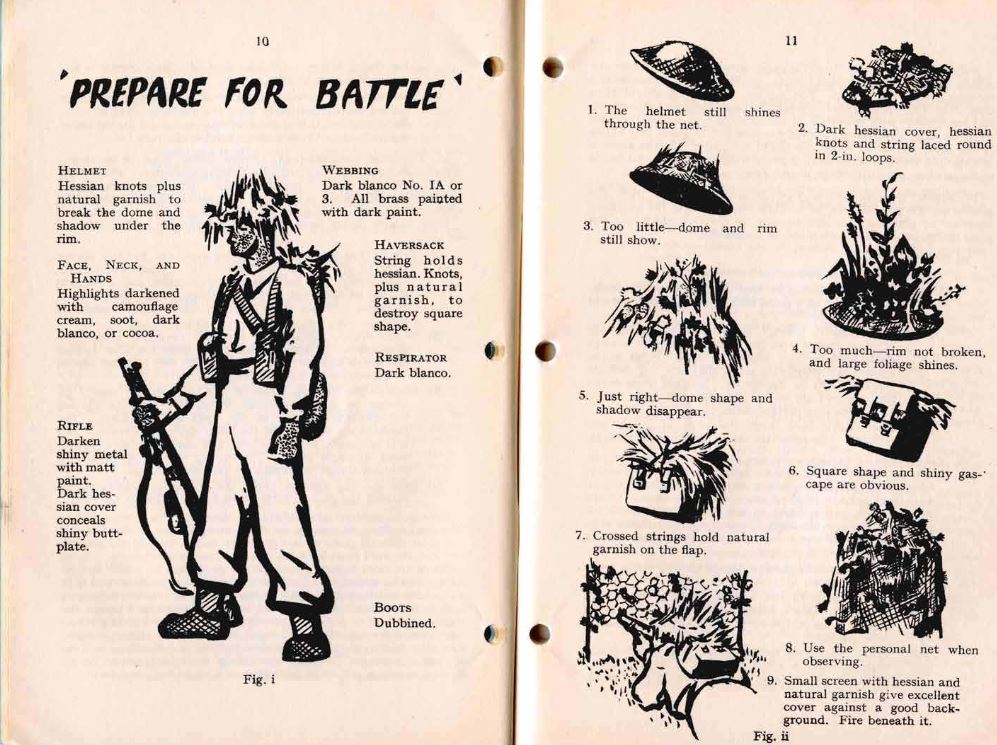
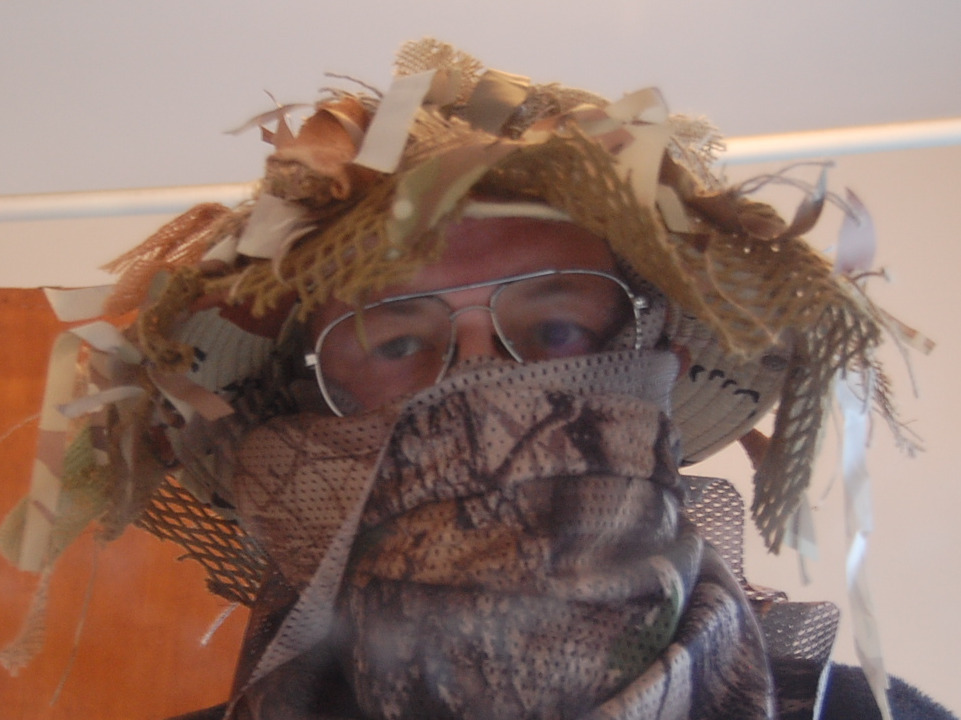
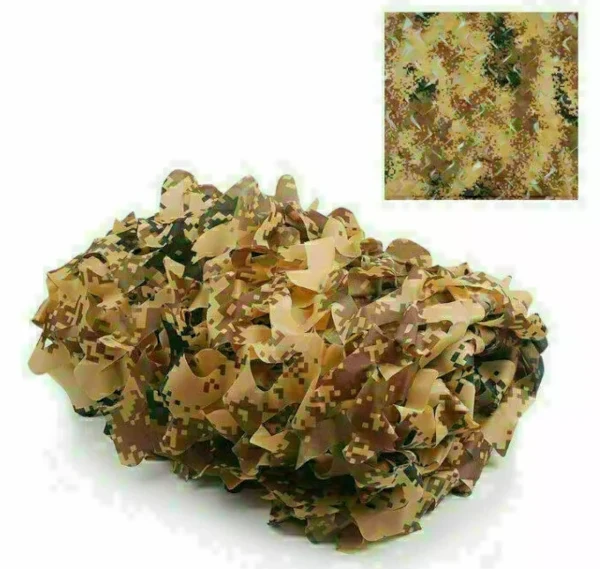
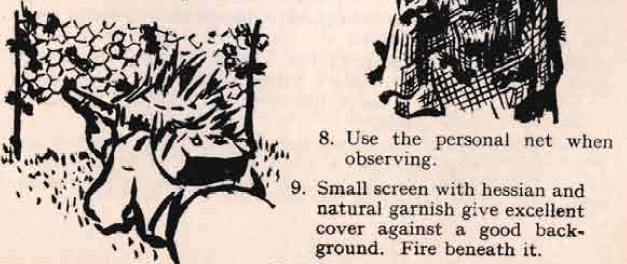


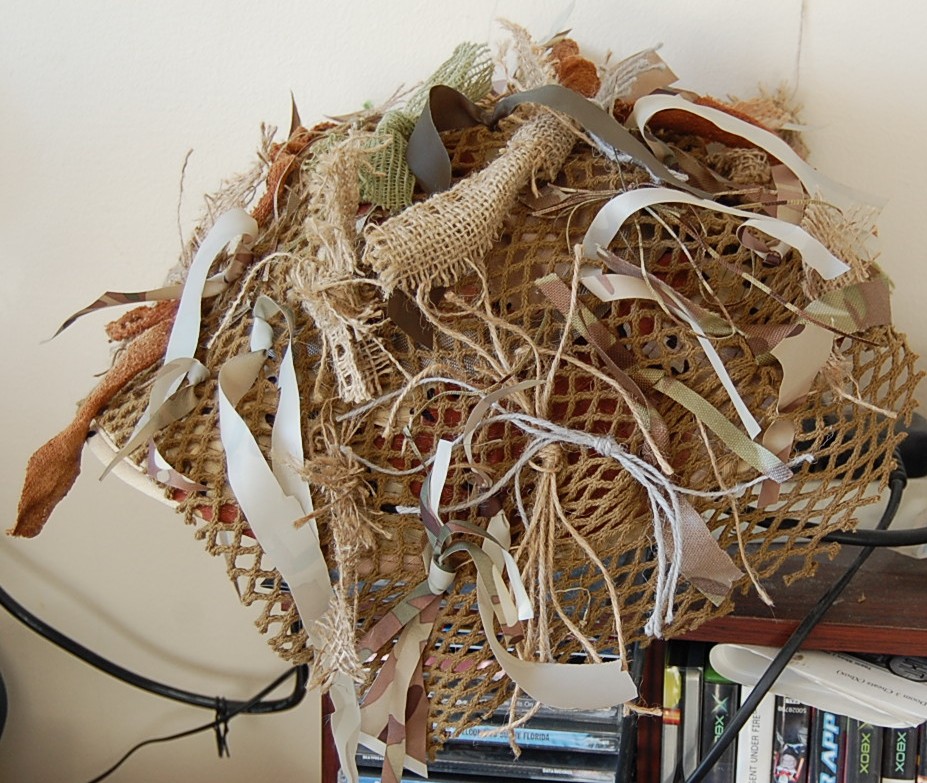
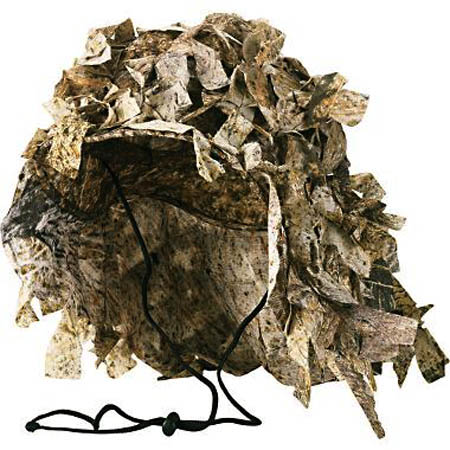
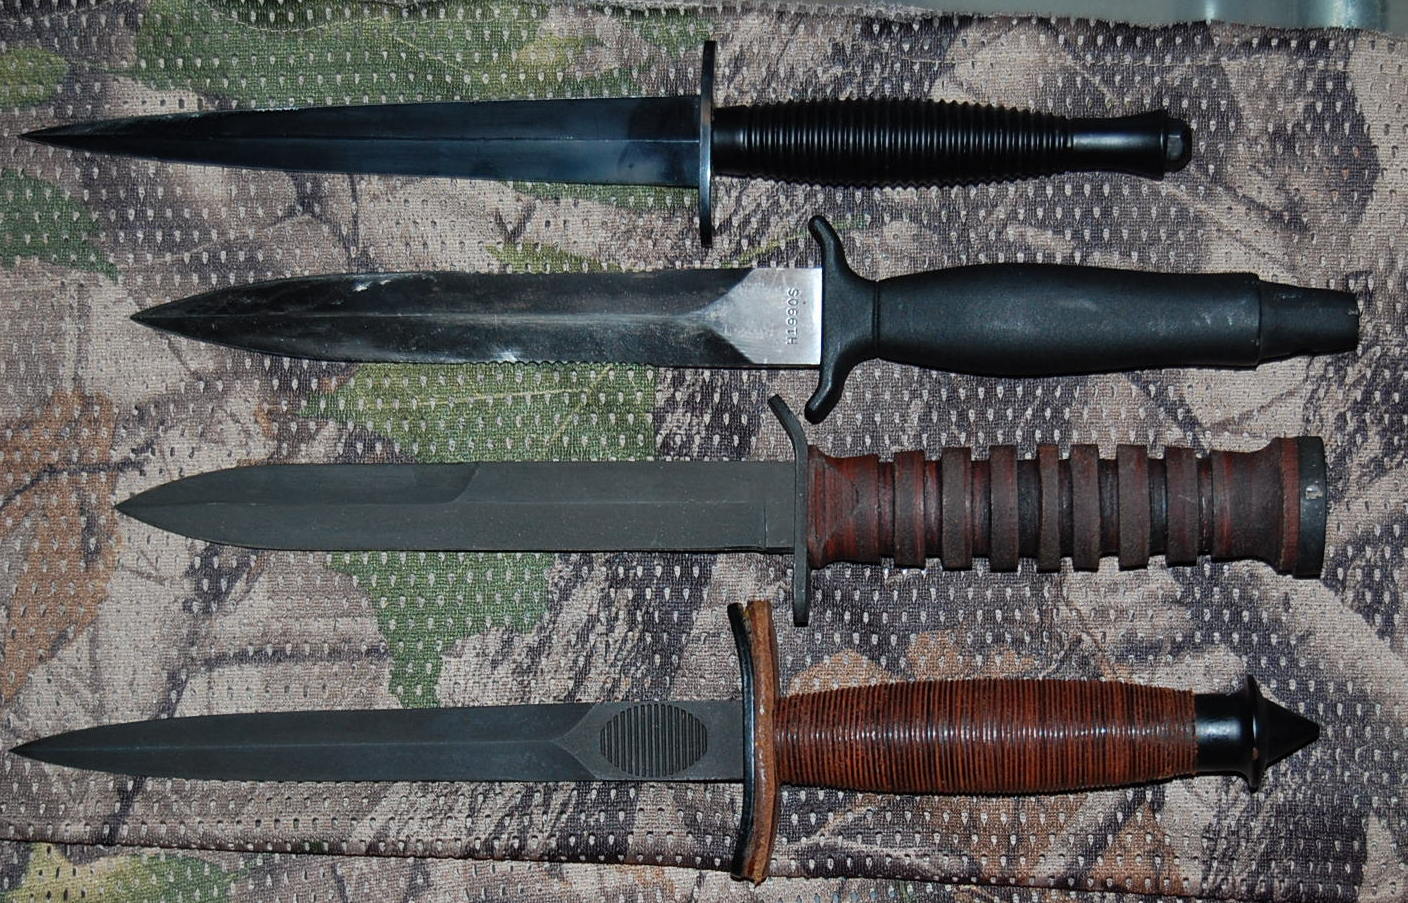

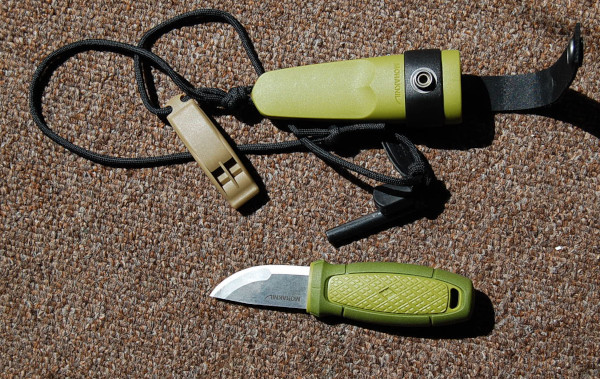
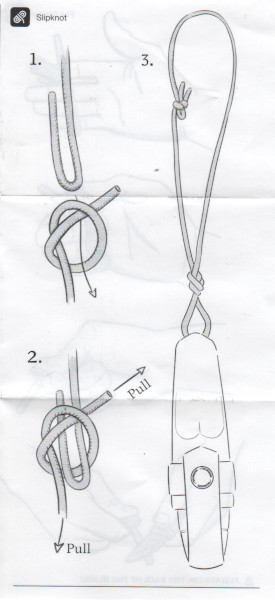
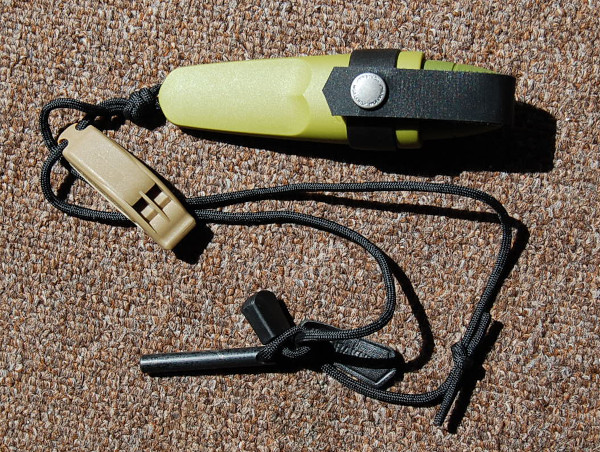
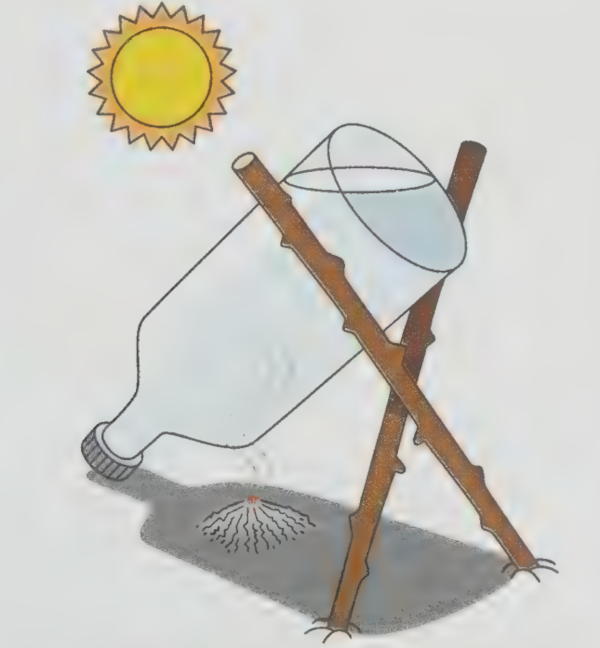

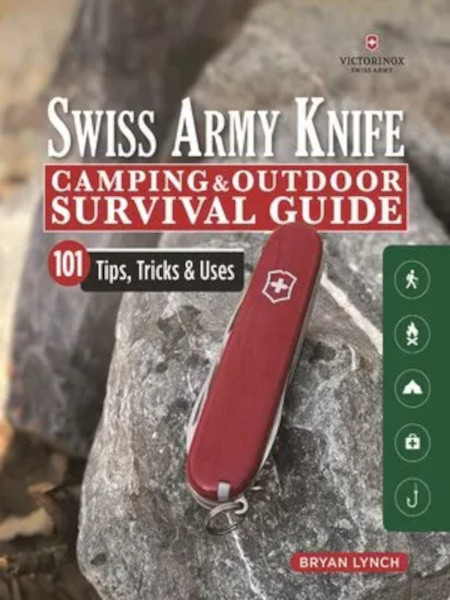
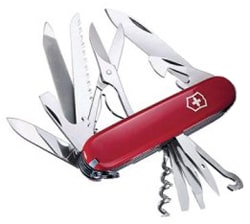


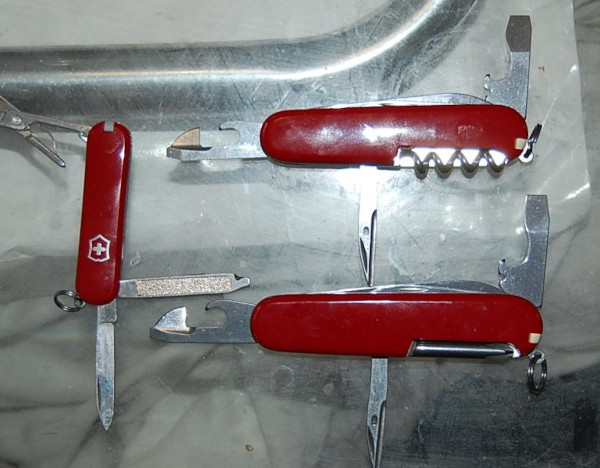

