I have used lockdown as a chance to complete a number of projects. I have also done a lot of reading on a wide variety of topics.
This reading included finishing some books I had stalled on, and looking at some others I had just never got around to giving my full attention to.
In the latter category were a number of books on Ninjitsu, including some by Stephen Hayes. Books on this topic often have a lot of chaff in with the wheat, although to be fair, that is true of many martial arts books written in the 80s, if not in general!
The Wind Posture
One of the sections that interested me was that on stances, the stance associated with the element “wind” in particular.
As I have discussed in my own books, I feel “stance” and most of its English alternatives is an unsatisfactory term.
A stance is a transitional rather than stationary configuration. Hayes likens them to snapshots or frames from a film rather than being stationary.
Most of us, even many high-grade martial artists, have a relatively shallow immersion in the art.
Stances are an important training aid but it is easy to become diverted by the details rather than passing through to master the underlying concepts. Interestingly the Japanese term “kamae” translates as “pose” or “posture”, but also as “base”. Stances are often the foundation for learning.
From Stephen Hayes Ninja Vol.1:
“The wind level of consciousness is characterized by the receiving posture, or hira no kamae. The receiving posture couples a freely moving base and the power to harmonize the body with the intentions of an attacker. The feet are placed hip-width apart and carry the body weight evenly. The knees are flexed slightly more than in the natural posture, creating a feeling of balance in the hips similar to that experienced just before sitting down on a chair. The back is straight, in a natural manner, and the shoulders are relaxed. The arms extend outstretched to the sides with the hands open, and the eyes gaze forward in soft focus, taking in the whole picture without limiting the concentration to one single point.
The body should have an extremely light, almost floating feel to it. Epitomizing some concepts that are the opposite of those embodied in the shizen earth pose, the wind-level hira no kamae prepares the fighter for adapting to and going with the attacking moves of the enemy. This adaptive sensitivity is centered in the chest behind the breastbone. The evenly distributed balance facilitates quick and easy movement in any direction in response to the attacker’s intentions. The outstretched arms have the potential of becoming tools to carry out punches, strikes, deflections, blocks, throws and locks, as well as acting as distractions and calming techniques.
In self-protection situations, the hira posture is used to handle attackers in a way that subdues them without injury, if possible. The pose itself is nonthreatening, and it appears to be an attempt to fend off an attack or to reassure an adversary that there is no hostile intention, as upraised open hands traditionally symbolize surrender or benediction. From the hira no kamae, footwork proceeds with circular or straight- line movements, as appropriate for the specific circumstances. The arms are used to entangle the adversary with spiraling actions or intercept the adversary with direct advances.”
Another book on Taijutsu (by Charles Daniels, taught by the same sensei as Hayes, Masaaki Hatsumi) shows a posture it calls “hoe no kamae”. While this uses an L stance and raised forearms, I suspect the application is similar.
Those of you wise enough to have invested in a copy of Crash Combat or Attack, Avoid, Survive (thank you!) will know I place considerable emphasis on evasion rather than parrying or blocking.
The basis of this is the ginga movement from Capoeira.
Could the wind kamae be an alternative or complementary evasion technique to ginga?
Sadly, I do not currently have much room to dance around, so I cannot experiment much with movement and evasive moves in hira no kamae.
Some observations:
On its own, hira no kamae and hoe no kamae look like the fighter is just standing there saying “Go on dude, hit me!”.
This is one of the symptoms of regarding a stance as static, amplified by still photography.
In practice, this posture will be used to allow fast body turns.
The outstretched arms contribute to maintaining balance.
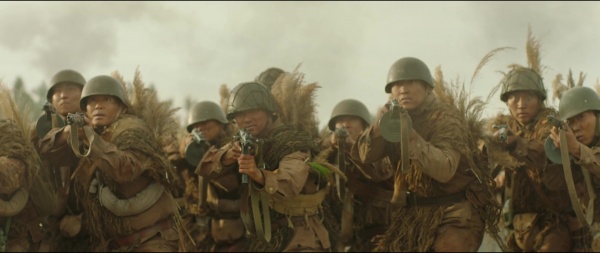
Study the body twist used in the photos below. Hira no kamae is not used, but it could have been passed through if the defender had thrown up his arms for stability.
Both of my martial arts titles explain how to use quick evasive turns similar to that shown. You will find these in the bayonet and knife sections, as well as elsewhere in the text.
White Crane
Hira no kamae may have reminded some of you of the white crane-inspired movements used in some styles of kung fu and karate.
Not surprisingly, white crane styles often put a considerable emphasis on evasion.
The extended lead arm can be used to parry attacks that cannot be fully avoided.
Brought up under the attacker’s armpit, and we have the tai chi technique of “diagonal flying”.
This is effectively the same principle as using a straight-arm karate parry against a foe’s torso and breaking their balance.
Hayes’ books often show defensive strikes made against the attacking limb, including from hira no kamae. This is also a tactic favoured by many white crane styles.
The wind posture is likely to place a defender side-on to an attacker.
As described above, the lead hand may be used for an assortment of parries and strikes.
The latter include finger jabs to the face and clawing actions.
The rear hand has the advantage that is has a considerable distance in which to generate power, and that it is effectively hidden from the attacker’s view.
This is the equivalent of the “tail” position used with swords and other weapons.
The foe has no idea from what direction a rear hand attack may come, and the rotation of the waist can create power and velocity.
One option is to adopt a side-on horse stance as the forward arm parries.
The rear hand then executes a classic reverse punch, the hips twisting through ninety degrees to transition into forward stance.
Hook punches are another useful technique for an enemy you are side-on to.
Kup and Pow
In Complete Wing Chun (Vol.2), the author discusses Pak Hok Pai, a white crane style with several techniques suited to attacking an opponent to the side.
In best Batman tradition, two of these are called “pow” and “kup”.
Pow chui has been described as a straight uppercut employed with a semicircular body motion. I like to think of it as a “long uppercut”, although technically it is more of a long shovel-hook.
Targets for pow chui include the testicles, kidneys or throat.
Kup/cup chui is a downwards, overhead strike that can be targeted at the soft muscles of a kicking leg, or the forearm, biceps or triceps of an attacking or guarding arm.
The temple, nose or top of the head can also be targeted with kup.
Like the corkscrew hook described in Attack, Avoid, Survive, a kup can be used to reach over and around a guard. The difference is that the kup typically comes from the rear hand while the corkscrew starts as a lead jab.
Choy Lay Fut is also notable for use of large arc swinging strikes.
A more horizontal motion, intermediate between pow and kup, can be used to throw a lateral, circular strike (a “roundhouse punch”, perhaps?), that is more open and straighter-armed than a hook.
While this has elements of being a “haymaker”, many of the standard objections against a haymaker do not apply if correct tactics and a hidden hand posture is used.
The back and kidneys or below the guard are the favoured target areas.
An upward angled or horizontal strike can be applied to the area of the sixth to tenth ribs: above the floating ribs and below the level of the lower tip of the sternum. This is likely to affect the lungs.
All these punches are powered by waist/hip rotation and are most effective with a relaxed, easily accelerated arm.
Kup and pow are both performed using the second knuckle of the fingers as the striking surface. These are the knuckles that would make contact if you were knocking on a door. Some styles call this a “leopard fist”.
Attack, Avoid, Survive showed a related technique, the half-fist, used to attack soft, narrow targets such as between the ribs. The thumb is often pressed against the side of the fingers, rather than being clamped across them as with a conventional fist.
Rear hand attacks can also utilize palm-strikes, chops and hammer-fist strikes.
Recently, my girlfriend described how her mother had often fought men who had turned up with the intent of raping her sister.
Many a bully and would-be rapist who dismissed the mother as a “mere-woman” got a percussive readjustment.
Her mother's technique of choice was a powerful overhand or underarm punch.
My girlfriend learnt the same techniques and has used them to defend herself on numerous occasions.
Tai Chi
In “How To Use Tai Chi as a Fighting Art” Erle Montaigue describes the “Stork Spreads Wings Punch”, another potential rear hand attack.
The “Stork Spreads Wings” posture is often translated as “white crane…”:
“This punch is one of the most powerful punches from any martial art. It is totally centrifugal and quite fast considering its distance…This is one of only three punches in T’ai Chi that uses the first two knuckles, in T’ai Chi we use the knuckles that most suit the position of the palm upon impact otherwise we use extra muscles to hold the palm into position and there-by lessen its impact…If you block with the right fist across to the left against a left face attack with the left palm underneath it, … the left palm then takes over the block while the right fist is thrown out at the target with the turning of the waist…Your left palm looks after the left fist while your right fist circles back up in a centrifugal punch to his left temple”