Disclaimer: “As an Amazon Associate I may earn from qualifying purchases.” Adsense and Infolinks were no help at all.

If you have enjoyed this article or it has been helpful to you please feel free to show your appreciation. Thank you.

Read The Third Wave by Alvin Toffler!
Categories
Phillosoph

A True Survival Bowie?

Sometimes a diversification can let us view a topic from another direction, casting new light on it.

Size Matters

The last blog made it clear to me that the many medium-sized (6 to 8") general-purpose knives that I have do not really have a role. That includes my beloved Buck 119 and the various five to eight inch kukris that I have acquired.
If SHTF or TEOTWAWKI occurs, I will be reaching for one of my larger blades and complementing it with one of my puukkot (plural of “puukko”).
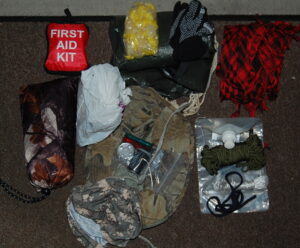
I have my favourite ten-inch sirupate kukri ready to go on a belt alongside a Mora Companion. A small pouch on the belt contains a fire kit and Lansky multi-sharpener.
Nearby is my barong-handled machete and a crowbar, ready to be added to the rucksac.
Already on my person I have my Swiss Army knife and mini-Leatherman, along with other items.
If you are planning to spend good money on survival knives, the sound advice is to “go big” and “go-small”.
Buy yourself a good chopper that can produce a fire and shelter with minimum effort when they are most needed.
Get a good fixed blade small knife that can handle more intricate duties. Puukkot are hard to beat for value and quality. Get what folders you want for EDC.
Another topic I touched on was that most of the original Bowie knife designs were designed to be primarily weapons. This can be seen in the shape of their point profiles, which are often combined with a long false edge.

The Bowie/Machete

With the above in mind, I will share a passage I came across in “Gun Digest Book of Knives, 4th Edition”, p.111-113:
“Another category of knife is the hybrid Bowie…The Bowie/Machete is made by Collins Machete, Case Knife, Western Knife and Legendary Arms.
Bowie/Machete came about when a South American customer went to Collins and wanted a machete made like a Bowie knife.
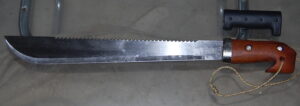
The result was a wonderful knife. It is one of the finest large skinning and butcher knives ever made. It is one of the few knives that can hold its own with a commercial slaughterhouse curved skinner and large butcher knife. These purely single-purpose knives are hard to beat at their specialities, but the shape and curvature of the Collins design is a most useful compromise of their features in a large knife.
The oversize butcher knife shape with the Bowie clip blade has a deep enough belly and enough sweep at the point to approximate the sweep of the professional skinning knife. In the hands of an expert, it is the best knife for skinning and butchering large game. For use as a small machete, the deep grind employed on these knives allows the same cut a much thinner machete would make. While a little light and short for heavy woodcutting. this is still a practical short machete knife.
For a working knife to carry in South America where it was intended, or anywhere else for that matter, this is a hard one to beat. When used as a fighting knife, it is an excellent chopper, while its broad blade produces more damage on thrust than lesser knives…
It should be noted that the simple tapered grip with the pronounced neb to anchor the hand found on these is an elegant masterpiece of a functional grip in its own right. These knives feel good in the hand where they lock in and go to work naturally. The hand is positioned for proper leverage with a heavy double guard to bear against at the front and a neb at the rear similar to the grip taken with an Indian Talwar sword. It is most effective for a working knife and far better than gimmick grips on some custom knives. Remember. everything possible with knives has been tried. This is an old, standard, elegant solution to the grip. Like the rest of the knife. it is conservative and effective all the way through.”
This sounds interesting!
No image of the “Bowie/Machete” is in the book. There is a photo of a Legendary Arms Bowie that it might be, but unhelpfully the blade is in its sheath!
Websearching on “Bowie/Machete” proves useless.
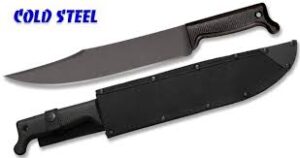
The Cold Steel design of this name post-dates the book, and it is evident from the shape that the Cold Steel offering does not have the features described.
Cold Steel Bowie Machete

The Bowie/Machete Identified?

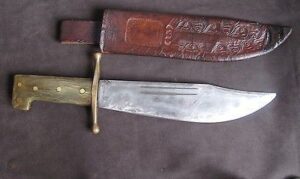
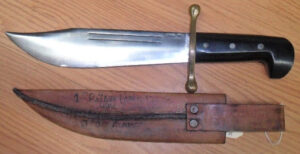
Eventually, I pieced together enough clues to suspect that the model described is the Collins & Co. Machete No.18.
Not actually a machete as most of us understand the term these days, but that was how the company designated it.
In 1942, the 10-inch Collins was adopted for survival kits of air crews operating in the Pacific, including at Guadalcanal Canal.
The marines took notice, and the model was widely used by the 2nd Marine Raider Battalion.
Maj. James Roosevelt, son of the then President, was involved in their procurement, and carried one numbered “30”.
One of my references, (“Fighting Knives. An Illustrated Guide to Fighting Knives and Military Survival Weapons of the World” by Frederick J. Stephens p.67) confirms that wartime production of this model was also undertaken by Case Cutlery, Western Cutlery and an Australian source.
“Knives of War” by Hughes, Jenkins and Buerlein adds a company called Kinfolks Inc to the list.
It is from Case that the frequently used, but incorrect designation “V44” or “V-44” seems likely to have been acquired. (The V42 discussed in the last blog was a Case design.)
Knives of War p.68-70 calls ithe No.18 a “Gung Ho Knife”, “Survival Bowie” and mentions an aviator’s example labelled “9-inch machete”.
Actual dimensions are given in Knives of War as a blade of 978" and 2" at its widest. Total Length is 14½".  I believe the blade was ¼" thick.
Minor variations between manufacturers can be found, variations including grip shape, grip construction and whether the false-edge was sharpened.
Some Collins examples had a grip of green horn, which has a very attractive camouflaged appearance.
Some sheathes had the tip cut-off to improve drainage.
Knives of War p.69: Former Marine Raider Rosenquist reports: “It was a real good, multi-purpose knife. We used it for opening ration cans, coconuts, cutting fire lanes, etc. It was handy as a small hatchet for cutting small trees and coconut-log bunkers and in combat as an effective fighting weapon.”Marine Bowie Horn handled Bowie Horn handled Bowie Black handled Bowie

The No.18 Today?

The No.18 is a Bowie design with a proven record of survival utility, not to mention it might also find its way to certain kitchens or meat-packing plants.
As well as its practicality, it has historical connections.
Many people understand the value of preparedness, and Americans love Bowies, so you might think a number of companies would be offering “Gung Ho/ No.18 Survival Bowies” and that they would be flying off the shelves!
Raider Bowie replica Raider Bowie box
Well, I have not had much luck locating any!
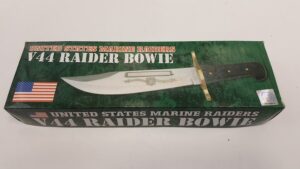
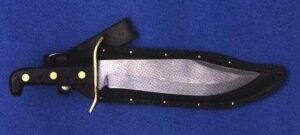
There is a reproduction “V44 Raider Bowie” (above). This is apparently low-quality steel, since it is intended to sit on a shelf rather than be put to use. Note that it is not a particular accurate reproduction, the blade having a single broad fuller rather than the two narrow fullers of the actual No.18.
No.18 Bowie Throwing Bowie
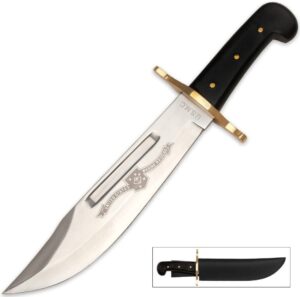
Legendary Arms offers a Bowie and a “Throwing Bowie” that has some resemblance (above), but note both have a short bevel grind rather than the blade section of the originals.
W49 Bowie
Western Cutlery is now Western Knives, with production in Asia. Their W49 (above) is/was not their version of the No.18. Dimensions are slightly smaller and the blade has a short bevel.
Ontario Bowie
Best candidate seems to be the Ontario SP10 “Marine Raider” (above). Despite the name, the blade form is different.
The Ontario SP53 is probably closer to the No.18 in spirit, but is not a Bowie.
Most obvious difference for both of these is the grip. I quite liked the machete-style grip of the original Collins.
As regular readers will appreciate, a flared or hooked grip is a very good feature for a chopping knife.

The Future?

Ideally, someone would bring out a nice No.18 Bowie blade blank that I could fit with a grip.
If anyone has been inspired by this to bring out a modern day No.18 Bowie, I would suggest having a good look at the modified original shown below.
The upper quillon has been removed and the lower bent so that it is out of the way when the strongest part of the blade is used for tasks such as batoning through material.
Horn handled No.18 Bowie
Categories
Phillosoph

Fighting Knives in a Modern Context

The other day, I found myself thinking about the variety of weapons taught by many martial arts.
When these arts were created, most of these weapons were relatively common place.
The battlefield, and the street, have changed since those times.
You are unlikely to fight with a sword, a knife or machete being more probable.
The entrenching tool is more likely to be to hand than an axe or mace.
Your spear or staff will seldom have to deal with a horseman, and is much handier if its length is less than your height.
The stick remains a useful weapon, but nowadays will often be wielded with the intention of not seriously injuring a foe.
Those of you that wisely have invested in a copy of “Crash Combat” will recognize the above as the arsenal of modern weapons included in the course.
The above reflection melded with a question my subconscious had recently posed to me: “Does one need a combat knife?”
Some authors use the term “combat knife” or “tactical knife” to mean a variety of multi-purpose knife.
In this blog, I am talking about specialist designs that have the primary role of use against two-legged predators.
Certainly, it is prudent to have a knife that one can fight with, but what are the merits of spending good money on a knife that is primarily designed as a weapon?
And what form should such a knife take?
There is a baffling variety of supposed combat or fighting knives.

Context

To answer that last point, we must return to the theme noted in the first paragraph.
We cannot really consider a fighting knife without also considering context. The requirements of a fighting knife have changed as the nature of combat has changed.
In the Middle Ages, for example, it was desirable that a blade be stout enough to deal with body armour, yet narrow enough to slip between plates or through a visor.
Jump forward to the age of the rapier, and a dagger might be required to serve as a main gauche.
The Bowie knife provides us with another illustration. The Bowie blade shape is commonly used for survival knives, which tends to make us forget the original Bowie knives were primarily fighting weapons.
The Bowie came into fashion in an era when pistols were generally single-shot. The Bowie was a handy alternative to a sabre or smallsword.
The fighting Bowie was at least eight inches long, with examples longer than twelve inches by no means unusual. A blade might be a quarter of an inch thick and broad enough to look like a pointed cleaver, which essentially was what it was.
A Bowie might be used against other knives, or longer edged weapons.
The usefulness of the Bowie waned with the increasing availability of mass-produced revolvers. Apparently many volunteers in the War Between the States invested in impressive Bowies, only to discard them once the wisdom of a lighter marching load became apparent.
There seems little point nowadays in carrying a large fighting knife such as a Bowie or smatchet.
Many large utility knives, billhooks and machetes can defend our person equally well and prove far more useful for other, more likely tasks.
You probably also own entrenching tools, hatchets and tomahawks that would also be superior weapons.

The Modern Fighting Knife

Let us assume that you want a fighting/combat/tactical knife, on the basis that you may one day perhaps need it.
The fighting knife will be carried in addition to more general-purpose blades, so cannot be too large or heavy.
If a fighting knife has a place in our arsenal, then logically it must be because it can meet a requirement or scenario better than our large survival knives and other tools.
Large knives are not particularly concealable.
While it is possible to thrust effectively with a machete or kukri, it is not the ideal shape for use against thick clothing and a hypothetical “take out the sentry” application.
These criteria narrow down the form that a modern fighting/tactical knife should take, and what we should be looking for when making our selection.
This is best illustrated with some examples.

Fairbairn-Sykes Commando Knife

No discussion of modern fighting knives would be complete without mention of the Fairbairn-Sykes knife, aka “The Commando Knife” or F-S.
If fighting knives are mentioned, this is most likely the image that popped into your head.
At the start of his book “Combat Use of the Double Edged Fighting Knife”, Rex Applegate gives a nice summary of desirable features for a modern fighting knife:
“The heart of the fighting knife is its blade. It should be 5 to 7 inches in length, double-edged, and wide enough to be razor sharp on both sides all the way back to the cross guard. The point must be sharp enough to penetrate and thick and tough enough to withstand side pressure.
The blade should provide slashing, ripping, and thrusting capabilities. Stainless type steel, correctly tempered, with a dull finish is preferable. The blade should be tempered to hold an edge as well as being easily sharpened and, at the same time, not brittle.
The oval-shape handle should fit the palm of the hand and be designed so that the edges of the blade can be immediately, and automatically, located in dark or light conditions. A nonslip surface is another feature that should be incorporated. The handle should not turn in the hand (sweaty palms, etc.) when the blade strikes resistance. The knife should be handle heavy with relation to balance. Nothing in the design should limit its possibilities for use as a weapon from any position or either hand. The overall length should be approximately 10 to 11 inches; anything longer makes it too unwieldy and cumbersome to carry. The weight should be in the 1/2 to 3/4 pound range.”
Applegate’s earlier work, “Kill or Get Kill”, has a similar description, although includes the suggestion that the blade be no more than an inch across at the guard, and that the handle have its largest diameter at the centre and taper towards both the guard as well as the butt.
Contrary to what you may often see claimed, the F-S is not the “Ultimate Fighting Knife” [ignoring that this is not what “ultimate” actually means!].
Comparison to Applegate’s description quickly illustrates why.
The grip of the F-S is round in section, rather oval. Being of cast metal, the grip is difficult to modify or replace.
While the balance point is in the grip, the cast grip possibly contributes some unnecessary weight.
Oddly, my F-S seems heavier than my M3, but is actually half an ounce lighter.
If you own an F-S, you will know that it is very difficult to get a sharp edge on it.
Common advice on the net is to regard the F-S as a thrusting weapon only, and steel the edge at an angle of about 40 degrees. Personally, I think a sharp blade will create more of a wound if uses as described in my books. Steeling the F-S at 20 degrees seems better.
The “razor-sharp commando knife” is, however, a poetic licence of the novelist who has never owned one!
Some of these features seem to have been the result of wartime mass-production, which have persisted.
The F-S gets a lot right too! My step-son, on first holding an F-S declared:
“Woah! I feel like it wants me to do something, but I am not sure what!”
Fairbairn’s writings on how to use the F-S knife include illustrations of cuts and slashes directed to the forearm and inside of the elbow, although how practical this would have been against a woollen greatcoat or tunic is debatable.
Incidentally, the ancestors of the FS were the Shanghai Fighting Knives, which were made from obsolete double-edged Lee Metford 1888 bayonets. In Fairbairn's own words:
In choosing a knife there are two important factors to bear in mind: balance and keenness. The hilt should fit easily in your hand, and the blade should not be so heavy that it tends to drag the hilt from your fingers in a loose grip. It is essential that the blade have a sharp stabbing point and good cutting edges, because an artery torn through (as against a clean cut) tends to contract and stop the bleeding.

Boker Applegate-Fairbairn

Following World War Two, Applegate collaborated with Boker to produce a knife that met his requirements, called the Applegate-Fairbairn.
I have no personal experience of these, and they are likely to always be beyond my price range.

Gerber Mk II

The Gerber Mk II answers many of the complaints that can be made about the F-S.
While it is called the “Mk II Survival”, this is primarily a fighting knife.
Mine has taken a fairly respectable edge.
The bad news is that the Mk II tends to have a higher price tag than one might wish for a knife that will not be your primary survival tool.
It is rather baffling that copies or replicas of the Gerber Mk II are not commonplace!

M3 Trench Knife

Shown with my F-S and Gerber is my M3 Trench Knife.
The M3 was also produced in Germany as the “NATO Combat Knife”. This blade configuration has also been used for a variety of bayonets.
The M3 was originally issued to soldiers not issued bayonets. Many riflemen acquired them too since they are handier than a sword bayonet.
Production of the original M3 stopped around 1944, with the M4 knife-bayonet being issued instead.
A nice design feature of the M3 is the asymmetrical guard, allowing the user to find the orientation of the main edge even in the dark.
While the M3 was designed as a utility knife, its configuration makes it a pretty good choice for a fighting knife. It compares very favourably to the Gerber Mk II in general size and features.
Personally, I do not mind that the M3 is not double-edged. The false edge comes already sharpened, and the balance of the knife is about an inch behind the guard, just where you would want it.
If you shop around, you can find reproduction M3s for a reasonable price.
Try websites that cater for WW2 re-enactors. Take a look at German trench knives while you are there.
In “Kill or Get Killed”, Applegate suggests “utility knives” can be reground into fighting knives, and shows a knife so converted. Presumably he means the M3, although he at one point claims that the utility knife has its weight too far forward in the blade.
The M3 as it comes is a pretty good fighting knife, with the option of serving in utility roles in an emergency.
Ideally, a fighting knife should only be used for its intended role, to keep it sharp.
Price of a reproduction M3 makes it a good basis for a custom project,
The derived M4 bayonet had a wooden or leather washer handle. Later models had a phenolic/bakerlite grip which is more practical. You are most likely to encounter the M7 model for the M16. The bayonet ring may be ground off if not desired.
Blade blanks for M3s or the related bayonet models, may also be found.
As Applegate suggests, the top edge can be extended, and if you have a belt-grinder adding a hollow grind is relatively simple. Tapering the blade may be more challenging. Personally, I would not consider this necessary.
Adding a fuller to the unsharpened section might be considered.
The grip of leather washers is probably simple to reshape or remove. Grip tape may prove useful here.
The large metal butt-plate may be more problematic for a customisation project, A narrow pommel of similar configuration to that of the F-S or Mk II might be preferred.

The V42

The V42 is another wartime design of fighting knife.
The skull-crusher pommel is a nice feature, although probably larger than needed.
The leather padding applied to the upper side of the quillon is a nice feature.
I have seen claims the pommel on the originals had a tendency to catch on and damage equipment. I suspect the versions on replicas such as mine have been made blunter.
My main complaint about this knife is the guard could be narrower and the blade somewhat broader.

Smaller Fighting Knives

As implied above, your fighting knife should be chosen so that it can be carried in situations you cannot carry a larger survival knife.
With this in mind, I will present two smaller examples of what can be considered fighting/tactical knives.
The larger knife is a Smith and Wesson 820.
The false edge is not sharpened, but the main edge has sharpened up to a very sharp edge.
This style resembles the M3. I prefer this configuration since it offers a little more utility, facilitating practices such as batoning.
Very impressive, and a very reasonably priced knife with most of the features you might wish for.
The smaller knife is a CRKT version of the AG Russell Sting (as favoured by a well-known literary figure!).
Small, but very solid and sharp.
Note that both knives have lanyard holes, a feature that would be welcome on the larger knives.
Adding wrist loops is on my to-do list.
Such knives are (hopefully) often carried and seldom used. Comfort and concealability are therefore priorities. A version of 820 with a flatter grip and reduced quillions, or a Sting with the option of a longer and possibly M3-style blade would be welcome.
These are some of your off-the-shelf options, illustrated with examples I have to hand.
Later blogs will cover other options.
Categories
Phillosoph

Fruit Juice and Knives

A friend of mine has warned me she intends to bring me a knife for some attention. It needs sharpening, but also has some marks. Too much touching the blade and not enough (if any!) oiling.

Gentle Rust Removal

If you paid attention in Science class you will know that you can remove rust with acids such as vinegar. Often this leaves a discolouration, however.
An interesting technique I have used is to remove rust with pineapple juice. Pineapple juice is a very mild acid. If you soak a blade for a few days it gently removes rust patches, leaving much less discolouration. Something like a vase is ideal. Just submerge the blade in juice to the depth required. If you lack a vase then the juice carton itself may be a suitable shape. You may have to brace it so the weight of the knife does not cause it to topple over.
I have only ever used pineapple juice for this, but other fruit juices should work. I suspect grapefruit juice may be too strong, but that is just a guess and I may be wrong.

Fruit and Bread Knives

I was watching a movie recently and a character makes a comment about the wisdom of cutting tomatoes with a bread knife. I guessed this may have been due to most people not having genuinely sharp kitchen knives, but I ran the idea past a chef friend.
My chef friend agreed one should cut tomatoes with a bread knife, and that it should also be used for other acidic fruits such as lemons and limes.
His explanation was that the acid of the fruits prematurely blunted other types of kitchen knife. The serrated edge of a bread knife was less affected by this. He did note that many chefs he had worked with were unaware of this.
So, if you are cutting acidic fruits in your kitchen, reach for a bread knife or serrated blade, preferably one of stainless steel.

Categories
Phillosoph

Pull-Sharpening for Knives and Tools

My recent project with the machete has spurred me to sharpen a few of the tools I have around.
In my book, “Survival Weapons”, I devote an entire chapter to the topic of sharpening. That chapter remains a useful guide to a topic that can sometimes seem cryptic.
At this point I should explain that one of my “virtues” is that I am lazy. According to admiring colleagues, I can be usually be expected to find the simplest, most stress-free method of getting a job done. Over the last week or so have I noticed that how I sharpen some tools now varies somewhat from the techniques described in the book.
Regular readers will know I own a number of kukris, as well as other large blades. There was this period of ill-health where I spent my holiday budget on swords instead! Probably safe to say I have more large blades than the average prepper. Some of these have concave or convex edges, or in the case of kukris, both. Some of the techniques for sharpening you will see on some websites are not ideal for such tools.
A useful stone for pull-sharpening and an angle-er
I have, over the decades, acquired a large number of sharpening systems. The one I have found myself using the most recently is shown above.
I inherited this stone from a deceased colleague. It is most likely an Arkansas stone. The stone itself is about three inches long and a little under an inch wide. It is firmly mounted (glued?) to a wood tray about four and a half inches long by an inch and a half wide. This provides a very nice handle when using the stone. Beneath the base is the matching wooden lid. 
The stone has just been cleaned. I used a little washing-up liquid and some water to remove most of the grime. A little bathroom cream cleaner took of the remaining residue.

The Angle-er

The device below the stone in the photo I call an “angle-er”. 
Having this nearby helps you visualize the correct angle while sharpening. This particular example has angles of 22.5, 15 and 30 degrees, which are pretty good choices for general usage. Some may prefer 17 or 20 degree and 35 degree angles. 20 degrees is the recommended edge angle for Swiss Army Knife blades, for example. I later recut the 30 degree corner to 20.
Once you have your tool close to the correct angle it is easy to vary it a couple of degrees if desired.
The beauty of this Arkansas stone is that I can move it instead of the blade. Unlike a larger flat stone this one is narrow enough that it can follow a curved edge, rather than attempting to grind it straight.
The method I use is essentially the same as was described for sharpening a machete, only instead of using a file I use a suitably sized stone.

Sharpening Styles

There are a number of ways that a stone or file can engage a blade. 
In the movies you often see a stone being dragged down a sword edge. Looks good but I have my doubts as to how useful this would be in the real world. 
Usually we want the sharpener to pass down the edge with some movement across the edge too.
The sharpening technique most often seen in “how to” guides is what may be called “push-sharpening”. If you were using a large, flat stone, you would move the blade as though you were attempting to shave the surface of the blade.
You will also see “push and pull” sharpening where the blade moves back and forth across the stone. I personally don’t use this method much and would not recommend it for the novice. 
Keeping the angle constant over the different strokes requires skill and it is easy to over-do things. If you can maintain an angle it is useful for quickly establishing a secondary edge.

Pull Sharpening

These days I tend to use drag- or pull-sharpening techniques. 
As you might expect, the blade moves in the opposite direction to push-sharpening. 
One of the advantages of pull-sharpening is that it is easier to move the sharpener across the blade edge, rather than moving the blade. This is useful when working on large or awkward blades but can be applied to small blades too. One does not need a workbench or similar for pull-sharpening. I usually sit on the sofa, watching the telly and using the advert breaks constructively.
Pull-sharpening is a good technique to use with small triangular-section sharpening stones. It is also suited to the oval stones sold for sharpening tools such as scythes.
lanskey sharpener
When you use a leather strop you are using an action like pull-sharpening. If you did not you would cut the leather!
If you are sharpening a tool using a high-speed device you should be using a pull-sharpening technique. This is so that if the high-speed wheel or belt snags the blade it will throw it away from you rather than at you!
One reason I like pull-sharpening is it is easier to view the angle of contact that sharpener and blade make. It is also easier to give both sides of the blade similar treatment without trying to use your non-dominant hand or run around the table.

Lubrication

Generally, I do not use lubricants such as oil, water or spit, for sharpening. An article I read, written by a professional sharpener, claimed that his experiments had concluded dry sharpening produced superior results. Much to my surprise, this article can still be found on-line! Generally I only apply water if a stone or sharpening system is particularly crumbly or high friction.

Pull/Drag Sharpening Technique

For example, hold your blade with the edge to the left. 
Place your sharpener at the desired angle, and push your sharpener right to left, moving it away from the blade spine or centre. 
A “pass” starts at the heel of the blade and moves towards the tip. A pass may take several strokes, depending on blade length and sharpener size. 
Make three to five passes on a side, then change. 
For the other side, you have two choices. You can flip your blade over so the edge is to the right and stroke the edge left to right; or you can turn the blade upside down and stroke the other edge right to left. 
Use whichever technique you prefer and better suits the tool being sharpened. 
Keep changing every three to five passes, reducing the number of passes as your tool approaches the desired sharpness.
Do not push downward. The weight of the blade or stone produces sufficient pressure.
Pull sharpening is a good technique if you are not that confident about your sharpening skills. It is easy to check and maintain the desired angle. It is also not a particularly aggressive technique, so you are unlikely to damage your edge. 
In fact, I recommend you try a very light touch as you make you strokes and passes. Let your stone trace the curves of the blade rather than trying to remove them. 
You will find that as the edge geometry takes shape, you will be able to feel when the stone or file is at the correct angle. Light pressure also lets your feel where sections of the edge have irregularities and need more work.
So far, the only problem I have had with pull-sharpening was with a particular multi-tool where the blade was unlocked and rather loose in the open position. Pull-sharpening tended to pull the blade closed. This would only have been a danger if I had wrapped my fingers around the grip while sharpening, rather than holding the back of the blade.
One caution. With folding blades that lack a lock, be careful when pull-sharpening or stropping. Hold the sides of the grip so your fingers are not in the way should the blade unexpectedly close.
Pull-sharpening is a useful technique to add to your repertoire. 
The knives in my kitchen are kept sharp mainly by a butcher’s steel and a set of crock-sticks I have in a cupboard there. 
I maintain my assertion that crock-sticks (ceramic rods) are a very good way to teach yourself the fundamentals of sharpening. Crock-sticks are a form of push-sharpening, but pull-sharpening has improved my technique in using these too. 
Rather than just slicing down, I now use a lighter touch and let the stick surface trace alone the curve of the edge, keeping contact to the very tip and engaging the edge at a better angle throughout its length.
I think one of the most important things I have learnt in decades of sharpening is that it is another of those skills where less is more. You will get much better results maintaining a light contact with the sharpener rather than pressing down.
Categories
Phillosoph

New Machete Grip

Surprisingly, machetes have featured infrequently in this blog. Possibly this is because much of what could have been said is already covered in “Survival Weapons” and “Crash Combat”.
One of the virtues of machetes is that they are mass-produced in their thousands, allowing you to acquire a reasonable quality tool for a very modest outlay. Sometimes the sheath costs more than the knife!
Some auction sites that no longer sell “knives and bayonets” still sell machetes.
A typical machete may be a fraction of the price of a smaller survival knife, yet prove more capable and more useful.
In addition to new items, you may find some bargains second-hand or army surplus.
Certainly, there are machetes being sold for hundreds of dollars, but it is unlikely that ten times the outlay will get you a ten-times better tool.
The price of machetes is such that you may find yourself owning several, and distributing them among various kits and caches. You may have one in your garden shed, another with your bug-out bag, and one with your vehicle, plane and/or boat.
If you are a bit of a kit tinkerer, this gives you an excuse to try out a variety of models without wasting large amounts of money.

Adding a Barong Handle

I have spent the last couple of days fitting one of my machetes with a new grip. The new grip is modelled on that of a couple of barongs that I have.
Machetes sometimes attempt to escape their user! You might cut at a springy branch placed under tension by other growth. Such an event can knock a machete right out of the user’s hand and send it flying into the brush.
It is rather surprising that more machetes do not feature retention features such as knuckle bows and wrist loops. Many models don’t even have a hole in the grip for fitting the latter!
The barong-style handle is functional as well as cosmetic. The bird’s head shape facilitates both retention and manipulation.
My grip is made from teak, which once served as a chunk of laboratory bench top.
The grip was shaped with a variety of hand-tools, with the occasional use of a Dremel-tool and an electric drill.
Once the sanding was complete, it was treated with several applications of linseed oil.
The metal collar was made from a strip of soda can.
Just above the machete you can see one of the original handle halves.
The only modification made to the blade was one corner of the tang was reduced and rounded.
Flip-side view: Some dust still in need of cleaning off.
I changed the cord for a longer piece with an extra knot, to allow use as both a wrist loop and a thumb loop.
The grip part could be slimmer, but I err on the side of caution when carving.

Sharpening a Machete

Currently, I am sharpening this machete up, and it now has a reasonable edge on it.
Most newly purchased machetes need some sharpening.
You will be tempted to try sharpening it with a Dremel or bench grinder, but it is possible to overdo this.
Machetes are made of softer metal than most smaller knives, and do not need a fine edge. The “micro-serrations” of the edge actually help the machete bite on vegetation.
This means all you really need is a medium-sized “bastard” file. A round file is useful for major work on tools with a concave edge, such as kukris and billhooks.
In the field, you can maintain the machete edge with your usual sharpening tools. My EDC includes a diamond-impregnated card, and my kukri has a chakmak and small stone with it.
If planning a trip where you expect your machete to see lots of use, it is worth packing a file in your camp gear.
Hold the file at an angle of around 22.5 degrees (for example) to the blade flat and push away from the spine.
The noise the file makes on the steel will give you clues as to which parts of the edge need more work. Sharpening sometimes involves touch, sound, and/or sight.
Half a right angle is 45 degrees and 22.5 is half this again. Fold the corner of a piece of paper twice and use this to check your angle.
I have been sharpening with the machete across my knees, edge away from me.
You could probably make a rig with a couple of supports at 22.5 degrees. The width, flatness and relatively straight edge of a machete favour this arrangement.
With the machete resting on the ramps, edge up, a file held horizontally will be at the correct angle.
Now I have an edge at the correct angle it is easy to file either side while holding the blade vertically. 
Categories
Phillosoph

Musketeer Cloak for Survival

Another night where the only good stuff on TV I have seen before. I remembered that the BBC series “The Musketeers” had been added to box sets. I think I had missed the early episodes when they were first shown, so I downloaded episode one and started watching.
As it turned out, I remembered quite a bit of the first episode, so must have started watching part way through the first one. Good fun, however.
According to some sources, a cloak with arm-vents is called a “mandelion”. This is often also defined as being waist-length. The cloaks in the series appear to be around knee length.
The costumes of the musketeers in this series is interesting. It features a pauldron on the right shoulder and is mainly leather. Think “Mad Max” meets Dumas! No idea as to the historical accuracy, but looks good. I wonder how uncomfortable it was in the sunnier scenes.
What did grab my attention this watch through was the design of the cloaks worn by the musketeers. According to some web-sources there were at least two different cloaks used. A lighter weight, light blue cloak was used in “parade” scenes, a heavier, darker blue in other scenes. In some scenes the cloaks appear to be hooded. In the episode set in the “Court of Miracles” Portos wears a brown cloak sharing some design features with the musketeer cloak. Cloaks with similar features appear worn by other characters in later episodes.
The distinctive feature of the cloak is that it has two long arm vents so the cloak resembles a long tabard. These are usually shown open, but the long line of buttons suggest they can be closed so the cloak can be worn in a more conventional fashion. Presumably these slits can be partially unbuttoned too. Unlike the tabard, the cloak has a full length opening down the front. This too has a long line of buttons, and the fold-over of cloth suggests when closed it may share some of the features of a double-breasted greatcoat. While it is hard to make out, the rear part of the cloak may have a waist-height buttoned vent for use when riding. As one might expect, the collar of the cloak is substantial and can be turned up to protect the neck. In warmer conditions the cloak is shown worn on the left shoulder, with a cord passing under the right armpit.
Some patterns. I suggest the rear side of the side pieces be sewn to the back part. The wearing of a rapier seemed to necessitate a second side vent. A cloak could be constructed by joining a semi-circular back piece to a rectangular front section. In such an instance it may be prudent to continue the top of the front section back to create a vented yoke, rather like a trench coat.
The merits and possibilities of a cloak for survival have been discussed on previous posts. One advantage is that it is sufficiently roomy that any of your other cold weather items can fit beneath it. For a modern version two-way zips might be utilized. For the arm vents I would suggest poppers be used, allowing a closed vent to be more easily opened. Seventeenth century clothing often featured closely spaded buttons, so a modern cloak may need less poppers than the buttons used on the costume items.
Categories
Phillosoph

Breakfalls: The Lateral Roll

Close combat has been described as the art of knocking someone down and kicking them while they are down. In this light, it is perhaps surprising that breakfalls are a rather neglected skill in many martial arts and self-defence courses.
The book Arwrology recounts and incident where a serviceman uses a breakfall to avoid injury when he is thrown to the ground during a bombing raid. Breakfall techniques can be incorporated into the warm-up for a training session in any martial style. In an ideal society, children would be taught breakfalls in kindergarten, learning a useful skill to save them from possible injuries in later life.
It will come as no surprise that Crash Combat and Attack, Avoid, Survive both contain sections on breakfalls. Breakfalls can be classed as “rolls”, “slaps” and “non-traditional”. A roll is self-explanatory. Slaps use the impact of the forearms and palms on the ground to brake the fall. In my books, the non-traditional techniques are represented by the cartwheel and the parachute landing fall. Once, on an isolated mountain path I missed my footing. Executing a parachute landing fall saved me from injury in a remote location, even though I was wearing a heavy pack.
In my books I also describe the forward roll, and slap techniques to the front, side and rear. Today I will look at two additional techniques.

The Rear Roll

The first is the rear roll. This resembles the rear slapping technique, but without using the forearms to brake you. The starting posture for learning resembles that used to learn the rear slapping roll. Instead of using your arms you continue to roll backwards, across your back and shoulders. It may be necessary to roll several times. Ideally you finish on your feet, ready to stand up from the squat position.

The Lateral Roll

The second technique is the “lateral roll” (yokonagare). The starting position for learning this resembles that used for the sideways slap breakfall. These photo sequences from books by Stephen Hayes illustrate the principle better than my text does:
The extended leg provides balance, and should be extended straight so that the bottom of the thigh absorbs the impact with the ground. The supporting leg is allowed to fold as much as practical to reduce drop distance. In the first sequence the roll seems to be to the rear quarter rather than to the side. The same starting position and core technique can be used to make a roll to the rear.
The lateral roll has a number of other applications. As well as being a breakfall, the technique can be used to drop below and away from an attack. It can also be used to drop and roll behind cover if spotted or fired upon. Possibly the move could be incorporated into certain sacrifice throws.
This is a move that can be initiated from any stance where the weight can be easily transferred to the rear leg. My Capoeira background notes that the actual roll action is preceded by a posture similar to negativa. It also resembles the semi-squat position often seen with some Chinese martial arts. For negativa and other breakfalls, see my books.

Categories
Phillosoph

Wind and White Crane: Hidden Hand Attacks

I have used lockdown as a chance to complete a number of projects. I have also done a lot of reading on a wide variety of topics.
This reading included finishing some books I had stalled on, and looking at some others I had just never got around to giving my full attention to.
In the latter category were a number of books on Ninjitsu, including some by Stephen Hayes. Books on this topic often have a lot of chaff in with the wheat, although to be fair, that is true of many martial arts books written in the 80s, if not in general!

The Wind Posture

One of the sections that interested me was that on stances, the stance associated with the element “wind” in particular.
As I have discussed in my own books, I feel “stance” and most of its English alternatives is an unsatisfactory term.
A stance is a transitional rather than stationary configuration. Hayes likens them to snapshots or frames from a film rather than being stationary.
Most of us, even many high-grade martial artists, have a relatively shallow immersion in the art.
Stances are an important training aid but it is easy to become diverted by the details rather than passing through to master the underlying concepts. Interestingly the Japanese term “kamae” translates as “pose” or “posture”, but also as “base”. Stances are often the foundation for learning.
From Stephen Hayes Ninja Vol.1:
“The wind level of consciousness is characterized by the receiving posture, or hira no kamae. The receiving posture couples a freely moving base and the power to harmonize the body with the intentions of an attacker. The feet are placed hip-width apart and carry the body weight evenly. The knees are flexed slightly more than in the natural posture, creating a feeling of balance in the hips similar to that experienced just before sitting down on a chair. The back is straight, in a natural manner, and the shoulders are relaxed. The arms extend outstretched to the sides with the hands open, and the eyes gaze forward in soft focus, taking in the whole picture without limiting the concentration to one single point.
The body should have an extremely light, almost floating feel to it. Epitomizing some concepts that are the opposite of those embodied in the shizen earth pose, the wind-level hira no kamae prepares the fighter for adapting to and going with the attacking moves of the enemy. This adaptive sensitivity is centered in the chest behind the breastbone. The evenly distributed balance facilitates quick and easy movement in any direction in response to the attacker’s intentions. The outstretched arms have the potential of becoming tools to carry out punches, strikes, deflections, blocks, throws and locks, as well as acting as distractions and calming techniques.
In self-protection situations, the hira posture is used to handle attackers in a way that subdues them without injury, if possible. The pose itself is nonthreatening, and it appears to be an attempt to fend off an attack or to reassure an adversary that there is no hostile intention, as upraised open hands traditionally symbolize surrender or benediction. From the hira no kamae, footwork proceeds with circular or straight- line movements, as appropriate for the specific circumstances. The arms are used to entangle the adversary with spiraling actions or intercept the adversary with direct advances.”
Another book on Taijutsu (by Charles Daniels, taught by the same sensei as Hayes, Masaaki Hatsumi) shows a posture it calls “hoe no kamae”. While this uses an L stance and raised forearms, I suspect the application is similar.
Those of you wise enough to have invested in a copy of Crash Combat or Attack, Avoid, Survive (thank you!) will know I place considerable emphasis on evasion rather than parrying or blocking.
The basis of this is the ginga movement from Capoeira.
Could the wind kamae be an alternative or complementary evasion technique to ginga?
Sadly, I do not currently have much room to dance around, so I cannot experiment much with movement and evasive moves in hira no kamae.
Some observations:
On its own, hira no kamae and hoe no kamae look like the fighter is just standing there saying “Go on dude, hit me!”.
This is one of the symptoms of regarding a stance as static, amplified by still photography.
In practice, this posture will be used to allow fast body turns.
The outstretched arms contribute to maintaining balance.
Study the body twist used in the photos below. Hira no kamae is not used, but it could have been passed through if the defender had thrown up his arms for stability.
Both of my martial arts titles explain how to use quick evasive turns similar to that shown. You will find these in the bayonet and knife sections, as well as elsewhere in the text.

White Crane

Hira no kamae may have reminded some of you of the white crane-inspired movements used in some styles of kung fu and karate.
Not surprisingly, white crane styles often put a considerable emphasis on evasion.
The extended lead arm can be used to parry attacks that cannot be fully avoided.
Brought up under the attacker’s armpit, and we have the tai chi technique of “diagonal flying”.
This is effectively the same principle as using a straight-arm karate parry against a foe’s torso and breaking their balance.
Hayes’ books often show defensive strikes made against the attacking limb, including from hira no kamae. This is also a tactic favoured by many white crane styles.
The wind posture is likely to place a defender side-on to an attacker.
As described above, the lead hand may be used for an assortment of parries and strikes.
The latter include finger jabs to the face and clawing actions.
The rear hand has the advantage that is has a considerable distance in which to generate power, and that it is effectively hidden from the attacker’s view.
This is the equivalent of the “tail” position used with swords and other weapons.
The foe has no idea from what direction a rear hand attack may come, and the rotation of the waist can create power and velocity.
One option is to adopt a side-on horse stance as the forward arm parries.
The rear hand then executes a classic reverse punch, the hips twisting through ninety degrees to transition into forward stance.
Hook punches are another useful technique for an enemy you are side-on to.

Kup and Pow

In Complete Wing Chun (Vol.2), the author discusses Pak Hok Pai, a white crane style with several techniques suited to attacking an opponent to the side.
In best Batman tradition, two of these are called “pow” and “kup”.
Pow chui has been described as a straight uppercut employed with a semicircular body motion. I like to think of it as a “long uppercut”, although technically it is more of a long shovel-hook.
Targets for pow chui include the testicles, kidneys or throat.
Kup/cup chui is a downwards, overhead strike that can be targeted at the soft muscles of a kicking leg, or the forearm, biceps or triceps of an attacking or guarding arm.
The temple, nose or top of the head can also be targeted with kup.
Like the corkscrew hook described in Attack, Avoid, Survive, a kup can be used to reach over and around a guard. The difference is that the kup typically comes from the rear hand while the corkscrew starts as a lead jab.
Choy Lay Fut is also notable for use of large arc swinging strikes.
A more horizontal motion, intermediate between pow and kup, can be used to throw a lateral, circular strike (a “roundhouse punch”, perhaps?), that is more open and straighter-armed than a hook.
While this has elements of being a “haymaker”, many of the standard objections against a haymaker do not apply if correct tactics and a hidden hand posture is used.
The back and kidneys or below the guard are the favoured target areas.
An upward angled or horizontal strike can be applied to the area of the sixth to tenth ribs: above the floating ribs and below the level of the lower tip of the sternum. This is likely to affect the lungs.
All these punches are powered by waist/hip rotation and are most effective with a relaxed, easily accelerated arm.
Kup and pow are both performed using the second knuckle of the fingers as the striking surface. These are the knuckles that would make contact if you were knocking on a door. Some styles call this a “leopard fist”.
Attack, Avoid, Survive showed a related technique, the half-fist, used to attack soft, narrow targets such as between the ribs. The thumb is often pressed against the side of the fingers, rather than being clamped across them as with a conventional fist.
Rear hand attacks can also utilize palm-strikes, chops and hammer-fist strikes.
Recently, my girlfriend described how her mother had often fought men who had turned up with the intent of raping her sister.
Many a bully and would-be rapist who dismissed the mother as a “mere-woman” got a percussive readjustment.
Her mother's technique of choice was a powerful overhand or underarm punch.
My girlfriend learnt the same techniques and has used them to defend herself on numerous occasions.

Tai Chi

In “How To Use Tai Chi as a Fighting Art” Erle Montaigue describes the “Stork Spreads Wings Punch”, another potential rear hand attack.
The “Stork Spreads Wings” posture is often translated as “white crane…”:
“This punch is one of the most powerful punches from any martial art. It is totally centrifugal and quite fast considering its distance…This is one of only three punches in T’ai Chi that uses the first two knuckles, in T’ai Chi we use the knuckles that most suit the position of the palm upon impact otherwise we use extra muscles to hold the palm into position and there-by lessen its impact…If you block with the right fist across to the left against a left face attack with the left palm underneath it, … the left palm then takes over the block while the right fist is thrown out at the target with the turning of the waist…Your left palm looks after the left fist while your right fist circles back up in a centrifugal punch to his left temple”
Categories
Phillosoph

Help for Time Travellers

In my novella, “Anatopismo”, one of the characters expresses surprise that a community has electricity. The other character is surprised by this reaction and responds “Why not? It is just wire and magnets.”
I was reminded of this passage since I have started reading “How To Invent Everything: A Survival Guide For The Stranded Time Traveler” by Ryan North (2018, Riverhead Books) ISBN 978-0735220140.
A common theme that occurs in this book is that many of humanity’s inventions and discoveries could have been made centuries or even millennia before they were. Sometimes an idea was adopted in one field, but it was a considerable time until it was applied in others. For example, wine was being pasteurized centuries before it was applied to other foodstuffs, such as milk.
How To Invent Everything will probably prove interesting to many readers of this blog, but particularly those interested in long term scenarios.
I wonder how many people's long term preparations include a hard copy of Four-Figure Tables?
The book is packed full of diverse, useful information in an easily readable style.
There are a few points of contention. The beer recipes given are rather vague. The comments made about the cloudiness Egyptian-style beer are probably out of date.
Staphylococcus are not necessarily harmless. The author also describes yeast as “animals”, which is a pretty basic, avoidable mistake, and makes me wonder about other inaccuracies. You should probably double check any facts from the book before you get into any arguments, but that is a sound policy anyway.
On the topic of verifying information, the book is worth reading just for the comments on the scientific method:
“This is the more accurate theory of combustion that we still operate under today, but we could still be wrong.
Or, more likely, we could still be more correct.
Here’s how you produce knowledge using the scientific method.
An example: maybe you notice (as per step 1) that your corn didn’t grow well this year. For (2), you might ask, “Hey, what the heck, everyone, how come my corn didn’t grow well this year?” You might suspect the drought affected the corn’s growth (3), and so (4) decide to grow corn under controlled conditions, giving each plant different amounts of water but equal amounts of everything else you can think of (sunlight, fertilizer, etc.). After carefully doing that (5), you might conclude (6) that a precise amount of water grows the best corn plants, and (7) let your farmers know. And when your corn still doesn’t grow as well as you want, you might explore (8) and wonder if there’s more to growing great corn than just making sure your corn isn’t thirsty.*
The more ways a hypothesis has been tested, the more likely it is to be correct, but nothing is certain. The best case you can hope for by using the scientific method is a theory that happens to fit the facts as you understand them so far: science gives you an explanation, but you can never say with absolute certainty that it’s the correct one. That’s why scientists talk about the theory of gravity (even though gravity itself clearly exists and can cause you to fall down the stairs), theories of climate change (even though it’s obvious our environment is not the same one our parents enjoyed, or that you’re enjoying right now), or the theory of time travel (even though it’s a fact that you’re clearly trapped in the past for reasons that cannot have any legal liability assigned).
Note that the scientific method requires you to keep an open mind and be willing—at any time—to discard a theory that no longer fits the facts. This is not an easy thing to do, and many scientists have failed at it. Einstein* himself hated how his own theory of relativity argued against his preferred idea of a fixed and stable universe, and for years tried in vain to find some solution that reconciled them both. But if you succeed at following the scientific method, you will be rewarded, because you will have produced knowledge that is reproducible: that anyone can check by doing the same experiment themselves.
Scientists are often seen as turbonerds, but the philosophical foundations of science are actually those of pure punk-rock anarchy: never respect authority, never take anyone’s word on anything, and test all the things you think you know to confirm or deny them for yourself.”
Categories
Phillosoph

The Soft-Core Bag

Today I am going to introduce what I call my “soft-core bag”. This is not a “bug-out bag”, although it could be included in the contents of one.
I have a number of bags and rucksacs, and there are certain items that I would invariably want in one if I was carrying it.
Stocking each pack with necessary items is not economically practical, however.
Perhaps, I thought, I should have a box containing the necessary items and potential alternatives. This was part of the solution, but I quickly realized many items could be packed together so they could easily be grabbed in one go.

I drew on the lists given in the previous post to select the current loadout.

  • Top left: A small first aid kit. This supplements the items I carry in my skin-level EDC.
  • Directly below the first aid kit in a dark brown camouflage bag is a rain poncho. Inside the stuff-sack are two three-metre lengths of cord. Paracord stretches, so something non-elastic is preferable. These may be used to help create a shelter or as a belt for the poncho and a poncho-liner when windy or very cold.
  • The white plastic bag beside the poncho contains a toilet roll. This has subsequently been replaced with a clear ziploc bag. A refilable 100 ml bottle of alchohol hand sanitizer has been added to this bag. Both toilet paper and sanitizer may aid in fire-lighting.
  • Middle top can be seen a bag of boiled sweets and a pair of warm gloves. These are sitting on top of a dark green all-weather (AW) blanket. You can see some of the shoelaces that are tied to the grommets of this. I intend to add a pair of silver space blankets and a foil survival bag too.
  • Top right, a red and black shemagh. This is a spare/additional shemagh, since I am often wearing one these days.
  • Bottom centre is my Advantage-camouflaged boonie hat.
  • Sitting on the boonie hat is a plastic bag carrying a small fire kit. This has two butane lighters, two nightlights, four birthday candles, a 35mm film container filled with Vaseline-soaked cotton wool, and a Fresnel lens.
  • Below the fire kit and to the left is an ACU-patterned headover which can serve various roles, including as warm headgear.
  • Bottom right is a one-litre Playtpus waterbottle. Sitting on it are a shoelace, hank of general purpose string, hank of green paracord and some braided fishing line wrapped around a piece of plastic (yoghurt carton) or a small tube.
  • Not shown: two supermarket carrier bags. I wear photochromic spectacles. If you do not, a pair of cheap sunglasses may be a prudent addition.
  • A recent addition is a baseplate compass and whistle on a neck cord.

The whole collection packs into a draw-cord bag, as shown. Note snap-link added to one carrying cord.
This bag is lined with another plastic bag to provide better water resistance. Everything except the AW blanket, space blankets, shopping bags, poncho and water-bottle fit inside the waterproof liner bag.
The headover is folded into a pouch and used to contain some of the smaller items. This pouch, in turn, is placed inside the boonie hat. The folded shemagh is placed with this.
Most of the pack contents are soft and crushable so no great genius at packing is really needed. Put the blanket in first and add the plastic bag of other contents. Put your water-bottle away from your back and ensure your poncho rides near the top of your bag.
Packed, but without water, the soft-core bag weighs about 1.3 kg. The volume of water I will carry and which water-bottle I will carry will vary with climate and anticipated conditions.
The soft-core pack is easily stuffed into a larger bag, immediately adding a collection of very useful items. On its own, it is a good bag to have for trips where you do not want to be bothered by a bag. It is light and low-density, and makes a pretty good pillow.
A quick glance inside the first aid kit. Items in this kit are consumed in preference to those in the skin-level EDC. Vaseline is good for chapped lips and other ailments.
The soft-core bag probably has more cordage than it needs, but I had some hanks already made up. This is a nice example of paracord carried using hojo-jitsu configuration.