Surprisingly, machetes have featured infrequently in this blog. Possibly this is because much of what could have been said is already covered in “Survival Weapons” and “Crash Combat”.
One of the virtues of machetes is that they are mass-produced in their thousands, allowing you to acquire a reasonable quality tool for a very modest outlay. Sometimes the sheath costs more than the knife!
Some auction sites that no longer sell “knives and bayonets” still sell machetes.
A typical machete may be a fraction of the price of a smaller survival knife, yet prove more capable and more useful.
In addition to new items, you may find some bargains second-hand or army surplus.
Certainly, there are machetes being sold for hundreds of dollars, but it is unlikely that ten times the outlay will get you a ten-times better tool.
The price of machetes is such that you may find yourself owning several, and distributing them among various kits and caches. You may have one in your garden shed, another with your bug-out bag, and one with your vehicle, plane and/or boat.
If you are a bit of a kit tinkerer, this gives you an excuse to try out a variety of models without wasting large amounts of money.
Adding a Barong Handle
I have spent the last couple of days fitting one of my machetes with a new grip. The new grip is modelled on that of a couple of barongs that I have.
Machetes sometimes attempt to escape their user! You might cut at a springy branch placed under tension by other growth. Such an event can knock a machete right out of the user’s hand and send it flying into the brush.
It is rather surprising that more machetes do not feature retention features such as knuckle bows and wrist loops. Many models don’t even have a hole in the grip for fitting the latter!
The barong-style handle is functional as well as cosmetic. The bird’s head shape facilitates both retention and manipulation.
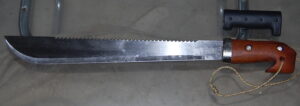
My grip is made from teak, which once served as a chunk of laboratory bench top.
The grip was shaped with a variety of hand-tools, with the occasional use of a Dremel-tool and an electric drill.
Once the sanding was complete, it was treated with several applications of linseed oil.
The metal collar was made from a strip of soda can.
Just above the machete you can see one of the original handle halves.
The only modification made to the blade was one corner of the tang was reduced and rounded.

Flip-side view: Some dust still in need of cleaning off.
I changed the cord for a longer piece with an extra knot, to allow use as both a wrist loop and a thumb loop.
The grip part could be slimmer, but I err on the side of caution when carving.
Sharpening a Machete
Currently, I am sharpening this machete up, and it now has a reasonable edge on it.
Most newly purchased machetes need some sharpening.
You will be tempted to try sharpening it with a Dremel or bench grinder, but it is possible to overdo this.
Machetes are made of softer metal than most smaller knives, and do not need a fine edge. The “micro-serrations” of the edge actually help the machete bite on vegetation.
This means all you really need is a medium-sized “bastard” file. A round file is useful for major work on tools with a concave edge, such as kukris and billhooks.
In the field, you can maintain the machete edge with your usual sharpening tools. My EDC includes a diamond-impregnated card, and my kukri has a chakmak and small stone with it.
If planning a trip where you expect your machete to see lots of use, it is worth packing a file in your camp gear.
Hold the file at an angle of around 22.5 degrees (for example) to the blade flat and push away from the spine.
The noise the file makes on the steel will give you clues as to which parts of the edge need more work. Sharpening sometimes involves touch, sound, and/or sight.
Half a right angle is 45 degrees and 22.5 is half this again. Fold the corner of a piece of paper twice and use this to check your angle.
I have been sharpening with the machete across my knees, edge away from me.
You could probably make a rig with a couple of supports at 22.5 degrees. The width, flatness and relatively straight edge of a machete favour this arrangement.
With the machete resting on the ramps, edge up, a file held horizontally will be at the correct angle.
Now I have an edge at the correct angle it is easy to file either side while holding the blade vertically.