Disclaimer: “As an Amazon Associate I may earn from qualifying purchases.” Adsense and Infolinks were no help at all.

If you have enjoyed this article or it has been helpful to you please feel free to show your appreciation. Thank you.

Read The Third Wave by Alvin Toffler!
Categories
Barata

Computers and Related Hassles

Today's blog subject is a little removed from the usual themes of self‑defence or self‑reliance.
I would like to pass on some tips that make life a smidgen easier.
Think of them as a defence against some elements of modern life attacking your sanity, if you wish.
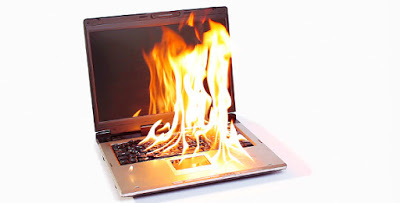
Burning computer

Reset Folder

A common theme on this blog is to urge the reader to have back‑ups, both for you computer, and for your life in general.
On my backup and external drives I have a folder I call “Reset”.
In Reset are copies of the themes, backgrounds, profile photos, keyboard shortcuts, bookmarks, macros, browser extensions, fonts and plugins that I favour.
All the things that make my computer programs look and work just like I want them to.
Also in this folder are some installation .exes of some of my favourite programs.
When I have a new machine, or have to update my operating system, or something similar, I can quickly get things back to the way I like them.
A small but useful component of this folder is a text file checklist.
* The text file lists the programs I favour.
* The file lists which files need to be changed, and with what,
* The file also records where on the computer these files need to be put.

ISO to Go

Also on my external drives is a folder containing the ISOs of the operating systems I use on my home computer and laptop.
 I plan to have an ISO of my personal operating system if I can find a utility that works with my system.
Should I need a “live disc”, an ISO may easily be transferred to a flash drive with “Ventoy” on it.

Router Password Card

A previous broadband provider included with the router a plastic card with the network passkey printed on it.
That company was brought out by a less competent company that hiked the prices up, so I changed broadband providers.
The new provider did not provide a card, so I made my own.
On a blank plastic card I wrote the necessary information. I keep this card by the router.
Whenever my girlfriend or step-son visit, they will usually reach for that card to reset their devices.
This idea relies on the card being placed back with the router once it has been used. This has not been a problem in practice.
A very simple idea that has proved very useful.

Box of Computer Bits

Behind my computer is a box. It is a two-litre ice cream tub spray-painted black to match the computer. It is a useful height to rest my external hard drives on.
In the box is a multiple slot card reader for reading micro-SD, SD and other card-shaped formats.
Also in that box are various USB drives, SD cards, dongles, adaptors and computer leads.
Handy stuff to have near your computer.

Code Leads

I have a lot of computer leads, both in that box and elsewhere.
Most of them are black, so it can be time consuming finding the lead with the connectors that I need.
My solution was half an hour of time spent colour coding.
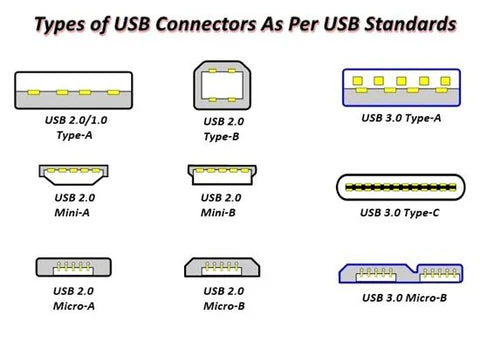
Types of USB Connector
One of the lead types I use most often has a USB-A at one end and a mini-B at the other. The “A” end now has a red and a yellow band, while the mini-B end has the same colours reversed with the yellow band closest to the mini-B connector.
Not only can I tell the type of lead at a glance, but which end each type of connector is at.
Leads with a USB-C connector rather than a mini-B use red and green.
An iPod lead has red and white bands.
A lead with a micro-B connection for attaching to drive enclosures uses red and blue.
A lead that has two type-A connectors, or two type-C has only one band at each end, respectively with red or green.
Leads with a type-A to type-B are rarer and usually stay plugged into a scanner or printer. For these, each end has red, yellow and blue bands.
Initially, I added the coloured bands using electrical tape. Perhaps I should have used longer bits, since several have detached.
So I invested in a bag of mixed coloured cable-ties/zip ties.
100 x 2.5 mm are ample size for this application. I found I needed extra red and yellow.
Best review your connector types before you order.
If you make a mistake, a cable-tie may be opened again using a pin. This is a variation of shimming.
If a cable-tie loosening is a concern, the cut end may be melted into a blob by gentle heating with a lighter flame or application of a heated metal implement.
My current earphones are shaped specifically for the left or right ear. I have tagged the left one with a cable-tie so it is easily distinguished by sight or touch.

Labels on USBs

My USB flash drives range from old examples with two gigabytes to more recent in 32 gigabyte sizes. Some of the smaller capacity drives are still handy for some purposes.
You can save a lot of time if you write the capacity of a USB drive on the outside.
There are two ways to plug in a USB. The right way and the first way you tried. Put your labels on the upper or outward side.

Paint Your Plugs

Ever unplugged your computer when you wanted to disconnect the device plugged in beside it?
I used to think plugs should have those little windows you can insert a piece of card into.
One day I remembered all the model paint I have, some of it in bright colours I seldom use.
So now my electrical plugs have legends such as “XBox”, “PSP”, “DVD”, “Comp”, “Shredder”, “Hoover” and similar in a variety of colours.
If you lack paint, stickers and a wide pen are an alternative.
Providing that I look at what I am doing, it is a lot easier to plug-in or unplug the device that I want.

Find the Remote

On the topic of stickers, the black TV remote control is often hard to locate when watching late at night.
I have added luminous star stickers to both sides in different configurations.
Now, not only can I find the remote, I can tell which side it is up and which end is which.

Hair Today…

Einstein
I suppose, given the great diversity of humanity, there may be someone who enjoys removing hair from the plughole. Probably whole forums, websites and fetish magazines about it.
Best not look.
You may have a sink strainer in your kitchen sink. Few people seem to think of using one in the bath/shower and bathroom sink.
Removing hair from a sink strainer is a lot easier than fishing it up out the plughole.

Final Thought

A lot of time would be saved if when a website asked for a password, it included the information that the password included numbers, capitals and/or non-alphanumeric characters.
Categories
Barata

Palms: A Handy Measuring Tool

Over my decades of writing this blog, I have learned a number of useful things.
Some of them are useful in everyday life, rather than being strictly emergency or self-defence skills.
How to count to twelve on one hand
One example I often use is the technique of counting on finger bones rather than fingers. Using this method it is possible to count to twelve with one hand, or to 72 or 156 using both.
Somewhere along the line I learnt the trick of counting in fours.
I used to group things into threes when counting. Fours is more efficient, and it is easy to group fours into larger groups of twelve, sixteen or twenty for a quick total.
The count of larger groupings may be combined with the finger bone counting method. Eight twenties and three left? 163.
Some readers may have noticed that in my later writings I have tried to utilize anthropic measurements when this is clearer.
“Three body lengths” distance is much easier to visualize than six metres, seven yards or 21 feet.
Similarly, instructing someone to place their feet two foot-lengths or a shoulder-width apart compensates for varying body sizes, so more useful than giving an exact value in inches, feet, yards, centimetres or metres.
Today’s idea derives from my fictional measuring system, which was eventually used in my novel “Anatopismo”.
In this system there was a sub-unit called the “vingt” that was a sixth of a standardized cubit, or a twentieth of a standard double pace.
Only recently did it occur to me that the vingt was very close to the width of a human palm.

Palms

Many cultures have used units of measure based on or named after the palm. Some are based on the palm width, others on the hand length.
In this article, “palm” should be understood to refer to palm width.
Logically enough, the palm is often subdivided into four “digits” (finger breadths).
Some definitions of the palm are as being the width of four digits, rather than the width of the palm.
What is interesting is how the palm width correlates with a number of other body-based units of measure.
A cubit distance
As alluded to above, a cubit is around six palms. A double pace is around 20 palms, so a single pace is around ten palms.
A cubit approximates a shoulder-width, so a shoulder width is approximately six palms or 24 finger-breadths.
Two cubits, or twelve palms is approximately the distance from the finger tips to the nose if you hold your hand out to the side. This is approximately a yard, and cloth was sometimes measured out using this method. Hence the term “clothyard”. 13 palms, or two cubits and a palm is about a metre. Since most of us are under six foot tall, these “yards” and “metres” will be a little short.
Four cubits, or 24 palms, is approximate to an arm-span (approximately a fathom), which can be taken as equivalent to a body-length. An arm-span is a handy way to measure cordage.
Use your quick maths tricks here.
To multiply by six, triple and double the result.
Multiply by 24, triple and double three times (keeping count on your finger bones!). Multiply by 20, double and add a nought, and so on.
A seconds pendulum is about 99 cm. If you need to time something, use a cord half a digit less than half an arm-span plus a palm long.
I am not suggesting you throw away your tape measures and rulers.
Knowing the relationship between digits, palm widths and cubits can provide you with a useful “personal approximating” system.
If you are consistent with whose hand you use and how you measure, these units can have an acceptable level of accuracy.
If using this system to make something, I suggest you remember the maxim of “measure twice and cut once”. In practice, measure several times, and err on the side of caution. Trimming down is easier than adding material back!
Where across the palm should you use for measuring?
Personally, I go across where the fingers join the palm, from the outside of the bottom joint of the first finger to the outside of the bottom joint of the little finger. It is easier to measure in digits on this line too.
A palm width is approximately three inches or 7.5 cm. A digit is therefore approximately three-quarters of an inch, or 18-20 mm.
My palm is about 83 mm or 3.25 inches, making my average digit a shade under 21 mm. I am 1.8 metres tall, which makes me more than two palms under 24.
Like I have already said, this is an approximation system.

Paces

A double pace

Paces are more useful for longer horizontal distances.
A double pace, by the above, is 20 palms or three and a third cubits.
More usefully, this means ten cubits are three double paces.
Five body-lengths is six double paces.
Some older Russian Mosin-Nagant rifles may be found with sights graduated in arshin.
Arshin is defined as the distance from the shoulder to fingertips, but is often treated as being a single pace. Interestingly, that is one and a half cubits, which would make a double pace three cubits.
Actual paces are very variable, depending on speed, terrain, body size, age, disability, fatigue and other factors.
My current double pace is about 1.17 metres/46 inches, which is about 14 to 15 palms, depending what value of palm I use.
I have to walk with a cane these days.
I tried measuring between the points my walking cane contacted the ground, and got a value of about 33 inches/ 83 cm (10 palms), which shows how much a pace can vary.
Over any distance, my double pace probably averages around two cubits, which is a convenient value.
Categories
Phillosoph

EDC Lock Picking and Bypass Kits

As regular readers will know, the lock picking contingent of my EDC is rather small:
— A pair of Bogotas.
— A small snake rake.
— A double-ended turning tool.
Bogota Lock Picks
Other items, such as the three-inch pocket prybar, may have applications in bypassing locks. When the barrel of my doorlock came out with my key, it was the long file on my Swiss Army Knife that was needed to open the door.
Today I will bring you two interesting videos on lock picking and bypass tools for EDC. Credit to Dean for directing me to the first one.
While I have done a bit of lock picking, I don’t have as much experience with bypass techniques as I might wish. When the zombies come, I will be grabbing my kukri, crowbar and brick hammer. Those will bypass a few obstacles!
Some thoughts on the suggestions:
— The plastic shim seems like a very prudent choice.
— I have never used them, but padlock shims might be worth having. I seem to recall padlock shims can be cut from soda or beer can material. The edges of these will probably be surprisingly sharp, so take care.
— I have a number of bobby pins in my general EDC pouch. These are in a bag with some paper clips and about a dozen safety pins. A few weeks back some of these safety pins were used to repair my girlfriend’s jeans.
— I have some comb-picks, but have not been able to open any locks with them. The same can be said of my set of jiggler keys, although I suspect the latter are intended for car doors since they are too large for all my locks. Most keyways I encounter have kinks in them, so the straight combs and jigglers would be difficult to insert or move within them. I think my Bogottas and snake are a more effective and versatile option.
— Similarly, my set of skeleton keys stays at home since large warded locks seem to be relatively uncommon. If long enough, a bypass knife may serve instead. The small warded locks often used on luggage can be popped by a variety of implements, including sturdy picks like the Bogotas.
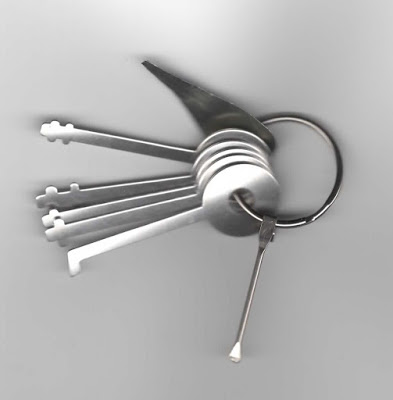
Bunch of Skeleton Keys and Decoder
— My bunch of skeleton keys includes a decoder I made from a cut-out shape of soda can (top). I do not think I have tried it out, since I seldom encounter combination locks. There are ways to crack combination padlocks without a decoder tool, and I have used these at least once.
— A bypass knife seems worth having. My Serenity Plus kit includes one that came with a set of my Chinese picks. I cannot recall if I have ever opened anything with it. Most of my padlocks are not vulnerable to this technique. I plan to try making a bypass knife that will fit in my EDC.
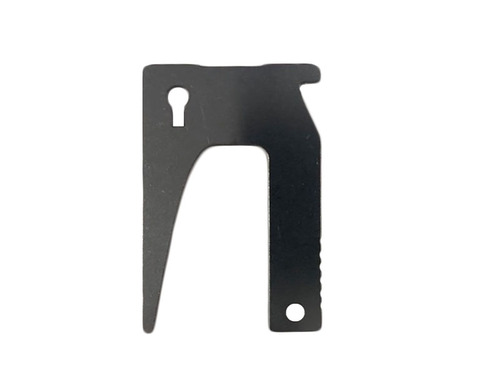
Mini-Slim-Jim Dimensions
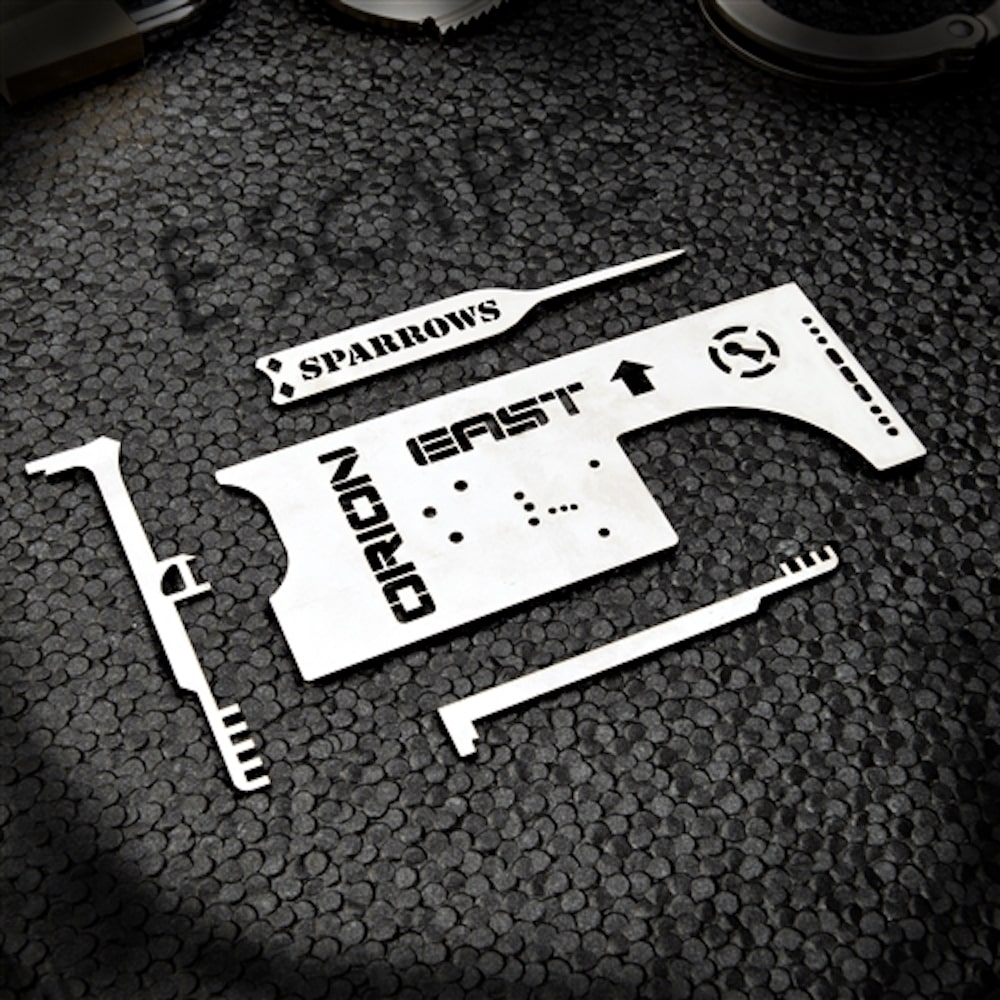
— The mini-slim-jim is interesting. Obviously this is too short to be used to open car doors. That is probably not a drawback given the number of vehicle vulnerable to slim-jims is probably decreasing every year. The mini-slim-jim is actually intended to bypass the latches of doors. The large notch on the tool is probably a legacy of its ancestry. Sparrows makes several sizes of slim-jim. They also make the “Hall Pass”, which is a credit-card-shaped tool in either metal or plastic. Southern Specialities offers their own design of tool for latches, the “Multipass”.
Sparrow's Hall Pass Southern Specialities Multipass Sparrow's Orion Hall Pass
I have tried making something similar out of an old plastic card. I didn’t have any success opening a door, but at the time I had yet to locate the correct dimensions. I am also now more familiar with the manual technique needed, so it might work better in future.
I have, however, managed to pop a latch using a TOK turning tool. This experiment seemed to indicate that a traveller hook may be a better way to attack a latch than a slim-jim. Being able to rotate the tool would have advantages. This is what the bent piece of music wire in the first video is intended for.
Sparrow's Traveller Hooks
I may try to fabricate a traveller hook that can fit in my EDC. Sparrows sell two sizes of traveller hook (also called traveller’s, travellers, shrum tool or travelling hooks). Auto-stores sell something similar as “O-ring pullers”. Skewers, ejector pins and music/piano wire can be used to fabricate traveller hooks. For reference, the Sparrow hooks use shanks 2.6mm (0.1 inch) thick.
Latches can sometimes be opened by threading a cord or wire behind them.
Categories
Phillosoph

Fruit Juice and Knives

A friend of mine has warned me she intends to bring me a knife for some attention. It needs sharpening, but also has some marks. Too much touching the blade and not enough (if any!) oiling.

Gentle Rust Removal

If you paid attention in Science class you will know that you can remove rust with acids such as vinegar. Often this leaves a discolouration, however.
An interesting technique I have used is to remove rust with pineapple juice. Pineapple juice is a very mild acid. If you soak a blade for a few days it gently removes rust patches, leaving much less discolouration. Something like a vase is ideal. Just submerge the blade in juice to the depth required. If you lack a vase then the juice carton itself may be a suitable shape. You may have to brace it so the weight of the knife does not cause it to topple over.
I have only ever used pineapple juice for this, but other fruit juices should work. I suspect grapefruit juice may be too strong, but that is just a guess and I may be wrong.

Fruit and Bread Knives

I was watching a movie recently and a character makes a comment about the wisdom of cutting tomatoes with a bread knife. I guessed this may have been due to most people not having genuinely sharp kitchen knives, but I ran the idea past a chef friend.
My chef friend agreed one should cut tomatoes with a bread knife, and that it should also be used for other acidic fruits such as lemons and limes.
His explanation was that the acid of the fruits prematurely blunted other types of kitchen knife. The serrated edge of a bread knife was less affected by this. He did note that many chefs he had worked with were unaware of this.
So, if you are cutting acidic fruits in your kitchen, reach for a bread knife or serrated blade, preferably one of stainless steel.

Categories
Phillosoph

Pull-Sharpening for Knives and Tools

My recent project with the machete has spurred me to sharpen a few of the tools I have around.
In my book, “Survival Weapons”, I devote an entire chapter to the topic of sharpening. That chapter remains a useful guide to a topic that can sometimes seem cryptic.
At this point I should explain that one of my “virtues” is that I am lazy. According to admiring colleagues, I can be usually be expected to find the simplest, most stress-free method of getting a job done. Over the last week or so have I noticed that how I sharpen some tools now varies somewhat from the techniques described in the book.
Regular readers will know I own a number of kukris, as well as other large blades. There was this period of ill-health where I spent my holiday budget on swords instead! Probably safe to say I have more large blades than the average prepper. Some of these have concave or convex edges, or in the case of kukris, both. Some of the techniques for sharpening you will see on some websites are not ideal for such tools.
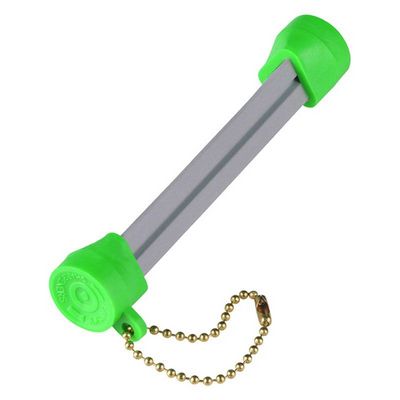
A useful stone for pull-sharpening and an angle-er
I have, over the decades, acquired a large number of sharpening systems. The one I have found myself using the most recently is shown above.
I inherited this stone from a deceased colleague. It is most likely an Arkansas stone. The stone itself is about three inches long and a little under an inch wide. It is firmly mounted (glued?) to a wood tray about four and a half inches long by an inch and a half wide. This provides a very nice handle when using the stone. Beneath the base is the matching wooden lid. 
The stone has just been cleaned. I used a little washing-up liquid and some water to remove most of the grime. A little bathroom cream cleaner took of the remaining residue.

The Angle-er

The device below the stone in the photo I call an “angle-er”. 
Having this nearby helps you visualize the correct angle while sharpening. This particular example has angles of 22.5, 15 and 30 degrees, which are pretty good choices for general usage. Some may prefer 17 or 20 degree and 35 degree angles. 20 degrees is the recommended edge angle for Swiss Army Knife blades, for example. I later recut the 30 degree corner to 20.
Once you have your tool close to the correct angle it is easy to vary it a couple of degrees if desired.
The beauty of this Arkansas stone is that I can move it instead of the blade. Unlike a larger flat stone this one is narrow enough that it can follow a curved edge, rather than attempting to grind it straight.
The method I use is essentially the same as was described for sharpening a machete, only instead of using a file I use a suitably sized stone.

Sharpening Styles

There are a number of ways that a stone or file can engage a blade. 
In the movies you often see a stone being dragged down a sword edge. Looks good but I have my doubts as to how useful this would be in the real world. 
Usually we want the sharpener to pass down the edge with some movement across the edge too.
The sharpening technique most often seen in “how to” guides is what may be called “push-sharpening”. If you were using a large, flat stone, you would move the blade as though you were attempting to shave the surface of the blade.
You will also see “push and pull” sharpening where the blade moves back and forth across the stone. I personally don’t use this method much and would not recommend it for the novice. 
Keeping the angle constant over the different strokes requires skill and it is easy to over-do things. If you can maintain an angle it is useful for quickly establishing a secondary edge.

Pull Sharpening

These days I tend to use drag- or pull-sharpening techniques. 
As you might expect, the blade moves in the opposite direction to push-sharpening. 
One of the advantages of pull-sharpening is that it is easier to move the sharpener across the blade edge, rather than moving the blade. This is useful when working on large or awkward blades but can be applied to small blades too. One does not need a workbench or similar for pull-sharpening. I usually sit on the sofa, watching the telly and using the advert breaks constructively.
Pull-sharpening is a good technique to use with small triangular-section sharpening stones. It is also suited to the oval stones sold for sharpening tools such as scythes.
lanskey sharpener
When you use a leather strop you are using an action like pull-sharpening. If you did not you would cut the leather!
If you are sharpening a tool using a high-speed device you should be using a pull-sharpening technique. This is so that if the high-speed wheel or belt snags the blade it will throw it away from you rather than at you!
One reason I like pull-sharpening is it is easier to view the angle of contact that sharpener and blade make. It is also easier to give both sides of the blade similar treatment without trying to use your non-dominant hand or run around the table.

Lubrication

Generally, I do not use lubricants such as oil, water or spit, for sharpening. An article I read, written by a professional sharpener, claimed that his experiments had concluded dry sharpening produced superior results. Much to my surprise, this article can still be found on-line! Generally I only apply water if a stone or sharpening system is particularly crumbly or high friction.

Pull/Drag Sharpening Technique

For example, hold your blade with the edge to the left. 
Place your sharpener at the desired angle, and push your sharpener right to left, moving it away from the blade spine or centre. 
A “pass” starts at the heel of the blade and moves towards the tip. A pass may take several strokes, depending on blade length and sharpener size. 
Make three to five passes on a side, then change. 
For the other side, you have two choices. You can flip your blade over so the edge is to the right and stroke the edge left to right; or you can turn the blade upside down and stroke the other edge right to left. 
Use whichever technique you prefer and better suits the tool being sharpened. 
Keep changing every three to five passes, reducing the number of passes as your tool approaches the desired sharpness.
Do not push downward. The weight of the blade or stone produces sufficient pressure.
Pull sharpening is a good technique if you are not that confident about your sharpening skills. It is easy to check and maintain the desired angle. It is also not a particularly aggressive technique, so you are unlikely to damage your edge. 
In fact, I recommend you try a very light touch as you make you strokes and passes. Let your stone trace the curves of the blade rather than trying to remove them. 
You will find that as the edge geometry takes shape, you will be able to feel when the stone or file is at the correct angle. Light pressure also lets your feel where sections of the edge have irregularities and need more work.
So far, the only problem I have had with pull-sharpening was with a particular multi-tool where the blade was unlocked and rather loose in the open position. Pull-sharpening tended to pull the blade closed. This would only have been a danger if I had wrapped my fingers around the grip while sharpening, rather than holding the back of the blade.
One caution. With folding blades that lack a lock, be careful when pull-sharpening or stropping. Hold the sides of the grip so your fingers are not in the way should the blade unexpectedly close.
Pull-sharpening is a useful technique to add to your repertoire. 
The knives in my kitchen are kept sharp mainly by a butcher’s steel and a set of crock-sticks I have in a cupboard there. 
I maintain my assertion that crock-sticks (ceramic rods) are a very good way to teach yourself the fundamentals of sharpening. Crock-sticks are a form of push-sharpening, but pull-sharpening has improved my technique in using these too. 
Rather than just slicing down, I now use a lighter touch and let the stick surface trace alone the curve of the edge, keeping contact to the very tip and engaging the edge at a better angle throughout its length.
I think one of the most important things I have learnt in decades of sharpening is that it is another of those skills where less is more. You will get much better results maintaining a light contact with the sharpener rather than pressing down.
Categories
Phillosoph

Breakfalls: The Lateral Roll

Close combat has been described as the art of knocking someone down and kicking them while they are down. In this light, it is perhaps surprising that breakfalls are a rather neglected skill in many martial arts and self-defence courses.
The book Arwrology recounts and incident where a serviceman uses a breakfall to avoid injury when he is thrown to the ground during a bombing raid. Breakfall techniques can be incorporated into the warm-up for a training session in any martial style. In an ideal society, children would be taught breakfalls in kindergarten, learning a useful skill to save them from possible injuries in later life.
It will come as no surprise that Crash Combat and Attack, Avoid, Survive both contain sections on breakfalls. Breakfalls can be classed as “rolls”, “slaps” and “non-traditional”. A roll is self-explanatory. Slaps use the impact of the forearms and palms on the ground to brake the fall. In my books, the non-traditional techniques are represented by the cartwheel and the parachute landing fall. Once, on an isolated mountain path I missed my footing. Executing a parachute landing fall saved me from injury in a remote location, even though I was wearing a heavy pack.
In my books I also describe the forward roll, and slap techniques to the front, side and rear. Today I will look at two additional techniques.

The Rear Roll

The first is the rear roll. This resembles the rear slapping technique, but without using the forearms to brake you. The starting posture for learning resembles that used to learn the rear slapping roll. Instead of using your arms you continue to roll backwards, across your back and shoulders. It may be necessary to roll several times. Ideally you finish on your feet, ready to stand up from the squat position.

The Lateral Roll

The second technique is the “lateral roll” (yokonagare). The starting position for learning this resembles that used for the sideways slap breakfall. These photo sequences from books by Stephen Hayes illustrate the principle better than my text does:
The extended leg provides balance, and should be extended straight so that the bottom of the thigh absorbs the impact with the ground. The supporting leg is allowed to fold as much as practical to reduce drop distance. In the first sequence the roll seems to be to the rear quarter rather than to the side. The same starting position and core technique can be used to make a roll to the rear.
The lateral roll has a number of other applications. As well as being a breakfall, the technique can be used to drop below and away from an attack. It can also be used to drop and roll behind cover if spotted or fired upon. Possibly the move could be incorporated into certain sacrifice throws.
This is a move that can be initiated from any stance where the weight can be easily transferred to the rear leg. My Capoeira background notes that the actual roll action is preceded by a posture similar to negativa. It also resembles the semi-squat position often seen with some Chinese martial arts. For negativa and other breakfalls, see my books.

Categories
Phillosoph

Battle of Jangsari: Camouflage

Recently I watched the movie “Battle of Jangsari”, set in the Korean War.
I enjoyed it, and many of my readers may do so too.
So as not to spoil your enjoyment, I will try to avoid any possible spoilers that I can in the following passages.
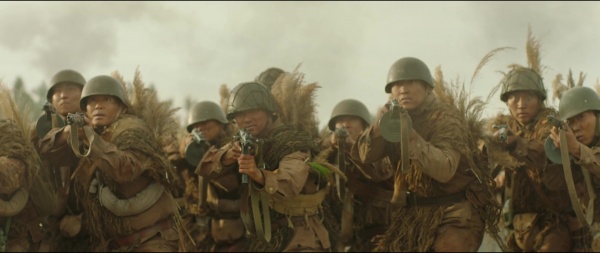
The photo below shows the North Korean troops that are sent as reinforcements. Notable on their first appearance is the bundles of grass/straw/rushes that each infantryman has sprouting from his back.
At first glance I thought this might be an earlier example of the device described as in a previous post as the Vietnamese Camo Ring.
Subsequent scenes show the foliage attached directly to their shirt/blouses.
The intention is the same, however. If an enemy aircraft had appeared these infantrymen would disappear.
“Osprey Men-at-Arms 174: The Korean War 1950-53” includes the following passage (p.37) on the North Korean summer field uniform:
“The uniform had reinforcing patches on the elbows, trouser seat and knees, and frequently single or double rows of horizontal ‘zigzag’ stitching around the cap and across the shoulders, chest and upper sleeves, which were used to hold leaf camouflage. ”
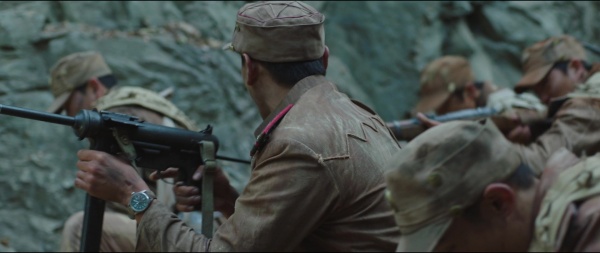
For some of the movie the South Korean (ROK) soldiers wear captured North Korean uniforms.
They do not use camouflage materials, but the means by which they can be attached are clearly seen in some shots. In these examples the “stitching” appears to be relatively substantial cord.
A side view of foliage attached to a machine-gunner’s back.
Some North Korean troops also have foliage attached to their upper arms, although the means of doing this is not clear in the film. Presumably loops might also be sew to the sleeves.
Many of the North Korean soldiers are also wearing short capes of what appears to be camouflage net.
In the movie this was not clear and appeared as an irregular shape of mossy green-grey on the upper chest. In the stills this is much more clearly seen to be net.
The Russian-style shoulder-boards worn with the North Korean uniforms appear fairly impractical. Men-at-Arms 174 notes that these shoulder-boards tended to fade less than the rest of the uniform, making them stand out as regular shapes and thus detrimental to camouflage.
Also note that none of the actors have camouflaged their helmets, leaving a distinctive, recognizable shape.
As I have pointed out in recent posts, shape disruption and texture contribute far more to camouflage than colour.
Notable in this movie is that the North Korean uniforms work far better in the terrain shown than the green American fatigues worn by some characters.
The Osprey publication states that the North Korean summer field uniforms was “olive khaki shade faded rapidly to a light yellowish hue”. Actual appearance varies in the photos since the soldiers of both sides get realistically dirty.
Minor spoiler follows:
In one scene the first sergeant stamps on a mine several times and chides the student soldiers, telling them it is an anti-tank mine and ten of them could run across it without setting it off.
This is not strictly true.
The mine shown is an American M15 that is claimed to need a force 159 to 340 kg (350 to 750 lb) on pressure plate to set it off.
“Taming the Landmine” (p.51) by Peter Stiff describes how repeated passages over an anti-tank mine would “settle” the trigger mechanism of some models until they became sensitive enough to be set off by a pedestrian, donkey cart or bicycle tire.
As an aside, in “Vietnam War Booby Traps”(Elite 236) by Gordon L. Rottman, p.25 the author notes he has been unable to find any real world mine that activates when someone removes their foot, as usually shown in movies.
Categories
Phillosoph

Cleaning Up Blood

My first post on the relocated blog, and in truth, I wish it left me under happier circumstances.
Both the girlfriend and myself are experiencing considerable health problems, compounded with some insidious behavior from several sources.
I will spare you the details, but will note that one of the “lighter” incidences in the last week was a cat giving birth, then rejecting and trying to kill its kittens!
Luckily one of the other cats stepped up and the kittens are now safe and doing well.
The other cat had decided it wanted to give birth while wandering around the house, often trailing a kitten still attached by its umbilical cord. Blood and other secretions were left around the house, which was not conducive to finding new tenants for vacant rooms.
This situation reminded me of a piece of knowledge that is not as widely known as it deserves.
In the past, I have been called upon to clean clotted blood from scientific equipment. Often these clots were within very narrow tubing. Anything that would fit down the tubing had insufficient strength to break up the dried blood.
The movie “Carrie” was on last night, so the fates seem to be telling me it was time I passed this knowledge on.
Keep calm and "Carrie" on
The solution (literally!) is 0.9% (isotonic) saline.
Nine grams of common table salt/sodium chloride dissolved in a litre of tap water. Or 0.9g in 100mls, 4.5g in 500mls, or any variation of such.
One advantage of using isotonic saline is that it will dissolve clotted blood without causing further lysis of the blood cells, and releasing the pigment.
A friend of mine once got blood on his jeans and asked on facebook how he should remove it.
Luckily for him I responded first and told him about isotonic saline.
There then followed numerous other suggestions, many of them exotic or expensive, several of which that would have marked or destroyed his jeans.
This was a nice example of what is so often bad about social media.
My friend used saline, and his jeans survived.
Categories
Phillosoph

Never Buy Envelopes Again?

Some time back I found myself in need of an envelope. I looked all over the house and there were none in the whole place. I’d have to wait until I went into work and find one there. Then it occurred to me I had a printer filled with paper! I made an envelope out of printer paper and posted the items I needed to deliver. There is probably some moral there about thinking in terms of labels rather than seeing actual form and function. An envelope is just folded and fastened paper.
This incident got me interested in if there were better ways to construct envelopes. Given that Christmas is coming, this seems a good topic to place on the blog today.
Below is a pair of videos on making envelopes. There are many alternate ways of doing this, as you will discover on youtube. These  two are origami methods that are useful if you need something more decorative. This page on the Art of Manliness site shows a simple variation that produces an envelope that stays closed.