A friend of mine commented that Canadian troops were wedded to the idea of carrying at least six to seven magazines.
Recently, I was reminded that many water-bottle pouches can hold five or six 30-round magazines.
I also came across a comment pointing out that you do not want your magazine pouches where most troops actually carry them, at the front on the waist.
Lousy to crawl with them at the front, worse to fall on. Not so comfortable if you have to sit down, and many armies now have more drivers than infantry.
The latter is not necessarily a bad thing! A small force, well-supported, can achieve more than a large, poorly supported one. This is how many guerilla, terrorist and clandestine forces operate. There are relatively few “trigger-pullers” and a much larger number of support and intelligence-gatherers. Put the right person, in the right place, at the right time with the right tools.
Load-bearing equipment (LBE) tends to be designed with the infantry in mind, but most of its users will be signallers, engineers, gunners and drivers.

Thinking further, most troops reload with their weak-side hand. (It might be different for some bullpups, but seems true for the M16, AKM and their relatives).
It makes sense to have most of the ammo where the weak hand can easily reach it? Why not have a water-bottle/utility pouch of magazines on the weak side of the belt, at the side?
If you read my blog on chest-rigs. you may recall the four-magazine pouches for the AK issued by some armies.
Someone will object that all the magazines could get tipped out at once, so alternately, a pair of ALICE-type magazine “cases” that hold three magazines each. These would tend to sit at eight and ten “o’clock” on the belt (for right-handers), which may be more comfortable.
Most rifle-magazine pouches available nowadays hold two magazines, and a pair of two-magazine pouches will be less bulky. These four magazines constitute the primary reloads. Additional magazines can be carried in chest or sleeve pockets or other locations.
Some experimentation will be prudent. Pouches for three mags usually sit with the spines of the magazines towards the body. Side-on may be better.
Pouches might be more accessible orientated obliquely or laid horizontally. And we need to remember the soldier may need to reload while prone.
The above arrangement puts 4 to 6 lbs on one side of your belt or harness, but there is a logical way to balance this.
The soldier will use his grenades in his strong hand, so on the strong-side of the belt we put a pouch or pouches holding several grenades.
When throwing prone, you lay on your weak-side, so it is logical to have your primary source of grenades on the strong-side. Perhaps some frags at two o’clock, pouches for one or two cylindrical grenades such as smoke bombs at four.
Actual grenade load-out will depend on combat role and mission.
Alternately, a smoke grenade pouch can carry a 500ml water-bottle.
So far we have one pouch or pouches on one side of the belt, another set on the other.
Our soldier is well-armed, yet front and back areas of the belt region are relatively clear, allowing our soldier to comfortably sit in a vehicle or crawl if someone is shooting at him or he doesn’t want to be seen.
No bulky butt-pack or kidney-pouches at the back that hinder him (or her) carrying a rucksack, or wave at the enemy as they crawl.
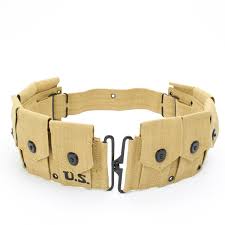
The front of the belt can be used for relatively small, low-bulk items, such as a compass pouch and some shell-dressings. With a number of small pouches the front of the belt could end up looking like an old Garand ammo belt! (above)
For non-infantry, the front of the belt will probably end up carrying small specialist tools and items.
For some personnel the grenades and magazines at the side may be replaced by larger utility pouches.
The back of the belt is clear so far. This clearly contributes to comfort when seated in a vehicle or carrying a long pack.
Here I am going to revive my “camelbum” concept and suggest a second belt, mounting two pouches.
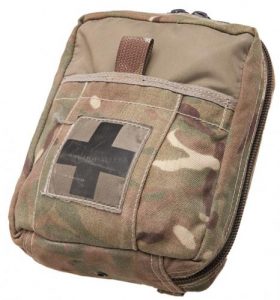
One pouch (clearly marked, and marked with blood group) contains an CI-IFAK (Combat Injury-Immediate First Aid Kit) for the soldier.
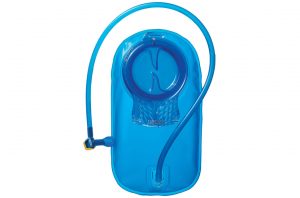
The other is a pouch containing a two-litre water-bladder dimensioned to fit inside. Having their own belt allows these to be worn rather like a bumbag. They can be added when in high readiness and shunted round the front or to a more convenient position when the soldier is seated or carrying a pack.
An entrenching tool or other tools can be shoved through the belt when needed, carried on the backpack when not.
As I have discussed elsewhere, carrying cases for such tools are superfluous, and have no place on the primary LBE.
A small, fixed-blade utility knife of about 25 cm loa. should be mounted over the weak-side pectorial muscle where it can be reached with either hand. See my books Survival Weapons and Crash Combat for more on this.
If a bayonet is carried, the logical place for it is on the weak-side of the belt, possibly mounted on the side of a magazine pouch in the manner of the British 58 webbing.
A larger survival knife such as a machete or kukri should probably be attached to the trouser belt, so it remains on-person should the LBE need to be discarded in an emergency.
The same is true of a handgun, which will likely be carried on the opposite side of the trouser belt. Field jackets and other garments should be modified/ redesigned so that tools and weapons carried in this manner are accessible.
This arrangement places the survival knife in the space between the magazine pouch(es) and the trouser belt, and the handgun behind/between the grenade pouches.
I have described this equipment configuration as mounted on a conventional LBE belt, but the basic concept should work with other carry systems.
Rather than on the waist, those weak-side magazine pouches might be mounted in the area under the arm, and this gives some possible alternate configurations. For example, three dual-magazine pouches mounted horizontally or obliquely.
Neck Dump Pouches
One currently fashionable item I have not mentioned above is the “dump-pouch” for empty magazines. What to do you do with those empty magazines?
If fitted with a cord pull-loop (as described in Survival Weapons), you can clip them onto a snap-link on your LBE or rucksack strap, although this may admittedly be a challenge while most of your attention is understandably on more pressing concerns.
Back in the day you might drop your magazines down the front of your smock or jacket, but this is difficult with modern combat-wear and armour.
The current solution is to fumble for a belt-mounted “dump pouch”, but the LBE belt is fairly crowded already and there may be more useful things that could use that space.
There is an easier, simpler, more efficient and cheaper option.
Take a sandbag and cut off the bottom foot or so. Save the rest for making textilage.
Hem the new top edge of the bag. You may choose to add a drawcord here at this step, although the cord is not needed for the dump-sack role. Elasticising the mouth will hinder the primary role.
Put a ring or loop at each top corner of the cord so you can tie or snap-link a strap or two to it. Straps should be easily adjustable for length, so should have some form of buckle. You may like to add a length of cord to each lower corner of the bag. These can be tied behind the back to stop the bag flapping around.
A sandbag is good because they are often readily available and the light tan colour is good for most environments. You can, however, make these bags out of any suitably coloured piece of cloth, including discarded or damaged combat wear and old tee-shirts. If you have access to a sewing machine, even a little cheap one, you can knock these bags out in minutes.
You will have to disguise the basic rectangular shape of the bag, so regardless of what you made it from, add some scraps of cloth and sandbag as textilage. Don’t forget the straps.
Some bold blobs of any suitably coloured and contrasting paint you have handy can be added too.
Adjust your strap so the bag hangs from your neck, at about chest level. Use the lower cords to keep it in place if you wish.
When you change magazines you can drop the empty into the open mouth of your neck bag.
The bag also helps camouflage your chest area. Since this area is subject to body-shading it helps that the basic colour of the bag is light. The neck bag will fit over a “reasonably-size” chest-rig while still allowing access to magazines.
The neck bag is a handy place to quickly stow anything else you come across during an operation. Bunch of materials or possessions that might provide intelligence? Drop them down your neck bag and examine them later.
When not in use a bag easily rolls up and can be kept rolled by tying one of the corner cords into a slippery hitch. A quick tug and the bag can be unrolled.
Such simple bags will provide useful for lots of other purposes. They are useful for foraging or supplying extra ammunition to crew-served weapons.
Add a pair of snap-on straps, or use one “Veshmeshok”-style and use as a simple rucksack.