Disclaimer: “As an Amazon Associate I may earn from qualifying purchases.” Adsense and Infolinks were no help at all.

If you have enjoyed this article or it has been helpful to you please feel free to show your appreciation. Thank you.

Read The Third Wave by Alvin Toffler!
Categories
Phillosoph

Polaris Lock Rakes

I will admit, I have been looking forward to these ever since I heard about them several months back.
Last night a review copy of the Polaris lock rake kit arrived.
Here are some initial impressions:
The Polaris is the baby of Chris Dangerfield of UKBumpkeys. It is available from UKBumpkeys or their North American outlet, LockPickWorld.com.
Polaris went on sale a couple of days ago and apparently are selling fast! Currently available at an introductory price with a 5,000 word ebook on raking techniques.
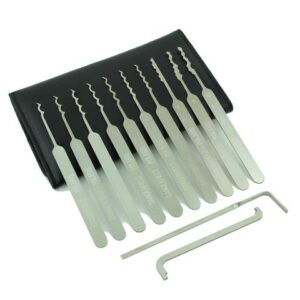
I was expecting the usual sort of pouch that lock picks come in. Instead, the envelope contained a rather elegant-looking black wallet. As I opened the flap it was obvious that it had magnetic fastening.
Polaris Lock Pick Set
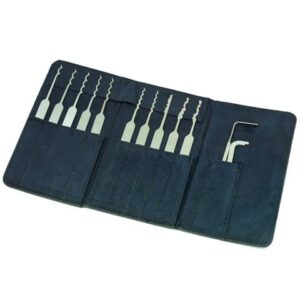
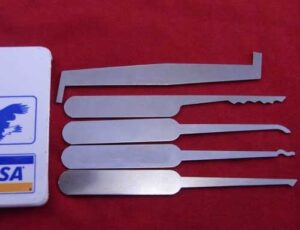
Once opened, you are confronted by a suede-type interior and a neat row of polished rakes, each in its own pocket. A flap to cover the points is thoughtfully provided, which is a nice attention to detail. On the far right, an eleventh pocket holds a pair of turning tools, one TOK and one BOK.
Each rake is nicely polished and proudly marked “DANGERFIELD – POLARIS”.
Each rake is also numbered, which is a feature I approve of. It can be useful to know you have already tried “no.4” or that “no.3” worked best on a similar lock in the past.
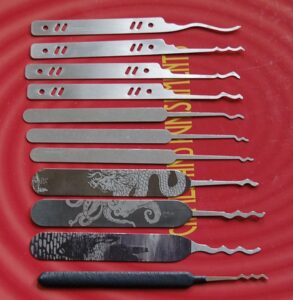
Polaris gives you ten rakes, and a very nice selection they are too! All rakes are 0.025"/0.635 mm thickness.
Regular readers will know that I have wanted to try a double hump Bogota. Rake no.1 is a double-hump Bogota! No.2 is the more common but very useful three-hump and no.3 is a four-hump. These all made quick work of most of my test locks.
Recently I have worked on several locks that seem to respond best to a technique that is intermediate between single pin picking (SPP) and raking. I use a rake but need to concentrate on a particular group of pins. The two-hump proved useful on these locks, having a bit more room to move about. On the other hand, the three-hump seemed a fraction faster on locks susceptible to conventional scrubbing and rocking.
Rake no.4 looked very similar to the four-hump Bogota but the peaks are more rounded. This is a cycloid rake. It resembles a Bogota but with slightly lower and more rounded peaks. No.5 is more symmetrical and you might think of it as a form of snake, worm or serpentine rake. It is actually a four-hump sinusoid. These are both useful for locks where the Bogotas are too tall.
No.6 and 7 are five-wave cycloid and sinusoid and appear to have a slightly lower wave-height, making them useful in locks that 4 and 5 are too high for.
So far, a nice, intelligent selection of rakes that nicely complement each other.
Polaris Lock Rakes
No.8 is a bit of a change of style since it is a ripple or jag, also known as an “L” or “city” rake. I think of this one as a “classic city”. I have at least two other kits with rakes of exactly the same profile. When I first started lock picking I was not particularly keen on jags. I did not then appreciate that they were not for techniques such as zipping or scrubbing. The correct way to use a jag is rocking. The no.8 is a fraction taller than some of the other city rakes I have. This is easily addressed with a little filing, but I doubt this is significant since jags tend to only be useful in taller, straighter keyways. When a jag does work, however, it tends to work very fast indeed! No.8 is no exception!
No.8 is the only straight-backed rake in the set, making it useful if you want to count the pins in a lock. Interestingly, I was able to use the straight back to rock open a mushroom-pinned practice lock.
You may have noticed that most lock pick sets seem to share the same assortment of picks? I have never seen another kit with rakes like no.9 and 10. When I first saw them I thought of them as double-sided jags. Chris Dangerfield likens them to jiggler keys.
Like more conventional jags, these can quickly open some locks by rocking. I have also had successes using them for gentle scrubbing. No.9 and 10 are fairly wide in places but I have opened some narrower, twisty locks by using the curves of the rake to probe around. Novel, but useful designs. Note that most of the rakes in this kit can be treated as double-sided. If they do not work one way up they may work inverted. Always worth trying.
I like the turning tools in this kit. Raking can be difficult with a TOK tool when used in the top of the keyway so try using it at the bottom. This suits some lock ways better than the other tool. When I first opened the wallet I was a little disappointed there was not more room for additional turning tools. Part of the reason for this is the turning tool pocket is on the wallet flap, so space is a little limited. You can probably fit a few more BOK tools in the pocket, and it would be useful to have a selection of different widths and thicknesses. Perhaps Dangerfield will release an add-on set?
I like the magnet feature of the wallet. It adds a certain “majesty” to opening it. It may have practical applications too. Turning tools and rakes can be “stuck” to either of the outer panels, useful when you need a hand free but cannot return the tool to its pocket. Will the wallet stick to a metal panel such as a locker door? Yes it does! It sticks to my fridge too!
The kit comes with a 5,000 word ebook on raking techniques. I don’t know if that is a permanent component or just for the introductory offer. Since my set is a review sample I did not get the ebook. Knowing Chris’ experience and enthusiasm for raking I expect it to be well worth a read.
In conclusion, this is a really, really nice rake set. Classy to look at but also with a really useful selection of rakes. It has all of the rakes you might wish for and also some effective novel designs. It is, as advertised, just a rake set. If you want to learn SPP you will need some hooks and half-diamonds. A Serenity and a Polaris kit would be an awesome combination! I plan to add a snake-rake to my Polaris set.
I would say, “add these to your Christmas list”, but I understand these are moving fast so the introductory offer may not last that long!
Categories
Phillosoph

Camouflage Headgear: Textilage

Recently I have been working on a number of camouflage-related projects. There is a bit of an inherent problem with this. Good camouflage is difficult to photograph. Decades ago I was told: “If you want to know about camouflage, read a photography book about how to take good photographs then break the rules they give you!” You will understand this better in a moment.
Today’s project was an attempt to experiment with some ideas about headgear. If your helmet still looks like a helmet when its cover is fitted, it is not camouflage! Why are helmet nets designed to be flush with the helmet rim, I wondered. Good camouflage guides tell you to break up the regular shape of the rim. If the net hung down irregularly it would provide better camouflage. It might also keep some insects away and have other benefits. Done right, it would be easier to construct too.
My first problem is that I did not have a helmet. I decided to camouflage a boonie hat instead. I would construct the net in such a way that it could easily be transferred to a helmet or other headgear. I selected a hat with “chocolate chip” desert camouflage. I wanted whatever was beneath the net to be light for some negative space effect. There is also good contrast between the major elements of this pattern.
My second problem was trying to locate a suitable net within my very limited budget. I eventually hit on the idea of using a cheap string vest. I would have preferred a sand-yellow, beige or coyote-brown example but could only find khaki-drab. I suppose if you are making several you could dye some white vests. The holes are probably a bit small for some natural foliage, ¾ of an inch or 20mm being preferable.
Cut a piece of the vest in an irregular, roughly rectangular shape big enough to hang past the rim of your headgear.  It should be short at the front but can be longer at the sides and back. Attachment is simple. The boonie hat already has a looped headband. Pass strings or tapes through these, through the net and tie with reef knots. For a helmet utilize the foliage bands of the issue helmet cover, or cut slots in the cover.
You now have a hat or helmet with a net draped over it. It is not camouflaged yet! One purpose of the net is to hold natural foliage, selected from what commonly grows in your area of operations. Light stuff is simply threaded through the net. Heavier stuff may need more support. This is often achieved by placing a rubber band around the helmet, beneath the net. This can be cut from a bicycle inner tube, surgical glove, elastic or similar materials.
Natural materials are supplemented by bits of cloth. For want of any better term we will call this “textilage”, since it is typically made from textiles and adds texture. Most of the materials used for this example were from a bag of off-cuts sold for the purpose. Be nice if more companies started doing this. Most of these bits are PU-nylon or condura in MTP camouflage. Some more variety and desert patterns would have been welcome, especially if the intention is to camouflage for sandy and urban environments. Other materials used include pieces of cut-up sandbag, medical gauze dyed with acrylic paint or tea, bits of cotton sock (also dyed) and jute string. Simply thread through the net and tie with an overhand knot. Shorter lengths that tend to stick up are used on the top of the hat, longer lengths that droop on the rest. Not that individual textilage bits do not need to be camouflaged. Anything in a suitable neutral or natural shade can be used.
You will end up with something that looks nothing like a hat or helmet, and that is what we are aiming for. Try your hat on and do some fine-tuning. You do not want anything within your visual arc that is obstructive or distracting. Pay attention to the peripheral areas of your vision.
OK, so what did my hat end up like? I only have one head available to model the hat, and it is not very photogenic. My attempt at a selfie was not really that successful, but it does show the distinctive brim shape of the hat is well disrupted.
A top view of the hat. The flash has revealed the pattern of the hat much more than it appears to the naked eye. I could have brought a cheaper, monochrome hat. The effect may be different if you have a lighter-coloured net or larger mesh.
Side view of the hat, very effectively hiding a chrome Phantasm ball.
Front view, no flash. Note how materials at the front hang past the brim less but still disrupt. If your helmet has an NVG mounting the net will hide it but can be raised so that it can be used.
Categories
Phillosoph

The Seven Low Blows

This blog has had less posts on self-defence than I originally envisioned. One of the reasons for this is that “Attack, Avoid, Survive” and “Crash Combat” cover the subject comprehensively.
I was discussing “Miller’s law” recently. This is the idea that the average number of related “data chunks” a person can recall is seven, plus or minus two. It seems prudent to keep this in mind when creating lists of ideas or concepts to memorize.
In keeping with this vein, I present the “Seven Low Blows”:
1.    The kick to the groin. We all know that a kick to the front of the pelvis can be decisive, regardless of your gender. Your attacker knows this too and landing the blow may not be as easy as some self-defence manuals make out. The classic groin kick is probably the front snap kick. Drawing the kicking foot back or stepping forward with the other foot will telegraph your intentions and is to be avoided. My personal inclination would be to use a front thrust kick. This is a kick I can perform with speed and accuracy. Hammer the front of the pelvis rather than kick his gonads up out his ears. A roundhouse kick might connect, and may be useful if the foe has his hip turned in to protect his groin. I would be cautious about using a roundhouse in this way and you may be better off attacking another target such as the near leg.
2.  Coccyx aka “tailbone”. This can be a very decisive target, resulting in serious injuries that will be slow to heal. The primary kick to hit this is a horizontal roundhouse. Kick slightly higher and you can hit the kidneys or the vertebrae where they join the pelvis. Don’t try to kick higher than this
3.  Front of the knee. Another devastating attack than can cause life changing levels of injury. None of the attacks described in today’s blog are for playing or sparring! Primary attack is the side thrust kick. It is easy to put a lot of weight and force behind this kick so it can also be directed against the thighbone. A useful variant of the side-kick is the “Moro” or oblique kick. See my books for details.
4.  Side and back of the knee. These can also be attacked with a side-kick. Alternately, use an oblique roundhouse/ snap kick against these areas. The side of the thigh, just above the knee can be attacked with the same techniques.
5.   Shin, calf and foot. The region below the knee can be attacked with a nearly vertical side-kick. This is a kick that works well with footwear. Scrape the side of your boot sole down the front of the shin and finish by stomping down on the top of the foot. A useful technique for escaping from grabs or holds. May be applied to the calf muscles at the sides and back of the leg.
6.  Knee strike. Blows with the knee can be delivered in situations where other kicks cannot. Often your foe will be holding onto you or you onto them when you use your knee. The groin is an obvious target but do not forget that the side of the thigh and the coccyx can be struck too. If a foe is bent forwards knee them in the nose, forehead, temple, hinge of the jaw, ribs or kidneys.
7.   Half-moon step. This is a stepping technique described under “Sanchin” in “Attack, Avoid, Survive”. It utilizes balance and movements you will have honed learning the crescent kicks. This step uses a semi-circular movement to move past an opponent or slip your leg behind their lead leg. This can set up a push or strike to trip or unbalance them. The arc of the foot movement may be inward or outward. One of the first practical applications for Sanchin that I learnt was to slip past an advancing opponent and then stamp backward at their calf. The motion itself can be used as a low strike. Aim it at the ankle-bone or the Achilles tendon, but be aware these may be protected by the footwear. You may also use this movement to step on or pin the foe’s foot.
Categories
Phillosoph

Toggle Ropes.

According to Home Guard Instruction Manual No.51, Part III a toggle rope is six feet long and made from hemp of one and a half inches' circumference. Spliced to one end is a wooden toggle, six inches long and one inch in diameter. At the other end is a spliced eye, described as “four inches”. Since the eye must fit over a toggle I suspect this dimension is the internal width. I will note here that most toggle ropes that appear in photographs appear much thicker than a circumference of one and a half inches would suggest. See here for more on how to construct a toggle rope.
The toggle rope is more an item for a soldier than for an individual such as a hiker or survivalist. A single toggle rope is useful, but its real strength is that it can be combined with the other toggle ropes carried in a unit. I will save descriptions of some of the ways a toggle rope could be used for a future post. Just to whet your appetite, here is a bridge made from toggle ropes.
For a modern version of a toggle rope a number of questions need to be addressed.
The first question is “how long it should be?” A storey of a building is about nine or ten feet high, so a three metre rope may be more useful in such an environment.
“How thick?” is another question. The rope needs to be thick enough that a soldier can climb it, but not so bulky it becomes a serious encumbrance. Is it practical to carry the rope with an overhand knot tied every half metre or so? If so, this may allow for an overall thinner and lighter rope. B-720 suggests: If your mission requires long ropes, consider the use of 1" [climber's] nylon tubing instead. It is lighter, more compact, and just as strong.
Rather than a toggle it may be more useful to have a large loop at one end and a smaller loop with a carabineer at the other. The larger loop should be wide enough for a booted foot to be placed in it. Two ropes can be joined by using the carabineer as a toggle in a sling toggle knot or toggled bight and eye.  
Should the toggle rope actually be a rope? Would one inch webbing work as well while being more compact. This line of thought suggests at least one man in the squad should carry an etrier rather than a toggle rope.
Categories
Phillosoph

Soldier's Load Checklist

Over the past couple of years I have looked at the soldier’s load several times. Today’s blog attempts to bring many of these ideas together as a single checklist.
The list below does not include weapons, armour or other protective clothing. Nor have I included radios or other specialist items. The later may be subject to a future article. In passing, I will note that body armour becomes counter-productive if its weight limits activity to such an extent the soldier becomes more likely to be hit. Similarly there is little point in carrying such a weight of water that your water consumption increases. Munition loads must also not be excessive. In an urban environment shelter can easily be found, so there is little point in carrying a tent. Packs should be cached whenever possible. Ideally the soldier will be able to operate for a day or so with just the “body” items suggested below.
Body.
·       Space blanket, trouser pocket. Can also be used as a waterproof and for signalling.
·       Combat utility knife, worn on weak side pectoral.
·       Swiss Army Knife. Avoid multi-tools that weigh more than a few ounces.
·       First aid kit, trouser pocket. Kit for minor injuries and aliments.  
·       Fire kit, trouser pocket. Pair of lighters and some tinder in a tube or bag.
·       Fishing and snare kit, trouser pocket.
·       Battle trauma kit, belt pouch. For major injuries. Complete kit must fit inside one two-litre pouch.
·       Water bottle(s) or bladder, belt pouch. Two litres of drinking water carried on the person. Either a single bladder or two one-litre bottles.
·       Water purification tablets. A small supply carried in either a pocket or a pouch.
·       Compass. Some personnel will need sighting compasses. The average rifleman will find a wrist compass adequate to most of his needs.
·       Fish line, 30 metres. Numerous uses, this is in addition to any line in the fishing kit.
·       Toggle rope. Exact form to be discussed in this article.
·       Flashlight with filter. This is in addition to weapon-mounted systems. Can be used for signalling. Probably carried in misc. pouch.
·       Pencil and notebook. In waterproof plastic bag.
·       Small mirror. Lightweight and unbreakable. This can be used for signalling. Mounted on a lightweight telescopic handle this may be used to look around obstacles or search under vehicles.
·       Zip ties. Numerous uses, including securing suspects and prisoners. A small number may be attached to a belt with elastic and passed behind a pouch. Additional ties can be carried in a pocket or pouch or in the pack.
·       Camouflage face paint. A small stick or piece of burnt cork to be carried in a pocket or in the misc. pouch.
·       Minimal weapon cleaning kit.
·       Small bottle of insect repellent.
·       Small bottle of sun cream.
·       Plastic whistle (brown or olive) and Photon light on neck chain.
·       Additional field dressings.
Patrol Pack.
·       Groundsheet/ All-Weather blanket or kipmat. One man carries a kipmat, the other a groundsheet.
·       Blanket/ poncho liner and/or lightweight sleeping bag with liner. Either or both may be carried depending on conditions.
·       Pair of sandbags. Used to cover boots if sleeping in boots. Numerous other uses.
·       Pegs (with screwdriver). Pegs of a design suited to the type of terrain anticipated. Screwdriver used to make holes for pegs
·       Pole sections and guy ropes.
·       Spare socks. One pair of spare insoles.
·       Foot powder.
·       Wash Kit. Mesh bag with
o  Half bar of unscented soap or small tube of liquid soap.
o  Child’s toothbrush and small tube of toothpaste.
o  One disposable razor.
o  Deodorant/ antiperspirant stick (unscented).
o  Plastic comb.
·       Bandana, to serve as towel.
·       Metal canteen cup, spork and canteen cup stove.
·       Brew kit.
·       Paracord, about 10 metres.
·       Reserve insect repellent. A larger bottle, to top up that carried on the body.
·       Reserve sun cream. A larger bottle, to top up that carried on the body.
·       Repair kit. Needles, safety pins, whetstone, invisible thread, pack/ pouch buckles, buttons, superglue, electrical tape wrapped around spare pencil.
·       Remainder of weapon cleaning kit.
·       Extra first aid items.
·       Extra water.
·       Extra water purification tablets.
·       Extra fire items.
·       Toilet paper. In waterproof bag.
·       Duct tape.
·       Bivibag (optional). Carried by man with groundsheet.
·       Hammock (optional). Terrain dependent
 ·       Lightweight section of camouflaged net. (optional).
Movable items: Some items may be more comfortably carried with the pack but are transferred to the body if the pack is cached. These include:
·       Poncho.
·       Tool. This may be a spade or pick, a crowbar, brick hammer or small axe. A variety of tools would be carried by a unit and the exact load out varied with environment.
·       A few 4"-6" nails. Can be used for shelter construction or as emergency pegs. In an urban environment can be used to secure doors or windows or construct a ladder.
Clothing. What additional clothing carried will depend on mission duration and conditions. There is little point carrying clean underwear on a patrol intended to last just a few hours.
·       Accessories such as hats, scarves and gloves.
·       Spare jacket and trousers, depending on mission duration and climate. The soldier changes into his drier, cleaner clothes to sleep.
·       Underwear and socks.

Food. Food is supplied in forms that can be eaten without cooking, and preferably without utensils. A few items are carried on the soldier, the majority in the pack. Food can be heated with Zesto-therms so the canteen cup is the only cooking vessel carried.

Categories
Phillosoph

Quickly Polished Off

Today’s blog is actually a follow up to two previous posts.
In The Great Locker Opening I mentioned that I intended to order another credit card kit and add the tools to the Serenity Plus kit. The new items arrived last night. In my review of the credit card kit I mentioned how nicely finished the items were. The new set was quite different. Not so shiny and with some very distinct burrs on some tools. On the other hand, the five-piece kit actually had six pieces, a duplicate snake being included. My cheap micrometer indicates the cruder picks are 0.2 to 0.5 mm thick while the better finished set are 0.1 to 0.2 mm.
If you read my previous article and the credit card set you received was not a nice as my first set, this is easily and quickly solved.
The burrs were quickly removed with a few swipes of a needle file. 600 grit abrasive paper is usually recommended for polishing picks but I didn’t have any. Given how rough the picks were I used 400 instead and then moved down to 800. This does not require a great deal of effort. About 30 seconds on each side of the pick should be adequate.
Most picks I have do not need polishing. I did recently apply some 800 paper to my Sparrow Worm, Warlock and Octo-rake. I think the two larger picks are designed with American locks in mind so could afford to lose a little bit of thickness. Likewise, the Worm is mainly used in narrow locks. The Worm had also got a bit discoloured so some light polishing cleaned it up.
The Great Locker Opening has an amusing footnote. The other day I noticed one of the lockers I had cleared had a new lock on it. Distinctive, since it was the same model of lock as that I had previously removed. Seems our squatter had got a two for one deal. A quick enquiry revealed the rightful tenant had not started using the locker yet. This may have been one of the quickest picks I have ever done. Not only did I know exactly the right turning tool and pick to use, but I even had the lock’s twin sister to practice on the night before.  
Categories
Phillosoph

The Great Locker Opening!

Version 1.1

As regular readers will know, I have acquired a number of lock picking items over the last few months. What most will not know is this was with a particular goal in mind. 
Where I work people are assigned lockers. This is on the understanding that come September, they empty the lockers and remove any locks. Of course, as is the spirit of the age many of them take the stance that the rules intended for everybody do not apply to them personally. It is quite amazing some of the things people will leave in lockers and often never return for!
Usually we cut the locks off or break them, but this sometimes damages the lockers. Given my newly learned skills this year I intended to pick as many locks as possible. This would also increase my collection of padlocks to practice on.
For the last few months I have acquired lock picks, comb picks, master keys and several other items that might help with “the Great Locker Opening”.
Ironically, for the first time, most of the people have observed the rules and vacated their lockers. Only five remain locked. One has a keypad padlock. Three are very small padlocks and one is rather large.
I will deal with the “failures” first.  There is a technique for opening the keypad padlock. I was not able to get it to work in the limited time that I had so cut this one off. I was unable to open one of the small padlocks. The actual problem was the wide but very small key way. All of my turning tools proved to be too wide or too thing to engage. Those that would left no room to use a pick in. This was a very small padlock that was easily broken. It is a paradox that many of the hardest locks to pick are easiest to brute force.
The first success had an odd key way. Very narrow up at the pins but wide at the plug edge. Firstly I tried my usual “quick” openers. The bogota, the Octo-rake, the Warlock and the Worm. No luck! I tried one of my snakes and she popped open! I had brought my snakes for situations where the bogotas could not be used, so this vindicated that decision.
The second success also had a keyway much wider at the edge than the pins. It also resisted the bogota et al. I had a sudden inspiration that I should use a low jag. I selected the no.10 pick from my “Honest Wave” kit. The lock opened with a few seconds of rocking and jiggling. (Since then I have opened this padlock just by attempting to turn the plug with one of my longer Chinese turning tools. It also opens using my knife pick or by turning with a relatively thick pick such as my single hump bogota.)
This left the largest lock. At least there were no problems getting a turning tool in! I tried a variety of the usual picks but it resisted my seductions. For some reason I decided to try my half-snowman.
Many people dismiss ball picks as a gimmick. They will point out they do not do anything that more conventional picks cannot do. I don’t dispute this. My half-snowman was a novelty purchase, a bit of whimsy if you will. I actually could not find anyone selling a half-snowman so mine is actually a full-snowman with one side ground down.
I employed a technique known as “having a bit of a poke around”. You can imagine my surprise and delight when the lock popped open after a few seconds! (Since then I have opened this lock with other picks such as the Serenity bogota and the Sparrow Worm.)
I am quite happy with three out of four for my first “public” lock picking. The failure was more due to lack of a suitable tool than technique.
Several things were learnt her, some of which I will cover in later posts. The primary one is that I need a turning tool(s) that can deal with wide but small keyways. I have some ideas along these lines and will keep you informed.
Like any tool kit, a collection of lock picks tends to have a small number of tools that gets used for the majority of jobs. Interestingly, all three locks were opened by my “other” lock picks. I did not bring my credit card pick set with me for this, but might have tried the jag and the snake if I had. I have ordered a duplicate set and intend to add the tools to my Serenity Plus kit when they arrive.
It is quite surprising how often you drop turning tools! It can also be difficult to tell one from another when they are mixed together. Distinctively marking turning tools with paint, coloured tape or heat shrink may address both problems.
Categories
Phillosoph

Soviet Camouflage Items

Only a short blog today. I left my flash-drive at home so cannot work on the articles that I had planned.
I did come across this interesting page on Soviet WW2 camouflage techniques.
Notable was Camouflage Net for Rifleman… is about 5 by 2 1/2 feet and weighs about 1/3 pound.” WW2 British Army/ Home Guard manuals show similar items staked out in front of entrenchments. A modern equivalent should be made brown so that it is more useful in urban, autumn, winter and arid environments. Such a net would serve many other purposes. Such nets could be placed over windows to prevent the entry of grenades or drones.
 
The other item that particularly caught my attention was Camouflage FringeThe fringe consists of a band about 3 yards long, from which grass colored matting is hung. On the ends are hooks for attaching the fringe on the object. The rifleman can fix the fringe on the helmet or shoulders. Five of these fringes are used to camouflage a machine gun, and six for an antitank gun.”
In previous posts I have discussed how a camouflage pattern garment is only the foundation for good camouflage. You also need to add 3D elements such as local foliage and bits of textiles to break up your distinctive shape. Problem is in some organizations modifying your gear like this is frowned upon. Similarly, attempting to camouflage your weapon is unpopular since everything has to be removed so the weapon looks nice on parade.
A partial solution to this may be a length of cord with some rags tied to it. Again this should use browns and yellows for versatility. Ideally there should be some way to add local foliage. Perhaps the cord should be two twisted strands so stalks or bundles of leaves can be placed between them. The only problem that I can see is that cords draped around the shoulders may get caught by vegetation. The camouflage cape is therefore a better solution.
Categories
Phillosoph

Camouflage Hood and Article

Langdon-Davies is a name that has often appeared in this blog, and rightly so. His book on fieldcraft is recommended reading. This book was a best seller during the Second World War.
In a previous blog I showed his suggestion on creating a camouflage smock from hessian.
Recently I was reading a Home Guard manual published at a slightly later date and it was with some amusement I read a passage that said that due to a shortage of hessian, it was no longer available for making “sniper suits”.

The book instead suggested that equal concealment could be achieved by attaching materials and foliage to the helmet, webbing and the arms and legs of the battledress.

It also recommended a facemask made from a sandbag. Below is the relevant page. I’m aware that it is crooked. I chose to leave it this way to impress that camouflage measures should be irregular.

As per Langdon-Davies, paired eyeholes are avoided as being distinctive. The surface of the sandbag may be painted in contrasting, disruptive shapes. The skin beneath should be camouflaged with creams or other materials.
A British Infantry training manual from 1944 makes these wise observations:
(a) Fieldcraft is universal.-This is a war of infiltration into the enemy’s position-that is, war in which small parties, such as sections or even individuals, work their way through, relying on their own skill and on the power of their own weapons. Infiltration cannot be carried out unless you are an EXPERT in movement in the field, concealment, and surprise. One bad movement by one individual may ruin everything.
(b) Fieldcraft is offensive and does not mean using ground to cower in a hole out of the enemy’s fire. Ground must be used as a hunter uses it-to get closer to the prey whom he is going to kill. You must use your knowledge and cunning to outwit the enemy.
(c) Observation is paramount in offence; concealment is paramount in defence.-This is a war of concealed posts, of camouflage. You cannot kill the enemy unless you can find him. You cannot even start to attack him, if you do not know where he is. 
(d) Cover from view is not cover from fire (especially if you have been seen getting there).-Train yourself to get away from enemy fire unseen. Do not dart behind a bush and stay there; that is suicide.
These comments are still relevant today, although I believe these basic principles are often neglected. Infiltration is often now regarded as a specialist skill rather than a basic requirement for the infantry role.
As a bonus, I have scanned an article on Personal Camouflage from an 1980s magazine. This is a nice, succinct summary of how to use foliage and other 3D materials to improve your camouflage.
Essentially the same advice was given in British WW2 manuals. Significantly, we seldom see such measures being taken by modern fighting men.
Categories
Phillosoph

It's Not Easy Being Green.

In my last blog I quoted Tom Wintringham’s advice that the first lesson to learn was how to take cover. This piece of advice can be applied to survival as well as military personnel and has many aspects. It includes how to find shelter from the weather. It includes how to take cover from gunfire. It covers the difference between cover and concealment and it includes how to move between cover. Some of these aspects have already be addressed in this blog and future articles will cover others. Today I am going to share some reflections on concealment and camouflage.
In 1848 the British Army in India began to use khaki-coloured garments. “Khaki” is an Urdu word meaning “dusty” and the colour was a light beige, tan or dull pale yellow. The pioneer behind this was an officer called Hodson and it is notable that his early correspondence refers to the uniforms as mud or dirt-coloured, with the intent to make his troops  invisible in a land of dust. Some garments were made by dying white items with tea. Garments that won’t show tea stains are only prudent for a British soldier, of course! Many garments were made from a cotton cloth called “khaki drill” and this name is used for the colour, the fabric and the uniform items issued in it. The British army at the time was a major influence on military fashions and many other nations adopted khaki, particularly for tropical wear.
In 1902 the British Army adopted a new service dress. Woollen cloth is generally not suitable for printing with camouflage patterns, so a single colour was required. (bear in mind the term camouflage did not come into use until during the First World War). The colour chosen for the 1902 dress was a hue intermediate between brown and green. Some paint manufactures call this hue “khaki drab” but it is commonly referred to as just “khaki”. Incidentally, the term “khaki” has become virtually useless for describing a colour. Imperial Japanese Army woollen uniforms are described as “khaki” but are closer to an ochre than khaki drab. Just to confuse things further the IJA used khaki drill for summer and tropical wear.
The colour of the new 1902 British Army service dress was also used for the later battledress. It has been described as matching the colours of heath and forests of the United Kingdom fairly well”. Most other nations adopted uniforms of a similar hue.
It seems to be deeply rooted into our psyche that nature and countryside is “green”. In actuality, a few days of military operations tend to render an area less verdant than before. Artillery, vehicles and boots soon create more mud than lawn. Green is also seasonal in temperate climates. Even in summer green is rare in some rural terrain such as rapeseed fields or ripened wheat. Hodsons original idea of mud or dirt-coloured uniforms is more logical.
The selection of khaki drab was also based on the assumption that most fighting would be in rural areas. The Spanish Civil War indicated that urban areas would be important battlegrounds. Urban terrain negated many of an attackers’ advantages in aviation, artillery and armour.
Below is a suggestion of what battledress might have looked like if it had been designed for both rural and urban use.
That urban operations are not exceptional has still not fully penetrated the institutional military mindset. For several decades British troops in Northern Ireland wore dark green DPM. When the US Army tried to develop a Universal Camouflage Pattern at the start of the 21st century it chose the colours sand, grey and green. In practice UCP appeared to be several pale greys that blobbed out into a light man-shape that stood out against most terrain. Equipment such as webbing and pouches that will be used in a variety of environments also tends to be made with green predominating.
If we are choosing clothing for concealment it is most logical that we choose hues that will work well in both urban and rural terrain. Generally this means neutrals such as the duller, lighter shades of browns, beige, greys, yellows and pale blues. Lighter shades counter body-shading and in certain conditions will reflect light from surrounding terrain.
Should you choose monocolour or camouflage patterns? In some environments camouflage can attract unwelcome attention which can be counterproductive. Prudence suggest that you have at least one ensemble of mixed monocolours. In a rural situation natural materials can be added to this outfit to disrupt the shape and better fit in with your surroundings. If you are in an area where there is lots of green there are green things growing you can use. The WW2 Japanese were noted for their effective camouflage but did not widely issue any camouflage pattern items that I know of. Instead they used nets and natural materials over their green or khaki gear
When buying items in camouflage patterns some prudence needs to be exercised. The primary task of camouflage clothing is shape disruption. The size and shade contrast between elements is far more important than the hues used. Many modern camouflage patterns neglect this fundamental, and often come up with all sorts of technical sounding snake-oil to defend this. The British MTP is a good example of a poor modern pattern. At more than a few metres the small colour elements merge and you see an obvious khaki drab man-shape, unlikely to blend with the background unless you get an exact match of hue and shade. Many older camouflage patterns tend to be too green and too dark for many environments, the latter made worse by body-shading. A good pattern needs contrast between elements and needs some of those elements quite light to counter shading and create the illusion of negative space.
You may be better buying some cloth or a garment of a suitable light neutral shade and adding your own pattern. See previous blog posts for ideas.
Below is a camouflage pattern and palette that I have been toying with. It is intended for both urban and rural use. In a verdant environment green can be added in the form of natural materials.
Any camouflage pattern on a cloth is only the foundation for your camouflage. You must add 3D elements too. Some of this is local and natural materials. If you are in a forest you might add bracken to your headgear, pack and shoulders. If you move into a wheatfield you dump the bracken and replace them with bunches of wheatstalks. 3D is also provided by textiles. Your cape or smock should include various scraps of fabric sewn to it that disrupt the shape and smoothness of the garment. These ideas have been covered in previous blogs.
The above advice comes with a caveat. Three environments occur to me where there may be alternate choices to the yellows, greys and browns suggested above.
The first is in snow, where predominantly white camouflage may be needed.
The second is in urban environments where red brick is the main building material. Many urban environments use a variety of materials so browns and greys serve well in most situations and do not look out of place near the occasional red surface.
The third is in rainforests, be they temperate or tropical. Brown-based items can work here if they are combined with local materials. This is, however, an environment where green-based camouflage patterns or pale green monocolours may be a more practical choice.