A friend of mine brought the “Italian Army Style Lensatic Compass” to my attention. I have a bit of a thing for interesting compasses so decided to treat myself. Being on a limited budget this is probably a copy rather than the actual issue model. This will be a relatively modest review since it only arrived last night.
The first thing that you notice, even before it is out the box, is the weight. My electronic balance tells me the compass weighs 290g or 10¼ oz. The box has the company names of “Sturm” and “Mil-tec” and the text outside is a mixture of English and German but, ironically, no Italian!
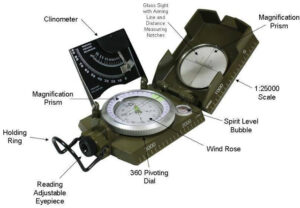
The compass itself is an interesting mixture of familiar and novel features. Like the US lensatic compass the cover is raised to the vertical for taking bearings of terrain features. Opened fully it can be used on a map as a 15cm ruler. The other side is a 1:25000 scale, which corresponds to 4cm per kilometre. This scale is marked in thousands of metres, in 10 metre increments.

The most obvious of the novel features is the clinometer, a black plate that folds over the compass dial. The clinometer has two scales, one marked in degrees and the other in percentage gradient. According to the manual the clinometer pointer has a lock to stop it swinging about. This appears to be that if you push it just past the fully vertical position it will stay there by friction.
The other novel feature is the eyepiece near the lanyard ring. With many lensatic or engineer’s compasses there is a lens that you fold up and use to look at the far side of the compass dial. In this model the viewer is built into the compass body. The eyepiece can be adjusted to compensate for discrepancies of vision. This system gives a really good view of the compass dial. The view is magnified so it is very simple to distinguish the single degree increments of the dial. The bearing is in black and the backbearing is printed above in red. All very clear and easy to read. I really like this feature!
The cover has a large clear window with various markings. One part appears to be designed to serve as a map detail magnifier. Just above the eyepiece is a fine notch that can be used to align the sighting line on the cover. This has a “pinhole camera” effect that brings the line into sharp focus. You eye easily moves from the sighting notch to the eyepiece below so bearings can easily be taken. Very well thought out and executed!
The base also incorporates a bull’s eye spirit level, a feature I’ve not found on my other compasses.
One surprise was that the compass bezel did not appear to rotate. Perhaps I am too used to Silva and Suunto designs, I mused. This part seemed quite solid. But why knurl the edges if it was not intended to rotate? Why bother printing it with a degree scale and etching reference marks on the glass surface? The image in the manual labels the bezel as a “pivoting dial” and this is listed in the features on the side of the box as “rotating compass ring”. Turns out (pun intended!) that the bezel does rotate but it is initially very firm. Persist with it and it will begin to work as intended. A word of caution, however. The bezel is marked in tens of degrees so “3” = 30 degrees and “30” =300. Setting the bezel helps you keep on the intended bearing. I’ll not bother describing how this is done in this post since the method will be familiar to many readers already. A future post will cover compass techniques.
The compass came with a small but comprehensive instruction booklet. The appeared to be all in German but halfway through the text was repeated in English. This section was actually titled “Englishch” which was not promising. In fact the translation isn’t as bad as I feared! The first few paragraphs cover the obvious basics. How to take a bearing, using the compass with a map and how to move on a bearing. Then there are instructions on using the clinometer.
The manual also includes a table. The first three columns are for converting between degrees, milliradians and grads (does anyone still use grads?). The fourth column is a % scale and the fifth column is fractions derived from height divided by distance.
The manual then gives information on how this table can be used to determine features such as object height at a known distance, or distance from an object of known size. All this is done without the need for trigonometry tables. I will describe this in greater depth when I have had opportunity to scan the table and some related sections.
The compass has one final trick under its skirt. If you flip it over you will find the table in the manual is reproduced on the bottom of the baseplate. The columns are even labelled in Italian! On the downside the font of this table is very small, and consists of black raised letters on a black background. It may be a good idea to copy the table in the manual and laminate it.
The compass is a bit on the heavy side, so if you love ultra-light gear this is not the model for you! The hinge between the base and cover seems rather slim so I will have to see if this loosens up or gives other problems. Because of the way it is orientated the clinometer will be at its most accurate if one person sights while another stands beside to read the scale. I think this is a very good compass for the price. It is certainly easy to use and I love the magnified and adjustable viewer.