Categories
Phillosoph

Ten Move Flow Drill

Today I am going to look at a flow drill. The video says “knife strikes” but the application of this is broader.
The numbering system used in this video is different to that I used for “angles of attack” in my books. This doesn't really matter, it is the flow of the moves that is important rather than its nomenclature. Some systems only teach five angles: the four diagonals and a thrust.
While the demonstration is made with knives, these moves can be used for a variety of other weapons or unarmed strikes. I will expand a little more on that  later.
The instructor refers to a “box”. This is an imagined rectangle within which you should attempt to keep your blows. No wide swings! Your box should be a little wider than your shoulders. 
 
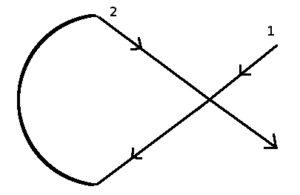
The first cut is an oblique cut from your high right to your low left. This flows upwards to make the second cut, from high left to low right. These combine to create an alpha shape. 
 
Flip your blade over and follow the alpha in the reverse direction, making the cuts from low right to high left and low left to high right. That is four cuts made already!
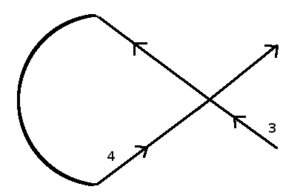
The fifth move is a thrust, made with the hand pronated (knuckles upmost). Then turn your hand palm upwards and make a horizontal slash, from right to left. Finish this move with another thrust, this time with the palm upwards (“supinated”). Pronate (turn over) your hand and make a horizontal cut from left to right.
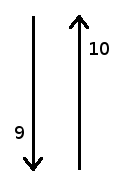
The ninth move is a vertical downwards cut, so you will find you need to learn not to overextend the previous horizontal move. Learn the most economical way to get from the end of 8 to the start of 9. 
The downwards vertical move is followed by an upwards vertical action. That completes the ten motions.
You will learn that the individual motions will need to be modified for particular weapons. With a knife the final move will probably be an upward thrust. With a machete it is more logical to turn your hand over and make this an upwards cut. The seventh move, the supinated thrust, isn't very useful if practicing empty-handed. More logical to pronate your hand and make a thrusting hammer-strike.
Practice this drill with a variety of weapons.
Here is the video:
 
Categories
Phillosoph

Textilage on Rucksacs.

Two projects I completed some time ago but had not got around to photographing.
The first project was to experiment with some textilage on rucksacs. For this I used a British army “Northern Ireland” patrol pack and a larger rucksac. I found a company that sells half a kilo of camouflage material strips. Most are PU MTP pattern and unlike most MTP, there is good contrast between the colour elements. Strips of hessian cloth or cord are also used. Note the variation in DPM colours. This is particularly notable between the large pack and its side pouches.
This is the large pack. Note that the side pouches can be removed. More on this later. 
Harness side. The shoulder straps have a strap sewn down them in loops. These allow strips of fabric to be easily applied. 
 
“Public” side of the large pack. Some netting, brown on one side and green on the other, has been added to the lid. This does not show up much against the DPM, but can be used for attaching natural materials. Note that there are are additional “ladder” straps down the outside. More textilage could be attached to these to further break up the shape.
Patrol pack, harness side. The shoulder straps lacked a looped narrower strap. Instead a length of paracord was zig-zagged down the padding and sewn at the curves. As you can see, the paracord is totally hidden by the textilage and the shoulder straps themselves are well concealed.
Public side of the patrol pack. Textilage added to the pack top to break up the shape. The top photo is the standard configuration. The side pockets are well constructed with a waterproof lining and drawcord top, the latter in DPM PU. Unlike the side pockets of the larger pack, these cannot be be detached. This feature may have been added to later versions of the Northern Ireland.
This photo (above) shows my second project. This pack has been modified so that a pair of the detachable side pouches can be attached. This can simply be achieved with some lengths of 20mm webbing and 20mm buckles.
Side pouches rigged for independent use.
Side pouches with their harness. The entire thing can be clipped to the patrol pack without needing to be disassembled.
Categories
Phillosoph

Shelterbox

I came across a charity called “Shelterbox” the other day. The contents tie in with my recent article on foundation survival kits.
A single shelterbox can hold materials for up to ten people, which is some impressive packing. The exact contents are varied to suit the intended location. I suspect many people might be interested in purchasing similar kits for their families. Such a box could do double duty as a table or footstool until needed. 
A bit of research identifies the box as 185 litre capacity.
You can carry a shelterbox on your back, but if you are smart, you find other means…
Categories
Phillosoph

Brick and Mortar Camouflage.

Way back in the 1980s I read an article about camouflage. In that article was a reference to the German army issuing a “brick and mortar” camouflage for urban combat. (Not the April Fool pattern above!) More information could not be found, and it was several years before I came across a single illustration.
Locating this image on line proved even harder!
 
Here is the illustration, taken from Funcken's “Arms and Uniforms. Second World War Part 2”. My recollection was of a red pattern with grey/cream swirls. My recollection is inaccurate, but it can be seen how the creases and wear lines on the illustration would create this impression.
This is actually the same pattern as shown in “Waffen-SS” by D.S. V. Fosten and R. J. Marrion.
In addition to this pattern the German army and SS issued a number of autumn patterns that used reds and oranges. These were intended for environments such as woodland leaf litter but might have also proved useful in some urban environments. Below is a German garment captured and used by the urban fighters of the Warsaw uprising.
 
Another German pattern that might be useful in brick environments: 
Future conflicts are very likely to take place in urban environments, yet most military gear is still being designed for verdant, rural environments. In some urban environments desert or semi-arid camouflages are useful. Other environments may need more red/orange dominant patterns. Correctly designed these patterns may also serve in some rural environments too. Smocks are the logical way to provide troops with the correct camouflage for the fight.
A friend of mine found this, originally a British army DPM item, it has been painted. 
Categories
Phillosoph

Getting Jigae

Various diversions took my thoughts in the direction of Korea the other day, and I recalled and located this image.
The soldier is Chinese, but the pack design is the Korean “chige” or “jigae”. The text notes that the frame can also be used to serve as section of tent frame. I spend a lot of time on this blog trying to teach people to carry less. Sometimes you have to be able to carry more, and one of the ways to do it is the jigae.

Yes, a floorboard!

I found some images of barrels being carried by jigae but so far no photographic evidence to back up the stories of 210 litre oil drums being moved by jigae
Rooting around the net I came across this company offering an aluminium version. This idea takes the idea further with what resembles a modified chair. Food for thought!
Categories
Phillosoph

More Toggle Ropes

A friend of mine asked me about “the thing with the toggle”, so today I will post a couple of examples of toggle ropes in use.
The first is called “the fly walk”. Two or more ropes are joined and passed behind a soldier. The two men above then take up the slack and the soldier “walks” up the wall. Another book of mine notes that once a high place was reached fishing line was useful for drawing up a toggle rope.
 
The second method uses a pair of ropes as a sort of ladder. Each time the climber bends his knee the man on the rope takes up the slack. The illustration shows a sliding loop for the foot. If you are not wearing rock-hard 1940s army boots I would suggest a fixed loop.