For many years I have been involved in various discussions on minimizing or optimizing the soldier’s load.
Some of that discussion is not relevant to this blog.
Some of it may be of interest to those readers that are servicemen, or those that are considering ways to reduce the weight of their own kits.
We still hear accounts of troops carrying six days rations for operations that are not expected to last long enough to need fresh underwear!
The topic of bedding and shelter I intend to address in a future article. Some of my thoughts can be found here.
Today’s blog addresses what might be termed “the sundries”.
Note that some of the following recommendations may contradict your unit’s SOPs and may not be permitted.
Part of being able to carry the stuff you really need is to not carry stuff you do not need. Personal mobile phones and music players have no place on an operation.
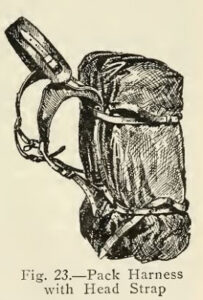
Backpack Contents
I will start with a discussion of the things that might be carried in your backpack.
Wash-Kit
- Half a bar of soap in a small PU drawcord bag. Half a bar of soap is likely to last you ages out in the field. The bag can be made from scrap waterproof material and should be within the sewing abilities of anyone.
- One disposable razor. In the field the main purpose of shaving is to ensure that your respirator is a snug fit. You don’t have to be baby-faced or look like a male model. A single disposable razor should last you a couple of weeks. Cut a few inches off the handle to reduce weight and bulk further. If respirator use is unlikely, consider a beard.
- Toothbrush. I doesn’t need to be a special camping or travelling model. Chop a few inches off the handle. Children's toothbrushes are more compact and seem to clean better.
- Small tube of toothpaste or tin of baking soda. A little will last you a very long time so do not carry too much.
- A low bulk towel. This may be a travel towel such as pertex, or better still, half of one. Alternately, your towel may be a spare bandanna or keffiyeh. If this is selected in a tactical colour it can be tied to your gear to dry in the wind.
- A small stick of deodorant might be included here. It reduces your “scent signature” and makes things a little more pleasant for whoever you share bedding with.
- A plastic comb is optional. Some people’s hair needs a lot of combing, some very little and others just have very little!
Note what is not included in this wash-kit:
There is no shampoo. If you need to wash your hair make do with the soap.
There is no shaving brush or foam. Use the face soap, it works fine.
The mirror for shaving is carried elsewhere and will be detailed later.
A flannel is unnecessary. If you want, use a corner of your towel/bandanna.
The soldier should carry a Swiss army knife so there is no need for items such as nail clippers.
The wash-kit goes in your “personal admin bag”. This bag may be a large pencil case or a simple sponge bag. Select something light and simple. Also carried in the personal admin bag is a medical kit, sun-cream, insect repellent and your repair kit.
The personal admin bag puts most of your personal gear in one place. It is easily grabbed and transferred between locker, patrol pack, large pack and kitbag.
Repair Kit
Take a couple of sewing needles and stick their points in a piece of foam. If possible one of your needles should be a heavy-duty type such as a triangular-section sailmaker’s needle.
Needles can be magnetized to act as emergency navigation aids.
Place the needles in a small plastic bag and add several metres of “invisible” thread and a handful of safety pins of various sizes.
A large “blanket pin” or two is worth including.
A few yards of dental floss can be used for heavier repairs. Other uses of dental floss include as fishing line and cleaning your teeth!
Add a couple of spare uniform buttons and rucksack buckles if you wish.
Items such as folding scissors and thimbles are unnecessary. Use your Swiss army knife.
In addition to the sewing items, your repair kit should hold a small tube of superglue and a few metres of duct tape. The tape can be wound around an object such as a pencil. A few metres of electrician’s tape can be added too.
Dirty Boots, Lighter Load
The personal admin kit would not normally carry boot polish and other shoe cleaning items.
For most operations this is not a priority. Boots can be cleaned before and after an operation.
In exceptional circumstances it may be necessary to take shoe cleaning supplies. Seldom will it be necessary for each man to carry a full kit. More prudent is for just one member of the squad or team to carry a tin.
Toilet Paper
A vital thing your pack should carry is some toilet paper. Flatten a roll and place it in a plastic bag. Carry it somewhere in the rucksack where it will be readily available. An external pocket is ideal. Toilet paper can, of course, be used as tinder.
Weapon Cleaning Kit
A weapon-cleaning kit should be carried.
At the minimum, this should consist of a pull-through or bore-snake with the correct size brush, half a toothbrush, small volume of solvent/lubricant, a rag and some patches.
Some of these supplies will be in the rucksack while some might be carried with the webbing.
A unit should never have more than half of its weapons being cleaned at any time. A weapon cleaning kit may therefore be shared between two soldiers.
Extra Clothing
Extra clothing carried divides into spare items and supplementary.
A spare set of underwear and at least one pair of spare socks should be in the pack.
A small container of foot-powder can be carried with the spare socks.
Additional spare socks can do double duty as carrying pouches or improvised mittens.
A spare set of combat dress may or may not be carried. In some environments you can change into your dry spare set to sleep in at night. In the morning you redress in your “day” clothes. If weight is critical, the spare set of combat dress should be one of the first items omitted.
Supplementary clothing includes such items as hats and gloves.
In addition to your helmet you will need at least two hats.
One should have a broad-brimmed and provide protection from the sun.
The other should be a warm hat such as a watchcap or headover. This can be used as a nightcap when sleeping in the cold.
Headovers are such useful items it is worth carrying more than one. Luckily they are of modest weight and bulk.
You may be carrying more than one pair of gloves. You may have a heavy pair for wire or ropework and another pair for fine work. In sub-zero conditions a spare pair of gloves/mittens is prudent.
Glove liners are also very useful. When carried in your pack, hats and gloves should be readily accessible in a pocket, not at the bottom of the pack under other gear.
Add a snaplink to your gear so you can stow your gloves when your pockets are full of other items.
Cooking Gear
In the past soldiers carried mess-tins and stoves.
Innovations such as MREs and heating pouches have reduced the need for such items and often they are not carried.
Any cooking or water heating that may be necessary can be performed with a metal canteen cup.
Mess tins were also used to receive food from field kitchens. Having only a canteen cup may be insufficient if soldiers are fed this way. Large scale catering units may provide disposable plates.
If cooking is at section or platoon-level soldiers may need vessels in addition to their canteen cup.
In such situations a pair of lightweight plastic bowls may be carried in the pack. A length of line can be added as a handle, allowing them to be carried like buckets. In this way a man with a pole or branch can carry food for several comrades.
Jacket Contents
Certain items should be carried in the jacket pockets or upper body. This includes a notebook, map protractor and writing implements. Pens malfunction. Carry at least one pencil.
Various bits of cordage, comms-cord etc is likely to be carried in jacket pockets.
Mirror
A small mirror should also be carried in a breast or sleeve pocket.
This should not be a heavy glass item as some armies issue. It should be plastic or made from a light piece of polished metal, such as a door fingerplate.
This mirror is used for shaving but serves other purposes too. It can be used for signalling or can direct a spot of light to designate a point of interest. It can also be used to look around corners, over walls or under objects when searching.
Whistle
A lightweight plastic whistle should be carried, perhaps attached to the dog-tag chain. Whistles are somewhat underused in the modern military. They can be used to raise an alarm or call for assistance.
A small LED light such as the Photon II can also be added to the dogchain and will prove useful. Some soldiers use a betalight instead.
Trouser Pockets
You are less likely to remove your trousers than your jacket or pack.
You should be able to sleep comfortably with these items in place. Pad them with spare socks or cordage if necessary
Fire Kit
A fire kit can be carried in one of the thigh pockets. This should be relatively simple and compact: Two disposable lighters, a birthday cake candle and a container of vaseline-soaked cotton wool for tinder. A tub of storm matches or a Fresnel lens might also be added.
This fire kit is wrapped up in a waterproof bag.
An additional lighter for “everyday use” may be carried somewhere else such as a sleeve pocket.
Fishing Kit
In the same pocket as the fire kit, a simple fishing kit can be carried.
This should consist of about six metres of braided line.
Hooks should be already tied to monofilament with a snap-link swivel at the other end. Split shot may be already tied to these lines.
A few mackerel feather lures can be included in this kit. Items such as extra split shot should be packed so that it does not rattle.
Add a few metres of brass wire to this kit. Brass picture-hanging wire can be an economical source of the latter.
In many situations, trapping or fishing may not be tactically feasible. If an enemy discovers your trap or trot line they may lay an ambush or set booby traps.
A kit of the sort suggested takes up very little room or weight and the cordage and hooks may be used for other purposes.
First Aid Kit
Field dressings are for major injuries. The first aid kit is a “boo-boo” kit for more minor injuries that may become a problem if not treated.
The kit should contain painkillers, band-aids and alcohol wipes.
Important medication such as anti-malarial drugs is also carried here.
Choice of other medical kit contents is a matter of personal preference but it is important to distinguish between “nice to have” and “very likely to be needed”. Your main medical kit is in your backpack.
The cargo pocket kit should remain small and compact so that is always carried on the solder’s person. Additional medical items can be carried in the personal admin bag.
Space Blanket
Carried with the pocket first aid kit is one of the most useful survival devices of all: A foil space blanket.
Depending on the climate, small quantities of sun-lotion and/or insect repellent are carried in the pockets or webbing. Larger volumes to refill these containers are carried in the pack.
Penknife
The soldier’s Swiss army knife should be carried in the trousers or on a pouch on the trouser belt. A small sharpening stone should be carried too.
Webbing Equipment
Intermediate between the contents of the pack and the pockets is the soldier’s webbing.
Primary purpose of the webbing is to carry ammunition and mission gear.
Ammunition and related issues may be dealt with in another post.
Today I will concentrate on other webbing-related loads.
Zip-Ties
The modern soldier should carry a number of plastic zip ties, aka cable ties or flexicuffs. Select “tactical” colours.
These can be laid along a belt and tucked behind a pouch. They are secured in this position by a couple of rubber bands or pieces of elastic.
The primary role is for securing prisoners and suspects.
Another potential use is to secure double doors by binding the handles together.
Water Supply
The webbing gear should also carry at least one litre of water.
Conventionally, this will be in a rigid plastic water bottle. One problem with such bottles is that if they have been partially emptied, the water sloshing around inside can hinder quiet movement.
If you fall on a rigid bottle it will hurt a lot!
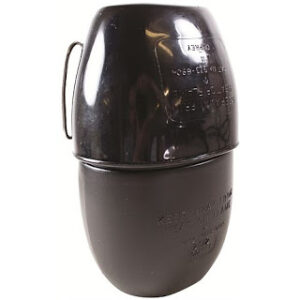
The British 58 pattern water bottle is designed so that the plastic mug fits over the top. In other words, you have to remove the cup before you can drink from the bottle.
Water bladders such as the Camelback and Platypus brands have become popular in the last few decades. Larger volume bladders are either carried in the pack or worn as a pack and can be drank from by a sip tube.
Having a litre or two of water with your belt order is still prudent even if you use a larger water supply in your pack. Draw from the supply in your pack when possible and keep the belt supply in reserve.
Some one-litre bladders will fit in an issue water bottle pouch. Unlike rigid bottles, air can be squeezed out of a partially full bladder to reduce sloshing noises.
A supply of water purification tablets should also be carried with your belt gear or in a pocket in your clothing
Canteen Cup and Brew Kit
The belt order may include a metal canteen cup. This is used for any cooking in the field that needs to be done. It is also used to pasteurize water if purification tablets cannot be used or supplies conserved.
For the British soldier the primary purpose of the canteen cup is to make tea.
One of the lightest ways to make tea is to use three six-inch nails to support the cup over a small fire.
A number of armies have issued cookers specifically designed to work with canteen cups.
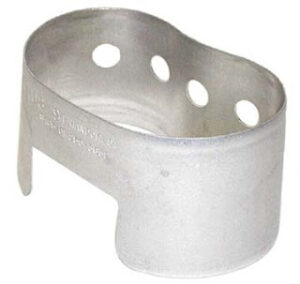
The American Natick cookers are designed to fit around a canteen instead of a cup. The GI would carry one canteen with a cup around it, the other with the stove around.
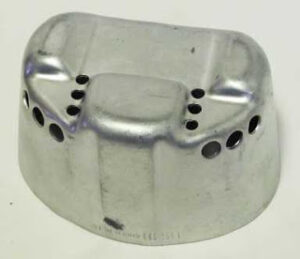
The British Crusader system has a metal cup that fits over the bottom of the water bottle and a stove that the cup nests in. Since the plastic mug fits over the top of the issue water bottle, this can be carried as well if you desire.
An improved stove, the “Crusader II” or “Fire dragon” is slightly taller and the capacity of the metal cup has been increased too.
This has resulted in the issue of a water bottle pouch that is 12" deep in order to accommodate the stove, bottle and cup(s) in one package.
This is obviously less than ideal. More practical may be to carry your water bottles/bladders in separate pouches to the stove and cup.
The space inside the cup can be used to carry some fuel for the stove. It will also accommodate a brew kit.
The basic brew kit is tea bags, sugar, powdered milk/creamer and a plastic spoon/spork. Carry sugar even if you do not normally take it in your hot drinks. Sugar is energy and your body will often give you a sweet tooth if it feels the need. Artificial sweeteners have no place in your kit!
A couple of OXO cubes provide variety. In cold climates, when you will be brewing up often, a couple of packet soups provide additional variety.
Instant coffee is not worthy of the name. Carry some coffee bags. Good coffee requires water that has cooled down a bit from boiling. Heat till water just begins to bubble and then remove from heat before adding coffee bag.
While a canteen cup and brew-kit are widely regarded as belt items, I think they are better carried in an external pocket of a pack, minimizing the mass on the belt.
Flashlight
A small flashlight such as a mini-maglite can be added to a pocket or the brew pouch.
This is used for jobs that more powerful weapon-mounted lights are not suitable for. It should be of a form that you can easily hold in your mouth or tuck in a hatband. A red filter should be fitted. A few metres of tape can be wrapped around the handle.
Navigation Aids
What navigation aids you carry will depend on your role and training. While land navigation skills should be encouraged, many riflemen only need a broad idea of direction during an operation. A wrist-mounted compass may provide adequate and convenient.
Fixed Blade Knife
Most modern bayonets are weighty and of limited utility. A stout but short knife of under 11" length should be carried over the weak-side pectoral muscle. This can be mounted on a suspender/brace but must be positioned so that it does not interfere with any backpack straps.
Other Tools
Most units have SOPs on where field dressings are to be carried. This is so a comrade can immediately locate a dressing when it is needed. Therefore such SOPs must be followed.
A bullet often creates both and exit and an entry wound. At least two field dressings should be carried by each soldier.

The distribution of entrenching tools poses some interesting questions.
One train of thought is for them to be only carried by half a force. This makes the assumption that half the force will be on guard while the other digs.
A few extra tools may be handy if the threat is not immediate but the task must be completed as quickly as possible.
If better tools are available, such as from vehicle pioneer kits, the carrying of personal entrenching tools may be redundant.
Ideally a range of tools should be carried by a unit. Fixed blade spades should be supplemented by picks, pick/mattocks (M1943), trench axes and similar. A few crowbars or axes with the squad will be of more use in an urban environment than entrenching tools.
A soldier should carry one “tool”, be it spade, M1943, crowbar, trench axe, tree saw etc.
On the march, such tools are best carried in the pack.
During an assault they may be transferred to the webbing.
Such tools are also used as weapons so the practice of slipping them through the belt for easy access is often seen.
In this light, the issue of bulky carrying cases to carry entrenching tools on the belt must be questioned.
As was discussed on the recent blog on tomahawks, a simple carrying loop may be all that is needed if some means of muzzling the edge and any points is provided.
