Disclaimer: “As an Amazon Associate I may earn from qualifying purchases.” Adsense and Infolinks were no help at all.

If you have enjoyed this article or it has been helpful to you please feel free to show your appreciation. Thank you.

Read The Third Wave by Alvin Toffler!
Categories
Phillosoph

Roman Tunica and Simple Clothing.

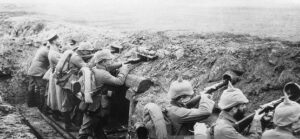
Recently I was re-reading an article a friend of mine wrote about military clothing being too hot. One of the contributing factors to this is that the design of military uniforms is often influenced by civilian conventions. It is usually a fairly conservative interpretation too so a design will often be based on conventions at least a generation old!
If we look back in history we see that for many centuries the outdoor wear of a soldier, hunter or farmer consisted of a tunic, cloak and (usually) some form of leggings. Sometime about the 18th century it close fitting jackets became more common. The cloak persisted a little longer but was eventually replaced in military circles by the greatcoat and then the parka. By the 20th century what the military was still calling a tunic was effectively a sort of close-fitting sports coat. As the use of body armour became more common soldiers were expected to wear their tunics/ combat jackets underneath it, and not surprisingly this was hot and uncomfortable. Recently there have been attempts to address this with “underarmour shirts”. Effectively these are sweatshirts with camouflaged sleeves. Most that I have seen appear to be fairly snug fitting. A better solution would be a smock that can be worn over the armour.
Many of us are not restricted by military dress regulations. If things go really pear-shaped we are going to value functionability over fashion or convention.
Following the train of thought I was once again looking at the clothing of Roman legionaries. Roman soldiers operated all the way from the border of Scotland to what is now Israel. The basic clothing they used apparently worked in all these climates did not change much over several centuries.
Cloaks have been discussed in several previous blogs so today I will look at the Roman tunic. I’ll retain the Latin term “tunica” to distinguish it from the Saxon/ Viking/ Medieval variant.

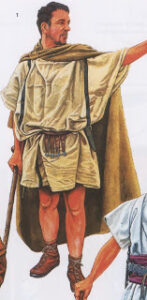
One of the things that strikes you about the tunica is how simple it was. A tunica is just a large rectangle of cloth, or a pair of rectangles sewn together. The cloth was usually woven on a vertical loom and then cut so the selvedge edges were the bottom or top and bottom, minimising the need to hem. If you are not much of a tailor, this is the garment for you!

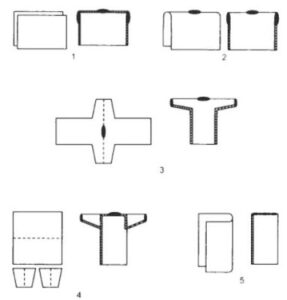
Typically a tunica did not have sleeves, its width being sufficient that the shoulder edge drapes over and covers the upper arm. Short sleeves were made from simple rectangles of cloth. The Romans considered long sleeves to be a bit wimpy and Julius Caesar was mocked for preferring a long sleeved tunic. Colder climates and the influence of other cultures seem to have changed this attitude over time. Long sleeved tunics were cut from a single piece of cloth, with ample volume beneath the armpits. Sometimes they were woven as a cross-shaped piece of cloth. When the sleeves were made from separate pieces they probably were cut to create the same shape.

The other thing that is notable about the tunica is that it is big. Records show tunics were made from cloth 1.55m by 1.4m. (60 x 55”). Unbloused, a tunic would hang to the wearer’s knees. One military punishment was to take a legionary’s belt and make him wear the tunic in this fashion. The belt was considered a symbol of soldiering so prohibiting its wear was a humiliation. It may have been that this was seen as demasculinizing since the tunic would have resembled to longer tunics worn by Roman women. Making an offender dress in women’s clothing is another recorded punishment.
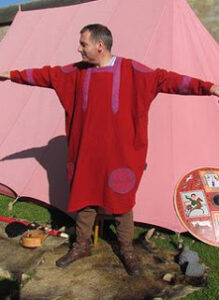
Worn correctly the tunic was belted and gathered up above the belt so it was mid-thigh length. Why was the tunic so long? Perhaps the intention was that it could also serve as a nightshirt. However, there are records of tunics being shortened with tucks at the waist. At least one Roman writer suggests that the tunic should simply be made shorter in the first place. This page for re-enactors suggests creating a tunica from two rectangles of 36-48” by 30-48”.
The fit of the tunica is interesting. In the Mediterranean countries it probably allowed air to freely circulate around the body. Even when wearing armour there would have been some circulation to the underarm region, without the need for modern contrivances such as zippers. Combined with a cloak the folds of the tunic probably trapped air and kept the wearer warm.
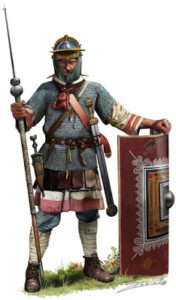
The large neck opening of the tunica seems to have been less liked by some Romans. There are illustrations and records of the tunica being knotted at the back of the neck to restrict the opening. One of the reasons for the large opening was that during tasks such as manual labour the tunic was sometimes worn with one shoulder bared. The wearing of a neck scarf was very common, particularly when armour was worn. The scarf would prevent the armour chaffing the neck. The scarf may also have served a function similar to the detachable collars of later centuries. Notably tunics worn by later and more northern cultures had less of a neck opening.
The tunica was not used in isolation, of course. Unless it was very hot an under-tunic of the same basic design would have been worn. This would have provided additional insulation and reduced the need to launder the outer garment.

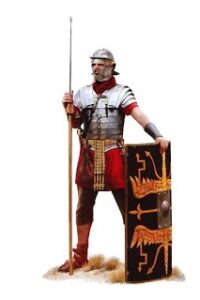
The tunica was long enough that it did not need to be worn with leggings. The Romans considered trousers to be barbarian and effeminate. The practicalities of military life overrode this prejudice. Bracae were breeches that reached to just below the knee. Trajan’s column shows infantry legionaries bare legged but cavalry and officers wearing bracae. Long trousers or a form of gaiter  or puttee seem to have been adopted where conditions required.

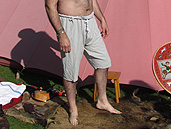
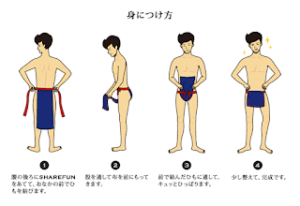
Some form of lower underwear was used. If the legionary was wearing bracae or trousers the lower part of the undertunic might have been gathered around the loins, as was common with the undershirt in medieval times. There are records of some form of underpants, “subligariorum”. Short, linen bracae-type garments are known. Loincloths were also used. The example shown in the picture below was probably “outerwear” for athletes and gladiators, a soldier wearing something less bulky and simpler.

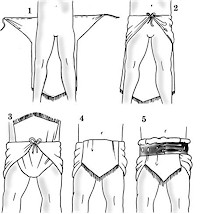
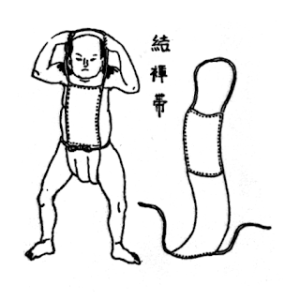
On the theme of simple to create clothing, I came across this illustration of a Japanese loincloth. Simply a rectangle of cloth 6-14” wide with a ribbon or tape sewn to one edge. The second illustration is a curious variant with a bib front and a loop to go over the neck.

Categories
Phillosoph

Ninja Boating

Yesterday I was watching an interesting video on tools used by historic ninja. At the start, almost as a throwaway comment the speaker mentions that the box he keeps them in also happens to be a boat!
Rooted around a bit, and found a video of this ingenious device.


Categories
Phillosoph

Survival Heliographs: When the Sun Is Behind You. Part Two

Following on from my post on heliographs one of my regular readers observed:
Aiming a signalling mirror with the sun behind you could be tough but basically if you have the sun behind you and a plane in front, the problem (conceptually) is put the mirror flat between the two.”
He is correct. During my research I came across this informative illustration:

Using a signal mirror when the sun is behind

Note that the signaller is using his free hand to aim by directing the reflected spot of light on to it.
Categories
Phillosoph

Survival Heliographs: When the Sun Is Behind You

A few weeks ago a friend showed me a military heliograph he had. If I recall correctly it was part glass, and like so much milspec equipment was surprisingly heavy.
In my emergency kit I have an item that serves the same purpose. It was made from a polished stainless steel door finger plate. Unbreakable and a fraction of the weight and price of the military item.
“You know how to use the sighting hole?” I asked.
I explained that as you aimed the device by looking through the hole it would cast a spot of sunlight onto your face.
The heliograph was mirrored on both sides so you could see the reflection of this spot of light in the near side.
You then adjusted the mirror till the spot of sunlight moved back to the aiming hole.
This gives you the optimum angle for directing sunlight in the aimed direction. 
Another technique is simply to hold your hand up between you and your intended target.
Some survival heliographs have a little stick you can aim at, but your finger or hand works fine.
Angle the mirror until the sunlight shines on your hand, then drop your hand out of the way.
This technique can be used with mirrors that lack an aiming hole or items that are only reflective on one side.
This is probably the more practical method when you are trying to signal a moving target like a search plane.
Aligning an aircraft, aiming stick, light spot and looking through a sighting hole all at the same time sounds like a major plate-spinning exercise!

Another method, taken from this page:
“A rifle barrel was fixed in alignment on the station with which it was desired to communicate, accurate alignment being obtained by sighting through the bore. A small disc of white paper was then fixed just in front of the muzzle, and an ordinary hand mirror was used to reflect the sun’s rays towards the receiving station. The successful transmission of messages depended on each flash being accurately directed towards the receiver, and this was ensured by the disc of white paper at the end of the muzzle of the rifle barrel ; for if rays of light from the flat hand mirror passed through the bore the annular shadow of the rifle barrel could be seen on the disc, and all other rays were therefore bound to travel in the same direction.”
One of the disadvantages of heliographs is that you cannot use them to signal in a direction where the sun is behind you. Or can you?
I did some research.
One of the interesting things about heliographs is that they only came into widespread use as a communication device in the 19th century.
There are some earlier accounts of signalling with light flashes from reflective objects but the true potential of this technique was not exploited.
This is interesting since there is no real technological barrier that would have prevented messaging heliographs being invented centuries earlier.
The Elizabethans, Tudors or Romans could easily have invented heliograph messaging. Some events in history might have been very different if such a rapid communication system had been available!

Let us look at the setup of the British Mance heliograph.
When the sun was before the signaller the signalling mirror was set up facing it.
The operator looked into the mirror and moved it until he could see the reflection of his intended message destination.  
He then erected a sight so that it was in line with the destination and its reflection in the mirror.
Alternately the operator stood behind the mirror and looked through the hole in its centre, adjusting the sight until it was in line with the target.
The mirror was then adjusted so that it cast its light on the sight.
The centre of the Mance mirror was unglazed so it created a dark “shadow spot”. Positioning this shadow spot on the sight gave better alignment.
If the sun was not in the same direction as the message destination, the signal mirror was still set up so that it faced the sun.
The sight was replaced with a second mirror, termed the “duplex” mirror. In some designs the duplex mirror might be on its own tripod, or might be a second single mirror heliograph.
The duplex mirror was set so that there was a reflection of the intended target. Alternately, the hole in the centre could be used to aim it at the target.
The signalling mirror was then adjusted so it cast its light onto the duplex. The Mance manual suggests gumming a piece of paper onto the duplex to facilitate correctly placing the shadow spot. Any non-reflective object could be placed before the duplex with the same effect.
By using a pair of reflectors, heliograph positions could exchange information in both directions, even if the sun was behind one.
Many survival manuals will tell you about signalling with heliographs. I have never seen one address what to do it the sun is behind you.
There are various ways you can use this technique.
“Mirror” in this context means anything that is reflective. A CD, a piece of foil, a mess tin, a polished knife blade, a piece of glass, a watch face, compass face or the screen or polished back of a phone. The reflector of your flashlight should not be overlooked!
If your vehicle has broken down, use your windscreen as a duplex reflector and a rear view mirror to direct the sunlight on to it. Most vehicles have two wing mirrors.
If you have a comrade, have him hold a reflective object.
Point your hand at his reflector and use your heliograph to cast sunlight onto it. Drop your hand out the way.
Your comrade uses the light cast on his own hand by his reflector to ensure it that it is aimed in the intended direction.
If you are on your own, improvise by mounting the duplex on any natural or self-constructed suitable object.
Categories
Phillosoph

WMD: Weapon of Mosquito Destruction.

I have been known to grumble that mosquitoes are a creature I would not be too worried about if they appeared on the endangered species list. Mosquitoes and gnats are more than just a pest. They spread diseases such as dengue fever, filariasis, Japanese encephalitis, malaria, West Nile virus, and yellow fever.
Understandably I have high hopes that this invention becomes widespread.
The comment about power supply is rather daft. This technology could easily be combined with solar power. Mosquitoes are a problem in urban areas too. I recall the unpleasant sight of a whole ferry bulkhead covered in mosquitoes in Venice. Hopefully mosquito lasers will become a common item of street furniture in tropical towns and cities. They would be a welcome feature of hotel rooms and bedrooms. And if they could also be programmed to zap ugly buzzing house flies too, so much the better!

Categories
Phillosoph

Chalk and Ziplocks

Recently I have been encouraging my girlfriend to put together a small medical kit for her use.
In a previous blog I mentioned that I came across a first aid pouch in the local 99p store.
I would have paid that for just the pouch, but it also came with a number of medical items. Not enough to constitute a full medical kit, but a useful start.
I looked on line for something similar for my lady and came across a pouch that claimed to hold 23 medical items. The contents include 15 plasters of three different sizes and even a small set of scissors.
Not a full medical kit, but a good starting point. I presented this to her with a handful of additional alcohol wipes and the suggestion that she add some painkillers.
At the same time, I presented her with a bundle of ziplock bags. Many of the contents of this pouch are loose and would be vulnerable to water. Hence, ziplock bags.
A stock of such bags is recommended since many items of your travelling or emergency kit will need their additional protection.
It is also a good idea to include some spare bags in your kit.
Suppose, for an example, that you need to change location and need to leave a message for anyone that might come looking for you. A piece of paper from your notebook will not last long in the rain and the ink will run. A spare bag will solve this problem.
Of course, wet ink is not a problem if your kit includes a pencil.
In similar vein I will pass on a tip that I encountered decades ago but that I do not often see repeated. This is to include some chalk in your kit.
Chalk can be used to leave messages, mark locations and indicate routes. Ideally have a piece of light chalk and also a darker colour for contrast when writing on lighter surfaces.
Keep your pieces of chalk in a ziplock bag, but wrap them individually in clingfilm or the different colours will contaminate each other.
Categories
Phillosoph

Pipe Firing Ports.

Being a Friday, today's post will be a little more abstract.
A friend of mine recently showed me a book of photos from the First World War. One image in particular caught my interest. Unfortunately it is not practical to scan the image. Instead I have found another photo showing the same points of interest. From the uniforms it is from the same time period and may even be the same trench section. Here is the photo.
What I find interesting is how firing ports have been created by simply burying a pipe in the rampart. Further along you can see that a rectangular firing slot has been created using planks, probably from shipping boxes.
In most trenches troops fire over the parapet or cut crenels to fire through. Some trenches do use firing slots but constructed in a parapet of sandbags. The approach seen in this photo is much simpler. There are no sandbags to reveal the exact position of the trench. No heads have to be raised above the parapet. There are no crenels that are obvious targets for suppressive fire. The outer ends of the pipes and slots are probably hard to discern.
A pipe would only provide a narrow field of fire but this is not a problem if they are arranged for mutually supporting interlocking fields of fire. At Iwo Jima may of the highly effective Japanese positions were constructed with a narrow field of fire. The only way they could be engaged was to attack head on, which put you within the firearc of many other positions.
One wonders what sort of sight picture firing down a pipe provides. Certainly light glinting off the sights would not be a problem!
Modern troops still use earthworks and I wonder how few use techniques as simple but effective as those shown above? If you have a hide from which you hunt sharp-eyed game the buried pipe(s) idea might be worth considering.
Categories
Phillosoph

Attack, Avoid, Survive: Now in Epub!

A few weeks back the updated and expanded “Global Edition” of “Attack, Avoid, Survive” was released. It is now 376 pages long but changes in formatting mean that it has about 50% more content than the original book, including new techniques and extra illustrations. It is a sturdy brick of a book now. Not only will it teach you self-defence but you can use it to beat a rapist to death and it may just stop small calibre bullets 🙂
I rather like the printed edition of my book but I am aware many potential readers only have limited space on their bookshelves.
Late last night the Global Edition became available in epub. I had experimented with creating an epub version when the original book was published. At the time there were just too many technical problems involved in the process and it seemed likely that there would never be an electronic version of the book.
Since then, conversion to epub has become a little more user friendly. I was expecting to take a large chunk of the summer converting the manuscript. As it turned out it took much less time. This is not to say that it was not without its problems and didn’t involve some fairly intense work. People wonder why ebooks cost what they do when they need no paper or printing. It is because of the many more added man-hours involved in their conversion. I discovered a book that looked perfect in one viewer would have false hyperlinks in random places when viewed in another. I hope I have corrected all these, but have no way of knowing how other viewers might treat it. If there are such problems my apologies to the reader. I did my best with the limited resources and budget that I had.
Some of you will know that “Crash Combat” is already available in epub format. An obvious question is whether there will be an epub version of “Survival Weapons: Optimizing You Arsenal”? The answer is that I cannot see that happening anytime soon. The shotgun chapter of the book contains a large number of useful reference tables which may be problematic to convert to epub. I have no immediate plans to make an epub version of the book anytime in the near future so if you are interested in this book go ahead and get the print copy.
Categories
Phillosoph

Items for a Daysac, the photoshoot.

Some photos of the daysac kit I discussed yesterday. I will stress some other items are likely to be added as suits the intended trip. Currently the bag and the contents shown weigh about 5½ lbs with the waterbottle empty.  

Clockwise, from the top.
Red and black item is the keffiyeh. A hank of paracord and one of general purpose string rests on top.
The green item to the left and beneath the keffiyeh is the All-weather blanket. The trainer laces visible are attached to the AW blanket grommets.
To right of keffiyeh in white plastic bag is a toilet roll. Beneath this is a pack of disposable lighters. Only two will be carried and a couple of nightlight candles added.
The lighters and toilet roll are on top of my boonie hat
Under the boonie hat is a 3 litre Platypus waterbottle with drinking tube.
On top of the waterbottle is a pair of poundstore gloves and a headover to the left of them.
Left of the waterbottle and resting on the AW blanket is a pac-a-mac
The daysac is on the far left with the first aid kit on top. Above is the whistle/compass/thermometer/LED light/magnifier/mirror thing that I use as a zipper pull.
Not shown above: Pencil, candles and hand-crank LED flashlight. I forgot to take them out of their compartment for the photo!

A photo of the first aid pouch contents and the other side of the whistle thing.
The pouch came with a pair of clean disposable gloves in a small bag, visible top-middle. Bottom right is the rest of the contents the pouch came with. Some plasters, tape and absorbent materials. I cannot recall if the alcohol wipes came with the pouch or I added them later. These items will be placed in a better ziplock bag since this one has torn.
The contents I added: Painkillers and diclofenac. Tin of Vaseline. More plasters.
Categories
Phillosoph

Items for a Daysac

Some time back I acquired a new daysac.
To my mind, it is prudent if such a bag routinely has certain items stored in it.
I had recently been writing about the “six tools of travelling” so I thought that it might be interesting to use these as a guide towards stocking my bag.
The first item of the tools was a hat. Often my old daysac had contained my favourite sun-hat, an advantage-pattern boonie.
I decided it would be useful to have something for colder conditions too, so I acquired another headover. Very versatile items are headovers, as I will discuss in a future blog.
Treating headgear as a component of the category of protection of extremities, I also placed some gloves in the bag. These were cheap acrylic gloves I found in a poundstore.
With them I placed some disposable vinyl gloves which could be used with the acrylic gloves to form a vapour barrier system if it was really cold.
The next “tool” would be a towel or cloth. For this I chose a keffiyeh which can serve a variety of purposes. A bandanna or old triangular bandages are good alternatives.
I chose a black and red keffiyeh which could also be used for signalling.
For the medicine component, I brought a red medical pouch from the 99p store.
It came with some items inside but I mainly brought it for the pouch.
For a basic medical kit, ensure it has a useful number and variety of plasters. Add some painkillers and alcohol wipes and pack it all in waterproof bags within the pouch.
I added some diclofenac since I get migraines, and a small tin of Vaseline. A more recent addition is about a foot of elasticated sticking plaster tape wound around a short length of tube.
Suncream and insect repellant often also rides in the daysac.
For cordage I added some hanks of string and paracord.
For the fire component. I brought a bundle of disposable lighters from the 99p shop and placed a couple in the pack.
The last traditional tool of travelling would be a writing kit.
It is quite common for my daysac to hold a notepad and pen.
Possibly the pack should contain a pencil and some paper at least.
In fact, this last category tends to make me think about documentation and signalling in general and is what inspired me to add some additional items.
Whilst in the 99p store, I saw a whistle that also incorporated a compass, a thermometer a magnifier, a microlight and a mirror.
I’d not use this as my primary means of navigation, of course, but it forms a handy and novel ring pull for one of the daysac zips.
I added my Platypus waterbottle with its drinking tube to the bag. If you do not have something like this,  add an empty 2 litre soda bottle you can use for water. When travelling my daysac usually carries a supply of boiled sweets that can provide a very welcome energy boost.
The contents of my old daysac had included a mini-maglight.
I’d been rather impressed by a hand-crank LED flashlight from the 99p store.
Not as robust as the maglight, it was true, but something that could sit in the pack until needed without worrying about the state of the batteries. I acquired another example and added it to the daysac contents.
One of the first items I had added to be pack was my All-Weather blanket. This is a more robust version of the emergency mylar “space” blankets.
It is provided with grommets at the corners and has a non-reflective side.
Mine has been on many adventures with me and several times I have found its warmth and water resistance useful.
If you do not have one of these, you should at least include one of the smaller emergency space blankets in your pack. My local poundstore has two for a pound at the moment, so it is worth stocking up!
The AW blanket makes a pretty effective raincape, but I also added a pacamac to the daysac.
The final item that my daysac carries is a roll of toilet roll in a plastic bag. Should I need to make a fire that is going to be my first source for tinder.