Disclaimer: “As an Amazon Associate I may earn from qualifying purchases.” Adsense and Infolinks were no help at all.

If you have enjoyed this article or it has been helpful to you please feel free to show your appreciation. Thank you.

Read The Third Wave by Alvin Toffler!
Categories
Phillosoph

Two Pick Sets, One Review

Today I am going to look at two different lock pick kits. A seven piece kit and a five piece.

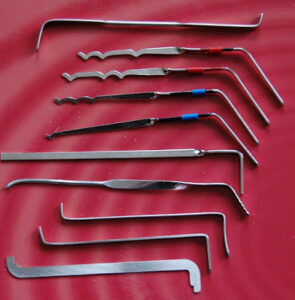
The seven piece kit is one you have already seen in my post on the Serentity plus kit I have built. These are often referred to as “mini-rakes” or “finger rakes”.
Regular readers will know that one of my more reluctant locks I practice on is a little Abus. In my early days of picking I considered the possibility that my Bogota rakes were too big to pick this lock. Hence, I became interested in acquiring a set of rakes more suited to smaller keyways. Experience has shown that it was my skills that were deficient in the case of the Abus. The Bogota is one of the most reliably performing picks for this lock. Ironically, one of the best picks for this lock is the much larger Octo rake. I was, however, well aware that in a few months I might have to deal with much smaller padlocks, so the finger rakes remained on my wish list.
Problem was, these rakes are actually part of a much larger kit. Many stockists break the kit into two parts and sell the parts separately. The finger rakes tend to sell well so are usually out of stock. Understandably vendors are reluctant to restock until they have shifted some of the other half of the kit. In short, I have had to wait several months for these. At least once they sold out before I was able to place my order.
The finger rakes appear to be made from what I suspect is music/ piano wire. The actual rake parts have had their sides filed flat to thin them. That is some nice attention to detail. What many websites on making picks from paper clips fail to tell you is that paperclips may be too wide for some keyways. You will need to file down the sides, or in the field, abrade them on a suitable hard surface.
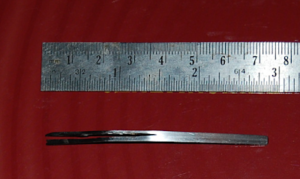
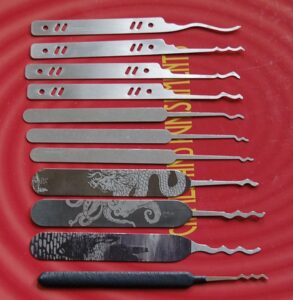
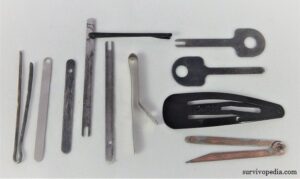
If you look carefully you will see the rakes can be grouped into two styles. One style resembles Soho/ Sabana/ Monserate-type rakes in that a straight section separates the humps. The set has a two-hump and a three-hump example, top and fifth down in the photo. The peak to peak distance (wavelength) of the finger rakes (12mm) is close to that of the equivalent part of a Soho, but not identical (13.5mm).
The remaining rakes might be termed as “continuous wave”, with one to five peaks. Wavelength is close (7mm), but not identical (6.5mm), to that of a triple-hump Bogota.
I brought this set to use on small keyways. A very pleasant surprise has been that this kit works very well on many standard-size keyways too. Being constructed of wire, these rakes are very light and springy. They are not suited to techniques such as rocking. The technique that seems to suit them best is scrubbing. Insert them in the keyway and move them back and forth. As always in lock picking, if it does not work, use less force!
I did find a padlock with a tiny keyway, only about 4 mm high. Mindboggling thinking about how small the pins must be! The main challenge was finding a suitable turning tool. I ended up using a short length of hairpin, doubtless a product of some of my recent handcuff opening experiments. The finger rakes popped this tiny lock open in a few seconds. They also open small warded luggage locks. Even the multiple-peaked examples fitted down the lockway.
People who make lock pick kits are well aware of the “socket set mentality” many men have, also known as “more is better”. The three-hump “Sabana” can do anything the two-hump can. In small locks, only the first hump and a half of either is likely to contact the pins. Likewise, the five-hump wave can do anything its less endowed sisters can. I am uncertain as to if the single-hump has potential as an SPP half-diamond. The locks I have successfully opened with it also open for the Sabanas and multi-waves. This implies that you could potentially split the finger rake set into two sets, making sure each has a Sabana and either a four or five wave rake. The three-hump and five-wave might find their way into my main lock kit.
I like the finger rakes a lot. I expected them to be a specialist item but they have proved more useful and versatile than expected. UK Bump Keys have them for under just under £3/ $5, which is great value. A few stockists charge a bit more, but this is often still a good price given how useful they are likely to be. These finger rakes tend to sell out fast, so balance how much you are willing to pay with how long you want to wait.
The larger kit the finger rakes come with is usually termed a “Wave rake” kit. I have seen these attributed to either KLOM, “Honest” or DAINU, with considerable variation in price. These are probably all made in the same place in China, so the possibility of directly importing only the finger rakes should be looked into.

The second set that I am looking at is one that I brought when I first began buying lock picks. It was a fun purchase of what I considered a novelty item.
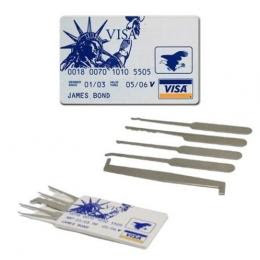
As you can see, it comes in a box printed as James Bond’s credit card. (Visa? I would have thought Access as better for lock picks!). The design on the box will actually vary, some websites offering a blank fronted box. I am a bit dubious as to the tactical practicality of pick sets apparently designed to fit in a wallet. It seems if you are illegally detained, your wallet and jewellery are very likely to be taken off you. This kit seems a little thick to fit in a wallet, but my wallet is one that only holds cards and is a little on the small side, so others may feel differently.

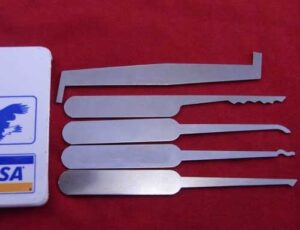
This kit was a surprise. The picks are actually quite nice! Several times on this blog I have mentioned the poor finish and crude production methods of some Chinese-made lock pick sets. The picks in this set are nicely finished with a good polish and smooth edges. The metal seems adequately springy. I have seen one video where the picks showed signs of rusting, so watch out for this if you carry them in humid conditions. It seems I was lucky with this example. The second of these kits that I brought was of much cruder finish.
The kit has two Single Pin Picking (SPP) lifters: a hook and a half-diamond. You also get two rakes: a snake and a jag/ city rake. The fifth piece is a turning tool. I have seen one video on youtube where the kit came with two hooks instead of a snake. I have also seen a kit offered for sale with a training lock that apparently has a duplicate snake instead of the jag.
I have heard complaints that the tools are too short but I have not found that to be a case. My Bogotas are probably shorter. The short handles may be an issue if you are using them for prolonged SPP. For the rakes, the short handles are perfectly adequate.
I like the snake rake. Last night I even opened my Abus with it. Regular readers know I am not a big fan of jags and ideally I would rather have seen a two or three-hump Bogota in this kit instead. I suspect the kit predates Bogotas, however. That said, this jag works very well. Using it as a rocker, it has opened several of my practice locks in well under a minute.
The one piece I do not like is the turning tool. It is too thin for a turning tool of this type and the noses too narrow. Used centre of the cylinder (TOK) it continually pops out. It is not much better edge of the cylinder (BOK). The best use for it may be to grind it into a Bogota!
This kit may be more practical if carried without the box. I have seen suggestions for drilling a hole in each handle so they can be carried on a split ring. Or rivet them to create a fan. There are key carriers that resemble jack-knives and this is potentially another way to carry this set. The short handles could be used as a tang to fit a longer handle.
The reason I think this kit may be of interest is that it can be found at very low prices. I paid just a few pounds for mine and the vendor also sent me a free booklet on lock picking. I have seen these sets at even lower prices. Then again, I have also see the same sets at five or six times this price, so shop around.
Categories
Phillosoph

Escape: Handcuffs and Double-locks.

Version 1.1

Today’s blog is the second part of our look at handcuffs. Once I have this out the way I can move on to the product reviews and suggestions.
I have seen suggestions that the handles of some lock picks can be used as shims. Most lock pick handles are way too wide for such use. Even types like the Bogotas that have handles designed to serve as turning tools are likely to be a millimetre or so too wide for many handcuffs. What can be done, however, is to use the head of a pick. Obviously some designs of head are too wide. Picks I have successfully shimmed with include my half-snowman, the Dangerfield one-hump Bogota and the jag from the “James Bond Credit Card” set. Some of the snakes and hooks should also be suitable.

Another experiment I conducted was to use a handcuff shim on a cable tie. As I suggest in the previous post, I have further slimmed down the single end of the shim I made. With it I have successfully disengaged the locking mechanism of a cable tie. Admittedly the tie I had handy was larger than average but I believe the tool should be effective on standard sized zip ties too.

In the last post on handcuffs I dealt with how to deal with single-locked cuffs. If you are in cuffs for any length of time a trained captor is likely to double-lock them. This is why I am rather dubious about E&E sets that contain a multitude of different shims.

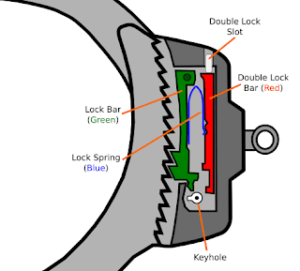
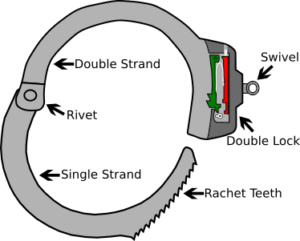
In the diagram above the double-lock mechanism is in red. Whilst the green single-lock pawl moves up and down, the double-lock mechanism slides back and forth (or up and down, with respect to the diagram above). The single-locking pawl is under constant pressure from a spring. The double-lock mechanism, however, clicks from one position to another and back again. When the double-lock is applied the red piece will physically prevent the green part from raising. Hence when a double-lock is applied the cuff cannot be further tightened and cannot be shimmed.
In the diagram above, you can see a channel above the double-lock mechanism. The handcuff key has a post that can be inserted into this hole to push the double-lock into the locked position. A paper clip, pen refill or any object of similar dimensions can be used to apply this lock if a key is not handy. Incidentally, looking for a post on the key is a good way to determining if the handcuffs you are considering buying a “real” or a novelty item. On some designs of handcuff there is a slot cut in the side and the lock is applied by using the post to flick across a “trigger”. A handcuff of this type can be seen in the “Secrets of shimming” video in the previous post.

To disengage the double-lock you normally need a key. The key is turned in the opposite direction to that you would use to open single-locked cuffs. First the double-lock must be released, then the key turned in the opposite direction to release the single-lock. In the diagram above the key would first be turned anti-clockwise, and then clockwise.
The primary means of dealing with double-locked cuffs is a key. You are advised to spend your money on acquiring a few keys before you invest in commercial shims. Later articles will look at some of the E&E keys available. But a word of caution:
Many years ago I watched a movie about undercover cops at a high school. In one scene a youth spots the handcuff key on a policewoman’s key ring. He says something like “I’ve been busted enough times to know a handcuff key when I see one!” The supposed schoolgirl manages to talk her way out of it, making some comment about being kinky or similar. Having a handcuff key in plain sight on your key ring may get you identified or mistaken for a cop, and the results of this may be more serious than in the movie. Some cops will take a dim view of non-police having handcuff keys, regardless of what the actual local laws permit. Likewise, in some localities carrying of a handcuff key(s) may be illegal. Escaping from legitimate custody is certainly illegal. The techniques on this blog are intended for protection against illegal restraint.
If you do not have a key there are a few things you can try to release a double-lock. Some lock picks can be used to push the bolt back to its unlocked position. Probably these will be hooks, but I have done it with the Dangerfield single-hump Bogota too. I’ve used the same tool to then lift the single-lock. The bulldog clip handle and some other improvised means work better for the latter, however.
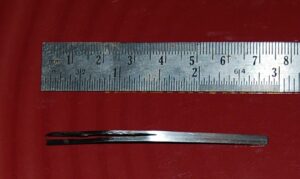
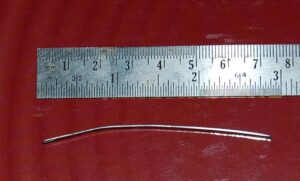
A better way to disengage a double-lock is to use a hairpin aka bobby pin. Strip the protective bulb from the end and bend the straight part. Contrary to what you may see in many youtube videos I have found that a gentle curve with a radius of about 18mm works best on the cuffs I have tried. If the slot at the bottom of the keyway is “6 o’clock” then you want to insert your piece of pin at about “2 o’clock”. Give it a vertical angle of about 30-45 degrees. The idea is that it curves around the post and the wall of the keyway to push on the bolt until it clicks across. Bend the pin more as necessary. You can use this slightly curved pin to shim the cuffs once the double-lock has released.
Transparent training cuffs, such as those supplied by Shomer-tech are useful in learning this technique, but be aware doing this repeatedly can damage the plastic around the keyhole. Once you have the basics practice on all metal cuffs.

No discussion of the double-lock would be complete without some mention of kinetic unlocking techniques. The idea is to strike the cuff against a hard surface so that conservation of momentum causes the double-lock bolt to bounce up to the unlocked position. I’m told that this trick is more likely to work with older models of modern handcuffs. A related technique is pull on the shackle of the cuff as the body is struck. The theory is that if the double-lock does not fully disengage it will still move enough to allow the pawl to temporarily lift. Pulling on the shackle while striking the cuff seems a rather complicated operation if you are on your own.
The Darby-style handcuffs that Houdini was familiar with were vulnerable to being opened by striking. Strike near the hinge and keyhole. Darby-style cuffs are still in use in some parts of the world.
Categories
Phillosoph

Serenity Plus Lock Pick Kit

Finally acquired the last component for my locksport kit, so it is time for a quick show and tell. I have come to think of this as my “Serenity Plus” kit.

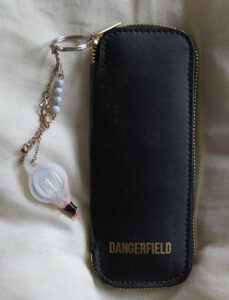
The Dangerfield pouch that was provided with the Serenity kit as a free upgrade. Note that I have added a small Photon II-style light to the zip-pull. Also notice the home-made red filter made from a red drinking straw and electrical tape. I usually watch TV with the lights off. The light lets me select a pick from the case if I feel like picking a lock during the advertisements.

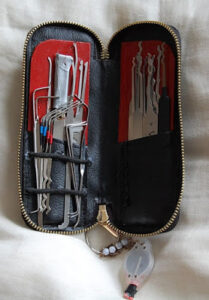
The pouch opened. Note that I have lined the pouch with red painted plastic backing. Appropriately enough these were created from security key cards, painted with red enamel paint. An elastic hair band has been cut and glued in position to hold the turning tools and hybrid picks. Not clear in the photo is that the right side includes a couple of hair pins, useful for making small turning tools, opening handcuffs and similar.
The right side of the pouch contains rakes and the left side lifters. The distinction between these categories is fuzzy, however. Various lifters can be used to rake or rock, and often this should be the first technique attempted with them. Rakes can sometimes be concentrated on a single binding pin. The Princess and Prince inverted are effectively deep hooks.

The contents of the left side. From the top:
    • Swerve rake from Serenity kit.
    • Bogota triple hump from Serenity kit.
    • Princess rake from Serenity kit.
    • Prince rake from Serenity kit.
    • Snake rakes from SouthOrd. Large, small and angled small.
    • Sandman rocker rake from Sparrow.
    • Octo Rake from Sparrow.
    • Warlock rake from Sparrow.
    • Worm rake from Sparrow.

The all important turning tools:
    • Wide tool made from laboratory spatula.
    • Pair of Soho rakes from Dangerfield.
    • Triple hump Bogota from Dangerfield.
    • Single hump Bogota from Dangerfield.
    • Standard width turning tool made from laboratory spatula. Hooked end designed to open small warded locks.
    • Turning tool made from wiper insert. With standard and narrow heads.
    • Serenity kit turning tool modified to have additional narrow head.
    • Prybar-type turning tool from Serenity kit.

Contents of the right side:
    • Razor pick with home-made protective cover. Note fishing line to prevent loss.
    • Curved Reach Ball hook from Serenity kit.
    • High hook from Serenity kit. (Steep/ Postal hook?)
    • Angled Ball hook from Serenity kit.
    • Half-diamond from Serenity kit.
    • Partial hook from SouthOrd.
    • Half-snowman rake from SouthOrd. Made by filing down SouthOrd’s double-ball pick.

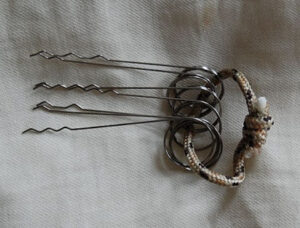
And as a bonus, my set of finger rakes, aka mini-rakes. These do not really fit in the kit but are something you are recommended to acquire. Intended to fit very small locks they work very well in standard sized locks too. Because they are springy they are more scrubbers than rockers. They tend to sell out fast when they are in stock. I’d like to thank Marcus of UK Bump Keys for his efforts to get me a set.
I make that as 28 items. Admittedly, there is some duplication with the turning tools but I do not consider that a bad thing. The half-snowman was an indulgence and just a bit of fun. Many of the other rakes will do anything this pick can, and probably in less time. I brought the snakes since I expected some locks would be difficult to use the Bogotas in. They have not seen much use, and I now have the finger rakes. The Sandman has not seen much use and I suspect it is better suited to American locks. Not found much use for the Swerve rake either. The Octo rake and Warlock, on the other hand, are very impressive. I’d put those on my must-have list right after the Bogotas. I have had little SPP success with the high hook. It has got stuck in a lock at least once! I may file the end round to create a Gonzo-style hook. I have not had much use for the razor pick yet. It only works on certain locks and I have yet to encounter any. Those E&E enthusiasts that think they can open any padlock if they have a razor pick are pr0bably in for a shock!


Categories
Phillosoph

Escape: Handcuffs and Shimming

Today I am going to look at ways to bypass the single lock of handcuffs. To do this it will be necessary to briefly describe the mechanism we will be dealing with.

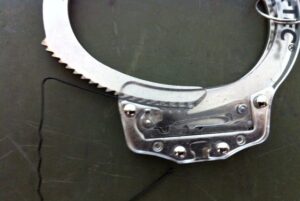
A typical pair of modern handcuffs uses a very simple mechanism. As you can see, the shackle/ strand (the moving part) has ratchet teeth. The teeth are engaged by the teeth on the pawl  (green part) within the mechanism. The pawl allows the shackle to move in but not be pulled out. In “single-lock” mode the handcuff can be tightened but not loosened. The handcuff key engages the pawl directly and lifts it up, disengaging the teeth and allowing the shackle to be opened. Note that the pawl is under spring tension so will drop if the pressure from the key is removed.

Above the pawl is a second mechanism (red). When this mechanism is engaged the handcuff is termed to be “double-locked” or “transport-locked”. When double-locked the pawl cannot rise, even if the correct key is used on it. The shackle of a double-locked handcuff can be neither tightened nor loosened. I will deal with double-locked cuffs in more detail in a future post. Today it is sufficient to understand that the techniques I will describe only work on single-locked cuffs, not those where the transport-lock is still engaged.
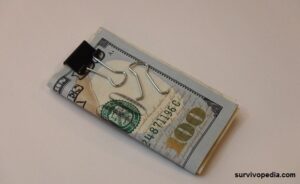
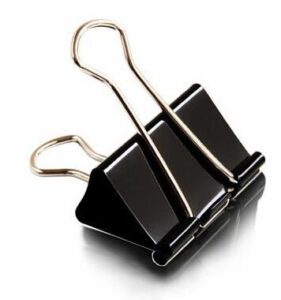
One way to unlock single-locked cuffs is to raise the pawl, mimicking the action of a standard key. For most cuffs this is relatively easy since the key has a simple flag without any cut-outs or other distinctive features. A variety of items can be used instead of a key. Bulldog clips, of the type that are triangular in section and have separate wire handles are very good for this. Obviously, these can be found in office environments or in desks. A desk can provide a prisoner with a variety of items that can be used for escape! Remove one handle and use the hooked end in the keyway of the cuff. Transparent training cuffs are very useful to have available when learning these techniques. Be careful of putting too much pressure on the plastic face of a training cuff and damaging the keyway.
The second technique for single-locked cuffs is shimming. This may be attempted when you do not have something to use as a key or when the keyhole is difficult to reach. Probably the best way to learn shimming is with a hair pin, aka bobby pin. Transparent training cuffs are very useful here.
Take a bobby pin and pull the protective blob from the end of the straight side. Open the pin out and give the straight side a slight curve. Slide the straight end of the pin along the top of the ratchet teeth on the shackle and into the housing. The pin can go no further when it is up against the pawl. You now need to push the shackle inward while also applying gentle pressure to the shim. This will obviously tighten the cuff but human wrists can take a measure of compression. If you do this correctly the pawl will raise and the shim will slide between it and the shackle before the pawl can descend again. If your shim is sufficiently inserted the teeth of the pawl and the shackle will be separated by the shim and cannot engage. Keep moderate pressure on the shim and you should be able to pull out the shackle.

The chief merit of shimming is that a variety of items you may have on your person or in your surroundings can be turned into shims. If you do not have a bobby pin then a paperclip or various bits of wire can be used in the same fashion. Shims do not need to be metallic. Strips of card or plastic may be suitable. Strips of aluminium soda can seem too flexible but this might be solved by folding them. The material used for the can ends is thicker. One way to use a piece of can as a shim is to fold it into an inverted U-section shape. This may not be practical if the shackle is a tight fit within the housing. It may not be possible to slip the material between the side of the shackle and the inner wall of the housing. A large plastic drinking straw may be used as a shim in the same fashion. Be careful when handling strips of soda can. You can easily cut your fingers and the blood may make your escape attempt more problematic.
If you carry an escape kit then including some purpose-built shims is prudent. Some users carry quite a variety but in reality you need two types at most, with perhaps a bobby pin or wire for very narrow cuffs.
Commercially available shims tend to come in two forms. There are standard shims and “split” shims that have a notch in one end. Some handcuffs have obstructions intended to prevent shimming and the notched shim is supposed to counter this. The commercial notched shims I have seen only have a notch of a few millimetres depth. Some high security cuffs have obstructions that seem to be deeper than this.

Most commercial shims are made of steel. Some websites specify stainless steel but very few also provide the information as whether the stainless steel used is also non-magnetic. For an item such as a shim that you may want to conceal a low magnetic signature is an attractive feature.
While I was pondering this problem I discovered the turning tools I had made from laboratory spatulas were not magnetic!
Like many items of scientific equipment, lab spatulas are often subject to massive mark-ups. Price may vary fiftyfold so shop around.
The spatula is slightly over 3.5mm width so needs to be narrowed down a little for use as a shim. Round the corners and bevel the ends a little while you are working on it. I chose to slot one end. I used the cut-off wheel of a Dremel for this, which is probably not the best (nor the safest!) tool for the job. Not the neatest job I have ever done but sufficient for illustrative purposes. Use abrasive paper on the shim to polish it and remove any rough edges. The shim should have a slight curve. Passing it through a handcuff’s mechanism a few times creates this.
I don’t currently have any cuffs with anti-shimming features to test this shim against. It works very well on the training cuff and both the bifurcated and non-bifurcated ends can be used with this. The length of this shim lets me insert it across the full width of the cuff. This results in the handcuffs looking like they are secure but capable of being pulled open when desired.
Some cuffs use a narrower shackle as an anti-shimming measure so perhaps the non-bifurcated end should be narrowed even further. This would result in a tool that has an elongated Y-shape or that resembles a very slim tuning fork!

Many thanks to Shomer-tech for providing me with the transparent training cuff.
Categories
Phillosoph

Escape Introduction

In a certain adventure series I watch one or both of certain events are likely to happen every few episodes.
The first is that the protagonists are likely to find themselves deep in dark woods with no phone reception.
The second is that one or both of them will be knocked out and wake up tied up somewhere, usually with a gloating adversary.
You’d think that they might consider investing in a pair of satphones, or some other alternate communication options. Investing in some counter custody equipment would also be logical.
Escape and Evasion (E&E) is not just something for action heroes and spies. Many of us are more at risk than we realize. I can think of at least two people that I know who have been victims of illegal abduction. Neither were wealthy. In one case the motive was rape. Fortunately both incidences ended happily, except for the would be rapist, and I have no problem with that result.
Today’s blog is an introduction to a series of forthcoming posts on the topic of escape.
An abductee may face confinement and/or restraint. I have already addressed confinement to some degree with the articles on lock picking. Lock picking is a non-destructive technique and if you are illegally confined you should have no qualms about damaging property if it allows you to escape.
This blog has also looked at some methods against physical restraint, most recently with an article on escaping zip-ties. For convenience let us divide physical restraint into four broad categories.
The first of these is restraint using cordage. This may be rope, leather thongs, string, wire or a variety of similar items. Here your main options are cutting the cord or undoing the knots. The practicality of each very much depends on the materials used and how you have been tied. Your teeth can be used to chew cord or manipulate the knots. If you cannot reach your own bindings you may be able reach those of a companion. Hands may be restrained before or behind you so any escape gear you carry should be accessible from either posture. Look for edges that you can abrade the cordage against. Look for objects in the locality you can break to create cutting edges. Items such as lighters can be used to burn through bindings.
Once you are free do not neglect the potential of the remaining cordage as a tool or weapon to further aid your escape.
The second class of restrain is that using chains and manacles. In the modern world the most commonly encountered of this category are handcuffs. Such restraints are much harder to break or cut. There are ways to bypass or damage the mechanisms, however. Ways to deal with handcuff restraint will be detailed in forthcoming posts. I’ll be assessing the merits of some of the commercial products offered.
A more recent category of restraint is the use of adhesive tape such as duct tape. I have looked at ways to break such restraints in a previous post. Many of the techniques suggested for use against cordage can also be applied to tape, with the obvious exception that there are no knots to attack. Your location may include organic solvents that can be used to weaken the adhesive. Possible sources include petrol, brush cleaner, paint thinner, stove fuel, nail polish remover, alcohols and similar.
The last category is that of zip-ties and similar devices. A variety of techniques against these have been covered in previous posts. Future blogs will look at some of the tools you may use to apply such techniques.


Categories
Phillosoph

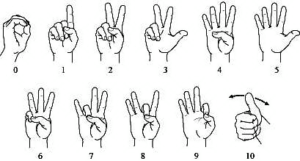
POW Manual Alphabet

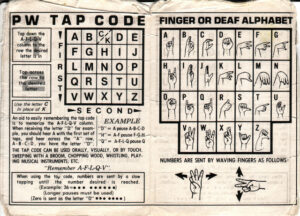
I found this while I was researching the tap code. In addition to the tap code the advice to potential prisoners had another form of manual alphabet.

Categories
Phillosoph

Good Advice from Kephart.

Let us start the week with more wise words from Horace Kephart. Advice as good today as it was nearly a century ago.
“Carry a change of underwear. When on a hike, take your bath or rub-down at close of day, instead of in the morning; then change to fresh underwear and socks, and put on your sweater and trousers to sleep in. Fresh dry underclothes are as warm as an extra blanket would be if one slept in the sweaty garments he wore during the day—to say nothing of cleanliness.”
Camping and Woodcraft 1927 Vol.2 p.100.
Categories
Phillosoph

Underwear for Survival

Recently I came across another reference to American Civil War (ACW) “Foot Cavalry”. As has been noted in other posts, many infantry in this conflict became adept at moving fast and light.

John Worsham’s account of the war as part of Jackson’s brigade is worth a read. So too is John D. Billings' memoir, Hardtack and Coffee, I'm told. 

Many of the lessons that they learned and techniques that they practiced have been generally ignored in more recent times.

In previous posts we saw how such soldiers reduced their sleeping gear to a blanket, gum-blanket or oilcloth and perhaps a shelter half. Their food and eating equipment occupied a foot square haversack.

Knapsacks were often discarded and what little they did not wear was rolled up inside a blanket. Such a blanket might contain little more than a spare shirt, socks, a nightcap and perhaps spare underwear.

Some cordage, a sewing kit, tobacco and a bible might complete the load.

One advantage these soldiers had was that their jacket and trousers were of wool, which stays warm if wet and dries more readily than cotton. Some garments were “jean cloth” –a mixture of wool and cotton.
Wikipedia has some silly comments about woollen uniforms, failing to appreciate that woollen cloth need not be the thick, heavy stuff used for modern winter clothing.
Woollen uniforms were used by most armies until after the Second World War, when the printing of camouflage patterns favoured switching to cotton.
Long frock coats were the current military fashion at the time of the ACW, but the majority of soldiers opted for either sack coats or shell jackets.
The sack coat was originally issued as fatigue wear. It was longer than a shell jacket but generally not as long as the civilian garments called sack coats.
The shell jacket was a waist-length garment and was favoured by troops that rode.
Union infantry seem to have favoured the sack coat, while the Confederacy mainly issued shell jackets, probably as an economy measure. Pragmatically the Confederacy allowed trousers to be blue, brown or grey.
Greatcoats were also used, and this article has instructions on how to fold one to fit in the knapsack.
If the knapsack was not being worn, the coat was presumably rolled in the blanket roll or carried in the company baggage until weather was cold enough for them to be needed. Presumably, many soldiers simply wore their blanket as a cloak if it was chilly.
Billings tells us some soldiers discarded their blanket in favour of the coat.
It is what these soldiers wore under their uniforms that is of interest to the modern outdoorsman.
At this period, shirts were regarded as an inner or underwear garment more than they are now. You might have seen soldiers in shirtsleeves, but wearing a shirt as the outermost layer was much less common.
Shirts might be woollen, cotton or linen. They might be issue items or civilian in origin. Many shirts were sent from home and homemade.
Typically, a shirt would be of the pull-over type with a buttoned opening reaching part way down. Such shirts were also thigh-length.
One reason for this length is that a shirt would also serve a soldier as a nightshirt. Nearly a century later, Rommel’s Afrika Korps were also issued long shirts so they could sleep in them.
Another reason for the long shirttails was that many men in the ACW period did not wear underpants. Instead they would tuck their shirt tails between their legs, a practice that dates back to at least the middle ages.
More than one shirt might be worn. A letter from a soldier asks his family to send him four woollen shirts, two of thin wool that can be used as undershirts.
While researching this article, I came across this facebook group detailed the contents of a British soldier’s blanket roll in 1776.
Three shirts were carried, one worn, two packed, and men ordered to “change their linnen [sic] three times a week”.
A recent military innovation of the ACW period was the issue of drawers.
Many soldiers had never encountered such things in civilian life and it was considered good sport to try to convince a newbie that these were parade trousers that he should wear.
The drawers issued were ankle-length and made of a cotton flannel, hardwearing on the outside and soft on the inner face. The use of cotton is perhaps a little surprising, given that cotton is cold when wet and slow to dry.
In a previous post, we saw that the WW2 Soviet soldier wore long cotton underwear, but this was presumably for easy processing through the field laundry.
One presumes laundry for a civil war soldier was more personal or ad hoc.
Perhaps there is something about the combination of cotton drawers under wool trousers that I am missing.
One advantage of cotton is that it could be boiled to kill lice, ticks and fleas.
Wearing two pairs of drawers might be done in cold weather or when riding.
When drawers were worn, the long shirt tails probably provided an additional protection against chaffing.
Worsham mentions Many wore around their waists, next to their skin, a flannel belt or worsted string, to prevent bowel complaint”. This may be a reference to the “kidney warmers” favoured by Germans (and Japanese!) and presumably those men were of German descent, as many Americans were.
Incidentally, “kidney warmers” were another component of Afrika Korps uniform. A future blog will discuss kidney warmers. They seem a useful addition to your cold weather gear.
Laundering seems to have been an issue for civil war soldiers.
New or clean underwear seems to have been a cherished spoil of war. There are even accounts of soldiers redressing during battles.
On the subject of cotton underwear vs woollen, we can look to James Austin Wilder and Horace Kephart, several decades later.
In “Jack-Knife Cookery” Wilder advises scouts to wear “light woolen athletics”, even in summer.
Kephart (Camping and Woodcraft 1927) informs us:
 However, the broad statement that one should wear nothing but wool at all seasons requires modification. It depends upon quality and weave.
Some (wool) flannels are less absorptive and less permeable (especially after a few washings by the scrub-and wring-out process) than open-texture cottons and linens.”
“If woolen garments are washed like cotton ones-soap rubbed in, scrubbed on a washboard or the like, and wrung out — they will invariably shrink. The only way to prevent shrinkage is to soak them in lukewarm suds (preferably of fels-naphtha or a similar soap), then merely squeeze out the water by pulling through the hand, rinse, squeeze out again, stretch, and hang up to dry. This is easy, but it requires a large vessel, and such a vessel few campers have.”
“Drawers must not be oversize, or they will chafe. But one’s legs perspire much less than his body, and need less protection; so, up to the time of frost, let the drawers be of ribbed cotton, which is permeable and dries out quickly. Cotton drawers have the further advantage that they do not shrink from the frequent wettings and constant rubbings that one’s legs get in wilderness travel. Wool, however, is best for wading trout streams. For riding, the best drawers are of silk.
I conclude that for cold weather, for work in high altitudes where changes of temperature are sudden and severe, and for deep forests where the night air is chilly, woolen underclothes should be worn. In hot climates, and for summer wear in open country, a mixture of silk and wool is best, but open-texture linen or cotton does very well. Pajamas should be of flannel, at all seasons, if one sleeps in a tent or out-of-doors.”
“Drawers must fit snugly in the crotch, and be not too thick, or they will chafe the wearer. They should be loose in the leg, to permit free knee action. Full-length drawers are best because they protect the knees against dirt and bruises, and safety-pins can be used to hold up the socks (garters impede circulation).”
In his 1906 edition, “The Book of Camping and Woodcraft” he comments:
 “It is unwise to carry more changes of underwear, handkerchiefs, etc., than one can comfortably get along with. They will all have to be washed, anyway, and so long as spare clean ones remain no man is going to bother about washing the others. This means an accumulation of soiled clothes, which is a nuisance of the first magnitude.”

What does all this mean to the modern outdoorsman or serviceman?

There are obvious advantages to having your field gear of wool but this can be a little hard to achieve in modern times.

Woollen garments tend to be expensive and may be too heavy or too warm for all-season wear.

Wool items can be found on Army surplus sites, often of Swedish or Finnish origin. 

Reenactor suppliers can also yield suitable garments, be they medieval, ACW or 20th century. Prices are often high but some companies do offer budget items.

I have come across ACW sack coats for about $60, which is not bad if you are happy with either grey or blue. Viking/ LARP/ medieval tunics can be found for similar prices and these may actually be more practical items for field wear.


Below is a wool/ polyamid tunic that incorporates printed camouflage components. This suggests how a monocolour woolen garment might be customized.

It is worth noting here that Kephart favoured a cotton flannel or chambray shirt as his outer garment over gauze woollen underclothing.
Trousers were either cotton moleskin or wool kersey.
Kephart notes that:
The material and quality of one’s underwear are of more consequence than the shell he puts over it, for his comfort and health depend more on them.”
Obviously long undergarments can improve our comfort when away from our centrally-heated and air-conditioned buildings.
A common theme we have seen is that woollen undergarments should be light and of open weave.
Kephart and Wilder both advocated that in winter wearing two sets of summer-weight woollen undergarments was preferable over one heavier layer.
Most of the woollen undergarments that can be found nowadays are designed for winter use and too warm for all-season use.
Long underwear of synthetic materials are also mainly designed as “thermals” for when the mercury drops.
For the upper body, we can get by with one or more layers of thin shirts, tee-shirts or long-sleeved tee-shirts.
The Spetsnaz use of string vests is worth recalling here.
Coolmax is a synthetic that is soft, fast drying but not overly warm. I have used a coolmax tee-shirt on several of my travels, including a visit to humid Hong Kong. I didn’t care about getting drenched in the heavy rain since the garment would dry off so quickly when the temperature rose afterwards.
For the legs, most of the long underwear commonly available is likely to prove too warm for all-season wear.
String long johns seem to cost ten times the price of a string vest!
One solution may be to repurpose some pyjama bottoms as long field drawers. Brushed cotton, cotton flannel and soft polycottons should all prove suitable. Just make sure the fit around the loins is sufficient to prevent chaffing.
The pyjama top can serve as a shirt, if pattern and colour allow.
My female readers may have guessed the second suggestion, which is to use pantyhose/ tights as an inner layer. Many horse riders know the benefit of these against chaffing. You can even get tights specifically designed for men, some more so than others!
Tights/ leggings in coolmax can be found and I am considering acquiring some.
Categories
Phillosoph

Morse Code

I touched on the topic of Morse Code in the last post. I learnt AMA in under a day and Cykey coding in less than an hour. Could I memorize Morse? Here is how I approached the task.
Firstly, learn the letters as sounds. Use your phonetic alphabet and say the Morse after the letter. “Whiskey: dot, dash, dash” or “Quebec: dah, dah, dit, dah”.
Most of you will already know one bit of Morse: SOS is three dots, three dashes and three dots.
Learn the vowels first.
Alpha is a simple dot-dash. Echo is the most used letter in English so is a single dot. India is two dots, like a pair of eyes. Oscar you already know from SOS. It is three dashes. Uniform is two dots and a dash (un-i-FORM).
Each of these vowels have a Morse character that is either their reverse or their inverse.
Alpha written backward is November, dash-dot. A and N form the word “An”.
You cannot write Echo backwards but you can swap the dot for a dash. A single dash is Tango. E and T go together as in “ET phone home”.
The inverse of India is Mike, two dashes. I and M form the abbreviations “I’m” or “’im”.
The inverse of Oscar is three dots, which is Sierra which you already know from SOS.
Uniform backwards gives us Delta dash-dot-dot. D and U form “du”, a phonetic rendering of “do”. Or you could think of “depleted uranium”.
To the above we will slip in another letter you may already know. “v-for-VICTORY”, three dots and a dash you may have seen in old war films. I always remember a scene when a Lancaster bomber flies past and flashes this signal to the ground troops, on of the soldiers explaining it to the others.
The reverse of Victor is the Morse code for Bravo. B and V sound similar.
You have just learnt twelve letters in Morse code! That is nearly half the alphabet, and includes some of the most commonly used letters. You can create many messages with just these.
Next, learn some simple words that use other characters.
I learnt my name which gave me the codes for Papa, Hotel and Lima.
Papa is actually the letters A and N together. The inverse of this is N and A and is the code for X-Ray. P and X go together as PX (Post Exchange).
Hotel is four dots, or two Indias. There is no four dashes in the standard international Morse alphabet.
The code for Lima reversed gives me that for Foxtrot. I associate this pairing by thinking Lima sounds like an animal and Foxtrot that it sounds like something to do with animals. Lima is one I remember by the visual mnemonic: A line with a dot on top and two to the side.
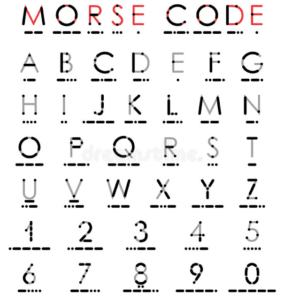
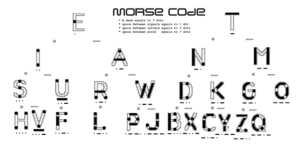
The chart below is a visual representation of Morse code. You will see a number of different versions of this. I like this one since it reproduces the codes in a linear fashion beneath each character, avoiding misreading the graphic. This chart will help you remember some characters. .
There are various ways to learn the other characters.
Charlie (CATCH-it-CAN-it) is memorable because it seems odd it is so long. Dash-dot-dash-dot. There is no reverse of this in the standard alphabet.
Juliet is another loner. It is one dash more than Whiskey..
Quebec, dash-dash-dot-dash also sticks in my mind, and may be remembered by the rhythm of “GOD SAVE the QUEEN”. The reverse of Quebec is the code for Yankee. Associate this pairing by thinking both “Q” and “Why” can be questions.
Kilo (KICK-the-CAN) is dash-dot-dash. “K” and “R” look similar and Romeo is the inverse of Kilo, dot-dash-dot.
Another chart, sometimes called a Morse Tree or dichotonic key.
You will encounter different versions of these and some put “dash/dah” on the other side, so look carefully.
This key is mainly of use in translating from Morse. It helps me remember that Juliet is one dash more than Whiskey (the-WORLD-WAR).
The reverse of Whiskey is Golf. Golf and Whiskey are associated, or you can think of G and W paired as in “Gross Weight” or “Games Workshop”/“Greedy Wizard”.
Some letters I remember by breaking them up into smaller letters. X-Ray is dash-dot-dot-dash so I remember it as “NA”. Like the letter X the code is symmetrical.
Zulu is dash-dash-dot-dot so “MI”.
The question mark is dot-dot-dash-dash-dot-dot. This is also the Morse prosign for “I will repeat” or “please repeat”. It is often taught as “IMI”.
Memorizing the Morse code is not the same as being proficient or fluent in it, of course.
An emergency situation is not a time for tests of memory if you can help it. Therefore I suggest you include backups.
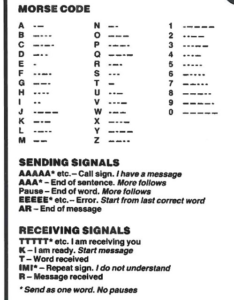
I have a small wallet that holds credit cards, membership cards and the like. For years it has carried a laminated card I made with Morse code on. Many of you will recognize the book I photocopied the original from (Note misprint of numbers! All numbers have five elements). It is folded just above “Sending Signals” so that the alphabet is on one side of the card and the signals on the other.
For larger kits I suggest you consider a suitably sized rendition of the chart below. I have modified this so that the linear form of the codes is below each character.
An alternate card may be found here.
Categories
Phillosoph

Binary Tap Code

In the movie “Ship Ahoy”, Eleanor Powell’s character tap dances as message in Morse code.
In real life, Vietnam POW Jeremiah Denton informed the world that prisoners were being tortured by blinking out the word “TORTURE” in Morse code.
I cannot be denied that Morse code is useful.
It is not the easiest system to master, however.
You have doubtless seen movies where someone knocks on the plumbing and a character identifies it as Morse code, which one of them can understand.
Morse code actually requires two signals, distinct in sound or duration, so it is impossible to tap out certain characters in Morse by banging on pipes.
SOS is one of the few signals you can tap out with a single sound. In this instance you may vary the interval between taps, rather than their duration. Three fast taps, three slow taps, three fast.
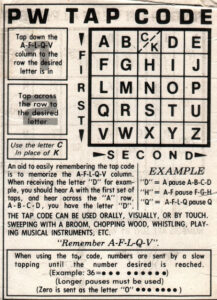
Another code system used by POWs was the tap code, sometimes known as the 5 by 5 tap code.
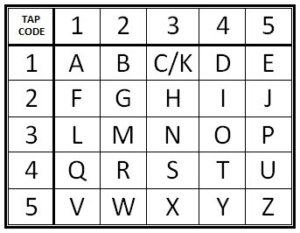
This code relies on creating or visualizing a 5 x 5 table of letters.
C and K are treated as the same letter.
The position of the desired letter in the matrix is identified by two sequences of between one and five knocks.
For the first set of knocks you count down the rows of the matrix.
For the second set you count across the columns.
Three knocks in the first sequence would have you count down to “L”.
Four following knocks would have you count across and end on “O”.
3-4 is therefore “O”.
A disadvantage of this code is that more than half the alphabet requires six or more knocks. Common letters such as U and Y need nine!

An idea that occurs to me is to combine some elements of Morse and the Tap code.
To do this, the references for the letters are converted into binary, using “dits” for zeros and “dahs” for ones.
A number value up to seven can be represented by a three-figure binary number.
The location of any letter on the Tap code matrix can therefor be represented by six figures or six taps.
That all letters are the same length may be useful for some applications such as binary one-use pads.
Since “O” is 3-4 it can be represented as 011-100 or dit-dash-dash-dash-dit-dit.
A dash means to move down a row or across a column, a dit to stay.
The binary system also allows us to distinguish “K”. Logically this is to the right of “J” so 010-110.
The binary referenced table potentially has 49 character positions, 64 if the zero rows and columns are included.
Numerals zero to five would be 000-000 to 000-101. Six to nine would be 001-000, 010-000, 011-000 to 100-000.
This is similar to the hand signals for numerals six to nine. 

SOS would be 100-011, 011-100, 100-011, so the Morse code …—… is easier to retain.

In binary tap code this effectively 3-7-3.

None of the standard letters use 7 so seven on its own could be used as a distress or “!”.