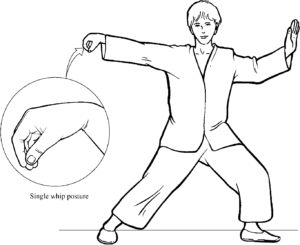
Today's blog continues on the topic of applications of tai chi's single whip movement. Be sure to read the previous blog on this subject.
As the left foot steps forward and out, there is a moment when there is no weight placed on it.
Anytime that your foot is in this state it may be used to kick.
Kicks from the single whip movement will often be forward or horizontal snap kicks.
Since tai chi fighting tends to be at relatively short ranges, it is prudent to use your opponent for additional support.
For example, an opponent swings a club at you with his right hand. You use your left palm to parry his forearm and momentarily take hold.
Your left leg springs upward and throws a roundhouse kick, contacting with the shin, instep or toe as appropriate for the range.
A likely target is the Liv 13 point on the side of the body where the torso is narrowest. This point allows you to attack the kidneys with a strike to the side of the body.
The hold on the opponent’s arm gives you support but also allows you to sense any following movement he makes.
If you have the window of opportunity a snap kick to the groin may be possible instead. You can follow this with the hooked palm making a strike to the Liv 14 area as described in the previous blog.
The next technique is an extension of something I described in my book in the section on the outward karate parry.
In that technique, you parried across the foe’s chest and a slight turn outward and body movement forward unbalanced them.
In our single whip example, the foe’s right hand is first parried by our right, so we are on their outside gate.
You step towards your foe, your left foot advancing behind them.
This movement may allow you to make a strike under their arm with your left shoulder.
Your left arm swings up under their right arm and extends forwards across their chest. Done correctly, this will nudge the opponent off-balance and the placement of your left leg will prevent him stepping back to regain it.
The next example uses an earlier part of the single whip movement.
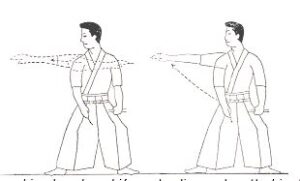
As an enemy punches at you with their right, you use your right arm and the hooked palm to parry it outward to your right.
The fingers of your left hand point towards your right elbow so your left arm forms a shield across your body.
Keeping your arms in the same relative positions, you step forward and use your hooked right palm to strike forward and down at the area beneath the foe’s right armpit.
This punch with the hooked palm and some of its targets were described in the previous blog on single whip.
In a variation of the above, you again parry with your hooked palm but your right hand finishes in a position where it is not on a direct line to the armpit. In this case you step forward and use your left to palm strike the foe’s body.
I mentioned single whip being used to initiate locks in the previous blog. Today I will describe some of the possible techniques in a little more detail.
Suppose we are on the outside gate and acting on the foe’s right arm. Your right arm has either hooked over or grabbed his wrist area.
One of the simplest moves from here is for the left palm to come up and strike the elbow. Since the other hand is pulling the arm in the opposite direction such an attack to the joint can be very damaging.
If the application of force is less acute, then a straight arm lock can be applied. Pull his hand back and to your right and apply your weight to his elbow.
If your left palm is applied to the lower side of his elbow, you can move the elbow up and pull his hand down to set up a bent arm lock such as a hammerlock. This can be used in various ways, including to pull him off balance.
For our third variation of lock, the left hand goes under the elbow and makes contact with the inner side of the elbow.
Readers of my book will know there are some strike points on the inside of the elbow and that the edge of the hand can be applied to these as this lock is made.
The intention here is to fold the elbow joint, raising the hand up.
You can then use the forearm as a lever to twist the upper arm and shoulder joint. Force the hand up and back and also push the upper arm backwards to unbalance the foe.
Sometimes the foe will not unbalance, orat least not enough to fall.
If this happens, release the hand and use your right to move in a fast semi-circle to hammer-fist him below the pectoral in the area detailed in the previous blog.
Bounce you right hand up again and use it to palm strike on the chest or face. Then try something else.
You can also apply locks from the inside gate, although this is a bit more dicey since you can be hit by his other hand.
In these examples the hooked palm right hand engages his left wrist area. As you step forward your left hand makes an edge-of-the-hand-strike on the crease of his elbow.
This is the same sort of lock as described in the previous section.
You fold his elbow joint and take his hand up and back, moving to his outside gate. As you stepped in, you probably placed your feet between his so this move can be turned into a thigh or knee strike to the groin.
Another technique for the inside gate is the variant of the karate outside parry. Engage the left wrist with your right hand and then step in, passing your left arm under his and extending it across his back. Turn your hips to the left to unbalance him.
In the previous blog on single whip I mentioned breaking wrist grabs.
My book contains a variety of methods for doing this, my favourite being the “underneath and outside” movement.
The video below shows a number of applications of single whip, including a method for breaking wrist grabs.
Note that as the hooked palm turns over it effectively passes underneath and to the outside of the grabbing arm.
The left hand coming over has a number of applications, one of which is to shield the body should the grab be turned into a strike or should the other hand or head be used to strike.
I hope this brief look at the applications of single whip have been of some interest.
For much more information on self-defence and the principles upon which some of these applications are based please buy a copy of my book.