Categories
Phillosoph

Three Fishing Lures

Today I’m going to briefly look at three different fishing lures. All three are designs you could potentially make at home or in the field.
The first type is the mackerel feather. Mackerel are a sea fish but these can also be used in fresh water. I will admit I have never personally tried mackerel feathers in freshwater but cannot imagine any reason why freshwater fish would not be interested. Such a lure could easily be constructed in the field by binding a feather or scrap of cloth to a hook. Mackerel feathers can be found for very reasonable prices and their low bulk makes them very suitable for compact survival kits.
The second type of lure is the mepp-type spinner. A piece of tin can or beer can can be used to make the spoon. Perhaps even thick foil or the ring-pull might be used. There are a number of videos showing how to make spinners but I particularly like this one. The only commercial parts used are the hook and bead. Everything else is made from wire or paperclips. Spinners can also be made by adding a hook and spoon to a couple of swivels.

The third lure is the bottlecap lure. Pierce or drill a bottlecap in two places. Don’t drill towards yourself or your hand as some videos show! Using a Heineken or Bud cap will catch you wimpy, weak, little fish, of course.
Bend the bottlecap inward so the markings on the top are visible. Attach a swivel to each hole. If you are short on swivels, use a no.3 split ring. If you are short on split rings make them by bending paperclips into shape. The idea tool for making split rings is round-nosed pliers. I don’t have any of these so my rings tend to be a bit oval, but no fish have complained yet. One idea is to put some BBs or bits of gravel within the cavity the bottlecap creates. The rattling is supposed to attract predatory fish to the lure. Obviously if you are likely to have to move quietly while carrying your fishing kit lures that rattle are not recommended.
Categories
Phillosoph

Suunto Clipper

          The engineer’s compass is my oldest compass, but the compass that I have used the most is my Suunto clipper. At first glance you may mistake this for a simple button compass of the sort so often found in survival kits. Look more closely and there are two distinctive features.


         The first feature, and what gives it its name, is the Suunto clipper has a clip. This can be clipped onto your watch strap but I have in the past attached it to lapels or cuffs, as needed. It is a well-designed clip which will securely grip a strap or material of sufficient thickness.
          The other feature is that this diminutive compass has a moving bezel. The bezel is marked in 10 degree increments, with letters at the four cardinal directions and numerals every 30 degrees in-between. The bezel rotates with audible “clicks”. Interestingly, there are four clicks to every 30 degree arc. For example, between N and 30 degrees there is a click at N, 10, 15, 20 and 30 degrees. You can therefore set the bezel exactly to bearings such as 15° or 45°. A very intelligent feature and some very nice attention to detail by Suunto.
          To the outside of the bezel is a small triangular pointer. Move the bezel so that the pointer is on your desired bearing. Align the needle with “N” on the bezel and select a landmark in the direction the pointer indicates. A quick stroke of model paint makes this pointer even more distinctive.
          I’ve had my clipper many decades now. It is a model with a blue card. Some websites claim the letters on the card are luminous. Either this has worn off on my own example or it was a feature that was introduced on later models. The more modern examples have a black card. Some websites also list the clipper as being suitable for diving!
 
          One reason that I have used the clipper so often is that it is the compass that I always have with me. I have a small container, rather like a 35mm film container but oval in section. The clipper lives in this at the bottom of a belt pouch, sometimes sharing its accommodation with a couple of aspirin.
          If I am out in the wilds I will pack a larger compass. The clipper has proved most useful in environments where the need for a compass is often unanticipated. Many guidebooks will give you directions such as “the hostel can be found a few blocks northeast of the station”. There are a number of techniques that can be uses to determine direction in an urban environment but sometimes these cannot be used. The sky may be overcast or satellite dishes are not visible. This is when a compass like the clipper comes in very useful.
Categories
Phillosoph

Epic Fail

There are instances when the threads of various topics I am working on intersect. Once such instance happened recently and got me looking into wrist compasses. I came across a wrist compass at a very modest price and decided that it might make an interesting topic for this blog, if nothing else. Other than my limited budget, one of the reasons I selected this model over others was the statement:
"The compass face can also be rotated to allow you to save your heading, which makes checking you're heading the right way exceedingly quick and easy."
 
  I cannot really see much point in a wrist compass that does not have a bezel or moveable section to do this.
 
I ordered the item in the afternoon and it was with me next morning, which was rather impressive for first-class mail.
I just could not get the glass to rotate. The mark on it stubbornly stayed at 12 o’clock. The compass was made by the same company as the Italian Army-style compass I recently acquired. You will recall that the bezel on this was very stiff initially so it was possible that I was doing something wrong.
The supplier had sent me an email, so I replied, asking for advice and including the statement from their webpage.
A reply arrived, stating they had checked their listings and could not find the description I had mentioned. It just so happened that the webpage address was still in my browser history. I sent them the link and cut and pasted the statement from the second paragraph.
The next day another reply arrives. This states that the webpage does not mention that you can rotate the housing.
I have a look at the webpage again. A whole paragraph has disappeared! Can you guess which one?
I have an idea. I put the webpage address into “Wayback Machine” and find an older version of the webpage. There is the second paragraph. I have sent the company this link and for good measure took a “snip” of the page including the second paragraph that had vanished overnight. No reply so far.
Two lessons learned here. The first is that if you are complaining about a misleading or incorrect representation on a webpage, take a “snapshot” or “snip” as proof for if the webpage changes. Secondly, Wayback Machine can be a useful fallback.
In fairness, the supplier did offer to let me return the item from the start. Given the low cost I was not going to bother and was just going to chalk up the loss. Now, given the changing webpage, I have decided to return the item and am curious as to how they behave. Will they return my money or will they welch because the packaging has been opened? I have no idea how I could have determined the housing could not be rotated without removing the packaging!
I will update this page when the matter is resolved, and will name and shame if necessary.

Categories
Phillosoph

The Engineer's Compass.

           Probably the oldest compass I have is an “engineer’s compass” similar to that in the photo below. These can be found at very modest prices so I suspect a number of readers might have one lying around.
           I acquired mine a long time ago. So long ago, in fact, that it predated the internet and I had very little idea as to how to use it. Books and magazine articles on compass use concentrated on baseplate compasses such as the Silva and Suunto brands. What were all these wires and notches and tiny magnifiers for?
           I had to work out how to use it myself. The method I came up with involved tilting both the cover and the lens bracket inwards so that they just made contact. I could look past the wire through the notch on the lens bracket. I could read the value off the dial using the lens. The gentleman in the photo below seems to have made the same conclusion.
 
           Nowadays there are a wealth of websites and online manuals on how to use a lensatic compass. I wasn’t quite right, but I was not that far wrong either.
           The lens bracket should be tilted inwards. By experimenting with the angle you can improve your image of the dial. According to most manuals the cover should be vertical for using the sighting wire. You will find, however, that if you incline the cover inwards it casts a shadow over the compass and the reflection of the wire allows you to read the value on the dial through the lens more accurately.
Categories
Phillosoph

Magnetic Declination

Methods for finding direction without a compass give you true north.
Maps are also drawn using true north.
Strictly speaking, a map shows “Grid north”, which may differ from true north, particularly on older maps.
Since we generally use a compass with a map, the difference between true north and grid north isn’t usually a worry.

A compass does not point to true nor grid north, it points at magnetic north.

Magnetic north is somewhere up in Canada. The difference between magnetic north and true/grid north is known as the “magnetic declination” or “G-M angle”.

This map of the world shows magnetic declination in different parts of the Earth’s surface. Since magnetic north is moving, this map will be out of date when you read it.
Note that declination has very little correlation with longitude.
The green line shows the agonic line. If on this line a compass will point towards true north.
On the isogonic lines, declination may be more than 20° in the northern hemisphere and even greater values as we travel south. Easterly declinations are in red. Westerly declination are in blue and given as a negative number.
So what effect does magnetic declination have on navigation?
Suppose I am in an area where the declination is 2° west. I’m facing a direction the compass tells me is north, 0°.
I notice something of interest ahead of me and try to locate it on my map. Rather than being on the north-south line the point of interest will actually be at a bearing of 358° from my position on the map. 0° is the same as 360° so 2° west gives 358°.
In another part of the world. I might face towards magnetic north but in fact be facing at a bearing of 13° east, a significant difference.
Magnetic declination will probably be marked in the margin of your map. Some maps have a declination in each corner of the map. Use the value closest to your position on the map. If you are midway or in the centre average the relevant values.
Note that the declination diagram is not drawn to scale. Don’t try to measure it with your protractor, use the values given in the text.
To make our life more interesting, magnetic north moves over time. The magnetic declination information will include an annual rate of change so you can calculate how much the declination has changed since the map was printed.
An old map I have of London tells me the magnetic declination for June 1989 was 6°W and that this was expected to change by 9'E every year.  
In 2001 it would therefore be expected to be 4.2°W.  
In 2016 this predicts it will have shifted by 243' from what it was in 1989. There are 60' in a degree so 243' is 4° 3' and predicts magnetic declination in London would be 1° 57' west by 2016.
This website gives the magnetic declination in London in 2016 as actually being 2° 10' west.
In practice, declination is rounded to the nearest half degree/30' or 10 mils. so we would treat both 1° 57' and 2° 10' as 2°.
The difference does illustrate that not only does magnetic declination change over time, but the rate of change may also vary.
If using old maps. it is important to get up-to-date information.

Once you have an up-to-date magnetic declination, what do you do with it?

This is where a lot of people get confused.

Declination, or G-M angle, is the difference between grid north (GM) and magnetic north (MN).

When do you add it, when do you subtract it? Some maps will give you this information, relevant for the area covered in the map. Where present, follow these instructions.

When a  map lacks this information, there are lots of rhymes and aide memoires that have been created to teach you what to do. Some of these, however, are only “true” in certain parts of the world.
Many readers will have been taught use the acronyms “MUGS” and “GUMA”. These stand for “Magnetic Unto Grid: Subtract” and “Grid Unto Magnetic: Add”.
A related rhyme is “Magnetic to Grid, get rid” and “Grid to Mag, Add”. Another acronym pair is “MUCA” and “CUMS”. The “M” stands for map and the “C” for compass in this case, but when stressed you might confuse these with “magnetic” and “chart”, so I find MUGS and GUMA safer, and LARS even better.
 
What MUGS means is that if you have a magnetic bearing, taken with your compass, you must subtract the magnetic declination before plotting the angle on your map. In our example above the magnetic bearing of 0°/360° has the declination of 2° subtracted from it to give the actual bearing of 358°.
When converting a bearing on the “grid” to a magnetic bearing you add the declination (GUMA).
I suspect that the MUGS/GUMA acronyms are probably British Army in origin, since they tend to favour a westward declination and could be used in the UK and most of Western Europe.
To make MUGS/GUMA global in application, we needed to learn one more thing: “West is Best, East is Least”.
“West is Best, East is Least” tells us to treat a west declination as positive and an easterly one as negative.
As you should know, subtracting a negative number adds the value of the number to the total. Adding a negative number subtracts the value.
Hence, from the above examples:
0°/360°(magnetic) – 2°W = 360°-2° = 358° grid (MUGS)
0°/360°(magnetic) – 13°E = 360°- (-13°) = 0°+ 13°= 13° grid (MUGS)

(It is possibly more logical to treat a westward declination as negative, giving us the rather nice acronyms of “MUGA” and “GUMS”. MUGS and GUMA are very well established, however.)

Another disadvantage of MUGS and GUMA is that the movement of magnetic north is changing the magnetic declination of the British Isles and parts of Western Europe to easterly.
As I update this article in February 2024, magnetic declination in London is now 1°51' East.
Yet another system, which is probably more useful in the future, is “LARS” = “Left: Add/ Right: Subtract”.
This uses the declination diagram on the map. You need to move right/clockwise to get from a westerly magnetic north line to the grid north line, so you subtract the G-M angle to convert from magnetic to grid azimuth. From the grid line to magnetic north is left/anticlockwise, so add the difference for calculating magnetic from grid.
For an easterly declination, the grid line will be to the left/anticlockwise of magnetic north, hence magnetic to grid adds the G-M angle and grid to magnetic (right/clockwise) subtracts in this case.
I recommend that you learn and use the LARS method.
Treat the G-M angle as an absolute value (always positive) and follow LARS: Left Add, Right Subtract.

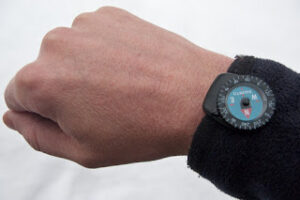
The method in the illustration above will be familiar to many compass users.
Rather than aligning the needle with the “N” arrow on the face it is possible to compensate for magnetic declination by holding the needle pointing at the declination value on the dial.
Hence if the local declination is “10°W”, you hold the compass so the needle points to the “350°” mark on the bezel rather than “0°”.
You may use LARS to calculate the offset (the value the needle should point at).
You are making a magnetic bearing into a grid one.
MAGMGA: Magnetic Azimuth +/- G-M Angle = Grid Azimuth.
For a easterly declination (East/Left Add) add the G-M angle to 0.
For an westerly (West/Right Subtract) , subtract the G-M angle from 360°/6400 mils.
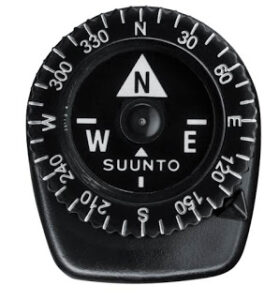
As a check, the needle and the north mark should resemble the declination diagram. In other words, if the G-M angle is easterly, the needle should be to the right/clockwise of the north mark.
This is useful when walking to a bearing, although you are better walking towards a landmark rather than walking staring at your compass (or phone!) all the time.
When sighting with a compass, the values you will get will still need conversion.
Remember that metal objects on your person or in your surroundings may affect a compass reading. Overhead power cables may influence the needle from as far as 55 metres away!
“West is Best, East is Least”
MUGS
GUMA
LARS
Categories
Phillosoph

Poles and Furcas

I once was tasked with the job of moving a heavy, bulky object. I forget what it actually was. It may have been a chest of drawers or a heavy cathode-ray TV. I asked a colleague to assist me. Moving the item proved to be much easier than I anticipated, so much so I felt I had wasted my colleague’s time. He wisely replied “Two men can carry a piano. One man cannot carry half a piano.”
  Yesterday I was reading an article that asserted that because of heavy weapons such as the 50lb Javelin ATGW the weight carried by modern soldiers was unlikely to decrease in the near future. There then followed proposals for high-tech solutions such powered exo-skeletons and cargo carrying robots that would follow a soldier like ducklings.
Why carry such things on a soldier’s back? Why not use a light handcart. Granted, a handcart cannot be used on all types of terrain so it would also need provision for being picked up and carried when necessary. Following such trains of thought I came across this webpage.
 
As the author notes, carrying poles are seldom used in the west except when hunters wish to carry a kill.


The ironic thing is those same two hunters probably walked into the woods sweating and carrying heavy backpacks. The idea of using a pole to carry those probably never occurred to them.
Carrying poles are still widely used in the east. Here are two interesting scientific papers on their use:


An interesting image. Western depictions of sedan chairs show the porters carrying the entire weight in their hands. If you think about it that seems rather unlikely and some form of strap or harness seems more likely. Note that in the illustration below of the stretcher the man at the rear is using a sling to take some of the weight. The Chinese sedan chair pictured uses two short poles to allow the load to be spread between four and their shoulders rather than their hands used.


If you are on your own, a carrying pole can still be used if your load can be divided. There are lots of images of heavy and/or bulky loads being carried by single individuals with carrying poles, but the one below is probably my favourite.


Another way to carry a heavy load with a pole was the roman furca. Apparently the real name was “aerumnulabut Roman soldiers preferred to call it by the same name as the structures criminals were crucified on. The furca is often described as a “forked stick” but in actuality was two sticks bound in a “T” shape, the longer being about four feet.  A furca could probably be used as a support to rig a makeshift shelter.


   Generally the furca is shown carried rather like a hobo’s pole. The website below explains how the system is more comfortable if used in conjunction with the shield and cloak. The Roman soldier carried a similar weight to that of many modern soldiers. Unlike an overloaded rucksack the furca could be quickly discarded in the event of an ambush. The same is true of other loads carried by pole.

Categories
Phillosoph

Compass and Clinometer Measurements.

As promised in the previous post, some scans on the angle measuring instructions that came with my “Italian Army” compass.

The first paragraph refers to the clinometer. If you work in certain fields the contents of column V will be familiar to you. This column can be read as either fractions or gradients. That is, for example, 25% = ¼ = 1 in 4. A slope of 14° therefore drops or rises one metre for every four metres of horizontal distance. A 45° slope is 1/1 so changes by a metre for every horizontal metre.
In the illustrated example below a hilltop is measures as being at 14° to the viewer so its height must be a quarter of the distance between the two. The converse is also true. If you know the height of an object and can measure the angle you can calculate the distance. A building storey is 3 metres so a three story building will be 9 metres. If the observed angle to the top of the third storey is 6° then the distance must be 90 (9 x 10) metres.
The same system can be used with horizontal angles, taken from bearings of each side of an object. Also illustrated is a way to use the graduations on the window in the cover to calculate the distance from an object of known width.

Categories
Phillosoph

Italian Army Style Lensatic Compass

         A friend of mine brought the “Italian Army Style Lensatic Compass” to my attention. I have a bit of a thing for interesting compasses so decided to treat myself. Being on a limited budget this is probably a copy rather than the actual issue model. This will be a relatively modest review since it only arrived last night.


         The first thing that you notice, even before it is out the box, is the weight. My electronic balance tells me the compass weighs 290g or 10¼ oz. The box has the company names of “Sturm” and “Mil-tec” and the text outside is a mixture of English and German but, ironically, no Italian!


         The compass itself is an interesting mixture of familiar and novel features. Like the US lensatic compass the cover is raised to the vertical for taking bearings of terrain features. Opened fully it can be used on a map as a 15cm ruler. The other side is a 1:25000 scale, which corresponds to 4cm per kilometre. This scale is marked in thousands of metres, in 10 metre increments.

        The most obvious of the novel features is the clinometer, a black plate that folds over the compass dial. The clinometer has two scales, one marked in degrees and the other in percentage gradient. According to the manual the clinometer pointer has a lock to stop it swinging about. This appears to be that if you push it just past the fully vertical position it will stay there by friction.
         The other novel feature is the eyepiece near the lanyard ring. With many lensatic or engineer’s compasses there is a lens that you fold up and use to look at the far side of the compass dial. In this model the viewer is built into the compass body. The eyepiece can be adjusted to compensate for discrepancies of vision. This system gives a really good view of the compass dial. The view is magnified so it is very simple to distinguish the single degree increments of the dial. The bearing is in black and the backbearing is printed above in red. All very clear and easy to read. I really like this feature!
         The cover has a large clear window with various markings. One part appears to be designed to serve as a map detail magnifier. Just above the eyepiece is a fine notch that can be used to align the sighting line on the cover. This has a “pinhole camera” effect that brings the line into sharp focus. You eye easily moves from the sighting notch to the eyepiece below so bearings can easily be taken. Very well thought out and executed!
         The base also incorporates a bull’s eye spirit level, a feature I’ve not found on my other compasses.
         One surprise was that the compass bezel did not appear to rotate. Perhaps I am too used to Silva and Suunto designs, I mused. This part seemed quite solid. But why knurl the edges if it was not intended to rotate? Why bother printing it with a degree scale and etching reference marks on the glass surface? The image in the manual labels the bezel as a “pivoting dial” and this is listed in the features on the side of the box as “rotating compass ring”. Turns out (pun intended!) that the bezel does rotate but it is initially very firm. Persist with it and it will begin to work as intended. A word of caution, however. The bezel is marked in tens of degrees so “3” = 30 degrees and “30” =300. Setting the bezel helps you keep on the intended bearing. I’ll not bother describing how this is done in this post since the method will be familiar to many readers already. A future post will cover compass techniques.
         The compass came with a small but comprehensive instruction booklet. The appeared to be all in German but halfway through the text was repeated in English. This section was actually titled “Englishch” which was not promising. In fact the translation isn’t as bad as I feared! The first few paragraphs cover the obvious basics. How to take a bearing, using the compass with a map and how to move on a bearing. Then there are instructions on using the clinometer.
         The manual also includes a table. The first three columns are for converting between degrees, milliradians and grads (does anyone still use grads?). The fourth column is a % scale and the fifth column is fractions derived from height divided by distance.
         The manual then gives information on how this table can be used to determine features such as object height at a known distance, or distance from an object of known size. All this is done without the need for trigonometry tables. I will describe this in greater depth when I have had opportunity to scan the table and some related sections.
         The compass has one final trick under its skirt. If you flip it over you will find the table in the manual is reproduced on the bottom of the baseplate. The columns are even labelled in Italian! On the downside the font of this table is very small, and consists of black raised letters on a black background. It may be a good idea to copy the table in the manual and laminate it.
         The compass is a bit on the heavy side, so if you love ultra-light gear this is not the model for you! The hinge between the base and cover seems rather slim so I will have to see if this loosens up or gives other problems. Because of the way it is orientated the clinometer will be at its most accurate if one person sights while another stands beside to read the scale. I think this is a very good compass for the price. It is certainly easy to use and I love the magnified and adjustable viewer.

Categories
Phillosoph

On Prejudice.

“Prejudice” is a word I expect we will be hearing a lot over the next few months, so I would like to share an observation. 
“Prejudice” derives from “pre-judged”. A good definition may be making up your mind before you have all the facts, or in spite of the facts. Many people who claim they oppose prejudice are quite happy to hold prejudiced views about groups they do not like. We see open prejudice against groups such as law-abiding gun owners. This is considered permissible.
The “logic” is that anyone who owns a weapon is potentially a killer and murderer. If we continue with this train of logic it will also be recognized that all men are potential rapists, all women are potential whores and all parents are potential child abusers.
If I were to make the statement that “Hilary Clinton is potentially a whore and a child abuser” many people would be offended but I am only applying the same treatment that she and other gun abolitionists apply to others. I hope this gives you pause for thought.
If you wish to oppose prejudice, make sure you yourself are not really perpetuating it.

Categories
Phillosoph

Tomahawk Strengths.

Researching tomahawks has led me down some interesting paths. One such path led me to an interesting site on boarding axes:
“Ships carried a large quantity of tools to meet any eventuality. These of course included axes for fire fighting – fire being an ever present hazard on wooden ships – for general repairs, and for tree felling and wood gathering ashore.
The main uses of an axe when fire fighting, whether at sea or on land, were for breaking open doors, smashing windows or knocking holes in walls and roofs to affect a rescue, releasing smoke or creating fire breaks. The thin angle of the blade as well as the spike could also be driven into the gaps around doors and windows to lever them open. At sea during battle this would also include damage control such as clearing fallen rigging and spars by cutting and dragging them clear and to pry out embedded hot cannon balls before they set the wood alight.
Axes were therefore always part of a vessel’s equipment and it is from these that the Boarding Axe evolved to fill a niche created by the art of naval warfare at the time of the great sailing ships.  
As well as being used for damage control they were also used as a combat tool in any boarding action between vessels, and it was this action that generally concluded the fight. The boarding axe was used to cut through anti-boarder nets and lines, to cut through rigging or ropes holding gun ports open, to smash through the doors and windows of cabins to attack the opposing crew who may be defending that as a stronghold. And of course in melee an axe may not be as good as a sword or cutlass but it was still a handy personal weapon.

A boarding party would always include a complement of axe carriers to support the main body of marines and sailors armed with musket and cutlass. As the axes were generally stored in racks near each gun they were also handy for defence against enemy boarders, being quickly available to the gun crews to cut grappling lines or defend themselves.”
This nicely sums up why a tomahawk or similar tool can be so useful. Not only can it create shelter or provide fuel, it can also be used to help create escape routes, particularly in an urban environment. A Falklands veteran I know of insisted his knife should be capable of cutting through the side of a helicopter sinking in the sea, having been in such an unfortunate situation.
A kukri will make short work of a wooden door. So too will a good tomahawk or hatchet. Many other survival knives will not, even though they cost several times more.
As I detail in “Survival Weapons: Optimizing Your Arsenal” a good kukri can be acquired for very reasonable prices. The catch is you have to get them from Nepal, although postage is also quite reasonable. On the other hand, you can find reasonably priced hand axes and hatchets in any hardware or DIY store.