Categories
Phillosoph

Lighter Kit and Stoveless Cooking

A friend sent me this video. Good timing, since I had just posted my article on ranger rolling and how it could be used to reduce the number and weight of stuff-sacks used.
I don't carry a lot of electronic gear nor do I idolize my phone, so I had not paid much attention to items such as power banks. With a suitable suite of compatible devices this may be a step towards solving the problem of the soldier's load.
One topic touched on is that of “stoveless cooking”. My friend sent me an additional video on this: 
Years ago I encountered a technique that might be called the “mobile haybox”.
The hiker would heat his food, or add boiling water, as appropriate. The food was then placed in an insulated container and stowed inside the rucksack.
Like a conventional haybox, the retained heat continued to cook the food over the next few hours. Ideally one used a “wide-mouthed thermos”, but those were not that easy to find in those days. More usually, you used a sandwich box or screw-topped container and wrapped your sleeping bag and other insulation around the outside. The wise hiker placed the container in a plastic bag in case of leaks!
The stoveless method is similar, in that you hydrate the food several hours in advance and give the water time to do its job.
The two methods can be combined. Providing it has a good seal, a sandwich box could be used.
Sandwich boxes, incidentally, make pretty good eating bowls for more conventional cooking. Remember that before you fork out a good chunk of cash on a specially designed backpacker's eating kit!
Have a look at the supermarket shelves for other suitable containers.
Buying them filled with food is often cheaper than attempting to buy an empty container.
I have seen plastic peanut-butter jars suggested for stoveless cooking and this is a way to utilize that peanut-butter stuck at the very bottom.
Categories
Phillosoph

Sam's Van: Kitchen Equipment

Sam’s Van is an idea from a friend of mine from Tennessee. When he was in his late twenties he proposed that a person should only have as many possessions as could be transported as a single van load.
For a variety of reasons, I can no longer meet this ideal, but it is a useful concept to help you declutter and reorganize your environment.
There are some interesting websites about minimizing your possessions and these can provide useful inspiration. However, Sam’s Van is about optimizing what you have rather than minimizing it.
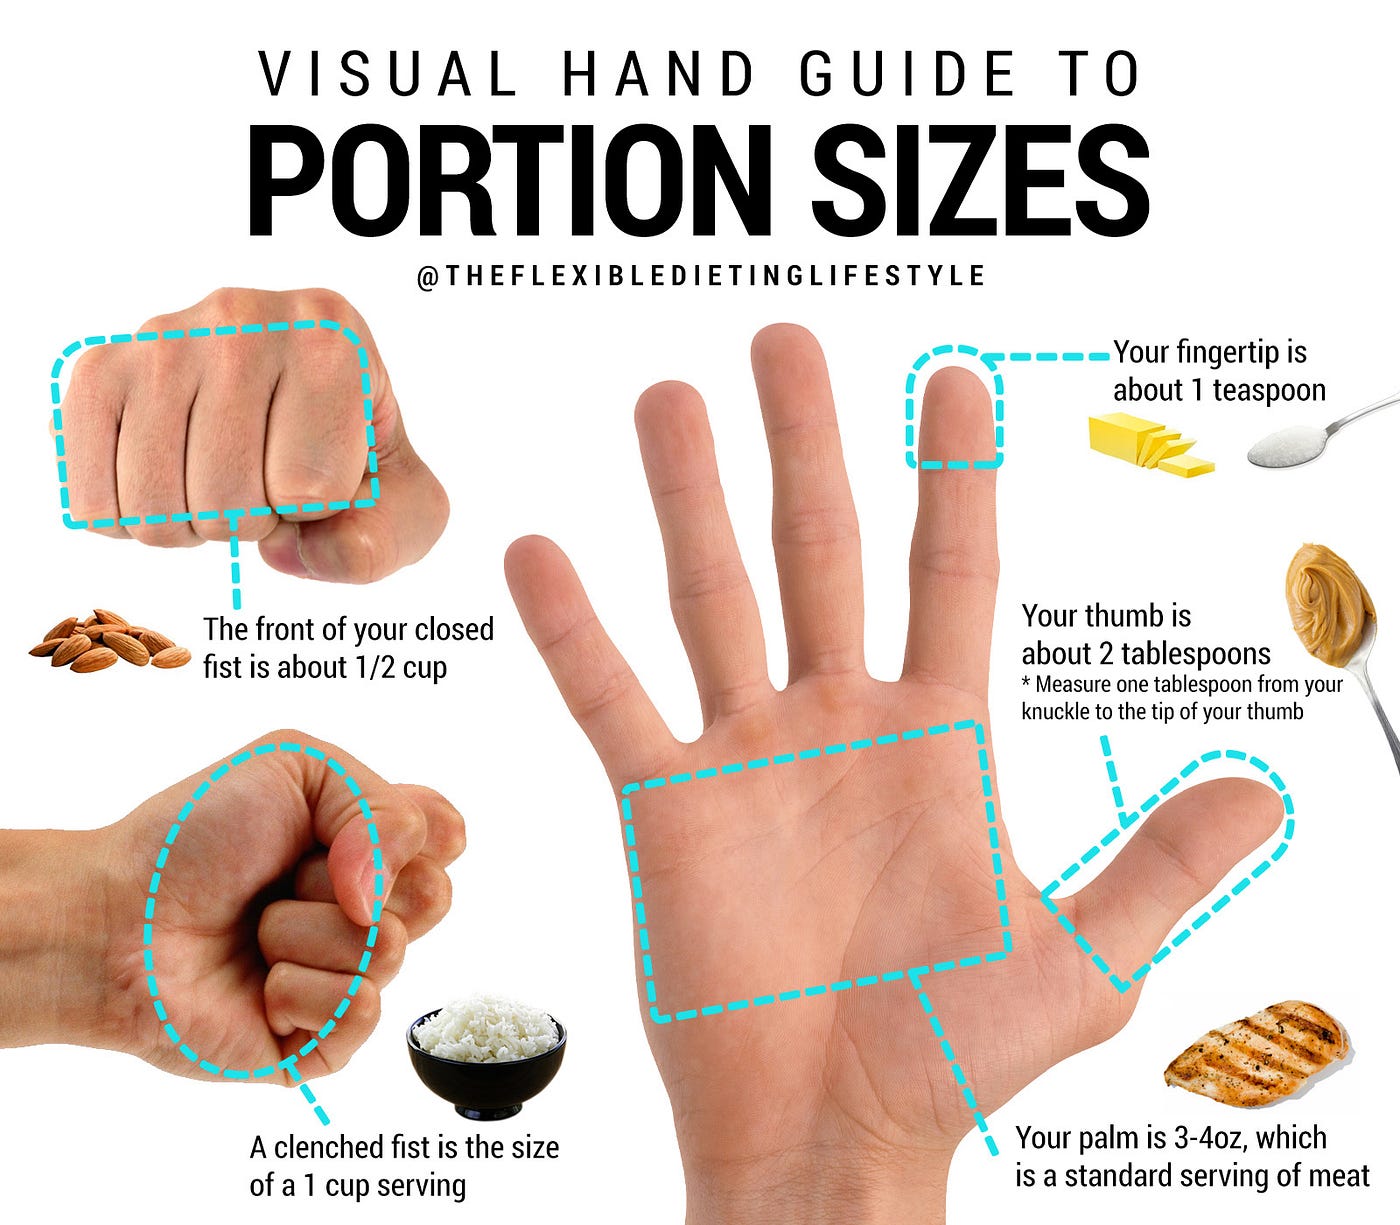
Recently I began to consider what I have in the kitchen.
This caused me to look at some lists of “essential” items of kitchenware, which did give me something of a chuckle. I quite like cooking so my kitchen contains some items I would not put on a basic start-up list.
The list below is a combination of what I have in my kitchen and items that appear on lists of essentials. If you are equipping a new kitchen or wish to declutter an old one, this list and my comments may be of help.

Plates, Bowls and Cutlery

At least four of each, with six preferable. The more you have, the less often you will have to wash up!
Bowls end up being used for microwaving veg and other uses so a few extra of these is prudent.
I found that teaspoons tended to be in short supply too so I brought a bundle more and released them into the drawer in the hope that they will breed.

Mugs

Extra mugs save on the washing up and let you be sociable.
Eight is a good number if you are on your own, twelve if a couple.
Mugs also get used as little mixing bowls for making sauces, instant gravy, mustard or similar.

Beer and Wine Glasses

You do not want to drink your beer and wine from mugs.

Pots and Pans

You will need two, maybe three, saucepans of a suitable size for your requirements. For example, if you are mainly cooking for yourself, a pot of about a litre size is going to be the most useful.
Make sure all the pots have lids and that they are of a configuration that you can use the lid to drain the pot.
Avoid steam-release vent knobs unless you like scalded fingers.

Wooden Utensils

You will need some spoons to stir your cooking and spatulas to flip frying or grilling food over. Since some of your cookware will be non-stick it is prudent to get non-metallic items.
If the local pound store does sets of wooden utensils, you can soon acquire half a dozen or more items of varying shapes and applications.

Frying Pan

If you are getting only one, get a non-stick one of reasonable width.
A frying pan can also be used for making and reducing sauces.

Mixing Bowls

A couple of bowls are useful for mixing stuff in, serving fruit or popcorn in and so on.
If you are smart you will select some that you can use in the microwave (and halogen oven). Some glass/pyrex bowls often have measuring graduations too.

Measuring Jug

I measure out the quantity of rice or pasta that I intend to cook using volume, so a measuring jug proves very handy. I also use it to fill the coffee maker with water.
It is used so often that it seldom leaves the draining board.

Chinese Cleaver

Something like 90% of cutting jobs in my kitchen are done by my Chinese cleaver. If I am using another knife it generally means the cleaver is in the wash.
Unlike the western cleaver, the Chinese model has a full bevel and a relatively thin blade. This type is sometimes called a vegetable cleaver but you can use it on anything you might wish to eat. As well as chopping, it can also be used for slicing, dicing and all sorts of fine cutting too.
Best place to get one is a Chinese supermarket, preferably one in a Chinatown district.
I have yet to cook anything the Chinese cleaver could not cut. Should such a situation occur, I have a Buck Ax in the kitchen too. The back of this gets uses as a hammer to break up frozen veg.
How to Use a Chinese Cleaver

Chopping Boards or Mats

Have at least one, and have it of a type that is easily washable. Use it to cut your veg before your move onto the meat or fish or use a different one for each.
If you want to have different boards for meat, vegetables and bread have them different colours.

Paring Knife/Knife Block

The other knife I use a lot is a “bird’s beak” paring knife. These are also called “shaping knives” or “peeling knives”.
This can be used for most of the jobs that a cleaver is not really suited for. Mine came with a knife block set. Its hooked blade is very useful for opening packaging.
I brought the knife block set to stop a certain “guest” abusing my boning knife.

Scissors

Modern packaging means that the scissors get used a lot too. I ended up putting a screw hook to hang them from inside the kitchen drawer so I could easily locate them.
Some lists of kitchen equipment have kitchen shears, which are presumably used for food preparation. Never used or owned these. The scissors or cleaver should serve.

Bread Knife

Whether you need a bread knife will depend on how you buy your bread and how much bread you eat at home. I have one as part of the knife block set and it sees occasional use.
Bread knives should also be used for cutting acidic fruits, so you should probably have one.
If you buy bread, have a cloth bread-bag to keep it fresh.

Carving Knife

There is one in the knife block set. Before I had that I usually used the cleaver.

Butcher’s Steel and Ceramic Rods

No point in buying a cleaver and knives if you cannot keep them in working condition.
I have a pair of ceramic sharpening rods and a butcher’s steel in my kitchen, ready to be used as needed.
See my book on how to use them.

Filleting and Boning Knives

I don’t have a filleting knife, and I find I have seldom used my boning knife.
Good ones tend to be expensive, so do not buy unless you expect to get lots of use out of them.
 

Whisk

Whether you need a whisk depends on your cooking abilities and style. If you have no idea on how to make a sauce or batter you do not need them.
I like the “magic” whisk type that look like they have a spring bent into a horseshoe-shape. I brought two or three of these to save on washing up.
Never felt the need for an electric mixer or blender.

Skimmer

This is a Chinese item like a cross between a ladle and a metal net. It is used to fish stuff out of boiling water or deep fat.
I have seldom used it.

Electric Kettle

You could get by with a saucepan if you have one clean but an electric kettle is worth having. Open flames and being half awake in the morning are to be avoided if possible.
Get the sort of kettle that will only boil the amount of water you need.

Toaster

The usefulness of a toaster depends on whether you have bread in the house. I had a friend staying with me who would buy bread for sandwiches so the toaster saw some use.
Since he has gone it has not been used much.

Garlic Press

I have not seen mine in over a decade.
When I need crushed garlic I simply flatten it between the cleaver blade and chopping board, which also makes it easier to peel. Then slice or mince further with cleaver as necessary.

Potato Masher

Use a fork unless you make a lot of mash.

Pizza Cutter

Just use a table knife.

Ice Cream Scoop

I seem to have inherited one! If you do not have one, simply use a spoon.

Can Opener

I don’t eat a lot of canned food.
When I needed something like canned tomatoes for a chilli con carne, I’d use the can opener on a penknife. A spare penknife is a useful thing to keep in the kitchen drawer.
A friend who was staying with me ate more canned food, so we brought a turnkey-type can opener from the pound-store.
Unless you are disabled or work in an industrial kitchen you do not need an electric can-opener. They are a waste of energy and money.

Bottle Opener/Corkscrew

You should have these. The penknife stands in reserve.

Pepper Grinder

Unsurprisingly, for grinding peppercorns.

Vegetable Peeler

I’m sure I have one of these somewhere but have not used it in years. Often you can simply scrape or wash fresh vegetables instead or use your paring knife.

Grater

I like grated cheese on my spaghetti, so I brought a grater from the pound-store. You can get by with cutting the cheese with a knife so this is an optional item rather than an essential.

Lemon Juicer

Lemon juice for pancakes gets brought ready squeezed. If I have to get juice from a fresh lemon, lime or orange I squeeze them manually or mash them with a spoon.

Pressure Cooker

I probably do not use this as often as I should.
It gets forgotten in the cupboard so I will try keeping it on a shelf instead. I eat a lot of rice and pasta and pressure cooking these does not offer much of a real time saving and the pot is large for the volumes that I cook. The pressure cooker is good for cooking rice or pasta with other ingredients.
Frozen veg is quicker and simpler in the microwave.
The pressure cooker does get used to make the Ham in Cola that I usually cook near Christmas.

Wok

I’m told that most people buy a wok, use it for a few meals then forget about it. I have been using mine for several decades for a variety of meals.
There are lots of things you can use a wok for other than stir-fries. If you do stir-fry, however, buy a chuan to move the food around with. This resembles a cross between a spatula and a shovel.
You will also need a bamboo brush to clean your wok with.
It is worth having a lid for your wok too. My lid got damaged in a move several decades ago and I have managed without, however.
You can buy a wok set in a nice box from many supermarkets. For a fraction of the price you can pick one up unboxed from a Chinese supermarket. Buy a cleaver, brush and chuan while you are there.
Don’t bother with non-stick or stainless steel woks. Get a carbon steel wok of 13-14 inches and season it.

Microwave

I use my microwave a lot but I really should use it more creatively. Mainly I use it to cook frozen vegetables. A bowl of frozen veg can be cooked in just a few minutes. I also use it to make polenta or mug brownies.
The microwave is used for defrosting too but it is less wasteful to let items thaw naturally in the fridge overnight.

George Foreman Grill

The grill in my oven is very inefficient, and the one in the microwave/grill is not that great either so I brought a George Forman grill.
I will admit I have used my wok and frying pan much less since I brought my George Foreman. Bear in mind it cooks both sides of the food at once so will cook quicker than a conventional grill.

Halogen Oven

This is a relatively recent addition to my kitchen and I probably use it more than any of the other cooking devices.
Make sure that your ovenproof bowls, baking pans and casseroles are of a suitable size and shape for use in the halogen oven.

Tongs

I don’t think I have ever owned kitchen tongs. The closest thing I have to them are cooking chopsticks, which I seldom use. A wooden spatula serves for flipping food.
This has changed with my use of the halogen oven. You need tongs (or chopsticks) to reach down into a hot halogen oven to turn or pick-up food. I also have tongs designed to pick up the racks or trays in a halogen oven.

Porridge Pan

If you like porridge, a small non-stick milk pan is worth having. It lets you make breakfast if the pans from the night before have not yet been washed.
I have a spurtle too, but you can use the handle of a wooden spoon instead.

Ladle

I have a couple of these but seldom use them. I do use one as a measure when pouring pancake batter.
You can also use some as very small saucepans for melting a few grams of butter, for example.
I would not class a ladle as an essential. I’d not throw my away but I’d not rush out to buy them if I didn’t have them.

Casserole Dish

Whether you want a casserole dish will depend on your cooking skills and inclinations.
It is a good idea to select one that can also be used in the microwave and halogen oven. I fill mine with tortilla chips and melt grated cheese over them.
A nice looking casserole dish can also be used as a serving dish too.

Measuring Spoons and Measuring Cups

I don’t own any of these and have managed without them. The scales, measuring jug and eating spoons get used instead.
I did, eventually, buy a couple of sets. Many recipes on the internet use volumes rather than weighing.
I also try to measure out high-calorie foods rather than serving myself too much.
Oddly, one set of cups I brought is based around a 200 ml volume rather than 236.6 ml, 240 ml or 250 ml.

Scales

Depending on your cooking style, these can be handy to have.

Timer

Handy to have, particularly if you are easily distracted or not that experienced at cooking.

Colander

Generally, I use the saucepan lids to drain pots. A colander can be useful for some other tasks such as washing fruit or veg. Can also be used as a well ventilated fruit bowl. 

Sieve

I seldom use mine but it is worth having one. A sieve can be used to drain stuff that would go through a colander. It can also be used to sift flour or icing sugar.

Baking Tin

If you want to use your oven, you will need at least one ware that can be used in it. You can use your casserole dish and get by using foil instead of a baking sheet. A non-stick backing tin a few inches deep can be used to make pies or toad in the hole.
According to at least one website a 9 x 13" dish will be the most useful. A square or round dish 8 to 9" across is more useful if there is just one or two of you. Round dishes are more useful for use in a halogen oven.
You will need a non-metallic cake slice (above photo) or knife to use with your non-stick containers.

Tupplewares

A few plastic boxes can prove handy.

Oven Glove and Tea Towels

My girlfriend’s sister took a dislike to my oven glove and it disappeared. Tea towels work just as well and are more versatile.
Towels are great for swatting houseflies from the air to keep your kitchen a “no-fly zone”. (Fitting fly-screen to the windows is a really cost-effective investment!)

Food Processor,  Blender,  Liquidizer

Personally I have managed to cook for several decades without owning any of these so I would dispute that they are “essential”.
Categories
Phillosoph

"Ed's Breads" and Other Flour Recipes

In one of my recent posts about mess kits I mentioned that my cooking techniques inspired in my fellow travellers a degree of curiosity and even envy. This was because I travelled with basic ingredients such as flour and porridge rather than (often heavier) pre-packaged meals.
Most hikers live off packets of rice and pasta until they are sick of it. A mountain hut warden I once met in Iceland claimed he had to resort to cooking his own food in a separate building since the smell of real meat could cause riots.
My friend Ed is a man of similar traits so I will start today’s blog with some recipes of his in his own words. This is a selection of recipes for flour that he uses when hiking in Wyoming.
Some of my own comments and variations in Section Two. (I once forwarded these recipes to another friend who was a gamekeeper and ex-soldier. Much to his wife's amusement, he could not stop making and eating flatbreads!)

Ed's Breads

FLATBREAD
Ingredients:  Water, flour
Procedure:  Fill coffee-can approximately half full with water. Shake flour into water approximately one spoonful at a time.
Stir each addition of flour into water before adding more. When mixture is a thick batter, stir busily for two or three minutes before adding more flour.
Continue to add flour and stir until mixture is a wet dough. Turn out onto floured cloth and knead with small additions of flour until dough is shiny and stiff.
Tear off egg-sized pieces of dough and pat flat and thin (1/8" or a bit thicker).
Bake flattened pieces of dough in greased lid of largest cookpot, uncovered, for roughly thirty seconds per side; turn promptly at the first hint of burning.
This is the ancient Egyptian pta, older by far than the pyramids, older than agriculture, the first bread. In India, it's a chuppatti, in Mexico a tortilla. Eat it rolled around butter and honey for breakfast (be careful, it drips), or cold sliced turkey ham for lunch, or curried lentils for dinner. Remember to pat out as many cakes as you plan to eat before starting to bake them: the skillet-time is very short, and you'll quickly run through all your prepared cakes. Don't hesitate to bake more flatbread than you'll eat at one sitting, because they can be carried for days and eaten cold at any time. Or you can re-heat and soften a chuppatti by laying it over the open top of a steaming teakettle for a few seconds. Uncooked flatbread dough can be wrapped in plastic and kept for several days.

SODA FLATBREAD
Procedure:  Fill coffee-can approximately half full with water. Stir in baking powder.  Shake flour into water approximately one spoonful at a time. Stir, knead, form cakes, and bake as for plain flatbread.
This will make a somewhat lighter flatbread.  If the dough is allowed to sit for a few minutes before rolling out, the cakes may expand as they bake, sometimes developing into regular balloons of bread. If so, good.

RICH FLATBREAD
Ingredients: Water, flour, one tablespoon baking powder, one-third to one-half cup vegetable oil.
Procedure:  Fill coffee-can approximately half full with water. Stir in baking powder. Add oil. Add flour, stir, knead, form cakes, and bake as for plain flatbread. These will be crisper than ordinary flatbread cakes.

SORTA BANNOCKS
Ingredients: Self-rising flour, water, small amount of cooking oil.
Procedure: Fill coffee-can approximately half full with water. Add oil. Stir flour into water approximately one spoonful at a time.  Stir, knead, and bake as for campbread, but reduce baking time to 45 minutes maximum.
This is becoming my campbread of choice, just because it's so easy. You can fancy it up with chopped dried fruit, nuts, and so on. Conversely, you can mix in cooked peas or lentils, cooked carrots, cooked chopped onions, etc., and make a serious ration bread for times when you need nourishment but can't build a fire.
CAMP BREAD
Ingredients:  Flour, warm water, two or three packages dry yeast, vegetable oil, honey, one handful raisins, one handful whole or chopped walnut meats
Procedure:  Fill coffee can half full with warm water. Dissolve honey in water. Add yeast to mixture and stir.
Wait 15-20 minutes or until a layer of brown foam has formed on the surface of the water. Add vegetable oil (about one cup for a large batch of bread), raisins, walnuts, and about two cups of flour. Stir well. Continue to add flour while stirring until dough becomes too thick to handle with spoon. Turn dough onto floured cloth and knead until shiny. Return to coffee can, cover with damp cloth, and allow to raise for about 1 1/2 hours or until dough has doubled in mass. Turn dough onto floured cloth, knead briefly, and form into a loaf by hand.
Put seven or eight clean one-inch granite pebbles and a half-inch of water in the bottom of the pot. Wrap the bottom of the dough in heavily oiled aluminium foil and rest it on top of the pebbles. Cover the pot tightly.
Suspend the pot about an inch above a bed of coals and leave it there for two or three hours, or overnight if you mean to let the campfire die down. Depending on altitude, it may be necessary to turn the loaf over about halfway through the baking process.
An hour and a quarter over hot coals would normally be enough. But once sleet was falling through a black night and I had had enough of standing in my poncho watching the campfire. I gave up and crawled into the tent; fire danger registered zero that night.
In the AM (bright and sunny, as it usually is in the Big Horns — and colder'n hell too), after shattering the 1/2" of ice on the tent fly, we crawled out and found that a) the fire was still alive and b) the bread was done to perfection. Luck, I suppose, but I think this approach could work under other conditions too.

This bread is one of the great staples of the trail. It's best when eaten in chunks torn roaring hot off a fresh-baked loaf.  It's next best when sliced and toasted over a new morning fire.  It's still mighty welcome even when all you're doing is building a cheese sandwich, somewhere on the trail to Nameless Lake.

Section Two

Note that lichens can also be used as yeast and in some environments a batter mix will naturally become contaminated with wild yeast, particularly if left in a warm place (such as beside a campfire) and originally made with warm water.

Take a portion of this mix and thicken with flour etc as described above to make your bread or pancakes. Keep the rest of the culture going by regularly adding warm water, a little sugar and flour or uneaten breadstuff. If you have it an occasional teaspoon of vinegar will be appreciated by the yeast. You can transport this culture in a closed top container (the yeast is anaerobic so needs no air) but allow room for expansion.

Other Doughs

The basic dough of just flour and water (with maybe a hint of salt) is much improved by giving it a good kneading. I've seen it suggested that you should add boiling water to the flour, but cold works too and smells a lot better.
Kneaded for ten minutes or so, this is the stuff used to make the pancakes served with Peking Duck and the pastry for Potsticker Dumplings.
Call them tortillas and fry them to make crisp tacos, or use more oil to make soft tacos.
You can also cut this dough into strips and then drop it into boiling water to make fresh noodles. You can add an egg to the noodle mix, but it's not essential. Not the world's best pasta, but I've been served a lot worse. You can also fry your noodles: unlike dried ones you needn't boil them first.
The other basic mix I use is known as Twister Mix:
Flour: about half a cup.
Baking powder: around a teaspoon, maybe less.
Teaspoon of sugar (or honey or syrup)
Pinch of salt
Blob of fat, butter, meat drippings etc.

Water: couple of tablespoons, often less.

The sugar and salt are optional and quantities are varied depending on what you are making. You can also do without the fat, or use oil as Ed does, which saves the job of rubbing the fat into the flour (melting the fat beforehand is a good trick too).
Once all the dry ingredients are mixed, gradually add the water till you have a dough. Ed's method of adding the dry stuff to the water is a good idea since I usually add too much water and have to pile in more flour.
I've seen it written that once the water is added, doughs with baking powder should be handled as little as possible to avoid driving the evolved gases out. My personal experiments with this indicate that my bread is improved by kneading it till smooth: maybe I've just got cold hands!
This dough can be improved by adding nuts and fruit, adding spices, eggs or using milk in place of some or all of the water.
Rolled oats (porridge flakes), pinole or cornmeal may be mixed into the flour.
I've read that fresh snow can substitute for eggs in pancake batter: I've yet to try it. The white ash left after a fire is supposed to be a substitute for baking powder.
Made as a dough the above mix can be wrapped around a stick to make twister bread, or as a flattened round (bannock) to bake either in a vessel or directly on the coals. Dropped in a stew or steamed a ball makes a fair dumpling.
If you have a vessel to cook in you can add more water to make it as a thick batter and avoid the kneading. Just drop a blob onto your frying pan. Made as a thinner batter it makes a pretty good pancake even without any egg added. Knock up some syrup from sugar, water and any fruit juice you may have.
Several ways of cooking dough have been mentioned already.
You'll notice that Ed bakes his bread in a billy, and this can be a good way if you can pile coals around and on top of the vessel, or better still place it in an "Imu" (cooking hole).
You'll also notice that the dough is not in direct contact with the sides of the vessel : you'll have a merry time trying to get the bread out if you let this happen!
Personally, I like to cook my bannocks in a frying pan since I usually have to use a stove rather than a campfire.
Lightly grease the base, or if you have no fat, dust with flour. Place the dough or thick batter into the pan and cook over a gentle heat, turning as necessary.
If cooking on a fire, once a crust is formed the pan is propped up beside the fire to brown the top of the loaf. If firm enough the bread is propped up to stand on its own. Placing a metal plate or pan lid over the frying pan and placing coals on top is another method.

Dough mixes can be therefore baked, fried or boiled and can be used as either sweet or savoury fare. They can also be used for sauces and gravies.

Ed makes his doughs up in a coffee can while mine ends up being mixed in one of my billies, but what if you just have a source of water and a bag of flour as proposed above? Well, you could possibly peel a sheet of bark or use the foil in your emergency kit, but there is an even simpler way

Sit your bag of flour down and make a well in the centre of the flour. Add a pinch of salt if you have it. In one hand you have a stick, in the other a handful of water, or a bottle. Gradually pour in the water while keeping the stick moving. You'll see a blob of dough begins to form on the stick. Flour your hands and remove the blob for kneading. You can also do this for the full twister mix, though rubbing in the fat can be a chore.

Categories
Phillosoph

Army Mess Kits

In a recent post I mentioned "Camping and Woodcraft" by Horace Kephart. This is a book that has a lot to teach the modern outdoorsman.
In one chapter, Kephart reflects on the difficulty in designing an acceptable, effective cooking kit for just a single traveller.
The billies are carried in a bag, bottom to bottom so that no soot and fuel contaminated vessel nests within another. The interior of the billies are filled with bags of food such as flour and rice so effectively they occupy very little space.
Each billy has a lid to keep dirt and insects out and to retain heat. Each lid has a folding ring allowing the lid to be lifted with a stick, knife or other implement when they are hung over a fire.
The frying pan is a full sized utensil of 8 or 9" diameter. Kephart expects the traveller to bake his own breadstuff and one of the ways to do this is in the frying pan.
The pan also needs to be big enough to cook any game or fish that are caught.
The handle is either folding or detachable, and there is provision to attach an extension piece when cooking over a large bed of coals.
A tin cup and a deep plate or bowl for eating from complete the outfit.
If you choose wisely, the plate can fit in the stowed frying pan and even act as a lid when inverted.
 Kephart’s suggestions seem logical but actually meeting these specifications proved to be more involved than I expected.
Most “camping billies” available on sale are nothing of the sort.
A true billy has a bail handle so it can be suspended above a heat source. This also allows it to be used as a bucket to fetch water.
The billies that you can find are generally much bigger than the one quart/two pint/one litre size suggested.
Camping frying pans, on the other hand, tend to be too small.
My own efforts to create a similar kit to Kephart's will be the subject of a later post.

 Many people interested in survival or bushcraft tend to take their cues from the military.

When it comes to field cooking, the circumstances of the solitary traveller are rather different from those of a soldier.

For many armies the mess kit has cooking as only a secondary function. Meals are prepared by a field kitchen or catering unit, and the mess kit is mainly used to receive the finished product.

Since World War Two, the use of ration packs has become widespread and mess tins are mainly used for warming up the precooked items.

Modern soldiers make much less use of mess kits than previous generations.

Nowadays MREs are supplied with flameless cooking pouches, so many troops in the field do not carry any cooking equipment other than a canteen cup.

Larger field catering units often use disposable tableware instead.

The most basic military mess kit is probably the rectangular British Army “1937 pattern”. This has two rectangular cooking vessels, one slightly smaller than the other so they can nest. Capacity is approximately 1 litre and 1.3 litres (or 2 and 2 ½ pints).
On the plus side, the 37 pattern mess tins fit nicely in a pouch or side pocket of a pack. The SAS Survival Guide shows one used as a container for a variety of useful items in a “survival pouch”.
On the downside, the basic set has no lid. You can use the larger one as a lid for the smaller.
A number of companies make lids/plates for the larger pot. Some versions of lid have a sliding or folding handle, allowing the lid to be used as a small rectangular frying pan. They even offered a variant with a non-stick coating.
The 37 mess tins are not by any stretch of the imagination billies. They work well enough on many stoves but if you are cooking using natural fuels you will have to have a good bed of coals or get creative improvising a pot support.
The smaller one fits inside the larger so you will need to get the smaller very clean if you want to avoid contaminating your next meal with soot or fuel residue. That is not always possible out in the field. Placing the smaller in a bag to keep the larger clean is prudent.
For receiving a dollop of whatever from the field kitchen or heating water to warm ration tins, “boil in the bag” items, or make tea the 37 are adequate enough.
The British Army mess tins have been around a long time and are widely used. This has spawned useful accessories and variants such as lids and non-stick coated tins.
On the downside, there are sub-standard knock-off copies out there. Running out of clean cooking pots, I once used a mess tin to brown some flour on my kitchen stove. Liquid metal resembling solder appeared!
I have been told a genuine tin should have a bit of spring to it. If you push on the side with your thumb it should pop-back.
Other armies have taken different approaches to the same requirements.

The Germans, Russians and a number of other armies have issued a mess kit that looks a little like a binoculars case. In fact, as a boy I thought these items on my toy soldiers were packed field glasses!

The basic item has an oval or kidney-shaped cross section.

The bottom part is a deep pot, often provided with a bail handle. The lid is deep enough to also serve as a cooking vessel and provided with a folding side handle. It is neither pot nor frying pan really but makes a reasonable (if unconventionally shaped) cup.

Such mess kits formed a compact package that could be carried in a pack or pouch or attached directly to a belt or the outside of a knapsack.

Some versions have other components such as dishes or  bowls that fit inside.

The German water canteen fitted inside a pair of aluminium cups of similar design to the mess kit.

To put these kits in context, they were often used in conjunction with field kitchens, and some soldiers of previous generations had more modest expectations when it came to food. If they got hot soup, coffee and fresh bread they considered themselves well off!

A small field kitchen such as the German horse-drawn models widely used in both wars had an oven and two big boiling vessels. One for coffee and the other for a hearty soup, stew or pasta dish.

A mess tin bottom full of soup and the lid filled with hot coffee was just what a fighting man wanted.

 Two variants of this basic pattern are deserve a special mention.

The first is the Swedish Army Mess Kit.

This has an oval section billy for the bottom and a lid that also serves as a pan.

Lid capacity is about 550 mls, the lower section holds 1.3 litres.

The handle of the lid has two folding rings of an arch-shape. A stick can be inserted through these if you need a longer handle or one that will not conduct heat.

The Swedish Mess Kit comes with its own stove. This is a sturdy windshield that fits over the outside of the packed mess kit. Inside it at two folding pot supports and the kit also includes a spirit burner of similar design to that used on Trangia stoves.

The stove could also be used with other heat sources such as hexamine blocks,  alcohol gel or natural fuel such as woodchips and pinecones.

The kit is completed by a plastic bottle marked with the Swedish triple crowns and the legend “RÖDSPRIT ELDFARLIG GIFTIG” (Methylated Spirit Inflammable Toxic). The bottle is of a size that it conveniently fits inside the mess kit but this practice is not recommended since leaks will contaminate your cooking vessels.

Keep your fuel bottle elsewhere and fill the interior of the mess kit with a brick of Supernoodles, some Oxo cubes, teabags etc.

I have used my Swedish Mess Kit several times. It is of a size and shape convenient to carry in a daysac.

If anything, it could be a little smaller. When you are hiking and the snow is on the ground it is been nice to stop and quickly heat up a quick hot snack of instant noodles.

The third kit I will discuss today is usually marketed as a Yugoslavian mess kit or “Eight piece” mess kit.

This differs from those of other armies in that the lower metal pot has a side handle rather than a bail.

The upper part is made from plastic so is more of a rectangular section bowl than a cooking vessel. The bowl is designed so that it slots onto a hook on the end of the handle, allowing both containers to be held in one hand.

Such arrangements are seen in a number of other mess kits and are intended to make handling the kit easier when queuing in a mess line.

The interior of the Yugoslav mess kit is used to store a plastic water bottle, which comes with its own rectangular beaker that fits over the top.

The final components are a carrying pouch and a metal knife, fork and spoon(KFS) set. The spoon and fork store in the handle of the knife. The knife also has a bottle opener cutout.

These Yugoslavian kits can be found at very reasonable prices. You only get one cooking vessel, but it is generously sized.

A detachable billy handle could probably be made by drilling holes near the rim at the point of balance.

I intend to acquire one of these kits soon so expect a more in depth review.

If nothing else the kits seems a good source of components that can be incorporated into a larger kit. Some camping KFS sets or water bottles cost more than this entire kit!

Categories
Phillosoph

A Decent Meal in Less Than Ten Minutes

Cooking for myself recently has been very efficient.
The other night my cooking proceeded thus:
I place a bowl of frozen sweetcorn in the microwave. This will cooked in under three minutes.
At the same time, I boiled a cupful of water in the electric kettle. This will be used to make instant gravy.
A good selection of ready-made sauces and instant stuff can really add variety to your diet.
A frying-pan heated up on the hob with a squirt of oil added. I keep the oil in a squirt bottle since it makes it easier to add less to a pan. Chopped fresh mushrooms went into the frying pan to brown for a few minutes.
While this was going on I heated up my new George Foreman grill.
I have seen some rubbish written on the internet about these grills drying food out. The George Foreman is basically a culinary trouser press. It cooks food from both sides at once, so it will take approximately half the time to cook something. Adjust you cooking plan accordingly!
On another hob, I boiled a pot of salted water. Following the previous blog post, I decided to experiment with pre-soaking dried pasta. It worked even better than I expected, so it was obvious I could now cook it like fresh pasta. A couple of minutes of cooking instead of twelve to twenty minutes.
Pork chop, mushrooms, sweetcorn and pasta in gravy, cooked in under ten minutes. Big saving on fuel, time and hassle.
Categories
Phillosoph

Cooking Rice in Under Ten Minutes. Save Fuel and Money

My gas bill this previous quarter was much higher than I expected. Made even more frightening by the fact that it was a mild winter and I had barely used the heating. This got me thinking again about ways to save energy when cooking. 
A friend of mine once told me that during the rationing of World War Two his mother saved fuel by soaking rice overnight. By doing this she only needed to cook it five minutes. Time to experiment with this method again.
Here is the method that I have ironed out over the last few days:
Measure out your rice. 100 g is a generous portion and comes up to the 100 ml mark in one of my measuring jugs. Rather than bothering to weight the rice, I just fill the jug to the mark.
Cooked rice is about three times the volume of dried. A quarter to half a cup of dried rice is good for a side dish. If you are hiking in the snow, a full cup may be warranted.
Measure food portion with handHand measures of food
For this pre-soak method, I generally fill a coffee mug half to two-thirds and top up with water.
Study the apparent depth and volume of the rice so you can estimate a similar amount by eye if necessary.
Place your cup of rice and water in the fridge. The first time I tried pre-soaking rice I ended up leaving it longer than I intended since I spent the next couple of nights down the pub and eating out. The rice sort of started fermenting, so I suggest you keep the soaking rice in the fridge just in case you are delayed. If it is winter, the kitchen is generally cold enough.
Leave the rice to soak a few hours, or better still, overnight.
When it is time to cook, pour the rice and water into a pot.
A broader pot heats up quicker and is less likely to boil over. You may need to add a bit more water to the rice so it is covered by at least a centimetre of water. Add a little salt too. Use a hob of suitable size for your pot.
Cooking instructions on packets of rice generally overestimate the cooking time or quantity of water needed.
If you add too much water, you are going to waste fuel heating it up. Too little and your pot may boil dry before you are done. You will have to experiment on getting the optimum for the pot you use. As in so many things, balance is the key.
Rice needs about twice its volume in water. As a general rule of thumb, ensure the rice is under 25 mm of water. For this method using presoaked rice you will actually need less water since there will be less cooking time.
Cover your pot, bring to the boil and then turn down the heat to simmer.
Give the rice about five to seven minutes.
If you are new to this cooking method, taste a little of the rice to see if it is soft or still a little gritty. 
Turn off the heat and let the pot stand, preferably over the still hot hob. The residual heat will continue to cook the rice without expending fuel. This gives you time to finish cooking the other components of your meal.
Drain your rice. Turn out onto a plate and serve with a variety of vegetables and a sensibly-sized portion of meat.
This method will prove pretty useful if you are hiking or camping and have to carry your own fuel.
In this case, I suggest that in the morning you place your rice and water in a wide-mouthed screw-top container and let it sit in your rucksack while you are walking. Such a container is a useful addition to your hiking kit since it can be used to prepare other backpacking foods that need a long soak.
I have not yet tried this method with brown rice. Is it possible to reduce the cooking time of dried pasta by pre-soaking?
I will have to experiment. Have a go yourselves.