In the previous blog, I noted that some of the techniques seen in I.33 and “Medieval Sword and Shield” were not suited to shields larger than bucklers.
This suggested that a blog on larger shields might be useful.
What might the Middle-Ages teach the modern riot shield user?
A shield was an important component of a combat system, and often essential in allowing a fighter to use their spear, sword, axe or mace effectively.

One of the first documents I found was the paper “Reconstructing Early Medieval Sword and Shield” by Hand and Wagner, the authors of Medieval Sword and Shield.
I was surprised to learn that there were no surviving medieval fechtbuch on shield use.
The oldest known texts on shield use are from the Renaissance, when shield use was already well on the wane.
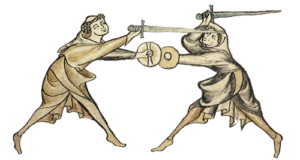
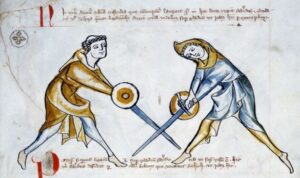
Medieval artwork showing shield use is less than ideal, due to lack of perspective and other factors that affect realistic, accurate depiction.
While there are no manuals on battlefield use of shields, Talhoffer’s 15th century fechtbuch does show the use of very high duelling shields used in judicial combats.
This source has supplied Hand and Wagner with some suggestions on how shields could have been used.
Hand and Wagner quote the following passage from Giacomo Di Grassi (1570) on how to use a round shield (“target”):
“Of the maner how to holde the round Target
If a man woulde so beare the rounde Target, that it may couer the whole bodie, and yet nothing hinder him from seeing his enimie, which is a matter of great importance, it is requisite, that he beare it towardes the enimie, not with the conuexe or outward parte thereof,… Therefore, if he would holde the said Target, that it may well defend all that part of the bodie, which is from the knee vpwardes, and that he maie see his enemie, it is requisite that he bear his arm, if not right, yet at least bowed so little, that in the elbowe there be framed so blunt an angle or corner, that his eyebeames passing neere that part of the circumference of the Target, which is neere his hande, may see his enemie from the head to the foot. And by holding the saide conuexe parte in this manner, it shall warde all the left side, and the circumference neere the hande shall with the least motion defend the right side, the head and the thighes.”


Points to note are that both the surface of the shield and its circumference (rim) are used to protect the user.
The right side of the rim is used to protect the right side of the user.
The shield should be held so that it does not obstruct one’s view of the enemy.
The least motion of the hand is needed to move the shield to defend the strong side, head or thighs.
I also had a look at the sword and shield chapter of John Clements’ “Medieval Swordsmanship”, a comprehensive work, although I have some issues with Clements’ writing style.
Clements shows a variety of ways a shield may be moved to counter attacks from various angles.
Given a shield may mass eight to twelve pounds or more, there is wisdom in using a hold that minimizes any extraneous movement.
Fighting with a Shield
Some description of how a sword (or other weapon) would have been used with a large shield will be helpful.
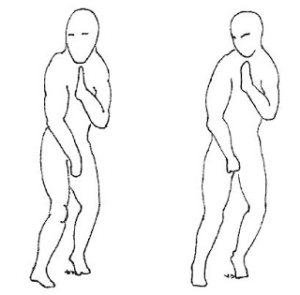
Clements describes three guards (or wards) for use with a shield and sword: high, middle and back. Similar techniques are used for axes, maces, spears and other weapons.
Cycling from one of these positions to another is simple, and they allow strikes to made with little shield movement.

From the high guard, the sword can make vertical, horizontal and diagonal cuts, thrusts and parries to either side of the shield. It can even deliver rising strikes from some angles.
The hand is held just above forehead level, with the pommel just within peripheral vision. The blade slopes 45 degrees upward and inward so there is no clue to which direction the attack will take.
The ochs (ox) position is similar to high guard but has the point directed forward. High guard is called high cocked guard in Attack, Avoid, Survive.

Middle position is well suited to thrusts and is less fatiguing if maintained. Cuts are best made by shifting to high or back position. The tip could be held lower than the hand and the blade advanced forward and across the shield, in a manner similar to hanging guard or high-seconde.
Back position is also known as “tail” or nebenhut. It allows cuts or thrusts to be made from a wide range of directions, and the weapon hand is hidden from the foe.
The tail position is, however, poorly suited to combat from close formations where comrades may be behind and beside a fighter.
A similar position to tail, with a club or mace held vertically, is shown in figures 35-37 of Hand and Wagner’s paper.

Typically, on television and in movies, we see shields used with the face towards the threat, and they are depicted as chiefly protecting the left side of a fighter.
The shield may even be moved to the left for an offensive move to be made!


Angling the Shield
The passage from Di Grassi got me thinking.
If you can defend your right side with the right side of the rim, why not position the shield so that it covers the entire torso and as much of the right arm as practical?
Hand and Wagner suggest an “open ward” with the shield sloped at an angle around thirty degrees.
Conceivably, a shield held at such an angle could cover most of the torso while presenting an angled face that is more likely to deflect attacks.
A turn of the waist would increase protection to the right side, or create the “inner ward” Hand and Wagner describe. A drop of the hand would deflect low strikes.

If we look at the illustrations that Di Grassi provides of round and square targets, it is plausible that what it is showing is the right edge of the target on a line close to the outside of the right shoulder.


Against missile fire, the shield was probably held perpendicular to the threat, for maximum cover.
The angled position would prove more useful for close combat. This is essentially the open ward that Hand and Wagner describe, with the variation that the right edge extends to the outside of the right arm.
The shield might even be angled in two planes at once, which might improve visibility.

This concept of angling the shield addresses several elements of the conventional (“forward”) depiction of shield use.
A human male is around 20 inches wide, so why are most shields 28-32 or more inches wide?
To the left side of a user, the shield used thus protects an area of empty air, meaning non-functional mass to carry.
If the shield is sloped vertically more of its width is used to defend more of its user.
I.33 and Medieval Sword and Shield illustrated how vulnerable a sword-hand was without a correctly used buckler.
Fighters using larger shields must have had some means to protect their weapon-hand.
With the shield angled, middle-level thrusts might have been made without the weapon-hand passing beyond the forward rim of the shield.
Similarly a sword-hand in high ward or tail ward would be some distance behind the protective zone created by the shield.
The forward rim of the angled shield can be used offensively, and has more impact than striking with the flat.
It is possible that both sword and shield were sometimes thrust forward at the same time, in a technique similar to “stab-knock”.
The forward edge of an angled shield may be used to hook the inner edge of the foe's shield. The fighter may then swing his sword across the face of his own shield to cut behind the enemy's shield.

There is no evidence shields were used this way, but neither is there any that proves they were not.
It is likely a variety of techniques were used, varying with the user’s skill, understanding and situation.
It would be interesting to conduct some experiments.
Shields and Vision
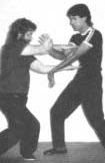
Many years ago I watched an interesting demonstration by a pair of Roman Legion reenactors.
“A” thrust at “B’s” eyes, so B raised his shield. In the moment that the shield blocked B’s vision, A stepped in and slammed his shield against B’s, knocking him off balance.
The attack to the eyes was then repeated. This time, B parried upwards and outwards with his sword. As the sword was swept to A’s left, his sword arm was extended so B struck it with his own shield.
A nice demonstration of the offensive applications of shields, but also of one of their liabilities.
The Scottish fencing master Donald McBane (1664-1732) notes:
“This Target is of great use to those who rightly understand it, but to unexperienced People is often very Fatal, by blinding themselves with it, for want of rightly understanding it.”
Certainly there are numerous period illustrations that appear to show a shield blocking a user’s vision, although lack of perspective makes any interpretation open to question.
Clements argues that it is inefficient to parry with a sword if one has a shield. The shield frees the other weapon to attack while a defence is conducted.
The Roman demonstration illustrates there are times when the parry with a sword or other weapon is preferable to movement of the shield.
Perhaps raising of the shield should be accompanied by an outward swatting movement to open a new line by which to keep the enemy in view? This might incorporate a simultaneous cut to the enemy’s attacking arm.