Categories
Phillosoph

A Different Angle on Accuracy and Precision

The other night, I had a dream that insisited that I should go back and re-read a webpage I had encountered about a week ago. This article was the key to a new way to look at accuracy, my dream told me. (Even my subconscious tries to sell me on clickbait, it seems!)

Firing from a squat position

I am not sure this article actually does that, but it makes for interesting reading, the little that I think I understand. Since I do not read Cyrillic and some of the translation choices are unusual, I am missing certain parts.
AKM Golden Ratio
One part that was very clear was:

…monograph of the Central Research Institute of Information “The effectiveness of automatic firing weapons”:“ 3.5. The degree of combining the midpoint of hits with the center of the target ..determines the accuracy of shooting”

This reminds me that the effective range of a weapon system is a product of target size and weapon system accuracy and precision.
Accuracy and Precision Explained

How Accurate Do You Need?

For an example, let us consider a system of a shooter, firearm and ammunition.
Firing semi-automatically, this system manages groups of about two and three-quarter minutes of angle/arc (MOA). This will not impress many of you, but we are considering this system shooting in combat conditions rather than on the target range.
2.75 MOA may be treated as three inches at 100 metres. (It is actually 2.858 inches at 100 yards/91 metres, but we will treat it as the former for purposes of illustration)
A human head is about six inches wide. Providing our shooter can aim and shoot competently, we can expect our shooter to make most head shots within 200 metres. Not too shabby!
Most decisive rifle combat takes place at under 200 metres. Most likely targets will not expose an area much larger than a head. Our three MOA shooter’s accuracy and precision is quite adequate.
As an aside, would it not be more realistic to make all combat targets head-sized? Since targets would only need to be A4-size, this would save paper and money!
The vital area of a deer is also around six inches or more. And most hunters try to take deer at well under 200 metres.
Make things even simpler for yourself by zeroing your rifle to 200 metres. 72% of rifle engagements occur at 200 metres or less.
Learn the correct holdover/aiming point for the rare times you will need a longer shot. There is unlikely to be time to fiddle with your sights and dial up the range.
What about torso shots? A human is about 18 inches across the shoulders, about three times the width of the head. Our shooter should be able to put bullets within a torso out to about 600 metres. 
It is worth remembering, however, that a bullet takes around a second to reach 600 metres. Even if you are a trained sniper, you will have to make a shot like this as a surprise attack.
If the enemy is aware of you and dodging, ducking and dashing, hits are going to be more a product of luck than skill. Might be better to save ammo until it may be used more effectively?
Shots against active, distant targets are best left to the machine guns, mortars and artillery. A machine gun that was firing at 2.75 MOA would probably be well regarded. At 600 metres it would put most of its burst into an area less than man-sized.
Full frontal torso shots may actually be rare under certain combat conditions. Many targets will be in cover and not exposing much more than their heads. What torso shots can be made, will be against targets crossing your line of sight or moving obliquely.
If we consider the apparent average torso width here as about twelve inches, we can expect our shooter to make hits out to 400 metres, should targets be actually visible at this distance. 97% of rifle engagements do not exceed 400 metres.
Our shooter should keep his rifle at a 200 metre zero and aim somewhere between armpit- and chin-height. This will produce a hit somewhere on the torso from 200 metres+. A higher aim point may be needed as range approaches 400 metres and beyond. The bullet will hit about 30 cm low of the aim point at 300 metres, three-quarters of a metre low at 400 metres.
Time of flight to 300 or 400 metres will be about a third of a second, so he should lead his target a little, but not too much.
So far we have only considered semi-automatic fire. If our shooter fires on fully automatic and measures the diameter of the group produced, effective range for automatic fire against head and torso targets may be calculated.

Conclusion

The Russian article makes the point that there is little point in adopting a more accurate/precise rifle if the sights are flawed.
The small group the AN-94’s hyperburst produces just makes it more probable for both rounds to miss the intended target if the aim point is wrong.
Generally, it is the shooter rather than the weapon or ammo that is the limiting factor.
Many of you reading this are capable of shooting a rifle better than 2.75 MOA.
If so, you are have adequate precision for realistic combat/defensive scenarios, which are most likely at less than 200 metres.
The ideal iron sight for combat would probably be an L-flip sight with a 5mm aperture zeroed to 200m and a 1.75mm aperture zeroed to 400m.
But, for such an application, does even higher precision actually contribute to a real increase in functionality?
As long as the group we shoot is smaller than the area of the likely target, at likely engagement ranges, is a smaller group actually a practical advantage?
Is it even possible that a tighter group may decrease our chances of hitting the intended target if our aim is slightly off?
Something to ponder before you hand over your hard-earned cash for the latest customization or accessory to give your defensive or deer rifle even greater sub-MOA performance?
Categories
Phillosoph

Crash Course in Rifle

A friend of mine was reading about the training of conscripts in Taiwan. He referenced some of the articles I have written about making training more relevant. These include my blog on the “Murray System” and the book that derived from it, my book “Crash Combat”.
Crash Combat is about unarmed and non-firearm combat. For a more generic training program, where would I start?
Probably, near the start, would be an introduction to practical use of the rifle, taught in several phases:

Introduction Phase

• Basic safety and orientation.
• Perceive, Recognize, Engage.
• Load, unload and clearing.
• Anatomy for shooters: The Lethal T, the belt-buckle aim and the armpit line.
No one goes past the introduction phase until the instructor is convinced all students are competent and mature in their handling of firearms and their behaviour on the range.

Phase One

This phase teaches shooting from behind cover, from various positions. It ingrains the habit of always using available cover, while teaching shooting posture fundamentals.
Firing from a squat position
Start with prone position and move on to other positions such as kneeling, sitting and squatting.
Key points:
• Fire around rather than over cover when possible.
• Keep low. Never be reluctant to get close to the dirt.
• Always use cover when possible.
• Use cover when reloading and clearing stoppages.
• What parts of a gun not to rest in contact with hard cover when firing.
• Includes section on correct techniques to use when firing from windows.
Phase one is conducted with half-silhouette targets of various sizes, engaged at relatively short ranges, such as 20 to 50 metres. Sights zeroed to 200 metres are used for all shooting.
Emphasis in this phase is on building the student’s confidence in their shooting while teaching good shooting postures and tactical positions.
There are no scores, shots being judged as either hits or misses. Reactive targets that make a noise, fall or flash a light when hit will prove useful.

Phase Two

Phases two is dry firing. It is effectively kata for guns, or tai chi with triggers.
As recommended by Elliot, students practice mounting their rifle to bring it smoothly up to firing position. This is practised in the various postures learnt in phase one.
Mounting is combined with tracking, breathing and trigger exercises:
• Tracking involves keeping a mounted weapon moving to pursue, swing through and lead a moving target.
• Breathing involves synchronizing the respiratory cycle with the moment of firing to minimize unintended movement of the weapon.
• Trigger exercise is developing a trigger “press” that causes minimum displacement of the barrel.

Phase Three

Phase three is Quick Kill training.
Airguns/airsoft guns with the sights removed are used to engage small thrown targets. This builds on the instinctive pointing and tracking skills developed in phase two. Phase three teaches effective engagement skills for situations when there is insufficient time to align sights or when sights are not visible.

Phase Four

Introduction to room-clearing techniques. The likelihood of operations in urban terrain means a familiarity with room clearing must become a fundamental skill-set of any firearm user.
• Shooting on the move and while sidestepping.
For safety, phase four may be practised with airsoft weapons.

Phase Five

Phase five is a repeat of phase one, but the engagement range is increased up to 250m.
Students may be required to crawl to a firing position, or use other appropriate modes of tactical movement.
Target shooting, long-range shooting, volley fire and other fields can be taught later. Soldiers with an aptitude for these disciplines can be encouraged accordingly.
The five phases are designed to quickly produce riflemen that can respond quickly and accurately against threats that occur within likely engagement ranges and terrain.
Categories
Phillosoph

Hip-Shooting a Rifle or Shotgun

Yesterday, I described a “sightless” shooting technique that can be combined with quick-draw.
Today I will briefly look at hip-shooting with a rifle or shotgun.
Truth told, I dislike both the terms “hip-shooting” and “snap-shooting”.
Many of the shooting techniques that do not require seeing the sights are not from hip-level, so I prefer to think of them as “sub-shoulder level shooting”.
The term “snap-shot” conjures images of a rapid shot from the shoulder.
Snap-shots, to me at least, seem more akin to the firing techniques of Quick-Kill or the shotgun-inspired methods in “Shooting to Kill”. Such techniques are described on other pages I have written, and are also described in “Survival Weapons”.
Also, I have become aware that in some previous eras the term “snap” was used for dry-firing a firearm.

Low-Ready

For the modern user of shotguns or rifles, the low-ready position is often used. It has a number of virtues:
• If you are going through a door, it does not leave a weapon sticking out that can be grabbed and pointed heavenward. If someone does grab you or your weapon, putting a round in his legs is still possible. Not something you can do from high-ready!
• The low-ready allows an firearm to be rapidly shouldered, allowing a fast sightless or sight-aimed shot, as appropriate.

Low-Port Carry

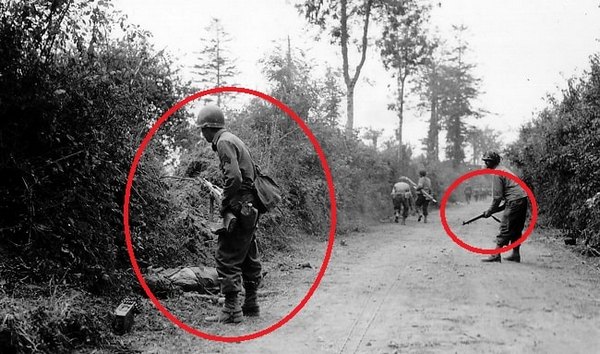
Low-port carry in WW2

The widespread use of the low-ready is apparently a relatively new innovation.
I came across this interesting article, discussing how soldiers in the Second World War actually carried their rifles.
If you have a Mauser, Arisaka, Mosin–Nagant, Garand or Lee Enfield, a low-ready carry will place the muzzle quite close to the ground. Add a 10 to 17 inch sword bayonet and you can see the low-ready is less useful than with a modern weapon.
The carrying methods most often seen in wartime photos are the high-port, trail-arms and a position modern reenactors call “low-port”.
Low-port had the rifle held approximately horizontal and often part of it was at hip-level.

Hip-Shooting from Low-Port

Snap-Shooting_Article-min

With this information in mind, it is clear that the “snap-shooting” method the marine advocates in the 1944 article above is literally hip-shooting with a rifle.
Categories
Phillosoph

"Shooting to Kill" for the Home Guard

There are a number of shooting systems that claim to utilize a shooter's “natural pointing ability”. While these systems seem to work, I will admit to having been a little skeptical as to just how inherent or accurate such pointing abilities really are.
Today I found an explanation that seems answer some of my doubts.
The writer explained that when you point at something the finger does not necessarily line up with the eye. Point at something and then move your head so you can look down your finger. You will find your pointing ability is much more accurate than you might have expected.
Learning this is rather timely, since this week I read “Shooting to Kill” by Andrew G. Elliot. Shooting to Kill is a manual written for soldiers and home guardsmen in the 1940s.
In my book “Survival Weapons: Optimizing Your Arsenal”, I describe a number of methods of using pistols or long-arms when there is not time to use the sights.
These include the “Quick Kill” methods based on the book “Shooting to Live” by Fairbairn and Sykes.
“Shooting to Kill” nicely complements the latter work, and not just in the symmetry of the titles!
The Quick Kill method can be described as locking your attention on your target and firing as your gun raises up into your field of vision. Shooting to Kill is written for riflemen but uses a method derived from the shotgun techniques developed by Robert Churchill.
Lock your attention on to the target, or more specifically the part of the target you intend to hit.
Raise your rifle to your shoulder and fire. This is done without trying to (consciously) acquire the sights.
Look, point and fire.
The body, support hand and eye are directed toward the target. The support hand fine tunes the muzzle's position.
The sights can be used if there is sufficient time, to “fine tune” the initial pointing.
If your shouldering action is sound, your eye should have naturally assumed a position where it was looking through the aperture rearsight at the foresight.
The brain automatically centres the foresight in the field of view.
If using a “U” rearsight, the eye should have assumed a position where it was looking across the rearsight at the frontblade, the top of the blade level with the top of the U.
Elliot notes that for most shots the sights are unnecessary if you have mastered this method.
Elliot notes that a rifleman is unlikely to engage targets beyond 300 yards so advocates that the battlesight be used exclusively in combat.
Like many of his contemporaries, he notes that a shooter has little need to concern themselves about the effect of wind, distance or rain at the combat ranges they will be shooting at.
Elliot on wind allowance: “The inexperienced will have heard much about allowance for wind, and the effect of rain on the bullet’s course. These factors can be ignored. In war, most shooting is at 300 yards or less, and at that range, wind or rain have no perceptible effect. In theory, with a strong wind, at a couple of thousand yards, aim should be taken a few feet to the windward, but in practice, except at very long ranges, it is better to ignore this academic principle.”
Traditional shooting ranges were only for zeroing and teaching the very rudiments. All other rifle practice should be combat orientated.
Elliot remarks that he gets respectable scores on the target range without using his rifle's sights.
The key to the technique that Elliot advocates is that the process of shouldering the rifle be sound and consistent.
The soldier or guardsman should often practise shouldering and pointing the rifle, for as much as an hour at a time. He notes this is also a very practical way to build up arm strength.
A firefight is no time to be guessing at target speeds and calculating leads.
Elliot suggests that moving targets be engaged with what would be called a “swing-through” of “smoketrail” method in more modern parlance.
Track the target and increase speed to swing past it and fire just ahead without halting your motion. Aiming point against moving targets was “the tunic buttons”. This automatically shortens the lead if the target is approaching at an angle.
Elsewhere he suggests the belt buckle as an aimpoint. Since soldiers often shoot high one can see the wisdom in this. A lower aim is also needed if a target is charging towards you or at a higher or lower elevation.
Some of the advice in this book needs to be taken in context.
Against an enemy firing over cover, an aimpoint several inches below the top of the cover is suggested.
The .303 rifles of this time had a battlesight zeroed to 300 yards, giving a maximal ordinate of seven to eight inches.
The .300 (.30-06) P17 used by the home guard had a battlesight set for 400 yards, giving a max ordinate of twelve to thirteen inches.
Thus a head shot at shorter ranges needed a significant hold under. More modern cartridges with a 200 metre zero will behave differently.
Against a prone target, Elliot suggests shooting low, which is reminiscent of Rhodesian combat techniques.
The book gives advice on a number of other matters.
When engaging low-flying aircraft, he suggests a lead equivalent to the distance between the forefinger and little finger tip of a spread hand held at arm's length. This is about ten to twelve degrees, which is about right for a target moving at around 200 mph.