Disclaimer: “As an Amazon Associate I may earn from qualifying purchases.” Adsense and Infolinks were no help at all.

If you have enjoyed this article or it has been helpful to you please feel free to show your appreciation. Thank you.

Read The Third Wave by Alvin Toffler!
Categories
Phillosoph

Survival Fishing: Part One

A friend of mine requested that the blog has something about survival fishing.
The section below is adapted from a book chapter by myself that was never published.
Many survival guides will explain how to catch fish in greater detail that I have room for in today’s blog.
They usually include ways of fishing without using a line such as trapping, lassoing, tickling, spearing etc.
Some of these techniques are described in my book on Survival Weapons.
Today’s blog will manly cover the selection of items for an emergency fishing kit, but we will include some information on their use, since many people find the depth of knowledge given in fishing books confusing. Also most such books are written from a sporting perspective: when the alternative is going hungry. your methods may not be so elegant.
This blog is about survival fishing for food. Using some of these techniques when your survival does not depend on them may result in prosecution.

Where to look for fish:

  • Weirs ( a good place all year round)
  • Edge of reed beds
  • Eddies in streams and rivers or known deep pools
  • Overhangs of trees (Watch your line!)
These are usually the places fish congregate most, but use your eyes and look for them.
Some cunning may be required and creeping up to the water's edge may be necessary to see and catch fish. Keep low so as not to skyline yourself.

The Minimal Fishing Kit

  • At least 10 m of line (10 to 15lbs), possibly wrapped around a half of matchstick or held in a coil by a rubber band or wire tie.
  • Pack of hook to nylon size 12. Depending on how these are carried, the points may need to be taped over.
  • Small assortment of split shot (BB are probably the most useful size).
This minimal kit will all pack into a 35 mm photographic container or similar and the outside of the tube can have a length of brightly coloured tape wrapped around it.
There will probably also be room for a spinner, wire leader, swivels and a small cork/piece of foam/old ear plug to act as a float (cork of about ½ x ¼ x ¼" drilled with a 2 mm hole).

The kit in my personal emergency kit also includes:

  • A coil of braided fishing line, turquoise in colour, carried in a loose coil. The rings of the swivels carried should be large enough for the braided line to pass through. Likewise the rings of the loose hooks and lures are of sufficient size they can be fitted onto the snap links.
  • A small tube filled with BB split shot.
  • About 10 metres of 6 lb test monofilament line, wrapped around the tube of shot and secured with a piece of tape. In retrospect I'd have the monofilament in a looser coil.
  • Five wire traces, about 18-24" with a swivel at one end and a snap swivel at the other. Wire traces can be brought though mine were made from brass picture hanging wire, unbraided into four or three strand pieces. These can be used as snares but do not look as suspicious as custom-made snares.
  • Various hooks, most of them small (size 12), attached to monofilament with a swivel at the other end
  • Loose hooks.

The hooks and hooks on nylon fit in the little plastic wallets the hooks came in, and these fit in a plastic bag with the wire traces as well.

The knots attaching the hooks and swivels to the line are varnished over for added security.

When you are cold, wet and hungry is no time to be trying to tie fishing knots.

I prefer to sit in the warm comfort of my home and attach as many hooks as possible to a short length of line, tying a loop in the other end that can easily be slipped through a loop tied at the end of a longer line.

For some useful fishing knots see my free on-line book on knots.

A Mepp-type lure (above) with a little silver spoon that spins around and attracts fish is also in the kit. It also has a piece of red rubber covering the shank (most fish and sea birds have their vision biased towards the red end of the spectrum).
White and/or red “mackerel feathers” would make good additional lures, as do hooks with sections of tin can or tin foil added. A piece of white plastic cup will also make a good lure.
See a later blog for more on fishing lures.

Fishing Methods

Passive fishing is to set up a rig and leave it unattended although there's no reason why you can't sit and watch it if you like.
The most common way to do this is to set up what is termed a “nightline”.
As the name suggests, this can be left overnight and any catch collected in the morning, which is useful if you spend the daylight travelling to safety.
There's no reason why you can't rig up a nightline during the day, of course.
It's a good idea to check the line several times during the night, since some beasts such as frogs and turtles can break free if left long enough.
Attach one end of the line to the bank and the other to a weight, and attach leaders with baited hooks at intervals along the line.
Throw the weighted end into the water. This is easier if you use a forked stick since it prevents getting caught by your own hooks.
Drive a stick with a notched top between the water and the anchor point on the bank and run the line over the top. Movement of this stick will show something is hooked. Placing a pebble or chunk of mud on top of the stick provides further visual clues: if it has dropped off, you've caught something!
Alternately, run the line over the water between two points, like a washing line with the baits suspended at different depths.
An improvised bell (empty tin can) can be used to signal a catch.
Vary the baits and take note of which ones seem to be taken most often.
You can also hang lines from branches overhanging the water.

Active Fishing

Active fishing involves you holding onto the line and sometimes actively moving the bait or lure.
Such fishing prevents you from doing anything else, so is best considered if you have to remain in the same location, such as near a crash or a broken down vehicle, or are with a companion who can't travel.
Active fishing and other methods will be described in following blogs.
******************************************************
I never did get around to posting the second part of this article!
Rather than have the two parts separated by hundreds of other posts, I have decided to add the rest of the chapter below.
Some of my ideas on the topic of survival fishing have evolved in the decades since I originally wrote this. I think many survival manuals and kits put too much of an emphasis on active fishing with a line.
See my post on trot lines (coming soon!).

Part Two

Active Fishing

Active fishing involves you holding onto the line and sometimes actively moving the bait or lure. Such fishing prevents you from doing anything else, so is best considered if you have to remain in the same location, such as near a crash or a broken down vehicle, or are with a companion who can't travel.
In the fishing kit detailed above, you use a hook to nylon attached by the swivel to the braided line, or a wire trace with a hook on the end attached to the braided line if you are after sharp toothed prey, such as pike or turtle.
A nice thing about braided line is it is a lot less fiddly to tie when you're cold and tired. You have several hooks, so there's nothing to stop you placing several traces on the handline, so you can vary the bait or depth you are fishing at.
The most basic method of angling is to put your bait on a hook and line and just dangle the bait in the water.
Some bait will float on the water, such as an artificial fly or lump of bread and will be taken by surface feeders. If the bait sinks, it will be taken by fish that feed at the level the bait stops at. You can control this by adding weights. That's it really.

Spinning

Spinning is done with lures or any bait that is highly visible.
What you're doing is pulling the lure through the water to make the fish think that the moving bait is a swimming fish. The line is lightly shotted, just enough to take it down to a depth predatory fish may be at.
Cast your line as far as you can, or beyond were you suspect fish, then reel it back in, passing any reeds where predators like to hide, and pausing occasionally: fish seem to like a jerking progress.
In fast moving water the lure may appear active enough without you reeling it in.
This method is a lot easier with an improvised reel: usually a stick or some other object you can wind the line around as you take it in.
A “classic” improvised reel is a tin can, a plastic bottle or similar on a stick. The line slips quite easily from its large diameter, so it can be used as a casting aid.
Attach the other end to the stick, or better still your belt in case your hand slips.
You can also throw out your line as one would a grappling hook, fire it by catapult etc.

Ledgering

Ledgering uses a weight at one end of the rig.
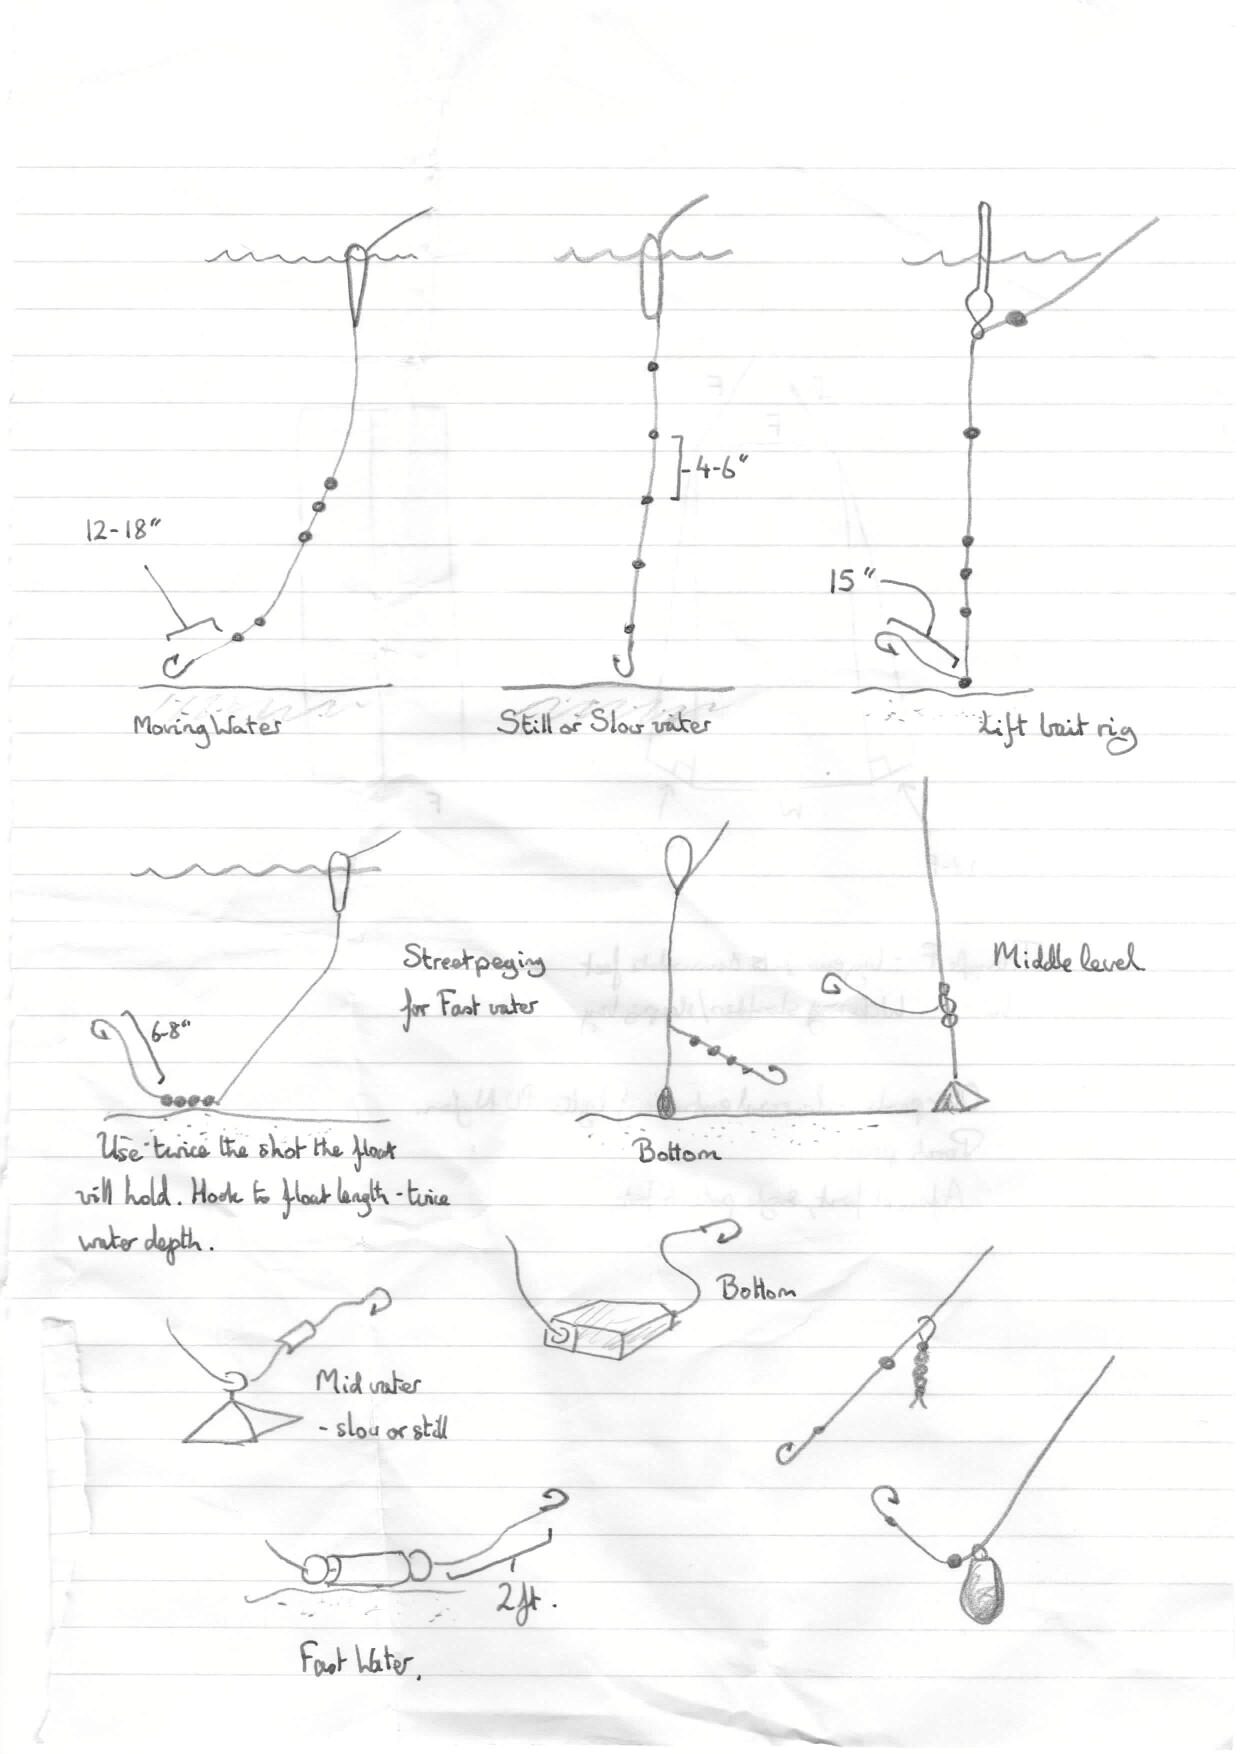
When using a rod, the weight may hang in free water but when using a handline it will usually rest on the bottom unless you are directly above where you are fishing. The diagrams illustrate several ledgering rigs for different waters.
When using survival fishing kits, it can be confusing as to where the large weight comes from.
One answer is the link ledger weight illustrated, which is a piece of line and several BB split shot.
Or you can use lead or stones in a piece of leaf, woven grass, hide or cloth. Some stones can be tied to the line directly with a Killick hitch.
The film canister used to carry the kit can be packed with earth or gravel and used as a weight.
Steel or brass washers have also been used as weights, and have the advantage they are relatively compact and will fit nicely into some fishing kit containers.

Float Fishing

A float is a buoy to suspend your rig from and also acts as a visual signal of a bite.
Just as anything that sinks and will remain attached to the line can be a weight, so anything that floats and stays attached can be used as a float.
The film canister can be taped or tied to the line. So can twigs, feather quills, porcupine spines, bits of polystyrene cups, inflated condoms etc.
A floating branch can support several lines.
Coloured tape can be added to floats so they are more visible.

Fly Fishing

You can do this with or without a rod.
Flies can be made from thread (frayed cloth from clothing), fur, feathers and hair, so can be field improvised.
You can use real insects too: anything that will sit on or float in the surface layer of water.
Think of when you used to play in the paddling pool on sunny days and insects would land in the water.
Remember the weird shadows they created on the pool bottom? Dark ovals outlined with silver?
This is because they deform the surface layer of the water, refocusing the light. This is really visible to fish under the water, who know this means something edible.
For fly fishing, don't shot the line and use a monofilament trace. The braided line will be too heavy.
Greasing the line so that it floats may be advisable since we won't be using special fly trace.
Best place to fly fish is where you can see real flies and fish disturbing the surface of the water to take them.
Try to imitate the flitting motions of the flies.

Bait

Fish will take artificial bait such as flies, lures, feathers and bits of wool or shiny metal.
Worms are not as common in some environments as you might expect, so often your best bet is to split open a rotting log and take your pick of the grubs and beetles you find.
Caterpillars are also easy to catch.
Bits of entrails from a previous catch or an animal you've trapped are good too.
In both cases you're turning something you probably don't want to eat into something you do.
Many fish are quite fond of berries, so when in season these should not be overlooked as bait.
[When I was originally writing this, there was a story in the press that fishermen were finding that female pubic hair was an excellent bait. This is supposedly something to do with the oestrogen so it needs to be fairly recently “collected” and isn't something you can keep in your kit till needed. Some of you reading will have a ready supply, so I'll pass the idea on though I can't testify to if this really works. If someone manages to get a meal out of this bait, maybe they'll let me know.]
The above all turned out to be bogus newspaper BS, but pubic hair (male, female or preferred identification) may be a useful material for making fishing flies.)

Rod Fishing

Dave (my intended co-author) is a far keener fisherman than I and uses the following rig for passive and active fishing.
In addition to hooks and spinners, this requires tape, a spool of line and a 4" piece of coat hanger wire or large paper clip.
Dave has used such a rig often, though being a Signalman his “rod” was often the antennae of a land rover.
If possible select and cut a length of sapling/wood for the use of a rod approx. 8 to 9 ft in length and inch to inch half in diameter.
With the wire, fashion a loop at the top end and secure this with your tape and short piece of line. Then attach the reel to the other end***(diagrams were to explain and show how)*** Now run the line through the loop and attach a hook to the end with a weight attached, Hey presto, you a ready for the off to go fishing!!
A rod needn't have eyelets and a reel.
The roach pole is a long pole used for float fishing with a fixed length of line attached to its tip, usually up to half the length of the pole.
This setup needs a little “give” to absorb the energy of a strike, and this is done either by the springiness of the rod or by including a section of rubber band in the trace. A couple of rubber bands can be used to hold together some of the items above. Or you can use knicker elastic.
The trick to using the roach pole is to always keep the tip over the float.
An improvised tenkara rod is another possibility. In Bushcraft 101 by Dave Canterbury, a “lillian braid” for a tenkara rod made from the mantle of some paracord is suggested. The “lillian braid” is how the rigging is attached to the rod.

Dave's Fishing Kit

Dave suggests the following as a kit suitable for carrying in a backpack, and suitable for both survival and recreation fishing.
1. 50 metres of line (10 to 15 lbs)
2. 3x Mepps (small spinners)
3. 1x container of split shot (assortment or BB)
4. 4 inch piece of coat hanger wire or large paperlips.
5. Packet of size 12 hook to nylon
6. 3 small traces
7. An assortment of other hooks large and small (loose)
8. 3 treble hooks about size 12: used for live bait.
This equipment to be packed into 35mm photographic containers and bound together with electrical tape (1 metre).
There are several options with this kit.
If you are going to carry 50 metres of monofilament line you might as well carry the spool you brought it on.
Loose hooks and maybe spinners can be taped to the side of the spool if desired.
Gluing a small length of dowel to the spool will help in using it as a reel.

Sea Fishing

For sea fishing, other elements come into play such as tides and conditions.
If one is going to be near the coast then you must be prepared for this eventuality.
By this, I mean carrying stronger lines up to 30 lbs test, larger hooks and swivels.
Weights pose their own problems but these can be substituted by stones from the beach.
Methods vary somewhat to those of freshwater fishing by using the tides.
Wait till low tide, wade out and lay a long line of baited hooks. Leave them secured to the bottom and return after the tide has come and gone and see what you have caught (Not very labour intensive!)

Fishing Kits for Life Rafts and Ditch Kits

Fishing is obviously one of the main ways to get food if in a life raft, but the kits often supplied are insufficient in both quality and quantity.
If you hook a big fish such as a shark, your safest option may be to cut line, rather than try to get it in the raft and kill it.
You may also have to rely on this kit for months, so plenty of spares make sense. So too does the extra expense of stainless steel hooks.
Another thing that is often lacking from kits but will prove useful is some form of winder, such as those used for kites.
Suggested fishing kit contents (courtesy Doug Ritter of Equipped to Survive):
400 ft. – Monofilament Fishing Line, 20 lb. test
36+ – Barbed Hooks, size 2/0
36+ – Barbed Hooks, size 2
24+ – Barbed Hooks, size 6
6 – Barbed Treble Hooks, size 1
6 – Barbed Treble Hooks, size 6
6 – Barbed Treble Hooks, size 8 or 10
24 – Nylon Leaders w/ Snap Swivels, 10-12 inch
12 – Wire Leaders w/ Snap Swivels, 8 inch
24 – Snap Swivels
24 – Assorted Sinkers
12 – Chrome Spoons and Lures
3 – Straight Shank Hook, size 9/0 (for gaffing)
2 – Winders
1 – Waterproof Fishing Instruction Booklet including illustrations of fishing knots

Fishing Nets

A net or fish trap is often better than a line if you can make one.
An “instant” net is a lady's stocking or tights. A fish becomes easily entangled and damaged in these, so this is a survival only technique.
When she was living in Brazil, my girlfriend regularly fed herself by fishing. Her father was a fisherman who had worked on the ocean-going boats. Her father would fish with a handline, but my lady preferred a net.
The net she used she calls a “pulsá”. It was round and had hooks for bait in the centre. It sounds like a lift-net in form, but she used it by throwing it into the sea and then hauling it in, which sounds like a type of trawling.
Categories
Phillosoph

Spetznaz String Vest

Today I’m going to post another exert from the book Aquarium, again detailing Spetsnaz apparel as described in the book.
“As for the rest of a Spetsnaz soldier's clothing, his underwear is made of thin linen. It should be new but already used a little and laundered at least once. Over the thin underwear he wears a vest made of a thick string, so that there is always a layer of air about a centimetre deep between the underwear and the outer garments. This was cleverly thought out. If it's very hot and you are running with sweat and your whole body is burning, the string vest is your salvation. Your clothes do not cling to your body and there is excellent ventilation. When it's cold the air pocket protects the body like a feather duvet, and moreover, weighs nothing. The string vest has yet another purpose. If a mosquito get its nose through your clothes it reaches empty space and not the body. Only in very difficult circumstances does a Spetsnaz soldier allow himself to be driven out into the open. He spends his time in forests and marshes. He may lie for hours in a burning hot marsh or in fierce stinging nettles with clouds of mosquitoes buzzing around him. Only the string vest can save him then. Over it he wears trousers and a tunic of green cotton material. All seams are treble-stitched. The tunic and trousers are soft but hard-wearing. At the elbows, knees and shoulders the material is trebled for greater strength”.
I have experimented with using a string vest as outdoor wear. The time that comes to mind is during a concert in a park on a very hot day. I wore the vest under a relatively heavyweight tee-shirt and had no problems with clothing sticking to my skin, despite the humidity. As the sun went down and the air got chilly I remained comfortable, so it is an idea worth trying out.
Contrary to the above, a common suggestion seems to be that string vests are best worn next to the bare skin, whether it is hot or cold.
Categories
Phillosoph

Greatcoat Tricks, Old and Spetsnaz

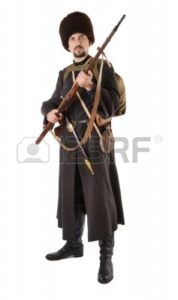
I’ve just come across an interesting comment about greatcoats being used by Russian soldiers in the 19th Century. The author notes that the coats were long enough to fall somewhere between the knee and the ankle in length and that the bottoms would often become heavy from getting caked with mud. He observes that many soldiers solved this by adding hooks and eyes to the coat so the skirts could be hitched up to make a shorter coat. Regular blog readers will recall that most WW2 Russian greatcoats used hooks and eyes instead of buttons, which were probably easier to use when wearing thick gloves or mittens. The idea of shortening the greatcoat, in turn, reminded me of this interesting passage in Viktor Suvorov’s book “Aquarium”.
“The saboteur also wears an outer garment like an anorak. It is thick, warm, light and waterproof. In it you can lie in a marsh without getting wet or sleep in the snow without freezing. It comes down to the middle of the thighs so as not to interfere with walking, and if need be you could sit for days on a patch of ice, as it provides something to sit on. It is very full at the bottom, which is important when running or walking fast. But if necessary the lower part can be pulled in tightly round the legs and so keep the warmth in. The Spetsnaz used to have similar trousers, padded and warm. But that was a mistake. When you have to walk for days on end without stopping such trousers are a nuisance. They upset the ventilation. Our wise ancestors never wore fur-lined trousers. Instead they had fur coats reaching down to their heels. And they were right, because fur trousers make you sweat but a long coat doesn't. We have now learnt this lesson, and a Spetsnaz soldier has not only a top coat, but a long skirt covering his body almost down to the heels which he can attach to it. In this way he can keep warm, but is never too hot. The skirt is easily unbuttoned and rolled up so that it does not take up much space in the man's kit. In the old days the top coat was reversible. One side was white and the other grey and green in patches. But that was also a mistake. The coat had to be soft inside, like a woman's skin, but on the outside it had to be as rough as rhinoceros hide. That is why the top coats are no longer reversible. They are soft inside and rough on the outside. And they are light grey in colour, like last year's grass or dirty snow. It's a very well-chosen colour. But in case of great need a white camouflage smock can be worn over the coat.”
Categories
Phillosoph

Six Items for Travelling

The publication of my book on Survival Weapons gives me the excuse to diversify a bit more on this blog, as some readers have requested.
Today's post nicely covers the aspects of both survival and marital arts and I hope will be of interest.
It seems odd these days, but once information about ninja was hard to come by. One of the best sources was (and still is) Donn F. Draeger's Comprehensive Asian Fighting Arts.
In the discussion of the ninja Draeger mentions the “Six tools of Travelling” or Shinobi-rokugu (p.127). Six items that a ninja would never leave on a mission without.

Draeger’s descriptions of the items were not as clear as one might wish, however. Last night, while researching a quite different topic I was able to clarify a few things. Items 4 to 9 in the illustration below represent Shinobi-rokugu.

Amigasa. Amigash was a broad brimmed straw hat, the Japanese version of what is commonly called a coolie hat.
A hat is obviously good protection from the sun and the rain but for the ninja has the useful property that it can also conceal the face without the attempt being obvious.
A hat such as this can also be used as an improvised buckler to fend off an attack with a knife.
In the movies, such hats are sometimes thrown like frisbees. While this would not do the damage shown in such movies, it would be a useful distraction.
Below is a photo that is reproduced in a couple of my Japanese language books. I originally thought that the arrows shown here were either hand-thrown weapons or darts for a blowgun.
Hand missiles this size made predominately from wood and feather would be rather light, while such large fletchings on a blowpipe dart would be unnecessary and less than efficient. Possibly these arrows were a hybrid for both than throwing and blowgun.
I now see these are actually arrows intended for a bow and what was visible in my books was just the tail section of the arrow. Each extends across the width of the hat, the rest of the shaft in a pocket of some kind so it resembles a supporting rib.
Doubtless other weapons were concealed in the hats. Bo-shuriken could be placed radially like the arrows and this would be a good hiding place of a garrotte/spare bowstring.
The floppy hats favoured by 17th century cavalry such as the English Cavaliers often concealed a metal structure called a “Secret” to protect from blows and it is possible that some amigasa also had a metal cap or framework within.

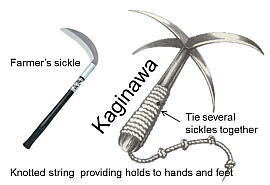
Kaginawa. A rope with a hook. ninja were known for climbing so it is hardly surprising that this would be an essential item. A length of cordage is always useful anyway.

Tenugui. Draeger calls this a towel, which conjures the “Hitchhiker’s Guide to the Galaxy” to mind.
The tenugui is actually made from thin cloth and is better understood as resembling a bandanna of about three foot by one foot size.
Kendo fighters will know the tenugui as a headscarf to be worn under the helmet, but it was originally a multi-purpose item, used as a bandanna in the fields and a handcloth in the home.
It could also be used as a bandage or sling, or as a mask to protect from smoke or conceal the identity. 
Sekihitsu. Draeger just calls this a “stone pencil”, which does not tell us much. In fact this was a portable writing kit ("Yatate"), which was not an uncommon item for feudal Japanese to carry on their person.
Ninja were spies as well as assassins and some means to record information and leave messages was essential to their task.
One of my Japanese language books shows this as something resembling Popeye’s pipe. The “bowl” is in fact an inkwell and the stem contains a brush. There is even a vent cut in the stem to allow the bristles to dry and air. Such kits could be used to conceal various weapons, and even the ink might be poisoned
Even standard yatate were sturdy enough to be passable clubbing weapons. Underneath this item in the photo is what looks like pieces of pointed chalk. This may be either chalk or a slate pencil. Both would be useful and this may explain Draeger’s use of the term “stone pencil”.
Kusuri. Medicines. Ninja are known to have produced special pills intended to staving off the effects of thirst or hunger. Various salves, ointments and insect repellents might also have been carried.
Doubtless the ninja also carried a few poisons and hid them in plain sight within their medicine kit.
Carrying a few medicines on your person was by no means unusual in feudal Japan.
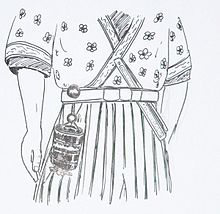
Shown in the photo is a typical Japanese medical kit (“inro”) which is rather neat. It has a number of small trays which act as compartments moving up and down the cords. The whole thing can be pulled together and hung from a belt. Quite practical and worth copying.

Uchitake. Draeger describes this as a short bamboo pole.
In Eric Van Lustbader’s novel “The Miko”, the uchitake isdescribed as a long bamboo pole that can be used as a walking staff. The other five Shinobi-rokugu items are packed into the pole, which can doubtless also be used as a fighting staff.
The sixth item of the rokugu is in fact a short tube of bamboo filled with gunpowder and is mainly intended for firelighting. Since the Shinobi-rokugu is intended as a basic survival kit some means of making fire would be needed and this makes much more sense.
Below is an illustration found in several of my books, but since I do not read Japanese I am little the wiser. The C-shaped item is obviously a striking steel but how the other items are used exactly I am unsure. The tube it is attached to resembles a flute, but has holes evenly spaced around it. Obviously this cannot be a container for gunpowder.
The lower item is apparently a charcoal/ char-cloth body warmer or donohi which could provide a ready source of ignition for lighting fuses, arson etc. Possibly the flute-like tube is the central part of the donohi around which the char-cloth is wrapped. This could be blown down to produce more heat when needed. A perforated tube could alternately be used to transport a lit slow-match.
How to make a Donohi

Some of you may note something is conspicuous by its absence. There is no mention of a knife. It may have been considered redundant to tell a ninja to bring a knife. In feudal societies, most people carried a knife as a matter of routine, using it for all manner of everyday tasks.

Shinobi-rokugu in the Modern Day

A few months back I brought a new daysac. Once I had it I began to add a few useful things to it, and now that I think about it my choices did parallel the Shinobi-rokugu.

  • One of the first things I added was a hat. In fact I added two. One is my much traveled broad-brimmed boonie hat. The second is a lightweight synthetic headover that can serve as a cold weather hat, neck warmer and so forth.
  • I’ve not added a rope and grappling hook, but I did add a ball of string to provide useful cordage. Perhaps I should add a hank of paracord too.
  • I put a bandanna in the bag too, and usually carry one in my pocket, so that is my Tenugui equivalent.
  • Not yet added, but when travelling my daysac usually carries a notepad and spare pen in a plastic bag. Perhaps I should consider some chalk.
  • Medicines. I will be adding a few aspirin, plasters and dicholorfenic. When I travel with this bag a bottle of insect repellent and sunscreen will doubtless be added.
  • My fire kit is a spare disposable lighter and a couple of nightlight candles. The latter can be used to get a fire going and can also be used for illumination.
For completeness, other items added to the daysac included an All-Weather Blanket, “pak-a-mac”, lever-powered torch, pair of woollen gloves and my Platypus Water Bottle.