Categories
Phillosoph

Gundata Bug Out Bag

A friend directed me to the following article on the contents of a Bug-Out Bag. I though it might be useful to examine it with “Uncle Phil’s List”. Below are the items arranged in the categories and some suggestions and observations of my own.
Shelter (Sleeping, Clothing).
The only real shelter item on the list was a small waterproof tarp. It may be prudent to include some spare clothing since theoretically you may have to grab your Bug-Out Bag while wearing only what you are standing up in, be it day or night. Perhaps a spare bag with boots and travelling clothes can be placed nearby to by grabbed if needed. In the Bug-Out Bag itself a blanket is able to serve both as clothing and bedding. Items such as gloves and hats are useful to protect the extremities from the extremes. A large bandanna or shemagh can serve a number of useful functions. A natural disaster often means bad weather so waterproof clothing is useful too.
Fire.
Waterproof matches and butane lighter(s). You might as well throw in a candle or two. They are good for getting fires going as well as illumination.
Water.
A means to purify water but also ways to carry water. A bottle or so of preboiled water should be in the bag to keep you going until you find a new water source.
Food Supplies, Hunting/ Fishing, Cooking.
Food suggested was peanut butter or Power Bars. Either are high calorie, can be stored for extended periods and can be consumed without cooking or heating. A number of alternatives may be chosen instead. Regular readers of the blog will know that I have experimented with pinole. A basic means of cooking such as a metal canteen cup would also be prudent. This item can also be used to pasteurize suspect sources of drinking water. A basic fishing kit is worth including since it takes up very little room and the items can be useful for other purposes.
First Aid (Medication, Wash kit, Hygiene).
The article suggests the bag carry a small First Aid Kit and some personal hygiene items too. Personal medication might come under “last minute items” that are added to the bag just before use. Hygiene items would be at the very minimum a spare toothbrush and a bar of soap. A supply of feminine hygiene items should also be included if there are female members of your party. Such items can also be used as field dressings and tinder. Toilet paper can prove useful too.
Tools (rope, repairs, money)
The author of the article suggests carrying some paracord, which is good advice. My kit contains a long hank of it tied Hojo-jitsu style. He also repeats the often seen advice of replacing your bootlaces with paracord. This isn’t going to give you a lot of paracord and it is unclear how you keep your boots on if you need paracord! I’d also include a bundle of more basic string in the bag too to conserve the paracord for jobs than need its abilities. Duct tape is also suggested and have numerous uses. (perhaps you can tape yourself into your boots when you need some paracord!). Some needles and synthetic thread take up little room and cost little so are worth adding.
An interesting suggestion is to include a small roll-up tool kit in the bag, about the size of a toilet roll. This can be used for repairing vehicles or liberating needed supplies. A small crowbar would be a useful addition to this kit. The author of the article suggests the bag contain a Swiss Army Knife or “good quality” multi-tool. My personal inclination is towards the former (I actually carry one on my person all the time but this list is on what to put in the Bug-Out Bag). Multi-tools tend to be expensive and often heavy. In reality a good pair of insulated pliers included in the tool kit is cheaper and more capable.
Personally I would make sure a bug-out bag also includes a larger blade such as a kukri short machete, tomahawk or golok. When you need shelter or fire you often need them in a hurry and a good cutting tool can make a lot of difference.
Disasters often bring out the best in people and encourage them to help their neighbours. Or sometimes it doesn’t! Thus the Bug Out Bag includes a defensive pistol in locations where such things are legal and the owner is properly training in their use. The final “tool” is a supply of money.
Navigation.
Maps and Compass. GPS is nice, but you need a map and compass too, and the knowledge of how to use them for when it decides not to work.
Signalling equipment includes at least one flashlight. Bombproof, waterproof “tactical” survival torches are very nice. A flashlight should not be too heavy or bulky and ideally should be an item that works without batteries. Hand-cranked LED lights can be found for just a few dollars and are fine for an emergency kit. Some have capacitors in them so you do not have to crank them continuously.
An AM-FM portable radio or scanner can provide useful information in times of trouble. Like the flashlight this is ideally hand-crank powered and not too large or bulky.
Categories
Phillosoph

Working Harder to be Lazy!

Since my last blog post was rather poignant today’s will be in a much lighter vein. This made a friend of mine laugh a lot so I might as well pass it on.
The other day I was entering an Underground Station. There is a large staircase going down one level and beside it there is a lift. Ahead of me is a man already about a quarter to a third of the way down the stairs. He suddenly realizes that someone has called the lift and the door has opened. He reverses direction and rushes back up the stairs to try and get in the lift!
I continued my leisurely descent down the stairs and noted at the bottom the individual had yet to emerge for the lift. He had actually used more energy trying to get in the lift than it would have taken him to continue down the stairs, only to travel down even slower.
One of the dumbest things I have seen in some time, which is saying something!
Categories
Phillosoph

Great Ultimate Erle Montaigue

Decades ago I became interested in Tai Chi. The World Wide Web and Google was still in the future so a friend and myself headed into Chinatown to see if I could find any books on the combat uses of Tai Chi. In one store I came across a small book called “How to Use Tai Chi as a Fighting Art” by Erle Montaigue. Pretty much what I was looking for and "did what it said on the label", as they say. Some parts of that book at the time I did not understand, while others had a far greater impression on me that I then realised.
A decade or so passes and I am inspired to write a book about self-defence and common principles found in various martial arts. While I am researching various aspects of this I discover Erle Montaigue’s website. I suddenly realize that a lot of what I have written about principles behind self defence have come from Erle’s book. Rereading the book again I see that many of the passages that previously I did not understand are describing concepts and conclusions that I had arrived at by other routes. Also on Erle’s website was the text of several other of his early books. As I read through these I realise that they could be combined to form a more comprehensive book on Tai Chi and Pa Kua.
I emailed Erle and explained that inadvertently my book had a lot more of his ideas in it than I had realised. Erle had nothing but encouragement for me and I ended up adding a very useful section on Long Har Chuan to the book. An occasional correspondence ensued, with Erle always willing to answer questions and offer encouragement. During this time I took the text of the books that I had found on his website, combined them and wrote some text to bring the various parts together. Erle took this rough work, turned it into a PDF and placed it on the website as a free “Tai Chi Compilation” book. At the time this was a side project for both of us so he never got around to adding the photos referred to in the text. Things got a bit garbled too. Erle labelled some of the text that I had written as his own and some of his comments as made by me. I consider this something of a compliment and an indication that some of my interpretation was on the right track.
Erle continued to provide encouragement with my own book, suggesting several publishers that might be interested. The book acquired some useful passages on Tai Chi-based combat and a sizeable and detailed section on Dim-Mak using my own system for locating points. A pleasant surprise was when Erle volunteered to write a foreword for my book. Erle was also an ex-wrestler so I was pleased he considered my section on Ju-jitsu worthy of special mention.
For a number of reasons it was some time before my book was finally published in mid-2011. I emailed Erle to tell him the good news only to receive a reply from his son, informing me Erle had been suddenly taken from his family that January. Today is Australia day, the anniversary of Erle’s death.
I have heard that some elements of the Tai Chi community took exception to Erle. Erle was a plain-speaking Aussie who had some strong opinions about some of the courses modern Tai Chi had taken. Many people are not even aware that Tai Chi is a martial art. It is largely thanks to Erle that many people now know better and know that Tai Chi is a potent fighting art. My own experience was of a man who was both generous and encouraging. He made a big impression on the world while he was in it and I believe the effect he had was beneficial.
Thank you Erle.
Categories
Phillosoph

Spears: One Handed

The other week I saw a photo of a model of an ancient warrior holding a spear.
A familiar image but this time something about it got me thinking. I don’t have the particular picture but the drawing below shows the same pose in the left figure.
What occurred to me was this.
Why is the warrior holding the spear in the middle?
Why carry a spear eight or nine feet long and only use four foot of its reach?
Some of you will have said “for balance” and I will deal with that in a moment.
Note that when the fighter holds his spear single handed in this way about a metre projects behind him.
Ancient warriors often fought in close formations so the length of spear behind a warrior is going to be a hindrance to the rank behind.
Often the butt of a spear was fitted with a spike such as the “sauroter” (lizard killer) used on some Greek spears and this would prove a real hazard to the ranks behind.
My favourite way to use a fighting staff is for my rear hand to grip it about a foot from the butt.
This gives me a length of material below my hand to defend or attack with which is not so long that it cannot be moved past my torso in certain movements.
Since the staff is a long homogenous cylinder this grip point is nowhere near the balance point.
The staff is mainly used two-handed but some moves just use the rear hand.
This is practical because when I make such moves the bottom part of the staff presses up against my forearm above, counterbalancing the greater length of the forward part.
I don’t know any ancient spearman, but I do have a friend who was a pikeman in English Civil War re-enactments.
I ran some ideas past him.
One thing I learnt was the balance point of a Civil War era 16 foot pike was a third of the way up from the butt. Grasping at this point it should be possible to hold the pike single-handed at chin level.
Given how pikes were used, it is logical their balance point should be more towards the user.
My friend also observed that my five foot fighting staff was actually heavier than many longer spears. He also observed that pikes and indeed many spears had their shafts tapered towards the head.
Unless the head fitted was very heavy, tapering a spear shaft would shift its balance point rearward.
We know that some spears such as those of the Persians were fitted with counterweights at the butt. Fittings such as the sauroter may have had an additional role in adjusting the spear’s balance.
There are therefore a number of techniques a spear maker could use to construct a spear that could be wielded while gripped closer to the butt end.
In Cowper’s book “The Art of Attack” he mentions spears with a swelling or other arrest near their butt and describes that these were so the spear was not lost when darted through the hand to provide more reach.
It is obvious from this statement that spears were sometimes gripped below their middle.
Gripping a spear about a cubit from its butt would give more reach and allow comrades behind to fight with less hindrance and hazard.
Rearward ranks could also move closer to the forward ranks so be able to offer more support to the forward warriors.
This source, and “Hunting Weapons” p.97 by Howard Blackmore confirms that lances and spears for “pig-sticking” were held either at the end, or two-thirds down from the point.
“The Oriental form of lance, used for sport or war, varied in length from 6-10 ft. The shaft of male bamboo was often decorated with lacquer, brocade, or silver and gilt, and was noticeable for its heavy metal butt which had a ball pommel ending in a spike. This acted as a counterweight when the lance was held well back towards the butt to give the maximum reach. The point was usually a small triangular or leaf-shaped blade…
European pig spears were rarely decorated and were fitted with much simpler types of blades and butts. There were, in the main, two sizes or types of spears.
The long spear was from 7-8 feet long and weighed about 2-3 lb. It was used ‘underhand’, grasped about two-thirds of the way back from the point, with the knuckles turned downwards and the thumb pointing along the shaft. In this fashion, with the arm hanging loosely at full stretch there was free play for the wrist, elbow, and shoulder. The boar was also kept at a safe distance and the whole impetus of man and horse came behind the thrust. The disadvantage of the long spear, like that of the lance, was its unwieldiness amongst bushes, trees, and long grass.
These snags were avoided by the short spear, which had a stouter shaft, 6½ ft. long, with a lead weight on the butt. This was used ‘overhand’. Grasped near the butt end, with the knuckles to the front and the thumb upwards, it was wielded from the elbow and plunged downwards through the back of the boar in a deadly, perpendicular stroke.”
“p.100: Roman mosaics in the British Museum show horsemen with short spears with leaf-like or arrow-shaped blades, either using them as a stabbing weapon held 'overhand' near the butt, or throwing them like darts.”
Here is a video on the single handed use of spears.
Categories
Phillosoph

More Applications of Single Whip

Today's blog continues on the topic of applications of tai chi's single whip movement. Be sure to read the previous blog on this subject.
As the left foot steps forward and out, there is a moment when there is no weight placed on it.
Anytime that your foot is in this state it may be used to kick.
Kicks from the single whip movement will often be forward or horizontal snap kicks.
Since tai chi fighting tends to be at relatively short ranges, it is prudent to use your opponent for additional support.
For example, an opponent swings a club at you with his right hand. You use your left palm to parry his forearm and momentarily take hold.
Your left leg springs upward and throws a roundhouse kick, contacting with the shin, instep or toe as appropriate for the range.
A likely target is the Liv 13 point on the side of the body where the torso is narrowest. This point allows you to attack the kidneys with a strike to the side of the body.
The hold on the opponent’s arm gives you support but also allows you to sense any following movement he makes.
If you have the window of opportunity a snap kick to the groin may be possible instead. You can follow this with the hooked palm making a strike to the Liv 14 area as described in the previous blog.
The next technique is an extension of something I described in my book in the section on the outward karate parry.
In that technique, you parried across the foe’s chest and a slight turn outward and body movement forward unbalanced them.
In our single whip example, the foe’s right hand is first parried by our right, so we are on their outside gate.
You step towards your foe, your left foot advancing behind them.
This movement may allow you to make a strike under their arm with your left shoulder.
Your left arm swings up under their right arm and extends forwards across their chest. Done correctly, this will nudge the opponent off-balance and the placement of your left leg will prevent him stepping back to regain it.
The next example uses an earlier part of the single whip movement.
As an enemy punches at you with their right, you use your right arm and the hooked palm to parry it outward to your right.
The fingers of your left hand point towards your right elbow so your left arm forms a shield across your body.
Keeping your arms in the same relative positions, you step forward and use your hooked right palm to strike forward and down at the area beneath the foe’s right armpit.
This punch with the hooked palm and some of its targets were described in the previous blog on single whip.
In a variation of the above, you again parry with your hooked palm but your right hand finishes in a position where it is not on a direct line to the armpit. In this case you step forward and use your left to palm strike the foe’s body.
I mentioned single whip being used to initiate locks in the previous blog. Today I will describe some of the possible techniques in a little more detail.
Suppose we are on the outside gate and acting on the foe’s right arm. Your right arm has either hooked over or grabbed his wrist area.
One of the simplest moves from here is for the left palm to come up and strike the elbow. Since the other hand is pulling the arm in the opposite direction such an attack to the joint can be very damaging.
If the application of force is less acute, then a straight arm lock can be applied. Pull his hand back and to your right and apply your weight to his elbow.
If your left palm is applied to the lower side of his elbow, you can move the elbow up and pull his hand down to set up a bent arm lock such as a hammerlock. This can be used in various ways, including to pull him off balance.
For our third variation of lock, the left hand goes under the elbow and makes contact with the inner side of the elbow.
Readers of my book will know there are some strike points on the inside of the elbow and that the edge of the hand can be applied to these as this lock is made.
The intention here is to fold the elbow joint, raising the hand up.
You can then use the forearm as a lever to twist the upper arm and shoulder joint. Force the hand up and back and also push the upper arm backwards to unbalance the foe.
Sometimes the foe will not unbalance, orat least not enough to fall.
If this happens, release the hand and use your right to move in a fast semi-circle to hammer-fist him below the pectoral in the area detailed in the previous blog.
Bounce you right hand up again and use it to palm strike on the chest or face. Then try something else.
You can also apply locks from the inside gate, although this is a bit more dicey since you can be hit by his other hand.
In these examples the hooked palm right hand engages his left wrist area. As you step forward your left hand makes an edge-of-the-hand-strike on the crease of his elbow.
This is the same sort of lock as described in the previous section.
You fold his elbow joint and take his hand up and back, moving to his outside gate. As you stepped in, you probably placed your feet between his so this move can be turned into a thigh or knee strike to the groin.
Another technique for the inside gate is the variant of the karate outside parry. Engage the left wrist with your right hand and then step in, passing your left arm under his and extending it across his back. Turn your hips to the left to unbalance him.
In the previous blog on single whip I mentioned breaking wrist grabs.
My book contains a variety of methods for doing this, my favourite being the “underneath and outside” movement.
The video below shows a number of applications of single whip, including a method for breaking wrist grabs.
Note that as the hooked palm turns over it effectively passes underneath and to the outside of the grabbing arm.
The left hand coming over has a number of applications, one of which is to shield the body should the grab be turned into a strike or should the other hand or head be used to strike.
I hope this brief look at the applications of single whip have been of some interest.
For much more information on self-defence and the principles upon which some of these applications are based please buy a copy of my book.
 
Categories
Phillosoph

Bag Thief Tricks to Watch Out For.

I got reminded of the following incident in the past the other day when a friend of mine described how a friend of his had recently got a phone call claiming to be from the police. She phoned the police station that had been named and established that the call was fraudulent.
Many years ago I was enjoying a quiet respite at work when there was a knock at the door. A young girl wanted to know where the security desk in the building was. While this building had security guards, there was nothing that could really be described as a security desk.
The young lady explains she had just got a call from her father. Her father had been phoned by her bank to tell her that the bank card she had lost that day had been found and that she could pick it up from the security desk the following morning. I thought about this for a couple of seconds and said: “You need to cancel that card now! Use my phone!”
What was happening was that the person who had stolen her purse had looked through her address book and then phoned her father pretending to be the bank. Being without your bank card for a couple of days while a new one is sent to you can be an inconvenience. Many people, if told that their card was in fact safe and could be picked up the next morning, will not bother to cancel the card. This buys the thief an entire night to use your card. You can spend a lot of money in a single night in a big city!
I think I have mentioned before that I regularly come across bags and other valuables just sitting in the corridors or placed on top of lockers. Yesterday as I went for lunch I came across a bag just placed on a chair at the top of the stairs, no one else within sight. I handed it into security. Sometimes I hear the excuse “There isn’t much worth anything in it”. That is not going to prevent a thief from stealing it. You will probably find that many things you had in the bag were much harder to replace than you thought. Modern thieves have many new ways to milk a victim of money. Long term readers of the blog will know my girlfriend had a bag stolen a couple of years back. Using the information on her phone he got into her email account and stole the video game credits she was sending to her son for Christmas, credits that she had worked long and hard to earn the money for.
Message for today is to be aware of tricks such as the one described above and not to give thieving scum easy scores.
Categories
Phillosoph

Single Whip and Horse Foot Palm

One of the advantages of writing this blog is that I can often cover topics that there was not room for in either of my books.
Today I am going to write a little about the “hooked fist”, which in turn leads to some discussion of tai chi’s single whip movement.
Single whip has a number of variations, and this is worth bearing in mind when you view videos of the movement.
Some are variations between different styles of tai chi, while others are different interpretations.
While tai chi is a potent martial art, many of its practitioners only study it for health or meditative purposes and this should be kept in mind when viewing movements.
For purposes of today’s discussion, the “whip” part of the movement will be considered to be with the right hand and the movement has three components I will discuss.

The first “component” is the right hand which comes up to chest level and moves outward, the wrist bending so that the closed hand hangs down. The arm looks a little like you are whipping the rump of a donkey with a riding crop or switch, hence the name of the position.
The shape the hand makes has a number of names. It is sometimes called “Hooked Palm” while the name “Turtle Head” is probably the most descriptive. Some instructors liken it to the “Crane Beak” hand form.
Given the equestrian aspect of the single whip position, the “Horse Foot Palm” name is perhaps most apt.
After the right hand has assumed position, the body turns to the left and the left hand comes up in an open palm. On some variants this is a simple semi-circular movement, while other variants cause the hand to roll over or spiral.
At the same time that the left hand moves the left foot steps forward and outward slightly. I used to find the turn and step unusually difficult until Erle Montaigue told me that you should keep your left elbow above your left knee when making that part.
In English, we tend to call single whip a posture or position, but it is actually a sequence of movements.
When movements from a kata or form are used in combat it is unlikely the whole thing would be used, and used exactly as you would perform it during a kata.
Elements of a kata or form are rather like clay from which you build the thing you need at the moment that you need it. They are not rigid geometric or mathematical constructions, or at least, they are not once your use of them matures.
Most tai chi moves are multifunctional. One instructor may tell you the combat application is one thing, another that it is something else. In reality there may be many more applications.
With that in mind, let us investigate some of the combat applications of the components of single whip.
Single whip is very much the signature move of tai chi.
In movies such as The Matrix you will see single whip used as an opening posture. In reality, it is better reserved until range has been closed with an opponent.
The left palm’s most obvious application is that it is a palm-strike. It is in a good position to hit the chest region or the chin, and the accompanying step forward adds power.
The open palm can also be used to parry, either with the palm or either edge of the hand. The spiralling motions used for the left hand in some varieties of single whip can be used to neutralize a wrist grab.
The horse foot palm is probably most widely understood as a parrying hand form.
It can hook over an enemy’s arm and pull it out or down.
It can parry to either side or upwards.
In his book “Knives, Knife Fighting and Related Hassles: How to Survive a Real Knife Fight” Marc MacYoung describes a tai chi-inspired “Whip Parry” as a defence against knife attack. Since the arm is semi-relaxed, the parry has a very short response time. Marc recommends that you move the wrist and let the hand go along.

Horse foot palm can also be used offensively in a number of ways.

The most obvious is to use it as a hammer-fist strike against targets such as under the arm or the temple.
The hand can also be used as a reverse hammer-fist: swing inward to hit targets such as the back of the head or the shoulder blade.
The hand can also be used to execute a downward glancing punch against certain bony areas of the body.
The hand posture is such that the force of hitting a bony area is dissipated along the arm.
Targets often used for such attacks include the GB 22 point about 3" under the armpit and the area just below the pectoral muscle.
The latter are Liv 14 and GB 24, on the mammary/mid-clavicle line, a couple of ribs down from the muscle in the sixth and seventh intercostal spaces.
These are all potent and potentially very harmful targets which can also be attacked by a hammer-fist from a horse foot palm. Horse foot palm can also suddenly be flipped over to make a back-fist strike to the enemy’s nose!

Both hands can of course be used together. Either hand can parry while the other counter-attacks.
If one hand grabs the wrist, the other can contact the elbow in various ways and apply various varieties of lock. This is another possible application for the spiralling movement of the left hand. Armlocks can be used to unbalance a foe.
The step forward with the left foot also has martial applications. In high level tai chi it is supposed to strike the KD 5 point on the enemy’s foot and drain their qi.
For the less advanced of us, the foot can be positioned to stop an enemy stepping back to regain their balance when the balance is disrupted by hand techniques.
Categories
Phillosoph

Survival Fishing: Part One

A friend of mine requested that the blog has something about survival fishing.
The section below is adapted from a book chapter by myself that was never published.
Many survival guides will explain how to catch fish in greater detail that I have room for in today’s blog.
They usually include ways of fishing without using a line such as trapping, lassoing, tickling, spearing etc.
Some of these techniques are described in my book on Survival Weapons.
Today’s blog will manly cover the selection of items for an emergency fishing kit, but we will include some information on their use, since many people find the depth of knowledge given in fishing books confusing. Also most such books are written from a sporting perspective: when the alternative is going hungry. your methods may not be so elegant.
This blog is about survival fishing for food. Using some of these techniques when your survival does not depend on them may result in prosecution.

Where to look for fish:

  • Weirs ( a good place all year round)
  • Edge of reed beds
  • Eddies in streams and rivers or known deep pools
  • Overhangs of trees (Watch your line!)
These are usually the places fish congregate most, but use your eyes and look for them.
Some cunning may be required and creeping up to the water's edge may be necessary to see and catch fish. Keep low so as not to skyline yourself.

The Minimal Fishing Kit

  • At least 10 m of line (10 to 15lbs), possibly wrapped around a half of matchstick or held in a coil by a rubber band or wire tie.
  • Pack of hook to nylon size 12. Depending on how these are carried, the points may need to be taped over.
  • Small assortment of split shot (BB are probably the most useful size).
This minimal kit will all pack into a 35 mm photographic container or similar and the outside of the tube can have a length of brightly coloured tape wrapped around it.
There will probably also be room for a spinner, wire leader, swivels and a small cork/piece of foam/old ear plug to act as a float (cork of about ½ x ¼ x ¼" drilled with a 2 mm hole).

The kit in my personal emergency kit also includes:

  • A coil of braided fishing line, turquoise in colour, carried in a loose coil. The rings of the swivels carried should be large enough for the braided line to pass through. Likewise the rings of the loose hooks and lures are of sufficient size they can be fitted onto the snap links.
  • A small tube filled with BB split shot.
  • About 10 metres of 6 lb test monofilament line, wrapped around the tube of shot and secured with a piece of tape. In retrospect I'd have the monofilament in a looser coil.
  • Five wire traces, about 18-24" with a swivel at one end and a snap swivel at the other. Wire traces can be brought though mine were made from brass picture hanging wire, unbraided into four or three strand pieces. These can be used as snares but do not look as suspicious as custom-made snares.
  • Various hooks, most of them small (size 12), attached to monofilament with a swivel at the other end
  • Loose hooks.

The hooks and hooks on nylon fit in the little plastic wallets the hooks came in, and these fit in a plastic bag with the wire traces as well.

The knots attaching the hooks and swivels to the line are varnished over for added security.

When you are cold, wet and hungry is no time to be trying to tie fishing knots.

I prefer to sit in the warm comfort of my home and attach as many hooks as possible to a short length of line, tying a loop in the other end that can easily be slipped through a loop tied at the end of a longer line.

For some useful fishing knots see my free on-line book on knots.

A Mepp-type lure (above) with a little silver spoon that spins around and attracts fish is also in the kit. It also has a piece of red rubber covering the shank (most fish and sea birds have their vision biased towards the red end of the spectrum).
White and/or red “mackerel feathers” would make good additional lures, as do hooks with sections of tin can or tin foil added. A piece of white plastic cup will also make a good lure.
See a later blog for more on fishing lures.

Fishing Methods

Passive fishing is to set up a rig and leave it unattended although there's no reason why you can't sit and watch it if you like.
The most common way to do this is to set up what is termed a “nightline”.
As the name suggests, this can be left overnight and any catch collected in the morning, which is useful if you spend the daylight travelling to safety.
There's no reason why you can't rig up a nightline during the day, of course.
It's a good idea to check the line several times during the night, since some beasts such as frogs and turtles can break free if left long enough.
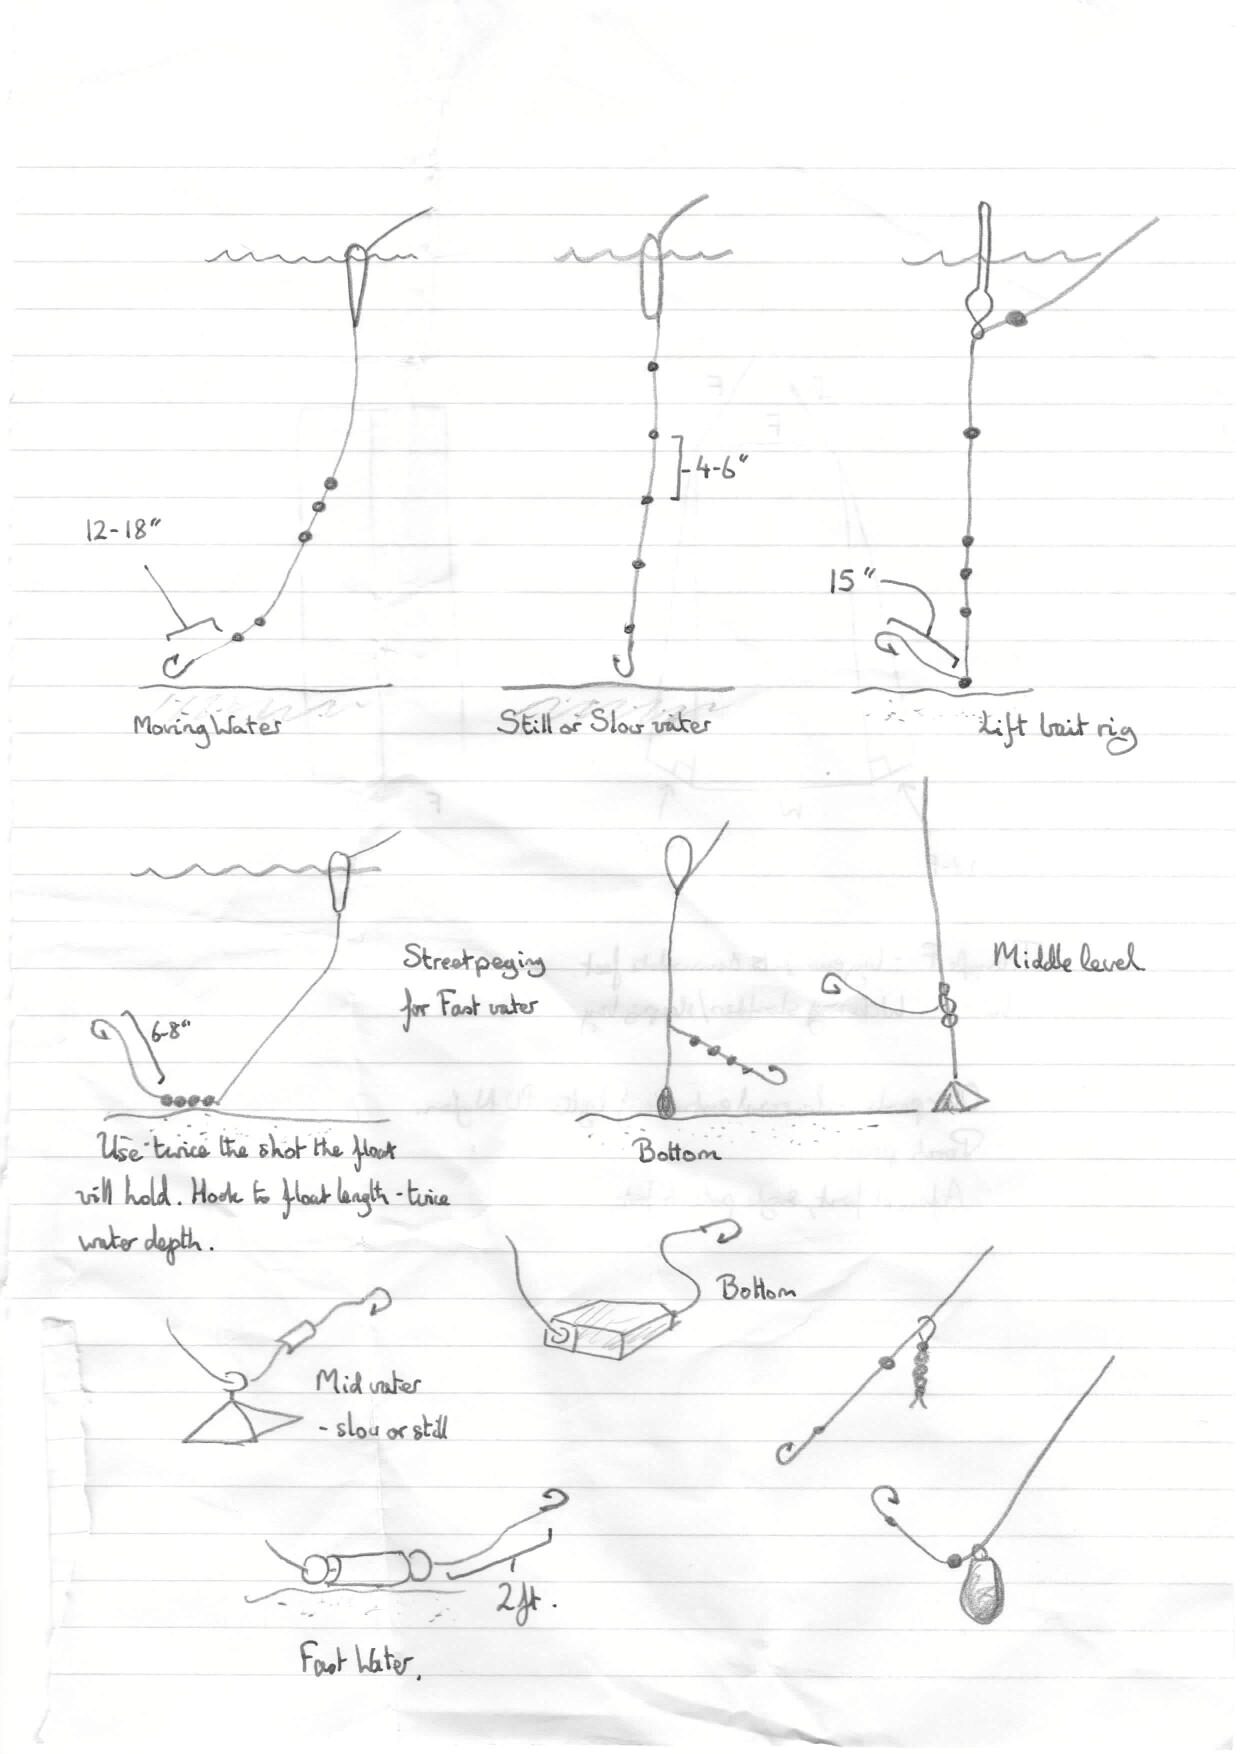
Attach one end of the line to the bank and the other to a weight, and attach leaders with baited hooks at intervals along the line.
Throw the weighted end into the water. This is easier if you use a forked stick since it prevents getting caught by your own hooks.
Drive a stick with a notched top between the water and the anchor point on the bank and run the line over the top. Movement of this stick will show something is hooked. Placing a pebble or chunk of mud on top of the stick provides further visual clues: if it has dropped off, you've caught something!
Alternately, run the line over the water between two points, like a washing line with the baits suspended at different depths.
An improvised bell (empty tin can) can be used to signal a catch.
Vary the baits and take note of which ones seem to be taken most often.
You can also hang lines from branches overhanging the water.

Active Fishing

Active fishing involves you holding onto the line and sometimes actively moving the bait or lure.
Such fishing prevents you from doing anything else, so is best considered if you have to remain in the same location, such as near a crash or a broken down vehicle, or are with a companion who can't travel.
Active fishing and other methods will be described in following blogs.
Categories
Phillosoph

Sandbags. Alternate Uses.

Recently I have been reading about certain aspects of World War One, in particular the stosstruppen or “stormtroops”.
A common and distinctive element of the stosstruppen equipment is the grenade bags underneath the arms. These were often sewn from sandbags. Sandbags had other uses too. One illustration I saw had a soldier carrying a sandbag to collect any booty or intelligence material he came across in a raid. Another feature of the stosstruppen was that they did not bother to carry their backpacks into battle. Backpacks were for the march to a position and were usually placed in storage once there. Instead the stosstruppen created an “assault pack” by rolling their greatcoat in their shelter cloth and strapping it as a horseshoe shape around their mess tin.

If attempting to capture a position a unit was required to carry four days’ worth of rations. Units in newly captured locations could easily become isolated. The rations of a German soldier a century ago were somewhat more spartan and modest than those of modern soldiers but I suspect he would still be hard pressed to carry four days’ worth in just an assault pack and the “bread bag” on his belt. A feature of trench fighting was that it was often only the lead elements that would be doing any actual fighting. The point would be taken by a couple of rifle, pistol or SMG men and close behind a “bomber” would toss grenades into the next trench section. Most of the unit would be carrying entrenching tools, sandbags and any other items needed to consolidate a captured trench section. These bearers would doubtless have also carried the bulk of the unit’s four day ration. This still raises the question as to how to carry those rations without backpacks. What I suspect is that often the rations were carried in the unfilled sandbags the unit was required to take along.
Sandbags had many other uses too. A sandbag could be wrapped around a rifle barrel to camouflage it when sniping. Camouflaged face veils for snipers could also be made from sandbags. Sandbags were used to make helmet covers, making your head less of a target when moving behind sandbagged parapets. Frayed bits of sandbag could be sewn to a garment to break up the shape and provide additional camouflage.

When it comes to using a sandbag as a carrying sack it is informative to look at the Russian veshmeshok. The neck is twisted closed and the carrying strap used to form a sort of lark-tail knot. A typical sandbags is 14-15" x 26-32" and can hold about 30-35 lbs of dirt so a carrying bag made from one can hold a useful load. Holes punched in the bottom corners, possibly eyeleted can be used to take a cord and made adjustable with a simple bowline knot. Alternately a small object such as a stone can be placed in the lower corners and a constrictor knot or round turn and half hitches can be tied around the material behind the object. The latter technique, incidentally is useful when you need to use a shelter sheet that does not have eyelets. There is not frame in a veshmeshok or sandbag, of course, so you have to give some thought to what you put in and in what order. Make sure there is something soft against your back!

In my book I mention that claymore mine bags often were used as handy ammunition carriers. A sandbag could provide the basic material for a similar but lighter carrier with just some basic sewing. Sew up the mouth and open one side, divide the compartment in two and add a strap, flap etc.

To both the World War One and modern soldier, sandbags are readily available and worth utilising. If you are a civilian then sandbags can be purchased from builder suppliers and garden stores and can often be found for less than a dollar each. Modern types are of circular woven polypropylene but more traditional hessian is also still available. A synthetic may be better for a carrying bag while hessian is better for adding camouflage to a hunting outfit. Hessian is quite a useful camouflage colour, particularly if used with contrasting browns, greens or greys. If you are wrapping a rifle stock in hessian remember folds, creases and shadows help break up the shape. You can also apply some paint of dye in dabs of a contrasting colour but don’t go overboard. It is the contrast and irregular intervals that help break up the shape.
Categories
Phillosoph

A Possible Con trick?

A friend of mine went out for a bite to eat and a quiet drink the other night. When he came back he did not look too good.
As the bar was closing a girl sitting outside collapsed. According to her sister she had been taking drugs. They had brought something that allegedly was “MDMA”. I say allegedly since a friend of mine was once concerned with analysing a large number of MDMA samples taken as evidence. The majority of them contained very little, if any MDMA but contained a lot of other things, many of them quite unpleasant or harmful.
As my friend and another customer attempted to help the girl she stopped breathing several times. My friend was able to get her breathing again by using artificial respiration. An ambulance arrived and the girl and her sister were taken away.
My friend felt that he had panicked a little and could have done more. I pointed out to him that he had undoubtedly saved her life and that at least he had done something positive when challenged. Some people would have run around like headless chickens. Some would probably have stood around videoing it on their phones. I did joke with him that in some countries he would now be sued by the girl for malpractice and sexual harassment! A joke sadly too close to the truth.
This had not been his only adventure that night. Minutes before this a fight had broken out in the bar between the landlord and a customer and my friend had helped keep them apart. What is interesting about this is the fight broke out a closing time with very little apparent cause. After they were separated the customer reached inside his jacket and produced a pair of broken glasses from his pocket. He then began to claim that the landlord had broken these in the fight and that he wanted compensation for them.
Certain aspects of how this was described to me suggest this might be a variation of an old con trick. Something to watch out for.