Categories
Phillosoph

Facial Camouflage.

Recently I have read books by Tom Wintringham, Bert Levy and John Langdon-Davies. A topic common to all three of these is the visibility of the human face.
If a soldier hears an aircraft overhead it is understandable that he might look up at it. An uncamouflaged human face is visible from a considerable distance so a pilot may observe his observer. Now imagine a company of infantrymen all looking up at an aircraft. Effectively this would be a sudden white flash saying “here we are!”
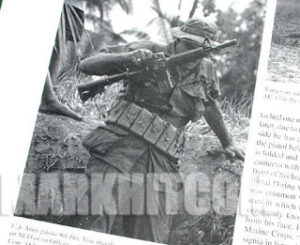
I recently read that “the secret to invisibility is to freeze like a lizard on a rock”. If an aircraft or other potential threat appears one should take cover if there is any nearby, freeze if there is not. Keep your eyes down on the ground. Only one or two men should observe the aircraft, and then only with adequate face camouflage. In a previous blog post I described a simple framework that could be worn on the back or the pack. These were used by the NVA and Viet Cong when on the march. Any time an aircraft appeared overhead they would drop to the ground and become bushes. Incidentally this also illustrates that marching formations should be irregular.
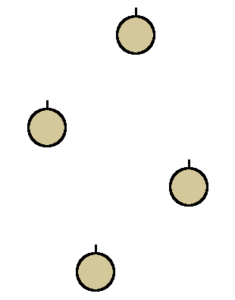
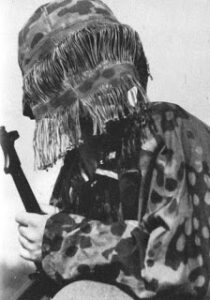
The following image was scanned from Langdon-Davies’ book.
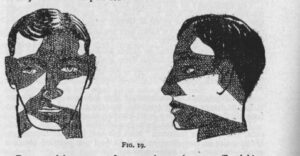
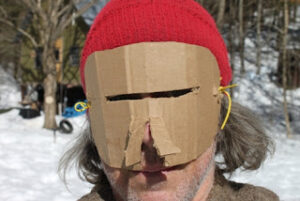
Langdon-Davies notes that eyes are very distinctive and that many animals have colour schemes that make their eyes less noticeable. Often this takes the form of a line, stripe or blob that runs across the eye. Logically, he advocates that a human soldier’s camouflage should do the same. The human nose is another prominent feature so this needs to be shaded to compensate for this. The scheme he proposes was using a single colour of camouflage, such a burnt cork. It was sufficient to disrupt the palest skinned face. Nowadays multi-coloured camouflage kits are common.
Camouflage creams may have advanced a bit but I have to question if the principles Langdon-Davies had described are being observed. It is not sufficient simply to get the face dirty or paint stripes across it. Prominent features such as the eyes and nose must be disrupted. Features that catch the light must be darkened and areas that are shaded must be lightened.
 
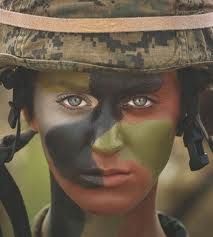
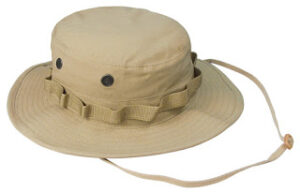
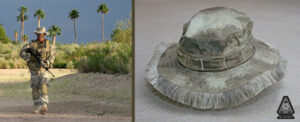
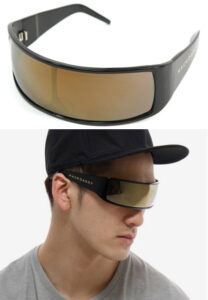
Langdon-Davies was writing for a primarily Caucasian audience but his comments also apply to other skin tones. Human skin can be reflective so needs dulling down. Blue eyes can be distinctive. Shade from suitable headwear can help.
While painting the face can be effective there may be situations where you will need to rapidly remove any facial camouflage. Face painting can be combined with other measures, of course.
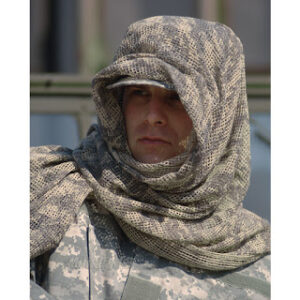
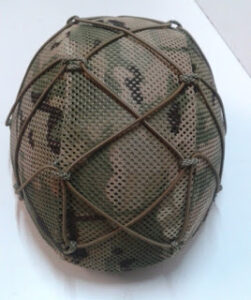
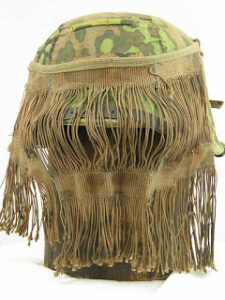
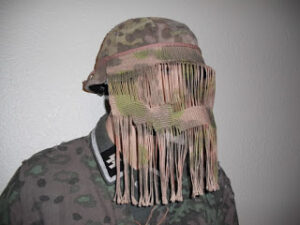
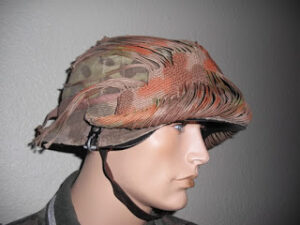
A tight-fitting face-net can be distinctive, defeating the purpose of the item. Face-nets or similar devices should be relatively amorphous. In a previous post we saw a face-veil used by German troops. While this was effective it was apparently impossible to run with this fitted. Such factors need to be considered if you have a mobile role. At night a net across the eyes may hinder vision to an unacceptable level.
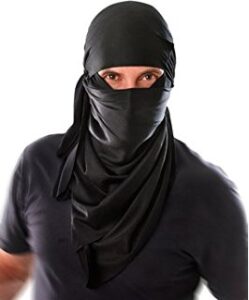
One of the simplest ways to conceal the face is a scarf or bandana across the nose and mouth. Folds in the material help disrupt the shape. Since the face area may be shaded by headgear I’d go for a relatively light coloured material with contrasting disruptive blobs. As I have suggested in previous posts, children’s clothing or cheap t-shirts can be an economical source of camouflage material.
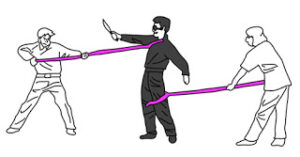
Even if you have correctly painted your face a cloth across the nose and mouth has other advantages. Facial recognition software has become commonplace in the last few years and we will undoubtablely see applications of it more lethal than the camera in your phone. A cloth across the nose and mouth also softens the sound of your breathing, which was one of the reasons the ninja favoured this. A ninja’s disguise might be a simple bandana and scarf. The bandana is folded diagonally and  worn over the hair. The scarf is pulled across the face and tucked up under the bandana. When not worn there would be nothing particularly suspicious about these items.
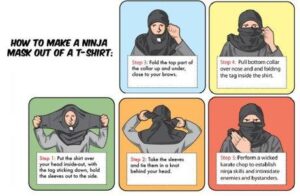
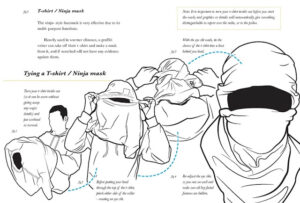
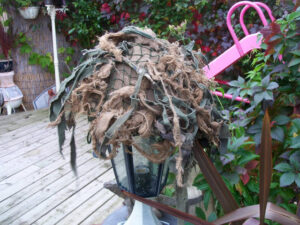
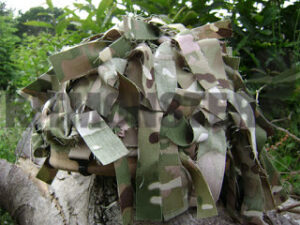
Make a web search of “ninja hood t-shirt” and you will find numerous sites and illustrations of how to make a ninja hood using a t-shirt or sweatshirt. Many of these are tongue in cheek but it should be apparent to the reader that if you use a shirt with a suitable camouflage pattern you may have the beginnings of something quite practical. Add some scraps of scrim and hessian to further disrupt the shape.
Categories
Phillosoph

Sasumata in the Modern World.

It has been a while since I have posted a martial arts-themed blog. I thought that it might be nice to have a change of pace from the recent discussions on camouflage and fieldcraft.
Recently I was watching some episodes of “Bleach” and “Highschool of the Dead”. By coincidence, sasumata appeared in both series.

In Bleach, sentries in the Soul Society are often seen equipped with these. They are particularly obvious in some of the episodes involving the Kasumiōji clan. In Highschool of the Dead they are evident in the early episodes set on the school grounds.
I have written about sasumata elsewhere. They were one of the “three implements of arresting”. Below are some photographs of samurai equipped for police duties.

This next illustration is particularly interesting. Note that the “cops” wear headbands to prevent sweat getting in their eyes. This would also keep hair out of their eyes but I doubt that was a major problem with samurai hairstyles! The cross shapes across their backs represent cords used to prevent the loosely cut jacket sleeves hindering their actions. A sasumata can be seen top right. A sodegarami is bottom left and tsukubo menace the swordsman’s sides. Possibly the most interesting feature of this illustration is that ladders are being used to fence the swordsman in. Japanese firemen used ladders as high vantage points to track the progress of a fire. These ladders might be supported by sasumata-like poles. I believe each neighbourhood kept a number of ladders for firefighters to use. The policemen here have found another use for them.
Japanese police still use the sasumata, as can be seen. Note the “T” shaped handle on one example. This could be used to help rotate the head or could be used to push or trip like a tsukubo. 
Incidentally, I would suggest approaching a target with the head of the sasumata held at about shin level. This reduces the change of a foe trying to grab the head before you make your move.

What I find most interesting about the modern sasumata is that they are not just issued to police. If a drunken, drugged or aggressive behavior occurs at a Japanese school the staff don’t just phone for the police and pray that they come in under twenty minutes. Japanese school staff have sasumata and other implements to deal with the threat. They hold drills and training sessions on how to use them too. This can be seen in the first episode of Highschool of the Dead, where a teacher carries a sasumata to confront the man behaving strangely at the school gates.
A radical idea that. Actually taking useful measures to protect children like they were valuable!
Categories
Phillosoph

Camouflaging Headgear.

A military helmet violates several of the “five S’s of camouflage”. They have a distinctive shape and silhouette. They may have a surface that appears shiny or unnatural under certain circumstances.
Both Levy and Langdon-Davis have points to make about helmets and their camouflage. Levy points out that in thick vegetation branches hitting the helmet can create noise. In such circumstances, the soldier is advised to carry the helmet rather than wear it. Both writers advocate that the best way to break up the shape of a helmet is by the application of local foliage. This garnish should be replaced when it ages and becomes unnatural looking.
Langdon-Davis notes that many soldiers that he taught assumed that their helmet was adequately camouflaged just because they had fitted the net-cover they were issued. More than half a century a century later and very little has changed! It is commonplace to see soldiers and marines that are wearing their issued helmet cover but have made no attempt to disrupt the distinctive shape of their helmet.
There are two ways commonly used to attach natural materials to a helmet.
One is the use of a rubber band that encircles the helmet. For the WW2 British army helmet Langdon-Davis suggest that two “s” shaped pieces of tin be shaped to keep this band in position. The use of a rubber foliage band is actually more commonly seen with German soldiers. Often the band was made from an tire inner tube.

The other method is to fit a net over the helmet. Some camouflaged cloth covers have loops or straps for the placement of natural foliage. Many do not!
In arid or urban environments plant materials may appear relatively rare. Turning your head into a bush might appear to be a good way to attract attention. However, in such conditions it is still important to break up the distinctive shape of the helmet. The use of natural materials is therefore supplemented by additional means.
Shown above is a competently camouflaged helmet. A competently camouflaged helmet looks nothing like a helmet.
A basic cover has been constructed from hessian, possibly a sandbag. This has a light, natural looking colour that creates the impression of negative space. Cheaper than a camouflage printed cover and more effective. You could paint disruptive blotches on this cover, but it is probably redundant given that the helmet will be garnished further. If you do paint the cover bear in mind the size of the object you wish to disrupt and paint appropriately large blobs of a colour that contrasts with the base colour.
A net has been placed over the hessian. In this instance it is green but the colour probably does not matter that much so long as it is a natural shade. If the enemy gets close enough to see the net colour the matter is probably moot!
A helmet sized net can easily be constructed if you do not have one. Several methods of net making are shown in my knot book. Below is another technique. A camouflage net need not be particularly neat nor regular. Quite the opposite, in fact.
The net is intended to hold any local foliage that is used. As can be seen, textile “garnishes” have been added too. An important point when added either natural foliage or textiles is not to overdo it. You are trying to disguise the shape, not create a new solid shape. Leave space for natural materials when applying textile garnish. 
Some of the garnish that has been added are strips of hessian. These are allowed to fray and go fuzzy. The owner has also used frayed cloth. He has used green but I would suggest a mid to dark brown to make a covering that will be more useful in urban and desert areas. If you are operating in a predominantly verdant area there will be plenty of local natural materials to prove greenery.
 
You could use strips of camouflage cloth for garnish. Bear in mind that your headgear may be used in a variety of terrains. Strips of British DPM or US woodland may work well in jungle but not so well elsewhere. Desert DPM, three-colour “coffee stain” or “chocolate chip” may be a more versatile choice. Incidentally, an economical source of camouflaged material for projects is children’s clothing. Camouflaged tee-shirts may be a cheaper source of materials than camouflaged bandannas.
You can tie your garnish directly onto the net. If that proves too fiddly an office stapler can speed the process up. If the staples go rusty and brown, so much the better.
Many of you reading this will have no interest in military helmets. The same techniques of camouflage can be applied to other forms of headgear if you are a hunter or prepper. My preference for such a project is a boonie hat. The brim creates shade, which is a component of camouflaging goggles or eyeglasses.

As can be seen, the band around the hat is designed to take natural foliage. On my first day on a certain Caribbean island I brought a cold drink, drank it and then inserted the ice cubes into the pockets of my boonie’s hat bang. Portable air conditioning!
Note that some desert pattern boonies lack a foliage band, which is a mistake in my opinion.
A net can be added to a boonie and textile garnish applied. You don’t actually have to have a camouflage printed boonie as a starting point for this project. Use a single coloured one if it is cheaper. My preference is for lighter colours such as sand or to use desert patterned examples. A company offers “sniper boonies” with a fringed rim. This is a feature that can be emulated.
Categories
Phillosoph

Camouflaging Boots

Another Home guard themed book that I have read recently is the excellent “Home Guard Fieldcraft Manual” by John Langdon-Davies. As you might expect, this book has a lot to say about camouflage.
Langdon-Davies notes that there are several features that give away a British soldier or Home guardsman attempting to conceal themselves. These are the helmet, the gasmask bag (worn on the chest), hands, face and boots. I will discuss some of these areas further on another day. Yesterday’s blog touched on the importance of footwear so let us examine this area today.
Langdon-Davies notes that boots have a distinctive shape. He comments that the only thing in nature that might resemble there shape is a pile of horse droppings. The boots worn by British soldiers at this time were black and often shiny. Nice for parades, horse droppings for camouflage.
It has been said that it takes at least half a century for the collective military mind to get an idea out of its head. Certainly for the rest of the twentieth century most soldiers were issued black boots. While the military favoured black boots most civilian hiking boots were brown. Only in the first few decades of the twenty first century have we seem a wider use brown or tan coloured military boots.
While brown or tan boots are less distinct than black boots they are still noticeably “boot-shaped”. Is it possible to make our “field boots” less noticeable?
A quick websearch reveals that camouflage patterned boots can be purchased. Unfortunately many of this are fashion items or for children. Many of the patterns used are less than ideal. Patterns with a large number of colours often have less contrast between the elements so at a distance “blob-out” to resemble a homogenous single colour shape.

Many modern boots are constructed from several different pieces. Some, such as the Vietnam jungle boot and my beloved Magnums use a combination of nylon and leather for the uppers. Inspired by two-tone shoes (below) a friend of mine suggested that field boots have the uppers constructed with each piece of a different shade or colour. This would break up the distinctive “boot-shape”. Note how the boots in the topmost photo use two shades of green nylon. The second photo below shows some footwear made from a variety of browns, and also orange, which is not so good!

Using suitable gaiters will partially cover a boot. Using items such as scrim to break up the shape may not be that practical since it is likely to catch on underbrush and soak up water.
When I was a young man there was a brief trend in spray painting Doc Martins. I visited one of the street market areas of the city recently and saw numerous hand painted boots and leather jackets on sale, many of them true works of art.
The nylon areas of a boot are probably easy to pattern. Acrylic model paints come with a warning that if they dry on clothing the colour will be near impossible to get out. Thin the paint a little with water so that it coats the nylon fibres rather than collecting in the pores. Permanent marker pens could be used instead.
Painting the leather areas of a boot may be a little more involved. Applying colour is easy enough. What we don’t want to do is affect the permeability of the leather.
Firstly, you may need to remove the existing finish of the leather on the areas you wish to paint. There are products called “leather deglazers” for this purpose. I have also seen acetone and iso-propanol suggested, although the former came with a warning not to use nail-polish removers. Rubbing the surface with fine sandpaper before removing the finish will help the new colour adhere and produce a more matt effect. The previous steps are unnecessary on suede.
Once deglazed the boots can be recoloured. There are acrylic paints specifically marketed for colouring leather or you can use leather or suede dyes. These are fairly reasonable in price and you will only need one or two colours. These products are designed to produce a gloss or semi-gloss finish. Shine is one of the enemies of concealment. A product called “duller” can be added to paints and dyes to give them a more matt effect. It can also be added to the final finishing treatment.
The actual pattern you apply to your boots should disrupt their shape. The different colours should contrast  and elements be of one to two inches width. Rather than “camouflage clothing” think “RAF aircraft pattern”, as shown on the Hurricanes below.
The Russians use a similar patterning for many of their military vehicles. A light sand/ yellow colour is used with darker shade of green or brown. Note that on one of these photos below the pattern uses three colours, but there is very little contrast between two of them. If you shrink the photo size you will see that at a distance this effectively becomes a two-colour pattern.

If your boots are already sand-coloured you will need to add bands and blobs of a darker brown. If they are already a darker brown you will need to add lighter sections. The trainers below give a good illustration of what to aim for, but bolder.
Once you are happy with your boots and everything has had a chance to dry you will need to apply an acrylic finisher solution. Most of those available give a gloss, satin or semi-gloss finish. If you cannot locate a matte finish use semi-gloss or satin and mix in some of the duller you used earlier.
I have yet to try this myself. Yet another project for when I have more funds.
Categories
Phillosoph

Guerilla Equipment List from Levy

Levy’s book has many interesting sections. Around page 101 he makes some suggestions as to the equipment that a guerrilla operating in a rural area might need.

His first suggestion is that the guerrilla carry a supply of money. In addition to such funds he suggests:
Monofilament fishing line had just recently been invented so it is probable that the fishing line mentioned above would be braided line. Levy describes it being used for tripwires, communication cords and for tying prisoners.
Braided line would probably be more useful as general purpose cordage.
For a modern equivalent, buy synthetic braided sea fishing line or kite string. Select a tactical colour, with grey probably being  the best choice, then brown rather than green.

For a more detailed examination of coloured light and night vision see this article.

The binoculars reflect that Levy often states how important reconnaissance and scouting are to the guerrilla/Home guardsman.
Like his former commander, Tom Wintrigham, Levy seems to hold a low opinion of the usefulness of the bayonet.
In an earlier section, he describes probing haystacks and bushes as one of the few things bayonets are good for.
In the section on house clearing, he cautions that rifles with fixed bayonets are more trouble than they are worth and likely to get caught on furnishings, drapery and endanger comrades.
I wonder if he would have held the same views on the shorter bayonets that could be mounted on sten guns that were introduced a few years later.
In the British Army, the bayonet was to be fitted when making shots at under 300 yards, and the sights were theoretically set to compensate for this. In practice, the rifles were zeroed in the factory without bayonets fitted!
The “good nine-inch knife” is probably of the type he describes earlier in the book. This would be nine inches long, no more than three quarters of an inch wide, double edged and with a guard.
This is clearly not an issue Fairbairn-Sykes commando knife, which is several inches shorter.
“Burnt cork” is simply a bottle cork that has been burnt at one end to produce soot that can be rubbed on the skin for camouflage. It might also be used to draw symbols or similar on light surfaces.
Contrary to what you may see on some youtube videos the “carbon black” produced is not a carcinogen when used on the skin.

The use of phosphorus matches to create a night sight is a wrinkle new to me. This probably won’t work with most modern matches, but feel free to experiment.
The modern equivalent of this list item would be a fire kit as described elsewhere on this blog.
This item is also a reminder that poor visibility favours the guerrilla so that it is prudent to have firearms with sights that can be used in such conditions.

Groundcloths and blankets have been covered in several recent blog posts.

A No.36 grenade was a Mills bomb, so “or” may be a typo. Combined with a length of fishing line, this could be set up to defend the area the guerrilla was sleeping in.

The technique of wearing socks over the outside of a boot is found in other Home guard manuals.
The issue boot of the time had hobnails, making them noisy on a number of surfaces. Wearing socks over the boots allowed the wearer to move more quietly. The socks also made the boot print less distinct, making the wearer harder to track.
A study in New Zealand suggests that wearing socks over shoes  gives a more secure footing in snow or ice. (Compare this to the Russian valenki)
Also see this page and this for a safer way to move on snow and ice.

The comment about keeping the feet in good condition reminds me of the comments of another writer on guerrilla warfare, Che Guevara.
Che describes good shoes as a “treasure” for a guerrilla and as one of his priorities.
He recommends that reserves of shoes should be accumulated and that covert workshops for the repair and manufacture of shoes be established if necessary.
In the past, British battalions included both cobblers at company level and a battalion shoemaker-sergeant among their specialists.
 

In the next paragraph Levy recommends woollen clothing.
Elsewhere in the book bandannas are suggested for both camouflage and disguise.
Categories
Phillosoph

Levy's Filibuster Formation

During the age of pike and shot it became common for commanders to study arithmetic and geometry. Considerable care was given to calculating the size and shape of formations that could be created with the available manpower. The formation kept the infantry safe from the cavalry and if selected correctly maximised the formation’s fighting power.
Modern warfare uses smaller units of men but the formation they are in can still have an influence on their fighting power. Accordingly, my book “Survival Weapons: Optimizing Your Arsenal” includes a section on small unit formations. The sections on teamwork in “Crash Combat” might also be considered to include some aspects of formation.
Someone once told me “The blob and the line are the only formations a squad needs. The lads can work it out from there.” He may have in fact said “blob and file” but “line” seems more logical. We are taught to stand and walk in files in nursery school. Learning the line is more logical for a soldier since the line formation maximises applied firepower. The echelon formation is just a slanted line and the arrowhead is two echelons. To my surprise I have found “blob” using in official WW2 British Infantry manuals. It was used to designate two or three men moving together.
This weekend I read “Yank” Bert Levy’s book “Guerrilla Warfare”. Beginning on page 66 he describes a reconnaissance formation I have not encountered in other works. He calls this the “Filibuster System” or “Staggered Triangle”.
“Filibuster” as a word apparently derives from a Dutch/ Spanish word for “pirate” or “freebooter”. Webster also defines it as an irregular military adventurer” and “an American engaged in fomenting insurrections in Latin America in the mid-19th century”. The latter is very apt given that Levy’s military career included work in South America.
Below is the illustration from Levy’s book. Levy does not specify the distance between soldiers. He gives the usual advice that distances can be increased in open terrain and reduced where visibility is poorer. My personal impression is that the Filibuster is a more open formation than conventional squad formations. Which man is the point man varies with which direction the triangle is moving. “A” would be the point-man when heading north. “B” would take over the duty if the formation changed course to the east. Each man watches the back of the man or men ahead of him.
If an enemy is encountered the two “corners” nearest him can engage him in a crossfire. In a reconnaissance mission this would allow the “far corner” to escape with any information gathered. Alternately he can fire between his team mates or manoeuvre to execute a flanking attack or diversion.
Levy’s illustration shows an equilateral triangle with “C” directly behind “A”. Shown below is an alternative configuration. In actuality these formations are unlikely to be perfect geometrical shapes. The most that can really be said for them is that they will have three (or four) corners and are unlikely to contain any right angles.
Levy remarks that the Filibuster triangle can also be used for larger fighting patrols with two or three men at each corner. For a four-man formation he suggests a “staggered square” variant of the Filibuster. Unfortunately that term does not tell us much and Levy does not provide an illustration. Below are two conjectures on what this formation might look like. Distances between members are not to scale.

The first illustration resembles a parallelogram. Everyone other than the point man follows the rule that they should be slightly behind the man on their right and to the left of the man ahead. This formation can be thought of as four echelon formations joined together.
The second illustration can be thought of as a modified rhomboid or diamond formation. Each man ensures that he is never level with the man to his side. Each man watches the back of the man or men ahead. This illustration also hints at how easily the Filibuster can change to other formations. It can narrow to form a staggered file or file. It can easily form a line, echelon or arrowhead formation, as needed.
Levy suggests that a five-man unit should use a four-cornered Filibuster. The fifth man should be the unit leader and somewhat behind the point man and to his flank. For formations of more than three men it may be more useful to form a modified arrowhead, the fourth man positioning himself to the outside of the second or third. Changing direction is as described above.
A six-man unit has the option of forming a pair of Filibuster triangles. These will probably move in echelon, each positioned to support the other. Alternately, the “five-man, four-cornered” formation might be used, the sixth man placed with the unit leader. This is a logical position for the unit’s machine-gun. RPG or mortar. Possibly the corner men will take turns in the centre position, giving them a rest from the concentration and vigilance the corner positions require.
The three-corner Filibuster seems to be a useful starting point for teaching small unit formations.
A more detailed article can be found here.
Categories
Phillosoph

Camouflage Overvisor

I have been thinking about some posts on camouflaging the head area. These will have to wait until I scan a relevant image. As an offshoot of this research I have been thinking about the issue of camouflaging the eye area.


Below we have an image of the popular conception of a ninja. In reality the items used to cover the face and hair might not be black. The “letterbox” for the eyes is very noticeable. Wearing a ski-mask type hood is not much better since this creates a pair of circles and the brain is wired to look for eyes.

One solution is to camouflage the area around the eyes with facepaint. The disadvantage of this is makeup is not as easily removed as clothing. That is a problem if the operative wants to disappear back into the local population.
Modern fighters often wear goggles. Some of us wear spectacles. These are reflective and thus difficult to camouflage. Some tactical googles are made with black frames rather than more useful colours such as tan.
Part of the solution is to wear a hat with a brim. This casts a shadow over the eye region and reduces the change of reflections. A headnet or mosquito net that covers the face can also be used.
A third solution is to construct an overvisor. Acquire a rectangle of mesh material of either metal or plastic. It should be lightweight but capable of holding a shape. Bend it into an arc so that it covers the “letterbox”. The brain is attuned to picking out eye-like objects, particularly when they are in pairs. The rectangular shape of the overvisor hides the familiar shapes of eyes or glasses. Two of the photos below show snow goggles improvised with a similar method.

Buy a can of cheap black acrylic spraypaint from the hardware store and use it to undercoat both sides of the mesh. Leave the undercoat to dry. For the next step you will take a pot of acrylic model paint. Tamiya “Dark Yellow” or “Desert Yellow” are good shades. Take a piece of tissue or foam, dip it in the paint and wipe off the excess so the sponge is just damp. Wipe the paint onto the outside surface of the mesh. If you have some experience with drybrushing you can use this technique instead.

You now have a rectangular visor that is black on the inside and sand-coloured on the outside. If any of the “outside” colour is visible on the inside brush over it with black. The inner side of the visor needs to be black since this lets you see through it more easily. It should work rather like a fencing mask or mosquito headnet. This, incidentally, is why headnets are always dark, despite mosquitos being supposedly attracted to dark colours. A net of a more reflective colour will be difficult to see through. The goggles shown below have the right idea but the wrong colour.

You will probably want to further camouflage the outside of your overvisor. The trick here is not to overdo it. The main objective is to break up the regular rectangular shape. You probably only need one additional colour as long as it contrasts with the sand colour. Olive drab, darkish grey or a middle/dark brown are good choices. Make the blobs one to two inches across and at least half an inch between them. A winter version might be all white or use white with grey or dull green.
A fringe of suitably coloured frayed cloth can be fastened to the lower edge of the overvisor to help conceal the nose and mouth.

How you wear the overvisor will depend on how you wear it. If you wear it on its own you may simply cut a notch for your nose and add some elastic. Parts of cheap sunglasses may be utilised but some form of retaining band is recommended. If you wear the overvisor over googles or spectacles you may want some mechanism to attach them directly, or attach it to your headgear. Whatever option you choose make sure that the overvisor is easily removable. The overvisor acts a bit like a sunshade so at night or in low light conditions you may have insufficient visibility.
Categories
Phillosoph

Ammunition Conservation

Writing yesterday’s blog I was reminded of a paragraph in the introduction of the English language version of “Total Resistance”, the Swiss military manual:
“In my command in the Philippines, I found that the only way to break out of an ambush action was to provide indigenous personnel with limited ammunition. A guerrilla with an empty rifle will retreat readily, while one with an adequate supply of ammunition will stay too long and risk capture.”
Che Guevara’s Guerrilla Warfare manual is often dismissed as being a rehash of Mao Tse-Tung’s work. This is an unfair and inaccurate statement. Che’s work has a lot of original content and insight. Che has a lot to say about ammunition. A good guerrilla should value his ammunition like gold or treasure and never fire one shot more than necessary.
“The veteran infantry soldier, though equipped with automatic weapons, will know the value of ammunition. He will guard it with loving care.”
Amusingly, of the 8-shot semi-automatic Garand he cautions “only people with some experience should use this, since it has the disadvantage of expending too much ammunition.”
If dismounted troops are not to become overburdened with excessive ammunition loads they are going to need to change some of the ways that they conduct operations. This is particularly true of riflemen.
In terrain or conditions where armoured personnel carriers cannot be used, the infantry must be supported by smaller tracked vehicles that can carry ammunition and stores. This might be something like a tracked quadbike or modification of a snowmobile with quieter hybrid-electric propulsion.
The defence-orientated civilian or prepper does not have the luxury of an extensive military resupply system. They too need to adopt tactics and practices that reduce the weight they carry and use ammunition more effectively.
Categories
Phillosoph

Soldier's Load: How Much Ammo to Carry

Continuing our look at the soldier’s/survivor’s load, I will return to the subject of ammunition.
Regular readers will know that I am not ashamed to draw inspiration from unusual sources. They will also know I am partial to the occasional video game.
I was playing a western-themed game and came to a point where I was offered a chance to buy some ammunition. I looked at how much ammo I had collected for the weapons I used the most and decided I did not need to buy any.
What was interesting was that I had something like 80+ rounds for the repeater carbine, my primary weapon. Granted that in the game there is a mechanism to make you a deadeye shot and slain enemies generally drop useful ammunition, but if it was in real life 80-100 rounds for a Winchester would seem an ample amount.

Historical Examples

The typical soldier in the American Civil War carried a cartridge box with 40 rounds ready for immediate use.
Yesterday I was reading about World War One trench raiding. Troops did not wear “equipment” (webbing) for these raids but the men carrying a rifle and bayonet carried 50 rounds. Other men carried ten grenades instead. “Marching load” for British soldiers was 90 to 110 rounds.
An account of a World War Two British platoon had each rifleman with 50 rounds and two to four magazines for the Bren gun. How much ammunition was carried in practice may have been more.
German soldiers of the same period are noted for being frugal with their rifle ammunition and letting the machine-guns handle the bulk of the offensive and defensive fire. I’ve encountered 90 rounds as the ammunition allocation for a Mauser rifle. The issue belt pouches only hold 60 rounds as twelve 5-round chargers so the remainder may have been in the pack if 90 rounds were carried.
The Japanese soldier carried 120 rounds. Twelve 5-round chargers were distributed between two frontal belt pouches and a further 60 rounds was in a “reserve” pouch at the back.
The American soldier in World War Two was issued with an ammunition belt with ten pouches, each for an 8-round Garand clip. In his famous study of the soldier’s load, SLA Marshall claims that soldiers generally carry more ammunition than is needed and suggests six clips (48/96 rounds) be carried instead.
If we look a little later in history, the American soldier in Vietnam was instructed to carry 330 rounds for his M16. Other sources say 14 magazines. Bear in mind, a loaded 30-round magazine weighs around a pound each. 880 rounds was allocated for each M60 so the riflemen probably helped carry some of this too.
The British soldier with a 7.62mm SLR was expected to carry five 20-round magazines and a 50 round bandolier or belt for the MG. With the switch to 5.56mm weapons and a rifle capable of automatic fire came a suggested load of 330 rounds: six 30-round magazines and 150 rounds in a bandolier.
In a previous post, I have discussed appropriate and inappropriate use for fully automatic fire with rifles.
If you have a semi-automatic or manual action weapon this is obviously not a concern.
How ammunition is carried may have an influence on the quantity a shooter carries.
Give a soldier two belt pouches that each hold three magazines and he will probably carry at least seven magazines. Three in each pouch and one ready in his rifle.
Give him a single pouch that holds four magazines and he will probably carry five. Give him a claymore mine bag instead and he may fill one pocket with magazines and use the other for other useful items.

A few posts back we looked at the Viet Cong chest rigs. If a wearer decides to carry six AK magazines, he has around 180 rounds.
An AKM 30-round magazine weighs about 1.8 lbs, so six loaded magazines weighs 10.8 lbs.
The equivalent load for an SKS would be eighteen 10-round chargers. Each of these weighs 0.4 lb loaded, so 180 rounds would weigh only 7.2 lbs.

Chargers

Several of the examples given earlier carried their ammunition in chargers (aka stripper clips, but calling them “strips” reduces confusion). The Garand took ammunition in true clips.
Contrary to what TV shows, video games and some supposedly expert gun writers will tell you, a clip is not a magazine.
A clip is a device that fits inside a magazine.
A charger/stripper-clip/strip remains outside a magazine and unloads its rounds into the magazine
Carrying ammunition in chargers rather than magazines constitutes a considerable saving in weight.
Unfortunately. there are not that many modern semi-automatic rifles that can be loaded directly with chargers. The SKS and M14 are probably the only ones you are ever likely to encounter.
Canadian FALs could have their magazines topped up with chargers while the magazine was in place. When Canada switched to the AR-15, this capability was not continued, probably because of the carrying handle.
Many modern AR-15-type weapons no longer have the carrying handle and a replacement receiver top that can take chargers may be possible.
The SKS has an integral 10-round magazine but this can be replaced with a 20 or 30 round capacity part. Since the chargers hold 10-rounds, it is possible to top-up such a magazine when it is only partially empty.
The capability to use chargers is just one of the advantages an SKS has over a semi-automatic AK-type weapon.
While most semi-automatic rifles cannot be loaded directly with chargers, chargers can be used to quickly reload magazines when they are not fitted to a weapon.
For some designs of magazine, a device to facilitate this may be needed. Carry a couple. It is practical to have just a couple of magazines and carry additional ammo as lighter chargers.

A Realistic Load

So how much ammunition is a realistic load?
We are talking personal load here. If you are mechanized, carry additional ammunition in your vehicle.
If you operate in a given area, establish a number of caches with additional ammunition and other useful items.
As a rough guide, if you are a hunter or outdoorsman, aim for 80-100 rounds and two or three magazines, including the one in your rifle. You can probably find pocket room for two magazines without needing a belt pouch.
There are chest-rigs and pouches that have just three single-magazine compartments. Such a rig could probably fit comfortably under a light jacket.
A pouch for a single magazine on your rifle-stock is not a bad idea, given that ammo is of only limited use if you are separated from your rifle.
If you are in the habit of loading 27 rounds into a 30-round magazine then three magazines still gives you 81 rounds.
Nine-round chargers would be very useful in the above case. Nine-round chargers would be useful for general use. They would allow more opportunity for magazines to be topped-up before they are fully emptied.
81 ready rounds will probably be ample for a semi-automatic weapon. Additional ammo can be carried as chargers.

Six and Six

If you are military, you will probably want to carry more ammunition.
Many soldiers weight themselves down so much that they become waddling targets.
Here it is important to distinguish between what is carried and what is worn.
For the ammunition carried on your webbing, set a sensible upper limit. Do not try to carry everything you have on your webbing.
If you must carry more ammunition than the suggested limit below, carry it in a pack, a claymore bag, pulk, handcart or vehicle. Then, at least, you can occasionally put it down if you need a rest or need to move fast.
How much to carry in your webbing? A sensible limit is what I call “six and six”.
For simplicity, I will only consider riflemen. Rifle-grenades, mortars, grenade launchers and machine-guns I will save for another day.
No more than six rifle-magazines/180 rounds and the equivalent of six (standard-sized) hand grenades (c.3 kg), for example: four frags and two smoke-bombs.
This is the ammunition permanently carried on the body and immediately accessable. With the magazine loaded in the rifle included, you have 210 rounds.
If a handgun(s) is carried, the reloads for these are in addition to the six rifle-magazines. A common recommendation is to carry two reloads for a handgun. If your handgun is your primary weapon, more might be prudent.
The six rifle mags and the grenades can be carried in a chest rig, belly rig, equipment belt or across a combination of these.
Add to this load four shell/first-field dressings. Some of these may be carried around the back over the kidneys.