Disclaimer: “As an Amazon Associate I may earn from qualifying purchases.” Adsense and Infolinks were no help at all.

If you have enjoyed this article or it has been helpful to you please feel free to show your appreciation. Thank you.

Read The Third Wave by Alvin Toffler!
Categories
Phillosoph

Shield and Buckler and Long Har Chuan

Recently, I read a very interesting book called “Medieval Sword and Shield” by Paul Wagner and Stephen Hand.
The generic title is a little misleading, since specifically the book covers the fighting system shown in I.33.
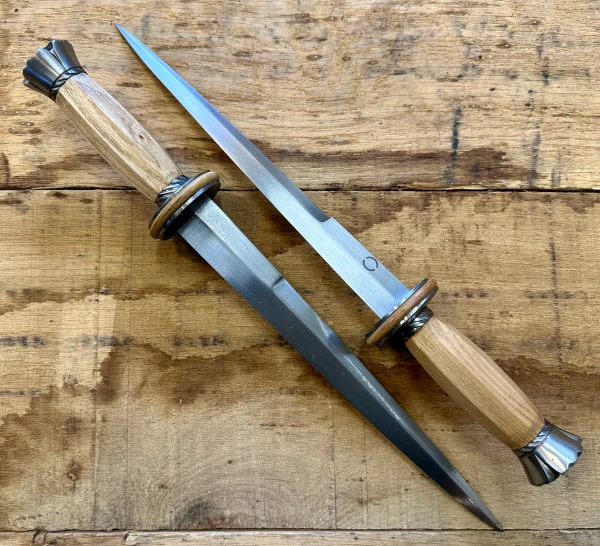
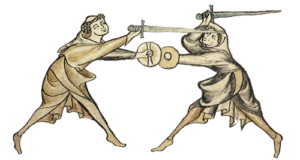
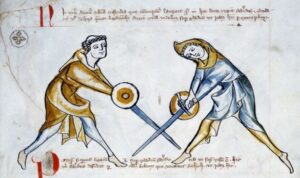
Royal Armouries Ms. I.33, which is the earliest known surviving European fechtbuch (combat manual) and addresses the use of the sword and buckler.
The book “The Medieval Art of Swordsmanship” by Jeffrey L Forgeng has a very nice reproduction and translation of I.33.
The above volumes sit side by side on my bookshelf.
I.33 is not an easy work to understand.
Medieval conventions on artwork make is uncertain as to the actual postures of the fighters, and the text is often less than clear and has some probable errors.
It has been suggested that the manuscript was written for readers already familiar with the system described.
Perhaps there was once an earlier “beginner’s course” manuscript, since lost to history.
If you read I.33, you will appreciate what a sterling job Paul Wagner and Stephen Hand have done in interpreting I.33 into a realistic fighting system.
Their book is comprehensive and logically laid out.
Nearly every technique described is illustrated by a photo sequence, and in most cases the text is on the same page as the photos.
As I know from personal experience, the latter is often much harder to achieve than one might think!

Stab-Knock and Shield-Knock

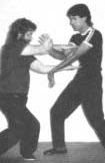
I.33 only deals with the use of sword and buckler, and the way these are used is distinctive.
The buckler is seldom used independently.
If the sword is held back in a cocked or charged position the buckler is advanced towards the foe.
When the sword is forward, the buckler is kept near the sword hand, and moved so that it is always between the sword hand and the likely approach of the enemy’s blade.
"Half-shield" counter and "Underarm" ward. Core techniques of I.33
Two of the core techniques of I.33 are “stab-knock/thrust-strike (stichslac)” and “shield-knock (schlitslac)”.
A stab-knock is made when the buckler contacts and controls the opposing blade.
Since the fighter is to keep sword and buckler together, the stab-knock is both an attack and defence in single time.
While the term thrust or stab is used, the attack may actually be a draw-cut or push-cut (aka “file”).
Contrary to the tired old myth that medieval swords were only swung, I.33 shows a number of thrusts.
Often the line of the sword obstructs the threat from the foe’s blade. This is reminiscent of the Long Har Chuan variant where an arm punches over an inward parry, simultaneously taking the parry over and striking.
Addressing another common myth: in I.33 a parry or bind with the blade often precedes the involvement of the buckler.
A stab-knock (or possibly a shield-knock and strike). Hands would be closer together at the beginning of a stab-knock.
Shield-knock generally refers to binding the foe’s bucker with your own. Ideally. this pins the opponent’s sword and buckler against his body, allowing the fighter’s sword to attack independently.
The latter assumes the enemy has his sword-hand and buckler close together, as recommended by I.33.
Shield-knock is sometimes seen applied to a buckler alone, or sometimes the sword-hand.
If the enemy has not protected the sword-hand with his buckler, then striking his arm with the buckler, preferably edge-on, is suggested.
Shield-knock differs from stab-knock in that the sword may be wielded independently when a shield-knock is used.
Right stays too long in fifth ward, so left shield-knocks his buckler and strikes. A strike in the other direction would inhibit right's sword-arm from making a late attack. Left probably stepped to right's weak side, but this is not shown by medieval art.
Right shield-knocks both buckler and sword. With no opposition to his blade he strikes the head.

Distance, Wards and Counters

I won’t attempt to discuss most of the techniques in Medieval Sword and Shield since they would be hard to understand outside the context provided by the book.
A useful concept that the book describes is that of close distance, wide distance and out of distance.
Close distance is when the fighters can strike each other without moving their feet.
Wide distance is that where a stepping movement is needed to move into striking distance.
Out of distance is where more than one stepping movement would be needed to reach striking range.
Such terminology is fairly common in sword fighting circles but often not so clearly and simply stated in other martial arts.
Another useful concept is the book clearly distinguishes between the terms “ward (custodiis)” and “counter (obsesseo)” as used by I.33.
A ward is a position you adopt before making an attack, while a counter is a position adopted in response to a ward.
It is stressed that one should not “lie” in a ward.
This echoes my own frequent comments about positions and stances not being static and being transitional.

Modern Applications

What can Medieval Sword and Shield teach the modern serviceman or prepper?
More than you might think!
For example, several of the core techniques show elements of Long Har Chuan, and I will deal with that topic further in a moment.
In Crash Combat, I advise the baton and machete user to become familiar with rising and horizontal strikes.
The two most versatile wards of I.33 are “underarm” and “priest’s special longpoint”.
The bucker is held in a similar position for that recommended for the unarmed “alive-hand”.
While we have machetes and other long blades, a buckler is unlikely to be used.
Some of the buckler techniques are not suited to larger shields such as a riot shield.
In two of my books I describe using a helmet of entrenching tool in the weak hand to defend from a blade.
The I.33 principle of keeping such a defence between your weapon-hand and the threat is directly applicable.
I.33 shows very few attacks to the hands or arms. The implication is that if the buckler techniques described are used such attacks are highly unlikely.
In combat without bucklers, the hands and forearms will often be targeted, whether a machete, baton or smaller blade is used.
This is why you must keep your hands and yourself moving.

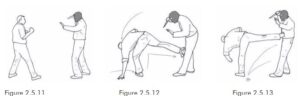
Long Har Chuan and Weapons

As I mentioned already, we can see the core principles of Long Har Chuan being used in some of the fundamental techniques of I.33.
Long Har Chuan boils down to two ideas:
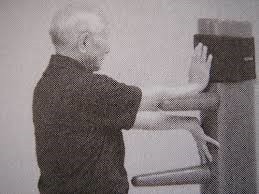
When we make an inward parry, we take over with an outward parry.
When we make an outward parry we simultaneously make an action with our other hand, either a strike or the beginning of another parry.
If we parry a foe’s right hand with an outward parry from our right hand we would move left and hit him with our left hand.
Using a machete or baton has some influence on how Long Har Chuan is applied.
If you have a long weapon in one hand you will likely favour its use.
In offence the weapon has more reach and inflicts more damage.
For defence it has more reach and is less vulnerable than your empty hand.
A bind. Note how bucklers cover the sword hand.
Suppose your enemy has a machete in his right hand, and you are configured the same.
Your first move will be to bind his blade.
“Bind” has a number of different meanings in blade fighting, and is used here to mean a sustained contact between blades, usually to exert control.
Contact his blade on the outside, with your own, remembering that the strongest part of a blade is near the hilt, so attempt to bind “forte to forte”.
Press his blade to your right and step in to your left. Make contact with his weapon arm with your left hand at the wrist, forearm or inner elbow.
This hand controls, checks and monitors his weapon arm.
This contact frees our weapon hand to unbind and strike at the foe’s neck.
Rather than a broad swing, this may the a thrusting action, resulting in a thrust, draw-cut or push-cut.
If we instead sensed his weapon arm reacting, we might instead strike down at it with our blade.
The procedure is similar for a bind on the inside of his blade, but in this instance his other hand is a potential threat and your should be ready to strike at this if necessary before attacking the neck.
As can be seen, both inward and outward parries/binds are taken over by the free hand to free the blade for use.
Categories
Phillosoph

Roundhouses and Side Kicks

Over Christmas I made some changes to the Global Editions of “Attack, Avoid, Survive”. These were mainly changes of font or tweaks to improve readability. The sort of things that nobody but the author are likely to notice. Due to the caprices of word processors, this took way longer than it should have, minor changes throwing dozens of illustrations out of position. I may have finally learnt my lesson, so do not expect any further modifications in the near future, if ever!

The Mystery of the Muay Thai Roundhouse

Of course, during this I did add some more content. Mainly paragraphs or sentences clarifying existing sections. The book is now a couple of pages and several hundred words longer.
As I added some extra text to the section on roundhouse kicks a memory stirred. Some reference to the roundhouse kicks of Muay Thai being different and “the leg swung like a baseball bat”. I consulted a few references on Muay Thai that I have. There is no doubt that Thai boxers make very effective use of roundhouse kicks, but I could find no difference in the description of methods. I realized that the origin of the half-remembered quotation may be Wikipedia. Reading the section on Muay Thai roundhouses, I was informed that the leg was straight on impact and that power came from rotation of the body. That is exactly what I had always done, and I cannot see any other way to do it. How could I execute a circular kick without involving the hips or waist? I consult the “Essential Book of Martial Arts Kicks” from Tuttle Press. There is a section on “Straight Leg Roundhouse” and a mention of its use by Muai Thai. I am told that it is no longer a whipping kick but a “momentum” kick. I presume this refers to kicking with a follow through. The description could be read to mean the leg is forced to keep straight, but such would cause tensing and is contrary to increasing momentum and good kicking technique.
I will explain here that I originally learnt my kicks in Karate, polishing my technique with Capoeira. Roundhouse kicks were taught by adopting horse stance and kicking through 180 degrees to one side from the other. In Capoeira roundhouse kicks were snapped off from ginga. The rear foot left the ground and struck out in front of you, following a course that was effectively a horizontal snap kick. With either, your leg finished straight if your kicking leg was properly relaxed. It was impossible to not use body rotation with this kick, and probably dangerous to try!

The Solution

It was only when I began to read about how other styles performed roundhouse kicks that I solved the mystery. For me, a roundhouse began when the kicking foot was still on the ground. For others, it started once the knee was raised up in the air. Hip rotation might be used for a kick from the back leg, but there were a variety of other kicks considered roundhouses. The raised knee position could be used to throw either a roundhouse, side kick or hook kick, so was useful for competitions. My Karate style had not been interested in sport and competitions, so the roundhouse I had learnt was closer to the powerful form used in Muay Thai. Of course, it is possible that the Wiki writer fell into the trap of over-specificity, looking for differences where few actually exist.

Essential Book of Martial Arts Kicks

The “Essential Book of Martial Arts Kicks” is worth a look, if you keep in mind it is primarily concerned with sport, tournaments and competition. All the kicks include an example of a self-defence application, but some of these will be more applicable or practical in the real world than others. The authors comment that most hook kicks are relatively new, implying they are something that has evolved more for competitions than actual combat. I was also intrigued to see crescent kicks were highly thought of. Personally, I am quite fond of crescent kicks, but have some reservations about their use in real combat. They are, however, a very good training aid for certain modes of footwork and maneouvre. The authors suggest that the broad striking area of a crescent kick is compensated for by the unexpectedness and variety of targets that it can attack, which is worth pondering. While the book has an emphasis on Karate and Tae Kwon Do, some attention is given to variations used in Savate, Capoeira, Chinese and Indonesian styles. A number of the Capoeira kicks and tactics seldom encountered in other styles are included, but I would have liked to see more Capoeira and Savate.

Side Kick Variations

Duck away from threat and two side kicks.
Evasion by turning, and side kick to outside gate
Side kick to outside gate preceded by body turn and back-fist.
Duck followed by side kick with hand on ground.
Drop to one knee to avoid attack, then side kick as rising.
Side kick from the ground. Attacker's knee is an alternate target.
Well worth a read is the chapter on side kicks. Side kicks are a very useful real world technique, and this chapter illustrates side kicks thrown from a number of unconventional positions or combined with evasions. Some of these may be considered hybrids of side and back kicks, and many of the above positions may also be used for a back kick instead. One of the setups illustrated resembles the start of an outward crescent kick from the lead leg, and can be used to attack an aggressor on the outside gate.
Categories
Phillosoph

Pec-Knives and the Gerber Strongarm

Pec-Knives

The pectoral position is a very useful position to carry a knife. It is accessible with either hand, and if the wearer is seated or prone. It can be readily utilized to cut a jammed seat harness, or when rolling on the floor with an aggressor.
This topic came up in one of my discussions on soldier’s load. Modern servicemen have a lot of gear to carry, and many do not believe carrying multiple knives is warranted.
If you are going to carry a single fixed blade knife, then the weak-side pectoral position is a good place to place it.
This carrying position influences the form of the “pec-knife”.
Pec-knives are discussed in “Survival Weapons”, and their use in “Crash Combat”.
The more general discussion of knife use for defence in “Attack, Avoid, Survive” are also relevant.
You sometimes see quite large knives carried in this position, but for most of us an overall length of less than eleven inches is more practical.
There is a wide choice of fixed blade knives in this size range. Harder is finding a knife of sufficient thickness and robustness. If this is going to be a soldier’s primary blade then it must stand up to some rough treatment.

Gerber Strongarm

A few weeks back I encountered the Gerber Strongarm.
This just seemed to shout “I will be a great pec-knife!” 
Just before Christmas, I got an email telling me the variant I wanted was back in stock. Money was short, but I had had a rotten day and a few minutes before midnight I gave into temptation and ordered a Strongarm. It helped that the price listed was about 30% less than most other stockists!
Would you believe it? I looked the next day and the price had jumped a big chunk. I had ordered just in time!
A few days later the Gerber Strongarm arrived. I wish I had had the money for another, but as it is, I may run out before the end of January. Buy books please, people!

The Sheath and Extras

An important component of a potential pec-knife is the sheath.
This mode of carry is most convenient with the knife inverted and the pommel downwards. Obviously it is necessary that the knife is fully secure in this position, but still capable of being easily drawn when needed in a hurry.
The sheath of the Stongarm has a large clip that engages a depression on the hilt. Note that this releases with an audible click, which may affect your tactics in some scenarios.
In addition to the clip, the smaller-width hanging strap has a retention strap with a popper.
The latter feature is one of the few I have issue with. This is a little tight, the slight increase in grip width my lanyard has added making it sometimes fiddly to close.
The length of strap past the popper is also on the short side, and may be difficult to pull on if wearing some gloves. It may be necessary to sew an extension onto this part.
An important feature of this sheath is that it is ambidextrous, so the knife can be inserted securely with the edge either to the left or right. This is useful for a pec-knife, it being considered to be prudent to carry your knife with the main edge outwards, away from your throat.
A couple of accessories are included in the box.
I have already mentioned that the smaller-width belt hanger has the retention strap. This affixes to the sheath by a strap and popper.
A larger width belt hanger can be attached to the smaller by poppers. Both belt hanging loops have poppers, making the easy to detach or attach without rethreading a belt.
A device that allows the sheath to be mounted horizontally is included, as is a device allowing easy attachment of the sheath to MOLLE/ RALS systems.

The Knife

The knife itself comes with either a semi-serrated or plain edge, and is available in either black or a more practical coyote brown shade.
The blade is 4.8 inches long, and 3/16th thick. Overall length is 9.8 inches and weight is given as 7.9 oz.
Blade material is 420HC stainless steel with a dark grey coating.
Grip is a rubber coating over glass-reinforced nylon.
There is a resemblance to Gerber’s LMF II knife. The LMF II is heavier (c.12 oz) and costs more. I have not handled a LMF II, but the Strongarm seems a better choice for the pec-knife role.
The butt of the Strongarm ends in a blunt triangular point that might serve for applications such as window breaking. This feature is thoughtfully provided with a lanyard hole. I know I have said this before (yesterday actually!) but it really is surprising how many expensive knives are not provided with provision for a lanyard or other features to reduce the chances of loss.

Making a Chest Rig

There are plenty of good reviews of the Strongarm out there, so I will concentrate on specifics of rigging it as a pec-knife. This is actually very simple.
Obviously, you can mount the sheath directly on your webbing, but what if you are not wearing such?
The Strongarm is potentially a very useful knife, and you may want it when you are not in full tactical gear.
I have seen the Strongarm described as a cross-over” knife, good for urban and wilderness.

Take about two metres of paracord. I know frugality is a virtue, but it is prudent to have a little too much rather than start again.
The Strongarm sheath has a number of “screwholes” down each side. Pass one end of your paracord through a hole near the sheath mouth, and the other through a hole on the opposite side, second from the end.
This should be made clear from the photos.
Experiment with what arrangement suits you personally.
Pull both ends of paracord so the middle makes a snug length across the front of the sheath. Now take both lengths, hold them together and tie a single knot in both. This can be an overhand knot but a figure-eight may be more comfortable when worn.
You should have created a large loop with the knife sheath threaded on it. This loop should be large enough to pass your weak-side arm through, the knot sitting somewhere between your shoulder-blades. Take the long, free ends and form them into a second loop using the knot I call a “slip-bend” in my free book on knots.
Place your other arm through this loop and tighten it by sliding the two parts of the slip-bend apart.
The Strongarm sheath should be hanging just before your weak-side armpit. If you have the small-width belt hanger still attached, this may be used to anchor the sheath to a belt, if you wish.
Note the snap-link, added by a magnus-hitch. The lanyard can be attached to this when greater security is wanted. It also proves useful for holding other items. I later relocated the snap-link to below the sheath, where it helps keep it in position.
A chest-rig for a knife can cost tens or hundreds of dollars.
This one is simple, lightweight, comfortable and costs just a couple of metres of paracord.
If you like this, throw some of the money you have saved this way!
Categories
Phillosoph

Designing a Fighting Knife

In a recent blog, I had a wander into the field of fighting knives.
Today I would like to share some additional musings.
Firstly, it is valuable to recognize that names such as “fighting knife”, “combat knife” or “tactical knife” are in actuality rather euphemistic, particularly in modern applications.
A knife vs knife duel is unlikely.
There is an adage that if you find yourself in a fair fight, you did not plan properly, and this should be remembered when considering knife use.
Knives are generally used either as weapons of desperation or advantage.
One of the points I made in the previous post is that probability of use did not justify carrying a large combat design.
A multi-role survival blade is a far better encumbrance, and most such designs usually serve well in a defensive or offensive role.
It is no secret that I regard the kukri as superior to most fighting knives on the market.
If a dedicated fighting weapon is needed, it should be a small to medium-sized design that compliments the large and small survival designs likely to be carried as well.
That said, what are useful features to have in the hypothetical situation where carrying a large combat blade is prudent? Something for you time-travellers and trans-dimensional trippers to consider 🙂 Some of these comments may be relevant to medium combat knives too.
The "Military Art of Training", published in 1622, advocates very strongly the wearing of the dagger by soldiers, and it quotes six reasons in support of the case:
(1) The handsome appearance of the weapon;
(2) Its advantage over the sword at close quarters;
(3) Its superiority in a private combat;
(4) Its utility for the speedy despatch of the vanquished;
(5) Its advantage as a means for tethering a horse in the open;
(6) Its awe-inspiring effect if drawn by an officer when sedition is imminent.
 
Firstly, we will ignore the field of swords, and stick to knives and daggers, not anything longer than a cubit.
A point ignored by many manuals on knife use is that even relatively light clothing can provide a surprising amount of protection from a knife cut. The garment may be shredded. but very little damage may reach beneath the skin.
Even if you are using a knife defensively with the intention of “cutting and running” it is important to use the point first against any clothed area.

Pesh Kabz

The second consideration for a fighting knife is with respect to whether the opposition will be utilizing armour.
One of the most useful designs for use against armour is that of the pesh kabz.
Mechanically a knife is a wedge. The pesh kabz blade tapers in both width and thickness, and has a T-shaped cross section. In effect the blade is an isosceles triangle in all three planes.
The blade is narrow enough to find its way through openings in the armour, yet retains a useful cutting edge if needed.
Some time back there was a vogue for non-metallic knives, including those in a tanto configuration.
A pesh kabz configuration would have been far superior.
As stated in “A Glossary Of the Construction, Decoration and Use Of Arms and Armor In All Countries and In All Times” by George Cameron Stone, “The knife is obviously intended for forcing an opening in mail; and as a piece of engineering design could hardly be improved upon for the purpose.” (p.494)
Pesh kabz are either straight, or have a recurve that brings the point closer to the axis of the hand. The latter are often very attractive in form.
I have an example of each, and I would not complain if issued one of these instead of a Fairbairn-Sykes. A modern pesh kabz has a useful potential as a knife among modern medium fighting knives.

Bagwell and Bowies

Shortly after writing the recent blog, I came across some references to Bill Bagwell, who claimed to have identified the features that were most desirable on a combat bowie.
This list of features included a distal taper, convex profile and edge and a sharpened false edge. The false edge is often quite long, creating an acute point. The blade is over nine-inches long, and over an inch or more wide.

Pugio

If you are going to have a long, sharpened false edge, an obvious question is why not have a double-edged cut and thrust blade?
Historically, one of the cut and thrust weapons par excellence was the Roman gladius. The gladius was a sword, but if you shorten the blade you have what is effectively the Roman pugio.
I have seen it claimed that a Roman soldier who lost his gladius could still fight effectively with his pugio. The width and length of pugiones give some credibility to this claim.
Supposedly the Gerber MkII was inspired by the Mainz-pattern gladius.
Pugiones seem to have retained the more attractive, wasp-waisted leaf-shape of blade long after the gladius had become straighter-edged and more utilitarian looking.
This may have been that swords were issued while daggers were commonly a private purchase.
In other words, a pugio-type design offers a broad blade, acute point and the cutting advantage of curved edges.
A central rib was a common feature, increasing the capability against bone or body armour.
A flat blade with a rib is effectively a pair of pesh kabz back-to-back.
Fullers might also be included in a modern design, and some use of them was made in ancient pugiones.

Jambiya

Another good design for a large or medium combat knife is the jambiya.
Indian/Middle Eastern designs such as the jambiya and pesh kabz tend to be neglected in the west, but have much to offer.
The interest in kerambits/ karambits shows knife-users are open to the potential of curved blade designs.
Fairbairn himself experimented after the war with a jambiya-like knife he called the “cobra”.
Modern Reproduction of Fairbairn Cobra
Like the pugio, the design of a large tactical jambiya could include fullers and a central rib.
A slightly curved blade can create an initially wider wound than a straight blade of similar dimensions. This is illustrated in the figures taken from Richard Burton’s “Book of the Sword”.
The very curved blade cuts a wide channel, but needs considerable force to penetrate sufficiently.
Incidentally, the primary cutting edge of a jambiya is the concave edge. You will commonly see it held or photographed upside down.
Examples with a false edge, and the geometry of some grips make it clear that the main edge is the concave.
The jambiya is held like a claw or hook. This has the tendency to drive the point into a target rather than causing it to glance off. The blade can also reach over and hook limbs. The curved edges give a cutting advantage.

The Russian/Caucasian/Georgian khanjali/kindjals/qama have straight or curved blades that resemble gladius, pugiones and jambiya, but some are long enough to be considered short swords.

Some decades ago, a knife called the “Hobbit” gained some attention.
The Hobbit was effectively an inverted jambiya.
The main edge should have been concave and the serrations would have been more useful on the convex side.
A modern, medium tactical jambiya would also be a welcome addition to the market.
Many years ago I attempted to sketch what one might look like

Length

Around 1922-24, the British Army conducted an extensive series of experiments.
The 17" sword bayonets then in use had proved to be unwieldy and too heavy for trench warfare. Their reach against cavalry was no longer needed and they were poor multi-purpose implements.
On October 2nd, 1924, a report by the Small Arms School stated:
“ (a) It has been conclusively proved during the war, and since, with our present system of training in the bayonet, that ‘reach’ is not a main factor but that ‘handiness’ is. A man with a short handy weapon will beat an equally skilled man with a longer cumbrous weapon practically every time. As regards length of blade for killing purposes, the Physical Training Staff went into this in considerable detail during the war, and came to the conclusion that a 6-in. blade was sufficiently long to deal with the most thickly clad of our enemies—potential or otherwise. The most thickly clad was taken as being a Russian in winter clothing.
…(c) The bayonet suggested for future adoption on the Mark VI rifle is one of about 8 inches in length, cruciform in section, and without the useless handle and cross-piece”
reproduced in The Lee-Enfield Rifle (p.135). Maj. E.G.B. Reynolds.
Also found in “The Bayonet Book” by Johm Watts and Peter White, quoted p.8 (“Short and Sharp”) of The Times Literary Supplement Oct 17 1975.
The Roman Vegetius famously declared “…a stab, though it penetrates but two inches, is generally fatal”.
He was talking of a stab from a broad gladius blade, rather than a narrow bayonet or knife, however.
Many authors clarify “two inches, in the right place”, the latter condition not always possible to achieve in combat!
Some of the criteria for a primary fighting knife are different to those for a bayonet.
A blade of between nine and eleven inches seems to be the optimum, and was the size of most pugiones.
The blade should be at least one and a half inches at its widest.
Specialist fighting designs, such as main gauche, may need to be longer.

Grips

If we look at pugiones, kindjals and jambiya we find something of a consensus on grip form.
Most examples feature a relatively slim grip with a broad, flattened butt.
A narrow grip between two wider areas often gives a good grip for a single hand.
If you hold the knife or sword with the blade flat and level and the knuckles upwards you will find the pressure of the palm on the butt nicely counterbalances the weight of the blade.
The pugio usually had an expanded section in the middle of the hilt which improved grip, functionally similar to the ridge on a kukri handle.
Any grip should include provision for a wrist loop. It is surprising how many knives costing hundreds of dollars lack this useful feature!
On the subject of grip, how a knife is gripped is a topic that some authors treat in some depth. Fencer grip, hammer grip, sabre grip, ice-pick grip, foil grip, ninja grip and so on.
Only recently, I noticed that the actual orientation of the hand was seldom mentioned.
Elsewhere I have discussed the “paintbrush grip” for double-edged blades. This tends to place the blade with the flat of the blade in a horizontal direction.
When I hold a single-edged knife I place the blade in a similar orientation, although my finger positions will be slightly different.
The reason for holding the knife so is not so the blade will slip between the ribs. Whenever possible, you should avoid thrusting at the ribcage.
If you do have to strike the ribs there are advantages to a horizontal blade angle, however.
I have seen it claimed that a horizontal blade that strikes a rib is more likely to glance past or split the rib than be stopped by it.
The main reason I hold a blade horizontal is that it makes more sense to me to have the edge as well as the point directed towards the threat.
If my hand is pronated (palm down) the blade slopes in. If palm up, it slopes outward. In either case, the main edge is towards the enemy rather than down towards the floor.
Some older sources describe holding the blade edge up, but this limits manoeuvrability.

Guards

The guard of the fighting knife is something that is not usually given sufficient thought.
If the knife has a guard, it is typically a simple crossbar or equivalent.
A simple crossbar works well on a sword. It will usually be wide enough to protect the hand. Enemy blades seldom touch the guard since a sword is long enough to parry attacks a foot or more away from the hand.
Some writers claim the main function of a sword guard was originally to stop the user from hitting his knuckles on an enemy shield.
The crossbar on a knife is seldom wide enough to effectively protect the hand. At best, it acts as an arrest to reduce the chance of penetration beyond the blade and to compress tissue for deeper penetration.
Even when the crossbar is long enough, it only provides protection in one plane.
Suppose, for example, you parry or block an attack with your blade. Since the blade is shorter, the contact point is going to be much closer to your hand than if you were using a sword.
Contact point is most likely to be on the flat of the blade, so the strike is very likely to glance down and hit your thumb or back of your hand. Potentially very nasty
In a Modesty Blaise novel, a character observes that Willie Gavin makes a steel against steel block, and reflects on Gavin’s skill, knowing that this is the most difficult of defensive movies with the knife.
Substitute “bloody dangerous” for “difficult”!
Certain styles of knife-fighting base themselves on sword fighting, so techniques involving parrying may be encountered.
One of the lessons here is to avoid using your knife (or your other hand) to parry, if possible.
Avoid letting your enemy make any contact with your weapon or hand.
If you do make contact, execute a “beat” and strike to the hand and arm beyond.
Keep both hands moving, and keep moving yourself.
Use your ginga and the other techniques in my books to avoid and attack rather than parry and block.
As an aside, the above implies there must be some length of blade over which parrying becomes practical.
Drexel-Biddle taught parrying, but had his students were training with hand-held sword-bayonets.
I would be fairly confident parrying with a ten-inch kukri. Shape and design probably contributes too. The forward curve of a kukri or jambiya increases control and compensates for length.
All that said, if I am designing a primary fighting knife, I would include a guard. Down-curved quillons that can catch a blade would be nice, although how realistic this is is debatable, and such a feature certainly needs to be backed by protection for the hand behind.
An oval or ovaloid guard, such as found on a tanto, might be a good option. The tanto, hamadashi, aikuchi and related designs themselves are good options in addition to the designs already mentioned.
As I understand it, “tanto” actually means (very) short-sword and it is not technically a “to” or sword unless it has a to-type guard and other sword fittings (Cameron Stone, p.604).
Most modern knives sold as tantos would not be classed as such, and the wikipedia article is erroneous [!]
A guard that provides protection in two planes may be problematic to wear.
One option is to offset the disc so less of it is against the body but it still protects the outside of the hand.
Renaissance daggers often combined quillons with a “thumb ring”, the latter a misnomer since it was positioned to defend the outside of the hand rather than involve the thumb.
Dagger by Tod Cutler
A rather nice dagger from Tod Cutler. The long ricasso/long false edge on one side increased the strength of the blade when prying between and levering plate armour.
Categories
Phillosoph

Fighting Knives in a Modern Context

The other day, I found myself thinking about the variety of weapons taught by many martial arts.
When these arts were created, most of these weapons were relatively common place.
The battlefield, and the street, have changed since those times.
You are unlikely to fight with a sword, a knife or machete being more probable.
The entrenching tool is more likely to be to hand than an axe or mace.
Your spear or staff will seldom have to deal with a horseman, and is much handier if its length is less than your height.
The stick remains a useful weapon, but nowadays will often be wielded with the intention of not seriously injuring a foe.
Those of you that wisely have invested in a copy of “Crash Combat” will recognize the above as the arsenal of modern weapons included in the course.
The above reflection melded with a question my subconscious had recently posed to me: “Does one need a combat knife?”
Some authors use the term “combat knife” or “tactical knife” to mean a variety of multi-purpose knife.
In this blog, I am talking about specialist designs that have the primary role of use against two-legged predators.
Certainly, it is prudent to have a knife that one can fight with, but what are the merits of spending good money on a knife that is primarily designed as a weapon?
And what form should such a knife take?
There is a baffling variety of supposed combat or fighting knives.

Context

To answer that last point, we must return to the theme noted in the first paragraph.
We cannot really consider a fighting knife without also considering context. The requirements of a fighting knife have changed as the nature of combat has changed.
In the Middle Ages, for example, it was desirable that a blade be stout enough to deal with body armour, yet narrow enough to slip between plates or through a visor.
Jump forward to the age of the rapier, and a dagger might be required to serve as a main gauche.
The Bowie knife provides us with another illustration. The Bowie blade shape is commonly used for survival knives, which tends to make us forget the original Bowie knives were primarily fighting weapons.
The Bowie came into fashion in an era when pistols were generally single-shot. The Bowie was a handy alternative to a sabre or smallsword.
The fighting Bowie was at least eight inches long, with examples longer than twelve inches by no means unusual. A blade might be a quarter of an inch thick and broad enough to look like a pointed cleaver, which essentially was what it was.
A Bowie might be used against other knives, or longer edged weapons.
The usefulness of the Bowie waned with the increasing availability of mass-produced revolvers. Apparently many volunteers in the War Between the States invested in impressive Bowies, only to discard them once the wisdom of a lighter marching load became apparent.
There seems little point nowadays in carrying a large fighting knife such as a Bowie or smatchet.
Many large utility knives, billhooks and machetes can defend our person equally well and prove far more useful for other, more likely tasks.
You probably also own entrenching tools, hatchets and tomahawks that would also be superior weapons.

The Modern Fighting Knife

Let us assume that you want a fighting/combat/tactical knife, on the basis that you may one day perhaps need it.
The fighting knife will be carried in addition to more general-purpose blades, so cannot be too large or heavy.
If a fighting knife has a place in our arsenal, then logically it must be because it can meet a requirement or scenario better than our large survival knives and other tools.
Large knives are not particularly concealable.
While it is possible to thrust effectively with a machete or kukri, it is not the ideal shape for use against thick clothing and a hypothetical “take out the sentry” application.
These criteria narrow down the form that a modern fighting/tactical knife should take, and what we should be looking for when making our selection.
This is best illustrated with some examples.

Fairbairn-Sykes Commando Knife

No discussion of modern fighting knives would be complete without mention of the Fairbairn-Sykes knife, aka “The Commando Knife” or F-S.
If fighting knives are mentioned, this is most likely the image that popped into your head.
At the start of his book “Combat Use of the Double Edged Fighting Knife”, Rex Applegate gives a nice summary of desirable features for a modern fighting knife:
“The heart of the fighting knife is its blade. It should be 5 to 7 inches in length, double-edged, and wide enough to be razor sharp on both sides all the way back to the cross guard. The point must be sharp enough to penetrate and thick and tough enough to withstand side pressure.
The blade should provide slashing, ripping, and thrusting capabilities. Stainless type steel, correctly tempered, with a dull finish is preferable. The blade should be tempered to hold an edge as well as being easily sharpened and, at the same time, not brittle.
The oval-shape handle should fit the palm of the hand and be designed so that the edges of the blade can be immediately, and automatically, located in dark or light conditions. A nonslip surface is another feature that should be incorporated. The handle should not turn in the hand (sweaty palms, etc.) when the blade strikes resistance. The knife should be handle heavy with relation to balance. Nothing in the design should limit its possibilities for use as a weapon from any position or either hand. The overall length should be approximately 10 to 11 inches; anything longer makes it too unwieldy and cumbersome to carry. The weight should be in the 1/2 to 3/4 pound range.”
Applegate’s earlier work, “Kill or Get Kill”, has a similar description, although includes the suggestion that the blade be no more than an inch across at the guard, and that the handle have its largest diameter at the centre and taper towards both the guard as well as the butt.
Contrary to what you may often see claimed, the F-S is not the “Ultimate Fighting Knife” [ignoring that this is not what “ultimate” actually means!].
Comparison to Applegate’s description quickly illustrates why.
The grip of the F-S is round in section, rather oval. Being of cast metal, the grip is difficult to modify or replace.
While the balance point is in the grip, the cast grip possibly contributes some unnecessary weight.
Oddly, my F-S seems heavier than my M3, but is actually half an ounce lighter.
If you own an F-S, you will know that it is very difficult to get a sharp edge on it.
Common advice on the net is to regard the F-S as a thrusting weapon only, and steel the edge at an angle of about 40 degrees. Personally, I think a sharp blade will create more of a wound if uses as described in my books. Steeling the F-S at 20 degrees seems better.
The “razor-sharp commando knife” is, however, a poetic licence of the novelist who has never owned one!
Some of these features seem to have been the result of wartime mass-production, which have persisted.
The F-S gets a lot right too! My step-son, on first holding an F-S declared:
“Woah! I feel like it wants me to do something, but I am not sure what!”
Fairbairn’s writings on how to use the F-S knife include illustrations of cuts and slashes directed to the forearm and inside of the elbow, although how practical this would have been against a woollen greatcoat or tunic is debatable.
Incidentally, the ancestors of the FS were the Shanghai Fighting Knives, which were made from obsolete double-edged Lee Metford 1888 bayonets. In Fairbairn's own words:
In choosing a knife there are two important factors to bear in mind: balance and keenness. The hilt should fit easily in your hand, and the blade should not be so heavy that it tends to drag the hilt from your fingers in a loose grip. It is essential that the blade have a sharp stabbing point and good cutting edges, because an artery torn through (as against a clean cut) tends to contract and stop the bleeding.

Boker Applegate-Fairbairn

Following World War Two, Applegate collaborated with Boker to produce a knife that met his requirements, called the Applegate-Fairbairn.
I have no personal experience of these, and they are likely to always be beyond my price range.

Gerber Mk II

The Gerber Mk II answers many of the complaints that can be made about the F-S.
While it is called the “Mk II Survival”, this is primarily a fighting knife.
Mine has taken a fairly respectable edge.
The bad news is that the Mk II tends to have a higher price tag than one might wish for a knife that will not be your primary survival tool.
It is rather baffling that copies or replicas of the Gerber Mk II are not commonplace!

M3 Trench Knife

Shown with my F-S and Gerber is my M3 Trench Knife.
The M3 was also produced in German as the “NATO Combat Knife”. This blade configuration has also been used for a variety of bayonets.
A nice design feature of the M3 is the asymmetrical guard, allowing the user to find the orientation of the main edge even in the dark.
While the M3 was designed as a utility knife, its configuration makes it a pretty good choice for a fighting knife. It compares very favourably to the Gerber Mk II in general size and features.
Personally, I do not mind that the M3 is not double-edged. The false edge comes already sharpened, and the balance of the knife is about an inch behind the guard, just where you would want it.
If you shop around, you can find reproduction M3s for a reasonable price.
Try websites that cater for WW2 re-enactors. Take a look at German trench knives while you are there.
In “Kill or Get Killed”, Applegate suggests “utility knives” can be reground into fighting knives, and shows a knife so converted. Presumably he means the M3, although he at one point claims that the utility knife has its weight too far forward in the blade.
The M3 as it comes is a pretty good fighting knife, with the option of serving in utility roles in an emergency.
Ideally, a fighting knife should only be used for its intended role, to keep it sharp.
Price of a reproduction M3 makes it a good basis for a custom project.
Blade blanks for M3s or the related bayonet models, may also be found.
As Applegate suggests, the top edge can be extended, and if you have a belt-grinder adding a hollow grind is relatively simple. Tapering the blade may be more challenging. Personally, I would not consider this necessary.
Adding a fuller to the unsharpened section might be considered.
The grip of leather washers is probably simple to reshape or remove. Grip tape may prove useful here.
The large metal butt-plate may be more problematic for a customisation project, A narrow pommel of similar configuration to that of the F-S or Mk II might be preferred.

The V42

The V42 is another wartime design of fighting knife.
The skull-crusher pommel is a nice feature, although probably larger than needed.
The leather padding applied to the upper side of the quillon is a nice feature.
I have seen claims the pommel on the originals had a tendency to catch on and damage equipment. I suspect the versions on replicas such as mine have been made blunter.
My main complaint about this knife is the guard could be narrower and the blade somewhat broader.

Smaller Fighting Knives

As implied above, your fighting knife should be chosen so that it can be carried in situations you cannot carry a larger survival knife.
With this in mind, I will present two smaller examples of what can be considered fighting/tactical knives.
The larger knife is a Smith and Wesson 820.
The false edge is not sharpened, but the main edge has sharpened up to a very sharp edge.
This style resembles the M3. I prefer this configuration since it offers a little more utility, facilitating practices such as batoning.
Very impressive, and a very reasonably priced knife with most of the features you might wish for.
The smaller knife is a CRKT version of the AG Russell Sting (as favoured by a well-known literary figure!).
Small, but very solid and sharp.
Note that both knives have lanyard holes, a feature that would be welcome on the larger knives.
Adding wrist loops is on my to-do list.
Such knives are (hopefully) often carried and seldom used. Comfort and concealability are therefore priorities. A version of 820 with a flatter grip and reduced quillions, or a Sting with the option of a longer and possibly M3-style blade would be welcome.
These are some of your off-the-shelf options, illustrated with examples I have to hand.
Later blogs will cover other options.
Categories
Phillosoph

Breakfalls: The Lateral Roll

Close combat has been described as the art of knocking someone down and kicking them while they are down. In this light, it is perhaps surprising that breakfalls are a rather neglected skill in many martial arts and self-defence courses.
The book Arwrology recounts and incident where a serviceman uses a breakfall to avoid injury when he is thrown to the ground during a bombing raid. Breakfall techniques can be incorporated into the warm-up for a training session in any martial style. In an ideal society, children would be taught breakfalls in kindergarten, learning a useful skill to save them from possible injuries in later life.
It will come as no surprise that Crash Combat and Attack, Avoid, Survive both contain sections on breakfalls. Breakfalls can be classed as “rolls”, “slaps” and “non-traditional”. A roll is self-explanatory. Slaps use the impact of the forearms and palms on the ground to brake the fall. In my books, the non-traditional techniques are represented by the cartwheel and the parachute landing fall. Once, on an isolated mountain path I missed my footing. Executing a parachute landing fall saved me from injury in a remote location, even though I was wearing a heavy pack.
In my books I also describe the forward roll, and slap techniques to the front, side and rear. Today I will look at two additional techniques.

The Rear Roll

The first is the rear roll. This resembles the rear slapping technique, but without using the forearms to brake you. The starting posture for learning resembles that used to learn the rear slapping roll. Instead of using your arms you continue to roll backwards, across your back and shoulders. It may be necessary to roll several times. Ideally you finish on your feet, ready to stand up from the squat position.

The Lateral Roll

The second technique is the “lateral roll” (yokonagare). The starting position for learning this resembles that used for the sideways slap breakfall. These photo sequences from books by Stephen Hayes illustrate the principle better than my text does:
The extended leg provides balance, and should be extended straight so that the bottom of the thigh absorbs the impact with the ground. The supporting leg is allowed to fold as much as practical to reduce drop distance. In the first sequence the roll seems to be to the rear quarter rather than to the side. The same starting position and core technique can be used to make a roll to the rear.
The lateral roll has a number of other applications. As well as being a breakfall, the technique can be used to drop below and away from an attack. It can also be used to drop and roll behind cover if spotted or fired upon. Possibly the move could be incorporated into certain sacrifice throws.
This is a move that can be initiated from any stance where the weight can be easily transferred to the rear leg. My Capoeira background notes that the actual roll action is preceded by a posture similar to negativa. It also resembles the semi-squat position often seen with some Chinese martial arts. For negativa and other breakfalls, see my books.

Categories
Phillosoph

Wind and White Crane: Hidden Hand Attacks

I have used lockdown as a chance to complete a number of projects. I have also done a lot of reading on a wide variety of topics.
This reading included finishing some books I had stalled on, and looking at some others I had just never got around to giving my full attention to.
In the latter category were a number of books on Ninjitsu, including some by Stephen Hayes. Books on this topic often have a lot of chaff in with the wheat, although to be fair, that is true of many martial arts books written in the 80s, if not in general!

The Wind Posture

One of the sections that interested me was that on stances, the stance associated with the element “wind” in particular.
As I have discussed in my own books, I feel “stance” and most of its English alternatives is an unsatisfactory term.
A stance is a transitional rather than stationary configuration. Hayes likens them to snapshots or frames from a film rather than being stationary.
Most of us, even many high-grade martial artists, have a relatively shallow immersion in the art.
Stances are an important training aid but it is easy to become diverted by the details rather than passing through to master the underlying concepts. Interestingly the Japanese term “kamae” translates as “pose” or “posture”, but also as “base”. Stances are often the foundation for learning.
From Stephen Hayes Ninja Vol.1:
“The wind level of consciousness is characterized by the receiving posture, or hira no kamae. The receiving posture couples a freely moving base and the power to harmonize the body with the intentions of an attacker. The feet are placed hip-width apart and carry the body weight evenly. The knees are flexed slightly more than in the natural posture, creating a feeling of balance in the hips similar to that experienced just before sitting down on a chair. The back is straight, in a natural manner, and the shoulders are relaxed. The arms extend outstretched to the sides with the hands open, and the eyes gaze forward in soft focus, taking in the whole picture without limiting the concentration to one single point.
The body should have an extremely light, almost floating feel to it. Epitomizing some concepts that are the opposite of those embodied in the shizen earth pose, the wind-level hira no kamae prepares the fighter for adapting to and going with the attacking moves of the enemy. This adaptive sensitivity is centered in the chest behind the breastbone. The evenly distributed balance facilitates quick and easy movement in any direction in response to the attacker’s intentions. The outstretched arms have the potential of becoming tools to carry out punches, strikes, deflections, blocks, throws and locks, as well as acting as distractions and calming techniques.
In self-protection situations, the hira posture is used to handle attackers in a way that subdues them without injury, if possible. The pose itself is nonthreatening, and it appears to be an attempt to fend off an attack or to reassure an adversary that there is no hostile intention, as upraised open hands traditionally symbolize surrender or benediction. From the hira no kamae, footwork proceeds with circular or straight- line movements, as appropriate for the specific circumstances. The arms are used to entangle the adversary with spiraling actions or intercept the adversary with direct advances.”
Another book on Taijutsu (by Charles Daniels, taught by the same sensei as Hayes, Masaaki Hatsumi) shows a posture it calls “hoe no kamae”. While this uses an L stance and raised forearms, I suspect the application is similar.
Those of you wise enough to have invested in a copy of Crash Combat or Attack, Avoid, Survive (thank you!) will know I place considerable emphasis on evasion rather than parrying or blocking.
The basis of this is the ginga movement from Capoeira.
Could the wind kamae be an alternative or complimentary evasion technique to ginga?
Sadly, I do not currently have much room to dance around, so I cannot experiment much with movement and evasive moves in hira no kamae.
Some observations:
On its own, hira no kamae and hoe no kamae look like the fighter is just standing there saying “Go on dude, hit me!”.
This is one of the symptoms of regarding a stance as static, amplified by still photography.
In practice, this posture will be used to allow fast body turns.
The outstretched arms contribute to maintaining balance.
Study the body twist used in the photos below. Hira no kamae is not used, but it could have been passed through if the defender had thrown up his arms for stability.
Both of my martial arts titles explain how to use quick evasive turns similar to that shown. You will find these in the bayonet and knife sections, as well as elsewhere in the text.

White Crane

Hira no kamae may have reminded some of you of the white crane-inspired movements used in some styles of kung fu and karate.
Not surprisingly, white crane styles often put a considerable emphasis on evasion.
The extended lead arm can be used to parry attacks that cannot be fully avoided.
Brought up under the attacker’s armpit, and we have the tai chi technique of “diagonal flying”.
This is effectively the same principle as using a straight-arm karate parry against a foe’s torso and breaking their balance.
Hayes’ books often show defensive strikes made against the attacking limb, including from hira no kamae. This is also a tactic favoured by many white crane styles.
The wind posture is likely to place a defender side-on to an attacker.
As described above, the lead hand may be used for an assortment of parries and strikes.
The latter include finger jabs to the face and clawing actions.
The rear hand has the advantage that is has a considerable distance in which to generate power, and that it is effectively hidden from the attacker’s view.
This is the equivalent of the “tail” position used with swords and other weapons.
The foe has no idea from what direction a rear hand attack may come, and the rotation of the waist can create power and velocity.
One option is to adopt a side-on horse stance as the forward arm parries.
The rear hand then executes a classic reverse punch, the hips twisting through ninety degrees to transition into forward stance.
Hook punches are another useful technique for an enemy you are side-on to.

Kup and Pow

In Complete Wing Chun (Vol.2), the author discusses Pak Hok Pai, a white crane style with several techniques suited to attacking an opponent to the side.
In best Batman tradition, two of these are called “pow” and “kup”.
Pow chui has been described as a straight uppercut employed with a semicircular body motion. I like to think of it as a “long uppercut”, although technically it is more of a long shovel-hook.
Targets for pow chui include the testicles, kidneys or throat.
Kup/cup chui is a downwards, overhead strike that can be targeted at the soft muscles of a kicking leg, or the forearm, biceps or triceps of an attacking or guarding arm.
The temple, nose or top of the head can also be targeted with kup.
Like the corkscrew hook described in Attack, Avoid, Survive, a kup can be used to reach over and around a guard. The difference is that the kup typically comes from the rear hand while the corkscrew starts as a lead jab.
Choy Lay Fut is also notable for use of large arc swinging strikes.
A more horizontal motion, intermediate between pow and kup, can be used to throw a lateral, circular strike (a “roundhouse punch”, perhaps?), that is more open and straighter-armed than a hook.
While this has elements of being a “haymaker”, many of the standard objections against a haymaker do not apply if correct tactics and a hidden hand posture is used.
The back and kidneys or below the guard are the favoured target areas.
An upward angled or horizontal strike can be applied to the area of the sixth to tenth ribs: above the floating ribs and below the level of the lower tip of the sternum. This is likely to affect the lungs.
All these punches are powered by waist/hip rotation and are most effective with a relaxed, easily accelerated arm.
Kup and pow are both performed using the second knuckle of the fingers as the striking surface. These are the knuckles that would make contact if you were knocking on a door. Some styles call this a “leopard fist”.
Attack, Avoid, Survive showed a related technique, the half-fist, used to attack soft, narrow targets such as between the ribs. The thumb is often pressed against the side of the fingers, rather than being clamped across them as with a conventional fist.
Rear hand attacks can also utilize palm-strikes, chops and hammer-fist strikes.
Recently, my girlfriend described how her mother had often fought men who had turned up with the intent of raping her sister.
Many a bully and would-be rapist who dismissed the mother as a “mere-woman” got a percussive readjustment.
Her mother's technique of choice was a powerful overhand or underarm punch.
My girlfriend learnt the same techniques and has used them to defend herself on numerous occasions.

Tai Chi

In “How To Use Tai Chi as a Fighting Art” Erle Montaigue describes the “Stork Spreads Wings Punch”, another potential rear hand attack.
The “Stork Spreads Wings” posture is often translated as “white crane…”:
“This punch is one of the most powerful punches from any martial art. It is totally centrifugal and quite fast considering its distance…This is one of only three punches in T’ai Chi that uses the first two knuckles, in T’ai Chi we use the knuckles that most suit the position of the palm upon impact otherwise we use extra muscles to hold the palm into position and there-by lessen its impact…If you block with the right fist across to the left against a left face attack with the left palm underneath it, … the left palm then takes over the block while the right fist is thrown out at the target with the turning of the waist…Your left palm looks after the left fist while your right fist circles back up in a centrifugal punch to his left temple”
Categories
Phillosoph

Striking with Both Hands

Today I thought I would look at several techniques where both hands apparently strike at the same time.
The targets and techniques given in this article are potentially lethal. They are only to be used in life-or-death situations.
The first technique will be familiar from my book.
It is “arn” from tai chi. “Arn” means “press down” but is often translated as “push”. Indeed, it does look like you are trying to push something.
One of the maxims of tai chi is that you should never be “double weighted”. You should never have your weight equally distributed between your feet and your hands should never be equally yin or yang.
Arn seems to violate this principle. The common explanation is that arn is in reality two palm-strikes arriving in quick succession. The hands are hitting rather than pressing or pushing, and one strikes just before another.

Arn can be a powerful attacking technique. In a frontal attack the hands strike the dim-mak points around the pectoral muscles or use the springiness of the foe’s own ribs to bounce him away.
It is directed upwards against the chest and downward against the stomach/solar plexus. Strikes to just below the pectorals may be made upward or with a spiralling inward twist.
In combat, the hands of Arn may be used at different levels, for example, one pushing down an arm and the other striking the front of the shoulder or nipple. The palms may also hit a pair of centreline targets.
As I have said before, this is a fighting technique that is overlooked by many other styles.
A number of combat styles do not share tai chi’s aversion to being double-weighted and include simultaneous striking techniques
Another thing to remember when interpreting forms is that if two hands are doing the same thing in a form, that is not necessarily how they are intended to be used in combat.
A form may have, say, double spear-hands but in reality one spear-hand would be a feint while the other hand was used to parry or readied for a more powerful follow-up.
The second technique we will look at comes from chuka, phoenix-eye fist.
Both hands are held palm upward in phoenix-eye configuration. The wrists or forearms are crossed, the lead hand being underneath. Both hands punch at once, the hands rotating palm down. The lead hand strikes low, the rear hand high.
I regard phoenix-eye and one-knuckle fist as soft-tissue weapons so primary targets will be above the suprasternal notch and below the xiphoid process.
The xiphoid/solar plexus region (CV 14) and a palm-width below the navel (CV 4) is another pairing. Combinations of CV 22, CV 17, CV 14 and CV 4 may be used.
A similar simultaneous attack is the double-dragon palms, sometimes called butterfly-palms.
This is a double-palm strike with one hand above the other.
The upper hand has its fingers up, the lower hand fingers down.
This can be used on the same targets as the double phoenix-eye punches.
Palm strikes are a weapon for both hard or soft body areas so this technique can also be used directly against points on the sternum such as between the nipples or the sternal angle.

If you are using both hands to attack, it implies that you have less need to parry or control. Sometimes the technique will be pushing a foe's attack or guard to one side or down.
Such attacks are therefore a more likely option when on the outside gate. So far we have considered frontal attacks. How might the above techniques be targeted if to the side of an enemy?
Double palm strike (po pai and other spelling variations) is used several times in wing chun’s advanced-level wooden man form. Palm striking is rather common in this form, in contrast to the snap punches used in earlier forms.
Wing chun students may like to ponder why this is so.

The last technique returns us to tai chi. It is shown in “How to use Tai Chi as a Fighting Art” by Erle Montaigue and is used as a counter to double dragon-palms.
One hand is held above the other, palms flat and fingers towards the enemy. The hands come in from the side to push the dragon palms off course.
The finger tips then thrust forwards to attack the body beyond.
Categories
Phillosoph

Dream Martial Art

I had a very interesting dream the other night. Some of it is still with me.
The inspiration for this train of dreaming was probably that I was reading about pak hok chuan.
In its early form, pak hok had eight punch techniques, eight kicks, eight finger techniques and so on. Eight was doubtless chosen because of a connection with the I-Ching.
In my dream, I was considering a fighting style.
It would have numerous offensive techniques and very few defensive ones.
Another key point in the dream was a stance with the palm held out. My dreaming mind told me this was in fact four related stances and that they were somehow connected with crescent kicks.
A Great Variety of Attacks
This part is fairly easy to interpret.
Readers of this blog and my books will know I consider the palm-heel and the hammer-fist as primary strikes. Some targets and some techniques work better with other body weapons, however.
The knife-hand is ideal for striking the crease of the elbow. Some punches work better with a one-knuckle or phoenix-eye fist than a palm-heel or conventional fist.
Likewise, I can think of at least half a dozen families of kicks, and each has a particular application or something to teach.
A fighting style needs a whole kit of body weapons it can select from.
Few Defensive Techniques
This bit is also quite logical.
It is better to have just a few defensive techniques that can deal with a great variety of situations.
This cuts down on decision time, hesitation and makes a defence more reflexive.
If you are holding a quarterstaff there are only really two defensive techniques.
If an attack comes from one side you parry it inward, if from the other side parry it outward. Readers of my first book will know that I suggest something similar for unarmed defence using a p’eng hinge/ SPBK posture.
I think this is where the bit about the four stances with the palm forward fits in too.
Bagua/Pa-kua and some other styles try to do most of the parrying with the forward palm. That palm would have to move to defend four different quadrants: high outside, high inside, low outside and low inside.
A crescent kick hits with the inside or outside edge of the foot. A defending palm would make some of its parries with the knife-edge or ridge-hand edge of the hand.
That is my best theory so far as to why that bit was considered so important, but it was a dream, so logic may not be relevant.
Manoeuver
Evasion is more important than parrying, so the dream had something about ginga, Pa-kua stepping and other movement techniques.
Jumping was flagged as an ability. I’d been reading some stuff on how jumping and landing from jumps was a very useful exercise.
Clapping
Clapping, as a method of rapid hand movement, was also present in my garbled thoughts.
The martial applications of this is something I have been meaning to write more on.
This dream is not a Xanadu moment.
A new fighting style has not suddenly sprung fully formed from my subconscious. The dream has, however, drawn my attention down some interesting routes.
I hope it does something similar for you.
Categories
Phillosoph

Hammer-Fist and Single Whip

Sometimes you search for something only to discover it was close by all along.
A case in point:
In my recent book, Crash Combat, I reflect that the hammer-fist is a somewhat underappreciated weapon in martial arts. I may have made this assertion in my previous book too.
Reading Joseph Wayne Smith’s book on Wing Chun, he makes a similar statement.
Hammer-fist can substitute for the chop, back-fist and even some closed-fist punches. It is much less likely to result in self-injury than some of these techniques.
Hammer-fist is easy to perform correctly and can deliver powerful blows to both hard and soft targets. Along with the palm-heel, it is probably one of the best hand strikes that we have.
Naturally enough, I was experimenting with some hammer-fist attacks the other day.
I’d been looking at the rapid 270-360° turn that is possible by using the “closed step” of Pa-kua/Bagua. (See my book for details).
This could be used to power a spinning back-fist to strike a foe in the outside gate. But a true back-fist can be fiddly, requiring a terminal flick of the wrist and impact with the first two knuckles.
A spinning hammer-fist is more logical and for most fighters more powerful.
I notice that if I bend my wrist inward a fraction my hammer-fist seems a little stronger or more stable at the moment of impact.
I also note that this mode favours a sort of “snap”.
I can throw the technique with a relaxed arm and hand and snap into a clenched hand just before impact.
This, of course, lets the arm and hand acquire more initial speed and produces a more powerful attack with less muscular effort.
From a variety of positions, I can just flick my arm and have it land in a hammer-fist. This curve of the wrist seems a technique worth cultivating.
And then it dawns on me!
This is the hand form of horse-foot palm from tai chi’s single whip.
I have written about this as a parrying technique and even as a form of punch. I have probably even written about hammer-fist-like strikes with this hand form.
But I had not grasped one of the other important things that posture was trying to teach: that a relaxed, slightly bent wrist gives you a very efficient hammer-fist.
As always, experiment for yourselves.
Can you use hammer-fist instead of your other strikes?
Can you relax more to make it faster and more powerful?