Disclaimer: “As an Amazon Associate I may earn from qualifying purchases.” Adsense and Infolinks were no help at all.

If you have enjoyed this article or it has been helpful to you please feel free to show your appreciation. Thank you.

Read The Third Wave by Alvin Toffler!
Categories
Phillosoph

Sword Bayonets Part One

For no particular reason I have found myself thinking about sword bayonets recently. Perhaps it was because in a recent re-run of “Wonder Woman” a soldier was wearing one, which struck me as odd since he was an MP in white equipment and you would have expected a baton rather than a bayonet. (for that matter, the episode was set in the 1970s so a sword bayonet would have been an unlikely piece of equipment for any GI!)
My interest in sword bayonets goes back many years. One reason is in the opening passages of the Modesty Blaise adventure “Operation Sabre Tooth” there is a trial by combat and a soldier requests a bayonet to defend himself. Another character reveals he keeps as sword bayonet under the seat of his jeep and enthuses over its merits other a knife. Another source of my interest is the following passage in the Gun Digest Book of Knives, Fourth Edition. Page 106.
“The Yataghan is more of a machete-length short sword with a kukri’s chopping forward curve, but with the point brought back for thrusting. These can have considerable advantages over a machete. The Yataghan was widely used for so-called “Sabre Bayonets” at the time of the War Between the States. The Remington Zouave Rifle carried it, as did many European guns of the period. Perhaps its short sword length and association with the bayonet prevented its other capabilities from being appreciated. At any rate, this splendid weapon didn’t catch on in the West except in bayonet form. It still offers much to the user and should not be overlooked when making your choice. It has the length and reach of the machete in a stiffer blade. It is a powerful forward-curved chopper like a kukri, yet retains a fine thrusting point. Well balanced and lively in the hand it will perform hard work with ease.It is light and easy to carry as well.”
Careful readers will note that it is often uncertain if the author of the above is discussing yataghans in general or specifically yataghan-style bayonets. The poor quality photo in the article seems to suggest a bayonet blade that has been fitted with a new grip (possibly stag antler).
The story of sword bayonets begins with the hanger. Hangers were a short sword that was carried by infantry and other troops. The hanger itself was derived from a civilian tool favoured by outdoorsmen. Hangers, “short hunting swords”  or “couteau de chasse” were useful for chopping firewood, clearing brush and butchering game. They were carried by noble and commoner alike. There are exciting accounts of them being used to hunt game and they were a useful defence against both beast and man. Decorated versions might be worn out court to display one’s affection for hunting. They might also be worn in town as a handy defence against robbers, in many cases being more effective and convenient than rapiers or small swords. Understandably the common foot soldier found the hanger to be a useful implement. In addition to the sword bayonet the hanger is probably the ancestor of both the naval cutlass and the machete, and is why you occasionally come across machetes referred to as cutlasses. Sword bayonets were created to produce a bayonet that also served as an infantryman’s hanger. The yataghan configuration blade provided better clearance for the hand when reloading a muzzle-loading weapon. The blade shape is not without other merits so a number of breech loaders also used sabre bayonets.
Despite the claims of the passage quoted above, most sword bayonets I have handled would not be particularly good general survival knives. Most hangers resemble shortened sabres with slightly curved blades. They can fight with both point and edge but their application as brush knives means they have to be effective choppers. Most bayonets, on the other hand, then to have their weight well towards the hilt. Many of the older examples have solid brass hilts. Those that do not still have a considerable weight of metal in the grip designed to facilitate attachment to a rifle or musket. I have a number of wakizashi, barongs, machetes and kurkis of comparable weight and/or length to my sword bayonets. Just handling them makes it clear that for medium to heavy chopping the sword bayonets are inferior.
The sword bayonet may have been intended to replace the soldier’s hanger but it was a poor substitute when it came to use as a general utility tool. As a bayonet if may be argued that they certainly looked impressive and provided a long reach. On the other hand their weight when fitted affected the mean point of impact when shooting. Several nations came to the conclusion that lighter, handier bayonets were more practical.
It is the sword bayonet as a hand weapon that I intend to look into over the next few posts. Sword bayonets, as you might expect, are well suited to thrusting attacks. Their blades are long, narrowish, rigid and often provided with fullers or strengthening ribs. While chopping power is limited the length of the blades can be used to apply a draw cut against thinly protected flesh. We will look into these aspects in later posts.
Categories
Phillosoph

Horizontal Throwing

Throwing objects in self-defence is a legitimate tactic if your life is in danger.
Some missiles may be capable of injuring an attacker, but a more likely consequence is that you will distract them long enough to press home a counter-attack or affect an escape.
In my book I describe a number of throwing techniques, some of them not that well known.
In this post we will look at an addition technique, that of horizontal or side-arm throws.
Horizontal throwing is harder to master than vertical throwing and generally has less range and power. On the other hand, it has several features that make it more applicable for self-defence.
One of these is that horizontal throws are less telegraphic than most vertical techniques, which increases the surprise element and distracting ability of a missile attack.
Another element is that a horizontal throw can be combined with drawing a missile from a place of concealment.
If a supply of projectiles are held in the other hand a number can be launched in a short period of time, the action of moving the throwing hand back to take another missile naturally setting up for another horizontal throw.
To throw an object such as a pencil, nail or knife, it is held in the palm, parallel to the fingers, as is described in the book for push-throwing.
Bend the elbow so your hand is near the opposite shoulder or hip, palm downwards. The action you are going to make is rather like a horizontal karate-chop.
Your arm should be relaxed during the motion and you should avoid the temptation to hurry the movement.
Lock your gaze on your intended target.
Smoothly let your arm swing straight and let the missile leave your hand when your fingers are nearly towards the target.
At the same time, sway your body towards the target to add momentum.
If you are throwing consecutive missiles you will rock back and forth as you throw and “reload”. Some sources talk of the missile being “pressed” towards the target and this is probably a better description of the release you are aiming for rather than thinking of this as a throw.
Unlike some of the other throws described in the book, this technique adds very little stabilization to the missile so is more suited to “nose heavy” objects.

To throw missiles such as coins or washers, the same basic action is used but the missile is head slightly differently.
The object is held horizontally between the thumb and second finger, with the forefinger on the edge to apply a little drag and induce some reverse spin.
Lock your eyes on the target and in a smooth, relaxed and unhurried manner swing your arm out straight so your thumb points towards the target.
If the missile you are using has a sharp edge, you may need to hold it between thumb and first finger and adding some spin-stabilization may require a little bit of a snapping action on release.

You will need to practice this to get the correct feeling and timing. Generally the missile is released just before or as your hand reaches the same vertical plane as your target.

Depending on distance you may have to aim above your intended target rather than pointing your hand right at it.

Categories
Phillosoph

Kubotan and Kongo Locks

Stuck in my files is an article on the kongo that I never seem to have time to finish, so today I thought I would post part of it.

Keep It Simple

99% of the time the only techniques you will need for using the kongo are the strikes.
However, the reader is doubtless curious about “fancy stuff” such as locks, so I’ll include some discussion of these in today’s blog, with the caution that it is better to keep things simple but effective in a real fight.
Some of these techniques are “pain compliance” techniques so their effectiveness will vary between individuals and situations.
For information on sensitive areas and “pressure points” a kubotan or kongo may be used against, purchase “Attack, Avoid, Survive”.

Know Your Bones

Most of the locks described here are applied against the bones of the forearm.
The forearm has two long bones, the one on the upper/thumb side being the radius and the lower bone the ulna. You can remember these by knowing they are alphabetical from top to bottom, R above U.
Locks should be applied so that the pressure is applied against either the ulna or the radius, depending on situation.
Force is applied against a single bone rather than distributed to several will be more effective.
Force is applied to these bones at the ends where they joint the hand.
Squeeze around this area with your fingers and you will soon locate where the more sensitive areas lie.

In the following description my main intent is to convey the mechanical principles of how these locks work.
For that reason I’ve generally described the positioning of the kongo/kubotan first. Many of the locking techniques are easier with the longer, thinner kubotan.
In practice, it is more likely that the opponent’s arm would first be gripped by the non-weapon hand and the weapon then brought into position.
To avoid such unwieldy terms as “strong side thumb” or “weak side fingers” the following descriptions will all assume that the kongo is being used in the right hand.

The Pincer or V-Locks

Hold your kongo/kubotan so several inches project from the top of the forefinger side of your hand.
You may have to shift your grip slightly from that normally used for striking.
At the same time, stick out your thumb so kongo and thumb form a sort of “V”. We will call this configuration “the pincer” and use it as the basis for learning the following locks.
The pincer itself is a pretty good technique. Grasp the foe’s thumb between your thumb and the kongo and apply pressure, using the weapon as a fulcrum. This can be performed against other fingers too. Or, use your pincer to take hold of the subject’s ear or other fleshy body part.
There are several other variations of the pincer-based locks. It is possible to hold the wrist, fingers or thumb in the pincer and use the left hand to assist in some other way such as manipulating the foe’s hand or thumb.

J-Locks

Put your right hand in pincer form and slip your right thumb under the foe’s wrist so the kongo passes over the top. Slip the thumb of your left hand over the free end of the kongo and pass your left fingers under your opponent’s wrist.
This is the basic mechanism of the lock but in practice it is more likely that you would first grip the foe’s wrist with your left hand and then bring the kongo into position under the thumb.
This technique can also be applied against the thumb. The opponent’s thumb is clamped between right thumb and kongo and your left hand grasps his wrist and hooks your left thumb over the free end of the kongo.
A related technique against the wrist is performed in the same way but does not place the right thumb under the wrist. The kongo is laid across the bone and the free end taken by the left thumb.
Disadvantage of this variation is that the kongo must not be allowed to slip around the wrist. Maintain the relative position of your hands so the kongo/kubotan lies level across the bone.
The advantage of this technique is it can be applied in situations where the thumb could not be easily slipped under the wrist.
I call this family of locks the “J-locks” since the kubotan forms the crossbar of the J while the fingers of the other hand form the curved section around the wrist.
Depending on the relative orientation of the arm these locks can also be applied against the ulna.

Delta or Gasket Locks

Instead of taking the free end of the kongo with the left thumb, it is also possibly to wrap the left fingers around the kongo and slip the left thumb around the wrist.
You therefore have eight fingers pulling against the kongo and two thumbs pushing into the wrist.
Takayuki Kubota (inventor of the kubotan) stresses that when using this technique the web of the thumbs should form a tight “gasket seal” against the suspect’s arm. The advantage of this technique is that it can be applied to either surface of the arm.
As well as placing the kubotan across the upper side of the wrist and the thumbs underneath, you can place the kubotan under the wrist and push down on the upper surface with your thumbs.
I think of this lock as the “Delta lock” since the two hands and the kubotan form a triangle,

X-Locks

Like the delta-locks, the X-locks create a triangle around the opponent’s wrist.
Hold the kubotan like a wand. This hold is easily assumed from the pincer. Alternately, an “ice-pick” hold may be used with the longer length of the kubotan projecting from the little finger side of the hand. 
Place your arm so the forearm crosses over the opponent’s arm. Hook the kubotan across the end of the radius or ulna on the far side of the arm.
Grasp the free end of the kubotan with the other hand so your forearms cross. The kubotan and your wrists form a triangle around the arm.
Reorient the opponent's arm as necessary and move your elbows apart so your wrists are scissored tightly around the opponent's wrist/forearm. Pressure may be increased by adding a rolling action to the wrists.

Eda Koppō

The Eda koppō techniques are taken from Matsaaki Hatsumi’s “Stick Fighting” (p.56) and he defines the term as “Attacking the bones with a stick”.
Many of the techniques shown in the book are variations of those already described but one is worth dealing with separately
Slip your fingers through the loop of the kongo as though you were going to strike with it and open your hand.
Place this hand on your foe’s forearm near the wrist so that the kongo either crosses the ulna or the radius.
The fingers encircle the wrist and the kongo is sandwiched between your palm and the foe’s arm, pressing onto the bone.
The other hand can be used to assist.
How effective this will be will depend on several factors, including the diameter and shape of your kongo, strength of your grip and the pain sensitivity of your foe.
For this reason my personal inclination would be to use this technique on the ulna if there is a choice, which seems to be the more sensitive of the two bones.
The advantage of this technique is that it can be applied with your kongo in the normal striking position and does not need your grip to be shifted so can be rapidly applied against a target of opportunity.

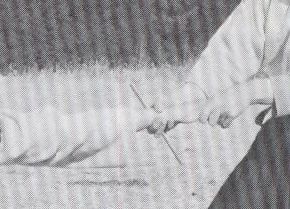
Suppose you are using a kongo without a finger loop or an object as improvised weapon? Brace it by placing your little finger and thumb under the object and your other three fingers on top (shown above).
You can also brace it between your thumb and second finger with the fore finger on top. This is a good technique for a longer, thinner object such as a pencil.

A final trick. Place your kubotan, kongo or pencil between any of the subject’s fingers, then squeeze the fingers together.
You probably have a pen or pencil nearby as you are reading this.
Try it out on yourself.
Categories
Phillosoph

Defending Against the Rush

A couple of years back I came across a Youtube video that was called something like “Close Range Knife Defense”.
This one was notable since it involved several young men having a great time fast-drawing their guns and shooting down imaginary attackers. Their speed and skills were impressive, their tactics deplorable.
Even if you can kill a charging attacker instantly, he is still likely to travel several metres.
This may be enough to knock you down.
If he had a knife this may arrive point first, resulting in you being injured or killed by a man already dead.
The chances are you will not achieve an instant kill every time. Even if your attacker is fatally wounded, he may use the final seconds to knock you down, stick his knife in you or thrust his thumb in your eye.
Remember, many victims of knife attacks are not aware of the knife until stabbed or cut. Always treat an aggressor as though they are armed.
You may not fatally wound him. Even the best of us miss occasionally when shooting under stress, drawing gets caught up on clothing or weapons misfire or malfunction.
If the charger was unarmed, you are still in trouble. If he knocks you down he can stomp you to death or take your weapon to use against you.
I have tried to emphasize in my book that defence and evasion must come before counter-attack.
If you have a weapon sheathed and you are attacked, your first response should not be to try and attempt to draw the weapon. You cannot outdraw him if his weapon is already drawn.
In a fast-draw competition, the odds are not good either since the attacker will have the advantage of initiative.
Even if your weapon is already in hand, it is prudent to combine using it with some evasive/ defensive action.
If an enemy appears suddenly before you, you don’t have time to see if he is going to charge you or open fire on you. Don’t stand were you are, move! Better a moving target than a sitting duck.
Let us return to our original example of the young men with pistols.
If their drill had been realistic, they would have executed some form of evasive action before they drew and fired. By having one of their number play the aggressor, and using some toy guns, this could prove a fun but very useful practice session.
In martial arts, considerable attention is paid to blocking and parrying techniques but generally these are concentrated on defending against hand strikes and kicks.
Some attackers will not move into a set distance and start throwing kicks and blows.
In our example above, we considered a knife-armed attacker charging a gun-man, but there are many other situations where one party may try to rush and overwhelm another.
Fighters who favour groundwork will want to get close to their opponent and get them to the ground as quick as possible.
Defending against an enemy that charges seems to be something some martial arts would rather not think about.
Yes it is crude and brutal. Whether it is unskilled or not is irrelevant.
It is a real and likely threat and can be very effective, particularly if you have never bothered to practice against it.
What defences are there against a rush? The primary defence remains the use of evasion.
The ginga movement from Capoeira that is included in my book is very good for teaching side-stepping and other evasive footwork.
Also useful is the hip-twist move that is the basis of in-quartata and certain kicking actions.
If your dodge does not take you sufficiently out of harm, you must combine it with a parrying action.
A charging opponent will have a lot of momentum, so blocking his force directly is not a practical option. We need to parry to redirect it.
Parrying his hands or forearms is not likely to have much effect. There is no point in knocking these aside if the body behind still knocks you down.
Parry against the upper arm, shoulder and torso regions. Use both your arms to make contact.
The p’eng hinge action detailed in the book can be easily adapted for this action, as can several other techniques such as the double-handed push, the shoulder check and the outside crane