Disclaimer: “As an Amazon Associate I may earn from qualifying purchases.” Adsense and Infolinks were no help at all.

If you have enjoyed this article or it has been helpful to you please feel free to show your appreciation. Thank you.

Read The Third Wave by Alvin Toffler!
Categories
Barata

Survival Sewing

“Military men make good husbands. They already know how to clean, sew and take orders.”
A few years ago my girlfriend was running a café. This turned out to be a surprisingly brutal and cut-throat business. We should have heeded the words of Charles Grodin’s character in “Midnight Run”.
One of the better memories was the sewing nights.
“Sewing” is probably not one of the first things that comes to mind when you consider heavy metal, but all those patches have to get on jackets somehow.
A group of friends would hire the café for an evening and sit sewing.
It was a highly talented, artistic and creative bunch of people, so these nights were always entertaining.
One of the newer members commented after her first visit: “I cannot recall the last time I just sat and just talked.”
Which is an interesting comment, and possibly a sad reflection on the current phone‑obsessed culture.
I do not recall personally doing any sewing on those nights, but have been known to wield a needle at times.
Often this was when travelling. It seems like buttons and seams wait until you have left the country before they loosen.
I recently added some extra pockets to a coverall. My girlfriend remarked at how neat the stitching appeared. That surprised me, since for a camouflaged item I was not attempting to be particularly neat.
My sewing is entirely self-taught, there being no youtube nor websites back when I started.
Here are a few things I have learnt along the way that may be worth passing on:
Finishing with a one-way weave
Finishing a seam with a one-way weave.
• Overly long threads are wasted motion. Having to make wider arm movements for every stitch soon adds up.
Sewing with shorter lengths of thread is less fatiguing.
As a general guide, a thread should be no longer than the distance between your shoulders. It is also probably stronger to secure a cloth with several shorter sections of thread rather than on long one.
The most notable exception to the above are the needles in my emergency kits. These are pre‑threaded with about a two foot of doubled “invisible” thread.
• Needles would often become undone when I sewed. My solution was simply to use a doubled thread, the ends joined in a simple overhand knot.
The only drawback to this technique is a higher probability of the thread getting tangled and knotted. This can be reduced if the two threads are allowed to untwist every half‑dozen or so stitches.
• Perhaps I was using the wrong knot? I have looked for advice on tying single threads to needles, but have yet to find anything useful.
Judging by some of the sewing sites online, many seamstresses do not bother knotting thread to needle and simply hold the thread in the eye with their thumb. I have started using this method on the rare occasions that I need to sew with a single thread.
Once you've got about an inch of thread "out the other side" let go of the needle and pinch both threads between your thumb and forefinger, *then* pull. This reduces wear and tear on the thread where it goes through the eye (which with linen can wear out before you run out of thread 😉), it gives you finer control over thread tension, and it reduces the tendency for the thread to slip out the eye of the needle.
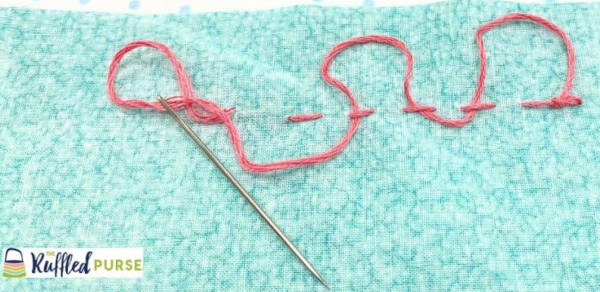
• I have been known to use a blanket stitch at times, but a lot may be done with a simple running stitch. I will often sew and seam and then go back on it, placing the second set of stitches between the spaces between the first. This is simple, strong, and looks relatively neat.
• I sew buttons with doubled thread. Even smarter is to use quadruple thread! Fold the thread in two and pass the loop through the needle eye. Place the loop and the two ends together and tie into an overhand.
• On the subject of knots:
The “fingertip” method allows you to rapidly tie an overhand/stop knot. This can become handy for applications other than sewing.
• I used to pride myself that I could thread a needle.
Years later, it is harder to see.
Now I often use threading aids. I have even added one to my ultra-compact travel sewing kit.
Threading Tool
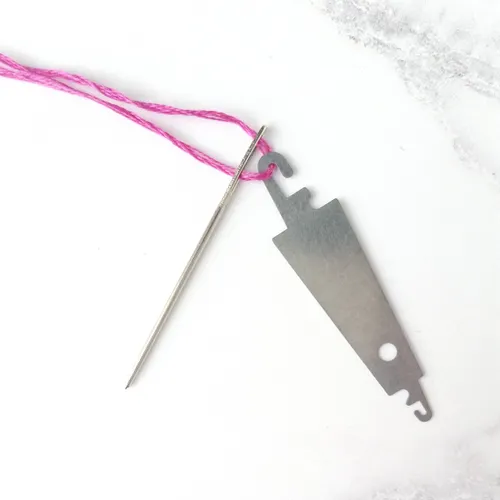
This is a flat lightweight piece of metal with a hook at each end, not as fragile as the type that use a rhomboid of wire.
These flat metal threading tools are roughly finished, so benefit from a little sanding or filing to smooth the edges.
I brought a bag of ten or so and added the others to my home sewing kit.
Fine wire or thread may be used as an improvised threading aid.
Threading aids work by pulling a loop of thread through the eye. This is a clue for how to thread a needle when you do not have a threading aid.
Try to push a loop of thread through the eye rather than the possibly frayed end.
My EDC and travel kits now include a number of devices that have magnifying lenses.
• Thread ends are sometimes easier to burn down with a lighter than cut off.

Home Sewing Kit

I have described my main travel sewing kit elsewhere. This fits in a little six by one centimetre plastic tube. If anything, it is a little too compact.
I have to pack it carefully so it does not become lost within larger bags. Usually it is in a ziplock bag along with other repair items such as spare rucksack buckles, superglue and tape.
My other emergency sewing kits are even smaller.
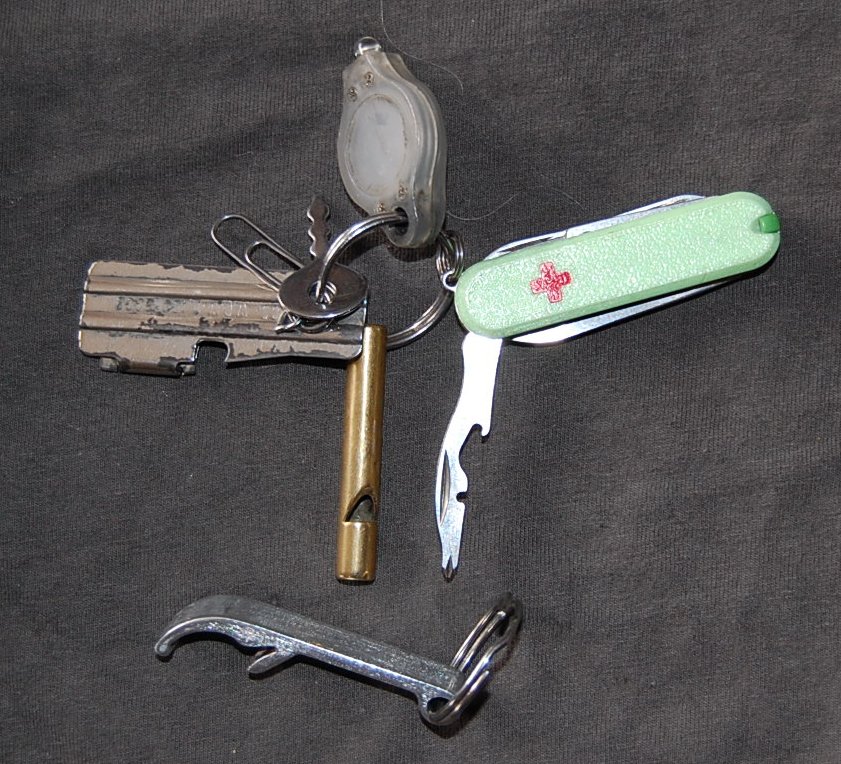
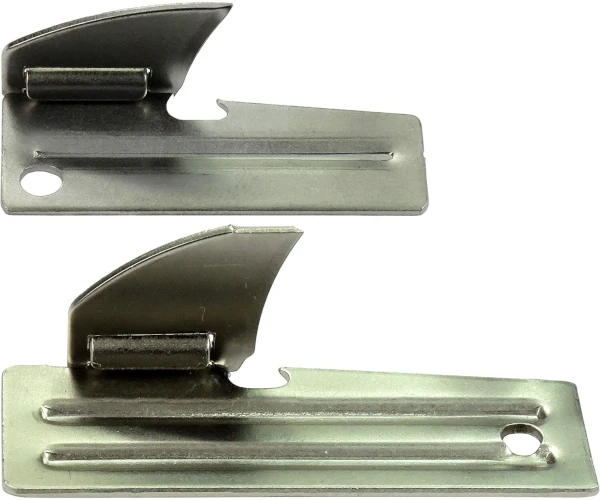
Each is a single needle, threaded and wrapped in invisible thread. One is taped to the side of the pencil in my pocket pouch. The other is under the saw of my Swiss Army Ranger.
At home, I have a much more extensive kit, most of which fits in a re‑purposed plastic box that originally had cakes or ice cream in it.
Such a home kit can be easily and cheaply stocked up.
Pound shops/dollar stores often have card‑mounted sewing kits with dozens of items. A couple of these give an assortment of coloured threads, pins, safety pins, needles, tape measures, thimbles and other items.
These are adequate for many applications.
Some needles in these kits come with incredibly small eyes. Make sure you own some needles that you can actually thread!
An X-Actio Knife
The little scissors with these sets are generally not much good. (Few scissors are better than those on Swiss Army knives. My spare Classic SD may end up in the sewing box)
Add a sharp‑edged tool or two to your kit, a seam‑ripper and/or pointed or curved scalpel/X-Acto blade, blackboard chalk for marking, and a disposable lighter.
My kit also includes some EMT shears that were surplus to requirements and a couple of razor‑sharp small folding knives.
The emergency sewing kits that some hotels give away to guest for the asking are worth acquiring should you come across them.
I suggest you also acquire a few upholstery and sailmaker’s needles.
One of the smaller straight needles can go in your travel kit and is useful for tougher materials. At least one rucksack of mine has been repaired with such a needle using dental floss.
The curved and other straight needles go in your home sewing box.
I also have some surgical needles, about a centimetre long and either straight or curved. These have proved useful at times.
Magnifying lenses and/or tweezers might be another useful addition to your box. I usually have these nearby on a workbench if I need them.
Categories
Barata

Best EDC Tools: Split-ring Tool Kit

I recently read a webpage where the author jokingly referred to his “take anywhere, always ready EDC tool kit”.
This was a split ring that rode on his keyring. On that ring was a Photon II LED light, a 58mm Swiss Army knife, and a P51.
I had a quiet chuckle, since I have essentially the same kit on my keyring.

Keyring Tool Kit

My keyring is an unlocked carabiner. Items can easily be added or removed.
It hangs from the ring of the key-hanger over my right front trouser pocket.
The carabiner itself is a useful tool. I recently used it as a handle for an overly filled shopping bag.
Keyring Tool Kit for EDC
P51, Photon light, SAK Rambler and whistle above the bottle-opener

Whistle

The most obvious difference is that my keyring kit also includes a whistle.
This is a thin brass tube that came with a cheap hollow-handled survival knife my brother had back in the 80s.
Technically speaking, it is better to have a non-metallic whistle for if temperatures drop below zero. Very cold metal sticks to flesh. (I have a number of plastic whistles with other items of gear such as the soft-core pack and German Army parka.)
I stick with the brass whistle on my keyring, since I have not encountered a non-metallic whistle that is as compact. If the inside of my trousers get that cold it may be too late to whistle for help.
If I really needed a keyring whistle for arctic conditions, I could probably make one from wood or scrap plastic.

Light

My Photon light is a knock-off, since I am a cheap bastard and got about a dozen for a fraction of the price of an original.
Gave some of those to friends.
Another is with my lock pick pouch.
The remaining lights give enough spares and batteries for mine to last me decades.
That said, my pseudo-photon still lights with its original batteries, and must be at least ten years old.

Rambler Swiss Army Knife

My keyring has a 58mm Swiss Army knife, and some readers will know I recently replaced my old Classic SD with the Rambler.
The Classic SDs are great, but I really recommend the Rambler.
The Rambler comes with the 58mm version of a combo-tool. This has a wire-bender/stripper, cap-lifter and magnetic Phillips screwdriver.
Capability to handle Phillips‑head screws is one of the few shortfalls of my SAK Ranger. The 3 mm screwdriver on the can opener can handle some Phillips screws, and the point of the nail-file might work.
My mini-Leatherman has a short, flat pointed tool that is intended for Phillips screws.
However, some screwheads are at the bottom of narrow screw wells.
The Rambler has a 3D Phillips screwdriver that has more reach and is better suited to narrow places than the Ranger and mini-Leatherman tools. The Rambler Phillips works with the tiny screws in the photon light.
The Rambler works with the Ranger in much the same way my Mora and kukri do.
The Rambler is easier to get at than the Ranger, so gets used for most jobs, which generally do not need a larger knife. Using the Rambler instead keeps the Ranger in good condition for when it is really needed, and decreases the chance of the Ranger getting lost.
The Rambler gives me two screwdrivers, scissors, a nail-file, a small blade, a bottle-opener, wire‑stripper/bender, toothpick and tweezers.
If I choose to carry a knife other than the Ranger, the Rambler on my keyring means I still have available to me some of the most useful capabilities of a penknife.
Being on my keyring, the Rambler and the other tools on the ring are readily available and immediately to hand. Thus, they see more use than items in pouches, pockets, or tucked in wallets.
Being with your keys, this is the tool set you are most likely to have with you when you need a tool.
Tools left at home in a cupboard or in your truck are not so useful.

P51 Can-Opener

The final object on that split-ring is a P51 can-opener. You can open a can with a Rambler/Classic SD, but a P51 is easier.
The P51 is the bigger brother of the famous P38 mini-can-opener. Some jobs were too much for the little P38, so the P51 was created.
Contrary to what you may read on many websites, the basic design dates back to at least 1924.
The P38 is about 38 mm/1.5 inches long, and has a hole in one of the “top” corners. The P51 is about 51 mm/2 inches long and has its hole at the bottom end.
P38 and P51 Can-Openers
Of the two types, I recommend the P51, since it has more leverage and is less fiddly, for a barely noticeable increase in size.
If you find the hook blade tends to catch on things, wrap a few centimetres of duct tape around it. The duct tape itself may prove useful.
There are whole webpages describing the various uses a P38/P51 may be put to.
Some of my favourites include:
Pry-bar suitable for opening paint tins and similar
Improvised screwdriver
Box cutter/letter opener
Fingernail cleaner
Measuring gauge
Improvised fishing lure
Scraper for ice
May be easily modified into a ferro-rod striker.
The P51 covers many of the applications that the Rambler does not.
For some jobs it is quicker to bring the P51 into action than to unfold a SAK blade.

Bottle-Opener

On its own ring on the keyring is a bottle‑opener.
The Ranger has a bottle‑opener, the Rambler has a bottle‑opener. The mini‑Leatherman has a bottle‑opener. With a little fiddling, I have opened bottles with the P51. Why do I need yet another bottle‑opener?
A while back I was at a party. Plenty of beer bottles, but bottle‑openers were in short supply.
I lent my Swiss Army knife to some people, but this made me nervous.
Several times have I lent items out and they have proved so useful they were never returned.
I added a “loaner” bottle‑opener to my keyring so in future I would not have to offer more prized tools. It is also quicker to use than the penknives, since nothing needs unfolding.

Other Items

A couple of other minor items may also be found on my keyring.
A paperclip is a useful bit of wire with several possible uses. Push resets of electrical devices. Eject stuck DVDs and computer discs. Can be used to shim or pick handcuffs.
There is a little key from a luggage padlock. This can open many small warded locks.
There is also a short length of insulated wire (not shown in photo) to bridge electrical circuits.

Conclusion

So there you have it.
One split ring, four(ish) tools.
A tool kit that will nearly always be with you and offers a wide range of useful capabilities.
This is a very good starting point for creating your EDC. Add some cordage and a lighter to your pocket and you have taken a big step in the right direction.
Procuring these items will not break the bank. Adding such a kit to your keyring is within most people’s means.