The tools on a Swiss Army Knife sometimes end up performing tasks you never imagined!
A few months back I went to unlock my front door, only to have the entire barrel of the lock detach and come away with the key! The metal file/saw proved to be ideal for reaching to the back of the lock and turning the bolt.
My girlfriend’s son had asked me why I always carry my SAK. Exactly for times like the above!
For more on Swiss Army knives and advice on choosing yours, see Knives You Need Part Two.
The Early Years
For the first few years of my early adulthood I carried a Chinese-made version of a Swiss Army Knife. I vaguely recall there were actually two, although I do not recall why I had to replace the first. To be fair, these were quite nice knives, with a good assortment of tools. The only problem I actually recall is a time when the corkscrew straightened out as I attempted to open a bottle of wine.
Some of the more recent Chinese-made knives are apparently really poor.
Back in those days, they were all I could afford, and they served well.
Once I had some money, I invested in a genuine Victorinox Swiss Army Knife (aka SAK).
Victorinox Champion
The model I selected was called the “Champion”, not to be confused with the “SwissChamp” that had become available a few years previously.
The longer named Champion was less bulky than the Champ, lacking the pliers.

The seven-layer Champion was about the ideal maximum size for a SAK, and had a really useful selection of tools.
Sadly, my Champion was lost in an unfortunate chain of events that do not need to be told here. Even worse, the Champion had been discontinued, so I could not buy a replacement.
There was no ebay back then, so little chance of locating a second-hand one.

Rise of the Ranger
As a replacement of the Champion, I selected a Ranger model. The most obvious difference between the two was the Ranger lacked a magnifying glass, fish scaler and Phillips screwdriver:
• The Phillips screwdriver had proved useful at times.
• I don’t recall ever using the fish scaler/hook disgorger, at least not for its intended purpose.
• I didn’t make much used of the magnifier either, although now that I am older and more decrepit, I suspect it might prove more useful.
As an aside, the magnifying glass on the Champion was very cleverly thought out. Its focal length was the same as the magnifying glasses’ height. In other words, if you placed your knife on a map, the detail under the magnifying glass would be in focus. This may have been the case for other models that had the magnifying glass.
I wonder if the same applies to the newer pattern of magnifier?
Since I wear glasses, an early addition I made to both the Champion and the later Ranger was to add the mini-screwdriver that fits into the corkscrew.
Originally this tool was only included with the SwissChamp. They were sold as spares, however, so I acquired one.
This has proved very useful over the years, often coming to the rescue of companions rather than myself. Half a lifetime ago I repaired the glasses of a grateful Swedish beauty in old Jerusalem.
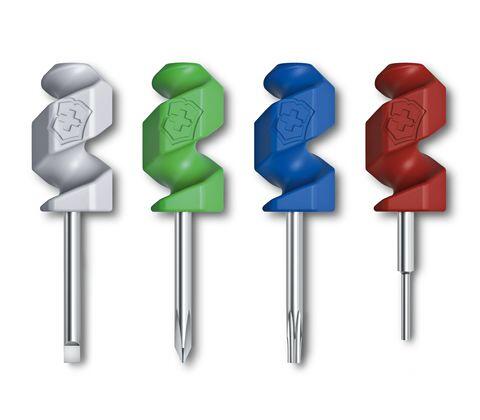
Victorinox now offer three alternate tools, each with a different coloured end.
I have carried the Ranger for many decades now.
The lack of Phillips screwdriver is compensated for by the Leatherman Squirt mini-tool I also carry. If you are in the market for a medium-size (91mm) model SAK, the Ranger must be one of the best options.
The Huntsman model is a good choice, but I have often found uses for the file/metal saw of the Ranger.
Swiss Army Knife Wiki
Recently I came across the Swiss Army Knife Wiki. This site is worth a look around.
Some interesting information on how to use the various tools, and some applications for them you may not have known.
My Ranger had a Phillips screwdriver all along and I never knew! I discovered that the tip of the can-opener is actually intended for use with Phillips screws as well as slot.
The tip of the file/metal saw can also be used on some Phillips or Pozidriv screws.
Adding a Pin to a SAK
The original reason I have been thinking about Swiss Army Knives recently is that I came across a blog post discussing the pin carried in the handle scales.
Below is a video on possible uses for “needles” [sic pins]. The channel has many other videos on various features of Swiss Army Knives.
Even before I watched the above video, I was thinking about adding a pin to my Ranger.
I own a number of very fine drill bits, so creating a channel for a pin would not be too difficult. I could probably add a pair.
I have lots of cheap pins. I decided to try and find the pins actually used, since they were probably better quality and the head looked a little wider.
A number of ebay vendors offered replacement pins for Swiss Army Knives.
The one I chose got my money since they offered another idea. Included with the five pins was a small magnet.
This magnet was sized to fit in the can-opener. With such a magnet, a pin could be magnetized as a compass needle.
The bits arrived this morning.
Fitting the Magnet and Pin
The 5.8mm magnet was a perfect fit for the can-opener.
The vendor included the advice that the tool next to the can-opener usually needs to be opened before closing the can-opener with the magnet stored in it.
If this is not so, the magnet tends to pull out of position, attracted by the neighbouring steel.
Although stainless steel, the blades of a Swiss Army Knife are magnetic.
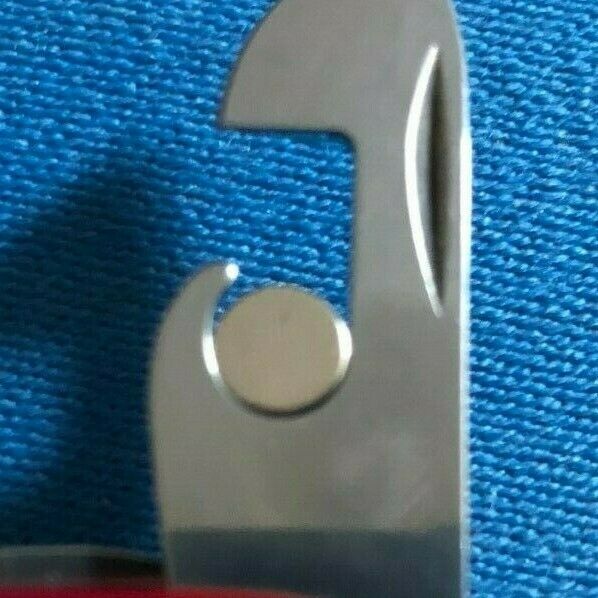
I experimented a little. The magnet is the correct size to fit in the multi-purpose hook.
It was strong enough to safely attach to many other parts of my Swiss Army Knife.
If I placed it in the bottle-opener, it was easier to close. When I opened the bottle-opener the magnet automatically attached to the top of the scissors, freeing the bottle-opener for use.
Finding a drill bit small enough for the pin was not a problem. Problem was most were too short to drill a channel as long as the pin.
The other problem was my Ranger has solid scales. It lacks the air-spaces found on some newer and alternate scales.
Drilling a channel deep enough and straight enough proved problematic, and inevitably the very fine drill curved and the channel exited on the inner side of scale. This actually proved to be fortuitous, allowing me to file a notch on the inner side for end of the pin to rest in.
I settled for adding just one pin for now.
Most of the alternate positions for a pin are obstructed by the rivets the scales snap on to.
Drilling the pin channel would have been easier if I had then known that you can remove the scales.
Many more recently produced Swiss Army knives already have a pin channel, even if most do not come with a pin. My 91mm Tinker in my gimlet box has a channel, as does an 84mm Sportsman I own.
I am not that impressed with the official pins. They come with a high price tag and are poorly magnetic. One of the most useful applications of a pin is to make a field expedient compass with the magnet, after all. I thought that this may be because my pins may not be genuine, but the same complaint is made by users whose knives came with pins.
I replaced the Victoriox pin with a cheap bead-headed pin. This is very magnetic, easier to remove without using the tweezers, easier to see and easier to pick up with magnet or fingers if dropped.
This video suggests that #22 Dressmaker: Size 20 pins are an alternative to the official pin.

Other Modifications
Incidentally, the back scale of my Ranger has two additional non-standard features.
One is a chip, where an idiot friend used my knife as a bottle-opener without using the bottle-opener!
I could fix this damage, but it is a useful reminder to be more cautious of whom I trust.
More useful are a series of three notches. The second is five millimetres from the first, the third 57 mm for the first.
The first and third notch are used to draw a circle of 57 mm radius. The first and second are used to mark the circumference in five millimetre increments. Each millimetre of the circumference closely approximates one degree. Such a compass face can be used with various improvised modes of navigation.
Another addition I have made is to add a needle and thread.
Take about a metre of invisible thread and pass one end through the eye of a needle. Tie the ends together and then wrap the thread around the needle.
Push the thread-wrapped needle down beneath the saw blade. It should be snug enough that it will not drop out if you invert the knife with the saw open.
I used the metal saw rather than the woodsaw, since this is likely to see less use.
While you are at it, wax your woodsaw.


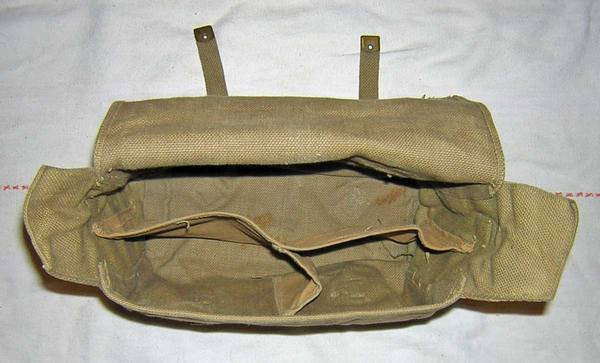 of the 37 pattern small pack were actual clothing. The interior was divided into two compartments, the forward one bisected by an additional divider. One forward pocket held the soldier’s pair of mess-tins, the other a water-bottle. Carried in the main compartment was a groundsheet, towel, soap, pair of spare spare socks, cutlery and possibly an emergency ration and cardigan. Below is a photo of a typical British infantryman’s small pack contents, taken from “British Army Handbook 1939-45” by George Forty.