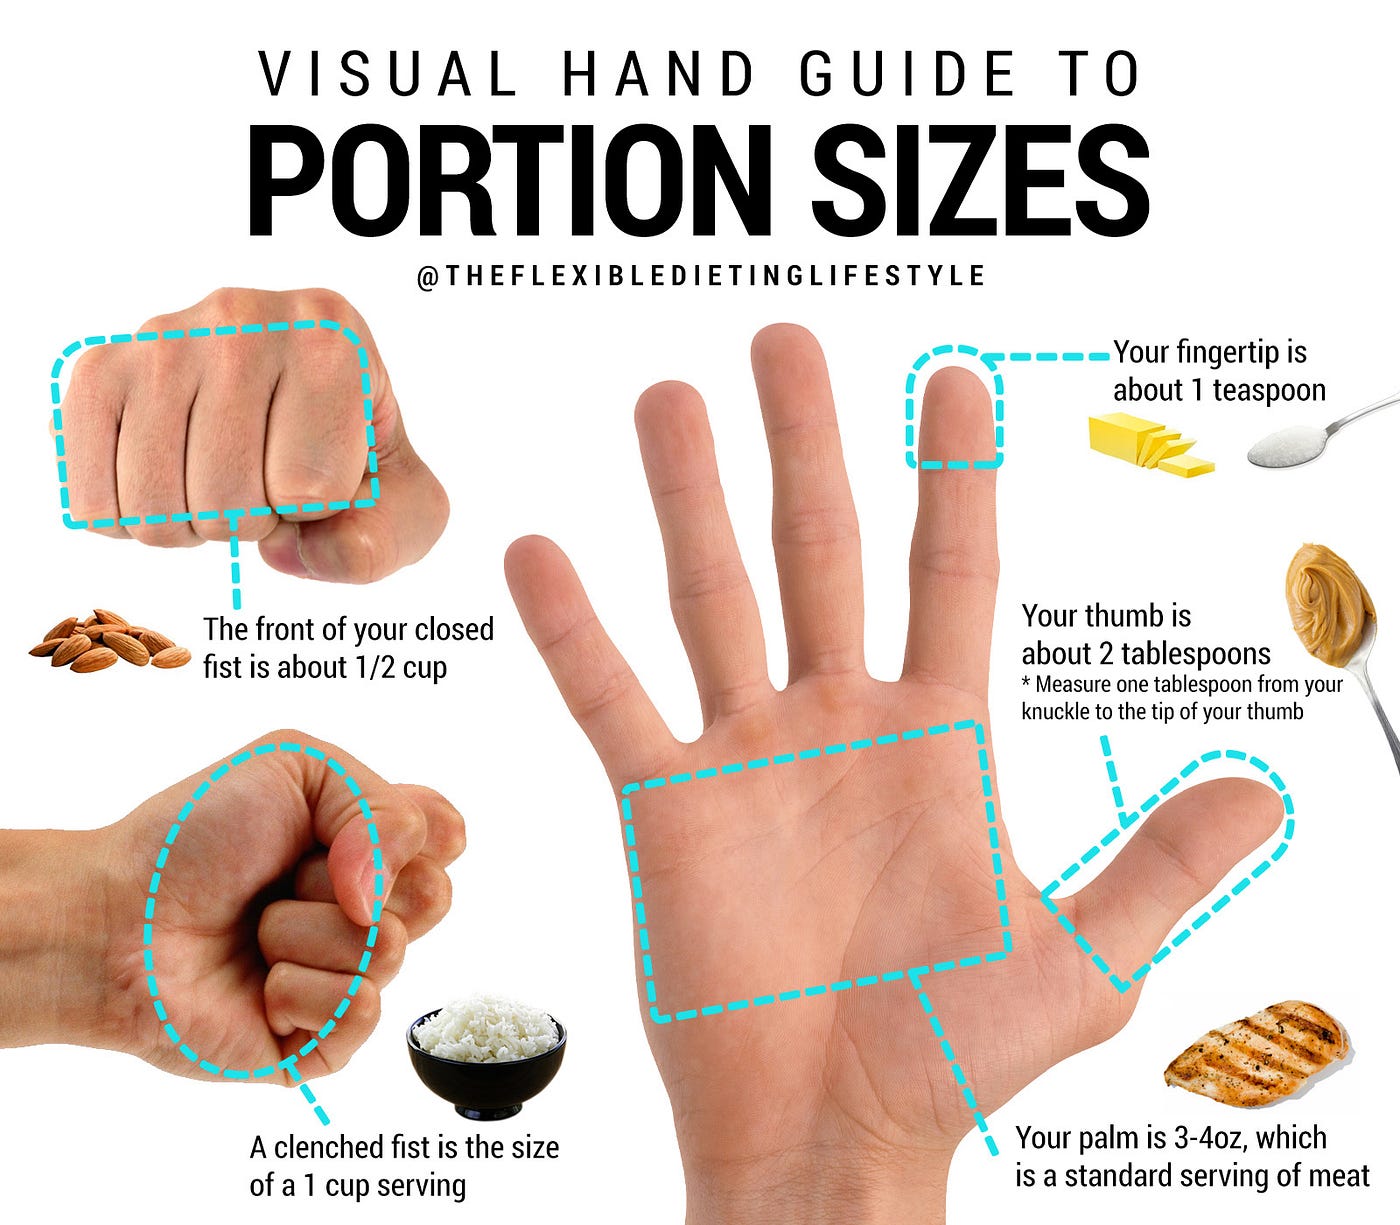
Having given you a list of items that you might need, some comments on how to carry it were logical.
It is always prudent to get some different views on a subject, particularly if it is a subject you feel you are already familiar with. Even after my many decades, I occasionally I pick-up a new idea, such as using a sandwich box to carry a wash kit!
And so, I find myself browsing videos and webpages on rucksack packing.
There is no single right answer, but a couple I encountered do stick in my mind.
One character starts by producing a waterproof bag. This is one of the expensive drybags that cost more than a reasonable takeaway:
“These are my waterproofs! Always keep them in a drybag!” they tells me, very proud of themself.
Why? I ask the screen. Are you worried that they might get wet, or is it to stop them drying out once they are wet?
If it is raining heavy enough to penetrate the rucksack, I want to be wearing the waterproofs, so a bag to keep them dry is redundant. Once they are actually wet, I will be stowing them somewhere on or in the rucksack where they can drain and dry.
Nit-pickers will doubtless waste time thinking of rare scenarios where having the waterproofs in their own dry bag will be valid, but I will move on.
It is not an efficient packing strategy nor use of money that could be better spent on something else.
A lot of rucksack packers have a selection of accessories for their electronic gadgets. I have to marvel that many of them carry numerous flexible electronic cables in hard cases, yet are content to throw expensive and valuable compasses in pockets or soft pouches.
Once I have some funds, I intend to find a rigid camera case suitable for my best compasses. That is a post for another day.
If it is a “72‑hour pack”, why carry boot polish and associated brush and paraphernalia? Freshly polishing boots only adds a little to their water‑resistance, and your boots should not be totally water‑proof anyway.
Air needs to circulate, your feet need to breathe and the interiors need a chance to dry‑out once water gets in over the tops. And you are better advised to wear matt-finish boots in a natural or neutral colour(s).
I can recall only one three week or more duration trip where I bothered to carry boot‑cleaning items. Most trips were to a climate and/or season where canvas or canvas and Goretex boots could be worn.
When carried, my boot cleaning kit was a single brush, can of polish and a shred of rag carried in an old cotton sock. Sock could be used to buff the cleaned boot.
Rather than continue on this vein, I will pass on some useful ideas that I have gathered over the decades.
Firstly, I will suggest a premise:
• Your pack will contain some items that you do not want to get wet. For example, your warm clothing, your bedding, your food etc.
• There are some items that will get wet, and once wet you will want them to dry. This includes parts of your tent, your waterproof clothing, etc.
• There will be some items in your pack that it does not matter if they get wet. This includes water bottles, cooking vessels, canned or pouched food, etc. If the exterior is contaminated by water containing sewage or microbes, that needs to be addressed, but leaving these items out in a quick rain shower would not be a concern.
Bags within Bags
A well thought out bag is a bag of other bags.
No rucksack should be considered to be totally waterproof. Thus, one or more waterproof liners are used to enclose the contents.
Items within these liners will themselves either be in plastic bags or stuff sacks.
You can buy drybags large enough for the main compartment of a rucksack. Some armies issue these, although examples may have gone through many hands and no longer be fully waterproof. Personally, I have never used these.
A heavy-duty plastic sack is a good alternative, and the usual choice before drybags were commonly marketed.
I used to be able to get 100 litre yellow bags from work. The current ones have things like “clinical waste” and “biohazard” printed on them, so not something that may be re-purposed and used in public!
The plain yellow bag I currently use has served on many trips.
Should I need to replace it, I am considering an orange plastic survival bag for the role. This could be cut down to size, or used intact with the mouth partially rolled down. In the latter case, it may still be used as an emergency shelter, or as a signalling panel.
Incidentally, if things turn extreme, your feet may be kept warmer by placing your feet (or the foot of your sleeping bag) into the emptied rucksack. If that bag contains the emptied liner or the end of the orange survival bag, so much the better!
When the tactical situation allows, I highly recommend using a light coloured bag as a liner. It is much easier to find items within a yellow or orange bag than in a black rubbish bag or dark-coloured liner.
There is an obvious niche in the market for sand-coloured plastic liners or drybags. Failing such an item, try a clear bag.
If you expect your pack to see heavy use, it is not unreasonable to “double bag” your main rucksack compartment. When I add the orange survival bag, the older yellow bag will probably be place around it, if it is still reasonably intact.
Similarly, if attempting to cross a river, placing a black rubbish bag or two around your rucksack liner is prudent. A few rubbish bags may be squeezed into the corner of a pack and take up very little room, but can prove useful.
Clear bags are useful in the construction of solar stills or transpiration traps.
I am sure someone will soil their panties over my use of plastic bags. The real issue is the disposal of plastics, not the use of them. I expect my bags to be in use for years, possibly decades.
Some people pack the contents of their rucksacks in colour-coded stuff sacks or packing cubes. Acquiring a suitable variety of colours and sizes may take some effort and expense.
Most stuff sacks are not totally waterproof, so for things you want to keep dry, such as clothes or food, you will probably end up lining the bag with a plastic bag or two anyway.
For many items, you may be better packing them in clear plastic bags and not bothering with a stuff sack.
Clear plastic lets you see what is actually in the bag rather than memorizing stuff sack colours. You may even label the bag with its contents with a marker pen.
For additional clarity, distinguish different bags with one or more pieces of coloured tape. For example, fire-related items red or orange; water, blue; green, clothing etc.
If planning a trip or building an emergency or camping kit, I strongly suggest that you stock up on some five‑ or ten‑litre clear plastic bags, such as freezer bags. Avoid getting rubbish bags in “biodegradable plastic”!
Bags that can be sealed watertight, such as “Ziplocs” are an obvious asset.
You should probably invest in a quantity of smaller bags too. These may be used for carrying EDC items or making fire kits.
Items that are particularly vulnerable, or that may cause serious problems if they leak, should be double-bagged.
A range of plastic bags is a much more prudent initial investment than a flashlight that can be seen from the moon!
If your bags do not have sealable closures, avoid overfilling them, roll over the opening and secure with mini-bulldog clips. If you lose a clip, or put it to another use, such as hanging up a survival blanket as a reflector or signal, twist the bag shut and use your cordage in a strangle knot. You may alternately roll the opening and use a piece of duct tape, but this solution may have only limited life.
Stuff-sacks are good for items that do not need to keep dry, such as your frying pan, or stuff you want to breathe and become dry, such as waterproof clothing.
Putting It Together
The above is the “how” of “how to carry items”.
The “where” is based on frequency/urgency of need and on the bulk/mass of the item(s).
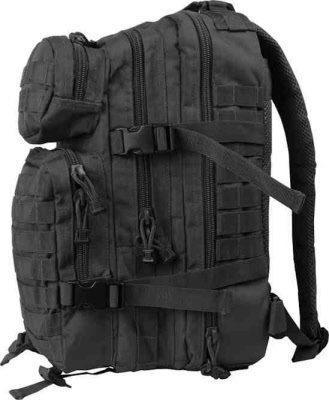
Popular High or Outward
Items that are frequently needed, or may be needed in a hurry, are placed where they are most accessible. Such items are often carried in the external pouches and/or lid pocket of a large rucksack.
Smaller items, that might be hard to locate within the main compartment, also tend to get carried in external pockets.
Most large rucksacks would be considerably improved by more external pockets, and more smaller pockets and/or interior divisions to better organize gear!
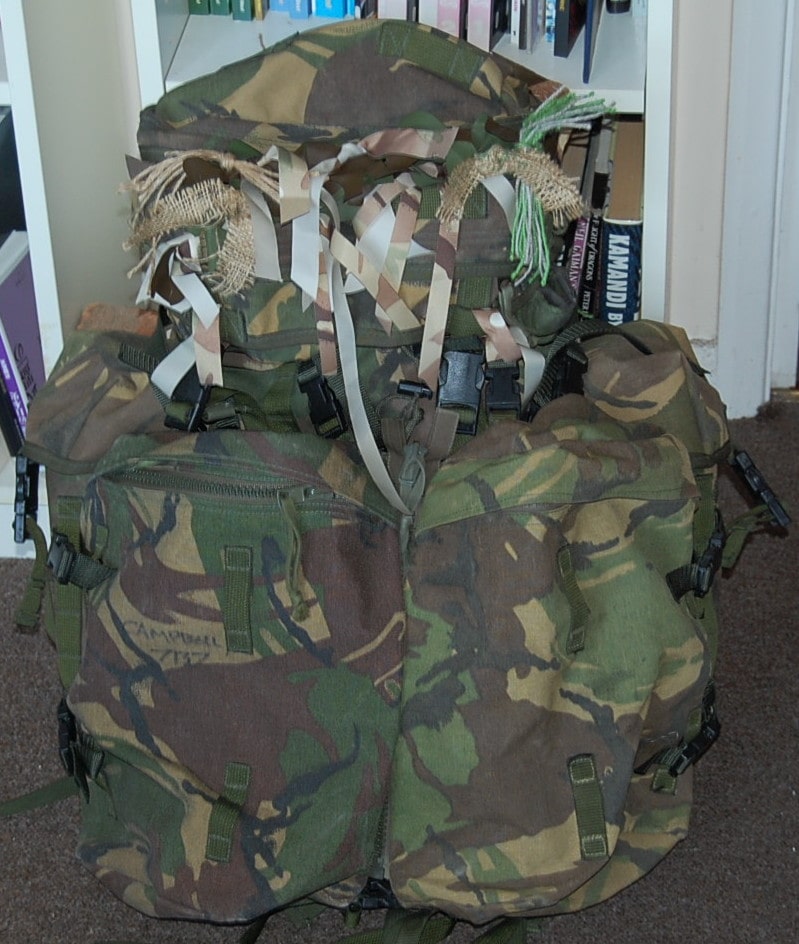
My favourite hostelling and hotel rucksack has six large external pouches. I knew the water bottle would be in the bottom-left side pouch, my wash kit and towel in the bottom right-side, and my journal and medical kit in the top, front.
I could even send someone else to fetch the medical kit by being able to unambiguously describe its location.
Items that are not so frequently used, or only carried as spares, tend to be placed toward the bottom of the main compartment. You will only need to unpack your sleeping bag once a day, for example, and not until your tent or shelter is erected. The sleeping bag is thus at the bottom of the main compartment.
You do not need your sleeping clothes until your sleeping system is set up, so this clothing will probably be stored under the sleeping bag.
Some packs have the main compartment divided into two sections, often with a removable partition and separate access to the lower section. The lower part is used for your sleeping bag and related items.
When you stop for a rest, your rucksack may serve as a seat. If anything within your rucksac would be damaged by you sitting in it, rethink and repack. Others will not treat your pack as gently as you. It may be dropped off the back of a truck, thrown about by porters and similar.
My Alaskan Packboard has a flap of waterproof PU. It was not intended to be load bearing. Someone trying to be helpful tried to hand me the pack by lifting it by the lid. Luckily, it was the end of the trip and easily fixed.
Hard Up, Soft Down
A sleeping bag is soft and compressible, which is another reason it is carried toward the bottom of the bag.
Denser items, such as spare water bottles, canned food and cooking vessels are held towards the top of the pack, so their weight helps compress the items below. These items may be needed more than once a day.
Conventional wisdom is that heavier items should be carried towards the top of a pack, and close to the back.
I have seen an alternate view that ammunition should be carried with the sleeping bag in the lower compartment to avoid the pack becoming excessively top heavy. This rather depends on just how much you are carrying.
In general, I would keep the dense items “high and to the back”, but keep in mind the option of redistributing some items if the pack becomes excessively top-heavy. Better still, have a rethink of what you are taking!
I have previously written about what to carry in a daysack, so will not repeat that information here, although some of those concepts will also apply to what items and how you carry them in a “big pack”.
In a previous blog, I explained my use of a soft-core pack, which allowed me to easily transfer a number of useful items between different packs.
In a follow-up, I suggest a similar range of items packed into the detachable side pouch of a military rucksack. This pouch would be worn as a pack when the large pack was not, but when a soldier might still have need of items such as googles, extra water, protective gloves, dry socks, or rain poncho.
The other side pouch would carry CBRN items, and also be carried if such threats were anticipated.
On many of my trips, I have ensured there was room at the top of my main pack to carry a daysack. This was packed with most of the items that I might need to hand for a day sightseeing. Many of these items were things it was always handy to have at the top of a main pack, such as a rain jacket, toilet roll and sun hat. Effectively, when the daysack was in my large pack it served as extra pockets.
I could dump my main bag at my accommodation, grab the daysack, transfer across my water bottle and journal, and I was set to see the town.
Some soldiers advocate carrying a “grab bag” of “mission essentials” at the top of their pack. This will contain relatively dense items such as ammunition and communication gear. The idea is that if the main pack needs to be abandoned, the grab bag and its contents go with the soldier.
An extension of this idea is that under the grab bag there should be a bag of “personal admin” gear that may be taken with the grab bag if possible.
Some soldiers already carry an unpacked daysack within or strapped to the outside of their large pack.
It seems to me that the above ideas may be combined with the creation of a daysack that fits into the upper part of an army large pack. The daysack would have an upper section optimized for carrying dense “mission essentials”, and a lower section for “life support” such as 24 to 36 hours of rations, a brew kit, a stove and mess kit/canteen cup.
This “assault pack” would have a compartment for a water bladder and provision to attach the side-pockets of the large pack, holding the contents suggested above.
Which “personal admin” items belong in the small pack and which should remain in the large pack will probably be hotly debated in certain circles and forums!
As is so often the case, I digress! Back to the topic of rucksack packing.
For convenience, I will divide the contents of a large pack into seven generic categories:
• Clothing
• Cooking
• Food
• Water
• Sleeping
• Shelter
• Miscellaneous/Any Other Business.
Clothing
You will probably have several bags of clothing, based on form or function.
Some clothing items may be needed at short notice, other items less often than your sleeping bag. This will influence where in the rucksack you carry these items.
Most of your clothing will be packed into waterproof plastic bags. Several small bags may utilize the available volume better than on larger bag.
“Dirty laundry” I tend to keep in a stuff sack, so that it may air.
Recently washed items such as socks may be tied to the outside of the pack, or held in a mesh bag pinned to the rim of the pack flap. This lets them air dry, and they may be easily slipped under the flap should it rain. Some rucksacks have external mesh pockets which are useful for drying your laundry.
Rain clothing is carried in stuff sacks. My rain poncho will be with my soft-core bag or side-pouch, along with some cordage and light pegs so that it may be used for a shelter.
A rain jacket and trousers, if carried, will be in a readily accessible area such as a side pocket, lid compartment or top of the main compartment. If the storm clouds are gathering, these items may be placed directly under the top flap, above the snow‑lock for immediate access.
Rain items tend to migrate, depending on if they are wet or dry.
If wet, they are generally left unbagged and slipped under the pack flap or strapped to the outside of the pack to dry.
You will probably have a plastic bag for your socks in the main compartment. It is also prudent to have at least one smaller Ziploc bag holding a single pair of socks in a more accessible location. If away from your pack, have a bagged spare pair on your person.
If conditions are bad, change into dry(er) socks whenever you can. Let the wetter pair air dry, bag them if they get dry.
With most clothing, I usually reckon on “wash, wear and spare” unless carrying a lot of other gear, or a very short trip, in which case it is “wear and a spare”.
Expect an unexpected dunking or downpour. Have a drier change of clothing you can change into while your other dries. Wear one set of clothes during the day, then change into the other set for sleeping, letting the day set dry.
Socks are an exception, and it is not a bad thing to have a few extra pairs.
Underwear may be bagged with your socks, or separately. If you are packing an emergency or bug-out bag, you may have several different types of underwear to suit different seasons and conditions. Bag these separately, according to type.
Spare shirts and trousers are carried in the main compartment.
If you carry a spare uniform or set of clothes for sleeping in, bag these separately and stow at the bottom of your bag under the sleeping bag.
You will need a warm jacket or jumper should the weather be colder than expected, and to prevent you from chilling once you cease a hard activity. This should be bagged individually and carried in the main compartment, but above the spare and unused clothing so it is relatively easy to access.
You may need several different types of gloves available.
It is prudent to carry spares of hats, gloves, neck gaiters and the like. These may be bagged in the main compartment if space is needed for other items in the outer pockets.
Most clothing items take up least space if rolled. There will be exceptions to this general rule of thumb, so experiment!
Cooking
Cooking is treated as a separate category to food.
On many of my “city-breaks” I have not carried any form of stove or cooking vessel.
Some backpackers take to the wilds only carrying food that will be eaten cold.
In general, you should have some means by which you are able to heat-treat water.
The use of cooking fires is not permitted in many areas, and an unmodified canteen cup and many camping cook sets are not particularly suited to such heat sources. You will need to carry some form of stove, and an adequate supply of fuel for it.
Being relatively dense items, your cooking vessels, fuel and stove should ride high up in the main compartment, helping compress the clothing and sleeping bag below.
You will eat or brew‑up more frequently than you change clothes, so these items also sit high for ease of access.
Stuff sacks are suitable for many of these items. Fuel containers that could leak should be placed in plastic bags and packed so that they stay upright. Fuel in general should be kept dry, so pack it in plastic bags. This also reduces any odours the fuel may produce.
Brew‑kit items will also be vulnerable to water and should be in a plastic bag.
Some travellers like to carry these in the side pocket of a large pack. There is usually room also for some fuel, a brew‑kit and about a day’s worth of food and snacks. This makes these items very accessible, and is particularly useful if you tend to stop to brew‑up every 90 minutes. Additional fuel will probably need to be carried in the main compartment.
The downside of using a side pocket for your cooking kit is that you might need this side pocket space for something with a higher priority. Another problem is that your stove and other items will be rather vulnerable in this position. If anyone else is likely to handle your bag, expect it to be knocked over, manhandled and possibly tossed off the back of a trailer. If you have to trust your large pack to airline baggage handling, I suggest you repack the stove and other vulnerable items to the main compartment.
Food
Most of your food will be in the main compartment, above your clothes. You should be eating more often than you change your clothes, and the mass of the food helps compress clothing and sleeping bag.
Most of the food will be in plastic bags. For many things such as rice or flour, double bagging is a good idea. Yes, I have travelled carrying and using flour. I have read Kephart and James Austin Wilder.
I once saw a backpacker’s guidebook advocate carrying dried rice in a plastic ice cream container. I still have no idea why the author thought that was necessary.
Many packaged foods are already in a form suitable for carrying in a rucksack. You might throw them in a bag just to keep them together. Canned goods are also generally “good to go” right off the shop shelf.
Some fresh foods, such as fruit, cheese and bread may be better kept in their paper bags. Pack fruit carefully so it does not get smushed.
In the past, I have carried some spices and condiments in 15 ml centrifuge tubes. Essentially, screw-capped plastic test tubes. More often used items were in 50 ml tubes. Curry powder, chilli powder, cayenne, cumin, salt, sugar, powdered garlic, Tabasco sauce, soy sauce and Worcestershire sauce can add welcome variety to meals. In hindsight, many of these could have been carried in small Ziplock bags, with the tubes only being used for the liquids.
Snacks, trail-mix and food for that day may be carried in external pouches for easy access. Some of these items end up in jacket pockets if you tend to “graze as you go”
In bear country, you will need a line and net to cache your food and other items..
Water
Water is quite heavy, so ideally rides near the top of your pack, near your back.
Many more modern rucksack designs include a compartment designed to carry a hydration bladder. Those that I am most familiar with are against the back and high up, so are the most efficient position to carry a large volume of water.
I suggest you get the largest hydration bladder that you can afford that is compatible with your pack, so a significant part of your water is carried where its mass is best dealt with.
Another advantage of such a hydration bladder is it lets you drink any time you want, or at least any time while you are wearing your pack.
Hydration bladders designed to attach to the outside of packs should be mounted as close to the top and back as practical. These may be better off carried within the main compartment for protection.
More conventional bottles are best carried in the main compartment, close to the top and the back.
If you do not have a hydration bladder, you will want to carry one bottle where it is readily accessible, such as in your daysack or an external pocket.
Sleeping
I once met a young Dutch backpacker who was rather offended that I was carrying my sleeping bag inside my rucksack.
“You are supposed to strap it to the outside!” he protested.
“But it fits inside! I have plenty of room.” I argued. Just to compound his annoyance, I was camping, so was also carrying a tent, stove, cooking kit and my daysack in my bag, while he was hostelling and had his pack so filled he had to carry his sleeping bag outside.
There are several approaches as to how to carry sleeping bags.
Firstly, use the right bag for the season and expected conditions. If you are hostelling in the Mediterranean in summer, you do not need your heavy, bulky extreme Arctic-rated bag!
On other pages I have given advice on what sleeping bags to acquire.
If you have to carry a sleeping bag on the outside of a rucksack, be aware that your bag is not protected against abrasion nor water. The stuff sack or compression sack you use with your sleeping bag is generally lightweight nylon.
Our ancestors knew to roll their blankets in a ground-cloth, tent section or gum blanket for protection. This never seems to occur to many modern travellers.
Don't use your only waterproof item to wrap your sleeping bag or pack! You will have trouble donning it when the heavens open.
It may be prudent to find a sports bag or similar that can fully enclose your sleeping bag. If necessary modify the sports bag with attachment points to keep it more securely attached to your pack.
Inside the sports bag, have a plastic bag big enough to hold the packed sleeping bag. Generally you want your sleeping bag to dry out from any moisture it may have absorbed in use. If the heavens are about to open, or you plan to ford a river, put your sleeping bag in a plastic sack to prevent it getting any wetter.
Where to carry the strapped sleeping bag? Possibly the most common solution is to carry it on the bottom of the pack. This is not so bad when walking, but can get in the way if you try to sit with your pack on.
Top of the pack is generally not so practical. I have seen soldiers try this, then discover they cannot raise their heads to fire when they have gone prone. Even if you keep on your feet, you may feel that your pack seems top-heavy.
A sleeping bag strapped to one side of your pack can get interesting if you try to navigate narrow doors or use crowded public transport. It may also throw off your centre of gravity. I have sprained an ankle carrying too much weight on one side (I had a sports bag instead of a rucksack). Similarly, a bag strapped to the front of the rucksack, projecting behind you, can cause problems, assaulting strangers and demolishing scenery.
As you will have gathered from previous sections, a sleeping bag can be carried in the main compartment of a large pack, and should be placed close to the bottom. You only need to unpack your sleeping bag once a day, and it can be compressed by the mass of other items above.
First time you put a bag in your large pack, it can be a shock! Some bags will appear to take 50 to 75% of the volume. How will you be able to carry all the other stuff you have?
Generally, sleeping bags are an item you do not roll to pack.
Your new sleeping bag probably came nicely rolled up in a stuff sack or compression sack. You can drive yourself mad trying to get it back inside in the same configuration.
The best way to pack a sleeping bag is to insert the foot part into the sack, then grab handfuls and cram them in, pushing them down as far as possible and into any empty space you feel. Takes a fraction of the time and is probably better for your bag.
If you have compression straps, first “foot and cram” as described. The best method I have found is to then sit on the sack and incrementally tighten alternate pairs of straps.
It is worth repeating that for long-term storage, sleeping bags should not be kept in stuff/compression sacks. Mine are loose in large plastic bags to keep the dust off. My down bag is in a roomy cotton sack the manufacturer thoughtfully provided.
If you want your bug-out bag ready to go at a moment's notice, your sleeping bag poses a problem. One solution is to have two bags, one stuffed and ready for action, the other lying fallow. Swap them over every few months. A variation is to alternate between a spring/summer and autumn/winter bag.
One of the problems of a bag in a stuff sack or compression sack is that it is fairly dense and will not compress much more. It may not be the best shape to efficiently use the interior volume of your rucksack.
An alternate approach is to just not use a stuff/compression sack!
“Foot and cram” your bag directly into the bottom of your rucksack. This allows the bag to “flow” into any available space. An interesting variation of this is to use a bivi-bag as the waterproof liner you cram the bag into. A nice example of making one item serve more than one role.
Not using a stuff sack is a relatively new idea to me, so I have not had time to try this “in the field”.
As an experiment, I placed a bivi-bag in the bottom of a British Army large bergen. Into this I crammed my Merlin Softee and a -15°C three/four season bag (A Eurohike “Backpacker Micro III” I have lying around. Amazing what people leave behind and never return for!)
The results were promising. The bergen is still 50% empty, not including the volume enclosed by the snow‑lock. That is impressive for two sleeping bags and a bivi-bag. I expect the bags will compress further once some mass is placed above them.
Unpacking the bags seems quicker than if they were in stuff sacks. More importantly, they may be packed up very quickly, which is useful if you have to vacate the area quickly.
An objection to this technique is that other items on top of the bag may damage the bag. This sounds like a problem with how the traveller is packing the rest of their gear!
Even if your rucksack does not have a separate sleeping bag compartment, I recommend keeping your sleeping system in its own liner/bivi-bag outside the liner with all the other items.
Kip mats are another sleeping item that is often strapped to the outside of a pack. While bulky, they are less massive than sleeping bags so cause less problems with the balance of your pack.
Rolled kip mats are a regular, single coloured shape. If you need to not be seen, make a camouflaged stuff-sack for your mat. Attach some textilage to the outside to further break up the shape.
Items tied to the outsides of packs may not fare well through baggage handling. Wrapping the pack in a dozen or so metres of plastic may only be a partial solution.
Some mats may be folded and will fit inside the main compartment. These may be carried outside the liner, and are usually placed close to the wearer’s back to provide extra cushioning.
A poncho liner or blanket may be called on to act as clothing during the day. It may need to be stored somewhere more accessible than your other sleeping gear.
Shelter
I was taught that your tent was to be carried inside your main compartment, but outside the waterproof liner. A tent will often be packed up while still wet, so the logic of this approach is clear. Outside the liner, the tent components have a chance to dry‑off while you are in transit.
Most modern tents come in a nice bag, probably fitted with carrying handles. You will want to re-purpose this. Chances are you will never get the contents back in this bag as neatly as they came from the shop.
Separate the tent inner and fly and place them in separate stuff-sacks.
Tent poles are usually carried down the corners of the main compartment, near your back. If your main compartment has a partition, it should have cut-outs at the rear corners to accommodate tent poles. If you are buying a rucksack with a partition, make sure it has this feature.
When packing your poles and tent bags, be careful that you do not damage the waterproof liner(s).
Your bag of tent pegs should be stored with the tent fly, unless you are so unfortunate to have an “inner pitches first” tent!
Tent pegs can be in a plastic bag or a small stuff sack. A clear plastic bag lets you see the contents, but won’t let the pegs dry so readily. Galvanized tent pegs should not corrode, but if you brought them from a budget source, they may not be quite what they claim.
It is a good idea to have an additional bag of spare and special purpose tent pegs. Store these in an outer pocket where they are readily accessible.
If the tent fly or inner got a good soaking, lightly fold it and carry it without its stuff sack, under the pack flap, over the snow‑lock. This will let it air and drain.
If you use a basha or tarp rather than a tent, packing instructions are effectively the same: Inside the bag but outside the liner.
Some individuals have squeezed a basha and associated items into the top pocket of a rucksack. There is not really much room for anything else, and getting it in and out may take several minutes and a black-belt in origami, which is not the best situation if you need to pack-up fast and get somewhere else.
Carrying a basha in the top compartment may increase the rain resistance of the rest of the bag. The same effect may be achieved by carrying the basha or tent fly just beneath the snow‑lock, although this may hinder accessing the main compartment for other items. Carrying your waterproof jacket and trousers at the top of the bag may produce the same protection but be more practical.
Some companies that customize rucksacks offer external poncho/basha pouches. Typically these are high on the front of the rucksack, just below the edge of the lid when it is closed. There are various ways to rig something similar, either as a pouch, or a square of tough material the shelter may be rolled up in. If going for the former, make sure there are drainage holes that let the contents dry.
Miscellaneous/Any Other Business
The above six categories include most of the items that will occupy most of the volume of your large rucksack.
This last category includes a variety of other items, some of which are very important, others less so.
Medical
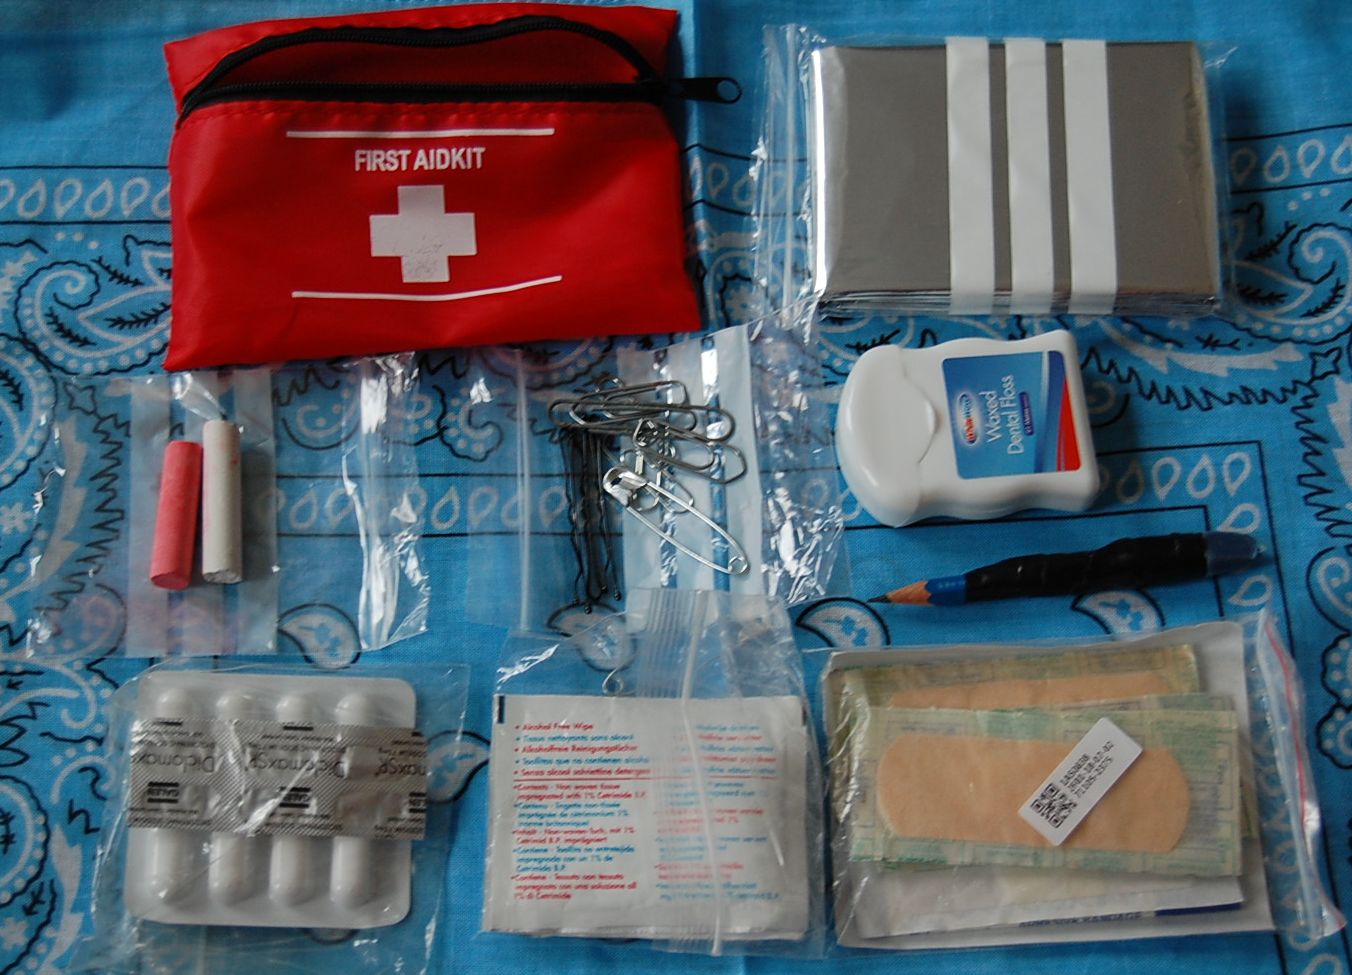
My EDC includes a number of first aid items. There is a more extensive kit in my large rucksack. An intermediate level kit may be found in my daysack/soft-core pack. I have described the contents of these kits on other pages. Many of the contents of these kits are individually in plastic bags to protect them from water. The larger pouches are within clear, sealable waterproof bags.
Your medical kits should be readily accessible, so an external pocket is preferred. It should also be obvious what it is.
You may have to send someone else to fetch your medical kit. They should be able to find it with simple directions such as “My pack. Top, front pocket. Green pouch with a white cross.”
Washing
Wash kits are another item that I have described in other blog posts. It is convenient to have them in an external pocket so they may be easily accessed when wanted. Some items of a wash kit inevitably get wet, and an external pocket gives them more opportunity to dry. The wash-kit is a large pack item. It would be a rare circumstance when I would want to carry this in my daysack.
Lights
My girlfriend: “Flashlight!”
I rummage through a specific pocket in my bag and produce a flashlight.
“How did you know I had a flashlight?” I challenged.
“You have everything!”
A flashlight lives in my daysack, or other readily accessible pocket. I have other sources of illumination on my person. My soft-core pack has a hand-crank flashlight from a pound store. It is 100% waterproof if I keep it in a Ziplock bag.
Some campers carry lanterns. I have had little use for them myself. I am more likely to go to bed than curse the darkness. My only lantern is made from a soda can and a candle.
Maps and Compass
It is not a bad idea to have a spare compass in your daysack or large pack. Pack it so that it is well protected from damage and moisture.
Maps in current use should be carried somewhere accessible, such as the daysack or top pocket of a large pack. Maps not in current use should be bagged against water and may be carried elsewhere where there is room.
Emergency Items
Emergency items such as flares, smoke bombs, space blankets and similar should obviously be in an easily accessible location. Bear in mind that the emergency may begin with you being separated from your large pack.
Repairs and Spares
Your repair kit should be relatively compact.
A few buckles, a minimal sewing kit, some bladder patches (to repair flexible water bottles), tube of superglue and some tape. This is described elsewhere.
I carry a single ladder-lock buckle and a side-release buckle, both 25mm and black. My packs have more 25mm buckles than other types, and these are more likely to break than the larger ones. Most of my packs have black buckles.
A length of wool or yarn to darn your socks, if you know how.
Decide if you really need whole rolls of tape or just a few metres. Shorter lengths can be wrapped around pencils or pieces of plastic.
Have a couple of zip ties, about 20 cm long. Many of the survival applications often proposed for zip ties are better with string or plant stems, but zip ties do have some repair applications.
A 25 mm square of Blu Tack may prove useful.
A small Zip-lpck bag will probably hold most of the kit.
Despite its low bulk and mass, the repair kit is a large pack item. Tucked into the corner of a lid pocket is probably a good location.
Cordage
Various sizes of cordage will prove useful.
It should be easy to find and access. In addition what I carry on my person, the soft-core pack contains several kinds.
Books and Notepads
I like to keep a journal when travelling, so carry a notepad. Also good for recording anything interesting, or drawing pictures when there is a language barrier.
Not surprisingly, the notepad is in a plastic bag. It lives in the external pocket of my daysack, or an external pocket of my large pack, depending on what I am carrying.
Guidebooks and novels currently in use migrate between the daysack and external pockets of the large pack. Guidebooks for previous areas or areas yet to be visited ride in the main compartment where their mass compresses whatever is beneath.
Electronic Gadgets
I never carried electronic items on my major adventures. Even my beloved iPOD stayed at home. I preferred to experience rather than to photograph and record. I know this approach will be alien and probably incomprehensible to younger readers.
Rationalize the electronic gadgets and accessories you intend to carry in your pack. A couple of USB adaptors will remove the need to carry half a dozen or more different cables. A hand-crank flashlight that also works as a charger and radio is a better choice than a more expensive and heavier power bank.
Miscellaneous Bag
Tucked away in the main compartment of my large rucksack I have often carried a “miscellaneous bag”. This might be an old pencil case or a Ziploc bag. It contained anything I might need in the future, but not at present: My home house keys, travel card to get me home from the airport, money that I could not use in the present country, presents for people at home, and so on.
Other Paperwork
It is amazing how many packing lists never mention toilet roll! This needs to be reasonably accessible and kept dry. My soft-core pack includes a roll in a Ziplock bag with a 100 ml bottle of alcohol hand sanitizer.
Ammunition
If you are armed, a realistic quantity of ammunition should be on your person. Spare ammunition may be carried in your pack. Since ammunition is dense, and may be needed in a hurry, it obviously rides near the top of your pack, and close to the back.
Final Thoughts
If your pack is totally full, you should probably rethink. Items that pack neatly at the start of a trip tend to bulk-up over a week or so.
You will need some free room for unexpected contingencies. And free space lets you move stuff around when looking for something. You do not want to unpack your pack every time you want something lower down.
Your pack isn't just a lump that you carry on your back.
When stopping for a rest, sit on it. It can be used as a windbreak when lighting a fire or cooking. Place it at one end of your shelter to block the wind. Use it for cover when hunting or hiding. Packed and rigged right, it may be used as a floatation aid or mini-raft.