In my recent post about throwing sticks and stones, I mentioned that creating a good spear was not as easy as some survival manuals make out, and that the throwing stick might be a better investment of your time and energies.
I had wanted to link this comment to an article that I had written back in my early days on the internet. However, the throwing weapons group I had originally written it for had long since disappeared, and to my surprise, I had not placed a copy on my other website.
Below is the original article from many decades ago, with some minor updating and editing.
Since I wrote this, I have discovered several of my original articles are preserved on this site.
A Short Essay on Spears
Sometime ago, I started putting together notes on easily-made weapons and started off with spears since most survival books make this out to be quite simple. Just grab a length of wood and sharpen one end, and off you go!
Not quite!
Assuming that you do have a handy forest nearby, you won't see that many six foot+ lengths of timber of suitable width just growing from the ground, not anywhere I've been, anyhow.
If you do find something without needing to chop down a tree, it probably won't be straight, so you have to beath it.
Beathing involves gently roasting the wood over a fire or in hot ashes to make it temporarily supple. After this, you will probably have to hang your spear up to dry a day or so. Hanging a heavy weight from it may help the shaft stay straight. Bell towers were sometimes used to make and store pikes and spears.
Throwing Spears
For a throwing spear, just sharpening a point on one end and throwing it may not be enough. The spear will probably yaw like crazy and you may miss your mark by at least a foot.
Your spear needs flight stabilization.
Although fletching is sometimes used, most throwing spears are stabilized by drag, for which the front half needs to be heavier than the rear.
For a “self” spear (one made of a single piece of wood), drag stabilization may be achieved by tapering the shaft towards the butt, or better still. selecting a length of wood that is already tapered.

Captain Cook's expedition to Hawaii acquired a very nice example of such a spear (above), which must have been the product of many hours carving, particularly since the owner was unlikely to have had metal tools.
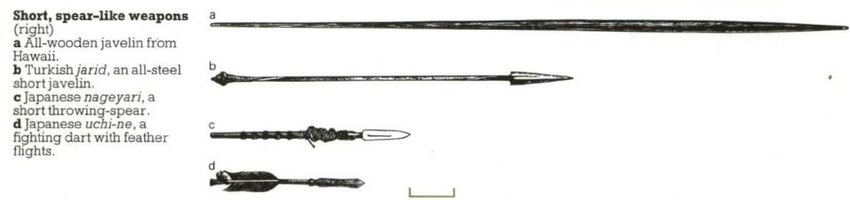
A simpler option is to fit a heavier head or a fit a weight just behind the head.
Most spears that have a separate head have a head that is denser than the shaft material.
Flint heads are well known, but one can also carve a blade from wood, maybe gumming flakes of flint or shell to it.
Fixing a knife as a spear point will do, but the blade length handy for a knife is often too short for a good spear and any cross guard will limit penetration. Traditional boar‑spears penetrated at least ten inches, and bear‑spears more than double this.
A point can be carved from wood, and fire hardened in some cases, but if for a throwing spear, ensure it has sufficient weight.
Fire hardening is a process that is often mentioned, but not described in detail in many survival manuals. Fire hardening is “lightly toasting” the sharpened point of a wooden weapon to drive out some of the moisture. The point is then sharpened further. Fire hardening may make a wooden tip harder, but also makes it more brittle. Sometimes grease, oil or fat is applied to the treated point afterwards.
Other useful construction materials include flint, obsidian, glass, shell, slate, bone, horn, antler or metal, either on their own or added to a wooden head.
Drag stabilization may also be increased by adding cloth streamers or long tufts of grass or hair behind the head.
Thrusting Spears
Sometimes your intended meal will have other ideas and will want to come up and inform you of its differing opinion. In such a situation, a thrusting spear is useful, no matter what other weapon you were using to hunt.
Forward balance is not such a problem for a thrusting spear but penetration still is. In this situation your concern is too much rather than too little.
Some beasties have been known to impale themselves further onto a spear or sword attempting to get the hunter within reach of their horns, tusks, claws or teeth!
The solution to this hazard is some form of arrest, usually a crossbar a foot or more down the shaft.
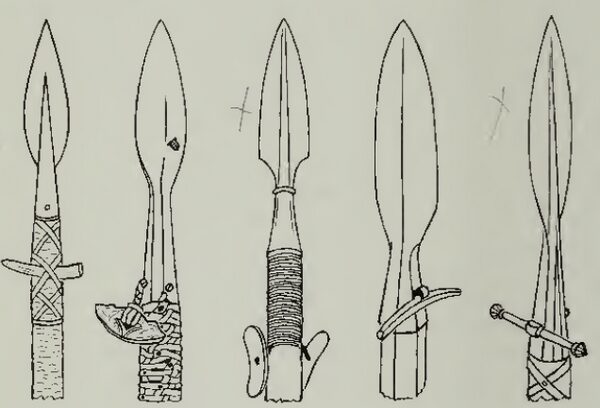
A number of examples are shown in the illustration above, taken from “Hunting Weapons” by Howard L. Blackmore.
The leftmost uses a boar tusk thrust through the bindings. Several others use plates of bone or horn attached by cordage. Blackmore, p.91: “To start with, in the fifteenth century, the bar was a piece of wood or horn held firmly in position by thonging. It was then realized that if the bar hung loose it was still effective and was not so liable to cause accidental injury to the bearer or his companions. The piece of horn forming the bar, often only roughly shaped, was fastened to the haft by a leather strap passing through a hole in the socket or woven into the binding which normally criss-crossed the head of the haft to provide a grip.”
In some weapons, the arrest is not so obvious, being incorporated into the design of the blade or socket. Examples of this include the partizan and the lugged or winged spears.
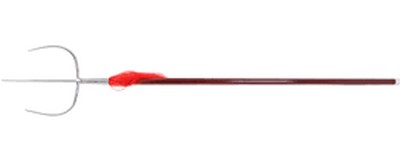
Having more than one point automatically limits penetration, as can be seen with the Chinese tiger fork.
Thrusting spears are also used for hunting, usually from ambush.
A thrusting spear should lack any barbs so that it can be easily withdrawn for a second thrust or to be used against another target.
Barbs and Multiple Points
A throwing spear may be barbed, and in a hunting situation this may be done for two reasons:
Firstly, it is done to keep a poisoned blade in the animal's body long enough for the poison to take effect. Often the head detaches so that the shaft (the production of which may have involved quite a lot of work) will not be lost or damaged as the animal escapes through the brush or tries to rub the head loose. Having a wound partially plugged by a shaft reduces the rate of blood loss, but the movement of the shaft will also inhibit clotting, prolonging bleeding time.
Heads are also barbed to prevent an animal escaping from the spear head when the shaft of the spear is held or the weight of the shaft will hinder escape.
The most familiar examples of this are fishing spears (which may be more effective thrust rather well as thrown).
Sometimes the head of a spear will be designed to detach but will be on a line so that the fish/seal/hippo(!) can be hauled in once exhausted.
The drag of the detached shaft through the water may further tire the animal and sometimes a bladder or buoy is added to the shaft increase this effect.
This technique is also used with arrows.
An very nice example (above), taken from “The Art of Attack” by Henry Swainson Cowper. The drag of the arrow shaft being pulled sideways through the water tires the prey. The barbed arrowhead is made from bone and inserts into a socket in the end of the shaft.
Because fish are often hard to hit, many fishing spears (and arrows) have multiple points, and this strategy may also be used on small elusive furred and feathered game too. For ideas for such designs, I suggest browsing Cowper and Blackmore, paying particular attention to the multi‑pointed spear, harpoon and arrow heads made from non‑metallic materials such as antler, wood and bone.
Throwing Cords
A useful trick that can be applied to spears is to tie a loop of cordage to the shaft and slip the first two fingers through the loop when throwing. This increases energy transfer to the shaft and was known to the Greeks as the “ankulé” and to the Romans as the “amentum”. Cowper describes this on p.230.
A variant of this is to tie the cord with a half hitch, either near the centre of gravity or the butt. Using this knot allows the cord to remain with the thrower after the spear is cast. Cowper describes this on p.231, using the term “ounep”.
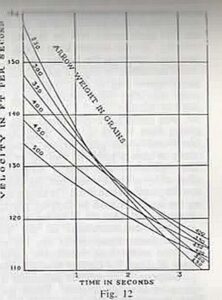
Miners in West Riding, Yorkshire, used this method to throw 31 inch long drag stabilised arrows, and ranges commonly exceeded 200 yards. Cowper describes this on p.230, the source being “The Crossbow/The Book of the Crossbow” by Sir Ralph Payne-Gallwey.
Conventional arrows can be thrown by the same method and this maybe a useful hunting technique for a bow hunter should your bow be broken.
If suitable materials are available, and the above design principles are borne in mind, quite effective spears can be made.
Spears are also useful as walking and wading aids, as carrying poles, shelter supports etc.