Disclaimer: “As an Amazon Associate I may earn from qualifying purchases.” Adsense and Infolinks were no help at all.

If you have enjoyed this article or it has been helpful to you please feel free to show your appreciation. Thank you.

Read The Third Wave by Alvin Toffler!
Categories
Phillosoph

Pec-Knives and the Gerber Strongarm

Pec-Knives

The pectoral position is a very useful position to carry a knife. It is accessible with either hand, and if the wearer is seated or prone. It can be readily utilized to cut a jammed seat harness, or when rolling on the floor with an aggressor.
This topic came up in one of my discussions on soldier’s load. Modern servicemen have a lot of gear to carry, and many do not believe carrying multiple knives is warranted.
If you are going to carry a single fixed blade knife, then the weak-side pectoral position is a good place to place it.
This carrying position influences the form of the “pec-knife”.
Pec-knives are discussed in “Survival Weapons”, and their use in “Crash Combat”.
The more general discussion of knife use for defence in “Attack, Avoid, Survive” are also relevant.
You sometimes see quite large knives carried in this position, but for most of us an overall length of less than eleven inches is more practical.
There is a wide choice of fixed blade knives in this size range. Harder is finding a knife of sufficient thickness and robustness. If this is going to be a soldier’s primary blade then it must stand up to some rough treatment.

Gerber Strongarm

A few weeks back I encountered the Gerber Strongarm.
This just seemed to shout “I will be a great pec-knife!” 
Just before Christmas, I got an email telling me the variant I wanted was back in stock. Money was short, but I had had a rotten day and a few minutes before midnight I gave into temptation and ordered a Strongarm. It helped that the price listed was about 30% less than most other stockists!
Would you believe it? I looked the next day and the price had jumped a big chunk. I had ordered just in time!
A few days later the Gerber Strongarm arrived. I wish I had had the money for another, but as it is, I may run out before the end of January. Buy books please, people!

The Sheath and Extras

An important component of a potential pec-knife is the sheath.
This mode of carry is most convenient with the knife inverted and the pommel downwards. Obviously it is necessary that the knife is fully secure in this position, but still capable of being easily drawn when needed in a hurry.
The sheath of the Stongarm has a large clip that engages a depression on the hilt. Note that this releases with an audible click, which may affect your tactics in some scenarios.
In addition to the clip, the smaller-width hanging strap has a retention strap with a popper.
The latter feature is one of the few I have issue with. This is a little tight, the slight increase in grip width my lanyard has added making it sometimes fiddly to close.
The length of strap past the popper is also on the short side, and may be difficult to pull on if wearing some gloves. It may be necessary to sew an extension onto this part.
An important feature of this sheath is that it is ambidextrous, so the knife can be inserted securely with the edge either to the left or right. This is useful for a pec-knife, it being considered to be prudent to carry your knife with the main edge outwards, away from your throat.
A couple of accessories are included in the box.
I have already mentioned that the smaller-width belt hanger has the retention strap. This affixes to the sheath by a strap and popper.
A larger width belt hanger can be attached to the smaller by poppers. Both belt hanging loops have poppers, making the easy to detach or attach without rethreading a belt.
A device that allows the sheath to be mounted horizontally is included, as is a device allowing easy attachment of the sheath to MOLLE/ RALS systems.

The Knife

The knife itself comes with either a semi-serrated or plain edge, and is available in either black or a more practical coyote brown shade.
The blade is 4.8 inches long, and 3/16th thick. Overall length is 9.8 inches and weight is given as 7.9 oz.
Blade material is 420HC stainless steel with a dark grey coating.
Grip is a rubber coating over glass-reinforced nylon.
There is a resemblance to Gerber’s LMF II knife. The LMF II is heavier (c.12 oz) and costs more. I have not handled a LMF II, but the Strongarm seems a better choice for the pec-knife role.
The butt of the Strongarm ends in a blunt triangular point that might serve for applications such as window breaking. This feature is thoughtfully provided with a lanyard hole. I know I have said this before (yesterday actually!) but it really is surprising how many expensive knives are not provided with provision for a lanyard or other features to reduce the chances of loss.

Making a Chest Rig

There are plenty of good reviews of the Strongarm out there, so I will concentrate on specifics of rigging it as a pec-knife. This is actually very simple.
Obviously, you can mount the sheath directly on your webbing, but what if you are not wearing such?
The Strongarm is potentially a very useful knife, and you may want it when you are not in full tactical gear.
I have seen the Strongarm described as a cross-over” knife, good for urban and wilderness.

Take about two metres of paracord. I know frugality is a virtue, but it is prudent to have a little too much rather than start again.
The Strongarm sheath has a number of “screwholes” down each side. Pass one end of your paracord through a hole near the sheath mouth, and the other through a hole on the opposite side, second from the end.
This should be made clear from the photos.
Experiment with what arrangement suits you personally.
Pull both ends of paracord so the middle makes a snug length across the front of the sheath. Now take both lengths, hold them together and tie a single knot in both. This can be an overhand knot but a figure-eight may be more comfortable when worn.
You should have created a large loop with the knife sheath threaded on it. This loop should be large enough to pass your weak-side arm through, the knot sitting somewhere between your shoulder-blades. Take the long, free ends and form them into a second loop using the knot I call a “slip-bend” in my free book on knots.
Place your other arm through this loop and tighten it by sliding the two parts of the slip-bend apart.
The Strongarm sheath should be hanging just before your weak-side armpit. If you have the small-width belt hanger still attached, this may be used to anchor the sheath to a belt, if you wish.
Note the snap-link, added by a magnus-hitch. The lanyard can be attached to this when greater security is wanted. It also proves useful for holding other items. I later relocated the snap-link to below the sheath, where it helps keep it in position.
A chest-rig for a knife can cost tens or hundreds of dollars.
This one is simple, lightweight, comfortable and costs just a couple of metres of paracord.
If you like this, throw some of the money you have saved this way!
Categories
Phillosoph

Designing a Fighting Knife

In a recent blog, I had a wander into the field of fighting knives.
Today I would like to share some additional musings.
Firstly, it is valuable to recognize that names such as “fighting knife”, “combat knife”or “tactical knife” are in actuality rather euphemistic, particularly in modern applications.
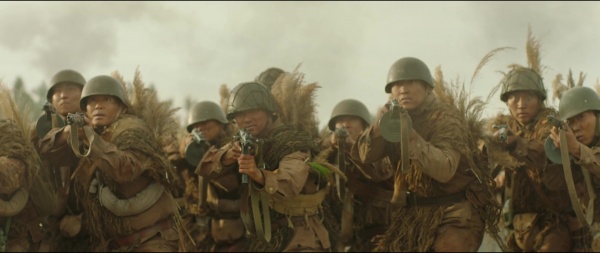
A knife vs knife duel is unlikely.
There is an adage that if you find yourself in a fair fight you did not plan properly, and this should be remembered when considering knife use.
Knives are generally used either as weapons of desperation or advantage.
One of the points I made in the previous post is that probability of use did not justify carrying a large combat design.
A multi-role survival blade is a far better encumbrance, and most such designs usually serve well in a defensive or offensive role.
It is no secret that I regard the kukri as superior to most fighting knives on the market.
If a dedicated fighting weapon is needed, it should be a small to medium-sized design that compliments the large and small survival designs likely to be carried as well.
That said, what are useful features to have in the hypothetical situation where carrying a large combat blade is prudent? Something for you time-travellers and trans-dimensional trippers to consider 🙂 Some of these comments may be relevant to medium combat knives too.
Firstly, we will ignore the field of swords and stick to knives and daggers, not anything longer than a cubit.
A point ignored by many manuals on knife use is that even relatively light clothing can provide a surprising amount of protection from a knife cut. The garment may be shredded. but very little damage may reach beneath the skin.
Even if you are using a knife defensively with the intention of “cutting and running” it is important to use the point first against any clothed area.

Pesh Kabz

The second consideration for a fighting knife is with respect to whether the opposition will be utilizing armour.
One of the most useful designs for use against armour is that of the pesh kabz.
Mechanically a knife is a wedge. The pesh kabz blade tapers in both width and thickness, and has a T-shaped cross section. In effect the blade is an isosceles triangle in all three planes.
The blade is narrow enough to find its way through openings in the armour, yet retains a useful cutting edge if needed.
Some time back there was a vogue for non-metallic knives, including those in a tanto configuration.
A pesh kabz configuration would have been far superior.
As stated in “A Glossary Of the Construction, Decoration and Use Of Arms and Armor In All Countries and In All Times” by George Cameron Stone, “The knife is obviously intended for forcing an opening in mail; and as a piece of engineering design could hardly be improved upon for the purpose.” (p.494)
Pesh kabz are either straight, or have a recurve that brings the point closer to the axis of the hand. The latter are often very attractive in form.
I have an example of each, and I would not complain if issued one of these instead of a Fairbairn-Sykes. A modern pesh kabz has a useful potential as a knife among modern medium fighting knives.
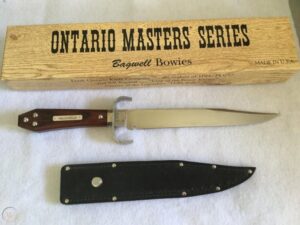
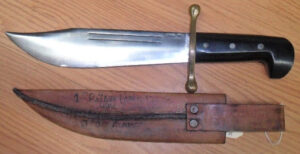
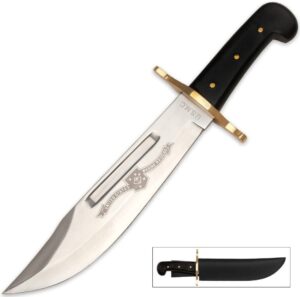
Bagwell and Bowies

Shortly after writing the recent blog, I came across some references to Bill Bagwell, who claimed to have identified the features that were most desirable on a combat bowie.
This list of features included a distal taper, convex profile and edge and a sharpened false edge. The false edge is often quite long, creating an acute point. The blade is over nine-inches long, and over an inch or more wide.
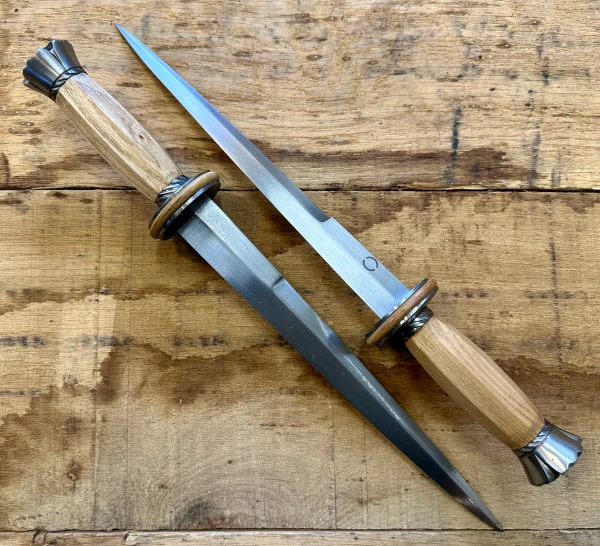
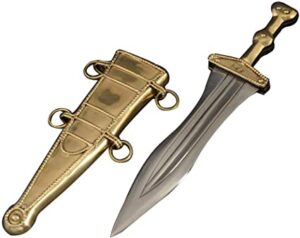
Pugio

If you are going to have a long, sharpened false edge, an obvious question is why not have a double-edged cut and thrust blade?
Historically, one of the cut and thrust weapons par excellence was the Roman gladius. The gladius was a sword, but if you shorten the blade you have what is effectively the Roman pugio.
I have seen it claimed that a Roman soldier who lost his gladius could still fight effectively with his pugio. The width and length of pugiones give some credibility to this claim.
Supposedly the Gerber MkII was inspired by the Mainz-pattern gladius.
Pugiones seem to have retained the more attractive, wasp-waisted leaf-shape of blade long after the gladius had become straighter-edged and more utilitarian looking.
This may have been that swords were issued while daggers were commonly a private purchase.
In other words, a pugio-type design offers a broad blade, acute point and the cutting advantage of curved edges.
A central rib was a common feature, increasing the capability against bone or body armour.
A flat blade with a rib is effectively a pair of pesh kabz back-to-back.
Fullers might also be included in a modern design, and some use of them was made in ancient pugiones.

Jambiya

Another good design for a large or medium combat knife is the jambiya.
Indian/Middle Eastern designs such as the jambiya and pesh kabz tend to be neglected in the west, but have much to offer.
The interest in kerambits/ karambits shows knife-users are open to the potential of curved blade designs.
Fairbairn himself experimented after the war with a jambiya-like knife he called the “cobra”.
Modern Reproduction of Fairbairn Cobra
Like the pugio, the design of a large tactical jambiya could include fullers and a central rib.
A slightly curved blade can create an initially wider wound than a straight blade of similar dimensions. This is illustrated in the figures taken from Richard Burton’s “Book of the Sword”.
The very curved blade cuts a wide channel, but needs considerable force to penetrate sufficiently.
Incidentally, the primary cutting edge of a jambiya is the concave edge. You will commonly see it held or photographed upside down.
Examples with a false edge, and the geometry of some grips make it clear that the main edge is the concave.
The jambiya is held like a claw or hook. This has the tendency to drive the point into a target rather than causing it to glance off. The blade can also reach over and hook limbs. The curved edges give a cutting advantage.

The Russian/Caucasian/Georgian khanjali/kindjals/qama have straight or curved blades that resemble gladius, pugiones and jambiya, but some are long enough to be considered short swords.

Some decades ago, a knife called the “Hobbit” gained some attention.
The Hobbit was effectively an inverted jambiya.
The main edge should have been concave and the serrations would have been more useful on the convex side.
A modern, medium tactical jambiya would also be a welcome addition to the market.
Many years ago I attempted to sketch what one might look like

Length

Around 1922-24, the British Army conducted an extensive series of experiments.
The 17" sword bayonets then in use had proved to be unwieldy and too heavy for trench warfare. Their reach against cavalry was no longer needed and they were poor multi-purpose implements.
On October 2nd, 1924, a report by the Small Arms School stated:
“ (a) It has been conclusively proved during the war, and since, with our present system of training in the bayonet, that ‘reach’ is not a main factor but that ‘handiness’ is. A man with a short handy weapon will beat an equally skilled man with a longer cumbrous weapon practically every time. As regards length of blade for killing purposes, the Physical Training Staff went into this in considerable detail during the war, and came to the conclusion that a 6-in. blade was sufficiently long to deal with the most thickly clad of our enemies—potential or otherwise. The most thickly clad was taken as being a Russian in winter clothing.
…(c) The bayonet suggested for future adoption on the Mark VI rifle is one of about 8 inches in length, cruciform in section, and without the useless handle and cross-piece”
reproduced in The Lee-Enfield Rifle (p.135). Maj. E.G.B. Reynolds.
Also found in “The Bayonet Book” by Johm Watts and Peter White, quoted p.8 (“Short and Sharp”) of The Times Literary Supplement Oct 17 1975.
The Roman Vegetius famously declared “…a stab, though it penetrates but two inches, is generally fatal”.
He was talking of a stab from a broad gladius blade, rather than a narrow bayonet or knife, however.
Many authors clarify “two inches, in the right place”, the latter condition not always possible to achieve in combat!
Some of the criteria for a primary fighting knife are different to those for a bayonet.
A blade of between nine and eleven inches seems to be the optimum, and was the size of most pugiones.
The blade should be at least one and a half inches at its widest.
Specialist fighting designs, such as main gauche, may need to be longer.

Grips

If we look at pugiones, kindjals and jambiya we find something of a consensus on grip form.
Most examples feature a relatively slim grip with a broad, flattened butt.
A narrow grip between two wider areas often gives a good grip for a single hand.
If you hold the knife or sword with the blade flat and level and the knuckles upwards you will find the pressure of the palm on the butt nicely counterbalances the weight of the blade.
The pugio usually had an expanded section in the middle of the hilt which improved grip, functionally similar to the ridge on a kukri handle.
Any grip should include provision for a wrist loop. It is surprising how many knives costing hundreds of dollars lack this useful feature!
On the subject of grip, how a knife is gripped is a topic that some authors treat in some depth. Fencer grip, hammer grip, sabre grip, ice-pick grip, foil grip, ninja grip and so on.
Only recently, I noticed that the actual orientation of the hand was seldom mentioned.
Elsewhere I have discussed the “paintbrush grip” for double-edged blades. This tends to place the blade with the flat of the blade in a horizontal direction.
When I hold a single-edged knife I place the blade in a similar orientation, although my finger positions will be slightly different.
The reason for holding the knife so is not so the blade will slip between the ribs. Whenever possible, you should avoid thrusting at the ribcage.
If you do have to strike the ribs there are advantages to a horizontal blade angle, however.
I have seen it claimed that a horizontal blade that strikes a rib is more likely to glance past or split the rib than be stopped by it.
The main reason I hold a blade horizontal is that it makes more sense to me to have the edge as well as the point directed towards the threat.
If my hand is pronated (palm down) the blade slopes in. If palm up, it slopes outward. In either case, the main edge is towards the enemy rather than down towards the floor.
Some older sources describe holding the blade edge up, but this limits manoeuvrability.

Guards

The guard of the fighting knife is something that is not usually given sufficient thought.
If the knife has a guard, it is typically a simple crossbar or equivalent.
A simple crossbar works well on a sword. It will usually be wide enough to protect the hand. Enemy blades seldom touch the guard since a sword is long enough to parry attacks a foot or more away from the hand.
Some writers claim the main function of a sword guard was originally to stop the user from hitting his knuckles on an enemy shield.
The crossbar on a knife is seldom wide enough to effectively protect the hand. At best, it acts as an arrest to reduce the chance of penetration beyond the blade and to compress tissue for deeper penetration.
Even when the crossbar is long enough, it only provides protection in one plane.
Suppose, for example, you parry or block an attack with your blade. Since the blade is shorter, the contact point is going to be much closer to your hand than if you were using a sword.
Contact point is most likely to be on the flat of the blade, so the strike is very likely to glance down and hit your thumb or back of your hand. Potentially very nasty
In a Modesty Blaise novel, a character observes that Willie Gavin makes a steel against steel block, and reflects on Gavin’s skill, knowing that this is the most difficult of defensive movies with the knife.
Substitute “bloody dangerous” for “difficult”!
Certain styles of knife-fighting base themselves on sword fighting, so techniques involving parrying may be encountered.
One of the lessons here is to avoid using your knife (or your other hand) to parry, if possible.
Avoid letting your enemy make any contact with your weapon or hand.
If you do make contact, execute a “beat” and strike to the hand and arm beyond.
Keep both hands moving, and keep moving yourself.
Use your ginga and the other techniques in my books to avoid and attack rather than parry and block.
As an aside, the above implies there must be some length of blade over which parrying becomes practical.
Drexel-Biddle taught parrying, but had his students were training with hand-held sword-bayonets.
I would be fairly confident parrying with a ten-inch kukri. Shape and design probably contributes too. The forward curve of a kukri or jambiya increases control and compensates for length.
All that said, if I am designing a primary fighting knife, I would include a guard. Down-curved quillons that can catch a blade would be nice, although how realistic this is is debatable, and such a feature certainly needs to be backed by protection for the hand behind.
An oval or ovaloid guard, such as found on a tanto, might be a good option. The tanto, hamadashi, aikuchi and related designs themselves are good options in addition to the designs already mentioned.
As I understand it, “tanto” actually means (very) short-sword and it is not technically a “to” or sword unless it has a to-type guard and other sword fittings (Cameron Stone, p.604).
Most modern knives sold as tantos would not be classed as such, and the wikipedia article is erroneous [!]
A guard that provides protection in two planes may be problematic to wear.
One option is to offset the disc so less of it is against the body but it still protects the outside of the hand.
Renaissance daggers often combined quillons with a “thumb ring”, the latter a misnomer since it was positioned to defend the outside of the hand rather than involve the thumb.
Categories
Phillosoph

A True Survival Bowie?

Sometimes a diversification can let us view a topic from another direction, casting new light on it.

Size Matters

The last blog made it clear to me that the many medium-sized (6 to 8") general-purpose knives that I have do not really have a role. That includes my beloved Buck 119 and the various five to eight inch kukris that I have acquired.
If SHTF or TEOTWAWKI occurs, I will be reaching for one of my larger blades and complementing it with one of my puukkot (plural of “puukko”).
I have my favourite ten-inch sirupate kukri ready to go on a belt alongside a Mora Companion. A small pouch on the belt contains a fire kit and Lansky multi-sharpener.
Nearby is my barong-handled machete and a crowbar, ready to be added to the rucksac.
Already on my person I have my Swiss Army knife and mini-Leatherman, along with other items.
If you are planning to spend good money on survival knives, the sound advice is to “go big” and “go-small”.
Buy yourself a good chopper that can produce a fire and shelter with minimum effort when they are most needed.
Get a good fixed blade small knife that can handle more intricate duties. Puukkot are hard to beat for value and quality. Get what folders you want for EDC.
Another topic I touched on was that most of the original Bowie knife designs were designed to be primarily weapons. This can be seen in the shape of their point profiles, which are often combined with a long false edge.

The Bowie/Machete

With the above in mind, I will share a passage I came across in “Gun Digest Book of Knives, 4th Edition”, p.111-113:
“Another category of knife is the hybrid Bowie…The Bowie/Machete is made by Collins Machete, Case Knife, Western Knife and Legendary Arms.
Bowie/Machete came about when a South American customer went to Collins and wanted a machete made like a Bowie knife.
The result was a wonderful knife. It is one of the finest large skinning and butcher knives ever made. It is one of the few knives that can hold its own with a commercial slaughterhouse curved skinner and large butcher knife. These purely single-purpose knives are hard to beat at their specialities, but the shape and curvature of the Collins design is a most useful compromise of their features in a large knife.
The oversize butcher knife shape with the Bowie clip blade has a deep enough belly and enough sweep at the point to approximate the sweep of the professional skinning knife. In the hands of an expert, it is the best knife for skinning and butchering large game. For use as a small machete, the deep grind employed on these knives allows the same cut a much thinner machete would make. While a little light and short for heavy woodcutting. this is still a practical short machete knife.
For a working knife to carry in South America where it was intended, or anywhere else for that matter, this is a hard one to beat. When used as a fighting knife, it is an excellent chopper, while its broad blade produces more damage on thrust than lesser knives…
It should be noted that the simple tapered grip with the pronounced neb to anchor the hand found on these is an elegant masterpiece of a functional grip in its own right. These knives feel good in the hand where they lock in and go to work naturally. The hand is positioned for proper leverage with a heavy double guard to bear against at the front and a neb at the rear similar to the grip taken with an Indian Talwar sword. It is most effective for a working knife and far better than gimmick grips on some custom knives. Remember. everything possible with knives has been tried. This is an old, standard, elegant solution to the grip. Like the rest of the knife. it is conservative and effective all the way through.”
This sounds interesting!
No image of the “Bowie/Machete” is in the book. There is a photo of a Legendary Arms Bowie that it might be, but unhelpfully the blade is in its sheath!
Websearching on “Bowie/Machete” proves useless.
The Cold Steel design of this name post-dates the book, and it is evident from the shape that the Cold Steel offering does not have the features described.
Cold Steel Bowie Machete

The Bowie/Machete Identified?

Eventually, I pieced together enough clues to suspect that the model described is the Collins & Co. Machete No.18.
Not actually a machete as most of us understand the term these days, but that was how the company designated it.
In 1942, the 10-inch Collins was adopted for survival kits of air crews operating in the Pacific, including at Guadalcanal Canal.
The marines took notice, and the model was widely used by the 2nd Marine Raider Battalion.
Maj. James Roosevelt, son of the then President, was involved in their procurement, and carried one numbered “30”.
One of my references, (“Fighting Knives. An Illustrated Guide to Fighting Knives and Military Survival Weapons of the World” by Frederick J. Stephens p.67) confirms that wartime production of this model was also undertaken by Case Cutlery, Western Cutlery and an Australian source.
“Knives of War” by Hughes, Jenkins and Buerlein adds a company called Kinfolks Inc to the list.
It is from Case that the frequently used, but incorrect designation “V44” or “V-44” seems likely to have been acquired. (The V42 discussed in the last blog was a Case design.)
Knives of War p.68-70 calls ithe No.18 a “Gung Ho Knife”, “Survival Bowie” and mentions an aviator’s example labelled “9-inch machete”.
Actual dimensions are given in Knives of War as a blade of 978" and 2" at its widest. Total Length is 14½".  I believe the blade was ¼" thick.
Minor variations between manufacturers can be found, variations including grip shape, grip construction and whether the false-edge was sharpened.
Some Collins examples had a grip of green horn, which has a very attractive camouflaged appearance.
Some sheathes had the tip cut-off to improve drainage.
Knives of War p.69: Former Marine Raider Rosenquist reports: “It was a real good, multi-purpose knife. We used it for opening ration cans, coconuts, cutting fire lanes, etc. It was handy as a small hatchet for cutting small trees and coconut-log bunkers and in combat as an effective fighting weapon.”Marine Bowie Horn handled Bowie Horn handled Bowie Black handled Bowie

The No.18 Today?

The No.18 is a Bowie design with a proven record of survival utility, not to mention it might also find its way to certain kitchens or meat-packing plants.
As well as its practicality, it has historical connections.
Many people understand the value of preparedness, and Americans love Bowies, so you might think a number of companies would be offering “Gung Ho/ No.18 Survival Bowies” and that they would be flying off the shelves!
Raider Bowie replica Raider Bowie box
Well, I have not had much luck locating any!
There is a reproduction “V44 Raider Bowie” (above). This is apparently low-quality steel, since it is intended to sit on a shelf rather than be put to use. Note that it is not a particular accurate reproduction, the blade having a single broad fuller rather than the two narrow fullers of the actual No.18.
No.18 Bowie Throwing Bowie
Legendary Arms offers a Bowie and a “Throwing Bowie” that has some resemblance (above), but note both have a short bevel grind rather than the blade section of the originals.
W49 Bowie
Western Cutlery is now Western Knives, with production in Asia. Their W49 (above) is/was not their version of the No.18. Dimensions are slightly smaller and the blade has a short bevel.
Ontario Bowie
Best candidate seems to be the Ontario SP10 “Marine Raider” (above). Despite the name, the blade form is different.
The Ontario SP53 is probably closer to the No.18 in spirit, but is not a Bowie.
Most obvious difference for both of these is the grip. I quite liked the machete-style grip of the original Collins.
As regular readers will appreciate, a flared or hooked grip is a very good feature for a chopping knife.

The Future?

Ideally, someone would bring out a nice No.18 Bowie blade blank that I could fit with a grip.
If anyone has been inspired by this to bring out a modern day No.18 Bowie, I would suggest having a good look at the modified original shown below.
The upper quillon has been removed and the lower bent so that it is out of the way when the strongest part of the blade is used for tasks such as batoning through material.
Horn handled No.18 Bowie
Categories
Phillosoph

Fighting Knives in a Modern Context

The other day, I found myself thinking about the variety of weapons taught by many martial arts.
When these arts were created, most of these weapons were relatively common place.
The battlefield, and the street, have changed since those times.
You are unlikely to fight with a sword, a knife or machete being more probable.
The entrenching tool is more likely to be to hand than an axe or mace.
Your spear or staff will seldom have to deal with a horseman, and is much handier if its length is less than your height.
The stick remains a useful weapon, but nowadays will often be wielded with the intention of not seriously injuring a foe.
Those of you that wisely have invested in a copy of “Crash Combat” will recognize the above as the arsenal of modern weapons included in the course.
The above reflection melded with a question my subconscious had recently posed to me: “Does one need a combat knife?”
Some authors use the term “combat knife” or “tactical knife” to mean a variety of multi-purpose knife.
In this blog, I am talking about specialist designs that have the primary role of use against two-legged predators.
Certainly, it is prudent to have a knife that one can fight with, but what are the merits of spending good money on a knife that is primarily designed as a weapon?
And what form should such a knife take?
There is a baffling variety of supposed combat or fighting knives.

Context

To answer that last point, we must return to the theme noted in the first paragraph.
We cannot really consider a fighting knife without also considering context. The requirements of a fighting knife have changed as the nature of combat has changed.
In the Middle Ages, for example, it was desirable that a blade be stout enough to deal with body armour, yet narrow enough to slip between plates or through a visor.
Jump forward to the age of the rapier, and a dagger might be required to serve as a main gauche.
The Bowie knife provides us with another illustration. The Bowie blade shape is commonly used for survival knives, which tends to make us forget the original Bowie knives were primarily fighting weapons.
The Bowie came into fashion in an era when pistols were generally single-shot. The Bowie was a handy alternative to a sabre or smallsword.
The fighting Bowie was at least eight inches long, with examples longer than twelve inches by no means unusual. A blade might be a quarter of an inch thick and broad enough to look like a pointed cleaver, which essentially was what it was.
A Bowie might be used against other knives, or longer edged weapons.
The usefulness of the Bowie waned with the increasing availability of mass-produced revolvers. Apparently many volunteers in the War Between the States invested in impressive Bowies, only to discard them once the wisdom of a lighter marching load became apparent.
There seems little point nowadays in carrying a large fighting knife such as a Bowie or smatchet.
Many large utility knives, billhooks and machetes can defend our person equally well and prove far more useful for other, more likely tasks.
You probably also own entrenching tools, hatchets and tomahawks that would also be superior weapons.

The Modern Fighting Knife

Let us assume that you want a fighting/combat/tactical knife, on the basis that you may one day perhaps need it.
The fighting knife will be carried in addition to more general-purpose blades, so cannot be too large or heavy.
If a fighting knife has a place in our arsenal, then logically it must be because it can meet a requirement or scenario better than our large survival knives and other tools.
Large knives are not particularly concealable.
While it is possible to thrust effectively with a machete or kukri, it is not the ideal shape for use against thick clothing and a hypothetical “take out the sentry” application.
These criteria narrow down the form that a modern fighting/tactical knife should take, and what we should be looking for when making our selection.
This is best illustrated with some examples.

Fairbairn-Sykes Commando Knife

No discussion of modern fighting knives would be complete without mention of the Fairbairn-Sykes knife, aka “The Commando Knife” or F-S.
If fighting knives are mentioned, this is most likely the image that popped into your head.
At the start of his book “Combat Use of the Double Edged Fighting Knife”, Rex Applegate gives a nice summary of desirable features for a modern fighting knife:
“The heart of the fighting knife is its blade. It should be 5 to 7 inches in length, double-edged, and wide enough to be razor sharp on both sides all the way back to the cross guard. The point must be sharp enough to penetrate and thick and tough enough to withstand side pressure.
The blade should provide slashing, ripping, and thrusting capabilities. Stainless type steel, correctly tempered, with a dull finish is preferable. The blade should be tempered to hold an edge as well as being easily sharpened and, at the same time, not brittle.
The oval-shape handle should fit the palm of the hand and be designed so that the edges of the blade can be immediately, and automatically, located in dark or light conditions. A nonslip surface is another feature that should be incorporated. The handle should not turn in the hand (sweaty palms, etc.) when the blade strikes resistance. The knife should be handle heavy with relation to balance. Nothing in the design should limit its possibilities for use as a weapon from any position or either hand. The overall length should be approximately 10 to 11 inches; anything longer makes it too unwieldy and cumbersome to carry. The weight should be in the 1/2 to 3/4 pound range.”
Applegate’s earlier work, “Kill or Get Kill”, has a similar description, although includes the suggestion that the blade be no more than an inch across at the guard, and that the handle have its largest diameter at the centre and taper towards both the guard as well as the butt.
Contrary to what you may often see claimed, the F-S is not the “Ultimate Fighting Knife” [ignoring that this is not what “ultimate” actually means!].
Comparison to Applegate’s description quickly illustrates why.
The grip of the F-S is round in section, rather oval. Being of cast metal, the grip is difficult to modify or replace.
While the balance point is in the grip, the cast grip possibly contributes some unnecessary weight.
Oddly, my F-S seems heavier than my M3, but is actually half an ounce lighter.
If you own an F-S, you will know that it is very difficult to get a sharp edge on it.
Common advice on the net is to regard the F-S as a thrusting weapon only, and steel the edge at an angle of about 40 degrees. Personally, I think a sharp blade will create more of a wound if uses as described in my books. Steeling the F-S at 20 degrees seems better.
The “razor-sharp commando knife” is, however, a poetic licence of the novelist who has never owned one!
Some of these features seem to have been the result of wartime mass-production, which have persisted.
The F-S gets a lot right too! My step-son, on first holding an F-S declared:
“Woah! I feel like it wants me to do something, but I am not sure what!”
Fairbairn’s writings on how to use the F-S knife include illustrations of cuts and slashes directed to the forearm and inside of the elbow, although how practical this would have been against a woollen greatcoat or tunic is debatable.
Incidentally, the ancestors of the FS were the Shanghai Fighting Knives, which were made from obsolete double-edged Lee Metford 1888 bayonets. In Fairbairn's own words:
In choosing a knife there are two important factors to bear in mind: balance and keenness. The hilt should fit easily in your hand, and the blade should not be so heavy that it tends to drag the hilt from your fingers in a loose grip. It is essential that the blade have a sharp stabbing point and good cutting edges, because an artery torn through (as against a clean cut) tends to contract and stop the bleeding.

Boker Applegate-Fairbairn

Following World War Two, Applegate collaborated with Boker to produce a knife that met his requirements, called the Applegate-Fairbairn.
I have no personal experience of these, and they are likely to always be beyond my price range.

Gerber Mk II

The Gerber Mk II answers many of the complaints that can be made about the F-S.
While it is called the “Mk II Survival”, this is primarily a fighting knife.
Mine has taken a fairly respectable edge.
The bad news is that the Mk II tends to have a higher price tag than one might wish for a knife that will not be your primary survival tool.
It is rather baffling that copies or replicas of the Gerber Mk II are not commonplace!

M3 Trench Knife

Shown with my F-S and Gerber is my M3 Trench Knife.
The M3 was also produced in German as the “NATO Combat Knife”. This blade configuration has also been used for a variety of bayonets.
A nice design feature of the M3 is the asymmetrical guard, allowing the user to find the orientation of the main edge even in the dark.
While the M3 was designed as a utility knife, its configuration makes it a pretty good choice for a fighting knife. It compares very favourably to the Gerber Mk II in general size and features.
Personally, I do not mind that the M3 is not double-edged. The false edge comes already sharpened, and the balance of the knife is about an inch behind the guard, just where you would want it.
If you shop around, you can find reproduction M3s for a reasonable price.
Try websites that cater for WW2 re-enactors. Take a look at German trench knives while you are there.
In “Kill or Get Killed”, Applegate suggests “utility knives” can be reground into fighting knives, and shows a knife so converted. Presumably he means the M3, although he at one point claims that the utility knife has its weight too far forward in the blade.
The M3 as it comes is a pretty good fighting knife, with the option of serving in utility roles in an emergency.
Ideally, a fighting knife should only be used for its intended role, to keep it sharp.
Price of a reproduction M3 makes it a good basis for a custom project.
Blade blanks for M3s or the related bayonet models, may also be found.
As Applegate suggests, the top edge can be extended, and if you have a belt-grinder adding a hollow grind is relatively simple. Tapering the blade may be more challenging. Personally, I would not consider this necessary.
Adding a fuller to the unsharpened section might be considered.
The grip of leather washers is probably simple to reshape or remove. Grip tape may prove useful here.
The large metal butt-plate may be more problematic for a customisation project, A narrow pommel of similar configuration to that of the F-S or Mk II might be preferred.

The V42

The V42 is another wartime design of fighting knife.
The skull-crusher pommel is a nice feature, although probably larger than needed.
The leather padding applied to the upper side of the quillon is a nice feature.
I have seen claims the pommel on the originals had a tendency to catch on and damage equipment. I suspect the versions on replicas such as mine have been made blunter.
My main complaint about this knife is the guard could be narrower and the blade somewhat broader.

Smaller Fighting Knives

As implied above, your fighting knife should be chosen so that it can be carried in situations you cannot carry a larger survival knife.
With this in mind, I will present two smaller examples of what can be considered fighting/tactical knives.
The larger knife is a Smith and Wesson 820.
The false edge is not sharpened, but the main edge has sharpened up to a very sharp edge.
This style resembles the M3. I prefer this configuration since it offers a little more utility, facilitating practices such as batoning.
Very impressive, and a very reasonably priced knife with most of the features you might wish for.
The smaller knife is a CRKT version of the AG Russell Sting (as favoured by a well-known literary figure!).
Small, but very solid and sharp.
Note that both knives have lanyard holes, a feature that would be welcome on the larger knives.
Adding wrist loops is on my to-do list.
Such knives are (hopefully) often carried and seldom used. Comfort and concealability are therefore priorities. A version of 820 with a flatter grip and reduced quillions, or a Sting with the option of a longer and possibly M3-style blade would be welcome.
These are some of your off-the-shelf options, illustrated with examples I have to hand.
Later blogs will cover other options.
Categories
Phillosoph

Pull-Sharpening for Knives and Tools

My recent project with the machete has spurred me to sharpen a few of the tools I have around.
In my book, “Survival Weapons”, I devote an entire chapter to the topic of sharpening. That chapter remains a useful guide to a topic that can sometimes seem cryptic.
At this point I should explain that one of my “virtues” is that I am lazy. According to admiring colleagues, I can be usually be expected to find the simplest, most stress-free method of getting a job done. Over the last week or so have I noticed that how I sharpen some tools now varies somewhat from the techniques described in the book.
Regular readers will know I own a number of kukris, as well as other large blades. There was this period of ill-health where I spent my holiday budget on swords instead! Probably safe to say I have more large blades than the average prepper. Some of these have concave or convex edges, or in the case of kukris, both. Some of the techniques for sharpening you will see on some websites are not ideal for such tools.
A useful stone for pull-sharpening and an angle-er
I have, over the decades, acquired a large number of sharpening systems. The one I have found myself using the most recently is shown above.
I inherited this stone from a deceased colleague. It is most likely an Arkansas stone. The stone itself is about three inches long and a little under an inch wide. It is firmly mounted (glued?) to a wood tray about four and a half inches long by an inch and a half wide. This provides a very nice handle when using the stone. Beneath the base is the matching wooden lid. 
The stone has just been cleaned. I used a little washing-up liquid and some water to remove most of the grime. A little bathroom cream cleaner took of the remaining residue.

The Angle-er

The device below the stone in the photo I call an “angle-er”. 
Having this nearby helps you visualize the correct angle while sharpening. This particular example has angles of 22.5, 15 and 30 degrees, which are pretty good choices for general usage. Some may prefer 17 or 20 degree and 35 degree angles. 20 degrees is the recommended edge angle for Swiss Army Knife blades, for example. I later recut the 30 degree corner to 20.
Once you have your tool close to the correct angle it is easy to vary it a couple of degrees if desired.
The beauty of this Arkansas stone is that I can move it instead of the blade. Unlike a larger flat stone this one is narrow enough that it can follow a curved edge, rather than attempting to grind it straight.
The method I use is essentially the same as was described for sharpening a machete, only instead of using a file I use a suitably sized stone.

Sharpening Styles

There are a number of ways that a stone or file can engage a blade. 
In the movies you often see a stone being dragged down a sword edge. Looks good but I have my doubts as to how useful this would be in the real world. 
Usually we want the sharpener to pass down the edge with some movement across the edge too.
The sharpening technique most often seen in “how to” guides is what may be called “push-sharpening”. If you were using a large, flat stone, you would move the blade as though you were attempting to shave the surface of the blade.
You will also see “push and pull” sharpening where the blade moves back and forth across the stone. I personally don’t use this method much and would not recommend it for the novice. 
Keeping the angle constant over the different strokes requires skill and it is easy to over-do things. If you can maintain an angle it is useful for quickly establishing a secondary edge.

Pull Sharpening

These days I tend to use drag- or pull-sharpening techniques. 
As you might expect, the blade moves in the opposite direction to push-sharpening. 
One of the advantages of pull-sharpening is that it is easier to move the sharpener across the blade edge, rather than moving the blade. This is useful when working on large or awkward blades but can be applied to small blades too. One does not need a workbench or similar for pull-sharpening. I usually sit on the sofa, watching the telly and using the advert breaks constructively.
Pull-sharpening is a good technique to use with small triangular-section sharpening stones. It is also suited to the oval stones sold for sharpening tools such as scythes.
lanskey sharpener
When you use a leather strop you are using an action like pull-sharpening. If you did not you would cut the leather!
If you are sharpening a tool using a high-speed device you should be using a pull-sharpening technique. This is so that if the high-speed wheel or belt snags the blade it will throw it away from you rather than at you!
One reason I like pull-sharpening is it is easier to view the angle of contact that sharpener and blade make. It is also easier to give both sides of the blade similar treatment without trying to use your non-dominant hand or run around the table.

Lubrication

Generally, I do not use lubricants such as oil, water or spit, for sharpening. An article I read, written by a professional sharpener, claimed that his experiments had concluded dry sharpening produced superior results. Much to my surprise, this article can still be found on-line! Generally I only apply water if a stone or sharpening system is particularly crumbly or high friction.

Pull/Drag Sharpening Technique

For example, hold your blade with the edge to the left. 
Place your sharpener at the desired angle, and push your sharpener right to left, moving it away from the blade spine or centre. 
A “pass” starts at the heel of the blade and moves towards the tip. A pass may take several strokes, depending on blade length and sharpener size. 
Make three to five passes on a side, then change. 
For the other side, you have two choices. You can flip your blade over so the edge is to the right and stroke the edge left to right; or you can turn the blade upside down and stroke the other edge right to left. 
Use whichever technique you prefer and better suits the tool being sharpened. 
Keep changing every three to five passes, reducing the number of passes as your tool approaches the desired sharpness.
Do not push downward. The weight of the blade or stone produces sufficient pressure.
Pull sharpening is a good technique if you are not that confident about your sharpening skills. It is easy to check and maintain the desired angle. It is also not a particularly aggressive technique, so you are unlikely to damage your edge. 
In fact, I recommend you try a very light touch as you make you strokes and passes. Let your stone trace the curves of the blade rather than trying to remove them. 
You will find that as the edge geometry takes shape, you will be able to feel when the stone or file is at the correct angle. Light pressure also lets your feel where sections of the edge have irregularities and need more work.
So far, the only problem I have had with pull-sharpening was with a particular multi-tool where the blade was unlocked and rather loose in the open position. Pull-sharpening tended to pull the blade closed. This would only have been a danger if I had wrapped my fingers around the grip while sharpening, rather than holding the back of the blade.
One caution. With folding blades that lack a lock, be careful when pull-sharpening or stropping. Hold the sides of the grip so your fingers are not in the way should the blade unexpectedly close.
Pull-sharpening is a useful technique to add to your repertoire. 
The knives in my kitchen are kept sharp mainly by a butcher’s steel and a set of crock-sticks I have in a cupboard there. 
I maintain my assertion that crock-sticks (ceramic rods) are a very good way to teach yourself the fundamentals of sharpening. Crock-sticks are a form of push-sharpening, but pull-sharpening has improved my technique in using these too. 
Rather than just slicing down, I now use a lighter touch and let the stick surface trace alone the curve of the edge, keeping contact to the very tip and engaging the edge at a better angle throughout its length.
I think one of the most important things I have learnt in decades of sharpening is that it is another of those skills where less is more. You will get much better results maintaining a light contact with the sharpener rather than pressing down.
Categories
Phillosoph

New Machete Grip

Surprisingly, machetes have featured infrequently in this blog. Possibly this is because much of what could have been said is already covered in “Survival Weapons” and “Crash Combat”.
One of the virtues of machetes is that they are mass-produced in their thousands, allowing you to acquire a reasonable quality tool for a very modest outlay. Sometimes the sheath costs more than the knife!
Some auction sites that no longer sell “knives and bayonets” still sell machetes.
A typical machete may be a fraction of the price of a smaller survival knife, yet prove more capable and more useful.
In addition to new items, you may find some bargains second-hand or army surplus.
Certainly, there are machetes being sold for hundreds of dollars, but it is unlikely that ten times the outlay will get you a ten-times better tool.
The price of machetes is such that you may find yourself owning several, and distributing them among various kits and caches. You may have one in your garden shed, another with your bug-out bag, and one with your vehicle, plane and/or boat.
If you are a bit of a kit tinkerer, this gives you an excuse to try out a variety of models without wasting large amounts of money.

Adding a Barong Handle

I have spent the last couple of days fitting one of my machetes with a new grip. The new grip is modelled on that of a couple of barongs that I have.
Machetes sometimes attempt to escape their user! You might cut at a springy branch placed under tension by other growth. Such an event can knock a machete right out of the user’s hand and send it flying into the brush.
It is rather surprising that more machetes do not feature retention features such as knuckle bows and wrist loops. Many models don’t even have a hole in the grip for fitting the latter!
The barong-style handle is functional as well as cosmetic. The bird’s head shape facilitates both retention and manipulation.
My grip is made from teak, which once served as a chunk of laboratory bench top.
The grip was shaped with a variety of hand-tools, with the occasional use of a Dremel-tool and an electric drill.
Once the sanding was complete, it was treated with several applications of linseed oil.
The metal collar was made from a strip of soda can.
Just above the machete you can see one of the original handle halves.
The only modification made to the blade was one corner of the tang was reduced and rounded.
Flip-side view: Some dust still in need of cleaning off.
I changed the cord for a longer piece with an extra knot, to allow use as both a wrist loop and a thumb loop.
The grip part could be slimmer, but I err on the side of caution when carving.

Sharpening a Machete

Currently, I am sharpening this machete up, and it now has a reasonable edge on it.
Most newly purchased machetes need some sharpening.
You will be tempted to try sharpening it with a Dremel or bench grinder, but it is possible to overdo this.
Machetes are made of softer metal than most smaller knives, and do not need a fine edge. The “micro-serrations” of the edge actually help the machete bite on vegetation.
This means all you really need is a medium-sized “bastard” file. A round file is useful for major work on tools with a concave edge, such as kukris and billhooks.
In the field, you can maintain the machete edge with your usual sharpening tools. My EDC includes a diamond-impregnated card, and my kukri has a chakmak and small stone with it.
If planning a trip where you expect your machete to see lots of use, it is worth packing a file in your camp gear.
Hold the file at an angle of around 22.5 degrees (for example) to the blade flat and push away from the spine.
The noise the file makes on the steel will give you clues as to which parts of the edge need more work. Sharpening sometimes involves touch, sound, and/or sight.
Half a right angle is 45 degrees and 22.5 is half this again. Fold the corner of a piece of paper twice and use this to check your angle.
I have been sharpening with the machete across my knees, edge away from me.
You could probably make a rig with a couple of supports at 22.5 degrees. The width, flatness and relatively straight edge of a machete favour this arrangement.
With the machete resting on the ramps, edge up, a file held horizontally will be at the correct angle.
Now I have an edge at the correct angle it is easy to file either side while holding the blade vertically. 
Categories
Phillosoph

Survival Kits: Bringing It All Together

Today I am going to try and bring together some of my ideas regarding survival kit and selection of contents. When possible, I try to approach topics from a different perspective to that echoed on most websites.
Regular readers may know that I have my reservations about the “little tin of gizmos”. Thinking that you are covered because you have a couple of band-aids and a couple of loose fishing hooks and swivels is a recipe for disaster.
Survival kit may exist on several levels. On your person you will have your skin-level EDC. Most of mine is in the pockets of my trousers, although some items are on my trouser belt or key-ring. If you are carrying a bag, it is prudent to have some additional items in your bag. You consume the items in your bag in preference to your skin-level items. Military personnel often have an intermediate level in their webbing load-bearing equipment. Ideally this should only hold ammo, weapons, some water and immediate first aid items but the tendency to add additional gear is common. A larger pack or vehicle may provide higher levels of survival gear. One should always plan for the contingency that one may get separated from bags or vehicles. This is why your skin-level gear is important.
My current planning list looks like this:
Seven Tools of EDC
Hat, Towel, Rope
Medical, Writing, Fire, Knife
Foundation Survival Kit
Blanket, Fire, Knife
Poncho, Water, Toilet Paper, Canteen Cup
Travelling Kit
Navigation, Signalling, Illumination
Washing, Repairs, Food,
Documentation, Money, Clothing, Armament
The item names are memory aids and should be taken generically rather than specifically. “Knife” represents other tools, “blanket” represents sleeping bags and related items and so on.
The Seven Tools of EDC
The Seven Tools of EDC were inspired by the roguku or Six Tools of Travelling. I remember these as three flexible things (hat, towel and rope), three multi-part things (medical kit, fire kit and writing kit) and a knife.
Hat” represents other protective clothing, such as gloves, goggles and sun-glasses. At “skin-level” this will be whatever headgear and other items suits the current or expected weather. If I am taking a bag I will probably have two hats. One will be to protect from the sun and keep the rain off my glasses, probably a boonie hat. The other will be a warm hat such as a watch cap or headover. If it is really cold spare gloves and headover are a prudent precaution.
Towel” in this context is a multi-purpose piece of cloth. At skin-level this is a bandanna in my pocket but recently I have also been wearing a shemagh. If I lose or did not bring my hat these can serve as head coverings. Any bag I carry usually has a spare bandanna and/or shemagh in it. In colder conditions the shemagh is replaced or supplemented by a woollen or acrylic scarf.
Rope” for the ninja may have meant a grappling hook and rope. For me this reminds me to carry some cordage. At skin-level this is a couple of armspans of paracord, a hank of string, a container of dental floss and a retaining cord for my glasses. Packs contain longer lengths of paracord. If heading for the deep wilderness I would have a toggle rope or the modern equivalent.
Medical Kit. On my person I have a small number of plasters, alcohol wipes and pain-killers, plus some personal medication. I have a more extensive medical kit I carry in daysacs, plus a bigger kit in my travelling bags. Medical also includes such items as insect repellent and sun cream. These are usually bag items but certain conditions may require a small supply to be carried on your person. Whenever possible items are consumed from the larger kits before the skin-level kit.
Writing represents communication and recording. In my pockets I carry a pen, pencil and two pieces of chalk (one light, one dark colour). Usually have a phone on my belt. Daysac may contain a notepad in a plastic bag. When on holiday I keep a journal.
Fire Kit. For everyday use this is simply a disposable lighter riding in the bottom of a pocket. I carry a plastic bag with a couple of tissues in, which could be used as tinder. If straying further afield I would add a container of tinder, fresnel lens and spare lighter to my pockets. Daysac has a couple of spare lighters and some candles.
Knife” represents tools and related hardware. My Swiss Army Knife goes nearly everywhere with me. I also have a Leatherman Squirt and pocket prybar on my person. A diamond impregnated metal card is carried for sharpening.
Foundation Survival Kit
The items on the Foundation Survival List are mainly bulkier “bag” items, with a couple of significant exceptions.
Blanket” represents sleeping items in general. It includes poncho-liners, sleeping bags, cloaks and long coats. These can keep you warm, even when not sleeping. This category is called “blanket” to remind us about the survival blanket, which is compact enough you can easily fit one or more in a trouser cargo pocket. They are reasonably priced so you can buy a dozen and stick spares in coat pockets and any bags you might carry. As well as keeping you warm, they can keep the rain off, spread out as a signalling panel, possibly even used as a heliograph. One is in the little medical pouch that carries most of my skin-level EDC. For decades now my daysac has carried the survival blanket’s larger cousin, an All-Weather Blanket.
Fire Kit. A fire kit was included in the original Foundation Kit list. It is repeated since the ability to create a fire is an important component of survival. Have a means of making fire on your person, and additional means in your bag. Consume the bag supplies before that on your person.
Knife. Another duplication, but repeated for much the same reason. In this context it can be read as “a bigger knife”. Useful as a pocket knife or muli-tool are, they can only get you so far. This category also reminds us to remember other, larger tools such as a crowbar or entrenching tool. Have a fixed-blade knife on your trouser belt. If you lose your pack, webbing or even your jacket or shirt you will still have a useful survival tool.
Poncho includes other forms of rain-proof clothing and shelter items such as tarps, tents, shelter halves, basha-sheets, groundsheets and so on. Any bag of sufficient size should include a means of rain protection.
Water represents a means to carry water, and the means to ensure that it is drinkable, such as water purification tablets. In rural areas a supply of water and purification tablets should be both on your person and in your pack. Consume the water in your pack before that on your person.
Toilet Paper. A roll of toilet paper in a waterproof bag is a prudent addition to any bag. A small bag with a couple of paper tissues rides in a cargo pocket of my trousers. A bag with additional tissues will be added if I am heading off the beaten track. As well as intended use, such tissues can be used for nosebleeds, nose-blowing and as tinder.
Canteen Cup. A metal canteen cup or similar small cooking vessel is a useful addition to the above items. Boiling water to sterilize it will conserve water-purification tablets. It can also be used to sterilize instruments or blades intended for medical uses. Even if you wear a water bottle on your person, the canteen cup is probably best carried as a pack it. The interior can be packed with some of the smaller items listed above.
There is a survival adage that says you cannot live three minutes without oxygen, three hours without shelter can kill you, you can last three days without water and three weeks without food. The Foundation Kit contains the essentials towards keeping you alive beyond three days.
Travelling Kit
What I have chosen to call the “Travelling Kit” are mainly “very useful” rather than essential. Food is obviously essential, but you can last several days or more without it.
Repairs. If away from home, a small repair kit is worth putting together. My compact little sewing kit has seen many uses over the years. This is supplemented by a couple of rucksac buckles, dental floss, a roll of electrical tape and a tube of superglue. A small screwdriver that fits in my Swiss Army Knife corkscrew has been used to repair several pairs of glasses. I have seen it suggested that a piece of glue stick of the type intended for hot glue guns may also be useful. You can even add a little repair capability to your skin-level kit. A small bag of safety pins can deal with tears and zipper problems. Around the pencil I have wrapped a length of electrical tape then bound two threaded needles to its sides.
Food includes food procurement and cooking means. Put together a small fishing kit, with some wire traces that can be used as snares in extremis. Assemble as much of the kit as is practical before hand. Sitting in the wind and rain as the light fades is no time to be tying on swivels! Add the fishing kit to your trouser pocket items if heading into the wilds. The food you carry should include some items that can be consumed without heating or rehydrating. Some boiled sweets/ hard candy is a useful addition to any daysac, giving a quick energy boost when it is needed.
Illumination. There are numerous small flashlights that are suitable for skin-level EDC. The little Photon lights can be added to a keyring, dogtag chain or whistle lanyard. A larger flashlight is a suitable addition to a daysac or larger pack. My daysac has a handcrank model in it.
Navigation. Personally, I have found a small compass a useful addition to my EDC. Even in town it is sometimes useful to know which direction is which. A number of guidebooks have information such as “…the hostel is to the northwest of the piazza”. If travelling away from civilization better maps and compass are recommended. GPS is nice, but you should plan for when it stops working. Without a compass there are other ways to determine direction, which is why these items are under “very useful” rather than essential. Worth repeating is that in most cases where rescue can reasonably be expected your chances of survival are better if you stay put rather than walking out.
Signalling. Signalling assumes there is somewhere out there to signal to. Flares are not much use if no one is likely to be in line of sight. Tell someone where you are going and when you will be overdue. Signalling overlaps with Illumination and Fire, and mobile phones have already been mentioned. Your skin-level kit should include a whistle. Mine is on my key-ring. A small heliograph is easily fabricated. The back of my phone is mirror-polished, so I would use this instead.
Washing. If you do any travelling you should put together a lightweight wash kit. How to put one together is detailed on another page. I prefer mesh bags over the more elaborate, heavier and more expensive wash bags.
Documentation. Travelling may require visa, permits, passports and other documentation. Make sure you have it all before any trip, and store in a waterproof bag. Make photocopies of important documents, such as your passport, and carry then separately to the originals. I prefer to carry some of these things on my person rather than in a bag.
Money. In some environments, one of your most useful tools. Includes credit, debit and ATM cards. Have information on what to do if you lose the latter. Don’t put all your eggs in one basket!
Clothing. How much spare clothing, its type and quantity will depend on trip duration and conditions. 
Armament. Carry if you can. The world is full of nasty people who will rob you or hurt you just because they can.
Categories
Phillosoph

Bush Shirts

You may have an emergency kit or bug-out bag ready packed, but what clothing do you have stored with it? Your emergency kit should include an outfit of clothes suitable for travelling. This must include underwear, outerwear, footwear, headgear and insulation suited to any season. There are many possible choices, some better than others. What are our best options, particularly if on a budget?
For most of the nineteeth century the US Army wore a dark blue woollen uniform. This was considered suitable for all climates, regions and seasons within the US. In practice the material and colour were uncomfortable and impractical for the hotter months and latitudes. Durability was also an issue. Troops often returned from campaign with uniforms in a very poor state. The blue woollen uniform was also poorly suited for the various menial tasks a soldier might be called on to perform.
Troops on campaign were, however, allowed considerable latitude when it came to clothing. During the Geronimo campaign some infantry in Mexico and Arizona are known to have marched wearing only their army underwear of undershirts and cotton drawers. (Uniforms, Arms, and Equipment: Headgear, Clothing, and Footwear by Douglas C. McChristian) Historical accounts mention soldiers on campaign wearing their “overalls” as an alternative or replacement for uniforms. The overalls in question were a two-piece alternative to the stable frocks mounted troops were issued. Mounted troops were required to conduct stable duties twice a day. Horse hair and dust would have rapidly fouled the blue wool uniforms so troops on stable duty wore either frocks or overalls of white cotton duck garments over their blue uniforms. These overalls and smocks saw use as campaign wear or unofficial uniforms. The white colour was less than ideal, but a few weeks of campaign often turned them another shade.
Officially, the US Army remained resistant to issuing a summer uniform. When regulations were relaxed to permit the wearing of a white summer uniform, the soldier was expected to pay for the garments out of his own pocket at whatever prices sutlers asked. It was not until the 1880s that a summer uniform was issued. Quartermaster General Holabird ordered surplus shelter tents to be made into coats and trousers. Experiments with dying the canvas brown also proved successful. The uniform was clearly intended to serve as a summer uniform and campaign wear. The jacket was of blouse or sack-coat style, rather than a stable frock coverall. I have seen it suggested that the canvas uniform was designated a fatigue item so troops would not have to pay for them from their clothing allowance.
Jump forward about half a century and things come full circle. World War Two saw fatigue-duty clothing being used as hot weather combat wear. By the Korean War this had become common practice and “fatigues” became synonymous with hot-weather combat dress.
When selecting outdoor gear it may seem logical to copy what the army uses. After all, the army spends millions developing and testing gear, and surely wants our troops to have the best possible. Sadly, no! If this hypothesis was true, why do different armies produce different solutions to the same problem? Why is gear changed and replaced with such frequency?
If you study the history of, say, US combat/ field jackets, you observe a repeating cycle. Something practical is designed. After a few years in service it is noted the practical item is not that smart looking. A new, smarter replacement is adopted. Troops complain the smarter item is not that practical, so a replacement is designed, and so on. This cycle dates back well into the blue woollen uniform era. The army wants practical field and work wear that still looks soldierly. (This trend can be seen in a number of books on the history of US Army uniforms. Several of the “U.S. Army Uniforms of…” series by Shelby L Stanton are a good starting point) The US Army currently seems to be in a “non-practical” phase. Trousers are cut too narrow to fit over knee-pads or to allow good air circulation. Shirts intended to be worn under body armour have no camouflage on the torso, with tight-fitting sleeves that do nothing for shape disruption and air circulation. Camouflage that does little to hide the wearer.
As preppers, survivalists or outdoors-people, looking neat and soldierly is low on our list of priorities. We want versatile, practical gear that hopefully will not break the bank.
As I have mentioned in the previous post, for many conditions, jackets are too warm, particularly if lined. This holds true for many designs of combat jacket. As might be expected from the introductory passages, an unlined fatigue jacket is a possible option, if you can find such a thing at a reasonable price. More readily available are medium or heavyweight shirts, which we will designate “bush shirts”. A pair of cargo trousers and a bush shirt over suitable underwear is the start of a very practical clothing system. Notable is that the upper garment of US Army fatigues was originally designated a jacket, but troops were usually required to tuck it into their trousers. Eventually it was re-designated a “utility shirt” and redesigned with shirt-type cuffs.
If you now jump to googling “camouflage shirt” you will discover most of your hits are tee-shirts, which are not what we are looking for. Those that are not tee-shirts tend to be pricey!
Forget about camouflage patterns for a while. Smocks and other camouflage measures will be dealt with in other posts. For the moment we will be satisfied if our bush shirt(s) is a low-signature “neutral or natural” colour. Google “khaki shirt” and you should discover a wide variety of choices and colour shades. The true green coloured are best reserved for summer or jungle use. Similarly, very light khaki shades may be best kept for bright environments such as desert. This still leaves us a wide choice ranging from light tans to olive-brown. Mid to light greys and possibly pale olive are also acceptable shades.
Whatever shirt you opt for, buy it larger than you would usually wear. In cold weather that space allows you to wear more insulation under the shirt. In hot weather that space allows air to more freely circulate. Your shirt should also be long-sleeved, for when insects bite and thorns come scratching. Here is a good place to repeat a piece of advice from the Victorian explorer Francis Galton: “When you have occasion to tuck up your shirt­sleeves, recollect that the way of doing so is, not to begin by turning the cuffs inside out, but outside in-the sleeves must be rolled up inwards, towards the arm, and not the reverse way. In the one case, the sleeves will remain tucked up for hours without being touched; in the other, they become loose every five minutes.” Try it! He is right!
Most of the potential bush shirts you will encounter will be cotton or poly-cotton.  Microfibre shirts are becoming more widely available and often with a similar price tag to cotton. These are breathable synthetics, so should be quicker drying.
Other features are up to the buyer. A pair of practical breast pockets are useful, although your trouser pockets should be where your primary EDC gear is carried. The shirt is also your nightshirt, so overfilled pockets may be uncomfortable. A “traditional” shirt collar can be turned up to further protect the back of the neck, although since your outfit should include a neckerchief, shemagh or scarf this is probably moot.
Your bush shirt(s) can be customized, should you feel so inclined. Reinforcements can be added to the elbows and possibly the shoulder area too. Elbow patches should not hinder the sleeve’s ability to be rolled up or stay up. Breast pockets may be covered by pack straps, so sleeve pockets are a useful addition. These should be long enough to hold a pen or pencil. Poppers may be preferable to buttons. Vent zips or holes under the armpits can be added for increased ventilation. Additional pockets can be added to the lower part of the shirt, although these will not be accessible if the shirt is worn inside the waistband. If the shirt is worn outside the waistband the sides may be vented to allow access to a belt-worn knife or pistol. If desired, a bush shirt can be converted to a pullover style by sewing up the lower half of the front opening. This can reduce drafts around the midriff and keeps biting insects out.
In many conditions your bush shirt will be your outermost garment. When it gets colder it is an additional mid-layer beneath a jacket or coat. It may also be your nightshirt.
While I was planning this article, I came across the following passage in the Boy Scout Handbook (1911) “It is well to carry a spare shirt hanging down the back with the sleeves tied around the neck. Change when the shirt you are wearing becomes too wet with perspiration.”
Tying a jumper around your waist was standard practice when I was a schoolboy. The jumper tied and draped over your shoulders is a familiar 1980s icon. Carrying and using a second shirt this way is something quite different, and potentially very useful. If not worn in this way the spare bush shirt should be kept somewhere easily accessible, such as the outer pocket of a pack. The merits of being able to change out of sweaty gear were addressed in the last post. If the weather turns colder you can wear both shirts. The spare shirt can also serve as an emergency face or head covering or as a scarf. A wet shirt can be hung down the back, or the back of the pack, to dry. This is one of the reasons we choose neutral or natural tones for clothing, even undergarments. Drying laundry can act like a signal flag!
Categories
Phillosoph

The Layer System

I plan to make some posts on clothing.
Before I do so, it is appropriate that I address the commonly encountered concept of “the Layering System”.
Many websites and books pay lip service to the Layering System. The problem is that this is usually oversimplified into a “lie to children” that omits important facets.
The typical version goes something like: “Your clothing needs to be in three layers. The under layer (buy some wicking underwear), the mid-layer (we sell really nice fleeces!) and the outer layer (have you seen our Gore-tex range?)
Not technically false, but also lacking a lot of information you should also know.
The most important concept to grasp is that it is not the clothing that keeps you warm, but the air that the clothing traps.
Several layers of thin garments may keep you much warmer than a single thicker (and possibly heavier) layer. The best insulation is still, dry air. Most materials that we call insulators serve to catch and hold such air.

Underwear

I have addressed the topic of underwear in a number of other posts, so I will be brief here (pun intended!). Underwear is not just for wicking sweat off your skin surface. It is also there to prevent your body soiling the outer layers of clothing. Clean clothing traps air more effectively than that clogged up with oils, salt and other crud. Undergarments should be selected with of washing and quick drying properties in mind. Thin items will dry quicker than thicker. If it is very cold wear multiple thin layers of underwear. Carry a spare set of underwear. Depending on climate this may be simply a tee-shirt/ vest and a pair of underpants. Kephart tells us to change into our cleaner set for sleeping. If your underwear becomes sodden from exhaustion, change into the drier set. Use the dirty set to give your body a rub-down before donning the cleaner. Whenever practical, give the set your are not wearing a rinse or a wash. It may be prudent to change first if the set you are wearing is the dirtier.

Mid-layer

This should actually be “mid-layers!”. A thick fleece jacket or jumper can only be on or off. This may mean a choice of too-cold or too-hot. Many of the mid-layer garments sold in outdoor shops tend toward being overly insulated. If your mid-layer is actually several layers of thin garments you have a more versatile system. This is likely to be warmer and lighter. Individual layers will be easier to wash and quicker to dry. Chances are you have a number of old shirts or thin jumpers that can be combined as very effective mid-layers. Minor damage or marks are not a problem in this role. Shirts may be more comfortable as mid-layers with the collars removed.
Your body may be sweating as well as producing heat. You want to get rid of this water vapour before it can condense, or even freeze. Even if there is metre-thick snow on the ground, vent your clothing occasionally to remove humid air.

Outer Layer

The mid-layer(s) trap a layer of air that your body warms up. The outer layer prevents the wind blowing this warm air away, or the rain soaking into the mid-layers and displacing the air. Fleece jackets are often seen worn as the outermost garment. While this works with some models or under certain conditions, you will also find in other situations the wind will cut right through them.
You actually need a choice of outer layers. A rainproof is great if it is actually raining. In other conditions, even the breathable models may become clammy inside. Regularly venting your mid-layers is an important habit to acquire, even if you have top of the range breathables.
The more you wear rainproofs, the greater the likelihood they will be holed by thorns or other hazards. A few decades back “pac-a-macs” were fairly common. Rainproof garments that folded up into a small pocket or pouch when not required. These now seem hard to find and modern rainproofs tend to be more substantial, bulkier and more expensive. I have to think this may be a step backwards. On the other hand, some of the rain-ponchos on offer seem to be very light, compact and reasonable in price. They can also be used as groundsheets, shelters and so.
If you are not wearing your rainproof, you still need an outer layer that will retain the air your mid-layers are holding. Most cloths of a sufficiently tight weave can serve as a windproof. Most of your likely options are going to be cotton.
Cotton is not ideal as an outdoor material. If wool gets wet it retains most of its heat. Wet cotton is cold, and drains the body of heat trying to dry. While this is relatively well known, outdoor shops are full of cotton items they will try to sell you. Most military surplus items you may consider will be cotton. Cotton is easier to print in camouflage patterns, although the wide use of cotton in certain armies predates their adoption of camouflage. Most civilian, non-specialist items you might use instead of the above are also likely to be cotton.
You probably cannot avoid having some cotton items as your windproof layer. Sensible precautions are keeping a fire kit and rain-poncho on you. A change of clothing, carried in a waterproof bag, is also prudent.
For the lower body, cargo trousers and gaiters are a reasonable choice. The former can be modified as suggested elsewhere.
Combat jackets may seem a logical choice for the upper body. Their main problem is that in many conditions they tend to be too warm. You may be better basing your clothing system around a couple of bush-shirts, much as Kephart did. Field jackets and parkas can be added if the mercury drops.
A good bush-shirt may be cotton, but may also be found in fast-drying microfibres. Bush-shirts are a topic I will discuss in more depth in a future post. Relevant to today’s subject is that any shirt (or jacket) you plan to use as an outermost layer should be selected with room to wear several layers of insulation underneath. It should be at least a size larger than your usually wear. You should be able to comfortably wear it over a fleece jacket or NATO sweater, or their equivalent in thinner layers. In hot weather that space lets more air circulate.
As an aside, wearing a shirt over any insulation is a useful dodge to remember should you become separated from your jacket. A similar idea was to wear a combat jacket or bush-shirt over a waterproof jacket. This protected the waterproof from damage and reduced the noise that such a garment might make. It also might contribute to visual camouflage too. Although the outermost layer of clothing might get soaked, the waterproof kept the inner layers and wearer dry.
A few final points about the Layer System. The idea is that you can regulate or comfort and temperature by removing or donning garments as needed. Some means to carry unworn items will be needed. Stopping to change may not be practical. The rest of the platoon may not want to stand around while you redress, especially if your garment is under a mass of LBE and body armour! A common error in cold climates is to over-dress/ over-layer. If you are mobile, your level of clothing should ideally feel slightly chilly when standing around. Static roles such as sentry duty or manning foxholes will need more insulation. In any climate, do not neglect ventilation.
Categories
Phillosoph

Battle of Jangsari: Camouflage

Recently I watched the movie “Battle of Jangsari”, set in the Korean War.
I enjoyed it, and many of my readers may do so too.
So as not to spoil your enjoyment, I will try to avoid any possible spoilers that I can in the following passages.
The photo below shows the North Korean troops that are sent as reinforcements. Notable on their first appearance is the bundles of grass/straw/rushes that each infantryman has sprouting from his back.
At first glance I thought this might be an earlier example of the device described as in a previous post as the Vietnamese Camo Ring.
Subsequent scenes show the foliage attached directly to their shirt/blouses.
The intention is the same, however. If an enemy aircraft had appeared these infantrymen would disappear.
“Osprey Men-at-Arms 174: The Korean War 1950-53” includes the following passage (p.37) on the North Korean summer field uniform:
“The uniform had reinforcing patches on the elbows, trouser seat and knees, and frequently single or double rows of horizontal ‘zigzag’ stitching around the cap and across the shoulders, chest and upper sleeves, which were used to hold leaf camouflage. ”
For some of the movie the South Korean (ROK) soldiers wear captured North Korean uniforms.
They do not use camouflage materials, but the means by which they can be attached are clearly seen in some shots. In these examples the “stitching” appears to be relatively substantial cord.
A side view of foliage attached to a machine-gunner’s back.
Some North Korean troops also have foliage attached to their upper arms, although the means of doing this is not clear in the film. Presumably loops might also be sew to the sleeves.
Many of the North Korean soldiers are also wearing short capes of what appears to be camouflage net.
In the movie this was not clear and appeared as an irregular shape of mossy green-grey on the upper chest. In the stills this is much more clearly seen to be net.
The Russian-style shoulder-boards worn with the North Korean uniforms appear fairly impractical. Men-at-Arms 174 notes that these shoulder-boards tended to fade less than the rest of the uniform, making them stand out as regular shapes and thus detrimental to camouflage.
Also note that none of the actors have camouflaged their helmets, leaving a distinctive, recognizable shape.
As I have pointed out in recent posts, shape disruption and texture contribute far more to camouflage than colour.
Notable in this movie is that the North Korean uniforms work far better in the terrain shown than the green American fatigues worn by some characters.
The Osprey publication states that the North Korean summer field uniforms was “olive khaki shade faded rapidly to a light yellowish hue”. Actual appearance varies in the photos since the soldiers of both sides get realistically dirty.
Minor spoiler follows:
In one scene the first sergeant stamps on a mine several times and chides the student soldiers, telling them it is an anti-tank mine and ten of them could run across it without setting it off.
This is not strictly true.
The mine shown is an American M15 that is claimed to need a force 159 to 340 kg (350 to 750 lb) on pressure plate to set it off.
“Taming the Landmine” (p.51) by Peter Stiff describes how repeated passages over an anti-tank mine would “settle” the trigger mechanism of some models until they became sensitive enough to be set off by a pedestrian, donkey cart or bicycle tire.
As an aside, in “Vietnam War Booby Traps”(Elite 236) by Gordon L. Rottman, p.25 the author notes he has been unable to find any real world mine that activates when someone removes their foot, as usually shown in movies.