Categories
Phillosoph

My Left Pocket: Epilogue

An amusing little endnote to my previous post.
Last night I walked into my local takeaway. My iPod is hanging around my neck.
“That is exactly what I need!” enthuses one of the staff. “I am always losing my phone.”
“It’s a shoelace.” I explain.
“Where did you get it?”
“Er, my pocket.”
I have to explain that one day my headphones had broke.
The only replacements I had had too short a lead for me to use them and place the iPod in a pocket.
So I had fished a shoelace out of my pocket, tied it into a sort of net around the device and hung it around my neck with another shoelace.
The only later improvement was replacing the second lace with a badge lanyard I had in a drawer.
I end up reaching into my left pocket and demonstrating that I really was the sort of person who walks around with old shoelaces in his pocket.
I explained the technique was very simple, and was actually just a modified bottle hitch or parcel tying method. (even though it looks like my iPod is into Japanese bondage). 
Figure Eight Can Sling Method
I informed the lady there were doubtless lots of websites that could show her the knots, and also lots of interesting decorative knots too (for her phone that is, although that statement is also doubtless true of Japanese bondage too).
She suggested she could use ribbons, and that is a nice idea.
Categories
Phillosoph

DePugh on Wilderness Food and Gear

A friend of mine had some questions about food, and this reminded me of a section in Robert DePugh’s book “Can You Survive?”.
DePugh was on the run for seventeen months, and estimates that  about twelve of these were spent in the American wilderness.
Can You Survive? was written after this, and his insights into what was and was not useful makes interesting reading.
Not surprisingly, the need to avoid detection and capture influences his choices:
“Clothing has already been mentioned and the first aid kit will be considered in a following chapter. This leaves a long list of items that might be labelled “miscellaneous.”
In our previous list, we included a nylon cord. This item I would still retain but not more than 20 or 30 feet. A climbing rope is nice to have if several members together are working their way through mountainous terrain but unless some definite need is anticipated, I would leave such heavy and cumbersome items at home.
In our previous list of materials for the backpack we included such food items as these: dehydrated meals for at least 14 days, boullion cubes [sic], coffee or tea, sugar, salt and pepper, vitamins, halazone tablets, malt tablets and chocolate. Of all these items only one that I would include in a backpack survival ration today would be the halazone tablets—but I would include an abundant quantity of them. The dehydrated foods are fine so far as weight is concerned but I am more convinced than ever that cooking must be kept at an absolute minimum. There are times perhaps when it may be essential to cook certain vegetable items to guard against toxic substances or to cook animals that have been captured and might be infected by some disease. Except for these necessary occasions, even the smallest fire places such a traveller in great danger of being discovered by the enemy. For these reasons, the coffee, tea and boullion cubes are also out. Sugar can best be carried in the form of candy that cannot be spilled or be easily ruined by moisture. Most medical authorities agree that the American people eat more salt than is healthy for them. Ordinary foods contain all of the salt that a person normally needs for good health. Pepper, of course, is one of those niceties of civilization that are best left behind along with your cigarettes and pipe.
Of those foods that are readily available, the best in my opinion for emergency survival rations would include canned meats and cheese, peanut butter mixed with sugar packed in plastic containers, and various types of candy that are customarily sold in small pieces and in plastic bags. All of these items are very low in water and therefore contain a high proportion of nutritive value and they can be eaten with knife and fingers out of the container in which they are carried. For the person who may be required to flee for his life at any time, survival foods beyond the amount he can carry in his pack are a very dubious investment.
Our previous equipment list also included several items for cooking such as a nesting set of cooking utensils, heat tabs or sterno, knife, fork and spoon, plate, cup and scouring pad. Of these I would make do with my canteen, canteen cup and a good hunting knife. Such cooking as may be essential can be done in the canteen cup. If you know where to look, tinder is always available for starting fires. Sand can be used to clean your canteen cup thus eliminating the scouring pad. Under desperate circumstances, good table manners do not justify the extra weight of a fork and spoon.
Other items from our previous list which I would now eliminate include candles, shovel, ax, wire, rubber tubing, folding saw, pliers, wirecutter, screwdriver and file. Items which I would retain include matches in a waterproof container (I'd carry along a lot of these); a flashlight is good so long as the batteries will last; a sharpening stone is worth the weight; compass, maps, ground cloth, thread, safety pins, needles and extra buttons are well worthwhile but since they weigh very little a few fish hooks, line and sinkers might be included though I have grave doubts as to their practical value. Except in the high mountains I would say that a good insect repellent is worth its weight in gold.
A small towel or washcloth has many uses that justify the weight involved. Soap and toothbrush are essential. For men, a razor and blades may be necessary to avoid looking conspicuous on those occasions when contact with other civilians is unavoidable. Other desirable miscellaneous items include a small magnifying glass, paper and pencils.
The dangers of shooting or trapping wild animals while trying to evade hostile forces has already been referred to. In this regard a good slingshot might be worthwhile in killing small game silently as the opportunity presents itself. In capturing wild game, beware of those animals that are caught too easily. They may be diseased and therefore, unsafe to eat without cooking.”
Does “canned meat and cheese” mean canned cheese? Canned cheese may sometimes be found, and would make a change from the tinned meats. Presumably he does not mean the spray can cheese, which would be mass inefficient. Many uncanned cheeses keep fairly well if kept dry, including the often maligned processed cheeses.
Eating boiled leaves with a hunting knife sounds like a chore, so I think a spork is worth the weight.
Trail mix may be worth carrying for a little variety.
One can get a little more creative with the peanut butter.
A quick browse of the internet turns up two-ingredient cookies (peanut butter and syrup), three-ingredient cookies (peanut butter, sugar, egg), four-ingredient cookies (+baking soda), no-bake cookies and oat-squares (peanut butter, honey, rolled oats).
These probably do not have the shelf-life of peanut butter and sugar but can be used on shorter trips.
Categories
Phillosoph

EDC Shopping List

The other day I had cause to look in one of my boxes of outdoor gear. Various containers that I thought might prove useful. Items brought out of curiosity or sometimes just for their novelty. Gifts from friends. Some are milestones from my path of understanding.
Most of it I will never use. Either I have acquired better alternatives or my requirements have changed. So much money spent over the years that I could very much use now. Sadly most of this stuff has very little resale value.
If I knew then what I knew now” I could have saved myself so much time and money. This inspired me to think about the idea of a prepper/survival shopping list. If you have just come into the field, what should you be looking to buy first?
Hopefully my article on “Foundation survival kits” has proved a good start. A fire kit, bottle for carrying water and bag of toilet paper will have been easy to acquire. A poncho and liner or blanket will have cost a bit more but probably did not break the bank. You may be saving up for a good survival knife, but have hopefully bought a machete or hatchet to serve in the meantime. 
Most of the items suggested for the foundation are relatively bulky, however. They are “bag” items rather than things you can keep on your person all the time.
If you have a good “skin-level survival EDC” what you can find in your environment or in your pack is a bonus.
The good news is that you can build up a good EDC without a great outlay of cash. My article on skin-level gear mainly listed my personal items.
I have been asked for a more general list, so this might as well be a shopping list. As before, I will concentrate on the items you carry and save a discussion of clothing for another day.
Pocket Knife: This will probably be the most expensive item on this list.
In an emergency, this may be the only knife you have available, so it makes sense to get a good one. That said, as a cash-strapped youth I carried a Chinese-made penknife. It had a really good assortment of tools and the only trouble it ever gave me was a corkscrew straightening out.
With my first full-time pay-cheque, I brought a genuine Swiss Army Knife. In my personal list you will note I also have a mini-Swiss Army Knife (SAK), a Leatherman Squirt and a number of other tools. Some redundancy and backup is always wise.
My preference is a Swiss Army Knife, but many of you will be tempted by full-size multi-pliers/multi-tools. My SAK and Squirt together weigh several ounces less than many full-size multi-pliers, but the choice is yours.
Put a loop of cord on your knife so you can secure it to belts or snap-links when necessary.
If you wear glasses and opt for an SAK, buy the mini-screwdriver that fits in the corkscrew.
Optional is a small sharpening implement. Mine is a small metal card with diamond dust on one side. Small whetstones and other devices are alternatives.
Knives are not designed for prying, especially folding ones. A pocket prybar is a good addition to your EDC.
Lighter: The most basic fire kit is to carry a lighter. Get the type with a wheel. Even if empty, it can still be used to create sparks. Multiple disposable lighters can be brought in budget stores for about a buck.
Optional: Wrap the outside of your lighter with a few inches of duct-tape. Duct-tape is flammable and a small piece may be lit with the lighter and used to get a fire going.
Bandana: Bandanas can also be found for a modest price. Multiple uses. Have one in your trouser pocket.
Space Blanket: These can be found for very reasonable prices, which is good since they are one of the most important survival items that you can carry.
Bulk-buy and place one in your EDC, and one in each bag or outdoor coat you have.
Flashlight: Flashlights can get really expensive, so it may be sometime before you save up for the one you want, especially if you want a tactical, waterproof kubotan that will survive a nuclear attack.
In the meantime, small LED lights such as copies of the Photon II can be found on ebay. Carry one on your keyring. If you wear dog-tags, add one here too.
Whistle: A whistle is another useful addition to your keyring. Budget stores and ebay have these.
If you live or travel where temperatures often drop below zero make sure your whistle is non-metallic. Another useful addition to your dog-tags.
Cordage: Cordage can be put to many uses, but how much for EDC? About two metres/a fathom/an armspan of paracord is probably a good start. Or you can carry a spare pair of long bootlaces.
Buying a hank or roll of paracord is probably prudent. You will need it for some of the other items.
Dental floss: For lighter cordage I carry a compact container of dental floss. This fits in my pocket pouch of medical items. A hank of braided fishing line or kite-string is an alternative.
Pencil with tape: Another “non-medical” addition to my pocket pouch is a short pencil, wrapped in a length of electrical tape. A detachable eraser protects the point.
Chalk: Chalk is useful for marking trails or leaving messages. Half a stick of white or light-coloured, half a stick of dark. Bag the different colours separately.
Safety Pins: Useful for failed zippers and other wardrobe malfunctions. May be used to drain blisters or possibly as improvised fish-hooks. Mine ride in a little plastic bag with a couple of hair pins and paper clips.
Needle and Thread: At skin-level, this is a single needle, already threaded with about a metre of “invisible” thread.
Experiment with magnetizing the needle. You will need to select a method for protecting you from the point. Mine used to ride in a “sheath” made from a drinking straw. Now I have taped it to the side of the pencil.
Compass: If starting out, avoid tiny button “survival” compasses. They like to hide in the corners of pockets and pouches. I have to keep my larger clipper compass in a container to avoid this.
For about a buck or two you can find budget baseplate compasses on ebay. These are good entry-level items and you can use them to teach yourself some mapwork. They weigh about an ounce and you should be able to find room for one in your EDC. Add a lanyard so you can secure it to your person.
A whistle is a good addition to a compass lanyard. I prefer to use non-metallic whistles on compass lanyards.
Condoms: Condoms have a number of survival uses. Keep them away from your needle!
First Aid Kit: Your skin-level medical kit is for immediate treatment of minor injuries, i.e. actual “first-aid”.
For longer duration problems, have a more extensive kit in your bag. When you have the option, use the items in your bag before your EDC.
Budget stores and ebay sell little first-aid pouches that will fit in a trouser cargo pocket. Often they come with some medical items included. The contents may need a little tweaking but you can create a very useful pocket first aid kit for very little outlay.
Many of the items listed above can be fitted in the pouch. I even got my space blanket into mine.
Personal Medication: This will vary with the individual. In some environments this would include a supply of anti-malarials.
Tissues or Toilet Paper: A ziplock bag with a few metres of toilet paper.
Obviously, have a larger supply in your pack and use that in preference to your “emergency” EDC supply.
If you have a cold or nosebleed, the tissue paper saves your bandana.
Paper can be used as tinder and the plastic bag used to carry water.
The entire package can be useful padding for other items in a cargo pocket.
If, like me, you seem to accumulate lots of paper napkins from takeaways, use these instead.
A very useful addition to your kit that costs virtually nothing.
For low-level use I carry a small bag with just a few paper napkins. I add a larger bag should I plan to stray from civilization. 
Carabiner: A carabiner makes a very practical keyring and has a number of uses.
Several of the items listed above can be conveniently carried on your keyring.
If your gear has loops or rings it can be temporarily attached to the carabiner when you need your hands free. I sometimes use mine to carry shopping bags.
That concludes our basic list. A number of items but many of them can be acquired at very reasonable prices from sources such as ebay. Many of the items you may already have around the home.
In my previous article, I suggest several EDC items that “up-level” your readiness. Where practical these should be stored together in the same small pouch which can easily be added to your pocket contents. Another of the budget first aid pouches can be repurposed for this.
Up-Level Pouch contents include:
  • Fire Kit: Additional lighter, tinder in container, one or more candles. Fresel lens if you have one.
  • Fishing Kit with Snares
  • Optional: About two thirds of a metre of cooking foil, ideally the heavier duty “turkey” foil. Carefully folded and rolled.
  • Optional: Additional space blanket.
  • Optional: Larger compass, with spare whistle. Using a firesteel necklace as the lanyard is an option to consider. Add a small snap-link and Photon light.
  • Optional: Elasticated bandage. This came with one of my medical pouches. I don't include it in my daily EDC, but it is a useful addition to the higher readiness inventory.
  • Optional: Not really survival or vital items, I have added a few things that may be convenient. Ingredients and instructions on packaging seems to be getting printed even smaller, and my eyes no younger. To this end, I have added a small folding magnifying glass (actually a 10x loupe) to my money pouch where I carry my Suunto Clipper. This could be used to start a fire. In the same place, I have added a set of earplugs. Earplugs have proved so useful on some of my travels it seems only prudent to have a set on my person as well as that with my travel bag. The earplugs may not get used as often as, say, my Swiss Army Knife, but when I do need them I will probably really need them!
Categories
Phillosoph

Skin-Level Survival EDC

Suppose that you are separated from your bag or rucksack. Your webbing gear, if you wore any, has become damaged or lost. All you have is the clothes you stand up in and whatever is in your pockets. This is your “skin-level” survival kit. 
Part of your skin-level kit is the clothes that you are wearing. Hopefully you were dressed appropriately for the climate. If you were chilling by the pool when everything went pear-shaped, one of your first priorities is going to be to acquire some new threads.

Today I am mainly going to concentrate on what you have in your pockets, or carried on your trouser belt. This is what many people would call “EDC” or “everyday carry”, although the exact use of this term varies.
Some people would include the contents of their daysac or handbag in their EDC. This article will assume that such items are not immediately available. Reaching them may be one of your objectives.
Some people use the term “EDC” for all the paraphernalia they have on their person, while in other contexts it is specific for defensive weapons. This article intends to examine EDC for survival.
Look on the internet and you will find EDC lists that suggest you should always carry a solar still, fishing kit, gold coins, eating utensils and so on. This is not very practical.
The heavier and bulkier your EDC kit becomes the more likely you are to not carry it all the time and omit parts you may need.
A good EDC survival kit is designed to have two tiers of readiness.
“Lower level” is what you carry all the time. Many of these items are carried because they can be useful in daily life.
“Higher level” are items that you add when you step up to a higher level of readiness.
Your lower-level kit would be on you when you go down to the store. You would add the higher-level items if you were leaving town to hike in the woods.
For example, in my lower-level kit, I have a lighter, which can be used for fire-making or illumination. The expansion to higher-level is a little pouch that adds a container of tinder, some candles and a spare lighter. I have little need for a fishing and snaring kit in town, so these items are higher-level.
Many ingenious individuals have had fun creating survival vests, survival jackets, survival walking sticks, survival pens, survival necklaces or survival hats.
These are not the best way of carrying your EDC. Jacket pockets are better used for items such as gloves, scarves and hats.
Your survival EDC should be based around your trousers. Everything should fit in your pockets, or on your trouser belt.
Since you (hopefully) wash your trousers, items should be easy to transfer to a new pair, or to a pair of shorts if the weather permits.
What you carry should not add so much weight that you have trouble keeping your trousers up. Nothing should be so bulky or hard-edged that it digs into you if you have to sleep clothed, bangs against you when walking or might injure you if you fall on it.
Personally, I am seldom not wearing cargo trousers or cargo shorts. If you have to dress more formally, there are companies that sell suitable garments with extra, hidden pockets. 
Let us have a look at what I am carrying, and how I might expand it to a higher-level. Your up-level items should be stored together in a small bag such as a pencil case. Keep this with your knife-belt (qv).
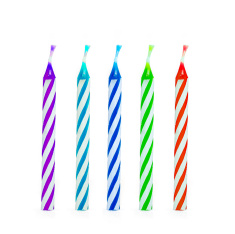
Fire: The lighter in my left pocket is my primary source of fire.
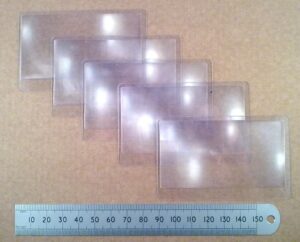
• To up-level, I will use a small fire kit that would be carried in my right cargo pocket. As described on other pages, this would have a spare lighter, a container of tinder, Fresnel lens (above), some candles and possibly some matches.
Note that the spare lighter is in a different pocket to the primary.
Food: I don't carry any food on me, so this category is more about means to procure food. At low readiness that is money and a credit card.
• For higher-level I have a container of line, hooks, wire and other fishing items. The dental floss I have in my left pocket pack could be used for snaring or fishing, the safety pins serving as hooks.
If you are diabetic, you may want to add a small supply of glucose tablets, hard-candy etc. 
You could carry a tightly rolled sheet of cooking foil, but I personally don't currently do this.
Signalling: I usually carry a phone. As well as being able to call for help, many modern phones have useful applications such as a notepad, compass or GPS capability. Phones are useful but also delicate, so should not be the sole thing you rely on.
The photon light on my keyring could be used to signal. The keyring also has a whistle.
My pocket kit includes a pencil and chalk, and I carry a pen (a retractable Zebra pen, since my belt pouch is rather small. I actually found this pen! Non-retractable, all-steel Zebras are suggested as a good alternative to more expensive “tactical” pens). A permanent marker such as a Sharpie may also prove useful.
I also have a compact flashlight.
• Up-levelling would probably add a larger, but compact, pocket torch.
A lightweight signaling mirror is another useful item. These are a good addition for tactical scenarios since they can be used to peek around cover.
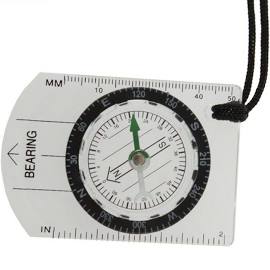
You may already have an item that can be used as a signalling mirror. Many compasses have a mirror and some phones or music players have mirrored backs.
A mini-flare kit could be accommodated with the other items in the right cargo pocket, but I have never actually owned one of these.
A larger whistle, on a lanyard, might prove useful. There are cord necklaces that include a ferro-rod and steel. If you can find them at reasonable price add a whistle, photon light and a snap-link.
Shelter: Most actual shelter items are too bulky for skin-level EDC. The exception is a space blanket. One permanently rides in my pocket kit.
You may want to carry additional space blankets. Not only can they be used for warmth, but also as protection from the rain and for signalling. Penny for penny and pound for pound, space blankets are among the best survival gear you can carry. Do not leave home without at least one.
Cordage: The dental floss in my pocket kit has already been mentioned. Either carry a couple of spare bootlaces or an arm-span of paracord. This can easily be carried in the bottom of a pocket and has numerous applications. I also carry a tubular retention cord that can be fitted to my glasses if needed.
• If up-levelling, a larger hank of paracord can be carried on your person if you have room. Braided fishing line also has many uses.
Tools: My keyring includes a bottle-opener, mini-Swiss army knife, a P38 can-opener and a little tool for removing SIM cards and opening CD drives. That last tool possibly does not have a survival application. (It broke, so has been replaced with a paper-clip that can be readily adapted should the need arise),
The keyring itself is a carabiner. Several of my items can open bottles. The bottle-opener is just a convenience, particularly in social settings. 
A small pouch on my belt carries by clipper-compass, a pen, a trio of lock-picks (two Bogotas and a snake), money, credit cards and a USB drive.
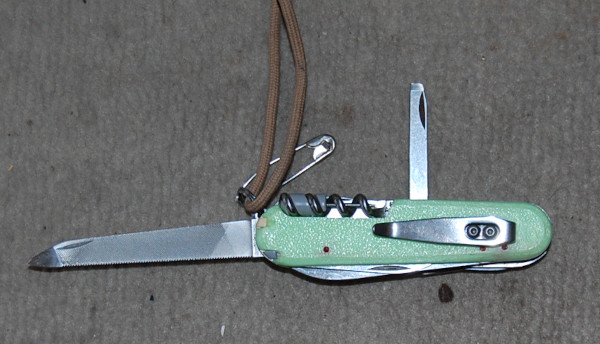
A second pouch has my Swiss army knife, mini-Leatherman, pocket prybar and a sharpening card. I find small-print challenging now, so I have added a tiny pocket-magnifier to this pouch.
The Swiss army knife includes a screwdriver that can repair glasses. 
A small bag in my pocket kit contains a few safety pins, hair pins and paper clips. These can be put to various uses.
A length of electrical tape is wrapped around my pencil. I may add a needle with a metre of invisible thread. I don't regard a sewing kit as an EDC-level requirement, but the weight is negligible and a sharp point potentially useful. I have now added a couple of threaded needles, wrapping them around the pencil.
• If up-levelling my main additions would be a larger knife and compass. More of that later.
Water: There are water bottles that can fit in a cargo pocket or on a trouser belt.
The bulk and weight of water means that you are unlikely to carry water at skin level unless the weather is very hot.
A few sheets of water purification tablets can be included in your pocket medical kit.
• If up-levelling the water category, I might add a “survival straw”, ideally one that fits in a cargo pocket. A condom could be used as a water carrier, but I don't carry them, no longer being single.
Medical: Your EDC medical kit is mainly for minor injuries. Have a better kit in your bag.
My pocket medical kit rides in my left cargo pocket. In addition to the items already mentioned it has alcohol wipes, plasters and pain-killers.
There is some medication I have to take with meals, so I carry a few days supply of this in my right cargo pocket. If you need to take medication regularly then you should carry a few days supply with you, and make sure it remains in-date.
• If up-levelling, a small container of insect repellent and/or sun-cream might be a prudent addition. This need only be a small volume, your main supply being in your bag or base. Chapstick or Vaseline in winter, if you think you will need it.
Other items: If you are out in the wilds, a few metres of toilet roll or paper tissues in a ziplock bag should be added to one of your cargo pockets. Make that a permanent part of your kit if you wish.
I have a small bag with a few paper napkins for about town” and a larger bag I add for rural”.
A bandanna has numerous uses and is easily carried in a side pocket. Since I lack some hair, I have used mine for head protection when caught out without a hat.
I wear photochromic glasses so don't carry sunglasses. These protect the eyes from both excessive light levels and more physical threats.
Non-survival items carried are a USB drive, travel card and music player, although the back of the latter is a mirror.
So far we have talked about pockets and belt pouches. 
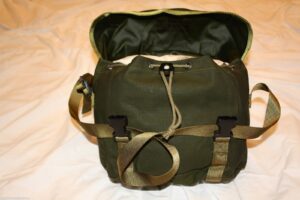
In years past most of my EDC was in a compact bumbag. I have learnt to make more use of my cargo pockets and have replaced the bumbag with a couple of pouches attached directly to my trouser belt. One is a repurposed pouch for a mobile phone.
You should not add so many pouches to your trouser belt that it interferes with carrying a rucksack, or sitting in a vehicle.
There are belts that are made of paracord, but if you unravel them to use the cord you have nothing to hold up your trousers, nor hang your pouches from!
There are trouser-belts with hidden storage compartments, and various ingenious buckles. The original boy scout belt had a buckle that served as a bottle opener.
Earlier on I mentioned adding a larger knife and compass to the skin-level kit.
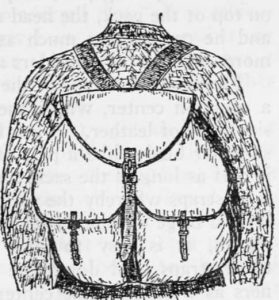
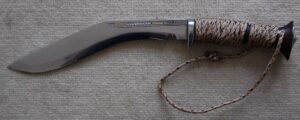
My favorite kukri weighs just under a pound, but hanging it on the trouser-belt is a bit much. What you need is a second belt. This is effectively an intermediate level between skin-level and webbing. When at a higher level of readiness you should attempt to keep it upon your person.
Your knife belt rides below the trouser-belt, like a cowboy's gun-belt. It should be adjustable, so that it can be worn over thick clothing when desired.
Add a compass pouch to one side of the belt, and attach the compass lanyard to the belt. Add a carabiner or snap-link to the front of the belt.
I carry my kukri on one side of the belt and a Mora puukko-type knife on the other. Not surprisingly, this belt could also be used to carry a handgun. 
If I need to carry a hatchet or entrenching tool, I can slip it between belt and body.
A folded rain-jacket, poncho or unfolded space blanket can be draped over the back of the belt.
Many police officers experience medical problems from the weight of their duty belts. Detaching the duty belt from the trouser-belt and wearing it lower like a gun-belt might improve matters.
The knife belt can be used to carry a litre or two of water. The best way to carry water is in bladders since this is lighter than conventional bottles. Rather than placing the weight on the knife belt, my proposed “camelbum”concept would give more options.
I have mentioned carabiners and snap-links a couple of times. Use one as your keyring, add one to your whistle lanyard and knife belt. Also have them on your rucksac strap and/or webbing.
When you need a hand free, or there is a risk you might drop a tool, attach the tool to the nearest snap-link.
This is an extension of the idea to collect empty magazines described in my book “Survival Weapons”. Make sure your tools have loops or rings.
Categories
Phillosoph

Kephart's Summer Outfit

There are a number of topics I intend to cover in the near future. The starting point for many of them begins with Horace Kephart, so it is prudent to begin with looking at some of his recommendations for outfitting. Here is his list of clothing and equipment for summertime trips in the North American woods. This particular version was taken from the 1957 reprint of the 1921 edition of “Camping and Woodcraft”. My 1927 edition has an identical list. My comments and clarifications and in green. Quotes from Kephart in khaki.
SUMMER EQUIPMENT FOR BACK-PACKING WEAR
“With such an outfit and his gun or fishing tackle, camera, or whatever may be the tools of his outdoor hobby, anyone of average physique and a little gumption can fare very well in the open, and enjoy absolute independence.”
Woolen gauze undershirt.
Hard to find at a reasonable price, nowadays! Key features are its permeability and ability to dry easily. A clothing system needs to build from the inside out. Modern alternatives may be string vests, mesh synthetics and soft microfibre garments such as Coolmax tee-shirts. In winter Kephart recommends wearing two sets of medium-weight woolen underwear rather than one heavy set.
Woolen gauze (or balbriggan) drawers.
Kephart notes that the legs sweat less than the torso so in warm weather drawers of open-weave ribbed cotton are a viable alternative to woolen gauze. Cotton drawers are easier to wash in the field. If cold conditions or lots of wading is expected drawers should be wool. Drawers should be long legged to protect the knees and legs from scrapes and bumps.
Woolen socks, winter weight, natural color.
These can be safety-pinned to the bottom of the drawers to keep them up, if necessary.
Army overshirt, olive drab chambray (or flannel).

“Flannel” is an ambiguous term but I think in this context he means woolen flannel, both woolen flannel and cotton chambray being suitable for summer overshirts, but it could mean cotton flannel too. There is some mention of chambray being better than “khaki” shirts, which may refer to the army issue item of cotton. The US Army of this period issued both woolen and cotton garments. “Khaki” often refers to the cotton version, the woolen being described as “olive”. Elsewhere Kephart suggests when the weather gets cooler an officer's woolen shirt be used instead of the chambray.

Shown is an illustration from the 1907 Abercrombie and Fitch catalogue. This is likely to be the sort of shirt Kephart wore. It is a head-over design and long enough to be a serviceable nightshirt. Incidentally, this catalogue defines “khaki” as being a closely woven cotton twill.
Silk neckerchief, 27 x 27 in.
Khaki trousers, extra suspender buttons.
Kephart notes that cotton trousers survive the woods better than woolen. His preference is for “genuine English moleskin” cotton. Wool trousers have advantages where the weather is very wet or much wading is done. Army trousers of “olive-tan wool” are acceptable but he considers woolen “kersey” better. Notable is Kephart always uses the term “trousers”, never “pants”. Elsewhere he suggest trousers can be cut off six inches below the knee.
Invisible suspenders.
Kephart notes these are hard on buttons, hence the spares suggested above.
Leather belt, narrow.
Army shoes, cone-headed Hungarian nails.
Army leggings, canvas.
Among their many merits, provide some protection from snake bite.
Felt hat, medium brim, ventilated, felt sweat-band.
A felt sweat-band is preferred to leather since it is permeable and quick drying.
IN POCKETS
Left shirt—Map sections, in cover. Leaf of almanac. Note book and pencil.
The map case he favours has six transparent pockets, each of which can hold two sections of a US Geological Survey map, back to back. Note book should be quadrille ruled for mapping and drawing to scale, which is a valid suggestion even today.
Take along an almanac to regulate the watch, show the moon's changes (tides, if near the coast), and, by them, to determine the day of the month and week, which one is very apt to forget when he is away from civilization. Have a time-table of the railroad that you expect to return by.”
Right shirt.—Compass.
I wear the instrument in a small pocket sewed on my shirt for that purpose, so it fits, and attach it to a button-hole by a short, strong cord. A long cord would catch in brush. If the compass is carried in a large pocket it will flop out when you stoop over or fall down.”
Left trousers.—Purse. Waterproof match box, flat pattern (as reserve).
Kephart was a pipe smoker. These matches were for emergencies, the supply on his belt being used for his pipe.
Right trousers.—Pocket knife.
The jackknife has one stout blade equal to whittling seasoned hickory, and two small blades, of which one is ground thin for such surgery as you may have to perform”
Fob.—Watch.
Left hip.—Pipe. Tobacco.
Right hip.—Bandanna handkerchief.
ON BELT
Right side, front.—Waterproofed matches (50) in leather belt-pocket.
Right side, rear.—Sheath knife.
Blade of less than five inches. Kephart carried a tomahawk, hatchet or axe, so did not feel the need for a larger knife.
Further on, Kephart says that if part of a group it is useful for each member to carry a whistle, and have an agreed code of signals.
ON BACK
Duluth pack sack, 24 x 26 in. . . 2 lbs 4 oz.
Shelter cloth, 7 x 9 ft., waterproof. . . 2 lbs 4 oz.
No support poles are carried. The surrounding woods and the tomahawk met these needs. Unlike many modern campers, Kephart expected to have a camp fire to sleep before. At high altitudes a closed tent (3½-4 lbs) and warmer bedding might be required.
Mosquito net, 68 x 72 in . . 4 oz.
U. S. A, [US Army] blanket, summer weight, 66 x 84 in, . . 3 lbs
Browse bag, 32 x 78 in . . 1 lbs.
The browse bag was a sack that could be filled with foliage, straw or other soft materials to serve as a mattress.
Pillow bag, 20 x 30 in . . 3 oz.
A smaller version of the browse bag, to serve as a pillow.
Rubber cape, 34 in . . 1 lbs 5 oz.
Designed to reach to the knee. Used as protection against the wind as well as the rain.
A cape has the merits of a poncho, in that it is airy underneath, and it can be slipped on over the pack-sack, while it has the advantage of leaving your arms free to fend off bushes, to climb with, to shoot, paddle, and so on.”
Stag shirt . . 1 lbs 8 oz.
The “stag shirt” Kephart uses is made of “Mackinaw”, a strong woolen cloth. The 1907 Abercrombie and Fitch catalogue describes the Mackinaw cloth it uses as 40 oz. The shirt is used instead of a coat or jacket and may be used as a sleeping garment or in combination with the cape. Modern Mackinaw garments are very expensive, and often only available in red check patterns rather than the more discrete grey Kephart favoured. Fleece jackets are a potential alternative, but many of these are insufficiently windproof so will need to be combined with a robust shirt or hoodie worn over them.
Spare suit underwear and socks, as above . . 1 lbs 2 oz.
Tomahawk, muzzled . . 12 oz.
The knife never was made that will compare with a good tomahawk.” ( I doubt Kephart ever encountered a kukri!)
The tomahawk or similar provided both firewood and shelter.
Among my most valued possessions is a tiny Colclesser tomahawk, of 8-ounce head and 2½ inch bitt, which, with hickory handle and home-made sheath, weighs only three-quarters of a pound. I seldom go anywhere in the woods (unless in marching order with a heavier axe) without this little trick.
It is all that is needed to put up a satisfactory shelter wherever there is hemlock or balsam, or bark that will peel, while for other service I use it oftener than I do my jackknife.”
Side-cutting pliers, 5 in, . . 4 oz.
There is some speculation that if Kephart was around today he might have carried a multi-tool. I suspect he might have been quite bemused by examples that weigh half a pound or more!
Carborundum whetstone, 4 x 1 x ½ in . . 2 oz.
Wallet fitted with small scissors, needles, sail needle, awl point, 2 waxed ends, thread on card, sail twine, buttons, safety pins, horse-blanket pins, 2 short rigged fish lines, spare hooks, minnow hooks with half barb filed off, sinkers, snare wire, rubber bands, shoe laces . . 6 oz.
A combination of sewing kit, repair kit and emergency fishing and snaring kit.

Strong twine in bag . . 1 oz.

Aluminum frying-pan (858 in.), plate, fork, white-metal dessert spoon, dish towel, in bag . . 1 lbs 1 oz.
2 Aluminum buckets (1 qt.), in bag . . 14 oz.
See my blog here for more information on these.
Tin cup, seamless (1 pt.) . . 3 oz.

Oddly the list does not include a water bottle, although elsewhere Kephart tells us:

“One may travel where water is hard to find, though this seldom is the case in a timbered region. The best canteen is one of aluminum which neither leaks nor rusts like the old-fashioned tin affairs. [Aluminum will be corroded by copper ions. Copper ions are present in most tap water.] It should have a canvas cover with felt lining. When the felt is wet its moisture cools the water in the canteen bv evaporation. The canvas cover prevents too rapid evaporation, and keeps the canteen from wetting one's clothing. At night or in case of illness, the thing can be used as a hot-water bottle, the insulation keeping the water hot for a considerable time. The best pattern is the present regulation army canteen, which is shaped like a flat flask, but with one side rounded a little and the other concaved to fit the body. It has a flat bottom, so you can stand it up. The aluminum screw-cap, held by a chain, cannot jolt out like the corks of common canteens.
Nails and tacks . . 3 oz.
Used to create camp furniture or assist in shelter construction. Kephart tells us these are only needed if expecting to stay several days in one place. Half a dozen each of 6d (2") and 3d (1¼") wire nails, and some galvanized tacks.
Cheesecloth, 1 yd . . 1 oz.
Used to carry fish or hang meat. Also used for straining. Could be used to create a head net against insects.
…substitute for a tea-ball.
Fly dope, in pocket oiler . . 2 oz.
Fly dope was insect repellent.
Talcum powder, in wpf. bag . . 1 oz.
For care of the feet.
Comb, tooth brush, tiny mirror, bit of soap in wpf. bag, rolled in small towel secured by rubber bands . . 6 oz.
Toilet paper . . 1 oz.
First aid kit . . 5 oz.
Spare matches, in tin box secured by adhesive plaster . . 2 oz.

Electric flasher, flat, round corners . . 5 oz.

Total pack without provisions. . . 18 lbs 3 oz.

Provisions will be discussed in a future post.
Categories
Phillosoph

Equipment Pouches

One of my reasons for writing this post is that I came across a statement that a certain army was currently issuing several dozen different designs of equipment pouch.
I see pouches for survival tins offered, which misses the point of a survival tin!
One even sees belt pouches for KFS!
This got me thinking about what configurations would be most useful. Some of us do not have an unlimited budget or supply system, after all!
It would be very nice to have pouches designed based on the golden ratio, such as in the proportions 1: 1.618: 2.618. Such gives a litre pouch of about 6 x 10 x 16 cm and a two litre of 7.8 x 12.6 x 20.3 cm.
Attractive though these are, we must also consider more practical considerations such as the dimensions of the already existing items that such pouches will be required to carry.

Medium Utility Pouch Size One

To begin with, let us consider a medium-sized utility pouch with internal dimensions of approximately a litre volume.
This could serve as a water-bottle carrier for typical military designs such as the British 1-litre ’58 pattern and the US 1-quart M-1961.
There should also be room for associated items such as canteen-cups and stoves, so size may be something around 9 x 14 x 22cm.
Personally, I think a two-litre bladder with a drinking tube is more practical, but designing the medium utility pouch to take a water-bottle also gives us a convenient size for many other items.
If you don’t carry a water-bottle, the pouch can still carry a cup and stove, zip ties, pliers, cordage, flashlight and a useful collection of other items.
Personally, I think a cup and stove are pack items rather than something that should be weighing down your belt. A size-one pouch containing these could be mounted on the outside of a pack for easy access.
It can be used to carry several magazines, bagged stripper-clips or several grenades.
The pouch itself would be fairly basic. If a draw-cord neck is desired, a suitable liner is added. Likewise, inserts can configure the interior to specialist roles.
There will be provision to mount smaller pouches on the outside should external pockets be desired

Small Utility/Frag Pouch

There would also be a small utility pouch, perhaps of about 10 x 12 cm.
This item is obviously inspired by the M1967 compass/field dressing pouch, and like this item it can exploit mounting positions high on the body.
It will also be convenient for mounting on the sides of a chest rig where larger pouches might be awkward.
The proposed item will not use the popper fastening that the M1967 does, since these are fiddly if a pouch is partially filled or contains soft contents.
For some contents it may be convenient to be able to mount the pouch with the opening downwards or to the side.
As well as compasses and first field dressings (FFD) such a pouch can hold various other items and would serve as a pouch for frag-grenades. This latter requirement may require a change in proportions.
There may be a case for sizing this pouch to carry mobile phone-shaped items.
Small utility pouches would be designed so they can be mounted on larger pouches. When used for FFD the soldier's blood group should be clearly marked on the outside and a TCCC casualty card or equivalent carried inside

Medium Utility Pouch Size Two

The medium utility pouch will be complemented by a larger version of approximately twice the capacity.
We will call this the “medium size 2” and the previously described variant the “medium size 1”.
The size 2 utility pouch would serve a number of functions and be designed so that it can be worn on the belt or be carried by shoulder strap.
One of its roles is to carry a 2-litre hydration bladder fitted with a drinking tube. This allows the wearer to easily access a source of drinking water independent of any backpack.
Another role for this pouch is to hold an Combat Injury-Immediate First Aid Kkit (CI-IFAK). This pouch would contain an insert roll holding a vacuum-packed major trauma kit and a pair of combat tourniquets.
Two such pouches at the back of a soldier’s belt resembles a more compact version of the British army kidney pouches, but their contents are more useful and combat relevant
The size 2 utility pouch was inspired by the Canadian utility pouch that was found to be useful for carrying a (C9) 200rd SAW drum. Alternately, a 100rd belt of 7.62x51mm/6.5mm Creedmore or five 30-round rifle magazines could be carried instead.
If the one-litre/quart water-bottle is the item we design the size 1 pouch around, then the SAW reload is what the size 2 is designed around.
For the ammunition carrying role, the contents of the utility pouch should be rapidly and easily accessible. This again suggests that the utility pouches be a relatively simple design.
For other roles one or more small stuff sacks could be carried in the pouch. It may be prudent to proportion the pouch so it can carry 2-litre plastic ice cream containers. Other possible contents include the US 2-quart canteen
Utility pouches with shoulder straps allow a machine gunner’s ammunition load to be shared throughout a unit. Each soldier carries a bag and deposits it with the machine gun team when they take position.
Such bags can also increase an individual’s ammunition if that carried by the chest rig is felt insufficient

Munitions Pouch

The fourth design of pouch would be the “munitions pouch”.
As regular readers will know, I am fond of the chest rig. I am also a fan of not overloading said rig.
The basic component of the chest rig should be a pouch that can accommodate a pair of magazines.
Depending on body form, a rig will have three or four of these. It makes sense to design the pouch to accommodate  a pair of AKM 30-round magazines, allowing it to also carry 20-25 round 7.62x51mm/.260 Rem/6.5mm Creedmore magazines. Such a pouch can easily take a pair of 30-round 5.56mm magazines or a 60-round 5.56mm coffin-mag.
Box magazines for shotguns may also need to be considered.
The pouch may be a little too big for the 5.56mm magazines but this may be addressed in several ways.
The pouch may be adjustable or some item used as a spacer beneath the magazines (extra socks are always useful!).
If the magazines are fitted with pull loops it probably does not matter if they sit deep in the pouch. Pull loops are detailed in my book “Survival Weapons: Optimizing Your Arsenal”.
Should such pouches be built, some smart company might produce larger capacity 5.56mm magazines the same length as those of the AKM.
A number of pouches capable of taking a variety of magazines are already offered by a number of manufactures
Other features of the munition pouch need to be considered.
Some ammunition pouches have a pocket for a pistol magazine on their front. Such could also be used for other equipment such as wire cutters, flashlights etc.
Many ammunition pouches do not have flaps, so it may be prudent to design the flap as removable.
If fitted, should a flap need to be lifted up, as is traditional or is it more efficient to have it open forward?
What is the most useful fastening for an ammunition pouch? Fastex buckle or tab and staple?  
A possible design might be a separate flap piece held by a strap and quick release buckle at both front and back. This might also facilitate the pouch being adjustable to magazines or loads of varying height
A single, filled munition pouch and a magazine on the rifle gives a shooter 90 – 120 ready rounds, which should be ample if correct fire discipline is observed.
The remaining munition pouches might carry other contents.
Such a pouch can take items such as rifle grenades or smoke grenades.
It may also be used for items such as some designs of radios.
At least one manufacture makes a “trauma insert” for ammunition pouches which contains an abbreviated CI-IFAK. The Size 1 utility pouch could be used for an intermediate-sized CI-IFAK
Extra small utility/frag pouches to hold additional grenades can be added if the wearer desires

Dump Pouch

Dump pouches” have come into vogue in recent years. Many are designed to fold or roll up so they take up little room when not in use. Some are cleverly sized so that they can carry a soldier’s helmet when it is not worn.

Cargo Pocket Liner Pouch

A soft, padded pouch that could fit in the cargo pocket of a soldier’s trousers would be useful for survival items and first aid kits. This should have loops that fit over the pocket buttons to keep it in place

Larger Utility Pouches

Larger pouches may be needed for specialized roles. These could be carried as shoulder bags or mounted on larger packs or webbing.
For example, some Canadian military units issued their personnel an extra buttpack to carry their NBC gear in.
The Canadian 82 pattern butt pack was 30 x 25 x 12 cm, which is approximately 9.8 litres by my calculation
The US army M1961 butt pack was 22 x 21.5 x 14 cm, so about 6.89 litres.
The most useful parameters for a buttpack/shoulder bag need to be determined.
Provision to attach small and medium utility pouches to the exterior needs to be included.

Claymore Bag

The M7 claymore mine bag (“bandoleer”) is another item that soldiers have found to be useful for functions other than its intended role.
Such bags could carry ten 30-round 5.56mm magazines or 27 40mm grenades.
A claymore bag has two pockets with a shared flap and is about 30 cm square. Given their intended contents I would estimate that it is at least 5 cm deep, giving a capacity of about 4.7 litres.
The claymore bag is similar in size to the haversacks used in the American civil war. These were used to carry rations and “table furniture”: a tin plate, cutlery and related items.
The haversack had an easily washed cloth liner designed to protect the bag from the food and vice-versa.
Civilian bags such as this one combine features of both, the larger pocket being useful for laptops

Fasteners and Patterns

I have touched on the topic of fasteners already. Fastex buckles or tab and staple systems are preferable to poppers, buttons, toggles or velcro.
Fastening systems should be operable with one hand and compatible with gloves.
Ideally, we do not want to issue duplicate items in different colour schemes.
It is also worth remembering that disrupting the box shape of a pouch is different to camouflaging a whole person.
The best “off the shelf” pattern for pouches is probably British two-colour desert DPM, although in some examples the darker shade is too orange. A grey-sand and coyote-brown version might be even better.
The high contrast between the sand and brown of desert DPM disrupts both perceived shape and depth. The light sections help counter the body shading that usually can be seen with pouches.
Two-colour desert DPM will be effective in a wide range of environments. In jungle, the pattern helps break up the shape of more verdant patterned garments worn beneath it. In snow, white tape can be added.
Categories
Phillosoph

Underwear for Survival

Recently I came across another reference to American Civil War (ACW) “Foot Cavalry”. As has been noted in other posts, many infantry in this conflict became adept at moving fast and light. John Worsham’s account of the war as part of Jackson’s brigade is worth a read. So too is John D. Billings' memoir, Hardtack and Coffee, I'm told. Many of the lessons that they learned and techniques that they practiced have been generally ignored in more recent times. In previous posts we saw how such soldiers reduced their sleeping gear to a blanket, gum-blanket or oilcloth and perhaps a shelter half. Their food and eating equipment occupied a foot square haversack. Knapsacks were often discarded and what little they did not wear was rolled up inside a blanket. Such a blanket might contain little more than a spare shirt, socks, a nightcap and perhaps spare underwear. Some cordage, a sewing kit, tobacco and a bible might complete the load.

One advantage these soldiers had was that their jacket and trousers were of wool, which stays warm if wet and dries more readily than cotton. Some garments were “jean cloth” –a mixture of wool and cotton. Wikipedia has some silly comments about woollen uniforms, failing to appreciate that woollen cloth need not be the thick, heavy stuff used for modern winter clothing. Woollen uniforms were used by most armies until after the Second World War when the printing of camouflage patterns favoured switching to cotton.
Long frock coats were the current military fashion at the time of the ACW but the majority of soldiers opted for either sack coats or shell jackets. The sack coat was originally issued as fatigue wear. It was longer than a shell jacket but generally not as long as the civilian garments called sack coats. The shell jacket was a waist-length garment and was favoured by troops that rode. Union infantry seem to have favoured the sack coat while the Confederacy mainly issued shell jackets, probably as an economy measure. Pragmatically the Confederacy allowed trousers to be blue, brown or grey.
Greatcoats were also used and this article has instructions on how to fold one to fit in the knapsack. If the knapsack was not being worn the coat was presumably rolled in the blanket roll or carried in the company baggage until weather was cold enough for them to be needed. Presumably, many soldiers simply wore their blanket as a cloak if it was chilly. Billings tells us some soldiers discarded their blanket in favour of the coat.
It is what these soldiers wore under their uniforms that is of interest to the modern outdoorsman. At this period, shirts were regarded as an inner or underwear garment more than they are now. You might have seen soldiers in shirtsleeves, but wearing a shirt as the outermost layer was much less common. Shirts might be woollen, cotton or linen. They might be issue items or civilian in origin. Many shirts were sent from home and homemade. Typically a shirt would be of the pull-over type with a buttoned opening reaching part way down. Such shirts were also thigh-length. One reason for this length is that a shirt would also serve a soldier as a nightshirt. Nearly a century later Rommel’s Afrika Korps were also issued long shirts so they could sleep in them. Another reason for the long shirttails was that many men in the ACW period did not wear underpants. Instead they would tuck their shirt tails between their legs, a practice that dates back to at least the middle ages. More than one shirt might be worn. A letter from a soldier asks his family to send him four woollen shirts, two of thin wool that can be used as undershirts.
While researching this article I came across this facebook group detailed the contents of a British soldier’s blanket roll in 1776. Three shirts were carried, one worn, two packed, and men ordered to “change their linnen three times a week”.
A recent military innovation of the ACW period was the issue of drawers. Many soldiers had never encountered such things in civilian life and it was considered good sport to try to convince a newbie that these were parade trousers that he should wear. The drawers issued were ankle-length and made of a cotton flannel, hardwearing on the outside and soft on the inner face. The use of cotton is perhaps a little surprising, given that cotton is cold when wet and slow to dry. In a previous post we saw that the WW2 Soviet soldier wore long cotton underwear, but this was presumably for easy processing through the field laundry. One presumes laundry for a civil war soldier was more personal or ad hoc. Perhaps there is something about the combination of cotton drawers under wool trousers that I am missing. One advantage of cotton is that it could be boiled to kill lice, ticks and fleas. Wearing two pairs of drawers might be done in cold weather or when riding. When drawers were worn the long shirt tails probably provided an additional protection against chaffing.
Worsham mentions Many wore around their waists, next to their skin, a flannel belt or worsted string, to prevent bowel complaint”. This may be a reference to the “kidney warmers” favoured by Germans (and Japanese!) and presumably those of German descent, as many Americans were. Incidentally, “kidney warmers” were another component of Afrika Korps uniform. A future blog will discuss kidney warmers. They seem a useful addition to your cold weather gear.
Laundering seems to have been an issue for civil war soldiers. New or clean underwear seems to have been a cherished spoil of war. There are even accounts of soldiers redressing during battles.
On the subject of cotton underwear vs woollen we can look to James Austin Wilder and Horace Kephart, several decades later. In “Jack-Knife Cookery” Wilder advises scouts to wear “light woolen athletics”, even in summer. Kephart (Camping and Woodcraft 1927) informs us:
 However, the broad statement that one should wear nothing but wool at all seasons requires modification. It depends upon quality and weave.
Some (wool) flannels are less absorptive and less permeable (especially after a few washings by the scrub-and wring-out process) than open-texture cottons and linens.”
“If woolen garments are washed like cotton ones-soap rubbed in, scrubbed on a washboard or the like, and wrung out — they will invariably shrink. The only way to prevent shrinkage is to soak them in lukewarm suds (preferably of fels-naphtha or a similar soap), then merely squeeze out the water by pulling through the hand, rinse, squeeze out again, stretch, and hang up to dry. This is easy, but it requires a large vessel, and such a vessel few campers have.”
“Drawers must not be oversize, or they will chafe. But one’s legs perspire much less than his body, and need less protection; so, up to the time of frost, let the drawers be of ribbed cotton, which is permeable and dries out quickly. Cotton drawers have the further advantage that they do not shrink from the frequent wettings and constant rubbings that one’s legs get in wilderness travel. Wool, however, is best for wading trout streams. For riding, the best drawers are of silk.
I conclude that for cold weather, for work in high altitudes where changes of temperature are sudden and severe, and for deep forests where the night air is chilly, woolen underclothes should be worn. In hot climates, and for summer wear in open country, a mixture of silk and wool is best, but open-texture linen or cotton does very well. Pajamas should be of flannel, at all seasons, if one sleeps in a tent or out-of-doors.”
“Drawers must fit snugly in the crotch, and be not too thick, or they will chafe the wearer. They should be loose in the leg, to permit free knee action. Full-length drawers are best because they protect the knees against dirt and bruises, and safety-pins can be used to hold up the socks (garters impede circulation).”
In his 1906 edition, “The Book of Camping and Woodcraft” he comments:
 “It is unwise to carry more changes of underwear, handkerchiefs, etc., than one can comfortably get along with. They will all have to be washed, anyway, and so long as spare clean ones remain no man is going to bother about washing the others. This means an accumulation of soiled clothes, which is a nuisance of the first magnitude.”
What does all this mean to the modern outdoorsman or serviceman? There are obvious advantages to having your field gear of wool but this can be a little hard to achieve in modern times. Woollen garments tend to be expensive and may be too heavy or too warm for all-season wear. Items can be found on Army surplus sites, often of Swedish or Finnish origin.  Reenactor suppliers can also yield suitable garments, be they medieval, ACW or 20th century. Prices are often high but some companies do offer budget items. I have come across ACW sack coats for about $60, which is not bad if you are happy with either grey or blue. Viking/ LARP/ medieval tunics can be found for similar prices and these may actually be more practical items for field wear.


Below is a wool/ polyamid tunic that incorporates printed camouflage components. This suggests how a monocolour woolen garment might be customized.

It is worth noting here that Kephart favoured a cotton flannel or chambray shirt as his outer garment over gauze woollen underclothing. Trousers were either cotton moleskin or wool kersey. Kephart notes that:
The material and quality of one’s underwear are of more consequence than the shell he puts over it, for his comfort and health depend more on them.”
Obviously long undergarments can improve our comfort when away from our centrally-heated and air-conditioned buildings.
A common theme we have seen is that woollen undergarments should be light and of open weave. Kephart and Wilder both advocated that in winter wearing two sets of summer-weight woollen undergarments was preferable over one heavier layer. Most of the woollen undergarments that can be found nowadays are designed for winter use and too warm for all-season use. Long underwear of synthetic materials are also mainly designed as “thermals” for when the mercury drops.
For the upper body we can get by with one or more layers of thin shirts, tee-shirts or long-sleeved tee-shirts. The Spetsnaz use of string vests is worth recalling here. Coolmax is a synthetic that is soft, fast drying but not overly warm. I have used a coolmax tee-shirt on several of my travels, including a visit to humid Hong Kong. I didn’t care about getting drenched in the heavy rain since the garment would dry off so quickly when the temperature rose afterwards.
For the legs most of the long underwear commonly available is likely to prove too warm for all-season wear. String long johns seem to cost ten times the price of a string vest! One solution may be to repurpose some pyjama bottoms as long field drawers. Brushed cotton, cotton flannel and soft polycottons should all prove suitable. Just make sure the fit around the loins is sufficient to prevent chaffing. The pyjama top can serve as a shirt, if pattern and colour allow.
My female readers may have guessed the second suggestion, which is to use pantyhose/ tights as an inner layer. Many horse riders know the benefit of these against chaffing. You can even get tights specifically designed for men, some more so than others! Tights/ leggings in coolmax can be found and I am considering acquiring some.
Categories
Phillosoph

Sleeping Bags for Hostelling

A few weeks back I got talking about my experiences of youth hostelling when younger.
I didn’t get into hostelling until I was in my early twenties so was often the “old man” of a dorm. That said, I often struck up enjoyable liaisons with some of my fellow travellers. Some of these only lasted a couple of days until our paths parted, others were friendships that remained active for many years.
I was asked to write a little on the blog about my experiences and conclusions. .
One of the first topics I was asked about was sleeping bags for hostelling.

Do you really need a sleeping bag for hostelling, I was asked? My answer would be yes. 
While many hostels provide some bedding there are many that do not. It depends where you are in the world and whether it is an official IYH hostel or not. .
I will note that some of my most memorable experiences have been at “unofficals”, although by no means should you avoid the official places. There have been some fun times in those too. .
Another reason for having your own bedding is that there will be times when you want to travel overnight by train or bus, saving yourself the price of a room for the night.
This is not going to be a generic article on selecting sleeping bags. I will save that for another day if there is interest.

Too Much of a Good Thing?

The most common mistake when buying your first bag is magnum-itis!.
A common mistake when buying a bag is to buy one that is too warm. .
Look around any hostel and you'll see several roommates with legs draped out of too hot five-season expedition bags. I did exactly the same when I brought my first bag (labelled as -15°C). I still have that bag but now reserve it for outdoor use or buildings that I know will be insufficiently heated. .
In truth, I have seldom used it. 
Use your hard saved money for a more practical purchase.
I soon invested in a one/two-season sleeping bag that folds up to the size of a rugby ball without the need for compression straps. My bag of choice was a Snugpak Merlin Softie 3, which I am happy to say are still in production. There are several variants available now. There are lengthened versions for the very tall. A tactical version has a reinforced lower for users that might need to sleep in their boots. (Put sandbags over them first!). 
Looks like the modern versions do have compression straps, probably because users expect them. My original stuff-sack neither had nor needed them.
The latest versions may have higher specs than my bag. According to its label my original bag is a “summer” bag for -5 to +10°C, comfort 0°C.

My Merlin Softie has been all around the world with me and is still good to go. I have used it for both hostelling and camping.
I prefer bags with two-way zips for hostelling and similar travels. They provide better ventilation and are easier to get into in a dark dorm room. 
Some designs can also be zipped together, if your bag has a right hand zip and your loved one's a left.
The compact size allows me to carry a very small pack, with plenty of room for everything else. 
The larger sleeping bags often take up most of your rucksac volume or become large unwieldy lumps lashed to the outside. 
Should conditions be colder than expected, I can always add more insulation in the form of clothing or blankets. Taking insulation out of a heavier bag would not be possible. 
Conceivably I could use my lower performance bag inside another bag.
I suppose if I had my time again I'd buy a one or two season bag and a two or three season and have a really versatile system for all conditions.
I have a lightweight down bag that might work well with the Merlin but I cannot recall any instances where I was cold in the Merlin bag. 
Bear in mind that many of your travels will be to warm places in summer and you will see that such a bag is more than adequate. 
You’ll spend a third of your time on holiday sleeping, so a good bag is a good investment.
Many hostels will provide blankets but expect the guest to provide a sleeping bag liner. A sleeping bag liner is basically a sheet sewn into a bag-shape to keep the bedclothes clean. Some hostels may also have sheets or bags for hire.

For a long time I carried a simple, easily washable cotton sheet bag, both for hostel bedding and to protect my own sleeping bags.
One morning in a German hostel it disappeared from my bed! The maid had mistaken it for one of the hostel’s sheets and sent it on to the laundry. This was my last morning before moving on to Holland, so there was no way my bag would be returned to me in time.
The hostel owner was most embarrassed by this and gave me a set of sheets as a replacement. Once I'd returned home I set about sewing these sheets into a replacement liner, with two modifications:
  • One was to sew the sheets into a mummy shape to match the shape of my sleeping bag.
  • The other was to sew round the opening several pieces of brightly coloured material. This was partially to make my bag instantly recognizable to prevent the same happening again, and also so that I could locate the opening of the bag by touch, saving me from using a light and disturbing my roommates.
Although quite reasonably priced, liners can be very easily made, and there's no reason why they have to be white.
Make them from something you can recognise in an instant and line the neck with something that feels different and identifies it further. Some of you may consider a piece of lace.
I’m still using my homemade liner. Nowadays you can find pile liners to make your bag warmer. There are also silk liners and pertex ones, which have tempted me but I have yet to try.
If you are a restless sleeper who often gets tangled up in their bed clothes, you can make or modify your liner so it has separate legs.
Categories
Phillosoph

Sam's Van: Kitchen Equipment

Sam’s Van is an idea from a friend of mine from Tennessee. When he was in his late twenties he proposed that a person should only have as many possessions as could be transported as a single van load.
For a variety of reasons, I can no longer meet this ideal, but it is a useful concept to help you declutter and reorganize your environment.
There are some interesting websites about minimizing your possessions and these can provide useful inspiration. However, Sam’s Van is about optimizing what you have rather than minimizing it.
Recently I began to consider what I have in the kitchen.
This caused me to look at some lists of “essential” items of kitchenware, which did give me something of a chuckle. I quite like cooking so my kitchen contains some items I would not put on a basic start-up list.
The list below is a combination of what I have in my kitchen and items that appear on lists of essentials. If you are equipping a new kitchen or wish to declutter an old one, this list and my comments may be of help.

Plates, Bowls and Cutlery

At least four of each, with six preferable. The more you have, the less often you will have to wash up!
Bowls end up being used for microwaving veg and other uses so a few extra of these is prudent.
I found that teaspoons tended to be in short supply too so I brought a bundle more and released them into the drawer in the hope that they will breed.

Mugs

Extra mugs save on the washing up and let you be sociable.
Eight is a good number if you are on your own, twelve if a couple.
Mugs also get used as little mixing bowls for making sauces, instant gravy, mustard or similar.

Beer and Wine Glasses

You do not want to drink your beer and wine from mugs.

Pots and Pans

You will need two, maybe three, saucepans of a suitable size for your requirements. For example, if you are mainly cooking for yourself, a pot of about a litre size is going to be the most useful.
Make sure all the pots have lids and that they are of a configuration that you can use the lid to drain the pot.
Avoid steam-release vent knobs unless you like scalded fingers.

Wooden Utensils

You will need some spoons to stir your cooking and spatulas to flip frying or grilling food over. Since some of your cookware will be non-stick it is prudent to get non-metallic items.
If the local pound store does sets of wooden utensils, you can soon acquire half a dozen or more items of varying shapes and applications.

Frying Pan

If you are getting only one, get a non-stick one of reasonable width.
A frying pan can also be used for making and reducing sauces.

Mixing Bowls

A couple of bowls are useful for mixing stuff in, serving fruit or popcorn in and so on.
If you are smart you will select some that you can use in the microwave (and halogen oven). Some glass/pyrex bowls often have measuring graduations too.

Measuring Jug

I measure out the quantity of rice or pasta that I intend to cook using volume, so a measuring jug proves very handy. I also use it to fill the coffee maker with water.
It is used so often that it seldom leaves the draining board.

Chinese Cleaver

Something like 90% of cutting jobs in my kitchen are done by my Chinese cleaver. If I am using another knife it generally means the cleaver is in the wash.
Unlike the western cleaver, the Chinese model has a full bevel and a relatively thin blade. This type is sometimes called a vegetable cleaver but you can use it on anything you might wish to eat. As well as chopping, it can also be used for slicing, dicing and all sorts of fine cutting too.
Best place to get one is a Chinese supermarket, preferably one in a Chinatown district.
I have yet to cook anything the Chinese cleaver could not cut. Should such a situation occur, I have a Buck Ax in the kitchen too. The back of this gets uses as a hammer to break up frozen veg.
How to Use a Chinese Cleaver

Chopping Boards or Mats

Have at least one, and have it of a type that is easily washable. Use it to cut your veg before your move onto the meat or fish or use a different one for each.
If you want to have different boards for meat, vegetables and bread have them different colours.

Paring Knife/Knife Block

The other knife I use a lot is a “bird’s beak” paring knife. These are also called “shaping knives” or “peeling knives”.
This can be used for most of the jobs that a cleaver is not really suited for. Mine came with a knife block set. Its hooked blade is very useful for opening packaging.
I brought the knife block set to stop a certain “guest” abusing my boning knife.

Scissors

Modern packaging means that the scissors get used a lot too. I ended up putting a screw hook to hang them from inside the kitchen drawer so I could easily locate them.
Some lists of kitchen equipment have kitchen shears, which are presumably used for food preparation. Never used or owned these. The scissors or cleaver should serve.

Bread Knife

Whether you need a bread knife will depend on how you buy your bread and how much bread you eat at home. I have one as part of the knife block set and it sees occasional use.
Bread knives should also be used for cutting acidic fruits, so you should probably have one.
If you buy bread, have a cloth bread-bag to keep it fresh.

Carving Knife

There is one in the knife block set. Before I had that I usually used the cleaver.

Butcher’s Steel and Ceramic Rods

No point in buying a cleaver and knives if you cannot keep them in working condition.
I have a pair of ceramic sharpening rods and a butcher’s steel in my kitchen, ready to be used as needed.
See my book on how to use them.

Filleting and Boning Knives

I don’t have a filleting knife, and I find I have seldom used my boning knife.
Good ones tend to be expensive, so do not buy unless you expect to get lots of use out of them.
 

Whisk

Whether you need a whisk depends on your cooking abilities and style. If you have no idea on how to make a sauce or batter you do not need them.
I like the “magic” whisk type that look like they have a spring bent into a horseshoe-shape. I brought two or three of these to save on washing up.
Never felt the need for an electric mixer or blender.

Skimmer

This is a Chinese item like a cross between a ladle and a metal net. It is used to fish stuff out of boiling water or deep fat.
I have seldom used it.

Electric Kettle

You could get by with a saucepan if you have one clean but an electric kettle is worth having. Open flames and being half awake in the morning are to be avoided if possible.
Get the sort of kettle that will only boil the amount of water you need.

Toaster

The usefulness of a toaster depends on whether you have bread in the house. I had a friend staying with me who would buy bread for sandwiches so the toaster saw some use.
Since he has gone it has not been used much.

Garlic Press

I have not seen mine in over a decade.
When I need crushed garlic I simply flatten it between the cleaver blade and chopping board, which also makes it easier to peel. Then slice or mince further with cleaver as necessary.

Potato Masher

Use a fork unless you make a lot of mash.

Pizza Cutter

Just use a table knife.

Ice Cream Scoop

I seem to have inherited one! If you do not have one, simply use a spoon.

Can Opener

I don’t eat a lot of canned food.
When I needed something like canned tomatoes for a chilli con carne, I’d use the can opener on a penknife. A spare penknife is a useful thing to keep in the kitchen drawer.
A friend who was staying with me ate more canned food, so we brought a turnkey-type can opener from the pound-store.
Unless you are disabled or work in an industrial kitchen you do not need an electric can-opener. They are a waste of energy and money.

Bottle Opener/Corkscrew

You should have these. The penknife stands in reserve.

Pepper Grinder

Unsurprisingly, for grinding peppercorns.

Vegetable Peeler

I’m sure I have one of these somewhere but have not used it in years. Often you can simply scrape or wash fresh vegetables instead or use your paring knife.

Grater

I like grated cheese on my spaghetti, so I brought a grater from the pound-store. You can get by with cutting the cheese with a knife so this is an optional item rather than an essential.

Lemon Juicer

Lemon juice for pancakes gets brought ready squeezed. If I have to get juice from a fresh lemon, lime or orange I squeeze them manually or mash them with a spoon.

Pressure Cooker

I probably do not use this as often as I should.
It gets forgotten in the cupboard so I will try keeping it on a shelf instead. I eat a lot of rice and pasta and pressure cooking these does not offer much of a real time saving and the pot is large for the volumes that I cook. The pressure cooker is good for cooking rice or pasta with other ingredients.
Frozen veg is quicker and simpler in the microwave.
The pressure cooker does get used to make the Ham in Cola that I usually cook near Christmas.

Wok

I’m told that most people buy a wok, use it for a few meals then forget about it. I have been using mine for several decades for a variety of meals.
There are lots of things you can use a wok for other than stir-fries. If you do stir-fry, however, buy a chuan to move the food around with. This resembles a cross between a spatula and a shovel.
You will also need a bamboo brush to clean your wok with.
It is worth having a lid for your wok too. My lid got damaged in a move several decades ago and I have managed without, however.
You can buy a wok set in a nice box from many supermarkets. For a fraction of the price you can pick one up unboxed from a Chinese supermarket. Buy a cleaver, brush and chuan while you are there.
Don’t bother with non-stick or stainless steel woks. Get a carbon steel wok of 13-14 inches and season it.

Microwave

I use my microwave a lot but I really should use it more creatively. Mainly I use it to cook frozen vegetables. A bowl of frozen veg can be cooked in just a few minutes. I also use it to make polenta or mug brownies.
The microwave is used for defrosting too but it is less wasteful to let items thaw naturally in the fridge overnight.

George Foreman Grill

The grill in my oven is very inefficient, and the one in the microwave/grill is not that great either so I brought a George Forman grill.
I will admit I have used my wok and frying pan much less since I brought my George Foreman. Bear in mind it cooks both sides of the food at once so will cook quicker than a conventional grill.

Halogen Oven

This is a relatively recent addition to my kitchen and I probably use it more than any of the other cooking devices.
Make sure that your ovenproof bowls, baking pans and casseroles are of a suitable size and shape for use in the halogen oven.

Tongs

I don’t think I have ever owned kitchen tongs. The closest thing I have to them are cooking chopsticks, which I seldom use. A wooden spatula serves for flipping food.
This has changed with my use of the halogen oven. You need tongs (or chopsticks) to reach down into a hot halogen oven to turn or pick-up food. I also have tongs designed to pick up the racks or trays in a halogen oven.

Porridge Pan

If you like porridge, a small non-stick milk pan is worth having. It lets you make breakfast if the pans from the night before have not yet been washed.
I have a spurtle too, but you can use the handle of a wooden spoon instead.

Ladle

I have a couple of these but seldom use them. I do use one as a measure when pouring pancake batter.
You can also use some as very small saucepans for melting a few grams of butter, for example.
I would not class a ladle as an essential. I’d not throw my away but I’d not rush out to buy them if I didn’t have them.

Casserole Dish

Whether you want a casserole dish will depend on your cooking skills and inclinations.
It is a good idea to select one that can also be used in the microwave and halogen oven. I fill mine with tortilla chips and melt grated cheese over them.
A nice looking casserole dish can also be used as a serving dish too.

Measuring Spoons and Measuring Cups

I don’t own any of these and have managed without them. The scales, measuring jug and eating spoons get used instead.
I did, eventually, buy a couple of sets. Many recipes on the internet use volumes rather than weighing.
I also try to measure out high-calorie foods rather than serving myself too much.
Oddly, one set of cups I brought is based around a 200 ml volume rather than 236.6 ml, 240 ml or 250 ml.

Scales

Depending on your cooking style, these can be handy to have.

Timer

Handy to have, particularly if you are easily distracted or not that experienced at cooking.

Colander

Generally, I use the saucepan lids to drain pots. A colander can be useful for some other tasks such as washing fruit or veg. Can also be used as a well ventilated fruit bowl. 

Sieve

I seldom use mine but it is worth having one. A sieve can be used to drain stuff that would go through a colander. It can also be used to sift flour or icing sugar.

Baking Tin

If you want to use your oven, you will need at least one ware that can be used in it. You can use your casserole dish and get by using foil instead of a baking sheet. A non-stick backing tin a few inches deep can be used to make pies or toad in the hole.
According to at least one website a 9 x 13" dish will be the most useful. A square or round dish 8 to 9" across is more useful if there is just one or two of you. Round dishes are more useful for use in a halogen oven.
You will need a non-metallic cake slice (above photo) or knife to use with your non-stick containers.

Tupplewares

A few plastic boxes can prove handy.

Oven Glove and Tea Towels

My girlfriend’s sister took a dislike to my oven glove and it disappeared. Tea towels work just as well and are more versatile.
Towels are great for swatting houseflies from the air to keep your kitchen a “no-fly zone”. (Fitting fly-screen to the windows is a really cost-effective investment!)

Food Processor,  Blender,  Liquidizer

Personally I have managed to cook for several decades without owning any of these so I would dispute that they are “essential”.
Categories
Phillosoph

Soldier's Load: How Much Ammo to Carry

Continuing our look at the soldier’s/survivor’s load, I will return to the subject of ammunition.
Regular readers will know that I am not ashamed to draw inspiration from unusual sources. They will also know I am partial to the occasional video game.
I was playing a western-themed game and came to a point where I was offered a chance to buy some ammunition. I looked at how much ammo I had collected for the weapons I used the most and decided I did not need to buy any.
What was interesting was that I had something like 80+ rounds for the repeater carbine, my primary weapon. Granted that in the game there is a mechanism to make you a deadeye shot and slain enemies generally drop useful ammunition, but if it was in real life 80-100 rounds for a Winchester would seem an ample amount.

Historical Examples

The typical soldier in the American Civil War carried a cartridge box with 40 rounds ready for immediate use.
Yesterday I was reading about World War One trench raiding. Troops did not wear “equipment” (webbing) for these raids but the men carrying a rifle and bayonet carried 50 rounds. Other men carried ten grenades instead. “Marching load” for British soldiers was 90 to 110 rounds.
An account of a World War Two British platoon had each rifleman with 50 rounds and two to four magazines for the Bren gun. How much ammunition was carried in practice may have been more.
German soldiers of the same period are noted for being frugal with their rifle ammunition and letting the machine-guns handle the bulk of the offensive and defensive fire. I’ve encountered 90 rounds as the ammunition allocation for a Mauser rifle. The issue belt pouches only hold 60 rounds as twelve 5-round chargers so the remainder may have been in the pack if 90 rounds were carried.
The Japanese soldier carried 120 rounds. Twelve 5-round chargers were distributed between two frontal belt pouches and a further 60 rounds was in a “reserve” pouch at the back.
The American soldier in World War Two was issued with an ammunition belt with ten pouches, each for an 8-round Garand clip. In his famous study of the soldier’s load, SLA Marshall claims that soldiers generally carry more ammunition than is needed and suggests six clips (48/96 rounds) be carried instead.
If we look a little later in history, the American soldier in Vietnam was instructed to carry 330 rounds for his M16. Other sources say 14 magazines. Bear in mind, a loaded 30-round magazine weighs around a pound each. 880 rounds was allocated for each M60 so the riflemen probably helped carry some of this too.
The British soldier with a 7.62mm SLR was expected to carry five 20-round magazines and a 50 round bandolier or belt for the MG. With the switch to 5.56mm weapons and a rifle capable of automatic fire came a suggested load of 330 rounds: six 30-round magazines and 150 rounds in a bandolier.
In a previous post, I have discussed appropriate and inappropriate use for fully automatic fire with rifles.
If you have a semi-automatic or manual action weapon this is obviously not a concern.
How ammunition is carried may have an influence on the quantity a shooter carries.
Give a soldier two belt pouches that each hold three magazines and he will probably carry at least seven magazines. Three in each pouch and one ready in his rifle.
Give him a single pouch that holds four magazines and he will probably carry five. Give him a claymore mine bag instead and he may fill one pocket with magazines and use the other for other useful items.

A few posts back we looked at the Viet Cong chest rigs. If a wearer decides to carry six AK magazines, he has around 180 rounds.
An AKM 30-round magazine weighs about 1.8 lbs, so six loaded magazines weighs 10.8 lbs.
The equivalent load for an SKS would be eighteen 10-round chargers. Each of these weighs 0.4 lb loaded, so 180 rounds would weigh only 7.2 lbs.

Chargers

Several of the examples given earlier carried their ammunition in chargers (aka stripper clips, but calling them “strips” reduces confusion). The Garand took ammunition in true clips.
Contrary to what TV shows, video games and some supposedly expert gun writers will tell you, a clip is not a magazine.
A clip is a device that fits inside a magazine.
A charger/stripper-clip/strip remains outside a magazine and unloads its rounds into the magazine
Carrying ammunition in chargers rather than magazines constitutes a considerable saving in weight.
Unfortunately. there are not that many modern semi-automatic rifles that can be loaded directly with chargers. The SKS and M14 are probably the only ones you are ever likely to encounter.
Canadian FALs could have their magazines topped up with chargers while the magazine was in place. When Canada switched to the AR-15, this capability was not continued, probably because of the carrying handle.
Many modern AR-15-type weapons no longer have the carrying handle and a replacement receiver top that can take chargers may be possible.
The SKS has an integral 10-round magazine but this can be replaced with a 20 or 30 round capacity part. Since the chargers hold 10-rounds, it is possible to top-up such a magazine when it is only partially empty.
The capability to use chargers is just one of the advantages an SKS has over a semi-automatic AK-type weapon.
While most semi-automatic rifles cannot be loaded directly with chargers, chargers can be used to quickly reload magazines when they are not fitted to a weapon.
For some designs of magazine, a device to facilitate this may be needed. Carry a couple. It is practical to have just a couple of magazines and carry additional ammo as lighter chargers.

A Realistic Load

So how much ammunition is a realistic load?
We are talking personal load here. If you are mechanized, carry additional ammunition in your vehicle.
If you operate in a given area, establish a number of caches with additional ammunition and other useful items.
As a rough guide, if you are a hunter or outdoorsman, aim for 80-100 rounds and two or three magazines, including the one in your rifle. You can probably find pocket room for two magazines without needing a belt pouch.
There are chest-rigs and pouches that have just three single-magazine compartments. Such a rig could probably fit comfortably under a light jacket.
A pouch for a single magazine on your rifle-stock is not a bad idea, given that ammo is of only limited use if you are separated from your rifle.
If you are in the habit of loading 27 rounds into a 30-round magazine then three magazines still gives you 81 rounds.
Nine-round chargers would be very useful in the above case. Nine-round chargers would be useful for general use. They would allow more opportunity for magazines to be topped-up before they are fully emptied.
81 ready rounds will probably be ample for a semi-automatic weapon. Additional ammo can be carried as chargers.

Six and Six

If you are military, you will probably want to carry more ammunition.
Many soldiers weight themselves down so much that they become waddling targets.
Here it is important to distinguish between what is carried and what is worn.
For the ammunition carried on your webbing, set a sensible upper limit. Do not try to carry everything you have on your webbing.
If you must carry more ammunition than the suggested limit below, carry it in a pack, a claymore bag, pulk, handcart or vehicle. Then, at least, you can occasionally put it down if you need a rest or need to move fast.
How much to carry in your webbing? A sensible limit is what I call “six and six”.
For simplicity, I will only consider riflemen. Rifle-grenades, mortars, grenade launchers and machine-guns I will save for another day.
No more than six rifle-magazines/180 rounds and the equivalent of six (standard-sized) hand grenades (c.3 kg), for example: four frags and two smoke-bombs.
This is the ammunition permanently carried on the body and immediately accessable. With the magazine loaded in the rifle included, you have 210 rounds.
If a handgun(s) is carried, the reloads for these are in addition to the six rifle-magazines. A common recommendation is to carry two reloads for a handgun. If your handgun is your primary weapon, more might be prudent.
The six rifle mags and the grenades can be carried in a chest rig, belly rig, equipment belt or across a combination of these.
Add to this load four shell/first-field dressings. Some of these may be carried around the back over the kidneys.